
eviltwincustoms
-
Posts
903 -
Joined
-
Last visited
Content Type
Profiles
Forums
Events
Gallery
Everything posted by eviltwincustoms
-
1/16 photoetch seatbelt hardware
eviltwincustoms replied to DR JAY's topic in Model Building Questions and Answers
Myself, I would rather have the more realistic ones. I have a set from the Ferrari kit that should work as well, Chris I think you have that PE set. By chance are they pretty close to being the same sort of set up? -
They are rivets, if used for their original application. But on post#128 I think it was Clay stated they will simulate stitch welds.
-
Thanks Kane for the complement, I am happy with the way they are working out. I am not aware of any wheelie bars off the shelf,.... well now that I think about it I guess there are some 1/16 scale funny car diecast. But to answer your question they are or will be scratch built out of styrene and stainless steel tubing. I was going to go with all styrene, but find them to be extremely flexible and wanted something with a little more rigidity to them. But with me... this could change a couple days from now. LOL
-
Thanks Henry, based on the Picture it looks like they are roughly 4-6" off the ground, making the bottom bars Parallel to the ground plane. The only thing I don't know is if this is just because he is in the shop or if this is where they would ride all the time.
-
Just a small update, I thought I would show some work I have done in roughing out the wheelie bar. Keep in mind the wheels and rear end is just pinned in place so in a few of the pictures the passengers side wheel looks out of camber and the right rear coil over isn't mounted solid. I decided to go with 104" Wheelie Bars with 4" slim-line poly Magnum wheelie wheels. I may go add the extra small hole in the middle part to look like some orange ones from Jerry Brickle if I feel daring. I wish I had a rotary table and mill or lathe to get the holes centered accurately, but it is close enough for doing it by hand. I even added the concave from the bearing out, which was a pain dealing with white.. maybe I can work this better once primered up so i can see it better (or it may look totally awful once I do that... we will see) Currently I have them set up where they are running a scale 3" off of the ground, not sure where most run them as a first time generic setup when they start testing. If anyone know's and would like to provide insight it would be greatly appreciated. I can then get my wheelie mounts mounted in place for that top down bar and begin working on the support bars. Oh, my small Points file is my new High Tech Rear wing, it just needs to be adjusted for more down force! LOL Here are some quick photos.... Thanks for stopping in and taking a look see.
-
Ok, I am not quite sure why this entire conversation went south and has become a match about right or wrong. Hey I don't have any ill will towards anyone. First off I don't have a lathe or mill of my own to make these parts, so I am thankful for getting what I got. I have to take some ownership in this as well. Because if I was wanting something a different size or designed differently that is my fault to begin with because I don't have the talent to use CAD. Probably more of the patience to learn the program really! I would rather be building, I guess that is the ADD in me. Dave I have to say that I for one appreciate your feedback, for me I don't care for it to be sugar coated and nicey nice. I am someone that would rather have it direct and to the point. Even at work, I tell my boss "Just get to the POINT!"... LOL. I would hope you for one; would know by now, how much it is appreciated that you are willing to share photo's. Because if it wasn't for you sharing them either Offline or even posting them on the forums, I wouldn't be able to churn out (can I say that? because my stuff isn't fast by any means. )any of the stuff that I have made. When building stuff from scratch and trying to get measurements of parts, it is virtually DARN NEAR IMPOSSIBLE to even think about attempting such a task. But with your help and current knowledge, since you are around this stuff, it helps not only me but others as well. In the end, not only do I learn from my mistakes but I also get the opportunity to see and experience parts that I would probably never get the chance to see up close that aren't mounted to the car and pretty much invisible.
-
Well that is a shame, if the rotors need to be smaller. A couple things need to be changed then on the turned parts. Right now the way it sits the Caliper is very close to the mounting points on the Hub for the rotor. If the rotor was turned down to a smaller diameter then the caliper will hit on the rotor the way it is made. A suggestion for Jim (MicroNitro) next time or going forward might be to off set the rotor mounting so the Hub sits into it deeper on the face side. This way the mounting points would sit flush with the rotor face, then the caliper when it turns wouldn't hit the hub as it rotates.
-
Thanks Dave for pointing that out because I actually hadn't tried the wheel on the assembly at the time. The only thing I had to do was slightly massage the outer part of the caliper and the wheel fits right on the assembly with no binding or friction. I would assume that in 1:1, it would an 1" or 2" away from the inner wheel or would it be much more than that? The rotor when measured with the calipers says 0.7555", so that works out to be 12.08" somewhere in the ball park of a 12" rotor then?
-
Well, I thought I would resurrect this build from the DEAD and show a small update... With the Heartland Nationals next weekend, I would like to have it standing on its own two legs (4 legs in this case) so I can at least set it in the "Unfinished" category. So needless to say the wafer thin 3D printed part that comes from TDR to mount the rear Caliper to is just way to flimsy, so I had to do something about that. Plus the kicker was that it wasn't long enough to work in my application to fit over my Hub and onto the Carbon rotor. So I got out my brass and begin to draw a pattern out and and today was the day with my second attempt and I like the final result. Now I just need to duplicate it for the other side. On with the show as they say!! Once I complete the other side I can move to the front and begin figuring out what I need to do with that mess. Thanks for looking in, at my slow as molasses progress. LOL
-
What LUC.... where is the pic of the truck with the MONSTER POWER PLANT? I figured you would have at least had a Play shot with the 1/8 scale blown motor in it... Man you have a lot of parts sitting next to your truck build... Just think, you have only just started to break the surface on the scale nuts and bolts you will be needing from Scale Hardware and RB Motion! LOL.... I would cringe to think what I have just for my Camaro build... Thank goodness I didn't add up what I have spent on the project either, because I would be very depressed... LOL
-
I am tuned in to watch this project come together! Specifically due to the project being a Willys... and using Porcher parts to boot! This is going to be something wild just based on the drawings. Can't wait for the next update.. don't wait to long, and keep all of us in suspense!
-
yep, I have to agree with what has already been said. If you don't know much about these cars.... you sure had me fooled because they look spot on! You did a fantastic job in detailing out the cobalt. Look forward to seeing our next project!
-
Man Joe, that is some work on the header plumbing. Looks like it was a headache to try and figure out how to route each of them, and a very nice job on the collectors! You are doing a fantastic job, keep it up looks like you are almost out of the woods with plumbing your turbos from the exhaust portion with the hard work completed.
-
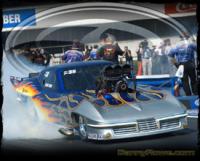
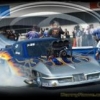
Anything from these classifications Pro Mod/Extreme Pro Mod and XTF (Extreme 10.5). If you can come away with Blower/ NOS and Turbo pic, interior, chassis shots and rear end shots.... this should just about cover everything. Mike Moran is suppose to be running a 2010 Mustang Turbo car in Pro Mod. If by chance he is present, if you can get some perfect side shots it would be appreciated. Even a Charles Terrell is another mustang I am looking at for Reference Photo's. They are both running Blue Mustangs and they are very distinguishable from the current 2010 Mustangs that run. The front hoods of the cars run extremely low to the ground. Charles mustang is sponsored by Pepsi Max and is a blown car. I know he runs in Outlaw Class, but not sure if he runs in ADRL or not. Thanks for thinking of the rest of us and offering to take reference photos! Much appreciated.
-
57 chevy pro mod w.i.p (updates 11/11/12)
eviltwincustoms replied to tyrone's topic in WIP: Drag Racing Models
I agree with Wayne it looks good... It really is strange how pictures can make things look off. As well I just noticed how much work you have done on knocking down all that resin on the inside of the quarter panels. I am amazed that those big pegasus tires fit under the car! -
Nice job on the General! You should be very proud of your accomplishment in completing a very clean build... Oh and it looks like Cookie Monster has his hands full! LOL
-
Nostalgia Gasser Inspiration
eviltwincustoms replied to Dr. Cranky's topic in WIP: Drag Racing Models
You know... I have to say that I have learned a lot from all the discussion that has been going on around what a "Gasser" is and how much they have changed over the years. I would also like to say that, even if I was one of the Ignorant ones, I would rather be better informed of what a TRUE Gasser is. So that I wouldn't be making that mistake going forward and continue to label something that it isn't. That would show True Ignorance. At least now if I hear the word gasser, I can at least speak intelligently about them going forward and not just lump the class into something it isn't. -
I am totally blown away by this one Brett! You did an outstanding job in turning this Tri 5 Shoebox into a flopper.... and the blue and white skull theme really sets this one off... Fantastic job all around!
-
Now that is really cool with the aluminum panels on the chassis.... thanks for taking new pics of the underside! Another forum member in KC! By chance either of you in the KCSlammers Model Club?
-
57 chevy pro mod w.i.p (updates 11/11/12)
eviltwincustoms replied to tyrone's topic in WIP: Drag Racing Models
Tyrone, I have to say that second time looks a 110% better, much much better than before! I know we each sure hate to tear things back apart, but you knocked that one out of the park with the changes you did. If you dont mind me asking is the rear end set at ride height now then with your shocks in place? You may have just left that one out of the shots above, but was wondering. Something I do see.. unless it is the way the chassis is setting is your front strut looks like it may be leaning forward? Can't quite tell.... if by chance it is, any plans of going back and re adjusting that top strut mount? I would think you can just un weld it and move it back a bit and fix the issue pretty easy. What did you use to wrap around your seat.... kinda looks like some sort of foam tape? I say it looks darn near the part, nice job! You even did some "Wayne" touches on the floor with the bits inside of your bars.. nice touch! I bet that wasn't an easy task... man in 1/24th scale that is not an easy task! Nice all around job! -
Now that would be one bad ass car... Do twin superchargers (one on top each other)like that 69 goat running around on YouTube.
-
1/16 Scale Army Vega Funny Car - Finished 10/14/2018
eviltwincustoms replied to Mooneyzs's topic in WIP: Drag Racing Models
Chris.... I think your project doesn't look anything like that reference picture you posted. You should just box that puppy up and send it to me and cut your losses! Then start fresh on your Pro Mod project! j/k You are just killing this project and I know that you have many many hours into this project where it sets today. You should be extremely happy with your work of Art! Bill (Vintagedragfan) and I were talking this past weekend about everyone on this forum and the great talent that is housed on this site. It is just amazing the work that gets turned out on here, Pro Mod or anything drag related for that matter. -
63 Pro Mod Vette.......Updated 09/28/14
eviltwincustoms replied to 1320wayne's topic in WIP: Drag Racing Models
The vette, keeps looking better with each update... Like everyone said, that rear end housing and wheelie bar set up looks outstanding. It sure would have been nice to have that in some sort of kit form. But I don't think resin would have been the right medium, because it would have been extremely brittle for something that small in diameter. -
1/16 Scale Army Vega Funny Car - Finished 10/14/2018
eviltwincustoms replied to Mooneyzs's topic in WIP: Drag Racing Models
Chris that looks pretty darn convincing to me! You need the small black rubber gasket/seal on each of the oil filters. -
Scott are you needing them for something specific? If you can't find any, the easiest thing would be to just have Jim (micronitro) just turn some for you.