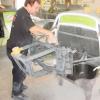
jmpsebring Posted March 24, 2012 Author Posted March 24, 2012 The glass beader does a great job smoothing out everything and cleaning everything. Some joints will need more solder to fill, some are perfect. Time to start over with a clean desktop and then round two of smaller bars.
Mooneyzs Posted March 24, 2012 Posted March 24, 2012 Jack this is looking amazing man. Great work on the chassis as well as the front bumper. are you using one of those mini glass beaders from Micro Mark??
Mike Kucaba Posted March 25, 2012 Posted March 25, 2012 If you did that the chassis wouldnt fit the body anymore because you would actually be building outside the space meant for it. The assumption on my part was that you would then shave off the thickness of the tube/rod.
jmpsebring Posted March 25, 2012 Author Posted March 25, 2012 I'm thinking a display with doors/nose/slick off and up on Pro-jacks. I've been looking everywhere for some small- pattern sheet for use as Temp flooring. This stuff is slightly large, but it's not as noticable when looking at "normal viewing" angles. I hit one corner with primer gray killing the gloss, and it's easily the best thing I've seen so far. One could easily use team colors by painting a border like teams that use different color tiles often do. Or you can buy it in colors at the store. It's cheap too! Find it with the knitting stuff at a craft store near you. The Back ground will be the wall of the trailer. Anyone reading this knows what I mean. Put a door on the wall, reflectors, space underneath, maybe the outside of one tire to prove it's a transporter. Deployed chutes and team paint will make a perfect natural setting. Plus it's alot of bang for the buck....visually. It seems logical to use an awning to angle up to the front of the case, but you have to be careful cutting off light sources from the car. One could light the project with batteries behind the wall....and it's never been easier finding bright Low-amp lites (LED's)but thats all stuff to decide later. I do however plan this far ahead. I will order the 17x9x8"case to keep things clean and dustfree over the months while building and as it sits now and then when I lose motivation. (AKA...get another model) . The base is critical since the Jacks must be bulletproof, yet appear to be portable while holding a top heavy & wide car .
Mooneyzs Posted March 25, 2012 Posted March 25, 2012 Jacking Looking Sweet man! Hey I know of a place you can find LED's. try http://www.superbrightleds.com/ I gotten a bunch of stuff there and it seems like they have a lot more now too. Take a look and you may find something that would work if you did kind of like an awning over it. Keep up the great work. this is a killer build.
Modelmartin Posted March 25, 2012 Posted March 25, 2012 I can tell you are having way too much fun. Keep up the good work!
jmpsebring Posted March 25, 2012 Author Posted March 25, 2012 I can tell you are having way too much fun. Keep up the good work! I've enjoyed building tube frames ever since I built my birdcage Maserati cockpit. Thank You Andy, I'm humbled by your presence.
hOLMS Posted March 25, 2012 Posted March 25, 2012 Hi Jack, you are doing a great job on this one...look fwd to more
jmpsebring Posted March 25, 2012 Author Posted March 25, 2012 I never thought I'd have this much done after a few days... On the other hand, I worked serious hours everyday. The TDR rear end came in :P and it is a tad(???) narrower. That meant everything needed to be narrowed. So this is start no# 3 on the rear section.
jmpsebring Posted March 25, 2012 Author Posted March 25, 2012 I had no idea how I was going to mount these tubs. When I got the rather pricey parts, I was not too impressed. They are not 'set' in their shape that well. But having designed the mounting method by 'pushing' the part against the frame, they fell back into place and now I think they were a huge time saver. I used a piece of L- shaped stock to define the mounting point. Never would have drilled where the holes were..until I set the tubs in place and noticed the band running around the tub. I didn't want to drill there. so I divided the space left over and pre-drilled some mounting holes. Once the top 1/16th tubing was in place and the tubs tight around them, they were marked with a marker and trimmed (a little long) and presto...Done!! I will build a center fill panel and all will be finished in carbon fiber. The rear of the tubs will be modified...on another day I'm done for now.....
Modelmartin Posted March 26, 2012 Posted March 26, 2012 I've enjoyed building tube frames ever since I built my birdcage Maserati cockpit. Thank You Andy, I'm humbled by your presence. Thank you for the flattery but I am just a hacker, hacking along!
Mooneyzs Posted March 26, 2012 Posted March 26, 2012 Jack... Very Impressive and it looks killer. Great idea on how you used the angle bracket. I like it.
stump Posted March 26, 2012 Posted March 26, 2012 Jack, SUPER work again mate. Hey, I'm diggin' these bead blasted brass chassis. Great advise/tip regarding those tubs too (front mounting bracket). That's going into my memory bank (as long as I don't forget)....
futurattraction Posted March 26, 2012 Posted March 26, 2012 Your chassis work is looking killer, Jack. As you said, I'm amazed at how quickly it has gone together thus far. Wow!
jmpsebring Posted March 27, 2012 Author Posted March 27, 2012 Before I get buried in more and more frame work, I decided to make some of the panels and inner details. The tunnel was made by splitting to piece of tubing in half, and soldering in a couple of panels. I was playing wth the idea of making the tunnel adjustable. Not sure it will stay. The center cover between the wheels is made by making one side over-lapping the other...then spreading them out until they butt up against the tubs, then gluing. Then a third upper part was trimmed to width, then push up to the rear bars then glued. That will now be a quick perfect pattern that took just minutes to make. BTW, I'm keeping the tubs too wide until they have to be trimmed.
jmpsebring Posted March 30, 2012 Author Posted March 30, 2012 My case came in today. Premature perhaps. But keeping things clean and knowing where to stage everything has to be planned early. Plus while it looks pretty big, once you put a car on jacks and a back transporter wall, at an angle...(because that's the law of Dio's) it will be, pushing the limits.
Romell R Posted March 30, 2012 Posted March 30, 2012 Thats a nice case I hope you dont mind me asking where you had it made??
Recommended Posts
Create an account or sign in to comment
You need to be a member in order to leave a comment
Create an account
Sign up for a new account in our community. It's easy!
Register a new accountSign in
Already have an account? Sign in here.
Sign In Now