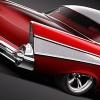
RobRus Posted April 19, 2012 Share Posted April 19, 2012 (edited) Hi Guys, This is a project I started about 2 months ago when I decided to get back into plastic modeling. I know the 40 has been done over and over but this is a car I always dreamed of owning so I thought it would be fun to start with. My plans are some what open but I know it is going to be a low, smooth and have a hand rubbed laquer finish. Other than that I am open to any sugestions and opinions on it. I ran into a bit of difficulty when trying to fit the motor and front suspension in and decided to stop working on it and do something less custom (for those that have seen it I did that blue 69 Cougar in the "Under Glass" section. I figured I needed something simple to get completed before I got to far into sawing plastic. I think I have documented the pictures pretty well so you can follow along to see what I have done but the short list is this: Models: 40 Ford Coup 79 Dodge Ram - Tire Donor / partial wheel donor (for silicone mold) Nascar Lumina - Engine and suspension/drivetrain donor Customization done so far: Shaved all chrome, door hinges, wipers Widened rear fenders 4 inches Frenched in Porsche Headlights Custom molded wheels using parts from the above kits. I want deep dish chrome reverse with baby moons and wanted to try my hand at casting a set. I looked through the Under Glass section to see if there were any other 40's for some inspiration but only found one. I have a few photos I have collected to give me some direction but I am really open to any ideas you may have as long as they are in the same theme as "low, smooth and shiny I think the pictures speak for themselves but I will be happy to explain anything you don't understand. An interesting thing I found when molding the tires is I tried to inject Hot Glue into the mold and it actually worked better than resin and the results actually feel just like kit tires (soft and bendable). I am sure someone else has done this but I thought it was cool... Edited April 19, 2012 by RobRus Quote Link to comment Share on other sites More sharing options...
Bartster Posted April 19, 2012 Share Posted April 19, 2012 What a coincidence! I helped my daughter build a farm dio last night for a school project & was thinking the hot glue might make good tires! Glad to hear it worked out for you. I just wonder about shrinkage over time? BTW, your '40 is looking nice. One of my all time favorites as well. I'm tuned in here! Quote Link to comment Share on other sites More sharing options...
High octane Posted April 19, 2012 Share Posted April 19, 2012 Looks like a great project you've going there with the '40 Ford which is a favorite of many builders. I like that you're molding your own wheels & tires and the NASCAR engine is a good idea also and I'm going to have to look into that for myself as I just won a NASCAR kit in a raffle the other day. Quote Link to comment Share on other sites More sharing options...
Dr. Cranky Posted April 19, 2012 Share Posted April 19, 2012 Looking forward to more of this one. I love these fat fendered Fords! Quote Link to comment Share on other sites More sharing options...
Brizio Posted April 19, 2012 Share Posted April 19, 2012 Wheels looks great! Quote Link to comment Share on other sites More sharing options...
crazyjim Posted April 19, 2012 Share Posted April 19, 2012 Looking good. Quote Link to comment Share on other sites More sharing options...
Badluck 13 Posted April 20, 2012 Share Posted April 20, 2012 Bob,yeah your right the '40 has been done over n over,why??,cuz its such a cool car and who could get tired of them,slick idea on the hot glue,I like how the fender widening treatment is real nice n subtle,and the Porsche lamps it a great touch,if its anything like your last build,its gonna be killer!! Quote Link to comment Share on other sites More sharing options...
Grumpa Posted April 20, 2012 Share Posted April 20, 2012 The '36 & '40 Fords make the best looking Hot Rods. Love the frenched Porsche headlights. Great idea! Quote Link to comment Share on other sites More sharing options...
jeffs396 Posted April 20, 2012 Share Posted April 20, 2012 KEWL!!! Quote Link to comment Share on other sites More sharing options...
RobRus Posted April 20, 2012 Author Share Posted April 20, 2012 (edited) Hey thanks guys. I acually had the chance to buy one back in the late 70's for $1500 from a body man I worked with but decided not to because I didn't want to commit to such a large project. I had just bought a 60 Chevy that my wife wasn't too happy about so I figured it wouldn't be a good health move for me... I still kick myself for not buying it anyway. I have been thinking about doing a very mild chop to the top but I have not decided yet. Either that or I have been eyeing an old Mercedes Gull wing I did many years ago that is in pieces. It looks like that roof would almost fit but that is pretty radical for what I see as a mild street custom. Those Porsche headlights are actually from a die cast 911 that I got from a friend. He was going to throw it out because it fell off of the shelf and broke the hood hinges so the hood would not open or close properly. It is a 1:18th scale so I need to trim them down but I like the way they look in the 40. Again, I am open to any suggestions or ideas since I don't have a specific plan I am following. Edited April 20, 2012 by RobRus Quote Link to comment Share on other sites More sharing options...
Tony T Posted April 20, 2012 Share Posted April 20, 2012 Great work so far! Love the wheels and tires! Quote Link to comment Share on other sites More sharing options...
Bartster Posted April 20, 2012 Share Posted April 20, 2012 Gull winging the doors would be a nice touch. I'm doing that on a custom. It can look so right on the "wrong" car. Quote Link to comment Share on other sites More sharing options...
Assa9 Posted April 20, 2012 Share Posted April 20, 2012 Great start so far. Love the porsche headlights what a great and innovative idea i am interested in seeing all the way to completion Quote Link to comment Share on other sites More sharing options...
RobRus Posted April 22, 2012 Author Share Posted April 22, 2012 (edited) Ok some more progress. Keeping with my theme of low, smooth and shiny I decided to do a mild chop. I am not a fan of radical chops, especially on the 40 Ford Coup. The lines of this car are beautiful just the way they came from the factory but that doesn't mean it can't be improved on. This is the first chop I have done in a number of years but I am not afraid of cutting up a perfectly good car so... I decided to do a mild 1 1/2" chop because I wanted it to be subtle and I also didn't want to distupt the lines of the body (especially the roof line flowing down into the trunk. At first I thought about doing a raked chop leaving the back about where it was but I decided on a full 1 1/2 all the way around. I actually raked it backwards very slightly leaving it just a bit taller in the front. That is a trick I learned a long time ago (it gives the illusion of stock proportions when doing a mild chop). Here is the progress on how I did it and the final results. Enjoy, Bob I cut a strip if blue tape 1 1/2 inches wide and laid out where I wanted to cut. The Cut I left the tape on and then sprayed some paint on it so I could tell where my guide lines were. I then sanded the white area up to my guide line. Edited April 22, 2012 by RobRus Quote Link to comment Share on other sites More sharing options...
RobRus Posted April 22, 2012 Author Share Posted April 22, 2012 (edited) Here is what the final results look like after being sanded, filled and primed. Not to bad for for the first one I have done in years. Edited April 22, 2012 by RobRus Quote Link to comment Share on other sites More sharing options...
Bartster Posted April 22, 2012 Share Posted April 22, 2012 Very nice slice. Your right, it doesn't ruin the already perfect lines of the '40 coupe! Quote Link to comment Share on other sites More sharing options...
rmvw guy Posted April 22, 2012 Share Posted April 22, 2012 Nice chop! I like what you're doing so far. Hope you keep it going with more pictures. Quote Link to comment Share on other sites More sharing options...
Dr. Cranky Posted April 22, 2012 Share Posted April 22, 2012 Beautiful work, again, making great progress. Quote Link to comment Share on other sites More sharing options...
GrandpaMcGurk Posted April 22, 2012 Share Posted April 22, 2012 Fantastic work on the dropping the lid, very well done....I'm curious as to whether you are going to replace the drip rail (rain gutter)? If you're not and your going for a smooth look (honestly, this is just my opinion) I think the top rear edge of the door would look better just slighty rounded rather than square? Quote Link to comment Share on other sites More sharing options...
RobRus Posted April 22, 2012 Author Share Posted April 22, 2012 Thanks guys, Back when I was in the body shop I have actually helped do a couple of chops so I know the kind of planning it takes to do one right. I was surprised that I didn't have to cut the roof up lengthwise to get it to fit but I guess that is due to only cutting 1 1/2 inches and the 40's pillars are nearly straight up and down. @Don, Yes I will be putting the drip edge back on. I think that is one of the things that will keep it looking like a mild custom. I found some really nice channel strips at the Hobby shop I think will work very well for that. The one thing that has bothered me from the start is the body line where the drip edge stops by the trunk. On this die is is not straight so I may have to fix that. I am guessing that most people will never know it has had so much cutting done on it but that is one of the things I love about mild customs. The average person will look at it and see a 40 Ford but the trained eye will be able to pick out the modifications. More to come... Quote Link to comment Share on other sites More sharing options...
Jantrix Posted April 23, 2012 Share Posted April 23, 2012 Very nice! I'll be saving this for when I do my '40! Quote Link to comment Share on other sites More sharing options...
Erik Smith Posted April 23, 2012 Share Posted April 23, 2012 One of the best WIPs I have seen. Thanks for the extra effort on the photos and labeling. Ford is looking really cool. Quote Link to comment Share on other sites More sharing options...
Kustom Rodder Posted April 23, 2012 Share Posted April 23, 2012 Looking very very nice cant wait to see it in color. Quote Link to comment Share on other sites More sharing options...
Raul_Perez Posted April 23, 2012 Share Posted April 23, 2012 Rob, As a former professional bodyman, it's always interesting for me to see how different people go about customizing 1:1 and model cars. When I built a 40 Ford Coupe a couple of years ago, I chose to modify the B and C pillars rather than add spacers to the top of the roof when I did the chop. While I was at it, I also slanted the B pillars to give it a more aggressive look, afterall, I dropped a 392 HEMI in under the hood of this one!! Here's the link to my build if you're interested in seeing some of the other mods that I did: http://www.modelcarsmag.com/forums/index.php?showtopic=18976 Here's the link to the finished build: http://www.modelcarsmag.com/forums/index.php?showtopic=26437 Keep up the good work!! Later, Quote Link to comment Share on other sites More sharing options...
Guest Posted April 23, 2012 Share Posted April 23, 2012 It's looking good so far Robert! I did the chop on my '40 almost the exact same way and like you, I was surprised that I didn't have to make the lengthwise cut also. I made my cuts by placing two cut off discs on my Dremel and then I just lopped the top off. It actually worked much better than I thought it would. Quote Link to comment Share on other sites More sharing options...
Recommended Posts
Join the conversation
You can post now and register later. If you have an account, sign in now to post with your account.
Note: Your post will require moderator approval before it will be visible.