Odaroloc24 Posted May 16, 2012 Posted May 16, 2012 So here's the story. I got this model from my dad and i loved it because i didn't have a 67 at the time. So i open it up and there is a 1970 GTO front end! :wacko: There were also some other parts to different car as well. So i tried to build it as best as possible. I built the engine and painted the body. The body it TERRIBLE! I first painted it a color that i cant remember then i painted it black. Didn't like it. So i then panted it red but again, didn't like it but instead of waiting for the WHOLE car to dry i went ahead and started to sand it again! LOL. The paint wasn't dry so it didn't sand so it looked looked a mess. So now i am going to try my hand at rusting it. :lol: Lets see how this goes. Will post pics later.
Rusty Sierra Posted May 16, 2012 Posted May 16, 2012 I love these kinds of builds because I whenever I make a mistake or do something that didn't come out the way I'd hope I try to cover it up via a different method and usually I'm left with a beautiful model.
Odaroloc24 Posted May 22, 2012 Author Posted May 22, 2012 Well got it all rusted. It looks nice for my first try. A video will be up soon.
kruleworld Posted May 23, 2012 Posted May 23, 2012 i guess you think video is the 'way of the future', but i'd suggest you also use pictures. some people can't watch youtube at work (we monitor usage of that site here) and also it's like watching an earthquake happening....
Odaroloc24 Posted May 31, 2012 Author Posted May 31, 2012 Well i'm going to go work a scout camp for about 6 weeks and wont be able to work on any projects. Be back in July! Mike
Odaroloc24 Posted August 15, 2012 Author Posted August 15, 2012 Well i haven't been on here in a while. After i came back from came had about a week to finish the two projects i was taking tot he 4-H fair. I finished them the day before the fair but im going to go back and find all of the pics I took of them and go through the story for all of you. I have a few pics here but i have to go find the others on another computer. So here is how i left it for a while. Here are some pics of the supplies i used for the rusting process. I also used this Ok so first i sanded the rough bumpy places down until almost smooth and just lightly sanded the whole body. Then i took a lighter and heated and dented any place i wanted a dent. I also took me dremel and cut away rust holes and anywhere that i didnt want plastic to be. I then took the brown and put a heavy coat on. I then sprinkled table salt on it. After that dried, i put a coat of yellow on it. When the yellow dries, i took the iron solution paint and painted anywhere that i wanted rust to form. When i got it how i liked it i covered the iron paint with rubber cement. Heres how it looked then Thats all the pics i have now but will go find the others later today. Mike
Odaroloc24 Posted August 15, 2012 Author Posted August 15, 2012 (edited) Found some more pics So after I put the rubber cement on, i put a coat of light blue. This is the color i wanted the final to be. After i did that i painted the iron paint on my rims and then put the Rust solution on it. The rust solution is just Ammonium Chloride and Copper Sulfate. I then put it in a plastic bag for 24 hours and this is what i came out with. Will post the rest here in a sec. They only let me post so many pics at a time. I also melted the tires a bit to try to give it a flat tire look. Mike Edited August 15, 2012 by Odaroloc24
Odaroloc24 Posted August 15, 2012 Author Posted August 15, 2012 So the reason why i put the rubber cement on was because you need to open up the places where you put the iron solution. The way i did this was i took some duck tape and places it on the paint and then pulled it off. This is what it looked like with all of the iron paint exposed. Then i sanded all of the pieces of salt out of the paint. I then wrapped it in a plastic bag and waited for 24 hours. Here it is after 24 hours. I have to go find some more pics of the final product. Mike
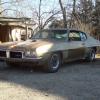
Odaroloc24 Posted August 15, 2012 Author Posted August 15, 2012 Here it is all done! There we go! Mke
kruleworld Posted August 16, 2012 Posted August 16, 2012 wow, it didn't look much until the rust took hold and it came out looking quite realistic. well done!
Odaroloc24 Posted August 16, 2012 Author Posted August 16, 2012 wow, it didn't look much until the rust took hold and it came out looking quite realistic. well done! Thanks! GREAT RUST!!! Thanks!
wrecker388 Posted August 16, 2012 Posted August 16, 2012 WOW! Talk about a great first attempt.Good job
Odaroloc24 Posted August 17, 2012 Author Posted August 17, 2012 WOW! Talk about a great first attempt.Good job Thanks!!
Madrdnckbldr080 Posted August 18, 2012 Posted August 18, 2012 Looks Good Michael... I remmeber my first Junker using sophisticated Finishes... Since then I've found new ways of using The product. and mixing it up with other weathering products... Again Great Job... Red
Odaroloc24 Posted August 18, 2012 Author Posted August 18, 2012 Looks Good Michael... I remmeber my first Junker using sophisticated Finishes... Since then I've found new ways of using The product. and mixing it up with other weathering products... Again Great Job... Red Thanks! What other products did you mix it with??
Recommended Posts
Create an account or sign in to comment
You need to be a member in order to leave a comment
Create an account
Sign up for a new account in our community. It's easy!
Register a new accountSign in
Already have an account? Sign in here.
Sign In Now