cobraman Posted June 11, 2012 Posted June 11, 2012 (edited) Going to build this up in the black version. I have some things done but still a long way to go. I must say that after building the 1/12 scale Shelby GT500 and then even the two 49 Mercs that this thing seems tiny. so far it seems to be a pretty cool and nice fitting kit. Edited June 16, 2012 by cobraman
Dr. Cranky Posted June 11, 2012 Posted June 11, 2012 I've been meaning to build the one I have, and this thread might just inspire me to do that. Keep it going, please.
Roncla Posted June 12, 2012 Posted June 12, 2012 i grabbed one of these the other day too. It seems tiny after other 1/25 kits let alone coming from 1/12
James2 Posted June 12, 2012 Posted June 12, 2012 It is small, but so were the 1:1's. Great kit, fantastic fit and real nice finished product. Treat the tiny pieces like PE and use tape, test fitting helps also.
rel14 Posted June 12, 2012 Posted June 12, 2012 The are a really nice build,, and to make it asphalt, I use tires and rims from the mono 1/32 nascar... there the same size,, But, build one from scratch, ( see Pic )
Brizio Posted June 12, 2012 Posted June 12, 2012 Nice I always want to build one, I will follow your post for inspiration.
Garagenous_Jim Posted June 12, 2012 Posted June 12, 2012 I have this kit on the shelf for a future build. Looking forward to see your progress. And I prefer the black color scheme also.
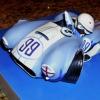
Art Laski Posted June 12, 2012 Posted June 12, 2012 (edited) Ray, If i can give you one tip, I see a lot of folks mount the dashboard incorrectly. It's hard to blame them, because the instructions make it seem as though the dash is mounted in a vertical manner, although it really dfoeasn't show it that way. The dash should really be at an angle that matches the edge of the cowl. That also allows the steering wheel to have the proper angle and not look like it would be in the driver's knees. Here's a pic of how I mounted mine. Hope it helps and I'm excited to see your build progress! I really love these kits. -Art Edited June 12, 2012 by Art Laski
cobraman Posted June 12, 2012 Author Posted June 12, 2012 Thanks for the tips. I will try and keep them in mind as I go forward.
cobraman Posted June 13, 2012 Author Posted June 13, 2012 Made some progress today. Body was painted with black lacquer but still needs to be decaled and cleared. Engine is done and some sub assemblies are done as is some painting. Did I say this before ????????????? This thing is tiny. Decals tonight ? Clear tomorrow ?
cobraman Posted June 13, 2012 Author Posted June 13, 2012 Another small update. I got the decals on and the body cleared. Have the engine and rear suspension mounted. Still some touch-ups to do. The tip about mounting the pins before attaching the suspension is a good one. I could see the fragile parts breaking as you tried to do it according to the instructions. As for the dashboard mounting, I may have screwed that up already so I will have to try and fix before further assembly.
James2 Posted June 13, 2012 Posted June 13, 2012 Coming along nicely. I did the same with my dash, to late to relocate. But maybe I'll take a second look.
cobraman Posted June 13, 2012 Author Posted June 13, 2012 Just another small update. I am getting close to the end. I did have some trouble assembling the 2 part front and rear nerf bars. The front was the worst. In my younger days this could have turned into a airplane and sailed across the room. Here is where I am now.
Hedgehog Posted June 14, 2012 Posted June 14, 2012 Very accurate build I'd say I noticed you put decals first then your final clear. If that is so, what's the right way because I've heard it's safer to clear and then decals. I wanna learn from the best builder in this forum guys thank you.
cobraman Posted June 14, 2012 Author Posted June 14, 2012 I have been building for about 50 years and I am in no way one of the best builders here. To answer your decal question I almost always clear after I decal a car. Some people don't and some do. If I am sure the decals will hold up to the clear I will clear after. Some don't think it looks realistc on some cars and I guess thats true but I prefer the look when the decals are cleared. Basicly it up to you and how you want your project to look.
cobraman Posted June 16, 2012 Author Posted June 16, 2012 Midget is done. More photos in the Under Glass section if interested.
Recommended Posts
Create an account or sign in to comment
You need to be a member in order to leave a comment
Create an account
Sign up for a new account in our community. It's easy!
Register a new accountSign in
Already have an account? Sign in here.
Sign In Now