BigBad Posted July 19, 2012 Share Posted July 19, 2012 Alright, enough lurking. Might as well post now. I started an Italeri Long Hauler 378. It's an experiment on how an Italeri kit builds up. Up to now it is going together very well and most stuff is falling into place, including the exhaust system. (At first I was going to build it box stock, but...) I like to take inspiration off of what I see on the road and I wasn't happy with the 378 sloped hood since most of the Peterbilts I see are 379's. So I followed Tim A.'s instructions to make it a 379-119. The rear hubs were shortened, buttons for the caps, the wheels still rotate too as I like to have the mobile parts on my models to "work" as intended. I also started to experiment with different types of aluminum finishes, the kit chrome being a bit much for realism. I "Bare Metaled" the fuel tanks and air filters, painted the weels and toll boxes with Alclad II chrome, and flattened the chrome from the bumper, grill and battery boxes with an Alclad II "light sheen" clear coat. I still kept some kit chrome for a little flash. I decided to try my hand at resin parts also as the tool boxes are from AITM and some photo etch parts as the flap weight and some truck badges will be parts from the KFS Pterbilt photoetch tree. So here are some teaser pictures of my work in progress. More pictures as work progresses. Quote Link to comment Share on other sites More sharing options...
towman1271 Posted July 19, 2012 Share Posted July 19, 2012 Its not nice to tease.... But you got my attention! Quote Link to comment Share on other sites More sharing options...
lapazleo Posted July 19, 2012 Share Posted July 19, 2012 Looking good! Quote Link to comment Share on other sites More sharing options...
mackinac359 Posted July 19, 2012 Share Posted July 19, 2012 Looking good so far. Tim Quote Link to comment Share on other sites More sharing options...
catd11rpusher Posted July 19, 2012 Share Posted July 19, 2012 I love the fuel tanks, are those stock or resin products? Nice work!! Quote Link to comment Share on other sites More sharing options...
BigBad Posted July 19, 2012 Author Share Posted July 19, 2012 I love the fuel tanks, are those stock or resin products? Nice work!! The tanks are the ones from the kit. Since there is a huge joint between the two halves, I wanted to get rid of it so i sanded the joint area downa ll along the tanks. Then I took out the Bare Metal sheet and covered the ends first, then the barrel, keeping the holding straps in the original kit chrome. I will try a piece of abs tubing to make custom fuel tanks on some other project for sure though! Quote Link to comment Share on other sites More sharing options...
pete3522 Posted July 21, 2012 Share Posted July 21, 2012 looks good Quote Link to comment Share on other sites More sharing options...
camaro68 Posted July 22, 2012 Share Posted July 22, 2012 Very nice so far Quote Link to comment Share on other sites More sharing options...
BigBad Posted July 24, 2012 Author Share Posted July 24, 2012 (edited) Thanks for the encouragement guys. At the start of this build I just didn't know where to go with this kit and then I found it... I wanted to do a Peterbilt with the Winslow type stripes for a long time and this picture is the inspiration for my model. My truck is nearing completion, I need to adjust the exhaust "Y" pipe and the intake pipes. I need to install the front bumper, the rear lights, the grill and rear view mirrors, then I need to find some more transparent decal material to finish the markings. It's gone pretty well up until now, the decal stripes gave me some work, but the kit went together smoothly thanks to the ideas I found in this forum and on Tim's trucks site. Overall it looks good. Pictures to come up soon. Edited July 24, 2012 by BigBad Quote Link to comment Share on other sites More sharing options...
truckabilly Posted July 24, 2012 Share Posted July 24, 2012 Great job so far. I like the changed hubs and the tool box. Surprising is the DD logo location on the mud flaps. At least I´ve never seen that. I would get rid of the tabs on the fuel tank strap. These are mounting points for the frame fairings. Since 379 doesn´t have any, the tabs should be off. The Winslow stripes look very good. Can´t wait to see them on your build. Quote Link to comment Share on other sites More sharing options...
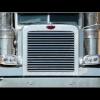
BigBad Posted July 24, 2012 Author Share Posted July 24, 2012 More teasers... Not finished but getting there. I added cab skirts from .040 styrene sheet, added Bare Metal foil and the chicken lights from the previously mentioned photoetch tree. The grill is completed, I used another page from the Tim's Trucks big book of Peterbilt building, I painted the headlight buckets black first, then coated the back of the lenses with bare metal foil for more definition. Shot from the hood left side with the Pete logo and surround from photo etch. Excuse the clarity of the pic. So, now on to the last stretch. All I can say for now is that this kit is easy to put together, I was a little put off with the cab being multi part, but the castings are very precise and it goes well together, of course, most of you already knew that, but being fairly new to these kits I wasn't! Quote Link to comment Share on other sites More sharing options...
BigBad Posted July 25, 2012 Author Share Posted July 25, 2012 (edited) Almost finished. Some decals and aerials left to be added. I'm having some trouble opening the hood, it opens only maybe a 1/3 of the way, the bumper-grill gap is a little tight, I might have to remove the bumper for some adjustment. Took some pictures of what i have. Anyway, it looks better in person than pictures. I'll take some pictures outside tomorrow. Edited July 25, 2012 by BigBad Quote Link to comment Share on other sites More sharing options...
BigBad Posted July 25, 2012 Author Share Posted July 25, 2012 Great job so far. I like the changed hubs and the tool box. Surprising is the DD logo location on the mud flaps. At least I´ve never seen that. I would get rid of the tabs on the fuel tank strap. These are mounting points for the frame fairings. Since 379 doesn´t have any, the tabs should be off. The Winslow stripes look very good. Can´t wait to see them on your build. Hey Jarda, thanks for the comment. I liked the Detroit Diesel metal sign I had, since these are a little big for the hood sides... I decided to use them as mud flap weights. They are almost the right size anyway! Yes I noticed the tabs on the tank straps, I don't like them either, but since this is an exercise, I'm going to leave them alone for the time being. But the next time I build a Pete... These are going to take a hike. Quote Link to comment Share on other sites More sharing options...
Jim B Posted July 25, 2012 Share Posted July 25, 2012 Nice looking Peterbilt. Great job. Quote Link to comment Share on other sites More sharing options...
camaro73 Posted July 25, 2012 Share Posted July 25, 2012 That is a great looking Pete. Love the paint job! Quote Link to comment Share on other sites More sharing options...
BigBad Posted July 25, 2012 Author Share Posted July 25, 2012 (edited) More pictures outside. compare this one to the real truck: I know... This is a 379-127, mine's a 379-119... Picky,picky! One of its best pictures: I wasn't too sure about the exact engine color on series 60's so I just painted it something closer to Alpine Green: I got more but... You get the picture! I will put more details on it such as the hood convex mirrors, once I figure out how to make them, then the decals and the trailer connections. Next project: 48' spread axle step deck out of two AMT Fruefauf flatbeds with 2 hole buds from KFS and tool boxes from AITM and some scratch building. Edited July 25, 2012 by BigBad Quote Link to comment Share on other sites More sharing options...
jay1968 Posted July 25, 2012 Share Posted July 25, 2012 looks great i love the attention to detail that you have done to this model. Quote Link to comment Share on other sites More sharing options...
Jim B Posted July 25, 2012 Share Posted July 25, 2012 Fantastic! I've used Tamiya Medium Blue XF-18 for the Series60 Blue. It's pretty close. Quote Link to comment Share on other sites More sharing options...
Bricksonwheels Posted July 26, 2012 Share Posted July 26, 2012 Great work! I was surprised to see you use an Italeri kit. I have made many in the past, always was happy about them. I always expected some American brands to have the home market for American modeling. Quote Link to comment Share on other sites More sharing options...
pete3522 Posted July 26, 2012 Share Posted July 26, 2012 looks great nice job Quote Link to comment Share on other sites More sharing options...
truckabilly Posted July 26, 2012 Share Posted July 26, 2012 Very nice work. The Winslow stripes fit perfectly. Even the hood now opens to the full degree. Great job. Quote Link to comment Share on other sites More sharing options...
Jim Whalen Posted July 26, 2012 Share Posted July 26, 2012 (edited) Hi, The Pete looks really good - nice clean build! Cheers, Jim Edited July 26, 2012 by Jim Whalen Quote Link to comment Share on other sites More sharing options...
jekylljr Posted July 27, 2012 Share Posted July 27, 2012 wow nice ! all you need is laidlaw decals Quote Link to comment Share on other sites More sharing options...
BigBad Posted July 28, 2012 Author Share Posted July 28, 2012 wow nice ! all you need is laidlaw decals Will be looking at that real soon. license plates, antennae, trailer hookups. Thanks Steve and all the others for the nice comments! Quote Link to comment Share on other sites More sharing options...
towman1271 Posted July 28, 2012 Share Posted July 28, 2012 Looks great!!!! Quote Link to comment Share on other sites More sharing options...
Recommended Posts
Join the conversation
You can post now and register later. If you have an account, sign in now to post with your account.
Note: Your post will require moderator approval before it will be visible.