Alyn Posted April 7, 2013 Posted April 7, 2013 love the paint job, Doug. Your masking edges look exceptionally clean too.
dougp Posted May 12, 2013 Author Posted May 12, 2013 Update 5/11/13 Just a little update. I had a coat of clear run on me, so I had to rework the driver’s side. Thank the Lord I was able to sand it out and reshoot. Otherwise it would have gone in the purple pond which would have meant redoing all the body work. If that had happened it probably would have ended up in the trash can after all the useable parts had been removed. The glass and interior tub are installed. The rear glass was tinted with Tamiya smoke and front cowling and wipers were painted in matt and semi-gloss black. The grille is painted and installed. The GMC logo was painted with Tamiya chrome with a coat of clear red over it. I’m in the process of reworking the headlights and turn signals. They were originally used with led lighting and are just clear lenses with no fluting detail. I think I have a solution which I show in the next update. Thanks for looking.
bryan_m Posted May 14, 2013 Posted May 14, 2013 wow! this truck is so cool man! im droolin. i love what youve done with this build, and with the boat too.......great use of spare parts! cheers bryan
dougp Posted May 17, 2013 Author Posted May 17, 2013 Thanks guys, I just finished detailing the engine compartment. Worked out my issue with the headlights. I reshaped a couple of round fluted headlight lenses and used Krystal Klear to attach them to the back side of the original headlight lens, followed up by a coat of chrome paint then matt black to match the inside of the hood. The pics don't do them justice. Stripped the original yellow coating from the side marker/turn indicators and re-painted with Tamiya clear orange. Working on the design of some kind of steps for climbing into the cab.
FIREMODELMAN Posted May 17, 2013 Posted May 17, 2013 WOW, Really sweet... The headlights are spot on, great job on the front end, well the whole truck.
redneckrodder Posted May 20, 2013 Posted May 20, 2013 that looks sick met.green and silver would've been cool too
BigBad Posted May 27, 2013 Posted May 27, 2013 That is turning out pretty nicely! Love the front end, looks really good!
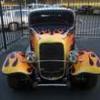
dougp Posted May 28, 2013 Author Posted May 28, 2013 (edited) Update 05/28/13 I'm calling it finished. The steps were made from the lower steps of the Louisville's fuel tanks. I cut the ears off the steps and drilled holes to add a length of styrene rod for the mounting braces. For the mirrors I modified a set from a diecast 06 mustang and scratch built the filler/mounting plates. I added the air horns from the Louisville to the driver's side radiator support like my 1:1 inspiration. And to finish off the rear frame rail I added stick-on jewels for running lights above the license plate holder. And now after almost 9 months she's complete. Thanks for all the great comments and support. It was a real challenge using new techniques and scratch building learned from this great site. I will continue the wip progress of the speed boat here unless the mods decide to move it to a more appropriate topic area. Thanks for looking... Edited May 28, 2013 by dougp
pharoah Posted May 29, 2013 Posted May 29, 2013 Wow,Doug,that turned out great! Nice paint scheme too.
Kit Basher Posted May 29, 2013 Posted May 29, 2013 Totally awesome! Love the detail and the overall concept. That is a fine looking truck, and it was fun watching you build it.
Alyn Posted May 29, 2013 Posted May 29, 2013 Nicely executed details (I may have to look for some of those jewels), topped off with a great paint scheme. Congrats on completing this very cool truck.
Davewilly Posted May 29, 2013 Posted May 29, 2013 That turned out awesome! it was well worth all your work! She is a beast! Wish they made a kit of one!
dougp Posted June 3, 2013 Author Posted June 3, 2013 (edited) Thanks for the support everyone. I will continue the wip for the speed boat here, but right now it's taken a back seat to a WWII Mosquito build for our club's show next weekend, a 56 Chevy build for Goodguys in August and my other wip a 71 Daytona. I promise not to let it die and will post updates as soon as there available. Edited June 3, 2013 by dougp
Recommended Posts
Create an account or sign in to comment
You need to be a member in order to leave a comment
Create an account
Sign up for a new account in our community. It's easy!
Register a new accountSign in
Already have an account? Sign in here.
Sign In Now