gautreau Posted October 27, 2012 Posted October 27, 2012 A friend of mine asked me to build a replica of his friends truck for him.I was not expecting it to be a longbox though.The conversion was quite easy.But the paint on this truck will probably be the biggest task of all.Now on to the progress pics. I started with this. For the conversionI needed 2 beds. First I cut the front of the white box out. The I cut the taillight section off. That was the chopping of the first box more to come soom. Thanx for lookin' Jeremy
gautreau Posted October 27, 2012 Author Posted October 27, 2012 (edited) Now to make it a long box. I cut 1/4" off the rear of the grey box. Next I cut off 9/16" off the front of the same box. I put the box from my lowrider build on top to show the difference. Here is a mock-up with the converted box. Thanx for lookin' Jeremy Edited October 28, 2012 by gautreau
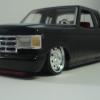
gautreau Posted October 27, 2012 Author Posted October 27, 2012 Forgot to post a pic of the truck I need to replicate. Thanx for lookin' Jeremy
jw78z28 Posted October 27, 2012 Posted October 27, 2012 wow that is going to be a hard paint job to recreate. good luck. nice job on the bed.
crazyrichard Posted October 27, 2012 Posted October 27, 2012 nice job and the paint def will be a challenge ! or are you going to make decals of the paint could photograph it deat straight and in ps edit it and remove the panellines and make it a printable version in the right size
gautreau Posted October 28, 2012 Author Posted October 28, 2012 Thanx fellas.I'm actually going to try and paint this truck.But first I have another project to finish in the next day or so.
gautreau Posted November 8, 2012 Author Posted November 8, 2012 I stretched the frame 14 scale inches tonight.The top frame in the pic is the modified one and the lower one is the stock length. Hope to have the box in primer tomorrow. Thanx for lookin' Jeremy
gautreau Posted November 20, 2012 Author Posted November 20, 2012 Small update I got the ride height set today. Hope to have it in paint by next week. Thanx for lookin' Jeremy
gautreau Posted November 23, 2012 Author Posted November 23, 2012 Started to build the bench seat for this replica. Thanx for lookin' Jeremy
Ben Posted November 25, 2012 Posted November 25, 2012 Very nice work so far!!! You should have that bed cast into resin once you get it perfect! There's lots of people looking for a nice long bed like that! If you get it copied, you'll end up with copies yourself for future projects! I'm sure there are a few great resin casters in the group here that would cast it for you.
W-409 Posted November 25, 2012 Posted November 25, 2012 Very nice work! I always like following these "Out Of The Box" type of projects... Your Long-Bed looks excellent, nice conversion. Paint will be very tricky job, but I guess you'll make it. Are you going to go with those wheels, they look quite different than those 1:1 wheels, or does that 1:1 Pickup have normally that kind of wheels that you have under this one?
gautreau Posted November 25, 2012 Author Posted November 25, 2012 Very nice work so far!!! You should have that bed cast into resin once you get it perfect! There's lots of people looking for a nice long bed like that! If you get it copied, you'll end up with copies yourself for future projects! I'm sure there are a few great resin casters in the group here that would cast it for you. Thanx I appreciate that.I have been asked to cast this bed before but sadly I'm not going to be sending it out to be cast.This will probably be the only long box conversion I ever do and the time restriction I have to finish it.
gautreau Posted November 25, 2012 Author Posted November 25, 2012 Very nice work! I always like following these "Out Of The Box" type of projects... Your Long-Bed looks excellent, nice conversion. Paint will be very tricky job, but I guess you'll make it. Are you going to go with those wheels, they look quite different than those 1:1 wheels, or does that 1:1 Pickup have normally that kind of wheels that you have under this one? Thanx I appreciate that.I am going to be using these wheels.They are the closest I could find.I'm going to remove the spikes on them to get then to look a little more accurate.
gautreau Posted December 14, 2012 Author Posted December 14, 2012 I've got quite a bit done to this build since my last update. I laid down the white base coat. I've also so masked off where it needs to stay white. Thanx for lookin' Jeremy
gautreau Posted December 14, 2012 Author Posted December 14, 2012 I got the engine all painted,assembled and wired.Just need to touch-up the paint in a few areas. Got the second color laid down and the graphic masked as well. Thanx for lookin' Jeremy.
gautreau Posted December 14, 2012 Author Posted December 14, 2012 Unfortunately me being over anxious led to the downfall of this paintjob. This is its current home "The Purple Pond" It has been soaking in there for almost a week now.I have scrubbed the body twice and flipped it over twice aswell.It should be ready to be wet-sanded and repainted next wek I hope. Thanx for lookin' Jeremy
gautreau Posted December 14, 2012 Author Posted December 14, 2012 I kept going on this build while the body is in the pond. Got the interior tub assembled. Installed the rad support on the frame. Started on the dual exhaust and scratchbuilt the driveshaft. I'll finish the exhaust once the box is in place. I built a phantom grille. It now sits on all fours waiting for the body to be redone. Thanx for lookin' Jeremy I'll be updateing this build next week hopefully once I start repainting it.
gautreau Posted December 16, 2012 Author Posted December 16, 2012 Well 2 out of 3 pieces are out of the pond.The cab should be out by Monday.Just need to wetsand them all down then it is round two in the paintbooth. Hopefully I will own this paintjob this time and it won't own me. Thanx for lookin' Jeremy
crazyrichard Posted December 16, 2012 Posted December 16, 2012 awsome progress , too bad the paint went wrong .. maybe you really need to take your time and only spray a light mist over it and waight a few minutes so it can set and dry a tad between every mist coat ..
Tom Geiger Posted December 16, 2012 Posted December 16, 2012 Spray a little clear after each taping before spraying the next color. The clear will seal off any places that might bleed through. Cool project. Ambitious paint job! It would be cool if someone cast that long bed and bench seat interior. I have a project sitting that I will need to do that same work. I even have the cooler set aside. See below!
hooknladderno1 Posted December 17, 2012 Posted December 17, 2012 Jeremy, Awesome job on the long bed conversion! I echo the suggestion above to get someone to cast it! A suggestion - if you can get your hands on some Tamiya tape, I think you will have a better time with your masking. You may also want to try pre-cutting the tape off the model and then applying it. I have learned the hard way about not burnishing the edges of the tape on more than one occasion! Look forward to the next update.
gautreau Posted December 18, 2012 Author Posted December 18, 2012 Thanx for the compliments fellas and the suggestions as well.I am going to slow way down on this paintjob this round. I had a a chance to pick Dr. Cranky's brain on painting.I found out I didn't let the pink cure long enough before laying the tape and spraying the next color. As for cutting the tape on the model I have never done that,I bought a hobby cutting sheet that I use to cut my masking tape.I also agree with burnishing the edges of the tape,I thought I had got it really well but the blow out prove I didn't get it well enough.
gautreau Posted December 19, 2012 Author Posted December 19, 2012 Everything was out of the pond lastnight. The cab and hood will need some minor sand after this round of primer.The box didn't fair so well after coning out of the pond as I thought. It needs a lot of work. So back to the bench I go. Thanx for lookin' Jeremy
gautreau Posted December 29, 2012 Author Posted December 29, 2012 Got the basecoat layed down again. Start to lay the graphics out again next week. Thanx for lookin' Jeremy
Recommended Posts
Create an account or sign in to comment
You need to be a member in order to leave a comment
Create an account
Sign up for a new account in our community. It's easy!
Register a new accountSign in
Already have an account? Sign in here.
Sign In Now