kilrathy10 Posted December 17, 2015 Posted December 17, 2015 Again....Some more beautiful work.....Just beautiful.....
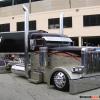
Kenny B Posted December 29, 2015 Author Posted December 29, 2015 (edited) Thanks again everyone for all your comments. With the exhaust in place now I needed to build some cab mount pipe mounts and pipe straps. Before I painted the truck I should have removed the old cab mounts for the stacks which would have been a good idea. Well we all know that glue will not stick to paint so I needed to remove some paint from the cab to make it work. I made up some new cab mounts and straps to go over the existing mounts. I made the pipe mounts a little longer so I can fit the pipes and then trim off what I don't need. When I made the cab pipe mounts I made a key way in them to fit over the existing squares that were there. They fit quite nicely and getting the glue to stick will not be a problem. They are now chromed and ready to be installed. I did run into another problem. I ended up handling the cab like a young excited boy and ended up cracking the drivers side door visor. I really have my work cut out for me now trying to fix it without having paint issues. The work continues. Thanks Ken. Edited February 5, 2018 by Kenny B
Tony-442 Posted December 30, 2015 Posted December 30, 2015 Wow... I can't wait to hear it run!! Amazing work brother. Please keep the updates coming.. 10-4!Cheers
GearUpJammer Posted December 31, 2015 Posted December 31, 2015 Wow,this truck is totally sick!and I mean that in a good way!
kilrathy10 Posted December 31, 2015 Posted December 31, 2015 This is so good....You've got one heck of a model going....Just keeps getting better and better....
Tesla Posted January 1, 2016 Posted January 1, 2016 This is so good....You've got one heck of a model going....Just keeps getting better and better....X2!!!
Kenny B Posted January 6, 2016 Author Posted January 6, 2016 (edited) Thanks to all for your comments. I now have the cab pipe mounts installed and the pipes are test fitted and ready to be chromed. I also repaired the drivers visor and repainted it. Thanks Ken. Edited February 5, 2018 by Kenny B
gatorincebu Posted January 7, 2016 Posted January 7, 2016 Can you say " Large Car?" Going to be very good looking with that paint job! I like it !! Be Well Gator
Kenny B Posted January 12, 2016 Author Posted January 12, 2016 (edited) Thanks guys for your comments. The sleeper doors will be next. Ken. Edited February 5, 2018 by Kenny B
DRIPTROIT 71 Posted January 13, 2016 Posted January 13, 2016 WOW!! This thing is really coming to life!
kilrathy10 Posted January 14, 2016 Posted January 14, 2016 MAN !!!! This thing is getting there.....Those stacks look outstanding....Very well done.....What a great model.....Totally be watching in earnest from here on out, for sure.....
Kenny B Posted February 7, 2016 Author Posted February 7, 2016 (edited) I have a small update to show. I have the sleeper doors hinged and installed on the sleeper. The sleeper interior is now installed as well. You sure don't see much through the doors. I ended up knocking the sleeper over on it's side hitting something and putting a nice gouge in the paint down to the body filler. "Surprise, Surprise" It is sure turning into a make work project. I should have painted the whole truck orange. At least JT could have got me some touch up paint. Edited February 5, 2018 by Kenny B
kilrathy10 Posted February 7, 2016 Posted February 7, 2016 (edited) I have a small update to show. I have the sleeper doors hinged and installed on the sleeper. The sleeper interior is now installed as well. You sure don't see much through the doors.I ended up knocking the sleeper over on it's side hitting something and putting a nice gouge in the paint down to the body filler. "Surprise, Surprise"It is sure turning into a make work project.I should have painted the whole truck orange. At least JT could have got me some touch up paint. LOL !!!! I most certainly could have......Man....Sorry to hear about this particular mishap....I'm sure we've all been there a time or two.....Of course I don't usually have years tied up in one model.....I hope you find a quick fix for it.....Maybe a place for some hazard lights or LED lights or something....If that's all that happened, I think you'll figure it out.....I wish you all the best on that, too..... Edited February 7, 2016 by kilrathy10
Kenny B Posted February 7, 2016 Author Posted February 7, 2016 LOL !!!! I most certainly could have......Man....Sorry to hear about this particular mishap....I'm sure we've all been there a time or two.....Of course I don't usually have years tied up in one model.....I hope you find a quick fix for it.....Maybe a place for some hazard lights or LED lights or something....If that's all that happened, I think you'll figure it out.....I wish you all the best on that, too.....Thanks JT. Some good ideas for sure. I'm trying to fill it with some left over paint and then wet sand it. And then fill again and wet sand again.Repeat over and over again. If that fails plan "B". What ever that is.
Canso65 Posted February 8, 2016 Posted February 8, 2016 Fantastic detail throughout this build Ken.I really enjoyed reading through this entire thread.As JT mentioned, I think we have all had small set backs like the paint chip. I think your idea of filling and sanding will work well.Rob
Belugawrx Posted February 12, 2016 Posted February 12, 2016 Ken,. you can do it, man ....just got caught up on the thread... brush and dry and coat and dry and brush and,....ad infinitum Good luck bro A beauty so far Cheers
Kenny B Posted February 19, 2016 Author Posted February 19, 2016 (edited) Thanks to all for your comments. I managed to fix the gouge on the top left rear corner. A real small paint brush some dabs of paint and some 4000 grit wet sanding did the trick. I had to slowly build each layer up until it was level with the rest of the paint. I lightly airbrushed the wound and then wet sanded again. The end result came out very nicely. I also now have the sleeper doors installed and interior is all put in place. The flat screen TV and mirror was also installed. Ken. Edited February 5, 2018 by Kenny B
Recommended Posts
Create an account or sign in to comment
You need to be a member in order to leave a comment
Create an account
Sign up for a new account in our community. It's easy!
Register a new accountSign in
Already have an account? Sign in here.
Sign In Now