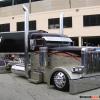
youngtiger1 Posted August 12, 2015 Posted August 12, 2015 Man, that looks awesome. Looks like your getting close to the finish line. Mike
Kenny B Posted August 12, 2015 Author Posted August 12, 2015 John, With the pipes tucked in close to the frame they scrape the hood when closing. The hood was bowed inwards at the bottom before I extended it. I should have checked that before I had it painted. They way the hood sits closed it doesn't line up with the the bottom of the cab. I don't need much clearance maybe a 1/4" at the most or a touch more. Because I heated up the hood the body filler where I added the extension has caused the seam to bubble or rise up and you can see where the joint is.I trimmed down the pipes as much as I can go. I let it sit over night with the wedge I used yesterday to spread it apart. It looks like it might just work this time. I can get away with only having to paint the top of the hood so it won't be to bad. The seams on the sides are fine and no other work will be required. The front of the hood will spread when the grill is in place and was very tight. I did a test fit and everything lines up so far. I'll see in a day or so once it sits without the wedge in place. Fingers crossed. Thanks, Ken.
Kenny B Posted August 12, 2015 Author Posted August 12, 2015 John, answer to your comment. John, With the pipes tucked in close to the frame they scrape the hood when closing. The hood was bowed inwards at the bottom before I extended it. I should have checked that before I had it painted. They way the hood sits closed it doesn't line up with the the bottom of the cab. I don't need much clearance maybe a 1/4" at the most or a touch more. Because I heated up the hood the body filler where I added the extension has caused the seam to bubble or rise up and you can see where the joint is.I trimmed down the pipes as much as I can go. I let it sit over night with the wedge I used yesterday to spread it apart. It looks like it might just work this time. I can get away with only having to paint the top of the hood so it won't be to bad. The seams on the sides are fine and no other work will be required. The front of the hood will spread when the grill is in place and was very tight. I did a test fit and everything lines up so far. I'll see in a day or so once it sits without the wedge in place. Fingers crossed. Thanks, Ken.
John Clutch Posted August 12, 2015 Posted August 12, 2015 Welp. Sounds like your stuck between a rock and a hard place. I hope the wedging works this time
Kenny B Posted August 12, 2015 Author Posted August 12, 2015 Man, that looks awesome. Looks like your getting close to the finish line. Mike Thanks Mike, Now it's little things to line up and a few small things to paint, I also want to redo the rims as well not happy with the stock finish on them. I still need to order the elbows for the exhaust stacks and tail lights as well. Ken.
Kenny B Posted August 12, 2015 Author Posted August 12, 2015 (edited) Welp. Sounds like your stuck between a rock and a hard place. I hope the wedging works this time John, At least it doesn't have to be totally rebuilt. Or did I just jinks myself....Knock on wood. I had it heated up pretty good and then into the ice bath real quick with the wedge still in place so...... We shall see. I really don't want to start the hood all over again. Ken. Edited August 12, 2015 by Kenny B
Kenny B Posted September 29, 2015 Author Posted September 29, 2015 It looks like I have solved my hood issues but it still needs to be repainted. Well only the top of it which isn't to bad. I have masked off the fuel tanks and have painted the rubber under the straps. I have also started assembling the sleeper panels, well test fitting them. Once the sleeper doors are on the rest of it can all be put into place. It's a ruff mock-up but you get the idea of what i'm doing. I have also made a flat screen TV but it still needs to be painted. Once the sleeper doors are clear coated they can be installed. More to come soon. Ken.
Petetrucker07 Posted September 29, 2015 Posted September 29, 2015 Awesome work man. I'd stay in that truck. The interior looks great. Lookin forward to seeing more.
DRIPTROIT 71 Posted September 29, 2015 Posted September 29, 2015 Looking Great so far! Looking forward to more!!
kilrathy10 Posted September 30, 2015 Posted September 30, 2015 Looking just too awesome, Man.....I'm loving the interior work.....Real fuzz....Don't get no better than that.....Awesome.....
gatorincebu Posted October 1, 2015 Posted October 1, 2015 I'm lovin' the sleeper...over the top detailing! X's 2 The whole truck looks great, and the sleeper is really cool. Good job thus far. Be Well Gator
Kenny B Posted October 2, 2015 Author Posted October 2, 2015 Thanks Clayton,Brian,JT,Dennis and Gator for your comments. With all the weight of the sleeper i'm glad that I put that arch in the frame. It will sit level now. Ken.
Kenny B Posted October 3, 2015 Author Posted October 3, 2015 I have a few more pictures. I put the sleeper interior together to take a look and to see if any changes or alternations might be required. I have a few things to adjust but not to bad. View from the cab looking back into the sleeper. The flat screen TV still needs painted. Ken.
gatorincebu Posted October 3, 2015 Posted October 3, 2015 Dammit Man ! The interior looks great. And the exterior is cool looking as well. The paint job and graphics look awesome! Be Well Gator
DRIPTROIT 71 Posted October 4, 2015 Posted October 4, 2015 This thing is amazing!!! Very Nice Indeed!!!
Kenny B Posted October 4, 2015 Author Posted October 4, 2015 Thanks,Clayton ,Gator and Brian. I put the sleeper on the scale. Total weight is 7.4 lbs with the turbo wing. Still working on some more engine wires as well.
72 Charger Posted October 4, 2015 Posted October 4, 2015 Nice work on the everything. That's one shiny engine
Petetrucker07 Posted October 5, 2015 Posted October 5, 2015 Llokin really good. The details are outstanding.
Kenny B Posted October 8, 2015 Author Posted October 8, 2015 (edited) Thanks Dave,Clayton and Brian for your comments. I wasn't happy with the finish on the wheels so I stripped the chrome off the wheels and drilled out the holes and removed the lug nuts. Wheels are sprayed with primer. Rims are painted with three coats of Gloss black. I sort of like them gloss black. Ken Edited February 4, 2018 by Kenny B
Kenny B Posted October 8, 2015 Author Posted October 8, 2015 (edited) Now that the rims are painted I have to decide if I should leave them gloss black with chrome accessories or go chrome with chrome accessories. Chrome lug nut covers and chrome center caps. Ken. Edited February 4, 2018 by Kenny B
Petetrucker07 Posted October 8, 2015 Posted October 8, 2015 I'd go chrome. You can't go wrong since everything else is chrome. Where did you get those "lug nuts". I'm really thinkin of building a 1/16 scale.
Recommended Posts
Create an account or sign in to comment
You need to be a member in order to leave a comment
Create an account
Sign up for a new account in our community. It's easy!
Register a new accountSign in
Already have an account? Sign in here.
Sign In Now