Guest Posted May 31, 2015 Share Posted May 31, 2015 Ken, I know you said the paint was Tamiya, was it a Tamiya Metalic or a Tamiya Mica? I know from past experiences that Tamiya Mica shades are sensitive to both base colors as well as clear top coats. I like the idea of the clear red, it just might give you enough of a red tone to make the brown look like dark cherry. Quote Link to comment Share on other sites More sharing options...
Kenny B Posted May 31, 2015 Author Share Posted May 31, 2015 (edited) Ken, I know you said the paint was Tamiya, was it a Tamiya Metalic or a Tamiya Mica? I know from past experiences that Tamiya Mica shades are sensitive to both base colors as well as clear top coats. I like the idea of the clear red, it just might give you enough of a red tone to make the brown look like dark cherry. Anthony, Here is a list of what I used. I used Tamiya Putty Basic for the body work Tamiya surface primer gray from a rattle can Tamiya Red X-7 Acrylic Tamiya Blue X-4 Acrylic (added x amount of drops from an eye dropper) Tamiya Black X-1 Acrylic (added x amount of drops from an eye dropper) Tamiya X20A Acrylic paint thinner All mixed in a new uncontaminated airbrush jar. That was all my base coat. Once the truck was sprayed it sat for almost a month to totally gas out in a dust free cabnet. I lightly wet sanded it with 4000 Micro mesh pad to remove any dust marks and a few spots of orange peel. The colour wasn't exactly as I wanted so I mixed up a top coat. Tamiya Clear Red X-27 Acrylic Tamiya Blue X-4 Acrylic (added x amount of drops from an eye dropper) Tamiya X-20A Acrylic paint thinner Once the truck was sprayed It sat for amost 3-4 weeks to totally gas out. Perfect colour. Lightly wet sanded again with 4000 Micro mesh pads. Final step Tamiya Clear X-22 Acrylic mixed with Tamiya Acrylic X-20A thinner (About a 60/40 mixture.) Sprayed through a new #5 tip and new airbrush bottle only used for clearcoating. Final coat went on very nicely. Once it dryed it turned brown. I still have to clear coat the sleeper. Hopeing that it turns brown as well so everything matches. Then I guess I will spray every thing with Tamiya Clear red X-27 alone to see if it will come back to the dark cherry burgandy. If not , I don't know at this point. Thanks for your input. Ken. Edited May 31, 2015 by Kenny B Quote Link to comment Share on other sites More sharing options...
Guest Posted May 31, 2015 Share Posted May 31, 2015 I don't know, very odd to say the least. I can only guess it was the clear X 22 on top of the X 27 clear red. Quote Link to comment Share on other sites More sharing options...
Ken Gilkeson Posted June 1, 2015 Share Posted June 1, 2015 new one on me, here I thought red and green make brown and red and blue make purple. Quote Link to comment Share on other sites More sharing options...
Kostas Parchas Posted June 1, 2015 Share Posted June 1, 2015 Anyway nice paint job! Kostas. Quote Link to comment Share on other sites More sharing options...
Kenny B Posted June 2, 2015 Author Share Posted June 2, 2015 Thanks guys. Ken. Quote Link to comment Share on other sites More sharing options...
Petetrucker07 Posted June 2, 2015 Share Posted June 2, 2015 (edited) Get your Camaro restored. Then maybe the bug will bite ya to fix this. FYI...they moved your Camaro to the Big Boys section. Edited June 2, 2015 by Petetrucker07 Quote Link to comment Share on other sites More sharing options...
Kenny B Posted June 2, 2015 Author Share Posted June 2, 2015 Clayton, Well, I started to wet sand the top of the cab. The wife says it looks like the colour of egg plant. I say maybe a rotten one. In the house it doesn't look to bad but once you get the sun on it that's another story.I'm going to spray it with clear red and see what happens. If it doesn't work maybe your son could work on it. FYI Camaro, I asked Harry to move it over to the big boyz section. I saw David's come around after a few years and mine got lonely. I thought it would cheer me up. Ken. Quote Link to comment Share on other sites More sharing options...
Petetrucker07 Posted June 2, 2015 Share Posted June 2, 2015 Clayton, Well, I started to wet sand the top of the cab. The wife says it looks like the colour of egg plant. I say maybe a rotten one. In the house it doesn't look to bad but once you get the sun on it that's another story.I'm going to spray it with clear red and see what happens. If it doesn't work maybe your son could work on it. FYI Camaro, I asked Harry to move it over to the big boyz section. I saw David's come around after a few years and mine got lonely. I thought it would cheer me up. Ken. On certain edges the red looks right, but the big areas it's that "color". With all that work you've put into this, the clear is gonna work. It's gonna work, it's gonna work, it's gonna work. Hope the power of positive thinkin works here. Your Camaros are top shelf man, like I said in that thread. It inspires me to go buy that Foose kit before they're gone. Hobby Lobby here I come. Quote Link to comment Share on other sites More sharing options...
Kenny B Posted June 2, 2015 Author Share Posted June 2, 2015 It will work,it will work,it will work. The 1/12 Camaro is a nice kit to build. I have all the 69 Camaro's in 1/25 (except the rag top) to build still. Ken. Quote Link to comment Share on other sites More sharing options...
cowboy rich Posted June 2, 2015 Share Posted June 2, 2015 Hope it works for you Ken hate to think an investment like that could end up in the instead of the display beautiful work until "it" happened Rich Quote Link to comment Share on other sites More sharing options...
kilrathy10 Posted June 3, 2015 Share Posted June 3, 2015 Man, that is a pretty dramatic color change.....Still looks good, though, IMO.....But, if you're not happy, you're not happy.....Hope you're able to remedy the problem.....It really does, still look good..... Quote Link to comment Share on other sites More sharing options...
DRIPTROIT 71 Posted June 3, 2015 Share Posted June 3, 2015 I know that I'm new to this forum and that my skills aren't the caliber of many of the great builders found here, so I don't have much to offer as far as technical help, but I just saw your Camaro for the first time. You have some major skills! My wife laughs at me when I have a major "painting set back". It happens to everyone to some degree. However, with the skills I saw displayed on the Camaro build, and this build to date, I'm sure that you will be able to find a solution to this problem. Just a word of encouragement from someone who admires your craftsmanship. Quote Link to comment Share on other sites More sharing options...
Ken Gilkeson Posted June 3, 2015 Share Posted June 3, 2015 I have had a few paint surprises myself over the years replicating a build from years before and getting different results. candy reds and greens being the toughest. Quote Link to comment Share on other sites More sharing options...
Kenny B Posted June 3, 2015 Author Share Posted June 3, 2015 Hope it works for you Ken hate to think an investment like that could end up in the instead of the display beautiful work until "it" happened Rich Man, that is a pretty dramatic color change.....Still looks good, though, IMO.....But, if you're not happy, you're not happy.....Hope you're able to remedy the problem.....It really does, still look good..... Thanks guys. I'll make it work. Ken. Quote Link to comment Share on other sites More sharing options...
Kenny B Posted June 3, 2015 Author Share Posted June 3, 2015 I know that I'm new to this forum and that my skills aren't the caliber of many of the great builders found here, so I don't have much to offer as far as technical help, but I just saw your Camaro for the first time. You have some major skills! My wife laughs at me when I have a major "painting set back". It happens to everyone to some degree. However, with the skills I saw displayed on the Camaro build, and this build to date, I'm sure that you will be able to find a solution to this problem. Just a word of encouragement from someone who admires your craftsmanship. Thanks Brian. I do have a few years of building under my belt. I'll make it work and it will be the colour I want even if it takes another 3 years. Thanks for the encouragement Bud. I've had set backs before and got over them. Sometimes you just need to sit a think about it, or redo it. Sometimes it really sucks having to redo many hours of work. Thanks again and welcome to Model Cars Fourm. Happy building. Ken Quote Link to comment Share on other sites More sharing options...
Kenny B Posted June 3, 2015 Author Share Posted June 3, 2015 I have had a few paint surprises myself over the years replicating a build from years before and getting different results. candy reds and greens being the toughest. Ken, Ya, I hear you there. I've had to strip a few too. Ken. Quote Link to comment Share on other sites More sharing options...
olsbooks Posted June 8, 2015 Share Posted June 8, 2015 While it sounds cheezy and flippant, TRY to look at it as a chance to make it better (though it was so close to perfection that is going to be difficult). We all run into barriers. As you so correctly point out, sometimes it does require a reset. It sucks during the moment but something better will emerge. Never give up. Never give in. Never accept second best. Peace. Quote Link to comment Share on other sites More sharing options...
Kenny B Posted June 13, 2015 Author Share Posted June 13, 2015 While it sounds cheezy and flippant, TRY to look at it as a chance to make it better (though it was so close to perfection that is going to be difficult). We all run into barriers. As you so correctly point out, sometimes it does require a reset. It sucks during the moment but something better will emerge. Never give up. Never give in. Never accept second best. Peace. Thanks Jesse for the encouragement. I haven't gave up on her yet. I started wet sanding the hood and cab with 4000 grit to get it smooth as glass. Then I still need to clear the sleeper to see if it will change colour as well so everything will match. Then I'm going to hit it all with clear red and see what happens. I sprayed the front of the sleeper where you won't see it with Future and it didn't change colour. So that won't work either. I'm waiting for my local hobby shop to get in some more clear so I can spray the sleeper to match the rest. Not in any real rush to finish it just taking my time to figure my next move. Thanks to all for the kind words of encouragement. Will post more soon. I hope. Ken. Quote Link to comment Share on other sites More sharing options...
Ken Gilkeson Posted June 23, 2015 Share Posted June 23, 2015 countless hours deserving the best. ;-)) Quote Link to comment Share on other sites More sharing options...
Kenny B Posted June 27, 2015 Author Share Posted June 27, 2015 What to do? What to do? I sprayed everything with clear red again and it looks good. I decided to spray the front of the sleeper with future and it turned brown again. I'm going to wet sand that down again and respray with clear red. I will try very thin coats of future and see if that will work. Haven't given up yet. Ken. Quote Link to comment Share on other sites More sharing options...
Petetrucker07 Posted June 27, 2015 Share Posted June 27, 2015 I'd almost forget the future if that's what happened. I'd wet sand and polish the paint. Quote Link to comment Share on other sites More sharing options...
Tesla Posted June 27, 2015 Share Posted June 27, 2015 Ken, sorry to hear about the paint problems You've done an excellent job on this build! Quote Link to comment Share on other sites More sharing options...
Kenny B Posted June 28, 2015 Author Share Posted June 28, 2015 I'd almost forget the future if that's what happened. I'd wet sand and polish the paint. Ken, sorry to hear about the paint problems You've done an excellent job on this build! Thanks Clayton and Dennis. Still wet sanding. Starting to look good. Ken. Quote Link to comment Share on other sites More sharing options...
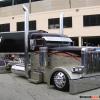
Kenny B Posted July 16, 2015 Author Share Posted July 16, 2015 (edited) I have finally set down the sanding pads. I have wet sanded just about as much as I can. It was time to drag out the wax and polished the sleeper. I see a few small things that still need a bit of work but no big problem. Well I'm pretty happy with the way it came out. There is still a bit of wet sanding to do and a few touch ups but most of the headache is done. Almost time to start putting her together. Thanks to everyone that is following my build. Ken. Edited February 4, 2018 by Kenny B Quote Link to comment Share on other sites More sharing options...
Recommended Posts
Join the conversation
You can post now and register later. If you have an account, sign in now to post with your account.
Note: Your post will require moderator approval before it will be visible.