DanR Posted February 24, 2013 Posted February 24, 2013 For a change of pace, I started working a Tamiya motorcycle kit. I hope I haven't bit off more than I can chew!
Christopher J Posted February 24, 2013 Posted February 24, 2013 Very nice! I like how the engine is looking so far. I have a Tamiya bike I started in around 2006 or so that I just recently ran across. I may see if I can download some instructions for it start back on it again. Looking forward to seeing how yours progresses, it's off to a good start.
XJ6 Posted February 24, 2013 Posted February 24, 2013 I was hoping to come across a 'Work Bench" on this Honda RC166.....It looks like you mixed the two colors for the engine?....Looks like you off to a good start.....and looking at this kit....Yes it seems it may just be a Challange.... Best of luck to you.....Will sure be following this one... Don...aka XJ6
DanR Posted February 24, 2013 Author Posted February 24, 2013 Don, Tamiya recommended a 1:1 mix of copper and red brown but it was too dark when compared to actual photos. I lightened it considerably with Titanium Gold until it was a more acceptable shade. I'm not thrilled with Tamiya's suggested colors, some are miles away from what's in the photos.
Chillyb1 Posted February 24, 2013 Posted February 24, 2013 I don't know about the biting and the chewing but the engine looks great.
Pete J. Posted February 24, 2013 Posted February 24, 2013 I absolutely love the 166 kit. I have two of them, unbuilt. Are you adding the Tamiya upgrades? I will be following this build with interest. Pete
DanR Posted February 24, 2013 Author Posted February 24, 2013 Pete, I'm doing a box stock build. The extras are a bit too pricey for a person building at my level.
DanR Posted February 25, 2013 Author Posted February 25, 2013 Not a lot of progress today. Had some painting issues that may be because of 10 year old cans of Tamiya spray.
DanR Posted February 25, 2013 Author Posted February 25, 2013 The preceding post was done entirely with a Samsung tablet. From the pic to the posting to Photobucket to linking the image to this page. I am loving it that I rarely need to turn on a laptop anymore!
XJ6 Posted February 25, 2013 Posted February 25, 2013 Don, Tamiya recommended a 1:1 mix of copper and red brown but it was too dark when compared to actual photos. I lightened it considerably with Titanium Gold until it was a more acceptable shade. I'm not thrilled with Tamiya's suggested colors, some are miles away from what's in the photos. Thanks for the tip.....be following along..... Thanks for sharing.... Don...
DanR Posted March 3, 2013 Author Posted March 3, 2013 Engine's wired and mounted. This was harder to do than you might think...
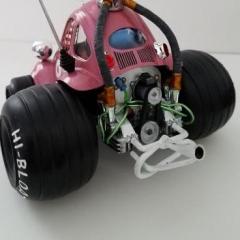
DanR Posted March 17, 2013 Author Posted March 17, 2013 (edited) I lost a week because I got busy with other things, but today I committed to building both sets of wheels. I could tell just by looking at the kit instructions and the parts that this would be a daunting task. I was right. Three hours later and with a slight headache as a reward, I have ONE wheel done. I'll do the other one next week - I need a break. In the meantime, I can move forward with the rear assembly. The parts for the second wheel are in the background. Yes, each wheel is an eight part assembly. For anyone building this kit, here are some tips: The spokes are attached to a circular rim of plastic. Leave them on there until you're ready to assemble them. While attached, scrape all chrome off where glue will be required (Tamiya shows the attachment points in shaded gray on the instructions). This especially includes the spoke tips. I found out the hard way just how delicate these are when I snapped off two but was lucky enough to be able to reattach them. Even luckier, they're next to each other on the wheel, so I can hide them behind the chain assembly. Be patient. I found that once two spoke halves were assembled and ready for the outer rim, it's best to line them up and press the spoke tips into the designated slots one by one, adding a drop of glue to each. Wait a little and let the glue set up on four or 5 tips before moving on, being sure to occasionally check that they're still seated properly. When all are in place and the glue is dried, take a piece of sandpaper and sand down any tips that are poking up slightly to allow for a uniform mating surface for the other rim. These are the kit parts and the end result - in my opinion - is a very nice looking wheel when it's complete. The key is to take your time. Block off an entire day for this if you have to! Edited March 17, 2013 by DanR
DanR Posted March 17, 2013 Author Posted March 17, 2013 Pushed through and made a little more progress. Done for the day.
lanesteele240 Posted March 18, 2013 Posted March 18, 2013 The preceding post was done entirely with a Samsung tablet. From the pic to the posting to Photobucket to linking the image to this page. I am loving it that I rarely need to turn on a laptop anymore! Yes. Since i figured how to post to photobucket with my iphone, making a topic with pics is to easy. I find myself over posting my pics. I picked up the laptop to print something out. My printer is to old to "hook" my phone to.
DanR Posted April 3, 2013 Author Posted April 3, 2013 (edited) Just a little more progress... Edited April 3, 2013 by DanR
krazyglu Posted April 11, 2013 Posted April 11, 2013 Looking really good, I really want to get this kit.
DanR Posted April 11, 2013 Author Posted April 11, 2013 Steve - I would definitely recommend the kit. It's been a challenging but fun build and the bike itself really is beautiful. I'm nearing the end, and hope to have it complete probably by next weekend or the weekend after that (since NNL East is April 20th and I just might have to make the drive from CT to NJ again).
mitchell Posted April 12, 2013 Posted April 12, 2013 did u get all the accessories for this kit? I want to build this kit too.
DanR Posted April 28, 2013 Author Posted April 28, 2013 Sadly, for anyone following this post, I completely screwed the pooch on this kit and decided to scrap it. My advice if you're going to build this - invest the extra money in Tamiya's front fork kit. The forks on this were a mess - weak, poorly constructed (which was a surprise for a Tamiya kit), and in the process of having to correct a minor mistake that I made, they snapped off and the front end was an irreparable mess. I see that Tamiya is releasing a full view version of this same kit. I may take another crack at it. I learned enough from my first pass at it to know how to build it right next time. My main piece of advice - wherever possible, attach the hoses and wires in advance. Trying to attach hoses to tight spaces caused a lot of the problems that led to me giving up on this.
Tony T Posted April 29, 2013 Posted April 29, 2013 Too bad. Could you use it as a background or diorama "project", so as not to be a total loss?
gerdog Posted May 16, 2013 Posted May 16, 2013 Don, Tamiya recommended a 1:1 mix of copper and red brown but it was too dark when compared to actual photos. I lightened it considerably with Titanium Gold until it was a more acceptable shade. I'm not thrilled with Tamiya's suggested colors, some are miles away from what's in the photos. My kit of this bike had a small correction sheet in with it, and it seems that Titanium gold was in the mix. I cannot find the sheet! So, my kit must have been a later production than yours. I like the pic of the chop stick holding the chain and rear sprocket. I was using a chop stick to hold some brake discs today for painting.
Recommended Posts
Create an account or sign in to comment
You need to be a member in order to leave a comment
Create an account
Sign up for a new account in our community. It's easy!
Register a new accountSign in
Already have an account? Sign in here.
Sign In Now