TFchronos Posted April 28, 2013 Author Share Posted April 28, 2013 floor boards look good, nice job! Thanks Jason! Wow this is a great build to watch. Doing a very nice job, and can't wait to see the end result. Thanks Michael! Quote Link to comment Share on other sites More sharing options...
TFchronos Posted April 28, 2013 Author Share Posted April 28, 2013 Jonathan why are you using two accessory drive systems (i.e. alternator) ? I've left them both alone because I haven't decided which engine I want the alternator on yet. This is also being built for a cross country race and I'm still toying with the idea of leaving one of the engines disabled for the race to conserve fuel. I don't plan on running two alternators I'm just leaving them alone for now to keep some options open. Whoa! I thought I read twin Hemi And that fuel-tank is madness! Thanks Matija! Quote Link to comment Share on other sites More sharing options...
TFchronos Posted May 5, 2013 Author Share Posted May 5, 2013 Here's another update, been working on a couple of other models so this one is still not getting the time it needs. An issue I will soon remedy. Anyway I cut out the wheel wells and added mounts for it to sit on the frame. It took a little thinking (yes it hurt) but it sits on it pretty nicely still needs a little work it's a little high on the back right tire. The only notable thing about this is it's all hand sanded, no demel was used. And there it is sitting on the frame waiting for the mounts to set up. Next update will be a test mock up of what it should look like when it's done. Quote Link to comment Share on other sites More sharing options...
Modelbuilder Mark Posted May 8, 2013 Share Posted May 8, 2013 Just have to ask, since I would be tempted to do so myself, but with the clear tank, any temptation to use gas colored water to fill the tank, or will you be painting it? Quote Link to comment Share on other sites More sharing options...
TFchronos Posted May 15, 2013 Author Share Posted May 15, 2013 Just have to ask, since I would be tempted to do so myself, but with the clear tank, any temptation to use gas colored water to fill the tank, or will you be painting it? The thought crossed my mind but the tank isn't sealed so I was just going the cover it with aluminum tape. But now that you got me thinking about it again I may have come up with a way to build a sealed tank. I think I'll try it and see if it works, thanks! Quote Link to comment Share on other sites More sharing options...
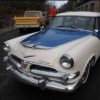
TFchronos Posted May 15, 2013 Author Share Posted May 15, 2013 Mock up test! Rims aren't final they're just for show Thanks for looking! Quote Link to comment Share on other sites More sharing options...
TFchronos Posted May 26, 2013 Author Share Posted May 26, 2013 Update time, after Jantrix very kindly pointed out that the stock front end would likely not hold the weight of the engines. Since then I've been working on building a heavier duty front end and this is what I got. All scratch built it made for a nice challenge and the joy of it is now the wheels turn. 3/4 ton springs with gas shocks upper a-arm setup and will be getting a stabilizer bar at the bottom. Forgot to get it in the picture. Next thing I will work on is the rear rims, I had an idea and want to try it out. Thanks for looking! Quote Link to comment Share on other sites More sharing options...
Jantrix Posted May 26, 2013 Share Posted May 26, 2013 That definitely looks like it will do the job. Great work. Quote Link to comment Share on other sites More sharing options...
TFchronos Posted May 26, 2013 Author Share Posted May 26, 2013 That definitely looks like it will do the job. Great work. Thanks! Quote Link to comment Share on other sites More sharing options...
IMPALA SS 427 Posted May 27, 2013 Share Posted May 27, 2013 Nice idea, love the steerable wheels. are you going for a rat rod look? because this would look sweet all rusted up. Quote Link to comment Share on other sites More sharing options...
TFchronos Posted May 27, 2013 Author Share Posted May 27, 2013 Nice idea, love the steerable wheels. are you going for a rat rod look? because this would look sweet all rusted up. I haven't really decided what I'll do with it in terms of color yet. I've never done a rat rod and a part of me wants to try, but a part of me also wants to do it up like a hot rod. Thanks Quote Link to comment Share on other sites More sharing options...
PappyD340 Posted May 27, 2013 Share Posted May 27, 2013 Hey Jonathan, very nice work on the frame and suspension, but I'm not real sure the fuel tank is going to be large enough for two HEMI'S you may have to build a tank on wheels to pull behind? seriously it's looking mighty fine can't wait to see more. Quote Link to comment Share on other sites More sharing options...
TFchronos Posted June 1, 2013 Author Share Posted June 1, 2013 Hey Jonathan, very nice work on the frame and suspension, but I'm not real sure the fuel tank is going to be large enough for two HEMI'S you may have to build a tank on wheels to pull behind? seriously it's looking mighty fine can't wait to see more. Thanks, I though really hard about that in the beginning and might do one latter on. Quote Link to comment Share on other sites More sharing options...
TFchronos Posted June 1, 2013 Author Share Posted June 1, 2013 Update time, it's not much but any progress is good progress right? So this one's about the back rims, I really liked the street rims the hot rod came with but because they're not deep dish they wouldn't look right on the pro street tires. The only suitable rims I have are from revell's pro street Chevelle, they are flat, bland, and have Chevy bow tie lug nuts. They just wouldn't look right on the hot rod so after some thinking I got the idea to combine the two rims together and turn the street rims into deep dish rims. So after a lot for gentle sanding the shave the pro street rims down with out causing the chrome the flake off and a little sanding to the street rims I glued them together to make custom deep dish rims so it's got matching rims all the around. Here's the pics. Before After And finally on the tire. Thanks for looking, as always more to come. Quote Link to comment Share on other sites More sharing options...
DAYTIME Posted June 1, 2013 Share Posted June 1, 2013 Good job on those wheels. They look great. Quote Link to comment Share on other sites More sharing options...
Dragfreak Posted June 1, 2013 Share Posted June 1, 2013 I've used that trick on wheels before as well, it really looks sweet with the torque thrusts on it! Quote Link to comment Share on other sites More sharing options...
TFchronos Posted June 2, 2013 Author Share Posted June 2, 2013 I've used that trick on wheels before as well, it really looks sweet with the torque thrusts on it! It's a slick trick, it was also my first time trying it. I was so worried about damaging the chrome, I'm glad it turned out well in the end. Good job on those wheels. They look great. Thanks Patrick Quote Link to comment Share on other sites More sharing options...
TFchronos Posted June 3, 2013 Author Share Posted June 3, 2013 Nothing to show just a little title change, I came up with a name for it. Mr Sinister. Thanks for looking! Quote Link to comment Share on other sites More sharing options...
Digo Posted June 3, 2013 Share Posted June 3, 2013 Brother Speaks! It's a great job you're doing, I'm open mouth! Congratulations on your creativity! big hug Digo Quote Link to comment Share on other sites More sharing options...
rustybill1960 Posted June 14, 2013 Share Posted June 14, 2013 Every bit COOL Man! Thank You for sharing Later Russ Quote Link to comment Share on other sites More sharing options...
TFchronos Posted June 14, 2013 Author Share Posted June 14, 2013 Brother Speaks! It's a great job you're doing, I'm open mouth! Congratulations on your creativity! big hug Digo Thanks Digo! Every bit COOL Man! Thank You for sharing Later Russ Thanks Russ! Quote Link to comment Share on other sites More sharing options...
TFchronos Posted July 28, 2013 Author Share Posted July 28, 2013 (edited) Well it's been a while since I've updated this, I've been pushing my GTX along for the past month so now it's time to start pushing the hot rod again. The engines were base coated with Tamiya silver chrome and then several coats of clear red to give it a nice candy red look. I also tried my hand at lowering the top, after the spectacular failure that the GTX was I was a little hesitant but wanted to try again anyway. Thankfully the end result this time was what I wanted. I wanted to take it down a little but didn't want it lowered so much that I would need a periscope so I could see out of it. I think in scale it should be about a 3 inch drop in the front and a 1 1/2 inch drop at the middle posts give or take. The engine painted red with those gigantic valve covers painted satin black. I also remade the steering setup, it takes up less space and should be more effective now. I forgot to cut off the extra on the linking pipe at the time of the photo, that's since been fixed. Thanks for looking! Edited August 1, 2013 by TFchronos Quote Link to comment Share on other sites More sharing options...
Ira Posted July 28, 2013 Share Posted July 28, 2013 Great Progress! Quote Link to comment Share on other sites More sharing options...
Jantrix Posted July 28, 2013 Share Posted July 28, 2013 Man, I'm liking this more and more. Quote Link to comment Share on other sites More sharing options...
The Styrene Chemist Posted July 28, 2013 Share Posted July 28, 2013 I like this build a lot! Nice scratchwork on that chassis and front suspension. Those hemi's look way to cool in that candy red... GOOD JOB ! Quote Link to comment Share on other sites More sharing options...
Recommended Posts
Join the conversation
You can post now and register later. If you have an account, sign in now to post with your account.
Note: Your post will require moderator approval before it will be visible.