iderek Posted March 28, 2013 Author Posted March 28, 2013 Side panel time!! This one was the most tricky part IMO. Just have to be careful once you get to the rear wheel fender. For the instructions, just like the hood, follow the number sequence "again" and apply the corresponding decals "again" lol. I found that when you get to the rear wheel fender, cut a few slots at the end so the decal can sit in the bend properly and not ripping. This is what I got after, I also did both sides. After everything dried, I used my modeler's knife and cut into the panel lines for the extra realistic look. And here are 2 shots of the whole car covered, without the sponsors. More to come~
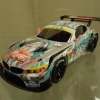
iderek Posted March 29, 2013 Author Posted March 29, 2013 (edited) The sponsor decals are pretty straight forward, but there is one that you'll need to cut into a few pieces. The one with Enkei RECARO P.MU SYNTIUM BELLOF On the left side is normal, but once you go over to the right side, you'll need to cut each sponsor separately and place it in reverse order. I guess FUJIMI was too lazy to printing a flipped side of it Here's what mine looks like after: I'll be doing the body accessories next, stay tuned! Edited March 29, 2013 by iderek
lanesteele240 Posted March 29, 2013 Posted March 29, 2013 Now could you please buy the miku porch gt3 and put it together
doggie427 Posted March 30, 2013 Posted March 30, 2013 Great job on an intense decal . I'm afraid I'd go crazy about half-way through and toss this body against the nearest wall. Well done Derek !
iderek Posted March 30, 2013 Author Posted March 30, 2013 Great job on the decals, looks good Thanks Martin!! Now could you please buy the miku porch gt3 and put it together Ahahaha~ maybe in the future, gotta save up for my real car Great job on an intense decal . I'm afraid I'd go crazy about half-way through and toss this body against the nearest wall. Well done Derek ! Thanks Doggie! I almost went crazy after doing the side panels together~ lol, the best way is to do one side of the car per day, so that'll give you a break from it. It just gets better and better! With the sponsors on, the whole car looks awesome, I can't wait till I start on the spoiler and front cannards!!
maltsr Posted March 30, 2013 Posted March 30, 2013 You're doing a great job so far Derek, I built the previous version last year so I know what you're going through
martinfan5 Posted March 31, 2013 Posted March 31, 2013 You're doing a great job so far Derek, I built the previous version last year so I know what you're going through Look whos back, nice to see you back Paul
maltsr Posted March 31, 2013 Posted March 31, 2013 Thanks Jonathan, haven't been building much lately, but getting back in the groove now
iderek Posted March 31, 2013 Author Posted March 31, 2013 UPDATE! I sprayed on my X-22 Clear as my clear coat, and while I was waiting for that to dry, I went on to finish the rest of the parts. Here is the front splitter and rear spoiler. I also "carbonized" it to replicate the real one. Hope you guys like it as much as I do right now!!
iderek Posted April 2, 2013 Author Posted April 2, 2013 Just going to post this here to let you guys know I have finally finished it!!! YAYY~ and here's the link to the "Under Glass" thread: http://www.modelcarsmag.com/forums/index.php?showtopic=73255
Recommended Posts
Create an account or sign in to comment
You need to be a member in order to leave a comment
Create an account
Sign up for a new account in our community. It's easy!
Register a new accountSign in
Already have an account? Sign in here.
Sign In Now