freakshow12 Posted June 3, 2013 Posted June 3, 2013 Wow!! I am serious about taking a copy too if you sell them
Custom Mike Posted June 3, 2013 Posted June 3, 2013 Jeremy, if I hadn't seen this from the beginning, I'd swear it was a kit, this is some insanely cool scratch-building!
Jeremy Jon Posted June 3, 2013 Author Posted June 3, 2013 (edited) Thank you Bill, Fred & Mike! I appreciate the compliments! Making in such a way that cast parts can be easily assembled & ease of casting, is quite a different challenge than just scratch-building for a single display model I'm excited to see it coming close to completion, next challenge is making the PPE photo etched parts! Made revisions to the 8 hole wheels, basically just enhancing the bolts, lugs and part line so they show up stronger The first set once primed washed out the details, that won't translate in casting well, so these will get reprinted That's sometimes the difference between an accurately scaled part and a part made to look correctly in scale! Edited August 23, 2013 by Jeremy Jon
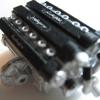
Jeremy Jon Posted June 4, 2013 Author Posted June 4, 2013 (edited) Small steps, the brake rotor centers came back from the 3D printers now Calipers are separate & molded with the mounts to the hub assembly Getting closer! Edited August 23, 2013 by Jeremy Jon
Jeremy Jon Posted June 11, 2013 Author Posted June 11, 2013 Been busy with my 'full time' job so only a little progress this last week, hinged doors and cover now, interior progress begun now, and the second set of wheels altered and sent out to 3D printers to be redone!
Deathgoblin Posted June 11, 2013 Posted June 11, 2013 Amazing work. I love what you're doing with this.
Scale-Master Posted June 11, 2013 Posted June 11, 2013 I have been following this from the start and I must say, it is shaping up beautifully! And rapidly too.
TFchronos Posted June 12, 2013 Posted June 12, 2013 It's so cool to watch this thing being built, top notch craftsmanship on it!
cartpix Posted June 13, 2013 Posted June 13, 2013 I worked for Vector, 20 odd years ago, when he went into "full" production. The prototype in a building right next to the composite shop. There was also a small block Ford with Gurney heads, in the same building. It was an interesting time period, in my life. Jeff
epi4561 Posted June 14, 2013 Posted June 14, 2013 How depressing.... I can't even figure out how to put a custom front clip on an old t-bird. Anyway, this is very impressive work. I'm watching with great interest.
Jeremy Jon Posted June 16, 2013 Author Posted June 16, 2013 (edited) Thanks Brian, Dominik, Mark, Jonathan, Luis & Garry! Edited June 16, 2013 by Jeremy Jon
Jeremy Jon Posted June 16, 2013 Author Posted June 16, 2013 (edited) I worked for Vector, 20 odd years ago, when he went into "full" production. The prototype in a building right next to the composite shop. There was also a small block Ford with Gurney heads, in the same building. It was an interesting time period, in my life. Jeff Thanks Jeff! That's very cool, another fellow I know just recently visited there for some video work! Got a detail question for you, PM sent! Edited June 16, 2013 by Jeremy Jon
Jeremy Jon Posted June 16, 2013 Author Posted June 16, 2013 (edited) Body is now in 'hard' primer, doors complete, engine hood done & side grills finished (not pictured) Next is to wet sand smooth (again) and final coat before casting! Interior underway, starting with some recast seats from old Tamiya kit - thanks Jim - they measured slightly underscale, most specifically in width - to narrow - and lacking some detailing, so I modified them slightly! The Vector W2 used Recaro Classic sport seats, and had very defined pads After sectioning the seats to add width, the pads were cut out and shaped, then reattached into the frame For ease I constructed in 3 parts, base, back & head rests There were 2 style of head rests, the 'open hoop' style & a solid 'block' style, they both have a particular shape & curved from face profile, also the block style extends far more forward Once the basic construction was done, the back panels detail was added, and control knobs added also I decided to make a single master seat for casting, so the reason for having dual knobs at bottom, so one side or the other can be cut/sanded off to make either a drivers side or passengers side seat The electronic control panels will be added next after another sanding and priming layer to smooth out imperfections More to come soon! Edited June 16, 2013 by Jeremy Jon
Jeremy Jon Posted June 16, 2013 Author Posted June 16, 2013 Hm? All photos got placed out of sequence from upload again?
Jeremy Jon Posted June 20, 2013 Author Posted June 20, 2013 Brakes for the inboard rear, and spindle mounted fronts done now, next mold duplicates to complete, made in two parts so that internal fins detail is retained Suspension construction began, with independent SLA front control arm suspension, with just steering arm holes to drill & steering arm link to make out of metal rod, so will have poseable steering of the wheels Getting closer!
S. Svendsen Posted June 21, 2013 Posted June 21, 2013 Holy BLAH_BLAH_BLAH_BLAH! Just saw this thread. Awesome work!
Ace-Garageguy Posted June 21, 2013 Posted June 21, 2013 Still heading out of the park. Great stuff here.
Jeremy Jon Posted June 21, 2013 Author Posted June 21, 2013 Thanks Bill! Park? sorry, Friday brain on wind-down
Ace-Garageguy Posted June 21, 2013 Posted June 21, 2013 (edited) Thanks Bill! Park? sorry, Friday brain on wind-down Homerun hit, out of the park. The best. Edited June 21, 2013 by Ace-Garageguy
Jeremy Jon Posted June 21, 2013 Author Posted June 21, 2013 Oh, I should have understood, Thanks! Boy, I really do need to get some sleep!
Recommended Posts
Create an account or sign in to comment
You need to be a member in order to leave a comment
Create an account
Sign up for a new account in our community. It's easy!
Register a new accountSign in
Already have an account? Sign in here.
Sign In Now