Ramfins59 Posted January 24, 2014 Posted January 24, 2014 Talk about goin' over the top with detailing John...??? ............and you were supposedly trying to "start off easy until you "got your chops back"............uh huh......sure......right......
bryan_m Posted January 24, 2014 Posted January 24, 2014 Talk about goin' over the top with detailing John...??? ............and you were supposedly trying to "start off easy until you "got your chops back"............uh huh......sure......right...... thats what we all say rich......."oh im not gonna detail this one too much"........the next thing you know youre scratchbuilding a working cigarette lighter! LOL cheers bryan
Ramfins59 Posted January 24, 2014 Posted January 24, 2014 I hear ya Bryan. I think we all fall into that "trap" once in a while. Overcomplicationitis can always delay a build, and sometimes even squash it
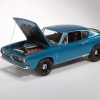
FASTBACK340 Posted January 24, 2014 Author Posted January 24, 2014 Yeah… Yeah….I know. I'm going to shoot myself in the foot with this one. That's why I made the comment that this is rapidly approaching the "gone" zone….. You know, where you gone and ruined sumthin! But yet, it really is a learning curve every time you make something. For example, the shift arms on the trans side cover. What I SHOULD have done was stack the plastic so I'd have two exact pieces. It's also easier to sand and shape, which should have been done nicer in the first place…..<sigh> the next time. BTW: While I'm jawing instead of building, this weekend I will either finish my `68 or make epic progress on the `70. My weekend is the opposite of last, and I should have time. I lost some momentum this week…. Thanks on the compliments and for following along. Hopefully I've shown something that has helped someone else. Or at the very least given the pro's something to chuckle at.
Skypower Posted January 24, 2014 Posted January 24, 2014 You have helped me a lot John and thank you.
MrObsessive Posted January 24, 2014 Posted January 24, 2014 John, another excellent project you got goin' on! I hear you on sweatin' the details! Yesterday I was making battery terminals out of solder for the '59, and wouldn'tcha know it...........I made the one battery cable too short. I put it away and went to bed, probably won't tackle it again till Sunday. "Z" bar for the bell crank clutch mechanism?? My friend I'm about to pass the torch! You asked earlier if someone was going to do this car in "In-Violet"? That was the exact color I had in mind when I get around to building mine. I'm torn between this car, a '57 Chevy Cameo Pickup, or a '68 El Camino for my next long term project. Another possibility is a resto project on a beat up rare builtup which I've never tried before. Keep up the great work!
bpletcher55 Posted January 25, 2014 Posted January 25, 2014 BILL , I would love to see you work your magic on the 57 chevy comeo pickup, great build JOHN , the details are excellent,!
Ramfins59 Posted January 25, 2014 Posted January 25, 2014 John, I wasn't picking on you by any means. I don't expect you to get in over your head on this, especially with all your firsthand knowledge and experience as a 1:1 auto "technician". You obviously know all the little details of a car and what you can and can't replicate on a model. It is a learning experience watching this project progress. Most of us would not even attempt to put in the details that you are doing. Keep it going my friend. By the way John, I'll be posting some progress shots of my "Tunaboat" replica project shorty.
FASTBACK340 Posted January 25, 2014 Author Posted January 25, 2014 I acknowledged your post in a humorous "yeah-yeah" manner! Believe me, I'm not taking anything serious here. Tonight I fell asleep in the recliner and now it's 2:00 am and I'm thinking of hitting the workbench. I'm also planning on blowing tomorrow in the there since I live in the Tundra now and I don't want to go out unless I MUST. Updates for sure in the afternoon, now let's see your `59 Rich. BTW: What year did you get her, and unfortunately….sell her?
Custom Mike Posted January 26, 2014 Posted January 26, 2014 Don't you think I'm approaching the point where I should stop the ridiculous detailing and FINISH the darn thing?!? Ya know John, you could always add more.... Swap out that resistor you're using for a fuel line and filter for one of these super cool neato Switching Diodes available at Radio Shack....they even look like they have gas in them! And you could always rip the valve covers off, strip 'em and repaint 'em with some Wrinkle Black and add some Hemi spark plug boots from Replicas and Miniatures.... Not that I want you to do any more work...just a friendly suggestion!
Ramfins59 Posted January 26, 2014 Posted January 26, 2014 I acknowledged your post in a humorous "yeah-yeah" manner! Believe me, I'm not taking anything serious here. Tonight I fell asleep in the recliner and now it's 2:00 am and I'm thinking of hitting the workbench. I'm also planning on blowing tomorrow in the there since I live in the Tundra now and I don't want to go out unless I MUST. Updates for sure in the afternoon, now let's see your `59 Rich. BTW: What year did you get her, and unfortunately….sell her? John, I sent you a PM on the '59. I bought her in October '96 and unfortunately sold her in the summer of '05. I paid $1,200 for it and enjoyed the hell out of it while I was able to drive it. I sold it for $2,500. Of course I put about $4,000 into it while I had it, but that's normal (and somewhat cheap) for having an oldie but goodie.
zaina Posted January 26, 2014 Posted January 26, 2014 Ya know John, you could always add more.... Swap out that resistor you're using for a fuel line and filter for one of these super cool neato Switching Diodes available at Radio Shack....they even look like they have gas in them! And you could always rip the valve covers off, strip 'em and repaint 'em with some Wrinkle Black and add some Hemi spark plug boots from Replicas and Miniatures.... Not that I want you to do any more work...just a friendly suggestion! An import with a hemi? What did you use for the wrinkle black paint?
Danno Posted January 26, 2014 Posted January 26, 2014 Great detailing, John. Thanks for outlining your techniques here.
Custom Mike Posted January 26, 2014 Posted January 26, 2014 (edited) Andy, it's actually VHT Wrinkle Black spray paint that I picked up at Auto Zone, if you do buy some, get a Primer/Sealer too, you'll need it. And make sure you follow the directions on the can to the letter, I tried to do it my way twice, then finally gave up and followed what it said on the can and they came out beautifully! Edited April 27, 2014 by Custom Mike
1972coronet Posted January 26, 2014 Posted January 26, 2014 Custom Mike - Nice work on those engines ! I'm curious as to what pulley & belt arrangement you've utilised on that 1971 440 , as the kit's arrangement has the routing for and installation-point for the RV-2 York A/C compressor ; yours is ostensibly missing . Thanks .
Custom Mike Posted February 2, 2014 Posted February 2, 2014 (edited) Custom Mike - Nice work on those engines ! I'm curious as to what pulley & belt arrangement you've utilised on that 1971 440 , as the kit's arrangement has the routing for and installation-point for the RV-2 York A/C compressor ; yours is ostensibly missing . Thanks . John, I though that kit came without AC, but apparently it does...as far as what belt setup I used, that was built ten years ago, so I really have no idea what was actually used! Edited February 2, 2014 by Custom Mike
ApexSpeed Posted February 2, 2014 Posted February 2, 2014 (edited) I'm really excited to see this project develop—this is one of my favorite colors ever produced on a factory muscle car, no joke. I'm impressed so far, and looking forward to more. What did you use for the wrinkle black paint? If you shoot any paint with an airbrush, I have a technique that can replicate a more scale krinkle or textured finish. Generally, I thin my paint for any airbrushing to about 1:1 paint to reducer--whether it is lacquer, enamel or acrylic. I don't have a perfect formula, I just try to get the consistency to be similar to 2% milk. I shoot things between 25-35 psi on average, depending on the paint and color, I adjust pressure based on feel. Here's the trick--thin your paint, in this case black, to something a little thicker--like whole milk--and dial down your air pressure on the airbrush to something barely more than blowing out a candle. Something in the range of about 5-10psi. It will feel like it's sputtering, but using this technique, you can get that wrinkle finish for valve covers or even a textured vinyl roof. I will shoot a color normally at standard mix and psi to get a color base, then shoot the thick stuff over the top in the same color. It works really well and gives a really nice, scale appearance. Edited February 2, 2014 by ApexSpeed
FASTBACK340 Posted February 3, 2014 Author Posted February 3, 2014 Wow Doug, that top looks fantastic! VERY nice method of doing it. Thanks for explaining! My Pink Project is getting there slowly. Just had some issues with another build that's going to alter my builds a bit, but it will get done.
Brock.Chance Posted February 3, 2014 Posted February 3, 2014 I've used that pink color before on a GTO and it turned out beautiful!
FASTBACK340 Posted April 26, 2014 Author Posted April 26, 2014 Well, now that 2 months has lapsed, it's time to get back to work on this one. Stay tuned….
geetee66 Posted May 2, 2014 Posted May 2, 2014 Looks like a real labour of love! Can't wait to see the finished thing
FASTBACK340 Posted May 2, 2014 Author Posted May 2, 2014 This weekend we get back to work on the FM3 Cuda....
my80malibu Posted May 2, 2014 Posted May 2, 2014 Liking all the small details but don't forget to paint the distributor cap.
Recommended Posts
Create an account or sign in to comment
You need to be a member in order to leave a comment
Create an account
Sign up for a new account in our community. It's easy!
Register a new accountSign in
Already have an account? Sign in here.
Sign In Now