jaydar Posted January 24, 2014 Posted January 24, 2014 (edited) Tamiya basic white is about 6.00 a tube. Ive also tried the Squadron green putty that Ray suggested, it works well too. I just find Tamiya easier to work with, The tamiya white is what i use and it is ok. Just remember to fill any depression or hole, the putty when applied must be higher than the surface because it shrinks so much when it dries. Or just reconcile yourself to two applications. Joe Edited January 24, 2014 by jaydar
Slotcar12 Posted January 24, 2014 Posted January 24, 2014 I got that kit....lol I also have the org one before amt went to that cheep plastic. I hope they learn from there mistake.... Still a good kit and fun to build. Paul
Skypower Posted January 24, 2014 Author Posted January 24, 2014 (edited) Thanks for the info guys. John I will be hunting some of the correct size wire and washers so I can make it look right. Thanks again for showing me the how too's. Always good to have a mentor or should I say mentors, because around here there seems to be lots of guys willing to help and give good advise and tips. Thank you all. Bob PS. I bought the new Cuda kit today so maybe that will be my next build, but I'm thinking AAR Cuda, who knows I still need to find a 340 and a 6 pack to go that route. Edited January 24, 2014 by Skypower
Speedfreak Posted January 25, 2014 Posted January 25, 2014 (edited) Hey Doug, the Nova's looking good man, really, don't get discouraged. Do you know what color your're going to paint it? One source for the 340 Six-Pack is the AMT '71 Duster 340 kit. (I'm working on that kit now in fact) Other folks will chime in too but I've read that's a pretty accurate 340. Edited January 25, 2014 by Speedfreak
Skypower Posted January 25, 2014 Author Posted January 25, 2014 (edited) Thanks for the info Gene. I don't know what color I'm gonna paint it yet I only have spray bombs at the moment so I might leave it primer till I get an air brush and paint booth. Right now I'm just frustrated but continuing on. Tonight I put the interior together and thought great no problems till I went to test fit, guess what, more issues. The interior was to tight and kept pushing the frame out from under the body and it wouldn't go all the way up in the doors. Two hours later, after sanding and fitting everything seems to fit fine and looks good. This one sure is teaching me some lessons in patience and persistence but its all good. Now maybe I can get some sleep I just couldn't leave it like that till tomorrow. Edited January 25, 2014 by Skypower
Speedfreak Posted January 25, 2014 Posted January 25, 2014 I'm in the same boat. I get frustrated all the time. Pay-off is in meeting the challange and the end result.
Skypower Posted January 27, 2014 Author Posted January 27, 2014 (edited) Thanks Gene. I started messing around with this one again tonight and sure enough nothing went easy. Hood was too short so a couple hours of messing with it, it's now getting closer. I also played with motor some and realized the deck on the block was not square so I had to add some filler to it so the intake was square with the oil pan. After messing with hood I stuck it on the body, and well it sits too low in the front so will have to be shimming it up, I think I kinda have that sorted as well, another night thinking I could start building and another night spent messaging parts instead. Oh we'll I have got to be getting closer to being able to start mocking this one up at least I hope so. I don't know if I went the best rout on fixing the hood but here's how I did it. Tell me what you think . I used .040 rod and glued it to the back edge of the hood cut it to length and then used squadron white filler to fill. I then worked on sanding all the edges square, seemed to work for me just took some time and several coats of filler on and off. I always sand to much off and have to refill. I got to figure that one out one of theses days. Still got some work on the hood to fix the corners but its getting close I think. You guys take a look and tell me what you think I have never messed with any box Novas so not to sure on the body lines just guessing. Thanks for looking. Edited January 27, 2014 by Skypower
Skypower Posted January 28, 2014 Author Posted January 28, 2014 Any suggestions on how to solve this problem. I have a significant gap between the hood and the grill. Seems to me that this should not be there but I don't have any idea how to solve it. Taking suggestions and opinions. Thanks Bob
lordairgtar Posted January 28, 2014 Posted January 28, 2014 (edited) http://nova88hb.www.50megs.com/66nova05.html Here is a good pic of the grille. There seems to be a bit of trim your model is lacking on the bottom edge of the hood.. Also the grille seems to sit too low between the headlamps. Needs to come up a tiny bit, about .75mm. A photo etch grille might be better. Edited January 28, 2014 by lordairgtar
Jetpilot Posted January 28, 2014 Posted January 28, 2014 There is a included chrome trim piece that you attach to the front lip of the hood.
Skypower Posted January 28, 2014 Author Posted January 28, 2014 Thanks guys I will dig thru the chrome bits and see if I can find that piece, I guess I just didn't do enough looking and jumped the gun after seeing that issue. After all the other issues I have had with this one I just thought not again. I will look when I get home for that piece. Thanks Bob
Skypower Posted January 29, 2014 Author Posted January 29, 2014 Problem solved found the missing part. Thanks everyone. Not much done tonight cut the hood out and cleaned up most of the rest of the parts, painted the distributor and that's about it. I did add to my collection of tools today, acquired a flex-I-file that sure helps with detail stuff and got this in the mail today. I used some credit card points I was about to loose, figured I could use this.
skymnky721 Posted January 29, 2014 Posted January 29, 2014 For filler I use the green stuff but it seems a lot of fellows really don't care for it. To each his own but I have had good luck with it. +1 Ive had good results w/this also
Skypower Posted January 30, 2014 Author Posted January 30, 2014 Thanks for the input Scott. Not much done again,mcan't paint with weather like this, I need to get some paint on the chassis so I can start building. So I did some more sanding on parts, more work on the hood, it needed to widened and stretched. Scratched a couple of shocks for the front and drilled the heads for plug wires, that's about it. Anyone know where I can get some springs for building shocks I just keep stealing all the pens in the house they work ok but I have seen much more realistic stuff on here, and would like to have the correct stuff. Thanks Bob
charlie8575 Posted January 30, 2014 Posted January 30, 2014 For springs, coil some wire around appropriately-sized rod. That'll let you keep your pens intact. If you have a good independent/co-op hardware store nearby (e.g., Ace, True Value, Do-it-Best, etc.,) check the small spring selection from Midwest Fastener or Sharon Bolt (the plastic boxes with all the nuts, bolts, etc. in them,) you might get a spring you can cut down to size and it won't be too expensive. Micro-Mark might also have some springs. Take a look. Charlie Larkin
Skypower Posted January 30, 2014 Author Posted January 30, 2014 Thanks for the info Charlie. I check those out.
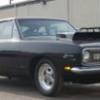
Skypower Posted February 1, 2014 Author Posted February 1, 2014 (edited) Starting to mock things up finally. Sorry not a great pic. Edited February 1, 2014 by Skypower
Skypower Posted February 6, 2014 Author Posted February 6, 2014 Well so much for doing an easy build out of the box. I just didn't like the way the car sat so I had to do this to get it to sit more like the pic above rather than the way it came in the box. At least I'm still learning more stuff. lol
dragcarz Posted February 6, 2014 Posted February 6, 2014 Did you ever think about stretching those rear wheel openings to better fit the big tires?
Skypower Posted February 6, 2014 Author Posted February 6, 2014 Your killing me. lol I do like the wheels on this one so I am sticking with them I just wanted it to sit lower. Now look at the mess I have created.
Skypower Posted February 7, 2014 Author Posted February 7, 2014 Ok finally got the ride height I wanted had to build some drop spindles, not a very good job but they work. I will clean them up and cut the extra post on the bottom off that i used to get the correct height from the lower control arms, hopefully they will look ok in the end. Poor mans rear suspension just some lowering blocks, and had to narrow the rear end to fit the tires properly, also had to put in a new upper shock support that's about it. How does it look, always taking suggestions on different ways to do stuff also since I'm new to this stuff. Thanks Bob
kendog261 Posted February 7, 2014 Posted February 7, 2014 Looking good I bought this kit awhile back on sale but when I opened it I wasn't very happy with it. You may be changing my mind about building it.
Skypower Posted February 7, 2014 Author Posted February 7, 2014 You should read thru the beginning of this build it has fought me from the start. I will say this though I bought another one of these kits and it is in much better condition than this one was. It has been a challenge but fun so far.
FASTBACK340 Posted February 8, 2014 Posted February 8, 2014 Bob, your doing great despite getting "one of those kits" that was hand delivered by the F`up Fairies. I hate those little SOB's…. But you got a handle on it. If you wanted an easy build, buy a Tamiya kit. For your $45+ all you have to do is shake the box and it goes together. Builds like your `66 Chevy are the teachers and you learn from it. And never mind it being a Chevy and you being a Mopar guy. I'm going through a few issues with my build too, and it's blood for me, not the unfamiliar. Stay with it. Patience and perseverance is the greatest tool on your workbench.
Recommended Posts
Create an account or sign in to comment
You need to be a member in order to leave a comment
Create an account
Sign up for a new account in our community. It's easy!
Register a new accountSign in
Already have an account? Sign in here.
Sign In Now