John Goschke Posted February 3, 2014 Posted February 3, 2014 Great color and nice job on the rub-out!
Lovefordgalaxie Posted February 3, 2014 Author Posted February 3, 2014 (edited) A little update Yesterday I prepared all the parts I wanted to paint semi gloss black, and glued them all to the painting stand. Today I got the Tamiya TS-29 paint I wanted to use and painted all the parts at once. The engine was painted silver yesterday, as it's the perfect base for red. My next step now is to paint the rest of the floor pan red oxide primer, and do the Coral Sand overspray. Probably I will prepare the interior parts to be painted the base gray color at the same time, so I only will have deal with the airbrush and compressor one time this evening. 1957 Ford Custom Tudor by Lovefordgalaxie, on Flickr 1957 Ford Custom Tudor by Lovefordgalaxie, on Flickr The frame was assembled as far as possible before being painted. This saves a lot of touch ups later, and makes all more "factory built" like. 1957 Ford Custom Tudor by Lovefordgalaxie, on Flickr The wheel backs were also painted semi gloss black. At the factory, at first all wheels were black, and only the outer faces were painted to match the body color, and even this was optional on the very basic Custom Tudor. 1957 Ford Custom Tudor by Lovefordgalaxie, on Flickr The floor pan will be painted red oxide primer. The front inner fenders will be masked to remain painted black. The front splash pan will be painted argent. 1957 Ford Custom Tudor by Lovefordgalaxie, on Flickr 1957 Ford Custom Tudor by Lovefordgalaxie, on Flickr Edited February 3, 2014 by Lovefordgalaxie
Lovefordgalaxie Posted February 4, 2014 Author Posted February 4, 2014 Another update: I painted the two tones of gray on the interior sides and front seat. 1957 Ford Custom Tudor par Túlio Lazzaroni Lovefordgalaxie, on ipernity 1957 Ford Custom Tudor par Túlio Lazzaroni Lovefordgalaxie, on ipernity Also painted the dash: 1957 Ford Custom Tudor par Túlio Lazzaroni Lovefordgalaxie, on ipernity Still have to paint the flat black parts, put the decals, and to paint all the details. Also painted the engine: 1957 Ford Custom Tudor par Túlio Lazzaroni Lovefordgalaxie, on ipernity And the floor pan is painted red oxide primer, that is really Revell Reddish Brown (matt 37) enamel paint. Still missing on this part are the Argent on the splash pan, the Coral sand overspray, and the flat black on the rubber floor mat. 1957 Ford Custom Tudor par Túlio Lazzaroni Lovefordgalaxie, on ipernity
Lovefordgalaxie Posted February 5, 2014 Author Posted February 5, 2014 Got the painting finished on the floor pan: 1957 Ford Custom Tudor by Lovefordgalaxie, on Flickr 1957 Ford Custom Tudor by Lovefordgalaxie, on Flickr Painted the gas tank and the gear carrier of the rear end: 1957 Ford Custom Tudor by Lovefordgalaxie, on Flickr On the interior parts, I finished dealing with the decals: 1957 Ford Custom Tudor by Lovefordgalaxie, on Flickr 1957 Ford Custom Tudor by Lovefordgalaxie, on Flickr 1957 Ford Custom Tudor by Lovefordgalaxie, on Flickr
mikemopar70 Posted February 5, 2014 Posted February 5, 2014 Great paint, smooth and shiny. I love the color on this car!!
Lovefordgalaxie Posted February 6, 2014 Author Posted February 6, 2014 Thanks for the comments guys!! I finished painting parts, and started the assembly process. Built the engine, and glued it to the frame. Then glued the exhaust, and glued the frame to the floor pan. After that I built the interior. 1957 Ford Custom Tudor by Lovefordgalaxie, on Flickr 1957 Ford Custom Tudor by Lovefordgalaxie, on Flickr 1957 Ford Custom Tudor by Lovefordgalaxie, on Flickr 1957 Ford Custom Tudor by Lovefordgalaxie, on Flickr When I got to this pint, I moved to the body, and foiled it, then super glued the glass: 1957 Ford Custom Tudor by Lovefordgalaxie, on Flickr 1957 Ford Custom Tudor by Lovefordgalaxie, on Flickr And that's where I'm right now. It's taking a while, usually I would have the car completed by now, but I'm not having much time to work on the '57, at least not the amount of time I would like to.
FASTBACK340 Posted February 7, 2014 Posted February 7, 2014 WOAH! Very NICE work! I love the color and the way you applied it. It's beautiful! That finish….. wow!
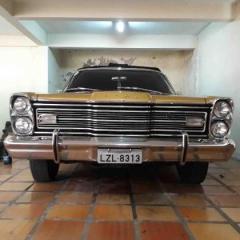
Lovefordgalaxie Posted February 7, 2014 Author Posted February 7, 2014 Finished!! Will be "under glass" in a few.
johnbuzzed Posted February 7, 2014 Posted February 7, 2014 That is a very nice, very clean build. The finish looks perfect in these pictures and probably looks the same in person. But, did you really use super glue to secure the glass in place?
Lovefordgalaxie Posted February 7, 2014 Author Posted February 7, 2014 That is a very nice, very clean build. The finish looks perfect in these pictures and probably looks the same in person. But, did you really use super glue to secure the glass in place? Thanks!! Yes, I use super glue on the glass. I first wax and polish the glass with automotive wax, like Meguiar's then put it in place and using a toothpick I apply a little drop of superglue to the corners of the glass, and let capillarity to take action. The secret is to use very little super glue. Never had any problems with fogging. Headlight lenses and other parts I glue with white glue.
the goon Posted February 7, 2014 Posted February 7, 2014 Wow, it's a real beauty. Like you, I love '57 Fords. Mark
Doug Bowen Posted February 8, 2014 Posted February 8, 2014 What a spectacular look! Wow. When I was growing up my Dad had a battleship grey '57 custom. Looked like a state trooper vehicle. After seeing this, I just don't think I could ever build one in GREY! Nice job. D
1 bad55 stan Posted February 23, 2014 Posted February 23, 2014 That is so nice,i really like your builds,You do excellent work.
66belair Posted February 23, 2014 Posted February 23, 2014 Simply amazing! Excellent color choice,I love 50's colors.
charlie8575 Posted February 24, 2014 Posted February 24, 2014 Very nice. What did you use for the lighter gray on the seats? I've been trying to find something that looked right, and haven't had much luck. Your shade is very close to what's needed. Charlie Larkin
Lovefordgalaxie Posted February 24, 2014 Author Posted February 24, 2014 Very nice. What did you use for the lighter gray on the seats? I've been trying to find something that looked right, and haven't had much luck. Your shade is very close to what's needed. Charlie Larkin I mixed Testors flat black and flat white enamels until I got to a tone close enough to the reference pictures I have of the real car. After I decaled the seats I clear coated with semi gloss clear.
Recommended Posts
Create an account or sign in to comment
You need to be a member in order to leave a comment
Create an account
Sign up for a new account in our community. It's easy!
Register a new accountSign in
Already have an account? Sign in here.
Sign In Now