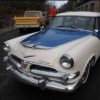
TFchronos Posted March 18, 2014 Share Posted March 18, 2014 (edited) Hey guys, this here is my second build of the year and it's a replica of Dom's Charger from Fast Five. It's being built for the Fast and Furious cbp. Starting out as a Revell 69' Charger it's going to be re worked to look like the 70' charger. Here's the start, small update and end result. First order of business is moving the front reflectors back a bit. Here is what the end result will look like, give or take. Thanks for looking more updates to come. Edited May 1, 2014 by TFchronos Quote Link to comment Share on other sites More sharing options...
MoparWoman Jamie Posted March 18, 2014 Share Posted March 18, 2014 Nice start man, I love that movie, love part 6 as well. 5 & 6 Film sticks out the most to me for some reason. Just so you know, the Fast Furious chargers had Chevy motors in them the last I knew about and heard. I think the fender chop you did looks very good. But you should have started with a Revell Daytona Charger kit though as that has a 1970 front end fenders on like what you needed. All needed to do was make a grill was all. But you would have needed to redo the rear window area though if you would have went with the 1969 Charger Daytona by revell. I'll be watching this build for sure. Quote Link to comment Share on other sites More sharing options...
kruleworld Posted March 19, 2014 Share Posted March 19, 2014 interesting. seems like a lot of work just to move the indicators Quote Link to comment Share on other sites More sharing options...
slusher Posted March 19, 2014 Share Posted March 19, 2014 Looking forward to your progress and build Jonathan. I love the charger in the movie. a few years ago I bought the AMT version just to have it. I have no idea what I will do with it but they are much more expensive now.. Quote Link to comment Share on other sites More sharing options...
TFchronos Posted March 25, 2014 Author Share Posted March 25, 2014 Nice start man, I love that movie, love part 6 as well. 5 & 6 Film sticks out the most to me for some reason. Just so you know, the Fast Furious chargers had Chevy motors in them the last I knew about and heard. I think the fender chop you did looks very good. But you should have started with a Revell Daytona Charger kit though as that has a 1970 front end fenders on like what you needed. All needed to do was make a grill was all. But you would have needed to redo the rear window area though if you would have went with the 1969 Charger Daytona by revell. I'll be watching this build for sure. Thank you, Fast Five was is my Personal favorite, my only complaint with the movie is they didn't show the race with the Porsche, I would loved to have seen that. I thought about using the Daytona real hard but what changed my mind was the back window. I figured it be easier to modify the Charger's front end rather than the Daytona's back window. I remember reading an article about using Chevy engines "for" the movie but I don't recall it ever being said what engine it had "in" the movie. I'll end up watching the movie again to make sure but for now I going to stick with the stock engine. Looking forward to your progress and build Jonathan. I love the charger in the movie. a few years ago I bought the AMT version just to have it. I have no idea what I will do with it but they are much more expensive now.. Thanks, the Fast Five Charger is definitely my favorite. I know right, those kits are expensive now. To think shortly after the first movie came out every Wal-Mart in my area had them falling off the selves and couldn't sell them. I wish I picked up a few lol. Quote Link to comment Share on other sites More sharing options...
TFchronos Posted March 25, 2014 Author Share Posted March 25, 2014 interesting. seems like a lot of work just to move the indicators Thanks, I'm trying to it as close to a '70 as my skill level will let me, moving them wasn't really that hard. Quote Link to comment Share on other sites More sharing options...
TFchronos Posted March 25, 2014 Author Share Posted March 25, 2014 Small update to the front end. Thanks for looking! Quote Link to comment Share on other sites More sharing options...
CJ1971 Posted March 25, 2014 Share Posted March 25, 2014 Thank you, Fast Five was is my Personal favorite, my only complaint with the movie is they didn't show the race with the Porsche, I would loved to have seen that. I thought about using the Daytona real hard but what changed my mind was the back window. I figured it be easier to modify the Charger's front end rather than the Daytona's back window. I remember reading an article about using Chevy engines "for" the movie but I don't recall it ever being said what engine it had "in" the movie. I'll end up watching the movie again to make sure but for now I going to stick with the stock engine. Thanks, the Fast Five Charger is definitely my favorite. I know right, those kits are expensive now. To think shortly after the first movie came out every Wal-Mart in my area had them falling off the selves and couldn't sell them. I wish I picked up a few lol. They're worth more now?? Really? Can't see why? I picked up a couple years ago only to find they're not true 70 chargers. Wasted my $ ? they're sitting in my stash somewhere waiting to not be used ? Quote Link to comment Share on other sites More sharing options...
TFchronos Posted April 1, 2014 Author Share Posted April 1, 2014 Got the front end done, well I still got to run the lines for the front clip. Also started to the Grille, next will be smoothing up the roof and interior work. Thanks for looking! Quote Link to comment Share on other sites More sharing options...
slusher Posted April 1, 2014 Share Posted April 1, 2014 Nice work on the marker lights Jonathan. Looking forward how you do your front grill. I picked up one of those kits just to keep. Like you i should have picked up a few.... Quote Link to comment Share on other sites More sharing options...
rickcaps55 Posted April 1, 2014 Share Posted April 1, 2014 Hi looking good the sidelights came out great. I'm not shure if you know but modelhause has all replacement parts for the 70 Charger there the old amt/mpc parts but they are 1/25 so they do fit it may save you time on trying to make them. Quote Link to comment Share on other sites More sharing options...
crazyrichard Posted April 2, 2014 Share Posted April 2, 2014 cool ! Quote Link to comment Share on other sites More sharing options...
TFchronos Posted April 3, 2014 Author Share Posted April 3, 2014 Nice work on the marker lights Jonathan. Looking forward how you do your front grill. I picked up one of those kits just to keep. Like you i should have picked up a few.... Thanks Carl! cool ! Thanks Richard! Quote Link to comment Share on other sites More sharing options...
TFchronos Posted April 3, 2014 Author Share Posted April 3, 2014 Hi looking good the sidelights came out great. I'm not shure if you know but modelhause has all replacement parts for the 70 Charger there the old amt/mpc parts but they are 1/25 so they do fit it may save you time on trying to make them. Thanks for the info info, I didn't know that. I like the challenge of trying to scratch build whenever I can but if my attempt fails that will make a great backup plan. Thanks again! Update within the next day or two, thanks again for looking everyone. Quote Link to comment Share on other sites More sharing options...
TFchronos Posted April 13, 2014 Author Share Posted April 13, 2014 Quick update, finished up the body work (I think). Sanded off the vinyl top and fender trim, also got some more work done to the grille. More pics to follow, thanks for looking! Quote Link to comment Share on other sites More sharing options...
TFchronos Posted April 13, 2014 Author Share Posted April 13, 2014 Second set of pictures, body re-painted and grille mock up. The grille is sitting a little off in the picture, it'll look right when it's permanently mounted. Thank you for looking! Quote Link to comment Share on other sites More sharing options...
Ira Posted April 13, 2014 Share Posted April 13, 2014 Great Progress Jonathan! Quote Link to comment Share on other sites More sharing options...
Dragfreak Posted April 13, 2014 Share Posted April 13, 2014 very nice Quote Link to comment Share on other sites More sharing options...
1 bad55 stan Posted April 13, 2014 Share Posted April 13, 2014 Looken good so far.. Quote Link to comment Share on other sites More sharing options...
TFchronos Posted April 17, 2014 Author Share Posted April 17, 2014 Thank you Ira, Jason and Stan. Another small but exciting update for me. It's also one of the biggest selling points of the build and that is the rims. Without knowing exactly what rims were used, I looked as best I could via Yahoo, Google, and Wiki search but wasn't able to find anything on the rims. So I just decided to model them out as best I could in 3D and had Shapeways print them along with a few other goodies that will be used later on in the year for another build. Viewport render of the front rim modeled in Blender 3D. Rear rim viewport Printed product, Strong & Flexible Plastic, Polished And the end result after some sanding and painting. Thanks for looking! Quote Link to comment Share on other sites More sharing options...
Dragfreak Posted April 18, 2014 Share Posted April 18, 2014 This 3D printing technology is some pretty cool stuff! Quote Link to comment Share on other sites More sharing options...
TFchronos Posted April 18, 2014 Author Share Posted April 18, 2014 This 3D printing technology is some pretty cool stuff! I agree Jason, it's awesome stuff. Can't wait for the day when 3d printers become common household items. I know I'll put one to good use. Quote Link to comment Share on other sites More sharing options...
slusher Posted April 19, 2014 Share Posted April 19, 2014 Great looking wheels... Quote Link to comment Share on other sites More sharing options...
TFchronos Posted April 24, 2014 Author Share Posted April 24, 2014 Thanks Carl! Sorry for no recent updates, I've been sick since Friday the 18th. Finaly got better and started working on it again. I need to get a move on, it's gotta be done by the end of the month. Started on the interior, got the wheels set and got the grille done, just need to do something for headlights. Pics! This back peice is covered with heat and air duct tape to replicate the sheet aluminum used for the movie cars. The grille is wire mesh, some of you might remember it from the '67 GTX I did for last years cannonball cbp. And Finally, a quick little mock up test with the rims. Thanks for looking, more to come, within the next few days hopefully. Quote Link to comment Share on other sites More sharing options...
gwolf Posted April 24, 2014 Share Posted April 24, 2014 Man, I love the fact you can move the turn indicators back, primer it and it looks like it was made that way. You have any advice for sanding the fill putty and scribing out door panels where putty filled them? Quote Link to comment Share on other sites More sharing options...
Recommended Posts
Join the conversation
You can post now and register later. If you have an account, sign in now to post with your account.
Note: Your post will require moderator approval before it will be visible.