Rudy Posted December 23, 2007 Posted December 23, 2007 I have some questions about taking pictures of my cars and projects, and wonder what others do. First, do you have a dedicated place for taking the pics, or do you just tkae them on the table? What do you use for lighting? I just got a new digital camera for x-mas (early, YAY!) and I am still trying to figure out how to use it, settings, etc. I am in a wheelchair so I cant take very good overhead shots and I am trying to find a good height to do it from. I want to take some pics of my past and current projects for you guys. Looking at some of the work on here I am a REAL AMATUER.(sp?) I built alot about 15 yrs ago, and built about 10 more 4 years ago and try to do a couple in the winter time as my options for stuff to do here in the great white north are limited...... Any help greatly appreciated!! Thanks, Rudy
Raul_Perez Posted December 23, 2007 Posted December 23, 2007 Well, Rudy, I'm no pro, but I'll share with you how I do it. You be the judge, based on my results, to see if you want to try any of my methods. First, I use a small wooden base that has been painted to look like a small section of a parking lot and a plain white piece of poster-board as a backdrop. When I get time, I want to create a small, two sided garage scene just for taking photos. I use several, typically four 100 watt, incandescent lights around the sides and top of the model for lighting. I typically don’t use the flash. I find that the flash tends not to work well on close-up subjects. I also have a digital camera. Though it’s capable of seven mega-pixel photos, I typically set it at 1mp for photographing the models. I set it for close-up, (macro close-up mode), indoor photography and turn the flash off. To get decent clarity and focus of the entire model, I don’t try to zoom in too closely. For the typical ¾ shot, try to focus the middle of the picture on the windshield post where it meets the door and hood. With all of the editing software available these days, I find it faster and easier to get a good, clear shot of the model, then crop out what I don’t want. Being in a wheelchair shouldn’t impair your ability to get good photos. From my opinion, I don’t like to see photos, that in 1:1, would have been taken from a crane hundreds of feet in the air. I like the images taken at what would be just slightly above a normal prospective if viewing the car in a 1:1 scenario. I use a tripod set between 30 and 36 inches high with a distance of two-to-three feet from the model. The other thing I’ve found is that I typically delete almost all of the first series of photos I take because after I’ve viewed them, I find all kinds of little things that need to be touched-up, cleaned or adjusted. With that, I use the first series of photos to check distance, focus, clarity, preferred angles… So, give it a try and post your work for review. I really like seeing other modeler’s work!!
MrObsessive Posted December 23, 2007 Posted December 23, 2007 Hi Rudy, I don't consider myself a pro either...........but like to take my pics in what I would consider a studio format. This means a plain background with no busy distractions................although a nice base would be okay for me if it's not too "fussy looking". My "studio" is actually my paint booth with different color poster board depending on the color of the model. The poster board is curled so the pic will look borderless something like you'd see in a magazine studio shot. I've got poster board in off white, light blue, silver, and black. BTW, you can get poster boards at most arts and crafts stores. My lighting is nothing more than and overhead flourescent light, with a 60 watt incandescent bulb on one side and a 50 watt "True Blue" bulb on the other. This provides me enough light without the washout effect of too bright a light. I also don't like using flash as it can really change the properties of the color of the model. I've got Paint Shop Pro software on my hard drive so in case things need touched up, I can do so before posting. As Raul mentioned, some shots I've taken over and over to get just right. My camera is a Olympus D-540 Zoom........it's only about 4 megapixel, but it's also about 4 years old so I'm due for an upgrade down the road. It still takes good pics as well as great closeups in Macro setting for when I need it. Here's a few pics of some of my recent models taken with my Olympus............. HTH!
Mike Posted December 23, 2007 Posted December 23, 2007 (edited) I usually set up on my card table with a large sheet of white construction paper that drapes down so there is not a seam in the background. I've got a high-watt light that's constant and a pair of smaller lights I set up closer to the subject for lighting. When taking pictures, I set my Sony to the "flourescent" light setting (in the MENU options) as this is the type of light I use mainly. I also turn on the MACRO function for fine details. Plus (depending on the angle) try to keep the center focus right so that the subject doesn't blur in the fore or background. I've posted a picture below that I've taken of one of my builds. Edited December 23, 2007 by Mike
Andy Wyatt Posted December 23, 2007 Posted December 23, 2007 I've seen some pics posted here and I wonder how they get them to come out so nice. I haven't had any luck taking decent indoor pics. For me the best lighting is natural outdoor lighting, preferably an overcast day. I try to set up my piece of plywood painted black so I get a solid background (usually grass in my yard).
Tom Kren Posted December 24, 2007 Posted December 24, 2007 No pro here either! My set up is a white window shade scewed to a shelf when i want to take a pic i just pull it down hit some lights on it and start taking pics.
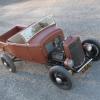
LUKE'57 Posted December 24, 2007 Posted December 24, 2007 I used to be a "pro" if that means I made my living doing it. I had two dirt tracks that I was track photographer at and shot weddings, reunions and such but that didn't mean squat when it came to model photography, as a lot of my early stuff painfully proves. I've seen some wonderful model pics shot by rank amatuers and some barely passable ones done by some really great pros. Sometimes it's like comparing apples and watermelons. LOL The indoor stuff with the three or four light system is beautiful but it doesn't appeal to me. I've seen some really nice model pics that looked just like the auto maker's stuff from the '50's and early 60's done that way. But I guess that with my background as a racing photographer I'm kinda partial to the sun for my lighting. What you have to watch out for in closeup photography is the depth of field and the background focus. A camera can't tell if it's a foot away from a model car or twenty or thirty feet away from a real one but the blurry background will tell on you every time. The trick is to use the smallest aperture (biggest number, I know, it confused me at first too) and focus the camera at the windshield post on a front 3/4 shot. That's because there's usually more in focus behind the point of focus than in front and there's also more car behind the windshield post than in front of it. If you use that focus point and bright sunlight then the depth of field (what's actually in focus) is usually enough to get even the background in focus and lend realism to your shot. Now let's get our "location" done the easy way. Cheap flat black or dark grey primer dry-sprayed on styrofoam or cardboard looks an awful lot like asphalt when you put a model car on it and you can just find a picture from a calender of a lake or something to use as the background and it makes a convincing shot. If you keep your eye out and think "in scale" as you go through the day you can "see" some pretty amazing things to use for a photo "set" for your models. This pic is taken on a sheet of styrofoam sprinkled with HO scale railroad ballast with a chain link fence made from the metal mesh in a used real car air cleaner on bent coathanger wire frames. The privacy fence made of saved popsicle and corn dog sticks. Total expenses- less than five bucks for the ballast and some adhesive and a couple hours work.
Raul_Perez Posted December 25, 2007 Posted December 25, 2007 I 100% agree that natural sunlight is the best!!! Couple that with a good background, the right angle and depthe of field and you end up with very convincing photos every time. The only problem I seem to have with using natural sunlight is that it seams to be long gone by the time I get home from work...
MarkJ Posted December 28, 2007 Posted December 28, 2007 (edited) This is the setup I use. The clamp lights have 100 watt daylight bulbs. the diffusers on the lamps are cut from the bottom of 1 gallon distilled water bottles . I use the manual settings on my digital camera with no flash. the poster board is light blue to keep the white balance on the camera correct. Turn the flash off on your camera . Set the iso to 50,the shutter speed to 1/40, the f stop to 5.6 the light source to tungsten. Use the timer on your camera set to 2 seconds so you dont shake the camera. use your macro setting and measure the distance from the end of the lens to the model and set the macro distance to that number in inches. then just press the shutter button. Edited December 28, 2007 by MarkJ
Howard Cohen Posted December 28, 2007 Posted December 28, 2007 As an amateur photographer, I really appreciate all the info and advice presented here. The only thing I do differently is using fluorescent bulbs marked 'daylight' in my ceiling light. It holds 4 bulbs and I use the equivalant of 4 - 100Watt bulbs. My background is a light white paperboard and a black&white photo of a Darryl Starbird's shop. Now after reading these messages, I am going to add an extra light or two on the sides and turn off the flash. My camera is a Canon Powershot A460 digital point&shoot with 2 different marco settings and I have let the camera brain do the thinking. It is 5megapixels with 4X optical close up. I don't use the digital closeup as it only causes distortion. Now I will play with the settings and see what I get. Thanks everyone.
ismaelg Posted December 28, 2007 Posted December 28, 2007 Not much to add to all these excellent posts. My 2 tips are: 1: Work with a tripod or any other stable base to take advantage of available light. 2: Avoid flash to prevent harsh shadows. I like to use natural light, so I usually take my pictures indoors, but close to a door or a window on a bright sunny day. Direct sunlight will create harsh shadows and will sometimes confuse the camera's metering system. Like modeling itself: Practice and have fun with it! Thanks,
Tonioseven Posted December 28, 2007 Posted December 28, 2007 I prefer outdoor photos because of the enhancement natural light provides...
MonoPed Posted December 28, 2007 Posted December 28, 2007 (edited) My approach is probably the most "low tech", and certainly the most "low buck". I place the model on my kitchen counter, turn on the overhead flourescents, with my camera attached to a tripod. Perfect? Hell no, but it works pretty well, which is good, 'cause I'm too lazy to set up a "studio" Edited December 28, 2007 by MonoPed
Recommended Posts
Create an account or sign in to comment
You need to be a member in order to leave a comment
Create an account
Sign up for a new account in our community. It's easy!
Register a new accountSign in
Already have an account? Sign in here.
Sign In Now