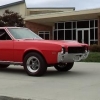
DynoMight Posted June 4, 2014 Share Posted June 4, 2014 (edited) Hello, for my first post, I'd like to show you my 1955 Nomad Pro-Street/Drag Wagon. I decided to call it the 9 Second Grocery Getter, for short I'll just call it the Grocery Getter. First, lets start off with the motor. It is a motor from a 1955 Badman Gasser kit. It is painted flat aluminum (oil pan, transmission) satin black (transmission) guards red (block) I re-painted the blower flat aluminum, since the chrome was not so good I painted the headers satin black and I drilled the ends out to look like actual pipe. Originally, I was just going to take parts of the interior and the chassis to fit the large wheels up there like this: But then I remember I still had the chassis to a prostreet 55 belair I did a while ago, so I cut it up and slapped it on there. More updates will be coming soon! Any advice/recommendations are welcome! -Glenn Also, where do you guys get your really wide slicks, and for what price? Edited June 30, 2014 by DynoMight Quote Link to comment Share on other sites More sharing options...
slusher Posted June 4, 2014 Share Posted June 4, 2014 Real nice start.. Quote Link to comment Share on other sites More sharing options...
GMCMAN52 Posted June 4, 2014 Share Posted June 4, 2014 going to be a great project Quote Link to comment Share on other sites More sharing options...
DynoMight Posted June 4, 2014 Author Share Posted June 4, 2014 Real nice start.. Thanks, I'm going to continue it tomorrow. Thinking of painting it either Hemi Orange or maybe tan to make it look like a "sleeper" going to be a great project Thanks man, hoping this one goes my way instead of my truck.. Quote Link to comment Share on other sites More sharing options...
W-409 Posted June 4, 2014 Share Posted June 4, 2014 Looking great so far! This will be an interesting project, as I like Classic Chevys and Drag Cars a lot. You've done a great work with this one, especially painting the Blower is a good thing...They rarely are chromed in 1:1 cars, either. Only thing I'd do different is the engine. It looks very good, but the engine in that BadMan kit is a bit too small in my opinion. I don't mean the cubic inches, I mean its' actual size. But of course once that engine is built nicely, the size isn't so big thing I guess. I'd buy the slicks from here: http://www.tedsmodelingmarketplace.com/drag-slicks-tf-or-fc-1-25/ Ted has a lot of nice stuff for sale and he is a very nice guy to deal with. I highly recommend his place. Quote Link to comment Share on other sites More sharing options...
1 bad55 stan Posted June 4, 2014 Share Posted June 4, 2014 Now this is my type of project,go hard Glen,i will be watching your progress! Quote Link to comment Share on other sites More sharing options...
DynoMight Posted June 4, 2014 Author Share Posted June 4, 2014 Looking great so far! This will be an interesting project, as I like Classic Chevys and Drag Cars a lot. You've done a great work with this one, especially painting the Blower is a good thing...They rarely are chromed in 1:1 cars, either. Only thing I'd do different is the engine. It looks very good, but the engine in that BadMan kit is a bit too small in my opinion. I don't mean the cubic inches, I mean its' actual size. But of course once that engine is built nicely, the size isn't so big thing I guess. I'd buy the slicks from here: http://www.tedsmodelingmarketplace.com/drag-slicks-tf-or-fc-1-25/ Ted has a lot of nice stuff for sale and he is a very nice guy to deal with. I highly recommend his place. Thanks Niko for the website! I'll have to see if I can find a bigger motor that would fit; but I think I already attached the blower to the motor... I can't remember... Now this is my type of project,go hard Glen,i will be watching your progress! Thanks Stan! I've looked at a couple of your builds (65 Impala and your Capri) and you were part of the inspiration behind this build. Quote Link to comment Share on other sites More sharing options...
MADDOG Posted June 4, 2014 Share Posted June 4, 2014 I read your posts.... I love your energy and enthusiasm. Looking forward to seeing your build finished. Great work so far!! Quote Link to comment Share on other sites More sharing options...
DynoMight Posted June 4, 2014 Author Share Posted June 4, 2014 I read your posts.... I love your energy and enthusiasm. Looking forward to seeing your build finished. Great work so far!! Thanks Mike! I'll have more updates soon! Quote Link to comment Share on other sites More sharing options...
Brizio Posted June 4, 2014 Share Posted June 4, 2014 Looks good! Quote Link to comment Share on other sites More sharing options...
DynoMight Posted June 4, 2014 Author Share Posted June 4, 2014 (edited) Hey Guys, Day Two I was cleaning out our storage room and I found one of my older brother's model, a 1940 Stone, Woods, and Cook, the black one. My brother told me I could have it, since the rear axle was snapped from the frame. I took the engine, (which I'll take pictures of after I touch it up) and also the frame. I'm going to see if I can fix the rear suspension and maybe use that because the Nomad's suspension is, well, (thumbs down emoticon) I will post pictures. Thanks for looking! -Glenn Edited June 4, 2014 by DynoMight Quote Link to comment Share on other sites More sharing options...
DynoMight Posted June 4, 2014 Author Share Posted June 4, 2014 (edited) Hey guys, got a lot done since 12:30! This is the ladder bars and the axle from the Stone, Woods, and Cook 1940 Willys. My brother glue-bombed (with superglue, of course) the axle to the wheel so the axle is pretty much useless because I don't want to cut the inner rim off and possibly damage the axle or snap it. The ladder bars were already snapped off so I kept them. I am probably going to save the front suspension and maybe the frame for a future build. The slicks off of the STC are gasser slicks, so they are pretty skinny, so I'll keep them for maybe a street machine. This is the motor I got from the Stone, Woods and Cook 1940 Willys. I believe Niko said that for this kit it should have a bigger motor than the Badman motor; and so I found this one. It is way taller and sticks out of the hood. I painted the chrome blower, headers, and rocker covers flat aluminum, because again, the chrome was way too shiny and where the parts were cut off the tree it wasn't chrome so I decided the paint them. I plan to wire it, the first time I have ever done something like that. Here's a picture of the tub. I put styrene tubing from the tree to reinforce it. Eventually I'll bondo it and rebuild the wheel arches on the wall. I got these slicks from a 66 Nova Prostreet and switched them with the ones I was using, they seemed to fit the Nomad better. I found this seat and decided I should use it I sanded the body and primed it. I think it came out ok. Thanks for looking at my build guys! More updates well come soon, I am really excited about this build and hopefully it'll come out pretty good! -Glenn Edited June 4, 2014 by DynoMight Quote Link to comment Share on other sites More sharing options...
DynoMight Posted June 4, 2014 Author Share Posted June 4, 2014 (edited) I decided I didn't want the trunk open (I didn't decide, the brackets breaking did, and besides, why would the trunk need to be opened anyways?) so I glued it shut. I'm going to have to putty the gaps and the front clip has a lot of molding lines, which I tried to get to when I was wet-sanding (pics later) but I couldn't get to them so I'll have to either putty over them or sand them away. I'm also debating on whether or not to have a flip up hood, like this Or not to have one. I think it'll be cool either way, but I want to know what you guys think about what I should do. Maybe I could also not make it hinging and just have it a completely removable hood like a gasser (kind of, not really sure what to compare it too). I can't really decide what I want to do.. Put in your five cents about what I should do. Advice/Recommendations welcome! -Glenn Edited June 4, 2014 by DynoMight Quote Link to comment Share on other sites More sharing options...
1 bad55 stan Posted June 4, 2014 Share Posted June 4, 2014 Hi Glen,A tilt front means alot more work,I'm not trying to put you of but you need to rebuild the firewall,the hinges are fairly simple though,They do look good tilting.Its really about what you want.Its all about haven fun so as long as you enjoy go for it.... Quote Link to comment Share on other sites More sharing options...
PappyD340 Posted June 4, 2014 Share Posted June 4, 2014 Extremely NICE start!! keep it going Glenn! Quote Link to comment Share on other sites More sharing options...
DynoMight Posted June 5, 2014 Author Share Posted June 5, 2014 (edited) Hi Glen,A tilt front means alot more work,I'm not trying to put you of but you need to rebuild the firewall,the hinges are fairly simple though,They do look good tilting.Its really about what you want.Its all about haven fun so as long as you enjoy go for it.... Yea, I was kind of going for the Henry J type hood, if you know what that looks like. I think I'll save it for the next project. Thanks for the support Extremely NICE start!! keep it going Glenn! Thanks! I got Tamiya putty so I'll get some seams and molding lines to disappear and be fixed. I'm probably going to wet sand it after I let the putty dry tomorrow. -Glenn Edited June 5, 2014 by DynoMight Quote Link to comment Share on other sites More sharing options...
slusher Posted June 5, 2014 Share Posted June 5, 2014 Real nice progress.. Quote Link to comment Share on other sites More sharing options...
DynoMight Posted June 5, 2014 Author Share Posted June 5, 2014 Here's the aftermath of wetsanding! I discovered multiple seams after this, so I sanded it a little more and re-primed it. I glued the trunk to the body because the brackets broke off and I thought why you would want to open the trunk just to see the back of the tub.. These are various angles of my wet sanding, the rear quarter panel had the Chevy symbol on it and belair written on it, and I didn't like how it looked so I sanded it off. After I wetsanded, I noticed multiple molding seams and lines so I resprayed the body with primer. I picked up some Tamiya Putty and I filled in the gaps. Mostly in the front bumper, back clip and trunk, and also the hood had a large gouge in it. The B pillar had a large molding seam so I puttied over it. I puttied the tub and also under it (not pictured) Eventually I'm going to sand the arches down so it is even with the floor pan and also it'll fit in the body better. Thanks for looking at my build guys! I'll sand the putty down tomorrow and hopefully start with the frame and figure out the rear suspension. Advice/recommendations are welcome! -Glenn Quote Link to comment Share on other sites More sharing options...
DynoMight Posted June 5, 2014 Author Share Posted June 5, 2014 Ok, I've been looking at paintjobs for this car and a couple caught my eye... Eye-catching, don't see it that much maybe.. Wow this one is awesome.. maybe... Eye catching, but you see red all the time and I already have 3 red cars out of my 10ish model collection.. Same as the one above it, eye catching but you see red cars all the time... This one is pretty cool, looks like a resto going on with the guy dumping all his money into everything but the paint... maybe. Let me know which one you guys like most.. I like the resto one and the yellow and dark silver... Advice/recommendations welcome! -Glenn Quote Link to comment Share on other sites More sharing options...
W-409 Posted June 5, 2014 Share Posted June 5, 2014 I like it! The Hemi will look better in the engine bay than a too small engine would. The bodywork looks good, too. Whatever color you choose, I bet it'll be a good looking one. Personally I might go with something like this: Quote Link to comment Share on other sites More sharing options...
Jade043 Posted June 5, 2014 Share Posted June 5, 2014 I'm liking where this is going Quote Link to comment Share on other sites More sharing options...
DynoMight Posted June 5, 2014 Author Share Posted June 5, 2014 I'm liking where this is going Thanks, I'm going to start on interior today! I like it! The Hemi will look better in the engine bay than a too small engine would. The bodywork looks good, too. Whatever color you choose, I bet it'll be a good looking one. Personally I might go with something like this: I like that color but that to me seems like something you'd see on a stock nomad and not a tire smokin 9 second car.. I'll think about it.. -Glenn Quote Link to comment Share on other sites More sharing options...
DynoMight Posted June 5, 2014 Author Share Posted June 5, 2014 ....... I was cutting the drive shaft tunnel out because I want to make my own, square one to look more like a prostreet instead of a wagon with a tub and a big motor.. I was cutting the tunnel out with my dremel, I got it out and I was cleaning it up and I decided to get the dremel out again with a sanding drum and sand down the rough edges, when I got up I dropped the interior and where the tub meets the stock interior bent and since the putty was on there, it made the plastic soft and it literally fell off when I picked it up. I remove the glue and all the putty I put on there, soon I will be attaching the tub back to the interior, this time with superglue. Besides that, I sanding some of the dried putty down and noticed the tailgate still has a gap on the left side, so I reputtied it and hopefully it will be even. I am going for a bodied look in the trunk area, instead of just gaps, so it'll be smooth and you'll think the tailgate would have never opened, like it was a fiberglass body. Meanwhile, I am waiting for the putty to dry and I will finished the driveshaft tunnel and remount the tunnel once my patience is returned and I don't want to throw it across the room... *sigh* Quote Link to comment Share on other sites More sharing options...
DynoMight Posted June 5, 2014 Author Share Posted June 5, 2014 Day 3 Today I sanded down some of the putty. mostly in the front, the B pillar, the front quarter panel, the hood and the trunk and back clip. Here's the transformation of the front clip and also the front quarter panel. Putty dried Sanding begins! (Hood is inculded) Here is the rear clip and trunk and also the B pillar. Putty dried I sanded to far down on the bottom clip so I had to reputty it. Also, the left space between the tail light and the trunk lid were very, very uneven so I reputtied that too, while I was at it, I also reputtied the right one too. I decided I did not want a rear bumper so where the bumper meets the body, I puttied over the space it would install into.. Thanks for looking at my build. Advice/recommendations are welcome! -Glenn Quote Link to comment Share on other sites More sharing options...
DynoMight Posted June 5, 2014 Author Share Posted June 5, 2014 Currently I am sorting out the rear suspension and trying to get the wheels to go up in the tub... Posting pictures later.. I also figured out how I'm going to get the big, wide motor into the skinny, small engine compartment, I'll show you later. Thanks for looking! Advice/recommendations welcome! -Glenn Quote Link to comment Share on other sites More sharing options...
Recommended Posts
Join the conversation
You can post now and register later. If you have an account, sign in now to post with your account.
Note: Your post will require moderator approval before it will be visible.