tyrone Posted February 2, 2015 Author Posted February 2, 2015 I got the dry sump tank plumbed and installed, and I also used a resin fuel cell from Scott (futurattraction) and made a magna fuel.. fuel pump from styrene and plumbed and installed in car.. next up is paint after I get the body ready.... Thanks for looking and comments welcome...
crowe-t Posted February 2, 2015 Posted February 2, 2015 Tyrone, This is a beautiful build, one of your best yet! It looks like the real thing under the hood. It's hard to believe this is a 1/25 scale car. What color are you planning on for this one? If you don't have any color in mind yet, might I suggest a Candy Blue over silver. A friend had a couple of Camaros back in the day, '67 & '68, that were both candy blue over silver. The '67 was the street car and the '68 was a Super Pro Bracket car he ran at Englishtown, NJ. That color really looked great on Camaros. How does this Revell Camaro body compare to the AMT 67/68 Camaro bodies? It looks accurate in the pictures but I haven't picked one of these up yet. Mike.
tyrone Posted February 2, 2015 Author Posted February 2, 2015 Thanks Mike,,, the revell body is alot better than the amt body... the body has alot of good detail..
tyrone Posted February 4, 2015 Author Posted February 4, 2015 Body work is almost done... I removed the lower side moldings, and added another light coat of primer.. still a few spots to fix.. then it will be time for paint... I'm leaning towards black with white bumble bee stripe... I also added some Strange decals to rear axles.. thanks for looking and comments welcome....
futurattraction Posted February 4, 2015 Posted February 4, 2015 Looks great, Tyrone. Can you explain, briefly, how you construct your wheelie bar nets?
tyrone Posted February 4, 2015 Author Posted February 4, 2015 Looks great, Tyrone. Can you explain, briefly, how you construct your wheelie bar nets? Scott... I use medical tape, colored with a black sharpie.. I cut thin strips and installed, the horizontal pieces first.. the I install the vietical pieces last leaving enough tape to fold over and catch on the bottom side... I put a small dab of super glue on in case the adhesive on tape gets weak too...
ClarkM Posted February 5, 2015 Posted February 5, 2015 Truly amazing i think i can speak for a lot of people when i say i am very jealous of your work. Keep up the great work!
tyrone Posted February 5, 2015 Author Posted February 5, 2015 Thank you Clark.. really appreciate it...
futurattraction Posted February 5, 2015 Posted February 5, 2015 Thanks for the explanation, Tyrone. I appreciate it...
tyrone Posted February 9, 2015 Author Posted February 9, 2015 Thanks fellas... I've got the chassis pretty much done... I added a coil and wire, radiator and fan done and wired,, I also added overflow tank to the trunk...
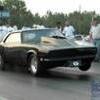
tyrone Posted February 9, 2015 Author Posted February 9, 2015 I also got some paint on the body today.. It was my first time using my air brush and air compressor I got for xmas.. It will have white stripe across nose... Thanks for looking and comments wellcome...
Petetrucker07 Posted February 9, 2015 Posted February 9, 2015 The detail you do man is awesome. The black really gives it the outlaw look.
Red rocket 10 Posted February 9, 2015 Posted February 9, 2015 WOW ! incredible Tyrone , You know I love your work , outstanding.......... Leonard
tyrone Posted February 9, 2015 Author Posted February 9, 2015 WOW ! incredible Tyrone , You know I love your work , outstanding.......... Leonard Thanks Leonard... first chance I've got to use my harbor frieght air brush and compressor...lol...
Belugawrx Posted February 9, 2015 Posted February 9, 2015 Hey Tyrone That looks absolutely stunning ! First shot with the airbrush is amazing What paints, thinners, etc. do you use ? I gotta say I've watched this one from the start,...Fantastic amount of detail here Thanks for the show so far Cheers
tyrone Posted February 9, 2015 Author Posted February 9, 2015 Thanks alot Bruce I really appreciate it.. I used model masters gloss black thinned down with just plain ole air brush thinner from testors... my wife got me an airbrush and compressor from Harbor Freight for x-mas and this was my first time using it.. I had a cheap one before that I was using the compressed cans on before I got this one.. I think it turned out good considering I know nothing about air brushes... but I like it more than rattle cans... thanks again...
crowe-t Posted February 9, 2015 Posted February 9, 2015 Tyrone, the paint looks fantastic! Using an airbrush definitely give more control and allows for a thinner, and more in scale paint job. Great work on the chassis! Mike.
Randy D Posted February 9, 2015 Posted February 9, 2015 Hi Tyrone, I am always so impressed when you show these pics when you are pretty much done with the chassis work. To compare these to pics from page one is just mind blowing !!!! Keep up the awesome work !!! Randy
tyrone Posted February 10, 2015 Author Posted February 10, 2015 Thanks alot fellas for the swell words... really appreciate it... Mike... your right about the paint it's not as thick as rattle cans.. I may be onto something with the airbrush...lol.. Randy... thanks alot man, means alot coming from you.. I love your stuff.. Darryl... thanks bro.. glad you like it.... I took a few pics of it with the doors, hood, and bullhorns on ... I'm gonna give it a few days, wet sand, and put one more coat of black on... dont want to take any chances and burn thru the paint...later on... thanks for looking and comments welcome...
Recommended Posts
Create an account or sign in to comment
You need to be a member in order to leave a comment
Create an account
Sign up for a new account in our community. It's easy!
Register a new accountSign in
Already have an account? Sign in here.
Sign In Now