tbill Posted February 20, 2015 Posted February 20, 2015 looking good! as has been mentioned, that paint scheme is killer, absolutely love it
Cabover Kid Posted February 20, 2015 Posted February 20, 2015 Cool sled, I have been working on the same kit for over a year. (Haven't had much time for it) but I'm ready to hang the chrome on the sides of the cab. I'd love some suggestions on how to glue mirrors grab bars etc. without gouging the goodie out of everything! Sort of a generic question from a newbie/wanna be, input appreciated!! Thx! Randy
purepmd Posted February 20, 2015 Posted February 20, 2015 Hey Jeff, I am really liking this build. Very eye catching paint job. Great job on the engine and suspension swap. Much needed upgrades. Very cool. Thanks for sharing. Mark.
Rigzndiesel Posted February 22, 2015 Author Posted February 22, 2015 Cool sled, I have been working on the same kit for over a year. (Haven't had much time for it) but I'm ready to hang the chrome on the sides of the cab. I'd love some suggestions on how to glue mirrors grab bars etc. without gouging the goodie out of everything! Sort of a generic question from a newbie/wanna be, input appreciated!! Thx! Randy Hey Randy, I have only built this kit once before in my younger days (in 1976 age 9). As memory serves me - I remember painting this truck green and gold with a paint brush. Those were the only colors at my disposal (it was a sick looking truck; green cab gold doors. This time around I want to do a better job for this 352. Anyways, I'm not gonna use the kit mirrors as they are the same for the 359 and they want you to omit the triangular brackets and only use the outer frame and mirror. They should actually be using the same mirrors that come in the KW K123 kits. But I think the KW mirrors are scaled too big to use on the 352. I will probably make mine using angle styrene (for the base that is attached to the door) to glue my outer mirror frame to. As far as the other chrome goes, I used longer grab handles from the snap Pete 359 on this build. I used a pin vise and drilled holes and pushed the grab handles into the cab and glued them from the inside once they were pushed thru. Scrape the chrome plating off the surfaces to be glued with a sharp Xacto and use tweezers to place the parts onto the cab. Just lay the cab on one side and take your time and be patient as your putting parts on. I think the biggest problem can be handling the model too soon as we all want to mock up the model to see how it looks with the new parts on. I am guilty of this...lol. Thanks for the comments! Jeff
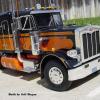
Rigzndiesel Posted February 22, 2015 Author Posted February 22, 2015 Worked a little on the fifth wheel. Made a release handle and a air lock coil and sanded down that big clunky base plate and added angle styrene to it. Interior in place. Made some mud flaps and hangers from wire. Once the paint dries I'll find a decal for the flaps. No chunky mud flap girls for this Pete! Thanks for the comments everyone! Jeff
Old Buckaroo Posted February 22, 2015 Posted February 22, 2015 No chunky mud flap girls for this Pete! Jeff Boooo
mackinac359 Posted February 22, 2015 Posted February 22, 2015 Looks good. Nice updating with the door handles and batterybox/air tanks. Tim
gatorincebu Posted February 22, 2015 Posted February 22, 2015 Real nice Pete! I like the colors and paintschem. The whole rig looks good to me. Be Well Gator
72 Charger Posted February 22, 2015 Posted February 22, 2015 Jeffery that's fantastic . I will have to repaint my 352 soon
Recommended Posts
Create an account or sign in to comment
You need to be a member in order to leave a comment
Create an account
Sign up for a new account in our community. It's easy!
Register a new accountSign in
Already have an account? Sign in here.
Sign In Now