kruleworld Posted March 26, 2015 Posted March 26, 2015 awesome start. i'll be following so i have something to refer back to.
Rotorbolt73 Posted March 27, 2015 Author Posted March 27, 2015 Thanks for the comments and following along with this. Its been a while and I've been working off and on with this project. Lots of body mods with this one, but making progress. Continuing where I left off: The bottom area of the front nose needed some attention to bend it in with the eckler flairs. Basically I just angled back the deflector to match up with the flairs and filled in the gap with some evergreen strips. Also, the eckler flairs have an open cove on the sides that needs to be filled in and converted with a slot vent style as per the movie car. I did this by carving some slots in a piece of evergreen sheet cut to fit in the flair cove, then glued into place. i'll sand this down to level it with the flair surface after it dries in good. Moving back to the hood, I glued the eckler cowl to the 84 hood. I then carved in the slots in the rear to match the movie car.
slusher Posted March 28, 2015 Posted March 28, 2015 More nice Matt. i have been checking for an update. Keep up the good work friend...
Reeves Racing Posted March 28, 2015 Posted March 28, 2015 I've never seen the movie or the car but this a great project and you are doing a super job.
Jantrix Posted March 28, 2015 Posted March 28, 2015 Wow this is looking great. Talk about having the guts to cut. I will be following from now on.
Rotorbolt73 Posted April 1, 2015 Author Posted April 1, 2015 Thanks guys. Well I think I have this hood figured out. After looking at several photos of these daytona vette hoods, I determined the shape I need. To do this, I used masking tape to create a template of the wierd contour shape hump just ahead of the cowl that flows down on both sides. I transfered the pattern to some evergreen sheet that was thin enough to bend into a curve. I flipped over the 2nd right side to make a reversed match for the left side side.Both side converge into a V'd point in the middle. Also, I cut out the two triangle holes for the twin scoupes. I glued both sheets to the front of the hood after carefully bending them to the contour needed. Note at how i had to notch the eckler cowl to clear the scoupe openings. After both sides dried enough, I made small side panels out of evergreen sheet to fill in the exposed openings along the sides of the new hood skin. Did the same for walling in the dual hood scoupes with each opening using three small pieces of evergreen sheet. I applied some of my sprue glue filler mix to help blend in all the joined edges. I'll sand these down later after it has dried fully.
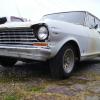
Rotorbolt73 Posted April 1, 2015 Author Posted April 1, 2015 Here is the hood on the body. I think it is pretty close. Its rough looking right now but I'll smooth it out after it has dried. I also cut in the vent slots on top of the front fenders.
Atmobil Posted April 1, 2015 Posted April 1, 2015 This looks like a cool project. I have seen that film but I have forgotten most of it, probably should get back to it I guess.
NYNS Franky Posted April 1, 2015 Posted April 1, 2015 One of my favourite movies as a child. I Can still remember sitting on the living room floor with my matchbox cars watching this. Great progress and idea for a build. Will be following this one!
slusher Posted April 1, 2015 Posted April 1, 2015 Here is the hood on the body. I think it is pretty close. Its rough looking right now but I'll smooth it out after it has dried. I also cut in the vent slots on top of the front fenders. Real Nice work on the hood. Its really coming together...
am73grand Posted April 1, 2015 Posted April 1, 2015 This is AWESOME! I too love this movie. You're doing an amazing job on this build.
Rotorbolt73 Posted April 2, 2015 Author Posted April 2, 2015 Thanks guys. Hopefully I will get this one actually completed. Now that the body is roughed in, I'm going to move along to other areas that need work. The interior is next. According to the film, the interior is a 70's style as best I can tell. I'm not vette expert but it appears there are two different cars used in the movie as the interior details change scene to scene. Especially the seats and steering wheel. So this area kinda' gives me some flexibility. According to the eckler instructions, the eckler vette kit is a 76. This has the dash, door panels that would be more correct for the movie car. Compairing the two interiors, the dimensions between the 82 and eckler 76 are pretty close. Actually the eckler interior bucket will fit in the 82 body but the floor is not deep enough and the rear "cargo" area is shaped differently to accomidate that kits hatchback feature. So I will be using the 82 interior bucket with the door panels and dash from the eckler kit. First step is to cut the door panels from the eckler bucket. Also the top of the 82 dash will be used as the eckler dash top is too short and doesn't meet the cowl all the way. So I carefully cut the top of the 82 dash off. The eckler dash top also needs to be removed and cut back to allow room for the 82 top so that when they are glued together they will clear the windshield. I then used the eckler door panels as a template to scribe on the sides of the 82 bucket on where to remove those panels for an exact fit. The use of the eckler door panels makes it easier to locate the dash in as well.
Rotorbolt73 Posted April 2, 2015 Author Posted April 2, 2015 (edited) Here is the Eckler door panels glued into the 82 bucket. After positioning the dash in to check the fit, I noticed this large gap between the dash center and the molded in console. Not to mention a hole where the 82 dash locates in. To fix this, I removed the front of the eckler console to use. Before gluing into place, I ground off the molded in 82 shifter boot and sanded the top of the 82 console smooth and then filed down and shaped the eckler console to fit. After gluing the 82 dash top to the eckler dash, I rechecked the fit..much better. Now here is my delima. Which seats to use. The eckler seats I like but they are too short and sit too low. I like the high backs of the 82 seats but they have the wrong upholstery pattern. Not sure yet what to do here. Maybe combine the seats...Unless I can find something better from another 70s era vette kit. Any suggestions?? The 82 interior has no pedal detail. I had a scrap interior toe board section in my parts collection that I cut the automatic style brake pedal and gas pedal from to use. The eckler vette does come with a steering wheel that does match one used in the movie. But the rim diameter is too small for my liking. Fortunately I have an identically styled one from the AMT 72 Nova kit to use in its place. Edited April 2, 2015 by Rotorbolt73
Zarana-X Posted April 2, 2015 Posted April 2, 2015 That's a whole lot of cutting goin' on. Making this look easy
Roadrunner Posted April 3, 2015 Posted April 3, 2015 Can't say that I ever saw the movie, but I like what you're doing here so far.
Rotorbolt73 Posted April 6, 2015 Author Posted April 6, 2015 While I think on which seats to use, I decided to move on to the chassis. The 82 chassis plate has a molded in rear suspension and a separate but basic front suspension. I'm not digging the molded in rear so I'm going to replace it. I decided to use the rear chassis section from the 84 parts car that I cut the rear tail off earlier. As you can see the 82 rear chassis also has no fenderwell tubs while the 84 does. So I cut both in half and shaped the 84 section to fit the 82 chassis and hybrid body. while I was in a cutting mood, I removed the molded in side exhaust and driveshaft from the 82 chassis. As you can see, everything is fitting together nicely. At this point I am wishing my 84 parts car had the rear suspension and exhaust system with it. That would make things a lot easier in this area.
Rotorbolt73 Posted April 9, 2015 Author Posted April 9, 2015 (edited) I spent some time sanding all the joints of the glued in body panels. I realized that the side markers on the front fenders had yet to be added. They were still located on the parts of the 82 body I had cut off earlier to make room for the eckler fender flairs. Rather than scribe the marker lights in, I trimmed the off the removed fender sections and cut a corresponding square hole in the eckler fender to transfer the 82 marker lights back into. While I was cutting out the marker light holes , I went ahead and cut out the molded in front nose inserts as well. Nothing seems to be there in the movie car except for some tow hooks. I also cut out the molded in upper firewall section to better detail this area later. Edited April 9, 2015 by Rotorbolt73
Rotorbolt73 Posted April 9, 2015 Author Posted April 9, 2015 (edited) The firewall from the eckler vette is better than the crude molded in 82 wall..To get it to fit, I trimmed off the molded in lower firewall sections from the 82 chassis plate. I then trimmed the upper cowl section of the eckler firewall to match the contour of the 82 cowl. I then positioned and glued the eckler firewall to the 82 chassis plate. I am quite pleased with the fit. As you can see, it went in quite nicely. Edited April 9, 2015 by Rotorbolt73
slusher Posted April 10, 2015 Posted April 10, 2015 Great work Matt, going to look awesome when finish
Recommended Posts
Create an account or sign in to comment
You need to be a member in order to leave a comment
Create an account
Sign up for a new account in our community. It's easy!
Register a new accountSign in
Already have an account? Sign in here.
Sign In Now