Modelbuilder Mark Posted September 10, 2013 Share Posted September 10, 2013 Oh yeah, always enjoy seeing mild custom work on the big sleds. Looking forward to seeing more. Quote Link to comment Share on other sites More sharing options...
Edsel-Dan Posted September 10, 2013 Share Posted September 10, 2013 I go more for the Factory Stock, But Do love those 59 Fords!! I too want to see the end result of this build/resto. I have a few myself. Yes, the front grill from all 3 brands, AMT, PMC, & Revell pretty much interchange But remember, PMC's tail lights were attached to the bumper and Surface mounted! AMT & Revell were inset. I modified both PMC Ranchero & Country Sedan wagon Toy issues to accept the Revell tail lights by drilling the location out. And to mount the Revell rear bumper, added a piece of .04-.06 styrene to the area between the fender edges, and drilling for mounting pins. The Ranchero got a Revell grill, the Wagon kept the PMC piece. I too have converted one to a 4dr sedan, but I started with a Butchered Convertible and added a resin 59 Edsel roof!! Quote Link to comment Share on other sites More sharing options...
John Goschke Posted October 11, 2014 Author Share Posted October 11, 2014 (edited) Little bit of progress on my Sunliner custom, adding some replica stock details to the interior. Scratch shift lever and turn signal lever from two different size dressmaker's pins with turned styrene rod handles and shifter base. The column is from the AMT '57 Fairlane and the wheel is from the Revell '59 Ford. Also scribed the openings for the glove box and ashtray since AMT did them as raised lines. What's slowed this project down was my decision to upgrade the highly visible interior with the better side panels from a Revell '59 Skyliner. Once they were installed I couldn't get past the fact the rear window cranks wouldn't have been able to turn without hitting the housings for the top arms. So I decided to remove the cranks and scratch some FoMoCo power window switches, which have a round chrome escutcheon with an ivory plastic toggle switch. The single switches were carved into the end of small sections of styrene rod, the driver's master switch was made from a bit of shaped styrene stock with thin strip glued to the face which was then notched into four sections. Now that this done I'm making wipers, an inside rear view mirror, and if I can't find the originals, a set of sun visors! Edited October 11, 2014 by John Goschke Quote Link to comment Share on other sites More sharing options...
Ramfins59 Posted October 11, 2014 Share Posted October 11, 2014 Great looking work John, as always. Quote Link to comment Share on other sites More sharing options...
StevenGuthmiller Posted October 11, 2014 Share Posted October 11, 2014 You have more patience than I do John! My '59 is getting the interior it came with, & believe me, being a Jr. Craftsman article, it does leave a little to be desired as far as "crispness" goes. But, no project is getting any special treatment in my shop. You brought her, you dance with her! Steve Quote Link to comment Share on other sites More sharing options...
impcon Posted October 14, 2014 Share Posted October 14, 2014 You are making some serious headway on the Ford and it's good to see. I appreciate the tips on combining the Sky Liner pieces with the annual and the power windows - well, ingenious and a very nice added touch. I appreciate you keeping the stock look for the most part and this will be a very nice display piece that you can be proud of. I'm looking forward to more updates.. Thanks for sharing. Quote Link to comment Share on other sites More sharing options...
Tonioseven Posted October 14, 2014 Share Posted October 14, 2014 Mr. Goschke, you do some fabulous work!! Thank you for sharing it with us!!! Quote Link to comment Share on other sites More sharing options...
slusher Posted October 15, 2014 Share Posted October 15, 2014 Great attention to detail.. Quote Link to comment Share on other sites More sharing options...
John Goschke Posted October 31, 2014 Author Share Posted October 31, 2014 Earlier this week got some more of the scratch small detail bits done. Windshield wipers. Interior rear view mirror. Sunvisors. Each wiper has an angled arm carved out of ABS plastic then an extension for the arm and a blade made from strip styrene. The ABS arm is drilled in back for a styrene rod shaft inserted through the cowl. They'll be painted gloss black before Alclad Chrome. The sunvisors were cut from styrene sheet using photos as reference for size and shape. The edges and corners were sanded round. The center inside corner and outside front corner were drilled to receive styrene rod shafts. The outside shaft was bent to fit in a hole drilled in the windshield header while each center shaft fits into a bracket on the header, more or less like the real car. The rear view mirror was cut and shaped out of ABS plastic sheet then drilled in back for an aluminum wire bracket. The bracket fits into a hole drilled in inside upper edge of the windshield. The mirror and bracket were sprayed gloss silver. The reflective face of the mirror was cut from a polished aluminum sheet. Still need to make a radio aerial. The two Revell '57 Ford Custom Tudor kits I have may lose their outside rear view mirrors soon, unless somebody who didn't use them wants to donate mirrors from that kit to the cause! Quote Link to comment Share on other sites More sharing options...
DeeCee Posted October 31, 2014 Share Posted October 31, 2014 Some great scratch work there mate, looking great. Quote Link to comment Share on other sites More sharing options...
StevenGuthmiller Posted November 1, 2014 Share Posted November 1, 2014 That's one thing I've been trying to come up with is a good way to scratch build some passable outside mirrors. That would be another good thing for some enterprising resin caster to come up with is a giant bag of "period" mirrors for about 5 bucks! Nice work John! It's coming along nicely! I'm still hoping the paint can be saved on my '59 project. It's sitting here staring at me as I type. The cracking seems to be mild & hasn't progressed any more, so I'm still hopeful. What color, or colors are you going with John? I hope something "50s". I love the colors from that period & pretty much loathe all these custom candy colors nowadays. But hey, it's not my build! Steve Quote Link to comment Share on other sites More sharing options...
sbk Posted November 1, 2014 Share Posted November 1, 2014 So nice! Tell me about the ABS as opposed to styrene & why you use it. Quote Link to comment Share on other sites More sharing options...
Greg Pugh Posted November 1, 2014 Share Posted November 1, 2014 Holy cow John! Fabulous work there!! Quote Link to comment Share on other sites More sharing options...
John Goschke Posted November 1, 2014 Author Share Posted November 1, 2014 (edited) Thanks, guys! That's one thing I've been trying to come up with is a good way to scratch build some passable outside mirrors. That would be another good thing for some enterprising resin caster to come up with is a giant bag of "period" mirrors for about 5 bucks! Nice work John! It's coming along nicely! I'm still hoping the paint can be saved on my '59 project. It's sitting here staring at me as I type. The cracking seems to be mild & hasn't progressed any more, so I'm still hopeful. What color, or colors are you going with John? I hope something "50s". I love the colors from that period & pretty much loathe all these custom candy colors nowadays. But hey, it's not my build! Steve Steve, I agree on the "mirror-pack" idea! Correct factory outside mirrors in pairs along with popular accessory mirrors in pairs would be great. As for color the outside will be custom colors in circa '59-'60 Larry Watson style. The interior will be stock, similar to yours except for the use of Tamiya Champagne Gold instead of the "Geranium" coral color. So nice! Tell me about the ABS as opposed to styrene & why you use it. Steve, the ABS seems to carve easier and hold sharper detail when I'm making these small detail parts. Also I think the grey color and greater opacity of the stock I have makes it easier to see what I'm doing than bright white styrene. It's also more flexible than styrene, especially Evergreen. Edited November 1, 2014 by John Goschke Quote Link to comment Share on other sites More sharing options...
Guest Posted November 1, 2014 Share Posted November 1, 2014 Glad to see you back in on this project John! The small details you add always make a big difference. Are you going to re work the front seat so that it isn't molded into the floor pan? My '60 Lincoln is the same way. Plus, I'm having to re work the overly shallow foot wells it has. You can see in Ron's photo of his Lincoln that the dash is right against what would be the firewall. Quote Link to comment Share on other sites More sharing options...
Ramfins59 Posted November 1, 2014 Share Posted November 1, 2014 John, you're doing some amazing and wonderful scratchbuilt details on this car. The finished product should be a real winner. Quote Link to comment Share on other sites More sharing options...
DumpyDan Posted November 1, 2014 Share Posted November 1, 2014 I like! Quote Link to comment Share on other sites More sharing options...
John Goschke Posted November 1, 2014 Author Share Posted November 1, 2014 Thanks again, guys! Glad to see you back in on this project John! The small details you add always make a big difference. Are you going to re work the front seat so that it isn't molded into the floor pan? My '60 Lincoln is the same way. Plus, I'm having to re work the overly shallow foot wells it has. You can see in Ron's photo of his Lincoln that the dash is right against what would be the firewall. No, Roger, I don't think I'm going to go any further down that slippery slope than I already have! I know what you mean about the front floor of AMT's '59 and '60 Continentals - a convincing argument for building a hardtop! Their Mercuries from the same years have somewhat the same problem. Pretty freakin' annoying... Quote Link to comment Share on other sites More sharing options...
StevenGuthmiller Posted November 2, 2014 Share Posted November 2, 2014 Thanks, guys! Steve, I agree on the "mirror-pack" idea! Correct factory outside mirrors in pairs along with popular accessory mirrors in pairs would be great. As for color the outside will be custom colors in circa '59-'60 Larry Watson style. The interior will be stock, similar to yours except for the use of Tamiya Champagne Gold instead of the "Geranium" coral color. Steve, the ABS seems to carve easier and hold sharper detail when I'm making these small detail parts. Also I think the grey color and greater opacity of the stock I have makes it easier to see what I'm doing than bright white styrene. It's also more flexible than styrene, especially Evergreen. I got tired of waiting for that "mirror pack" John, & decided to do a little scratch building for my '60 Chrysler. These old late 50s style mirrors for mopars are pretty much non-existent except for the AMT '57 300 kit. So I thought I'd try making one. It's fiddly work but I think it'll work with a little more tweaking. Steve Quote Link to comment Share on other sites More sharing options...
John Goschke Posted November 2, 2014 Author Share Posted November 2, 2014 Nice work on that mirror, Steve. That "twin-strut" Mopar mirror is very distinctive and a prominent feature on the later Forward Look cars. I made a set for my '60 Dodge, but cheated a bit on the head, cutting a pair off a couple circa '62 Johan mirrors (back in the days when I had a lot of Johan kits to rob parts from!) Covered 'em with BMF, which is looking a bit tarnished these days! Quote Link to comment Share on other sites More sharing options...
FordRodnKustom Posted November 2, 2014 Share Posted November 2, 2014 Glad to see you working on this Ford again John. Thanks for sharing your creative scratch building work. Quote Link to comment Share on other sites More sharing options...
StevenGuthmiller Posted November 2, 2014 Share Posted November 2, 2014 Nice work on that mirror, Steve. That "twin-strut" Mopar mirror is very distinctive and a prominent feature on the later Forward Look cars. I made a set for my '60 Dodge, but cheated a bit on the head, cutting a pair off a couple circa '62 Johan mirrors (back in the days when I had a lot of Johan kits to rob parts from!) Covered 'em with BMF, which is looking a bit tarnished these days! I used the back of a spot light from a '49 Merc kit for the head in this one. I think I'll use this one on the '60 Chrysler & then maybe try tho refine the design a little the next time around. Steve Quote Link to comment Share on other sites More sharing options...
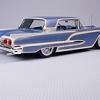
John Goschke Posted July 6, 2015 Author Share Posted July 6, 2015 After considering a number of different color schemes for this model, I was finally inspired by a H.A.M.B. thread about a 1/1 '40 Ford hot rod build that was to be painted in pale blue. I'm not sure why a '40 Ford coupe would cause a brainstorm realization about what color to paint a '59 Ford custom, but there you have it. The mind works in strange ways. Anyway, a number of other projects were set aside so I could once again focus on this one. Here's a mock-up of where it's at so far. The pale blue is Tamiya Pure White with a bit of their French Blue mixed in. The upper body is Tamiya Pure White. This is similar to a stock '59 Ford scheme of Colonial White and Wedgewood Blue, though my blue is a bit brighter. The interior is in the stock color combo, done in Tamiya Light Blue Pearl, Blue Pearl, and White Surface Primer. Carpeting will be a very dark blue. I started foiling the dash, but that will need to be redone after I add a radio between the heater controls and the clock. I wouldn't bother except that I made the aerial and the fender is already drilled to receive it. More foiling and detail paint obviously needs to be done. The exterior panels will be outlined in silver in Larry Watson style, similar to his '59 Caddy or the Terry Holloway '57 Plymouth. When finished this model should be a great stablemate for the '59 T-bird, shown in my avatar, I finished a couple years ago. Quote Link to comment Share on other sites More sharing options...
Ron Hamilton Posted July 6, 2015 Share Posted July 6, 2015 That's pretty!!! Quote Link to comment Share on other sites More sharing options...
72 Charger Posted July 6, 2015 Share Posted July 6, 2015 Very nice Quote Link to comment Share on other sites More sharing options...
Recommended Posts
Join the conversation
You can post now and register later. If you have an account, sign in now to post with your account.
Note: Your post will require moderator approval before it will be visible.