Old Buckaroo Posted December 30, 2013 Share Posted December 30, 2013 Jeff - that is some really nice work, and a great kit. It is good to see something built sporting "Daytons" PS - I use to chase cows all over that part of the country you live in. I remember a Coop, convenience store, watering hole and about 20 houses. Quote Link to comment Share on other sites More sharing options...
Rigzndiesel Posted December 31, 2013 Author Share Posted December 31, 2013 Hello again, Here are a couple of pics with the new decals applied. I'm limited with decals so here is what I managed to come up with. At some point during this build I broke the center post and the drivers side window pillar. Once the clear coat dries I will fabricate new ones. I fumbled the cab during handling instead of letting it sit to dry and put a smudge on the passenger side bottom of door, Rookie mistake to try and mock up the cab when the paint/clear coat is still wet. Oh well, this one will sit high up on the top shelf...lol I also want to "Thank" those that left comments. I appreciate them! Jeff Quote Link to comment Share on other sites More sharing options...
72 Charger Posted January 5, 2014 Share Posted January 5, 2014 Dont put it on that top shelf just yet . Some wethering may just hide that little smudge your doing a great job so far keep it up Quote Link to comment Share on other sites More sharing options...
Rigzndiesel Posted January 7, 2014 Author Share Posted January 7, 2014 I really want to finish this model before it finds a place on the shelf. At the moment I have a major problem; I don't have a windshield for this truck. I purchased this kit over 10 yrs ago on Ebay - open box some missing parts and no decals. I have a couple more Mack models but I hate robbing Peter to pay Paul. What to do......what to do... Here's what I got done so far. The rear fenders are removable and the A/C unit is just sitting on the cab and so is the bumper. I might dig out a windshield from another kit... still debating on doing that. I like to keep my collectable kits 100% complete and sealed in case I have to liquidate. I do have other models that are considered "buildable kits" in which case you just build it but I don't have another Ertl Mack. Unless I unseal one. Oh well...I'll figure it out. Jeff Quote Link to comment Share on other sites More sharing options...
Old Buckaroo Posted January 7, 2014 Share Posted January 7, 2014 Jeff that is a fine looking Mack, too bad about the MIA windshield. Put a feeler out in the "wanted" section of the forum. I would recommend sourcing some clear acetate sheet or a piece of clear packaging (you know that stuff you can never get into) and make one. Even with that curve it should not be too hard with persistence. Another tip I will share with you - on flat surfaces that you want to put a decal on brush on a little "Future Floor Wax" although the name has changed to Pledge floor care about the size of the decal and let dry, that ghosting of the clear decal paper wont be there. Quote Link to comment Share on other sites More sharing options...
cappy625 Posted January 7, 2014 Share Posted January 7, 2014 hello jeff,if you have complete kits that you don't want to open.you don't have to rob peter to give to paul.for the wind shield as sean said clear acetate works fine,sometimes looks better then the kit glass.or you could go to any arts and craft store and buy a sheet of clear plastic they use for dollhouse windows.and if you want to replace the front axle for that international kit.sourkrauts truck models sells replacement front steering axles for 1/25 scale models,and their made out of metal.just in case you want to build that IH.your doing a real nice job on that mack! I wouldn't hide that on the top shelf like you said.i'd put that right where everyone could see it. Quote Link to comment Share on other sites More sharing options...
tbill Posted January 7, 2014 Share Posted January 7, 2014 looks great I think. deserving of a visible spot on the shelf ! if that smudge isn't too bad, you could lightly wet sand it with some fine paper and then put some future on it to bring the gloss back. I have found since returning to building, future will help hide a multitude of sins, lol. Quote Link to comment Share on other sites More sharing options...
Rigzndiesel Posted January 8, 2014 Author Share Posted January 8, 2014 Sean - I wish this was a Pete model to have missing glass. That curve is exactly what I'm thinking about that's gonna be a pain. I'll give the floor wax trick a shot too. I did notice that "ghosting" and almost removed the decal and was considering redoing it. Good tip! Cappy - I will give the clear acetate a shot as I am curious to see how that stuff can work. I'll look into sourkrauts for a couple of steer axles! Thanks Tom - When I smudged the door the primer came through. I then reapplied paint to that area. Let it dry. I did (wet) sand it lightly with a 4000 - 6000 grit paper. I think it's still showing because I used a metal flake paint. When repainting, the metal probably laid differently than the first application. I'll try it again using the floor polish trick. Jeff Quote Link to comment Share on other sites More sharing options...
Old Buckaroo Posted January 8, 2014 Share Posted January 8, 2014 (edited) Sean - I wish this was a Pete model to have missing glass. That curve is exactly what I'm thinking about that's gonna be a pain. Jeff I haven't done any curved semi windshields but a multitude of curved automotive with clear acetate. (Im lazy and hate polishing out scratches) I will use a note-card trimmed roughly to fit on the inside to make a pattern, draw along the inside frame with a mechanical pencil if possible. One the pattern is drawn enlarge it - 3 to 4 mm Is what I start with. Once you have the pattern fitted with a inside lip being big enough for a gluing ridge transfer to the acetate. Here is the secret. "Aleenes Original Tacky Glue" it is a quick drying white glue that will dry clear. Start at a pillar post and work your way around making a small bead with a or little dots by using a toothpick for an aplicator. If you get a little out side of the frame a damp q-tip will clean it off. Once attached you can go back around with same glue and seal all the edges. Don't be discouraged sometimes it takes more then once to get it right Hope that makes sense I forgot - Tamiya tape works really well for holding the windshield in place (center) to get you aligned and started on the glue process. Edited January 8, 2014 by Old Buckaroo Quote Link to comment Share on other sites More sharing options...
Rigzndiesel Posted January 19, 2014 Author Share Posted January 19, 2014 Well, I have slowed on the progress of this build, I am sidelined because of the windshield. My skills are not what they used to be. I decided to repaint the cab. In doing so I destroyed the "G.S. Carter" decals when I stripped the paint off. Funny, I have several of the little window Pete kits and never liked the decals that come with it. When I was searching for a door decal to match, the brwnnblk accented the gold really well. I did like the look of them on this little Mack. Now I'm in search of a set of "G.S. Carter" and "Louisville" decals. In the meantime, I'm debating on whether I should start another build or finish up on one of four stalled builds. Yesterday, I stopped at the local HobbyTown and picked up the Moebius GD trailer...impressive kit!! J Quote Link to comment Share on other sites More sharing options...
alangarber Posted January 20, 2014 Share Posted January 20, 2014 If you still have the leftovers I'd be interested. Sleeper, Roof faring, bull rack ect. Message me Quote Link to comment Share on other sites More sharing options...
Rigzndiesel Posted January 22, 2014 Author Share Posted January 22, 2014 Jeff_ Great looking and I can see lots of love and care and it is Nice that you want to keep things as they should be. Keep Me posted. KEEP ON TRUCKING!!! Quote Link to comment Share on other sites More sharing options...
olsbooks Posted January 22, 2014 Share Posted January 22, 2014 I like it. Another (cheap) option to consider on the windshield. A 2 liter pop bottle. I have used them to recreate busted/missing canopies on airplane models for others in the past. Just have a candle for GENTLE heat and try. Surely are not out anything. The "curve" where the side rolls into the bottom of the bottle might be just about right for the hard curve at the outer edges. Worth a try anyway... Quote Link to comment Share on other sites More sharing options...
Rigzndiesel Posted July 8, 2014 Author Share Posted July 8, 2014 Been working on this gravel trailer that was once a built up. Got it off of Ebay a few months ago. It helped breath new life into this Mack project. I'm telling myself "No new projects" until this one is done - we'll see how long that lasts. Jeff Quote Link to comment Share on other sites More sharing options...
tbill Posted July 8, 2014 Share Posted July 8, 2014 looking good! great looking combo Quote Link to comment Share on other sites More sharing options...
Mackvision Posted July 12, 2014 Share Posted July 12, 2014 Nice work! The MPC DM-600 is in my opinion a VERY good representation of the 1:1 truck,Mack oversaw the development of both the DM-600 an 800 kits to guarantee accuracy and grant licensing............................Mark Quote Link to comment Share on other sites More sharing options...
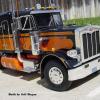
Rigzndiesel Posted July 14, 2014 Author Share Posted July 14, 2014 (edited) Tom - Mark Thanks for the kind words! Neat info on the Mack licensing, wish more truck manufacturers had oversight like Mack to ensure an accurate product. Slow progress on this as the trailer has a few missing parts. Mainly the small stuff that is not seen but I'd like to make it a complete model. Acquired a DM800 Mixer that had a decent windshield and am using it for this build. Here are a couple of recent pics. Comments, critiques welcomed...Jeff Edited July 14, 2014 by Rigzndiesel Quote Link to comment Share on other sites More sharing options...
BigBad Posted July 14, 2014 Share Posted July 14, 2014 That is turning out rather nicely! Good for you on finding the other Mack for that windshield. Looks really nice with the dumper trailer and the color keyed wheels. Good job! Quote Link to comment Share on other sites More sharing options...
purepmd Posted July 15, 2014 Share Posted July 15, 2014 Hey Jeff, GREAT looking model. Very good use of that kit. The green looked good as well, but the gold just flat works. Very well done. Quote Link to comment Share on other sites More sharing options...
angelo7 Posted July 15, 2014 Share Posted July 15, 2014 (edited) Hi Jeff. Thank you for posting your progress in this project and your pictures. I enjoyed it very much. I like your Mack a lot. I built this kit (the Mack DM 600) as a teenager over 30 years ago and I did not like it one bit back then. When I opened the box (in late 70s) I noticed the cab was offset and that was a disappointment for me as I had never seen a truck like this. But in the box art you don't notice that. I hated the truck. So I worked on it anyway but after a few weeks I ended up cutting the back part of the truck and made a wooden box to replicate a trailer and put the rear part of the truck on the wood box and I had a trailer. The cab and all the front part went to the trash can. Fast forward to last year: I bought the reissue kit with a trailer and it is my very best favorite truck right now. Life's ironies! Angel Edited July 16, 2014 by angelo7 Quote Link to comment Share on other sites More sharing options...
Old Buckaroo Posted July 15, 2014 Share Posted July 15, 2014 Great story Angel and even better the truck that won your admiration. Both look fantastic ! Quote Link to comment Share on other sites More sharing options...
Rigzndiesel Posted July 16, 2014 Author Share Posted July 16, 2014 - Robert - thanks for the comments. Now I'll have to find a windshield for the other Mack! - Mark - thanks for the comments. Good to see you back on the board. Anxiously awaiting an update to one of your detailed projects! - Angel - that combo is OUTSTANDING!!! I love the gloss red truck and the matching trailer! That is one beautiful model! I agree with Sean, that is a great story behind your choosing that truck and trailer kit. I first built the Mack over 30 years ago too and it was one of my favorites. I knew the model didn't look anything like the picture on the back page of the instructions but I hadn't seen the movie at the time. I was so impressed with the movable parts and opening doors that I didn't care if it resembled the movie truck. I finally saw the movie when I was in my late 20s. It's a great kit and yours turned out really, really nice!!! Thanks for the comments! - Sean - how goes it? PM sent Here's a recent WIP Quote Link to comment Share on other sites More sharing options...
Guest Posted July 16, 2014 Share Posted July 16, 2014 Nice work Jeff, I like the gold as well Quote Link to comment Share on other sites More sharing options...
Recommended Posts
Join the conversation
You can post now and register later. If you have an account, sign in now to post with your account.
Note: Your post will require moderator approval before it will be visible.