alan barton Posted July 10, 2019 Share Posted July 10, 2019 Really enjoying this build Geoff. The printed discs are sheer genius - I am going to have to try that one on my next build! Cheers Alan Quote Link to comment Share on other sites More sharing options...
zakdoggi Posted July 10, 2019 Author Share Posted July 10, 2019 12 hours ago, afx said: Stance looks great. Thanks JC ? 12 hours ago, alan barton said: Really enjoying this build Geoff. The printed discs are sheer genius - I am going to have to try that one on my next build! Cheers Alan Thanks Alan, Next time I'll use photo paper for the discs as the plain paper became a bit fragile during the detailing process. Otherwise, I like to use photo representations of the real components wherever possible. Keep an eye out for the dashboard unit when I get to it. Cheers...... Geoff Quote Link to comment Share on other sites More sharing options...
zakdoggi Posted July 23, 2019 Author Share Posted July 23, 2019 (edited) At the bench today working on my other project, the Chevy Nova, so got a couple of bits done for the Falcon too. Using photo-reduced images of the Racepak dashboard unit and the MSD ignition module, I glued them to plastic sheet. Pics show finished Racepak unit and the MSD module tops glued onto 5 layers of 0.5mm sheets to make the 2.5 inch scale thickness of the unit. Next session, I'll cut around the edges, then paint the units red and add the wiring harnesses. As always, comments most welcome. Cheers for now...... Geoff Edited July 23, 2019 by zakdoggi Quote Link to comment Share on other sites More sharing options...
zakdoggi Posted August 20, 2019 Author Share Posted August 20, 2019 In my haste to get some primer on the Falcon today, I forgot to wash the resin body and the results are evident!! Darn it! Out with the stripper!! Anyhow, I did manage to paint the fuel cell (made from thick paper card), the chassis plate and get a top coat on the interior. Color is Gloss Antique White USA from a Dulux dura max enamel rattle can. This will be the body color too. At least some more progress while the weather outside is cold and wet ? Cheers..... Geoff Quote Link to comment Share on other sites More sharing options...
zakdoggi Posted August 3, 2020 Author Share Posted August 3, 2020 (edited) Well it's been over 12 months since I last posted and the Kaufman Falcon is still under construction. It's been a rollercoaster ride this past year and finally I have the headspace in this very different world to get back into modeling. In a lockdown situation here in the State of Victoria, Australia. Can't go any further than 5km from home for anything and then only for an hour of shopping or exercise. So, what better way than to pass time at the hobby bench workiing on my projects. Will post some progress pics soon. Cheers......Geoff Edited August 3, 2020 by zakdoggi Quote Link to comment Share on other sites More sharing options...
zakdoggi Posted August 3, 2020 Author Share Posted August 3, 2020 Got some paint on the interior and rollcage. Installed the MSD pack behind seat and wired it in. Added the switch panel and shifter. Note the Racepak dash unit and black shrink tube on the rollcage as padding. Added aluminium tube exhaust ends and fabbed the red fuel cell out of sheet styrene. The straps are black chart tape. Painted the body in Antique White straight from the can. Noticed I've been a bit heavy-handed with the paint in a few spots..... will need to break out the sandpaper once it dries completely. That's it for today guys. As always comments and feedback welcome. Cheers....Geoff Quote Link to comment Share on other sites More sharing options...
afx Posted August 3, 2020 Share Posted August 3, 2020 Nice to see an update on this build. Quote Link to comment Share on other sites More sharing options...
Slotto Posted August 3, 2020 Share Posted August 3, 2020 Man this is a cool build. I've always liked Falcons Quote Link to comment Share on other sites More sharing options...
zakdoggi Posted August 4, 2020 Author Share Posted August 4, 2020 A wet sanding with some 500 grit paper and back into the spray booth for another shot at the top coat. Cheers....Geoff Quote Link to comment Share on other sites More sharing options...
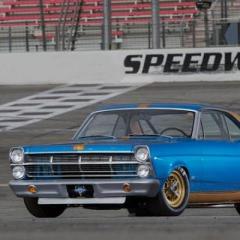
zakdoggi Posted August 9, 2020 Author Share Posted August 9, 2020 (edited) Well I never thought I'd get this close to finishing this one. Mock-up day to check stance and looks. Needs from and rear bumpers, grille and glasshouse to complete. Neasrly there!! Cheers.....Geoff Edited August 9, 2020 by zakdoggi photos Quote Link to comment Share on other sites More sharing options...
afx Posted August 9, 2020 Share Posted August 9, 2020 Stance look real good. Quote Link to comment Share on other sites More sharing options...
Spottedlaurel Posted August 9, 2020 Share Posted August 9, 2020 Looks excellent, very purposeful. Looking back at the first few images and then seeing it now your concept has worked out really well. Quote Link to comment Share on other sites More sharing options...
dino246gt Posted August 9, 2020 Share Posted August 9, 2020 That last rear 3/4 view sure looks cool, great stance! Quote Link to comment Share on other sites More sharing options...
zakdoggi Posted August 10, 2020 Author Share Posted August 10, 2020 Thanks Guys, The NASCAR kit has made this conversion so easy!! Cheers....Geoff Quote Link to comment Share on other sites More sharing options...
zakdoggi Posted August 16, 2020 Author Share Posted August 16, 2020 (edited) Well it's been a rainy day outside which meant some time at the workbench. Everything is done aside from fitting the glasshouse in. I'm using blister pack clear plastic for the side windows (flat) and Pepsi bottle for the front and rear screens (curved). Ecstatic at how the NASCAR kit fitted the resin body shell perfectly like it was made for it. A few imperfections in the paint but hey it all adds to the build. Happy with interior details and the disc brakes and calipers. They really set the wheels off. I think I've done justice to the real car too, even though this was never built as an exact replica but more of a theme. As always, your comments are most welcome. Cheers....Geoff Edited August 16, 2020 by zakdoggi Quote Link to comment Share on other sites More sharing options...
Straightliner59 Posted August 16, 2020 Share Posted August 16, 2020 I love this project! I intend to purchase one of those crappy, old AMT kits, just based on this. Looks great, Geoff! Quote Link to comment Share on other sites More sharing options...
zakdoggi Posted August 16, 2020 Author Share Posted August 16, 2020 17 hours ago, Straightliner59 said: I love this project! I intend to purchase one of those crappy, old AMT kits, just based on this. Looks great, Geoff! Thanks Daniel. Appreciate your comments. Cheers...Geoff Quote Link to comment Share on other sites More sharing options...
zakdoggi Posted August 23, 2020 Author Share Posted August 23, 2020 It's been raining all night and all day so I'm ensconsed away in the cave working on my models. Setting up the glasshouse in the Falcon - front and rear screens and side windows cut from blister packaging for the flat pieces and the side of a Pepsi 2lt bottle for the curved screens. Tacked in place with superglue then a bead of PVA run in to secure all around. Cheers.....Geoff Quote Link to comment Share on other sites More sharing options...
Recommended Posts
Join the conversation
You can post now and register later. If you have an account, sign in now to post with your account.
Note: Your post will require moderator approval before it will be visible.