freightshaker Posted September 5, 2011 Share Posted September 5, 2011 this is coming along really nice. I like the detroit going into it. Quote Link to comment Share on other sites More sharing options...
Kostas Parchas Posted September 6, 2011 Share Posted September 6, 2011 Looking good so far, can't wait to see this beauty completed. Kostas. Quote Link to comment Share on other sites More sharing options...
SpreadAxle Posted September 25, 2011 Author Share Posted September 25, 2011 Originally, I had planned on Winslow stripes for this one. They were 2 tone blue and silver from JBot. I clear coated them as recommended. However, the clear coat made them wrinkle up. All was not lost, though. This set from modeltruckin.com was a surprise included in an ebay purchase of a kit made last year. They are a variation of the Winslow stripes. I will need to repaint the interior Oxblood Red, but I like how they turned out. Even with one or 2 mishaps, I think they turned out nice. A little clean up on the stripes and she'll be ready for the next phase. I am curious, since I will be going with the Oxblood Red interior instead, anyone know of a good color for that? Quote Link to comment Share on other sites More sharing options...
Scalper Posted September 25, 2011 Share Posted September 25, 2011 the stripes look sweet. Quote Link to comment Share on other sites More sharing options...
BigBad Posted September 25, 2011 Share Posted September 25, 2011 (edited) Good choice of colors! Love the stripes. Makes it look like a Laidlaw truck somewhat. Like it a lot. How are the decals reacting installing them on the body? They look pretty neatly done. I just got some similar one from modeltruckin' myself. Do you have to coat them with clearcoat too? Which one? Edited September 25, 2011 by Z06Bob Quote Link to comment Share on other sites More sharing options...
mackinac359 Posted September 25, 2011 Share Posted September 25, 2011 The stripes match the color nicely. Good choice. Tim Quote Link to comment Share on other sites More sharing options...
cowboysevens Posted September 25, 2011 Share Posted September 25, 2011 looking super good ray !! the best color ive found for ox blood red is testers dark red, maybe over a light coat of black whiped away will help with the lil swirly leather pattern. Quote Link to comment Share on other sites More sharing options...
SpreadAxle Posted September 25, 2011 Author Share Posted September 25, 2011 Im really lovin the stripes. I definately need to go find some of them. I cant find them on Modeltruckin, are these before jerry bought the company? It's this set. Item PB-425102 http://modeltruckin.com/store/index.php?main_page=product_info&cPath=2_148&products_id=13 These were made b4 Jerry took over, but he offers them. The hardest part is the section for the side of the sleeper. Everything else went on fairly simple. I didn't clear coat these b4 installing them as I was too afraid after what happened to the original set I had from JBOT. I think these aren't as brittle, although I did have a break or 2. They slide off the paper really nice and are fairly simple to work with. Thanks for the compliments, everyone. Quote Link to comment Share on other sites More sharing options...
69A-CAR Posted September 26, 2011 Share Posted September 26, 2011 Really nice build you have! I have to say i love the stripe too. I have several sets I just got from Jerry, they are great. I personally like to clear over the decals once done, but that really is a personal preference and has alot to do with the paint type you use. Mark Quote Link to comment Share on other sites More sharing options...
SpreadAxle Posted September 26, 2011 Author Share Posted September 26, 2011 I will be clearcoating once decaling is complete. It's just that I was afraid to do it beforehand due to what happened to the last set I had. Quote Link to comment Share on other sites More sharing options...
Jim B Posted September 26, 2011 Share Posted September 26, 2011 Looking good, Ray. I like the red stripes with the silver. Quote Link to comment Share on other sites More sharing options...
SpreadAxle Posted September 28, 2011 Author Share Posted September 28, 2011 This is the oldest project I have going, so I figure I should spend time on it and get it closer to being done. The name on the door should give a hint as to the planned trailer I figure it was time for a mock up, so here it is. A had a few ideas hit me recently and I went with some of them. "Detroit Muscle" I'm not sure if I'm doing the winterfront yet. It's the piece that comes with the Revell AG 359 kit, just ground very thin. As to the bugshield, that's from the Black Widow Peterbilt(Revell AG)kit. I painted it Testors Transparaent Candy Apple Red and added the KFS decals to it. Turned out better than I thought Quote Link to comment Share on other sites More sharing options...
Jim B Posted September 29, 2011 Share Posted September 29, 2011 I'm likeing it so far. Quote Link to comment Share on other sites More sharing options...
truckabilly Posted September 29, 2011 Share Posted September 29, 2011 It is shaping up great. I like the color & stripes combination. And the engine is awesome. Jarda Quote Link to comment Share on other sites More sharing options...
SpreadAxle Posted September 30, 2011 Author Share Posted September 30, 2011 Here's my first real overall mockup so you can see the look I'm going for. I toned down the chrome by stripping and spraying it with Model Master Metalizer Aluminum Plate Buffing Lacquer. I'm going for the look of a truck that's about 5 years old. Taken care of, but driven. It will be slightly weathered(Paint chips, not so shiny chrome, little things like that) I took the Revell AG tank steps and narrowed them. The rear wheels came from the Revell AG Black Widow Pete and were molded in white plastic which was perfect. I added a few goodies. I'm going with a black frame. Trying to weather it in shades. The paint isn't done yet. Here's my grille. The mesh is from Plano Model Products and it's made of Stainless Steel. I believe it's item #210. I'm having trouble preventing the paint from rubbing off during buffing(any advice?). The grille isn't finished yet, just mocked up. I really like how it turned out, even though the grille isn't done yet. This material is really easy to work with, and cuts easily with a pair of scissors. Thanks for looking. Quote Link to comment Share on other sites More sharing options...
clayton Posted September 30, 2011 Share Posted September 30, 2011 Did you sand the primer and the paint after a few coats. I did not do that on a build I'm working on now and having trouble with the paint stick too. I kind of starting over. Quote Link to comment Share on other sites More sharing options...
SpreadAxle Posted October 1, 2011 Author Share Posted October 1, 2011 I usually do sand between coats. I need to do some more snding before coating again. Usually it's no problem, but it seems near the edges, the buffing will rub the paint right down to the plasitc. Quote Link to comment Share on other sites More sharing options...
SpreadAxle Posted October 3, 2011 Author Share Posted October 3, 2011 Starting to look like a truck finally. The engine, tanks and battery boxes are glued in place, everything else is just for the mockup. Still some plumbing to do, but I figure the details can be added easier with a few things already in place. The headlights are by Clint Freeman. I lost the lenses, so they are the fog light lenses from the snap kit I made these light bars from the rear bumper in the Revell AG Pete 359 kit. These represent the spring loaded type. I cut them to length, added the light on the end, and the plate that holds the spring is just scrap plastic. Still quite a few things to do, but I'm going to finish this one up soon. Quote Link to comment Share on other sites More sharing options...
Jim B Posted October 3, 2011 Share Posted October 3, 2011 Looking really nice, Ray. This is one sharp looking Pete! Quote Link to comment Share on other sites More sharing options...
SpreadAxle Posted June 15, 2015 Author Share Posted June 15, 2015 I thought I had updated this one, but I see it's been quite some time. This truck unfortunately had to have it's cab and hood stripped. Jerry at modeltruckin.com came through with some new stripes. They're the same color, just with a silver outline instead of the previous gold. I'll be getting to this one next. Quote Link to comment Share on other sites More sharing options...
SpreadAxle Posted May 30, 2017 Author Share Posted May 30, 2017 (edited) Time to catch this one up a little. This is the truck I am currently building. It's not too far from completion if I can avoid too many more setbacks. I had to strip the paint and start over. The cab is repainted. Same color as before. Dupli Color DSGM347. Here's my progress under the hood. Modified Revell AG 359 radiator scratch built condenser. I'm using another modified snap kit grille. Headlights are from amt. Tee single headlight shown earlier will be used on a California Hauler kit. New deck plates. Edited May 30, 2017 by SpreadAxle changed picture Quote Link to comment Share on other sites More sharing options...
SpreadAxle Posted May 30, 2017 Author Share Posted May 30, 2017 Now for the trailer. I started with this ebay junker and.... ...along with 2 other junked livestock vans created this early 1980s 45 ft livestock van. My references were 1978, 1981, and 1982 Wilson livestock vans that were 46-48 ft long. I modified the rear by replacing the swing doors with a solid wall. As for the roll up door, I made a new one using ribbed sheet plastic to simulate a metal roll up door. I'm using resin 2 hole Budd wheels I bought from a guy on ebay. the hub is a separate piece. I modified the brake drums from an amt Fruehauf tanker to use with these wheels. Quote Link to comment Share on other sites More sharing options...
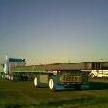
SpreadAxle Posted May 30, 2017 Author Share Posted May 30, 2017 I sprayed the first coat of paint on the trailer today. I can see some more body work will be necessary, but at least it's easier to see what needs to be done as this finish highlights things. I used Model Master Metalizer Aluminum Plate buffing lacquer. Quote Link to comment Share on other sites More sharing options...
DRIPTROIT 71 Posted May 30, 2017 Share Posted May 30, 2017 Looking good! I like the modification on the door! Quote Link to comment Share on other sites More sharing options...
landman Posted May 30, 2017 Share Posted May 30, 2017 Nice work. Love the stripes. Quote Link to comment Share on other sites More sharing options...
Recommended Posts
Join the conversation
You can post now and register later. If you have an account, sign in now to post with your account.
Note: Your post will require moderator approval before it will be visible.