taaron76 Posted May 9, 2015 Share Posted May 9, 2015 Looking good! That's a neat color combo. I did that with my '67 Fastback (Gold/Clear orange) and it turned out cool. Nice job!!! Tim Quote Link to comment Share on other sites More sharing options...
Stray Posted May 9, 2015 Author Share Posted May 9, 2015 Cheers Tim Bet yours didn't have a plethora of specks all over it! How on earth you guys get that liquid smooth and deep as look off the gun I have ZERO IDEA. Quote Link to comment Share on other sites More sharing options...
microwheel Posted May 9, 2015 Share Posted May 9, 2015 Morning Stray, I like the color your going with. As for me, when I work with Tamiya acrylics, to get it to mix- dry- and look right out of the air brush, I always start with mixing the tamiya acrylic 50/50 with denatured alohol, then I apply one or two mist costs, allowing it to dry for about 10 minutes between coats, then I do one medium coat, allow it to dry for another 10 or 15 minutes then a good wet coat. I never have a problem with fisheye with it. I used to when using tamiya or testors acrylic thinner, but never have with denatured alohol that you can get from any hardware store. I still get my share of orange peel but it wet sands out pretty easy after a couple days of gassing out. I also very seldom sand between coats, I usually just do my paint then after 24 hours, I do a my clear coats the same way I do my color coat. Once everything including the clear has gassed out for 2 or 3 days then I wet sand and plosh out with a good hobby wet sanding finishing kit that most hobby stores carry, an then polish with Novus 2. Quote Link to comment Share on other sites More sharing options...
Stray Posted May 10, 2015 Author Share Posted May 10, 2015 Thanks Jim! Is there any concerns with the denaturated alcohol causing delamination? Is it compatible with the acrylic top coat clears from auto spray cans? If you saw the box I use to paint in you would scream... it is why I have so much crud flying around lol. Quote Link to comment Share on other sites More sharing options...
mustang1989 Posted May 19, 2015 Share Posted May 19, 2015 That's a great color there Greg!! I hear you loud and clear on the acquisition of a paint booth. I too fight that same battle! Quote Link to comment Share on other sites More sharing options...
microwheel Posted May 19, 2015 Share Posted May 19, 2015 Thanks Jim! Is there any concerns with the denaturated alcohol causing delamination? Is it compatible with the acrylic top coat clears from auto spray cans? If you saw the box I use to paint in you would scream... it is why I have so much crud flying around lol. As for delamination, havent had it cause me that problem. As for being campatible, why not just use Tamiya's acrylic clear since your using their paint, and it mixes the same as their paint does. I don't use a paint booth either, I just paint in my open room on a stand.. yup lots of fumes during painting, (thats what a mask is for) and overspray everywhere, but thats what I built this room in my garage for anyways, it's a mess just the way a working mans room should be lol. Quote Link to comment Share on other sites More sharing options...
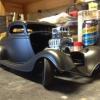
Stray Posted May 20, 2015 Author Share Posted May 20, 2015 WELL... I did what I did. I painted the body, left it for a couple days. Painted the clear and left that for three days. I started the finishing. Began with the 3200 grit in the finishing kit I bought. Keeping the pads wet while rubbing. Used them as recommended. And two days later I have found cracks AGAIN! I am thinking I am just plain cursed. This is pretty silly when you think that I am an airbrush artist and can't even get a decent paintjob on a model car lol Here's a few pics of the crackage. Quote Link to comment Share on other sites More sharing options...
mustang1989 Posted May 20, 2015 Share Posted May 20, 2015 Man Greg. If this were mine I'd let the paint gas out for 7-10 days the next go round. You've come too far to turn back. Hang in there bud. We're all cheerin' for you!! Quote Link to comment Share on other sites More sharing options...
Stray Posted May 20, 2015 Author Share Posted May 20, 2015 lol Joe. At this point I am thinking that since the body is smooth as glass mostly I should just give it a couple coats of Alclad's gloss black and leave it at that! Quote Link to comment Share on other sites More sharing options...
microwheel Posted May 20, 2015 Share Posted May 20, 2015 Greg what are you using for clear coat? Are you using automotive acrylic clear over Tamiya acrylic paints? If so, it may be what is causing it. Some atomotive acrylics dry faster and harder than tamiya acrylics. Aside from that, the only other time I've seen that probem is when I was polishing out a body, I flexed it too much, as I was handling it, during the wet sanding process, causing the paint to crack, but that was usually only in areas where the body could flex alot. If it's a compatibility issue between the tamiya acrylic color coats and a non-tamiya acrylic clear, you can always try clearing it with tamiya acrylic clear the next go round and it should work out fine. Quote Link to comment Share on other sites More sharing options...
Stray Posted May 21, 2015 Author Share Posted May 21, 2015 Hey Jim. I am using a automotive acrylic rattle can clear. Has not been an issue when using it on other stuff. I am going to strip her AGAIN. But I am gonna be shifting house in a few weeks so this build is going to have to be put on hold for now. When I get set up again I will strip and prep and paint again. This time I will just do primer, one colour, clear. Something simple! I think I have done enough work on the rest of her to let the build die completely. So until then I will tinker with the '50 pickup. Thanks for all the follows and look-ins and props and advice folks. I will resurrect this thread when I start the body again. Quote Link to comment Share on other sites More sharing options...
slusher Posted May 21, 2015 Share Posted May 21, 2015 i think your automotive acrylic is your problem..... Quote Link to comment Share on other sites More sharing options...
DeeCee Posted May 21, 2015 Share Posted May 21, 2015 That's the pits mate, but what was the common denominator in the 2 paint jobs? I layer my automotive clear on pretty thick, including having it go milky, and usually only 5 mins after the base coat has dried, and NEVER had it crack on me like that, the only time i had an issue, was a bad can of primer. If it goes milky i hold it under the spot light till it clears up, then throw more paint at it again, this method works on new kits and ones that have been painted a few times before. The only other think i can think of is mixing brands? I only use automotive primer, automotive acrylic base colors, and acrylic clear and pearls aswell. GOOD LUCK next time around mate. Quote Link to comment Share on other sites More sharing options...
Outlaw_Pitbull_0411 Posted May 21, 2015 Share Posted May 21, 2015 I've had paint crack do to temperature increase during the day and decrease at night from it expanding and shrinking Quote Link to comment Share on other sites More sharing options...
Stray Posted May 25, 2015 Author Share Posted May 25, 2015 Thanks for the replies folks. I think it is down to technique. I will try again soon! I do use auto rattlecan primer and clear. And my AutoAir paints are compatible because I have used them on bikes and cars and aluminium panels etc. It has been getting cooler at night5 now that winter is coming (No game of Thrones reference intended ) Live and learn... Quote Link to comment Share on other sites More sharing options...
Dominik Posted May 25, 2015 Share Posted May 25, 2015 Man Greg. If this were mine I'd let the paint gas out for 7-10 days the next go round. You've come too far to turn back. Hang in there bud. We're all cheerin' for you!! agree. perhaps the time between your basic paint and clear cote isn't long enough. I had the same problem couple weeks ago. i figured out, that the several layers of clear cote was to fast successively. though. take your time for the paintjob. Quote Link to comment Share on other sites More sharing options...
tbill Posted May 25, 2015 Share Posted May 25, 2015 I feel your pain, just had to put my 66 chevelle in the pond, ugh, all because I had an orange spot ( smaller than a pin head, but on pale yellow, it really stood out) on the roof, tried to paint the roof again and just made a mess, so, I will try again. We are in the same boat, lol. Quote Link to comment Share on other sites More sharing options...
Recommended Posts
Join the conversation
You can post now and register later. If you have an account, sign in now to post with your account.
Note: Your post will require moderator approval before it will be visible.