
Stray
-
Posts
504 -
Joined
-
Last visited
Content Type
Profiles
Forums
Events
Gallery
Everything posted by Stray
-
 I just lick mine. Sure my paintjobs tend to be crappy. But it tastes sooooooo good.
 -
'50 Chevy
Stray replied to Stray's topic in WIP: Model Trucks: Pickups, Vans, SUVs, Light Commercial
Thanks Joe trying to add an update but the forum is going wonky on me! Not much of an update yet again, still chipping away at different aspects of the build. This is where it's at at the moment: Front end lowered and in place, can't really get any lower! And the pic looks like the front wheel is not centred in the wheel arch but it actually is, just the lens angle makes it look out of whack because it is slightly inset. The rear is lowered with the frame tubbed and c'd. Lowering blocks are used so the springs can maintain their original mounts and position in the relocated frame rails. Door jambs are about done, have still got to mount the hinges inside the body and slot the jambs for them, but it is incredibly tight which is why I have had to split the interior, which is to aid the addition of the roll cage also. -
I built the Firebird as a kid. The body unfortunately got squashed during a move and I eventually took it all apart and turfed the shell and chassis, but kept everything else in spare boxes. Luckily enough, as I have been contacted by someone who needs the parts! So we are trading my parts for some kits of his. I do wish I could have sourced another body myself, as I have fond memories as it was a present from my folks. But if it can help someone else out to finish their build, I am glad to be of help.
-
Jeepers man... your eyesight must be fantastic! I gotta squint to even look at the pics on here, and I have a 32" monitor/tv! Yeah the spare treatment is always a winner. But you are definitely taking it to the next level. Way to go John! Just don't let anyone talk you into doing valve stems
-
This has win written all over it. Very nice build. Congrats.
-
I'm always a fan of old pro streeters. Keep it up bud.
-
Measure twice. Bend once. Measure again. Re-bend. Test fit. Toss out. Hide all sharp objects. Start again. Truth Joe, that looks awesome. Perfect scale and clean fitting. I'm jealous.
-
1950 Chevy pickup
Stray replied to Anderson_15_'s topic in Model Trucks: Pickups, Vans, SUVs, Light Commercial
Ah so THAT's how they're supposed to look! Sweet finish and stance mate. Looks really good. -
'65 Chevelle SS 396 Z-16 (Under Glass 7-July-15)
Stray replied to taaron76's topic in WIP: Model Cars
Looks like you'll just have to build a rotating display base with little LED flood lights to show it off matey She's really looking ace. Clean as and downright sweet. -
A pair of 66 Novas- small update for now on the wagon
Stray replied to microwheel's topic in WIP: Model Cars
Absolutely spiffy work as per usual Jim. These babies are gonna look awesome when you're done. -
Sources for 4 and 6 clyinder engines
Stray replied to 69NovaYenko's topic in General Automotive Talk (Trucks and Cars)
From The Parts Box: The Ford 170 Pursuit 6 cyl Holden (GMH) straight 6, can be from 161ci to 202ci And the 186 X2 version which had twin down draught Strommies An early Offenhauser A 2JZGTE with a rather large turbo And he has 4 versions of the SR20DET -
I have one of those! Gonna get a re-do now that I have alclad and other goodies to do it properly (sorry if I hijacked your thread!)
-
'50 Chevy
Stray replied to Stray's topic in WIP: Model Trucks: Pickups, Vans, SUVs, Light Commercial
Little bit of progress. Still working the door jambs and I have added some styrene to the dash sides to work it into the jambs. Also added a strip to the rear of the dash so the gap is not visible when the windscreen is added, plus giving it something to sit on. Pics: -
Nice and clean bird. Way to go.
-
Nice looking build man.
-
Man that is a really nice and clean build. You made an ugly little half car look good! Well done bud.
-
'71 F-100 Beater
Stray replied to Chuck Most's topic in Model Trucks: Pickups, Vans, SUVs, Light Commercial
Ooooh that's special. Thanks Harry -
You need a woman to go in and clear that out. Sure you will never find anything again, but it will be tidier! lol. You got a decent area man. I know how benchspace can become a premium when you don't have tool caddys and good shelving on hand.
-
is it hard to find these?
-
I've got that box, was given to me buy a friend a long time ago, but the 54 Panel I have is the later street edition. The only Street Demon kit I have is this one
-
'50 Chevy
Stray replied to Stray's topic in WIP: Model Trucks: Pickups, Vans, SUVs, Light Commercial
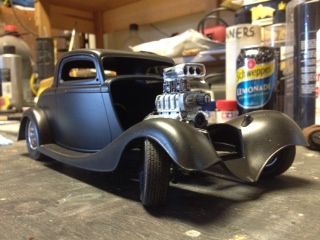
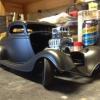
Not much of an update. Mostly just been toying with the suspension and figuring out lowering blocks etc. I have decided to cut the rear panel of the interior off and secure it to the cab. This is because the tub is a pain to get in since I have the filler panels all molded to the cab for a cleaner look. It will be a lot easier to mount the rollbar and interior this way. I hope! I have used sheet styrene to do the door jambs, and some bar for the thicker areas on the sides. Undecided if I will try to concoct some kind of door latch. Didn't REALLY want to go to that kind of detail. Will see where this goes. Also got me a tamiya paint stand! I was the only bidder on ebay, so got the stand, a head magnifier, a desk magnifier and some paint droppers all for the incredibly rich price of 99 cents! WIN. The door frames look rough but thate because i used a skim of putty in them to smooth out. Pics are before sanding. Man my desk is a mess. But it always is. Especially when I am sanding and shaving plastic and making what I need lol. -
I'm hungry for more now.
-
Someone built the car the way they wanted to. Good on 'em I say!
-
tickles?
-
41 Chevy
Stray replied to Hard_2_Handle_454's topic in Model Trucks: Pickups, Vans, SUVs, Light Commercial
Oh that looks great man. What kit is it?