NormL
-
Posts
183 -
Joined
-
Last visited
Content Type
Profiles
Forums
Events
Gallery
Everything posted by NormL
-
Frank! I am beginning to think you are stalking me .... Wait the Frank Rizzo that owns an Atom is out of Portland, OR. Could there be two? I will release it for printing once I have a fully successful print. If the spring storage works there will be two one with and one without. Sometime later this year I may do the panels, nose, tea tray and all of the rest
-
I did click and look at his work, very cool and interesting, but, ... sorry no interest. You can print it yourself though! You need photo's of what you want to model, in a perfect world directly from all angles and then make a model in SketchUp and refine it in Blender. Blender is still free and I am not sure if the free SketchUp has the horsepower. I use laser scanning, so, I haven't actually done this except for some BIM models I did. It does work though. This is a sample I found on YouTube: http://www.youtube.com/watch?feature=player_embedded&v=Z4VtU_bcevc A lot of work, but, once you are done you have a 3D model. Then take it into Blender and give it thickness and real printability. OK, evidently we can only embed two video's per post, so, you have to go oldskool and click the last one ....
-
Yes and no. A lot of the design tools are available free. Many of the designers on Shapeways use the open source Blender to design with and it is a great tool. 3D printing is going to open up a whole new way of doing things, case in point, my wife came to me before Christmas and was complaining that her favorite vacuum for the stairs was broken. Yeah, favorite vacuum, but, I left that alone. I looked at it and determined that the designers had made a shear point, inadvertent or not, at the head articulation point. I grabbed a vernier micrometer measured the stock parts added width where I thought appropriate and ordered a 3D print. My time from determining that I needed to design at part to the completion of the part was 45 minutes. My point is, once you are familiar with 3D design, it does not take long. I had never tried 3D design until this time last year, although I have used many other 3D applications prior. Laser sinter print is the 3D printing that I use the most because of its strength and cost. For most of what I have seen on this site it just does not have the detail for what you guys would like. That means more of a deposition style of printing. Amazing detail at the cost of durablity basically.
-
Yes, basically you can print anything you can model parametrically. At a certain point it does become more cost effective to utilize CNC however. My CNC is a 3 axis, so, undercuts require me to make two parts or more. A lot of detail for a small part is a lot easier to just print. Another thing to think about when printing is part strength and how it is printed, if it is sintered you have to think about the heat and its disapation. A printed stainless steel part through bronze infusion is very strong and so is sintered nylon, but, neither is as stong as the true cast part. As far as how much, to print the car is around $25 plus shipping
-
Yes, you are reading correctly, .... I am trying to print fully functional. It is fairly easy to print parts that snap together, I wanted to try something a little harder. This is a picktar of my car from several years ago. OK, Sumner, WA then
-
Very impressive work!
-
I also did make a very very tiny Atom and it is on Shapeways now "Tiny Atom" I did upscale it and make an HO one too. I just purchased a CNC that can cut a 96" x 48" x 24" item. I am in production of louvered front fenders for an Ariel Atom and have fairings, rear louvered fenders, a hard tonneau and side pods in the works. Ariel allowed me to use their logo on a Christmas ornament for the Holidays. A few more pictars ... The fender was just laid upon the rear tire as I have to take the front suspension apart to install them where they go and the left one had an issue that just got fixed. I show the fenders as they were printed at Shapeways and the molds were cast from the Shapeways print.
-
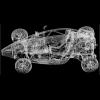
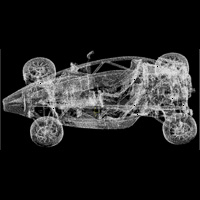
I didn't see a section in a quick look for 3D printing scale models. I find myself doing just that, so, I thought that I would share. I had posted on another forum that was more for diecast models and no one knew what to make of it, ... my bad. Reading on here there are some of you 3D printing already. This actually started several years ago when I did a 3D laser scan of my 2006 Ariel Atom 2. I have found several weird and unusual ways to use the data. I have made a cursor for a Garmin GPS, developed louvered fenders and fairings and used the data to help create a Christmas ornament. I have talked myself into a 1/24th scale version of the frame. The goal is to take the Atom frame, scale it 0.041666666666666666666666 to convert it to 1/24 scale and make it 3D printable. The item to add spice is to make it print in 3D fully functional. My design minimums are wire 1mm dia, surface 0.7mm thickness and most important, minimum gap 0.5mm. That means that the articulation points need to be 1 mm in dia minimum with a 0.5 mm clear gap all around. I have printed and reviewed the first print and I have submitted the re-design for printing. Doin' the Shapeways wait ... Test mule no. 1. 1. Not one of the wheels rotated when I unpacked it. This was just be the printing powder blocking the rotation, I stuck a screw driver on the inside of the brake and was able to giggle all of the wheels into rotation. 2. Steering shaft and mechanism works perfect. A statement for using 1.5mm diameter spars throughout (that's 1.4" real scale) 3. Wheels are very strong. These are the originals modeled ones and not the Team Dynamic's that are on the re-design, but, lesson learned. I can trim more material out of the TD 1.2's to make them look more like stock. 4. Atom frame at 1/24th printed fine with zero issues. Very strong when pinched in between fingers. The tea tray bar printed, but, is very thin. 5. Too much slop in the suspension. The shocks do work, however, all but one do not work with the suspension and I have to use a screw driver. 6. Too much shock deflection. Other than the deflection they work great. I will have to add a receiver shaft to the shock to get rid on the deflection. 7. Steering links to wheels both broke. Need beefy steering 8. Super low profile tires look stupid. Next printing will look better with more normal low profile tires. I have re-designed to some Pegasus off the shelf items 9. Printed tray under seats at 0.7 mm and it is flimsy. Thicken to 1 mm A YouTube video of test mule no. 1 and the suspension, rolling and steering issues Yeah, my YouTube skills are limited by my YouTube patience, ... which is none. No music, no ads and no explanation This is the re-design I will be printing. I have added a energy storing spring, a load, an unload mechanism to the print to see if it is possible. The car was laser scanned with a Leica HDS6200 scanner. The point clouds were turned into solid objects through algorithms in a software package called Cyclone. These objects were imported through AutoCad into Autodesk Inventor where the modeling was actually done. Going from a point cloud to a parametric object can be very time consuming. My scanners were designed to capture buildings and are really to large scale for cars. The net effect is I have more point scatter than a smaller scale scanner and it makes making the parametric surfaces more difficult, not impossible just more difficult. I have surfaces for the nose and hood behind the driver, but, they are jagged as I have never turned them into true surfaces. At 1/24th scale you would never see it, but, at real scale you do. Since the model is really just for parts design work and I just need to know where the stock stuff is, it works fine for me.