NormL
-
Posts
183 -
Joined
-
Last visited
Content Type
Profiles
Forums
Events
Gallery
Everything posted by NormL
-
Well it is time for a paradigm shift in philosophy. So far, I have printed "en bloc" as a fully functioning unit. It came out cooler than I ever thought it would, but, the material it is printed in is to hard to work with. Impressive as a printed object, but, in the end that is what it is. After looking at the superb detail available with the FUD material from Shapeways as demonstrated in these pictars .. I want to print it in FUD... A big thank you to Bernard Kron for the pictures I can't seem to take. Another big thank you to Bernard for his review and assessments of the prints. I asked Bernard to look at the prints for painting and/or finishing purposes. Basically, because I know nothing about painting model cars having only painted 1:1 in the last thirty years. The good of the project so far: 1. Wheels rotate, suspension and steering works 2. Print is very strong and takes a 1:1 human foot before considerable damage is done 3. A printed engine storage system that is so very close to working, So close I am calling it a success and I am just tired of printing it. 4. Flexibility of the material was fun to design to. 5. Printed as a fully functioning unit, no assembly other than tires 6. An outstanding desk ornament! The bad: 1. Material does not sand, is porous and is very very hard to bring to a surface that can take paint. 2. Suspension joints and steering system are inaccurate so that they could be printed with articulation. 3. WSF minimums made the gaps for articulation huge 4. Really really hard to paint a fully assembled model. 5. Detail is not good when compared to FUD 6. Printer leaves orientation marks With all that said, I am going to reconfigure the print for detail and for FUD printing. The detail of the stupid little jack is hard to believe when it is sitting in your hand and it too is fully functional! This will mean that I will have to rebuild the suspension, the steering, wheels and hubs. After many conversations with Bernard I realize there is merit to something that is not just an engineering exercise. I am talking about printing the model as a kit or a pile of parts, as many as I can cram into the printing box, tub, seats, cowls and the engine and transmission. I am going to work towards a strength and gap test piece in the next few weeks. The next model will focus on accuracy and sacrifice articulation, ... OK, that was hard to type. Yeah, it has occurred to me that I could print a working engine in FUD, pistons, rods, crank the works in 1:24, ... Must stop thinking this direction. OK, I will get it all out, I could print so the seat brackets are adjustable, the engine rotates (although that would be lost on the completed model), the steering works, the hood and cowl can be removed, the wheels rotate and still maintain accuracy with FUD. Suspension will not happen because you can print FUD to be flexible, but, it stress fractures very easily (springs would break) Bernard turned me onto scale hardware and I am thinking that I will try the first print to accept bolts in the flanges so that the wheels will be bolted on. I may not have the flange depth for this, we will see. I need to find a Cobalt SS engine locally to laser scan for modeling. If it is at a junk yard, I want to scan a couple of other engines for modeling too, if they will let me. I would love a VW V10 diesel, but, they are kind of rare, might have to settle for a Cummins as I like those too. I am actually excited about making a "kit" for the Atom in FUD. It will not be cheap, I am thinking that by the time I have all of the panels, seats and other parts done it will be right around four times the cost of the current print. I was also thinking of printing a "pole" of bearing material that would be driven into the bearing areas for an even tighter gap control on the suspension joints. Bernard has the jack that was printed and has a legitimate concern about will painting the jack fill the bearing areas and stop articulation.
-
OK, Pat was correct they do not have the luster you guys modeling would want. They will actually work for what I want though. I will probably re-print the Atom badge in a deposit style in the future so that it is smooth and chromes better. The high heat plastic for the Scarab came out with a radial pattern caused by the curve I put in the mounting. Deposit style would not work for this application, ... melted puddle kind of issue. Not hating it so far, we will see when it is on the car. I took some strapping tape and did a quick mount on the Treg. Lesson's learned. Laser sintered nylon is too rough and porous for chroming. A better choice would have been a deposit or extrusion style printer. Does it work as a car badge, well yes, but, a deposit style would have yielded a better product. Not bad for raising a photo in 3D though ....
-
Alumide does not have enough aluminum to polish (obviously), it does raise the heat capability quite a bit
-
Speaking as someone that has owned and used laser scanners since 2002, I think you should go from full sized to scale size otherwise you are multiplying the errors of the smaller scale.
-
A red frame would make the other details appear to be floating inside, ... that could be kind of cool
-
My guess is that green would stand out. During laser scanning our green lasers can't see red and our red lasers can't see green
-
3-D Printing is now affordable
NormL replied to Darren B's topic in General Automotive Talk (Trucks and Cars)
You have heard of the iWatch haven't you? Dick Tracy -
3-D Printing is now affordable
NormL replied to Darren B's topic in General Automotive Talk (Trucks and Cars)
Glad you changed the link, the first one had me confused to say the least -
Does anybody know if there is a Cobalt SS LSJ 2.0 engine that is already available that I could place in this frame? How about Recaro seats, although the Atom ones were special narrow ones?
-
Very very impressive
-
Very cool. Great coverage
-
Thanks Ben, I got it done between gluing sessions. I thickened it and modified it where I thought would be necessary. I am concerned that the main holder spar will need some gusseting, but, I want to print one to test.
-
This morning before heading into the garage I got side lined making some new 1/24th garage stuff. Got the individual wheel lifts done, the lock should work and they should slide correctly and of course the casters should spin and the wheels should rotate. Need to finish the holder.
-
I think the best way to see how I handled the tolerances, is to download the jack pdf on page 4. You can turn off and on various components and see how it was handled to make it actually work. I did it in Inventor which is very similar to Solid Works as they are both designed for this type of work. Each material has a minimum gap that must be maintained. The jack 's gaps are well over this number stated by Shapeways. I did this as on the Shapeways forums is was stated that you actually needed more with their FUD material. For a couple of hours of work, the jack is just cool (yeah, I am happy with myself on this one)
-
If you are speaking of 1:1 prints, yes each fender print was costing me in excess of $600. That is why I bought a CNC. These little prints that I show here don't cost much
-
Skip, I was being somebody that wanted to print all at once and see if I could make movement. That worked awesome and I learned a few new things doing it. Had some fun and I think the car as it is now can be great for what it is a static print that moves. I have to think that the jack would be painful at best to paint, but, jacks are all spray painted the same color from the factory so maybe not. Maybe when i come back to this and make the non moveable accurate version I should sprue it. Good point
-
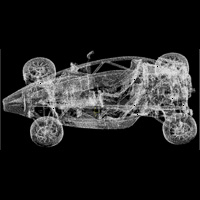
The 1/24th scale Atom frame is done. It now has working suspension, the ability to roll and working steering. The energy spring is still not functional, OK it works, but, the release mechanism is not achievable and there is still too much binding between shafts. I am going to be completely absorbed with work and movement on some full sized CNC's and prints, so, I am done with this for a while. If I come back to it I will finish the spring and add body panels to a non-functional accurate portrayal of the car. I will place just the working frame up on Shapeways in the next little bit. There will be a version for the way I did it with Pegasus tires (1601's and 1603's) and a version with printed (hard) tires. These are not something to give a child as they will break, they are for adult children.
-
Got the new prints today and sorry, ... the jack is way cooler than the Atom. This thing is just so small and all the wheels rotate and the the back ones spin and it go up and down and it holds the car up and my thumb is at least eight times its size.
-
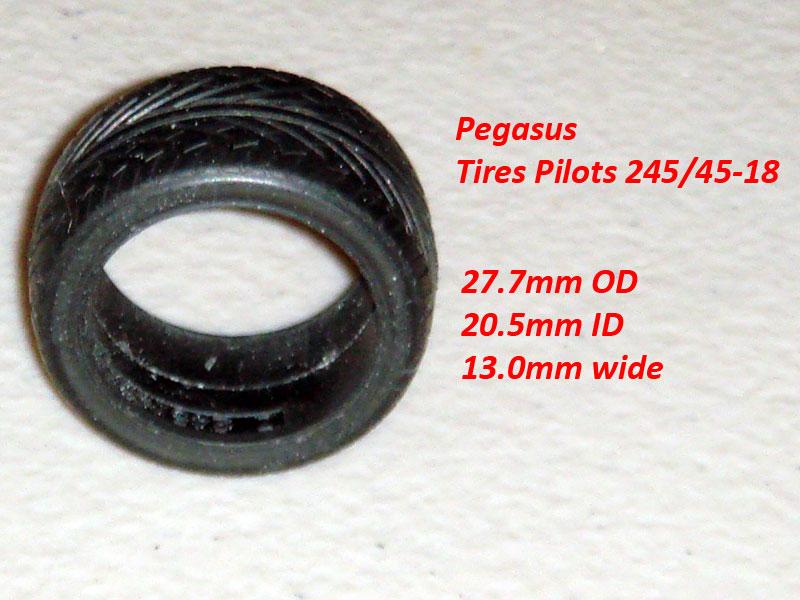
Erik, let me re-post here and I will re-direct people from my thread, unless Harry wants to just delete it. These four are from Pegasus.... #1277 http://pegasushobbie...oduct_info.html"Hella's" Chrome 24.5mm OD 20.3mm ID 11.4mm wide #1601 Tires S02's 225/50-16 26.0mm OD 19.1mm ID 11.7mm wide #1603 Tires Pilots 245/45-18 27.7mm OD 20.5mm ID 13.0mm wide. Note these are not showing on their website any longer They are out of stock and having issues with re-stock #2305 http://pegasushobbie...oduct_info.html"Holli's" 23" Chrome 28.5mm OD, 23.35mm ID, 12.35mm wide

-
WOW, just wow
-
OK, cool! Did a trip around Google, very nice stuff. I kind of got caught in that loop of, OK that's cool, ...now how much for the next step and how cool is that? I can tell that you like the old fashioned way as it was your Caterham I was referring too.
-
Thank you Rob and your statement has made me think a lot. The future of scale modeling, maybe, one possible future. I have been watching several threads from your best scratch builders and have been very impressed. They have a very unique skill set and the skill set to print an alternative to what they are fabricating is also a very unique skill set. I don't see their skill set not being utilized because someone can now print something similar. I see merit and pleasure in looking at and reviewing both. The best outcome will materialize from utilizing both. As I think we all know, printing is not pushing a button as you do have to understand fit, constraints and the 3D mathematics to get there. Yes, there are programs that make it a lot easier, but, that does take time. We can all assume that the programs and printers will get better and are frankly amazing where they are now. Don't think that a CNC home lathe or mill is not going to show up some time either. I look at the Caterham posted in a different thread and am stunned by what can be scratch built, is the awe caused by the ability of someone being able to do that going anywhere? er, ... no.
-
The third print is ordered! Now the two week wait begins .... February 8th
-
I added a girdle for the shafts and did not add a third shaft last night. The complexity of the third shaft is something to be avoided when the goal is a proof of concept, well at least that is what I talked myself into. The two shafts are actually three and I need to go back in and make sure that I have left enough "walking" room so the shafts can give the gears the full room of right and left travel that they need. I didn't want to check it right after I did it as I would not catch something stupid right in my face that a day's wait would make obvious. I also added outer drive shaft support to reduce gear binding that is occurring on test mule 2
-
I guess my post is mis-leading. The GT 40 is about a foot long