
NormL
-
Posts
183 -
Joined
-
Last visited
Content Type
Profiles
Forums
Events
Gallery
Everything posted by NormL
-
Well I see that it has been 4.5 years since I posted, LOL. I bought some 3D printers and have learned the hard way what can go wrong. I bought an AON M to print full scale fenders and fairings and have learned that big prints are very much harder than little ones. It is FDM and has an 18" x 18" x 25" print area along with two other FDM's for smaller work. I see that the Form 3 has finally been released and I need one of them as well. When I got the large printer, all effort went into learning and then making large objects, so, the Atom model was sidelined. When I get an SLA (the Form 3) I will circle back to the Atom model. Until then, here is a 1/256th scale Ariel Atom printed using sintered stainless steel I also made some Minions I had to make a filament lifting machine to get the big rolls of filament (10kg) to work
-
See a bunch of these around nowa days
NormL replied to Greg Myers's topic in General Automotive Talk (Trucks and Cars)
Actually they were designed specifically as a road AND track car. Only the SRA Atoms are track only. The very earliest Atom's had turn signals, lights, brake lights and seatbelts. They are a absolute hoot to drive and driven calmly, they are very reminisent of old time wind in your hair sports cars of days gone by -
What no carbon fiber front fenders? Just stunning!
-
I check in with this build every once in a while and all I can say is I am staggered! The ingenious ways that I see you create parts. My eyes are still ringing with reading that you made your own worm gears for the hose clamps ... I get the feeling that if I left you alone with some iron ore, bauxite, nylon and rubber, I would come back to a completed car and not be surprised if it could run
-
Skip, the 3.5R is the European Turbo, the US one is the 3S http://www.arielatom.com/buy-an-atom/ariel-atom-3s/atom-3s-options
-
Yes, the printing straight to mold is a concept we have been waiting for. You still have to do some post printing work especially for composite casting though
-
Things are about to get really interesting ... Shapeways is reviewing FULL color plastic printing. Yes, drape a jpg on your model and print it with finer colors than you can paint, er ... well most of you. Will there be draw backs, sure, but the concept is totally awesome. Can't wait to play with this! They have had full color sand stone, but, it is brittle and the design rules don't give you room for detail, but, this stuff has the same design rules as the plastic I usually use of theirs, WSF I will be able to drape my little HO Atom's for full color and make the 1/24th snap together full painted with moving steering, suspension and rolling. Making the seats slide is still a little much, but, it is still on the list Current draw backs that I am aware of, rough texture, no true black and no shinyness
-
OK, I am getting back on track to finish this project, sorry it is taking so long. I have gone back in and added a lot of detail to the model enough so that I feel 1/43 and 1/87 are good to go, although neither of those scales as a kit. I have learned a lot by making snap together surveying models since I posted last. I decided that I wanted a stainless steel key fob for myself and a gold plated brass pendant for my wife. I got both of them today and they a fabulous!! Pictured with some miniature candy, my thumb is wider ... #D printed stainless and 3D printed gold plated brass The 1/24th scale kit is still a ways off as I want to add a lot of detail The gold one is gold plated brass that is first printed in wax and then through the lost wax process converted to brass (I have been meaning to look into what that means just haven't). The silver looking one is Shapeways Polished Nickel stainless steel, which is a two stage process of layer printing of stainless and glue that is later infused with bronze. Stainless is approximately 70% stainless and 30% bronze when done. The stainless prints that I have all have a slightly rough texture about them, but, the close ups make it look far worse than it is. Look at the one with the pen. The stainless one is very robust and I will be using it with no reservations as a key fob. The brass one is much more robust than I expected, but, I don't believe that a brass fob would work myself. The brass one is heavier than I expected and I was informed that it is a bit heavy for a pendant. The stainless one is just slightly heavier Better said, ... the silver one is from their stainless steel print (there are like 8 different options) and they are all going to be a little pitted looking up close, they are cheaper and stronger. The gold one is from their semi precious metal collection and because they are made like jewelery they do look better, the trade off will be strength. They have some silver options in their semi precious and their precious metals
-
I know I am very tardy with any updates on the Atom model, but, in the interim I want to share some pictures fro the SurveyorConnect website. Nate Drummond did an awesome job painting the laser sintered plastic (these are not the detail plastic ones) surveying instruments The large one is 1/4th scale and the small ones are 1/6th scale. http://surveyorconnect.com/index.php?mode=thread&id=256600
-
Always impressed with your ability to look at an object you want to mimic and the creative way that you create it. Obviously you look at things from a place of a huge skill set, but, do you ever just have to "think on it"?
-
Very impressive!
-
3D printing growing as we speak
NormL replied to bbowser's topic in General Automotive Talk (Trucks and Cars)
Yes, it is a surface file that you download. You can cut it however you want and then just make sure it is a water tight solid and export again. An stl is a standard print file and does NOT contain the model as a mathematical version, only a surface TIN (triangular irregular network) -
3D printing growing as we speak
NormL replied to bbowser's topic in General Automotive Talk (Trucks and Cars)
David, good to hear I am not the only doing this! I do use lofting, but, not as much as you might think. Lofting is a great tool, but, as you probably know it can have its dark side when you try to find that little reason it won't allow you to do what you want. I am a land surveyor by trade so I have some very awesome geometry programs and will find the basic geometric shapes that must have been the original design and extrude them fillet and chamfer from there. This works great for manufacturing shapes, however, there for fender curves and shapes like that, RapidForm or finding splines and lofting works the best That Porsche is a nice little model of course, good detail that the prints I have seen don't really demonstrate: I uploaded it at 1/25th scale to Shapeways just to see the cost of a solid design like that. $256 in WSF and $1205 in FUD. Might want to plan on hollowing it out if you are going to print this, LOL. The stl as downloaded is full size -
3D printing growing as we speak
NormL replied to bbowser's topic in General Automotive Talk (Trucks and Cars)
It is not that hard to figure the difference. 1/25th to 1/8th is 3.125 numerically, so it is 3.125 x 3.125 x 3.125 in volume or 30.5 times the volume = cost -
3D printing growing as we speak
NormL replied to bbowser's topic in General Automotive Talk (Trucks and Cars)
You are spot on, however there is a third option that I have used and that is just to take the scan and grab a few points, if I can see how the geometry has to be, and make the geometry by hand. I actually do a lot of that now as i find it the fastest way to the end in many cases -
3D printing growing as we speak
NormL replied to bbowser's topic in General Automotive Talk (Trucks and Cars)
I am a little curious why you would want to go from 1/25th to 1/8th? Seems backwards to me, well at least to the way I work. Going scale backwards will dramatically increase your error too. Regardless, you need to make a parametric model of what was scanned and that is where the rubber meets the road. Yes, you can print directly from scans and I have done it, but, mesh triangle count gets enormous just for the smallest anything. If you keep your detail at a level that you find acceptable your file will start getting unmanageable and I use some very bad to the bone machines. So really, you need to think about making the mathematical model of the scanned part and that is parametric modeling. It involves very special programs and takes a lot of time to be good at. I did see that one of the small scanners can be had with RapidForm and that is an awesome program for creating parametrics from scan data. I am anxiously watching this unfold, as I purchased my first scanner in 2002 at a very ridiculous price point and have been involved ever since. It shot a 40°x40° window for 350 feet and had very noisy data. I am curious most for where the level of average expertise in 3D modeling will fall. I know it will not be zero, as nothing will get printed, but, where will it be? -
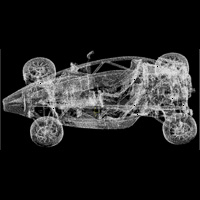
Thank you for your kind comments. You are 100% on the texture issue. I will release this as a combination detail and sinter plastic model because of this issue. I am planning on the hood, cowl and deck lids all being detail and the frame and suspension being sinter. It will be a while before I cut it into trees and make printable blobs. Since so many parts will look alike I feel I will have to place each corner on its own tree anyway. Model builders that actually build one can tell me if I was right on my choices. The design standards are so close for the two, I am doing a worst case design that way every item will be available in both plastics. My personal desk version will be 100% sinter as stuff will fall on it and customers will play with it, so, I just want strength. A desk is a very dangerous place for a model. I knew if I let this sit for a while I could think of a way out of my self made suspension issue. I think I have it and am going to dive back in. I have been asked for the model to do CFD analysis for some up coming after market wings. In order to use my model for this I need to finish the 1/24th scale to have all of the car parts. Cool stuff. I so want to do full scale side pods, more like Indy than F1, soon. I have now printed two metal objects to get my feet wet. I did a stainless steel key fob that is nothing more than a 3mm raise of a 2D logo with filleted edges. Regardless of the simple design the product is fantastic. The sharp edges are truly sharp and the round edges are truly round with no evidence of stepping. This is also true of the gold plated brass that I printed for my wife. It was also a simple design printed right to the minimums. Both came out great. The stainless print is heavily pitted as expected though
-
Inspirational! I want to go back to my project now. Such cool work, I like that you are making it your own and not a specific vehicle. "7's" vary so much in real life
-
I received my 1/6th scale Christmas ornaments I am doing of some surveying instruments. As content they have no reflection on the Atom model, but, as an exercise in printing separate and functional they do. I am designing the Atom to be printed as sinter or deposit and using the combine design standards. I am doing this for two reasons, cost and detail. Sinter is way cheaper and does not have the detail of deposit. The laser sinter does not really lose that much detail. The cost difference will be quite large for something on the scale of an entire kit. They will still be separate models as the flexibility of the sinter lets you snap together parts that just are not possible with deposit. These are sinter versions of the models shown in deposit above. I made them snap together mini kits. I already snapped the bottom on the T3 before I remembered that I am dying these, but, it is almost all green anyway. The one side, visible in the photos, of the scope portion of the Geodimeter does have print stepping on it. That is caused by the orientation when printing. It is the only faces to show it as the other side is fine. These are the dyed versions and they are so awesome! I dyed them last night, which is right at the limit of my artistic abilities. I managed to smudge black dye on the eye piece of the Geodimeter, which means that I will probably re-boil the color off and do it again soon. One thing though, ... I created a green Christmas ornament. Yeah, a green Christmas ornament. What was I thinking? The bases and scopes turn as designed and the side knobs on the Geod work great. Very happy with them, I just need to place some advertising on them and give them out to clients. It occurs to me that I could very easily print these with open scopes and holes in the bottom for a Christmas bulb. Yeah, that is going too far ... It is not up to the painting standards I have seen on this site, but, neither am I
-
If I wasn't convinced before I am now. The bracket cannot match stock as it would print too thin, so, this is a version of it that can print. The stock arm does have knobs on the end and the metal it bolts too is very thin.
-
WOW, that is big! Sooo cool
-
Thanks for the kind words I knew a compromise might be coming and it is here. This is the smallest I feel that I can get a ball joint for the suspension arms. This is way blown up and it is not as bad as the blown up picture makes it look. The ball on the end of the arm is 1.5 mm in diameter. I know that when it is printed that the points on the "cup" will melt back as they cannot exist that thin, so, I am making an educated guess on how much cup will be left to snap into. Another choice would be to model something that looks a little closer to the actual joint and make it a glue in peg. That is not going to look that good either as I will be compromised by the minimum printing width surrounding the mounting hole. I am leaning towards the ball joint as it is really only 1 mm total in width bigger and the same in the other two dimensions. There are limitations on how small I can go with non NASA printers. There is always printing everything in the right spot without gaps for movement, I guess. I could make the joints look great in that case. Printed "enblock" will make it very hard to paint, but, the most accurate. So that is the decision, suspension accurate and all at once or snap in and blob joints ... When I put it that way, I guess enblock is the answer.
-
People in Seattle don't know that we had a Stanley Cup Champion, I would be surprised if anyone else knew. We keep hoping for a team!
-
Masochistic is closer ... Seriously, it is more engineering than artistic, although both are fair comments. Think of drawing something in CAD and then raising it into 3D, once you have it in 3D then you can do 3D stuff to it, but, most of what I do starts as 2D. Well unless I am working from a laser scan, .. and that is a whole new level of complicated. Yes, there are people that will draw products and make them print ready, but, I am guessing that would be cost prohibitive for anything complex. Once you have the hang of it, it is fun. From ground zero to fully functional would be a little while though (I am thinking a minimum of a year). I started with a full 3D laser scanning background and I learn something new every day. As I said, I enjoy the challenge of can I do this, "insert some pointless objective that is hard" and then I try to achieve it. I have been successful more than I have failed and have learned a lot on the journey. I use Inventor as my main program, but, I do like a freeware called Blender and it is fully capable This is a great example of a pointless objective ... I did some GPS at a local race track and had the crew GPS the edge with a truck mounted pole hung out at the edge of the track and set to sample every 25 feet. They drove both edges and recorded the track position. I then took public aerial lidar information for the ground around the track and supplemented the data. This gave me the track and the topography for the track area. I then had the brilliant idea to place the track in 3D on a cell phone case. Let's just say there were a lot of hurdles on that one. I got this ... Yes, that is silly!! The topography matched the lidar so well I had to cut ditches that don't actually exist to highlight the track I also got the bug to design and print my own gear shift knob for the Atom and printed the one in the middle The one on the left is my lit flameball knob and the one on the right is the stock one. I also printed a Seahawk's phone case for myself and can't wait for it to arrive. Until then, I did print one for Seattle's only Stanley Cup winner. I will look to Tamiya for seats, thanks
-
OK, I am back and working towards a more traditional model. I was looking at my printing limitations and I still thinking that I can have working suspension, steering and rolling with clever design and not limit the authenticity. I did dye one of the frames black and it is very cool It is much darker in person. Most of the suspension is right at 1 mm in diameter, which happens to be my minimum sprue size. I am thinking the sprue size is going to have to be at least 1.5 mm to add some measure of rigidity to the print. Snap in ball joints for articulation and keeping the glue points as far as possible from the action. One of my big issues is going to be complexity, I do not want to make a manual, so, I want to sprue the parts for a part with it. Does anybody know of any 1/24th scale Recaro's