
Belugawrx
-
Posts
6,165 -
Joined
-
Last visited
Content Type
Profiles
Forums
Events
Gallery
Everything posted by Belugawrx
-
I agree! Steve your paint looks right on!! Cheers
-
Hate,... when I do that
-
Stan that is looking great!! Love the engine your putting in there, Is that clear red over chrome on the covers,..... Looks Great!! Just one thing.. and not to..offend,.. drill out the steering wheel spokes Lookin' good brother Cheers
-
Very Sweet!!!! That engine came out fantastic! Wait a m Paint and finish is extremely nice Kudos my brother Cheers
-
Very Very Nice Model And PICS Very well done sir Cheers
-
That is looking great !! Nice masking job Great engine!! Cheers
-
Finally got this one into paint and clear!! Colour is Duplicolor Dark Cherry Metallic Into the polishing shop in a couple of days..... And the power comes from Dale Jr's Monte Carlo! Q's, C's, and C's welcome. Cheers Little weathering and plumbing left to do on that one...
-
Stooges
Belugawrx replied to flint1962's topic in Model Trucks: Pickups, Vans, SUVs, Light Commercial
Love the STOOGES Great delivery Why i Oughtta Cheers -
Still lovin' that front hood Lightning show!! Cheers
-
American Pickers VW
Belugawrx replied to Dufasdave's topic in Model Trucks: Pickups, Vans, SUVs, Light Commercial
Love it!!! -
Sweet Aqua on top,...... of course Cheers
-
My Driveway Tomorrow How Much??
-
|WWWWWHHOOOO|AAAAAAAAAAWWWWWWHHHHHH
-
Cool I shot a round of golf thru that this am.!! great workbench brother truck is comin' along great! Dont get frustrated with that one it is extremely difficult!! Cheers
-
Mixed up some Milliput to anchor the body side hinge,... Drying right now Got a little over zealous on the intake carve, had to build it back in,... Q's C's + C's welcome Cheers
-
???
-
'58 Bonneville Hardtop Back on the Bench! 3/20/18
Belugawrx replied to John Goschke's topic in WIP: Model Cars
Cool mod Got a tutorial on the drip trim ? Cheers -
at least he's cross cutting!!
-
uhhyep
-
Was that expensive!?!
-
Too many projects going on.
Belugawrx replied to Ramfins59's topic in General Automotive Talk (Trucks and Cars)
I kept looking at my current? project, stuck,.. for so long, I put it away, .... and started,... and finished a less complicated, but detailed build Bing Bang Boom! Went back to the previous build, and knocked out the problem fairly quickly (for me), And now moving on,... SQUIRREL That '62 Tbird is looking at me!! -
That is lololow!! I'm seein' sparks already Cool Cheers
-
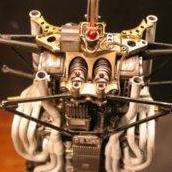
Ok .... Back at 'er... (had to build that dirtbike) Had a flurry of activity tonight,.. Dove in and got those doors hinged,..! they actually open and... close!! MILESTONE Needed to dremel out the under dash panels.. I used a red plastic wrapped paper clip and 2mm (1/16") o.d. aluminium tube.. trial and error pic.. the loop needs to be approx. 7mm o.d. (1/4"(for the other old school Canadian carpenters out there)) and I left the door side shorter to be able to take the doors off for paint and polish... Started on the engine and so far so good,.. lots of reference pics on Google,... TG... This is not a north american engine!!??? Had to make something to make that engine bay just that much more cramped!! I've been itchin' to paint this for a couple weeks!!.... but I'm glad I didn't. There is a lot left to do before then Q's,C's+C's welome!, and right now, needed... Cheers
-
Hey Now.... That's Real Nice Everything about that I like I need to get one!!!! Well done Sir
-
Another outstanding build Sir!! Great pics too! Gotta Love the Speedster Cheers