harti20
-
Posts
269 -
Joined
-
Last visited
Content Type
Profiles
Forums
Events
Gallery
Everything posted by harti20
-
Hi all Long time no progress on this one. That was caused by a complete lack of motivation in the first place. Then, when motivation started to come back, I decided to clear coat the body parts. Right after applying the clear I had the impression that I had quite a few spots where the airbrush had sprinkled some heavy drops on. But after closer inspection I noticed that they haven't been bent outwards, but looked more like small dents. I guess there must have been some oily residue from the compressor coming through the airbrush, contaminating the clear So I decided to vent the air tank of my compressor once again, something I haven't done for a few years now. While venting it, there suddenly was a loud bang and some parts of the compressor flying through the room. So I first had to get that fixed to be able to continue...

-
 I'm having this issue as well. It's now 8:01 pm in Central European Standard Time. I just wanted to reply to a topic of mine where I haven't posted anything for a few months now. Just in case it might help investigate further: I'm on a Mac, running macOS 15.2 Sequoia, using Opera V116.0. Edit 8:08 pm Central European Standard Time: I deleted most of my initial text in the reply in my topic, trying whether I could post it piece by piece. When I hit "Save" the part of the text I didn't delete and the pictures have been posted 8:05 pm). When I now try to edit the post to re-enter the text I get an error message saying "This comment can no longer be edited. It may have been moved or deleted, or too much time may have passed since it was posted for it to be edited."
 -
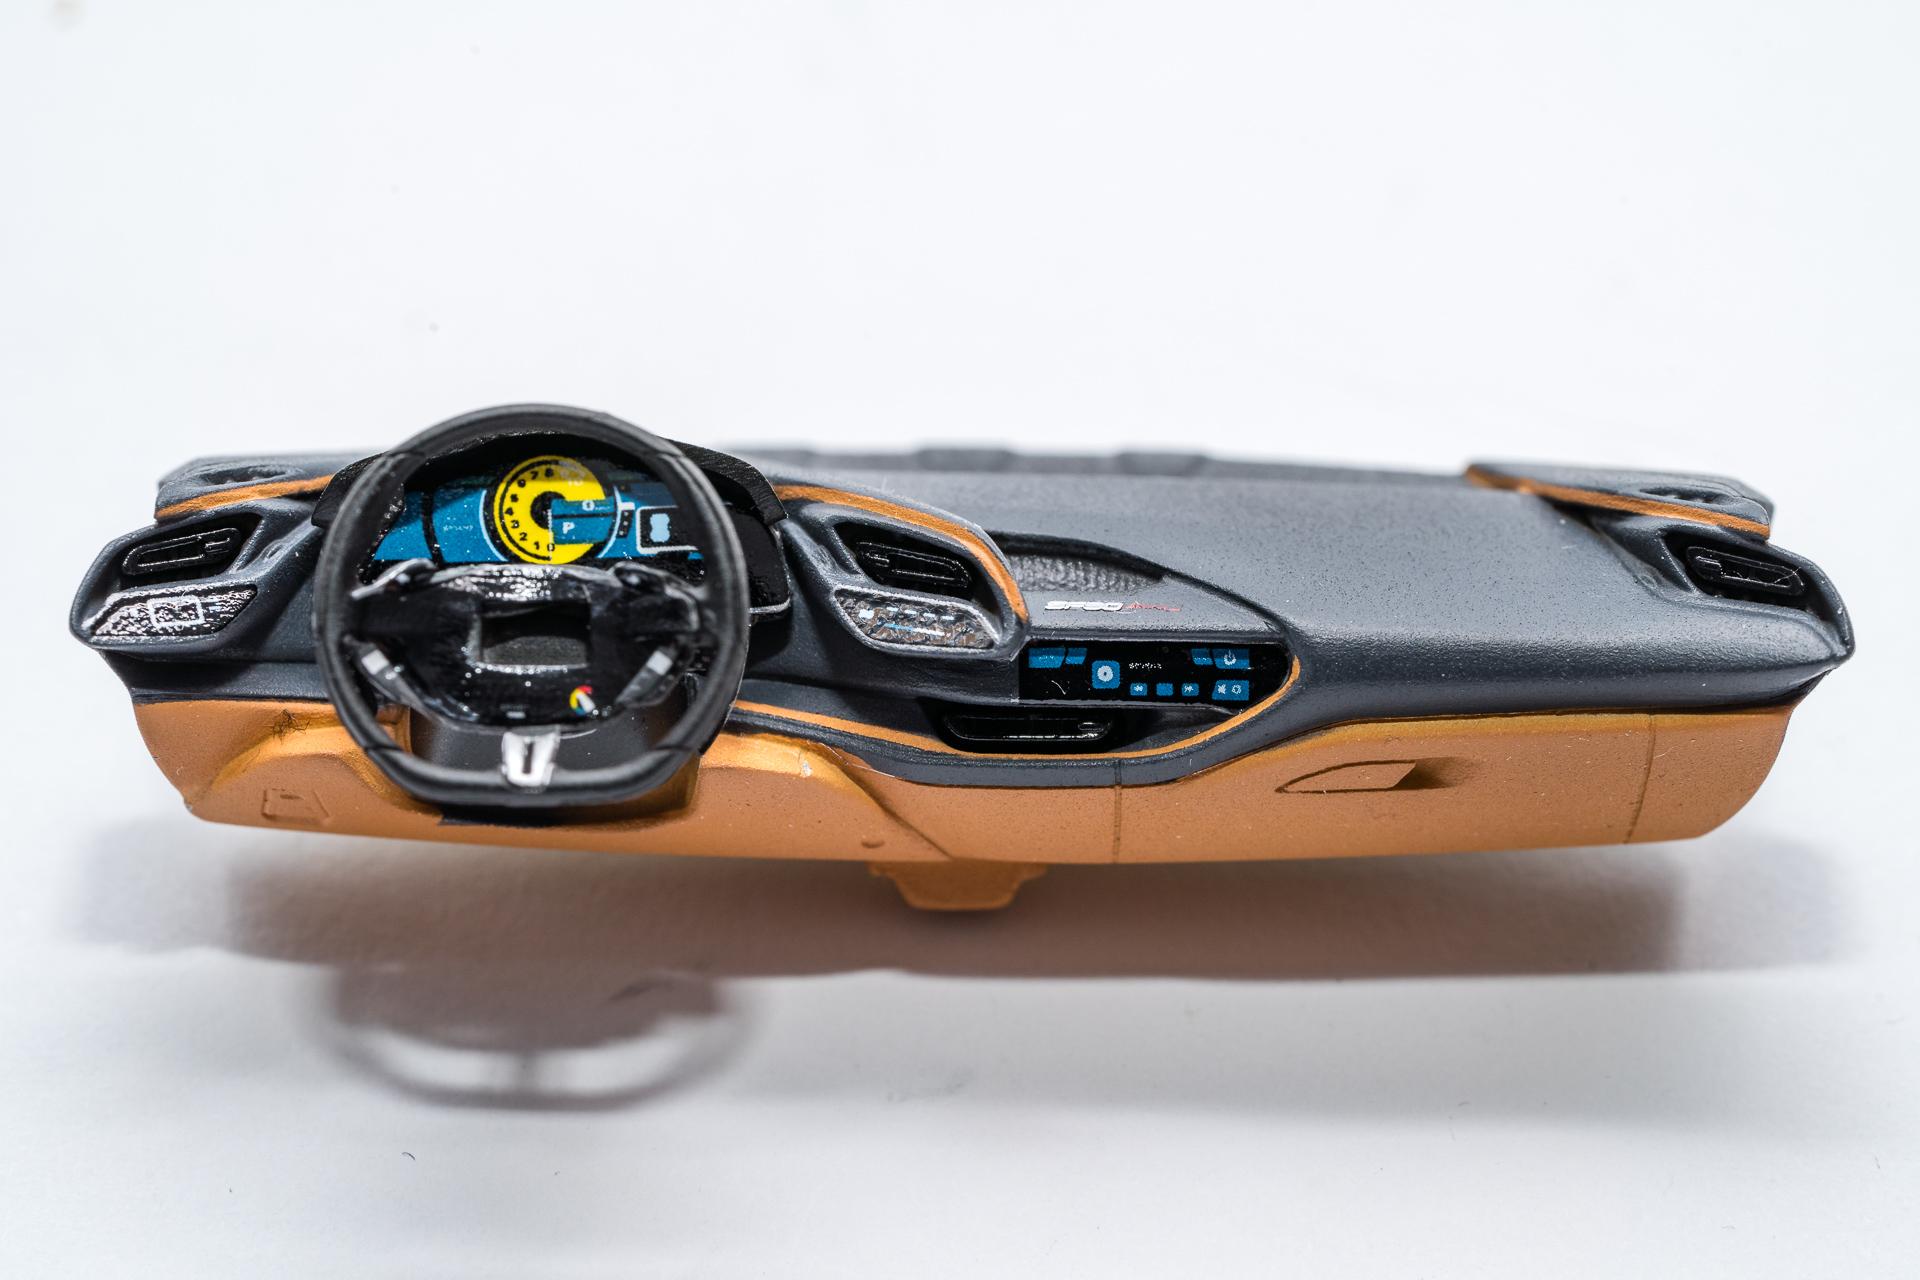
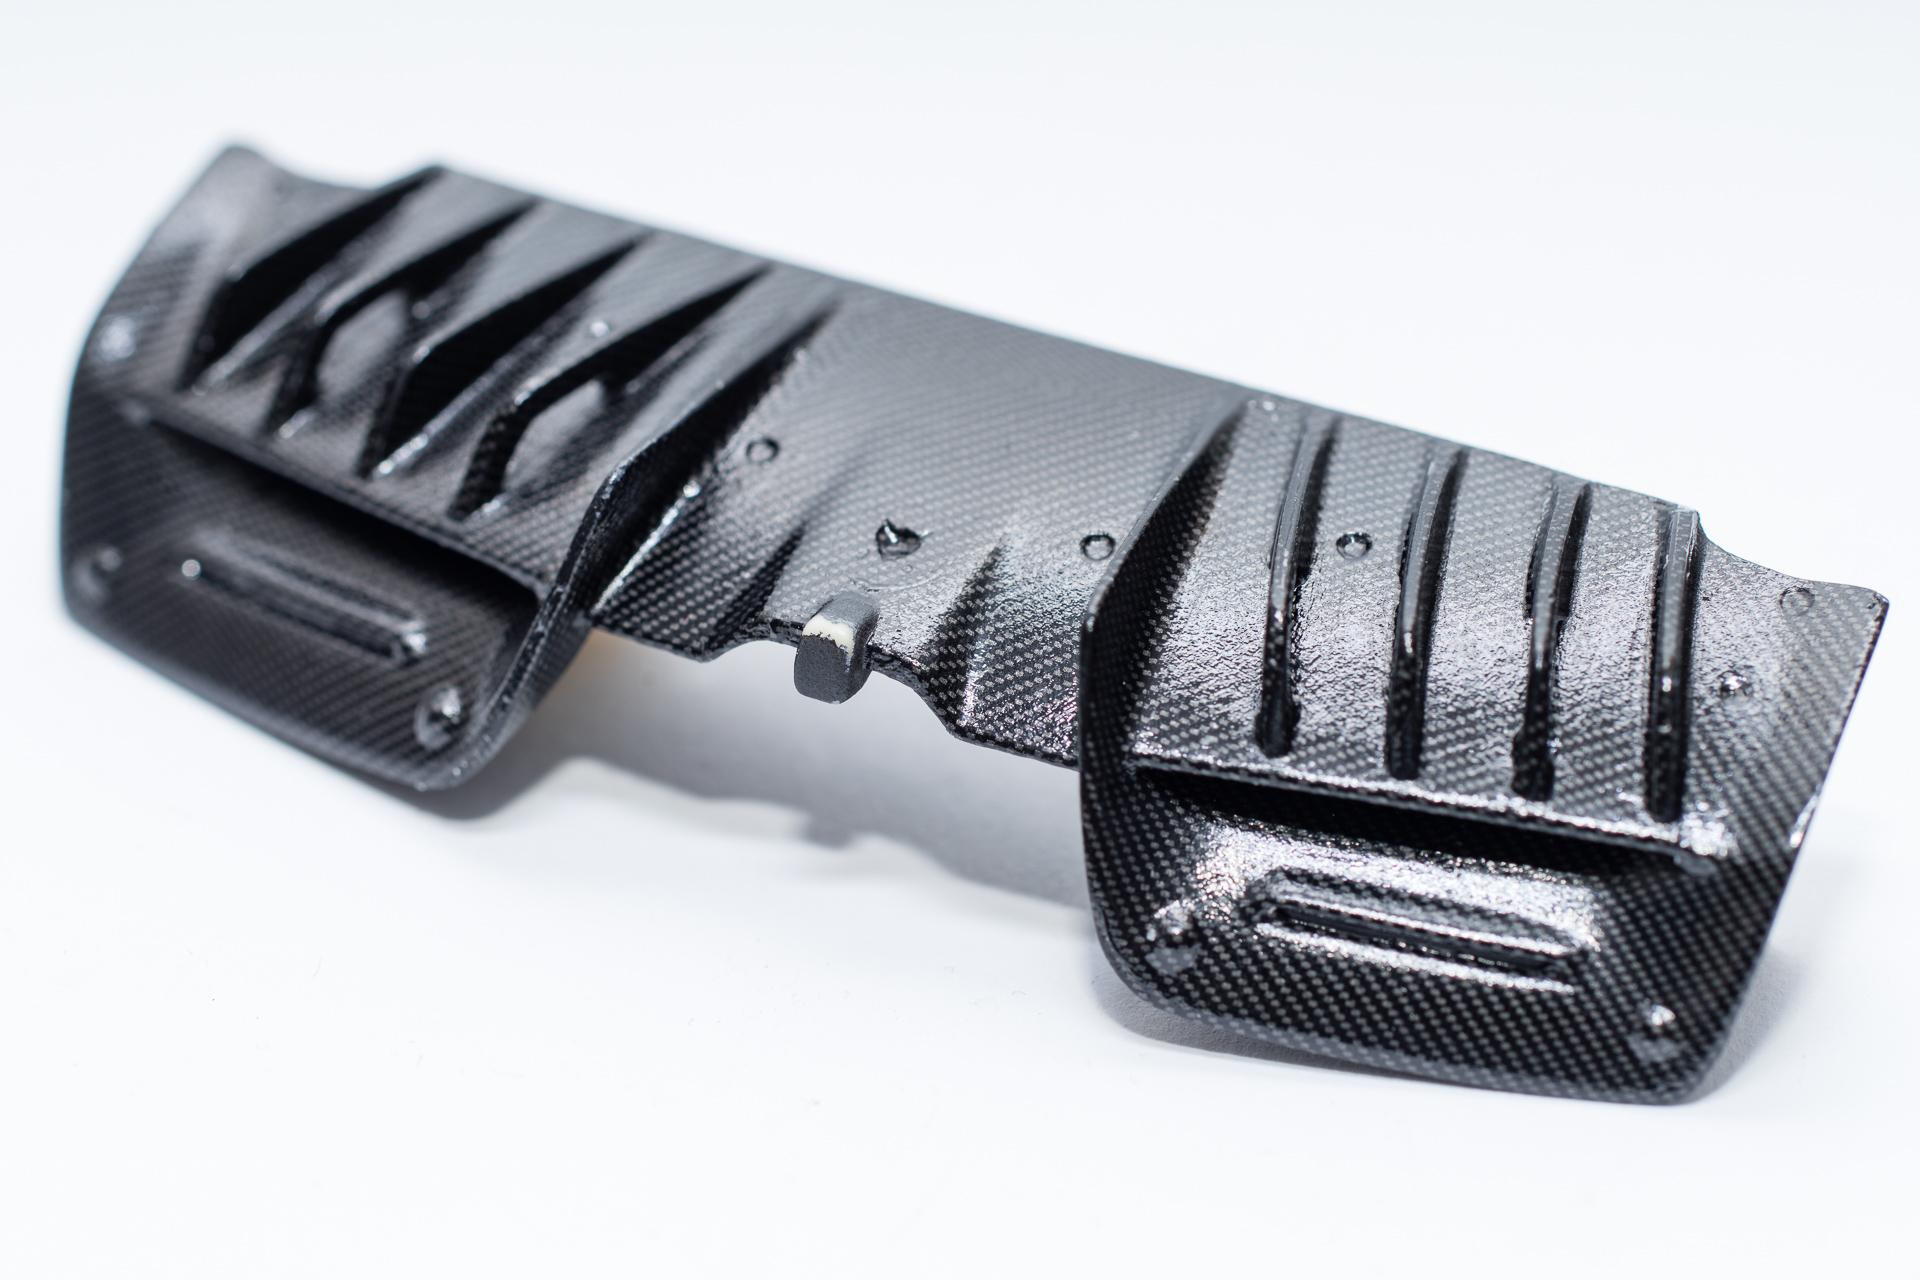
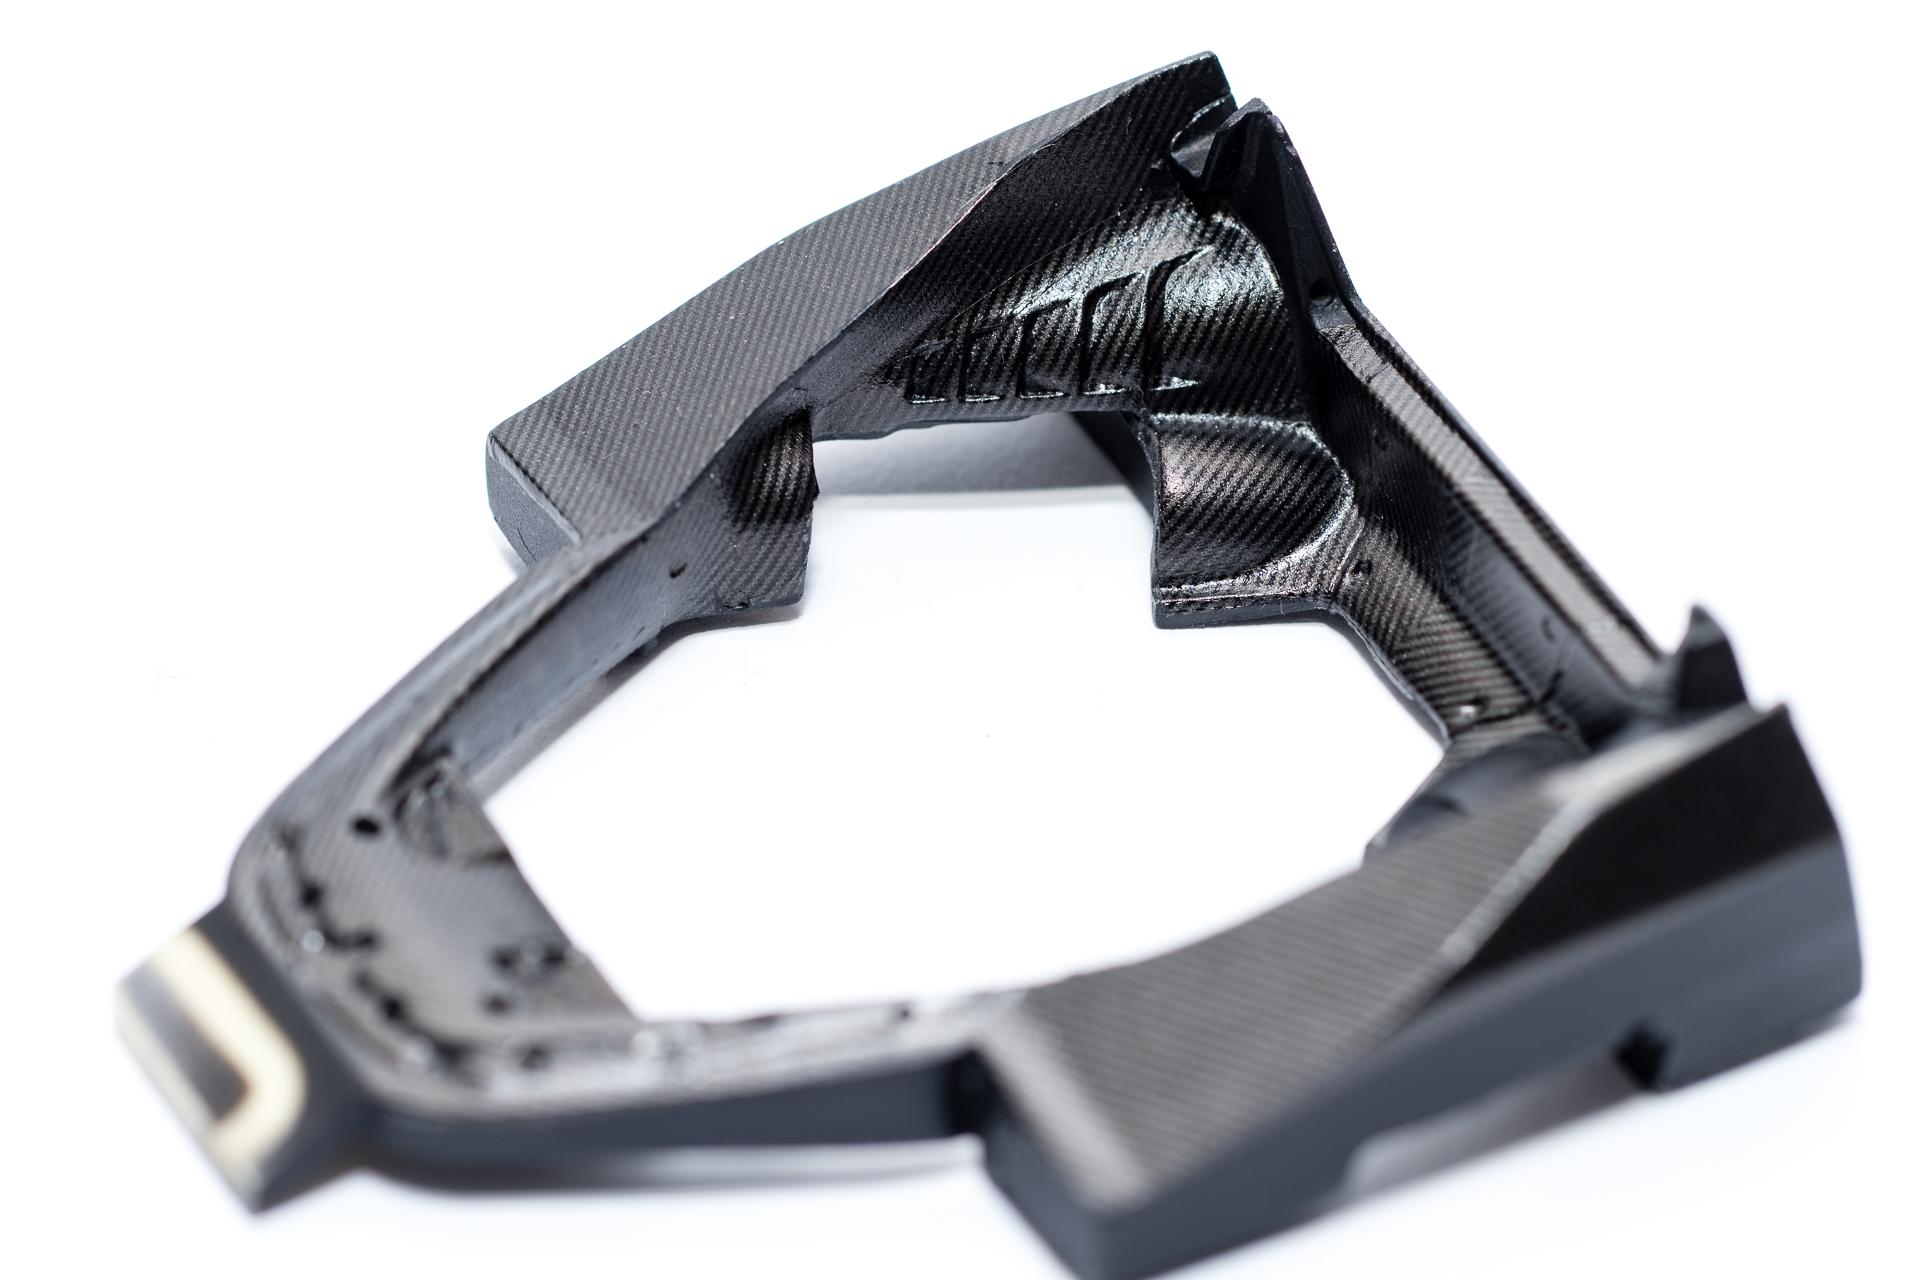
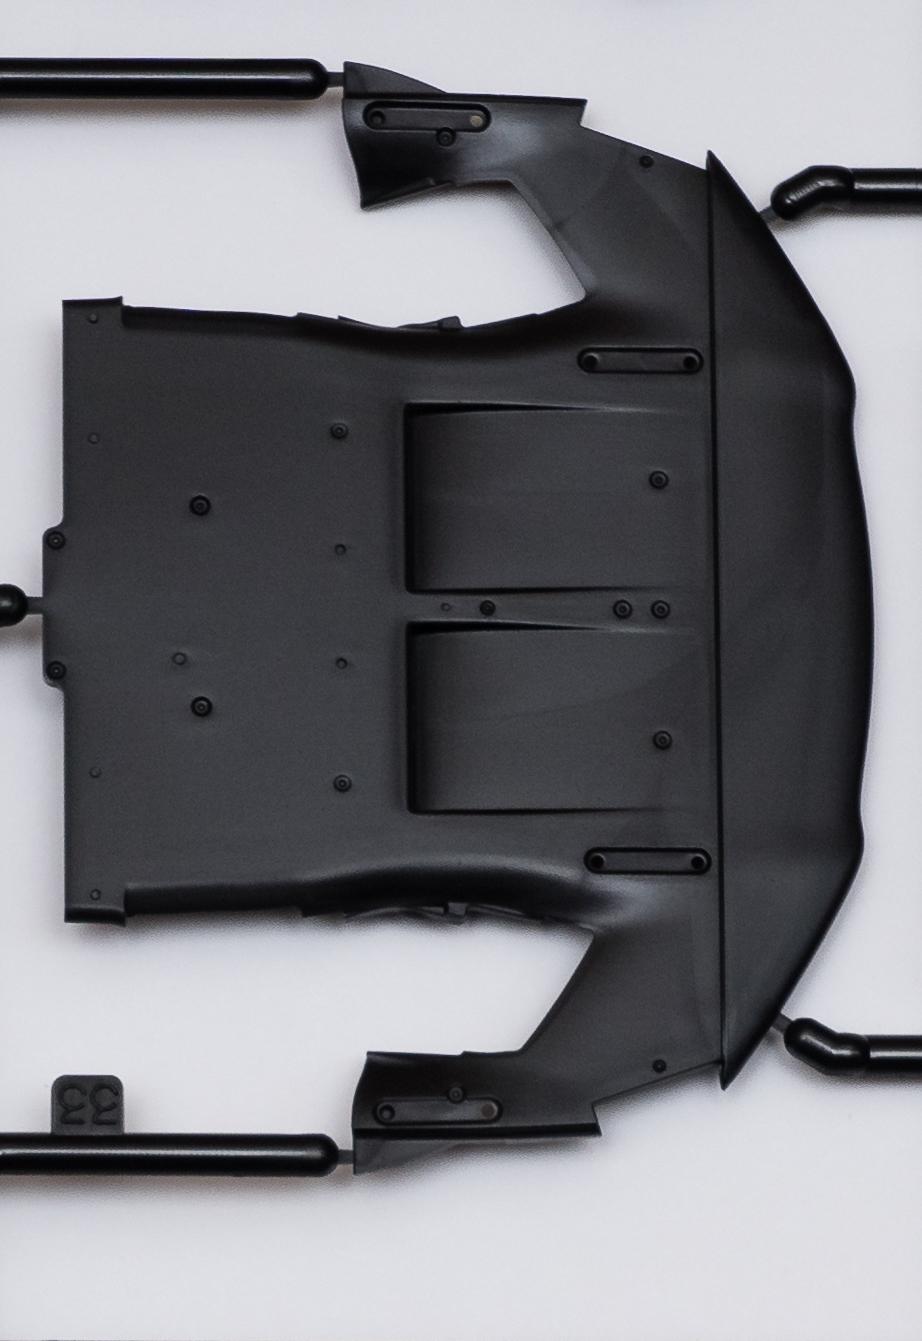
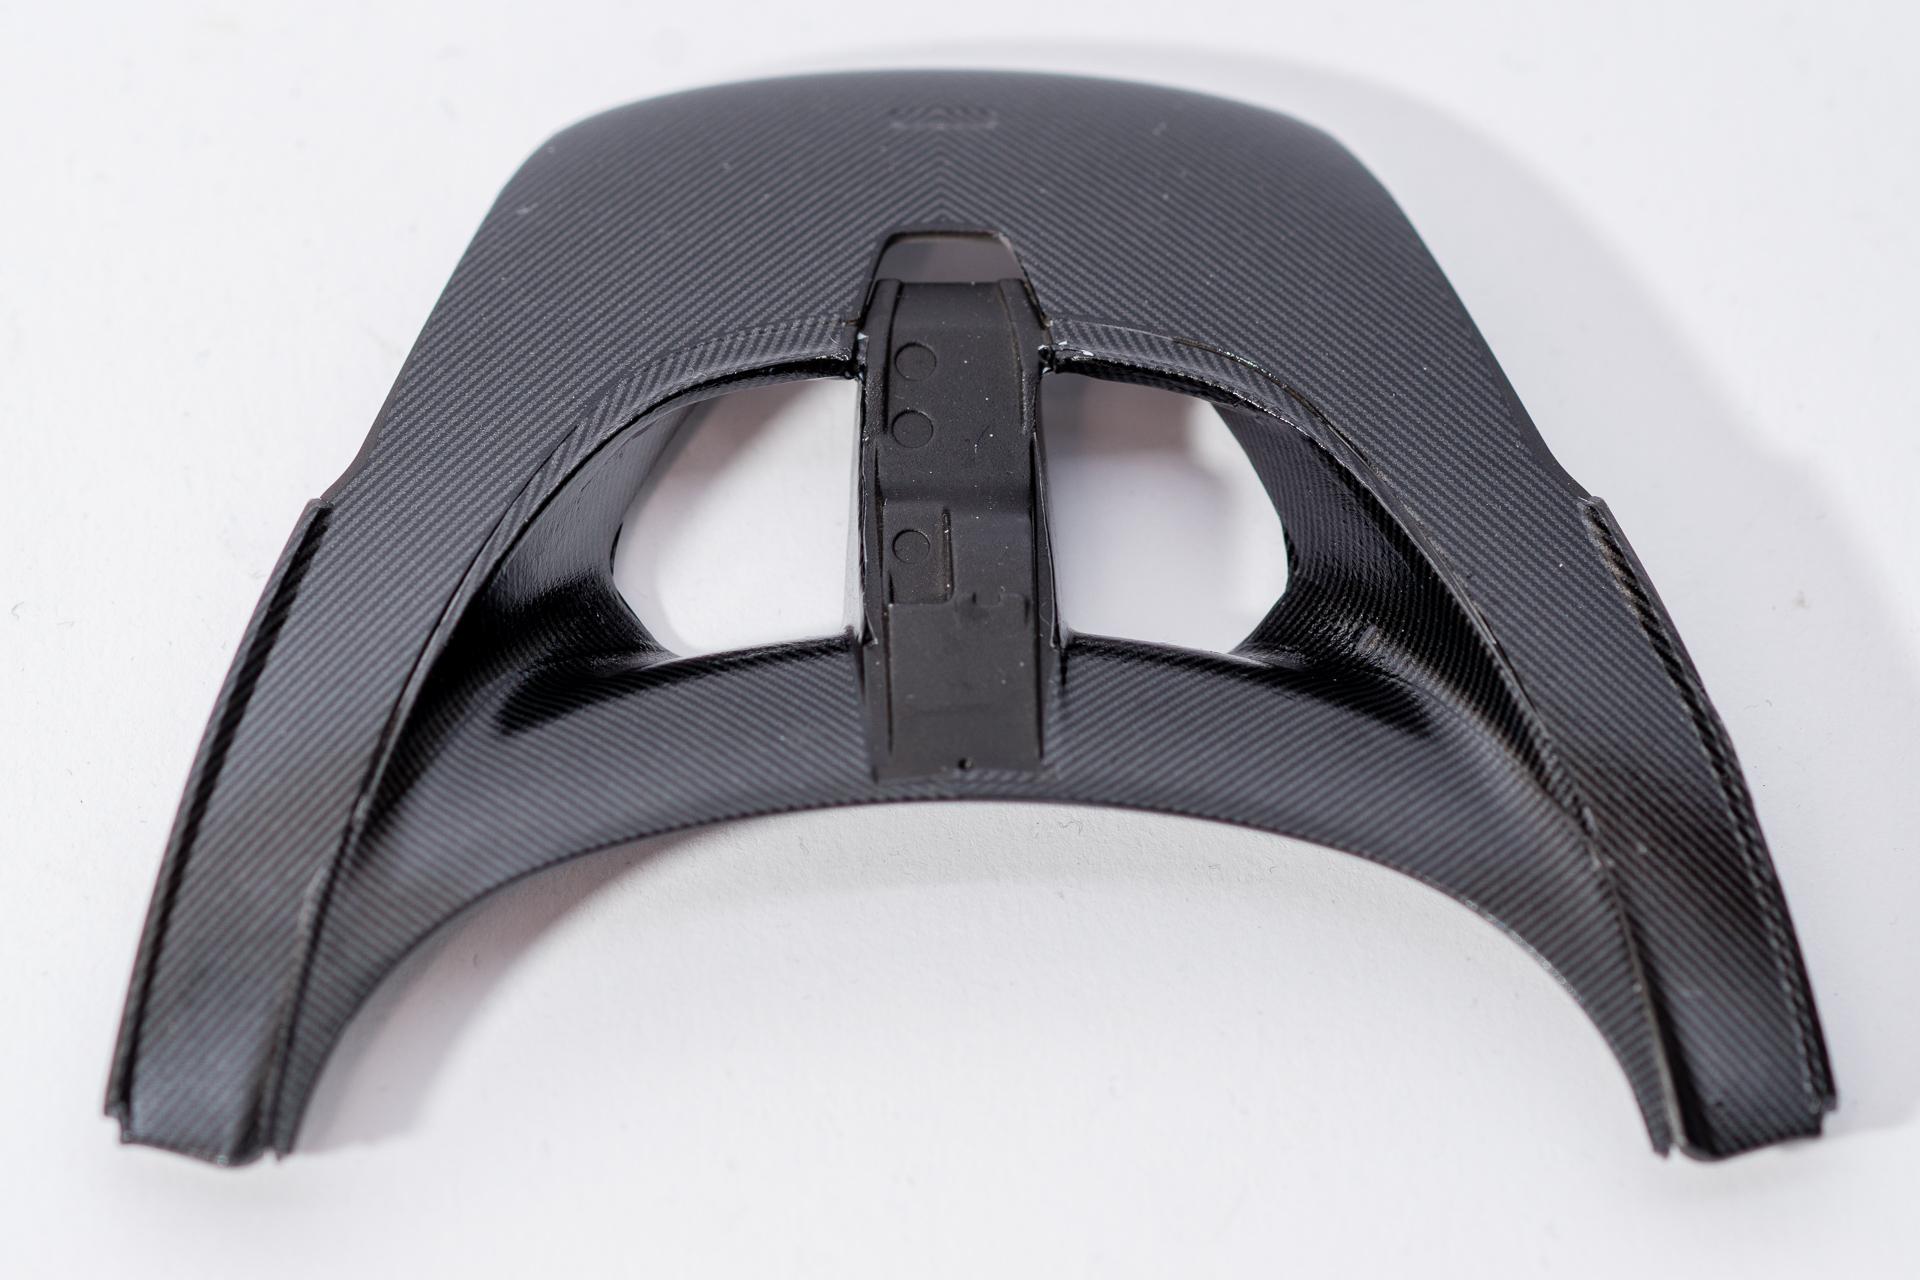
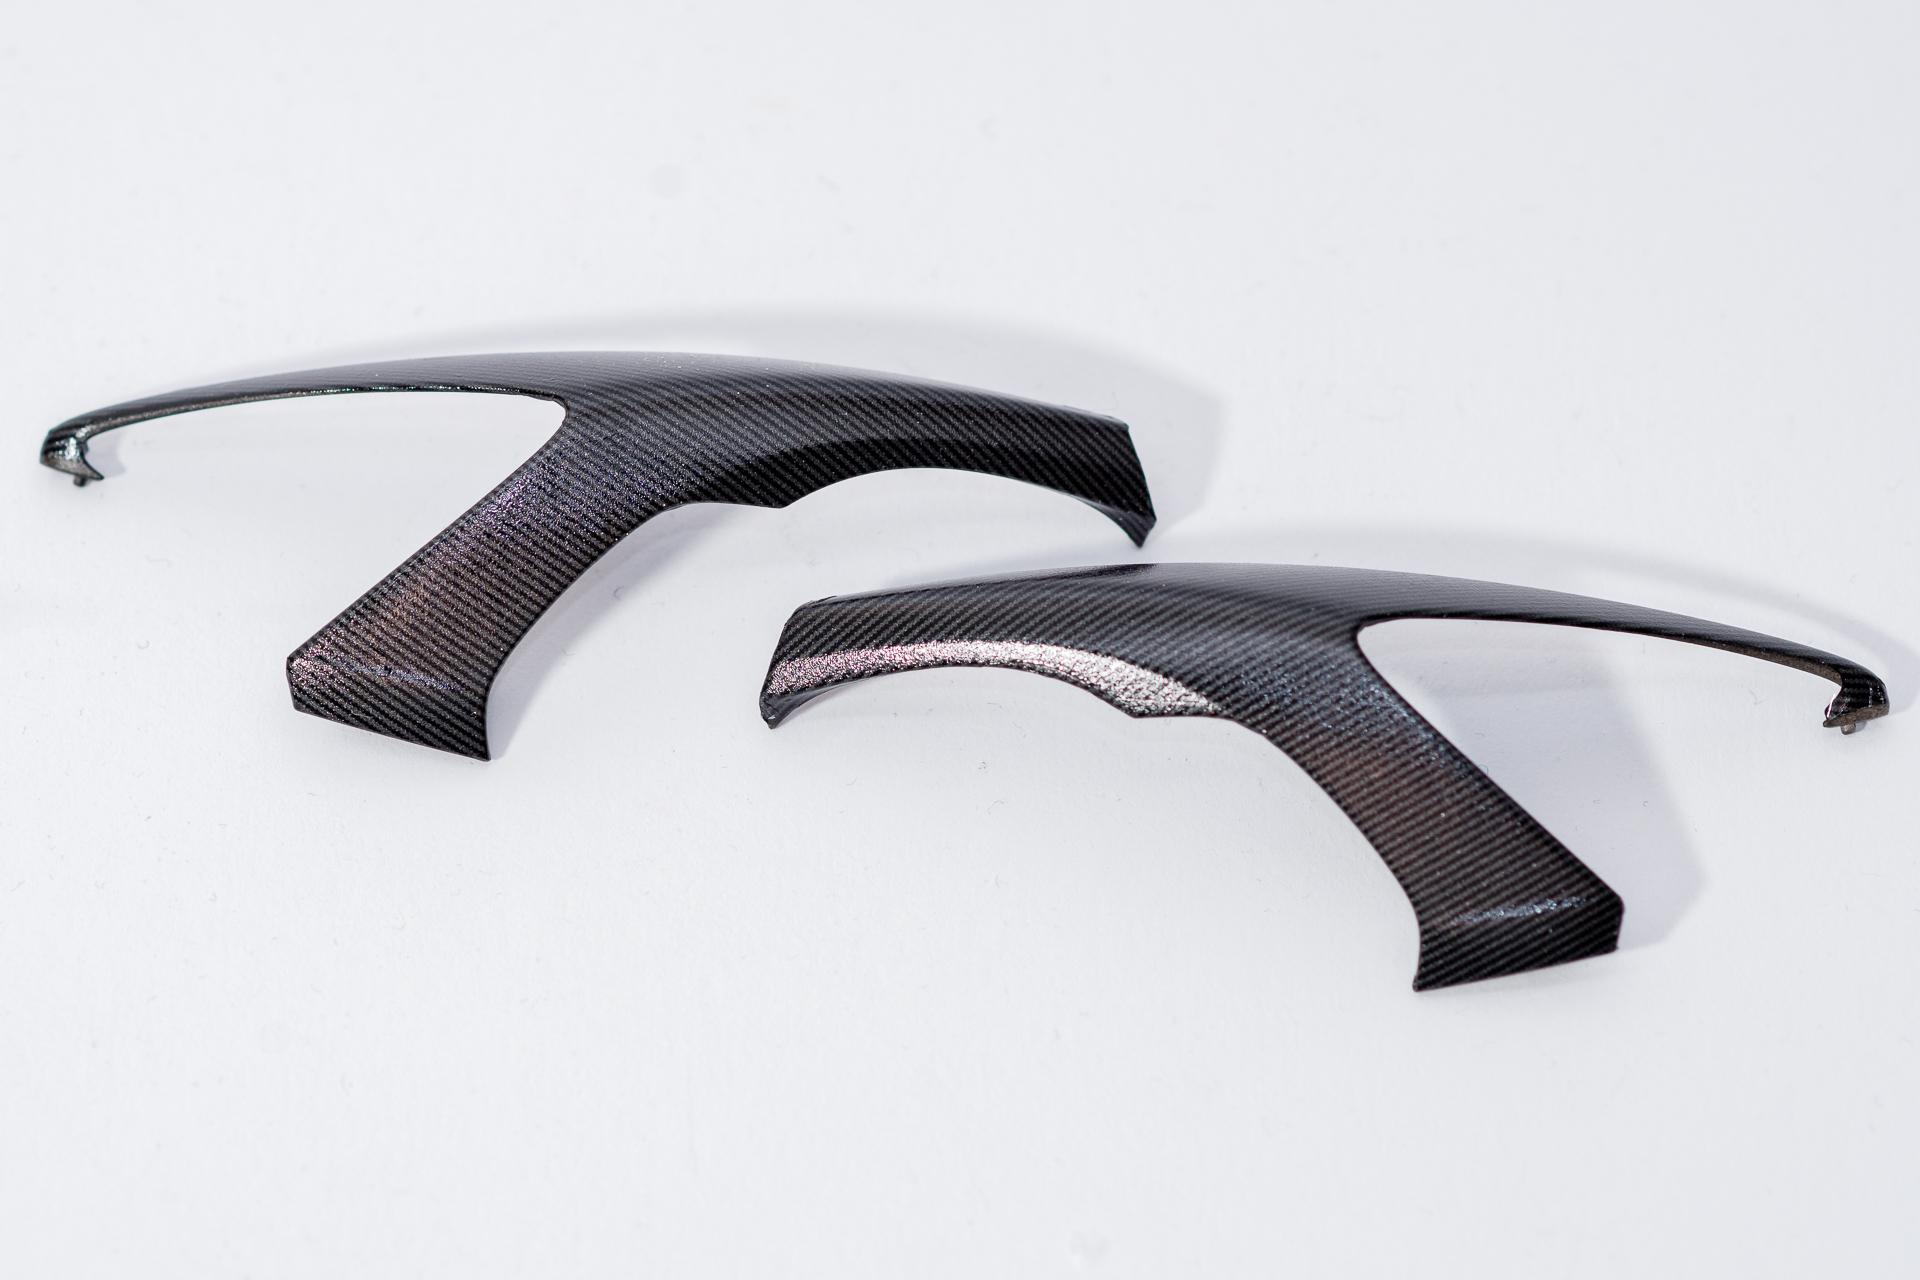
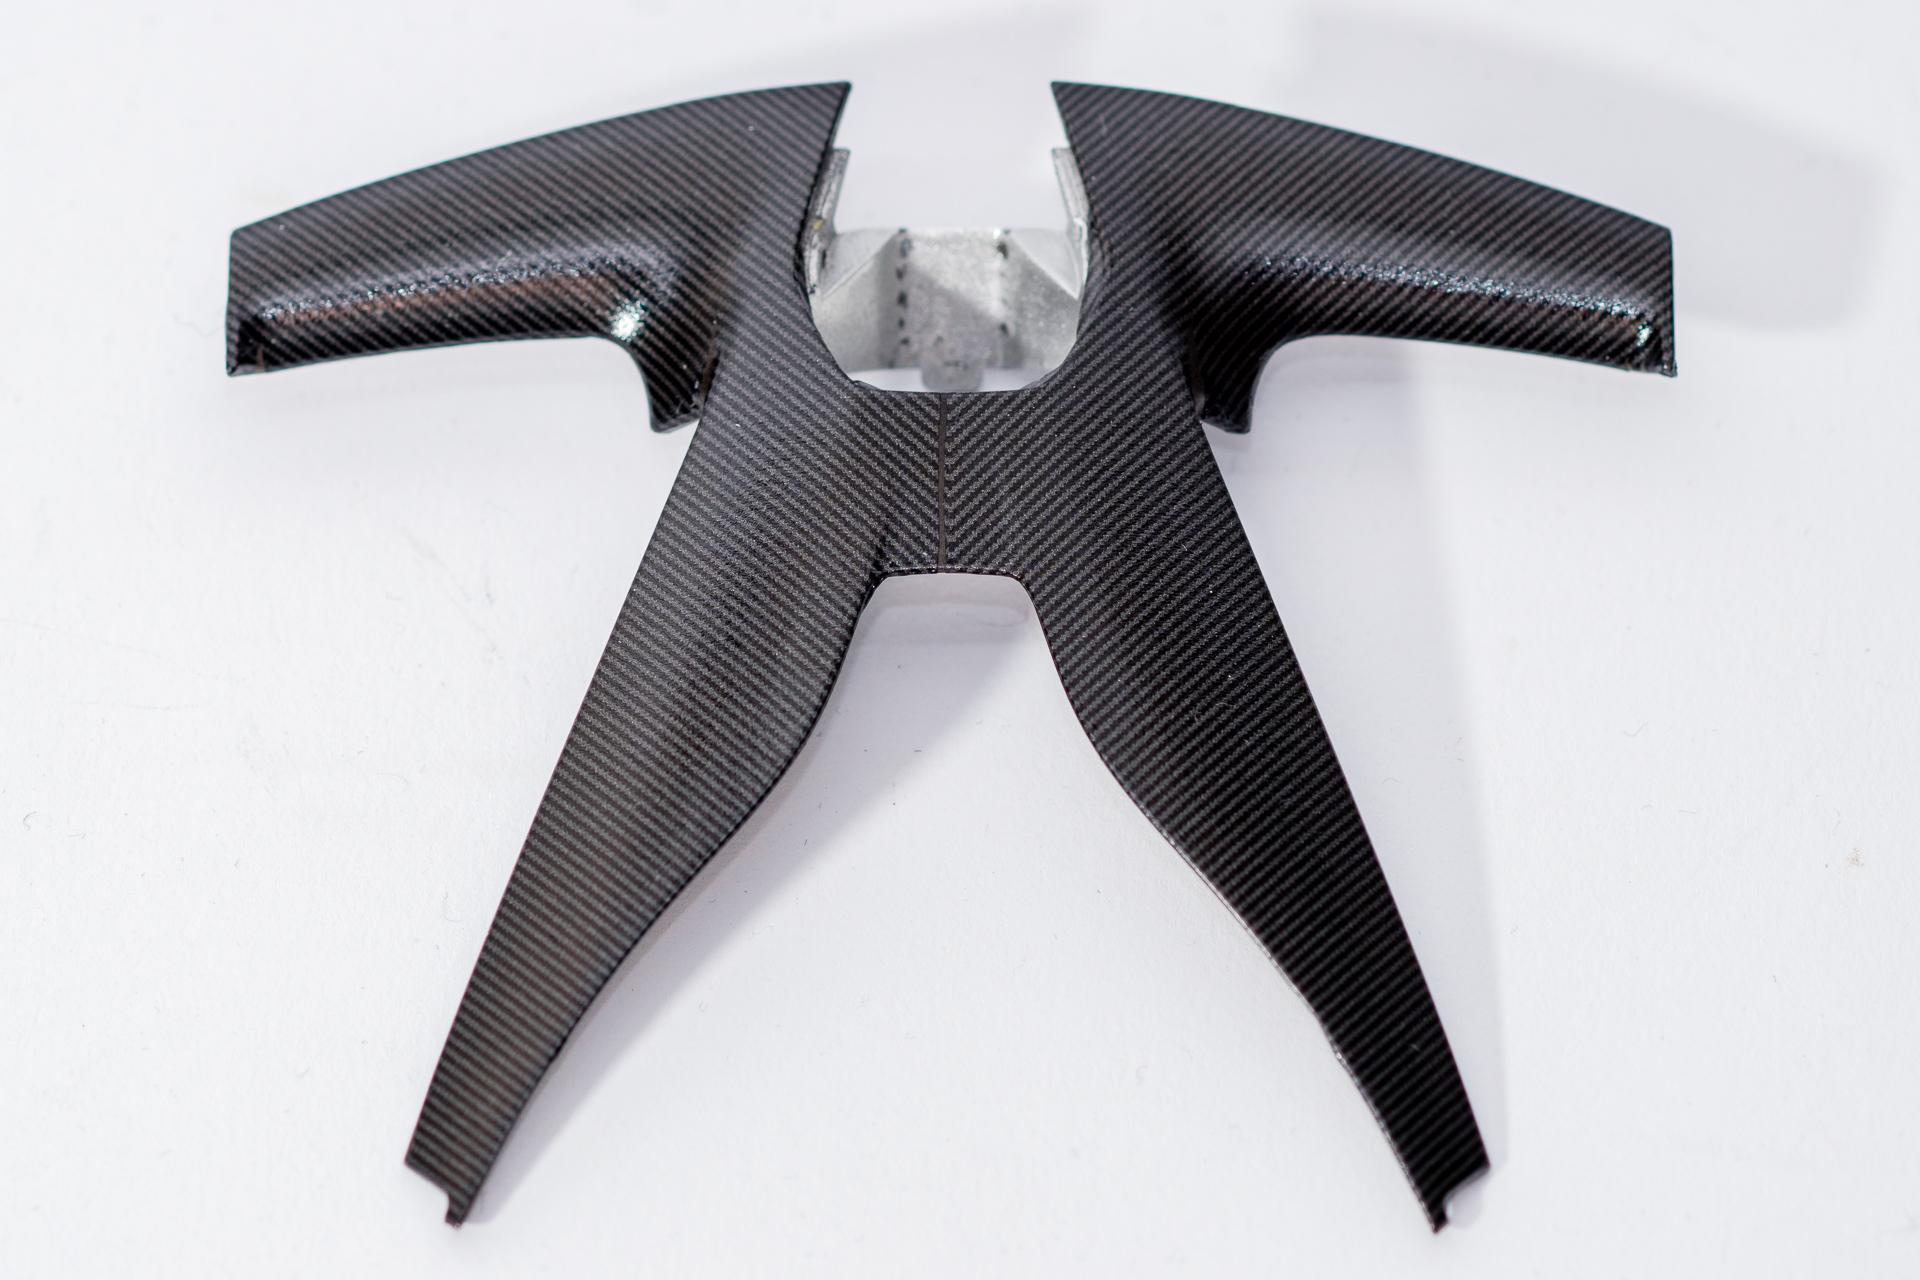
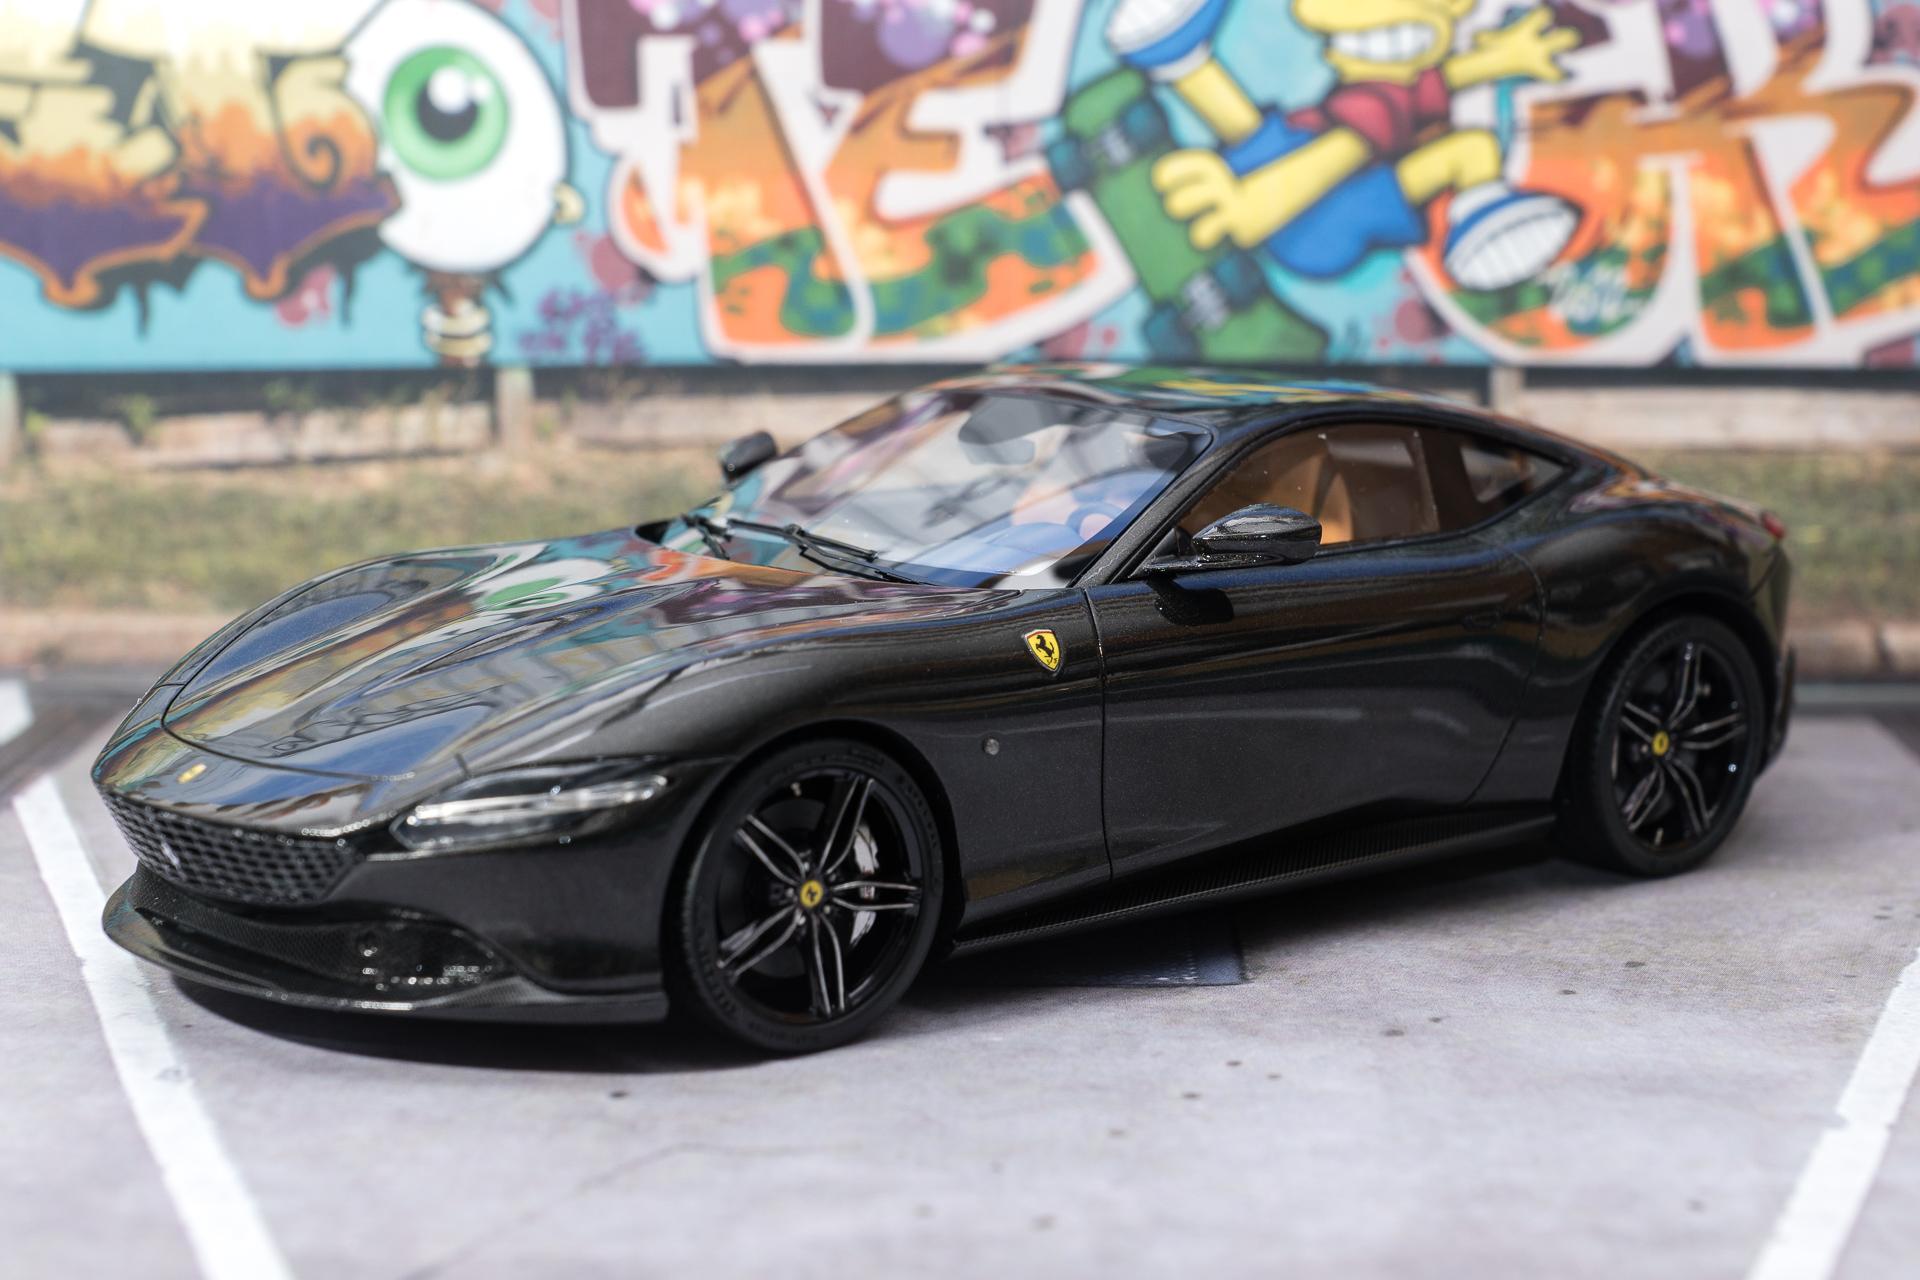
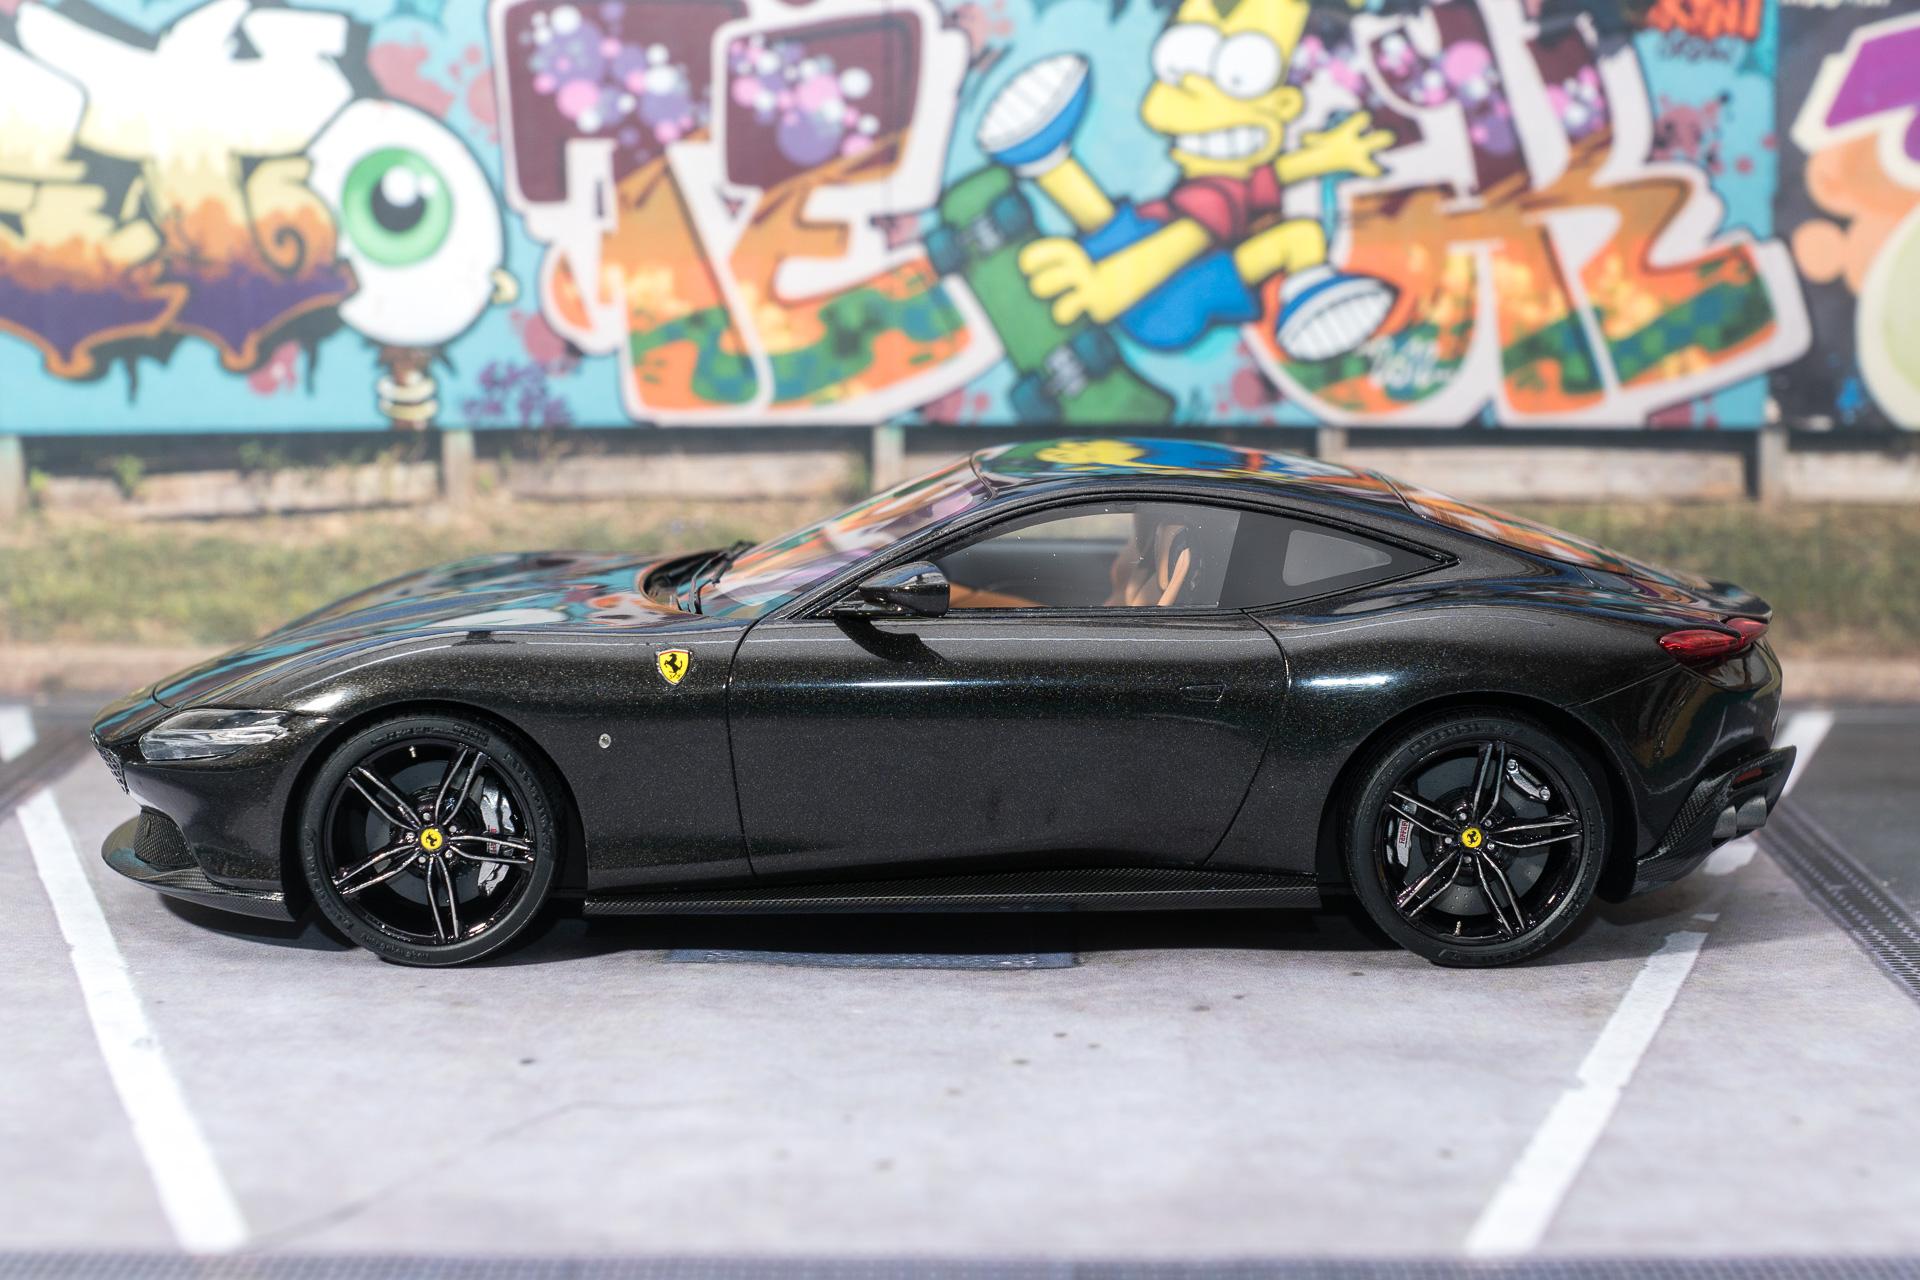
Hi all Initially my goal was to have this Ferrari finished for the upcoming exhibition at Basel, taking place on the weekend of 12./13. October. In order to get everything done by then, I had to concentrate on the exterior parts which will have to be clear coated. As I am using 2K clear, I can only use it on a friday when my son is at school, so I have the possibility to thoroughly vent the apartment before he comes home. And as the clear also needs some time to cure before I can start sanding and polishing I'll have to do it this friday (when possible). There have been a few CF decals which had to be applied to the body. Some spots I'll have to cover up with some black paint after clear coating to make it less obvious that the decals didn't cover everything. Fortunately (as usual) it is not as obvious to the naked eye as it is on the pictures. In addition to the body, the diffusor had to be covered entierly with CF decals I am quite disappointed by the building instructions for this kit, regarding the placement of the CF decals. There are quite a few occasions where the callouts are just wrong with interchanged decals for the left and right side. Especially on the diffusor I tried to apply a decal for the longest time until I realized that it belongs to the other side... Whenever I needed something else to do, I continued work on the dashboard. Mostly I had to apply decals as well, but at least they've been a little more colorful And to prevent me from getting too rollicking, I also applied the CF decal on the rocker switch With all the carbon applied to the body and diffusor the kit is now ready for clear coat on friday. The only parts still missing are the rear view mirrors, which have to be partially covered in CF decals. Unfortunately there haven't been any predefined decals in the kit, so I had to make templates myself. Yesterday I started with the first mirror, but gave up completely bugged out as I managed to cut it wrong three times in a row (first it was too small, on the second attempt the pattern was the wrong direction and the third attempt I seem to have successfully forgotten)... But as they are small and I've made the experience that i's quite easy to achieve a bright shine on a small part, they won't become a blocker for clear coating. There are several parts for the interior / engine compartment which I'll have to clear coat as well, where I'll be using Mr. Color Super Clear, so I can use this for the mirrors as well if needed. That's it for today's update Urs
-
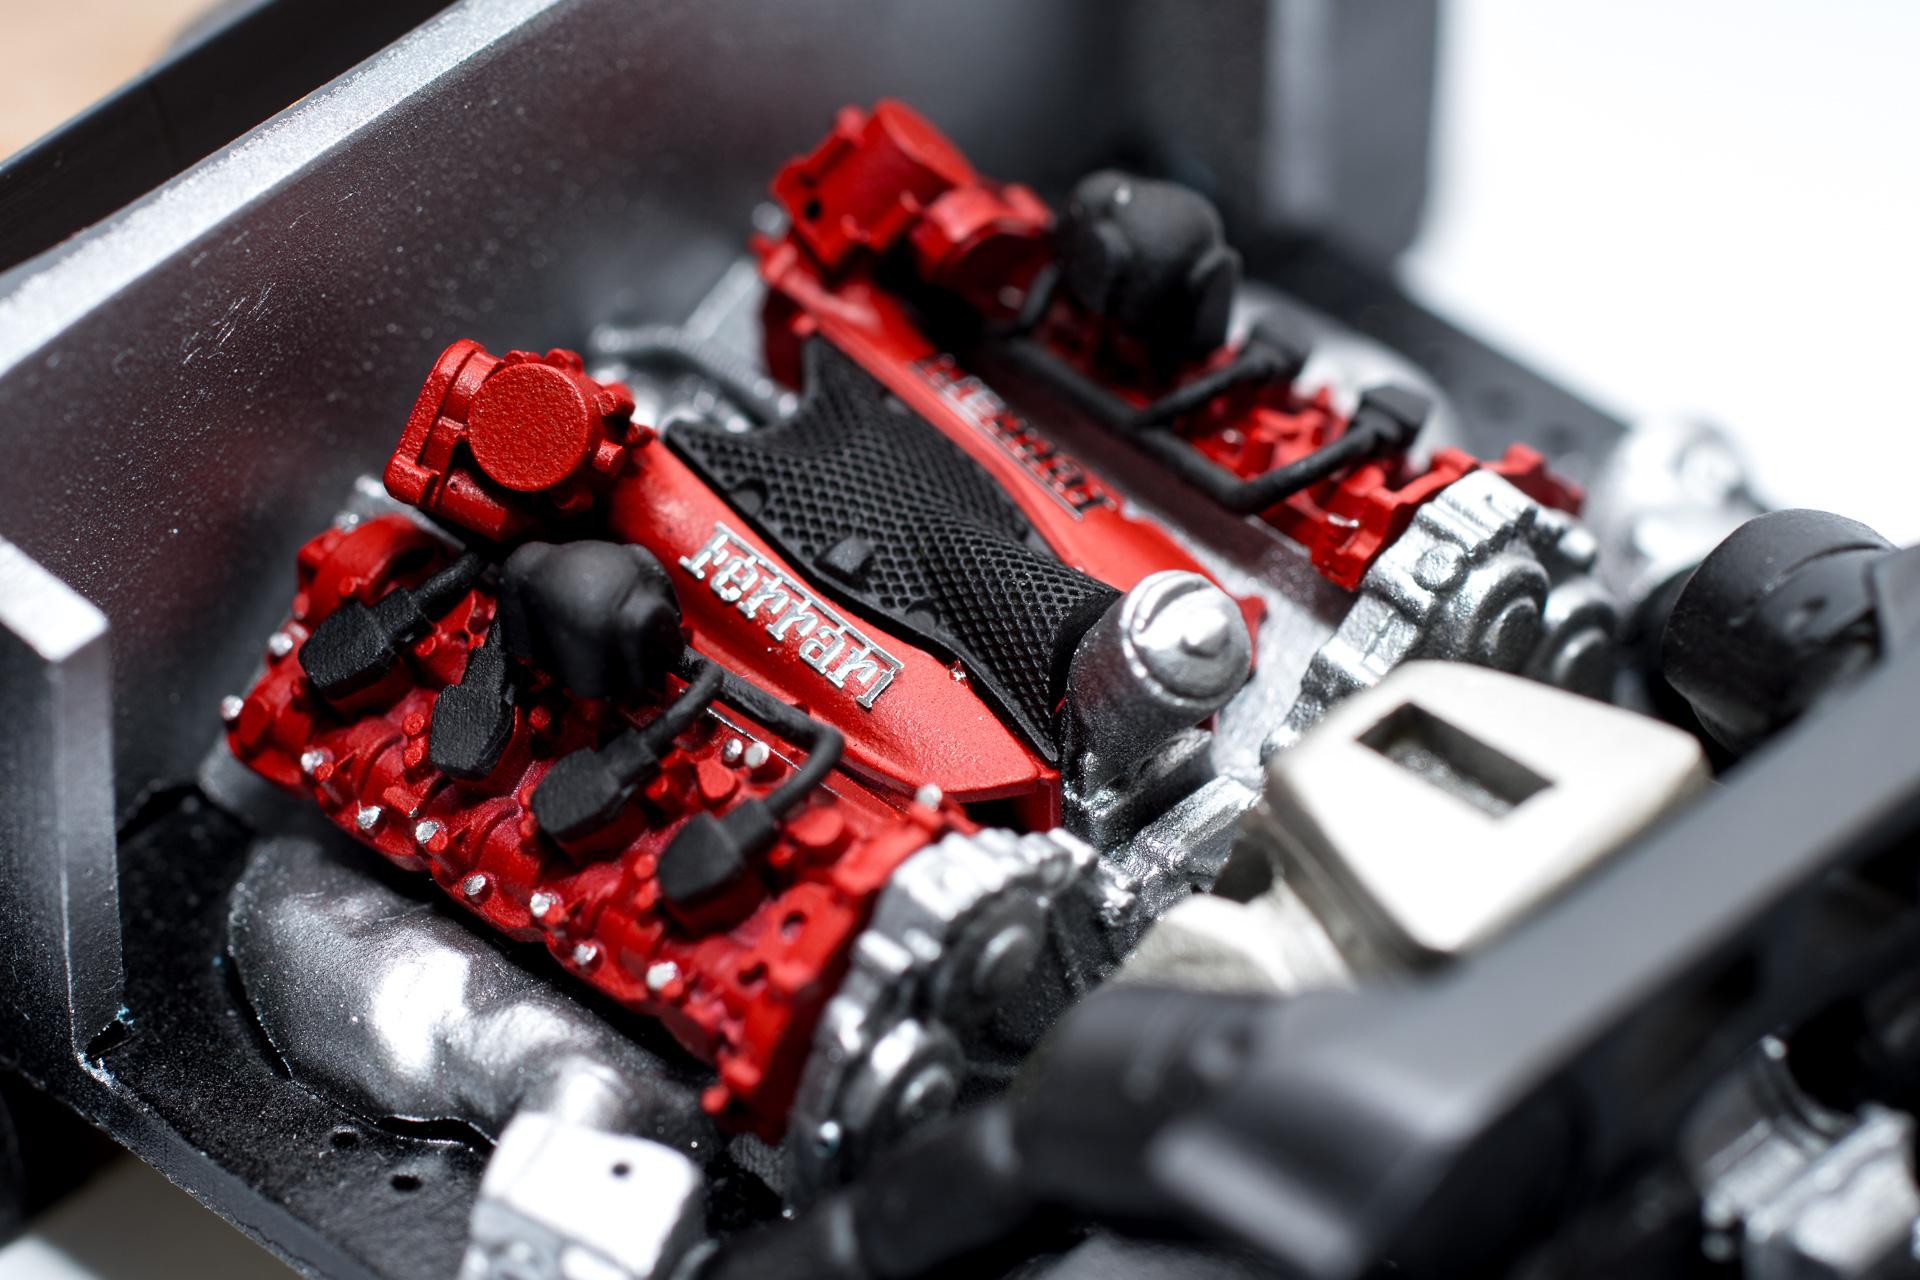
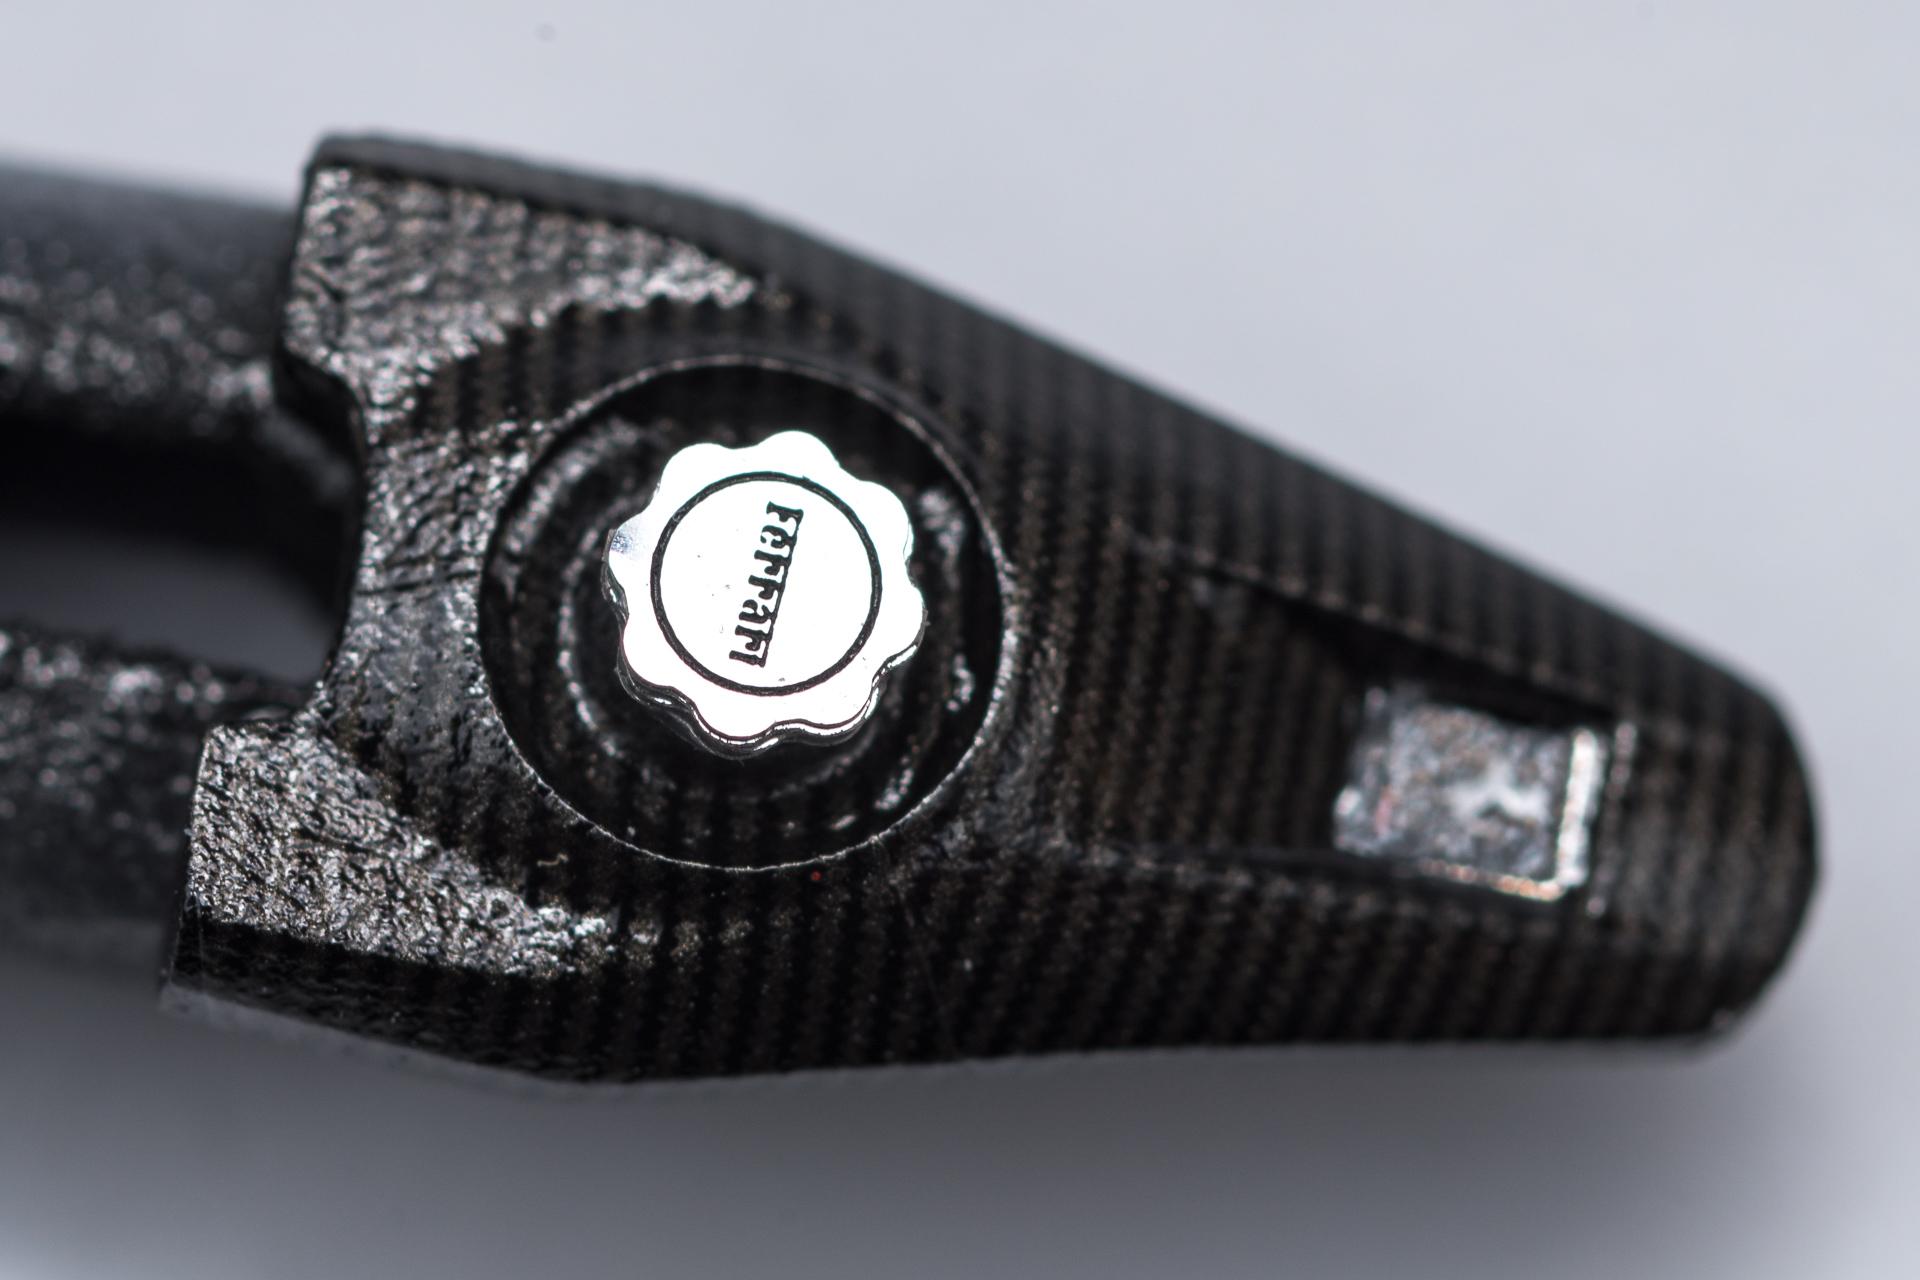
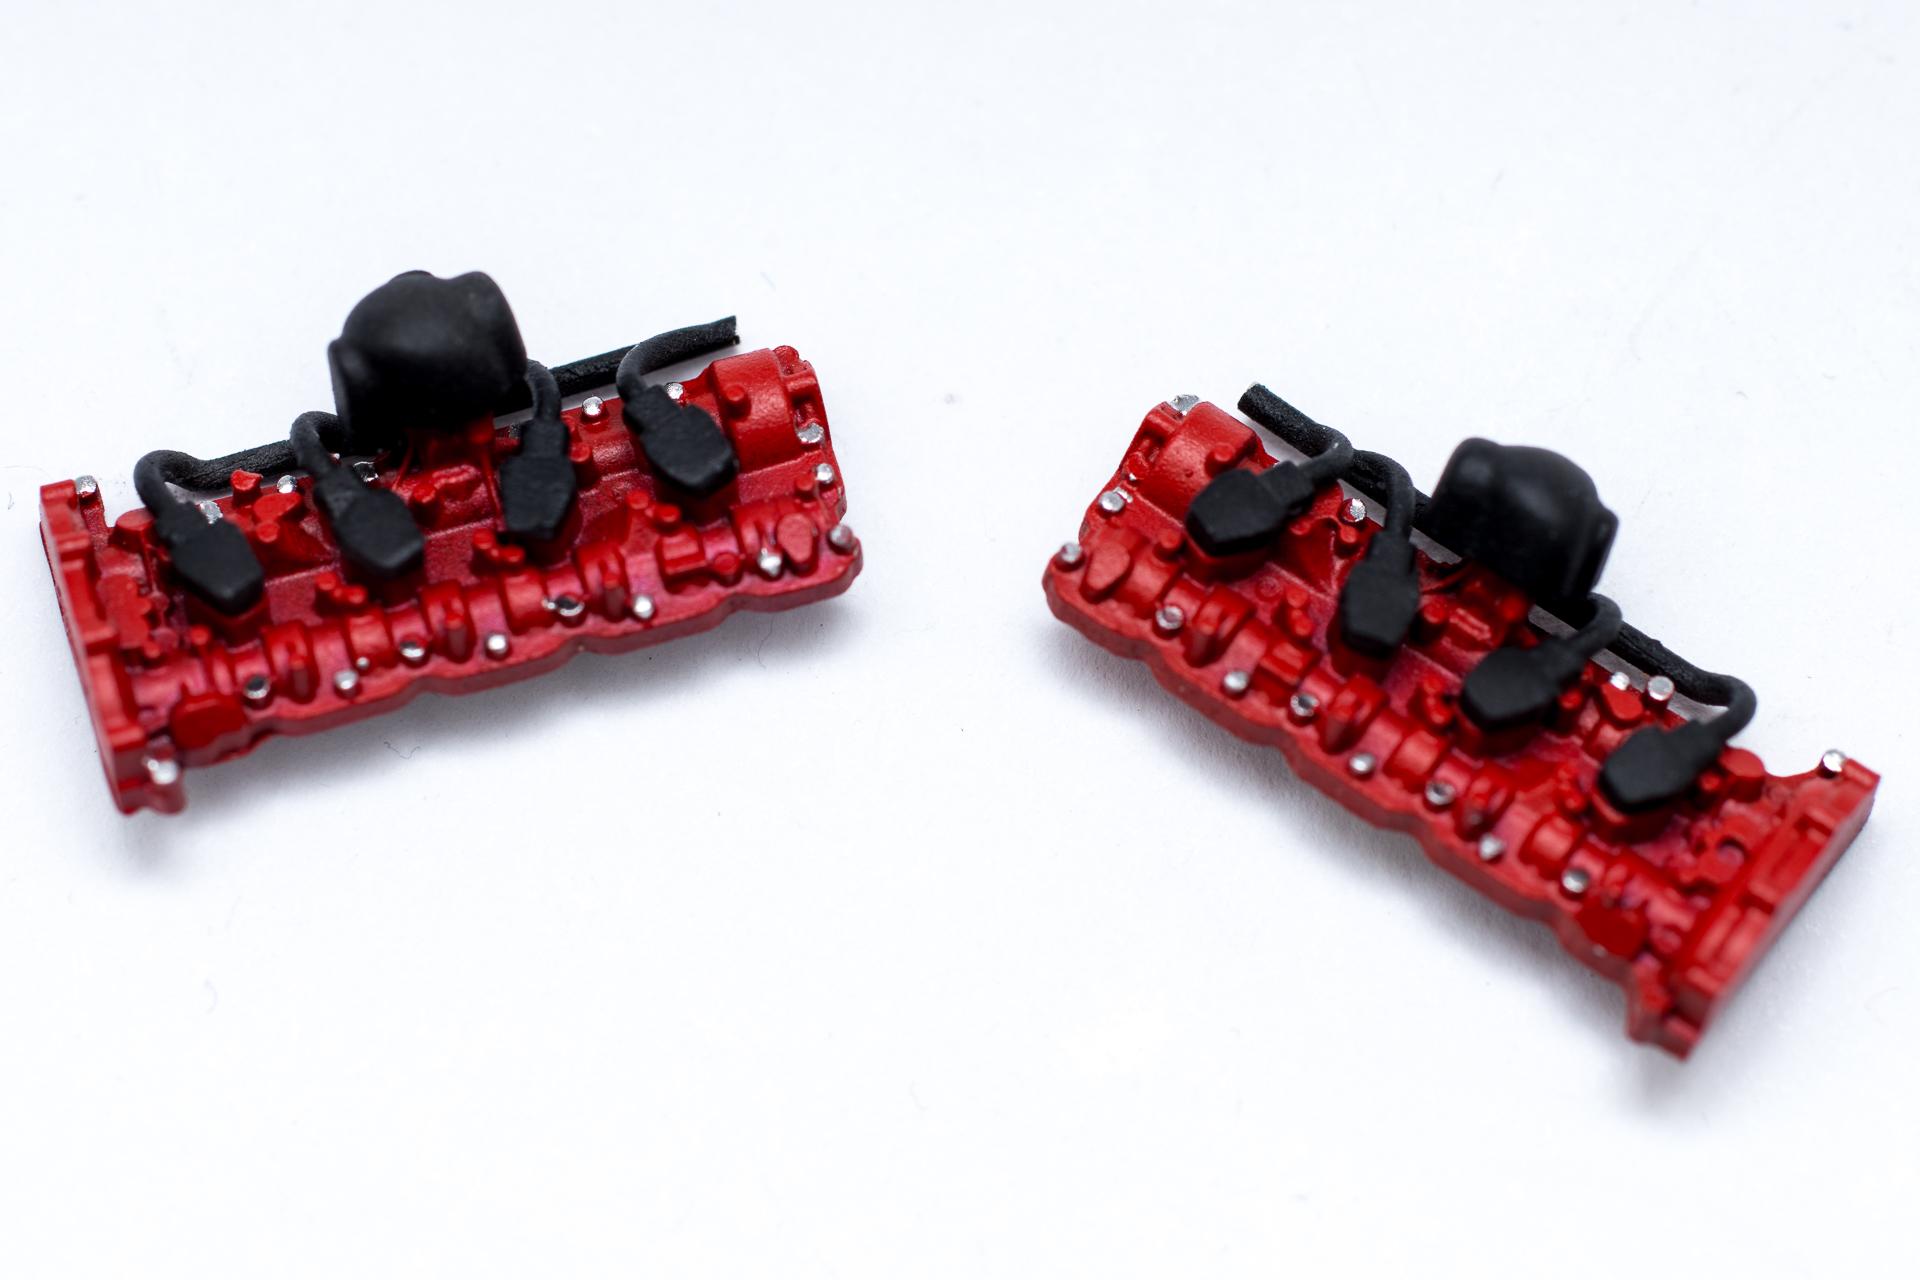
Hi all Thank you very much for your kind comment Once again I haven't had that much build time as I hoped for, but there is some progress anyway I can share with you. First of all, the first two carbon fibre decals have been applied on the body (right underneath the doors on each side) Decaling work on the engine covers started as well. Here I'll only have to cover the areas which aren't visible in the picture Assembly of the engine has been continued and the engine part from my last post was clear coated and the PE parts have been applied (the cap consists of a total of 4 parts) That's it for today Urs
-
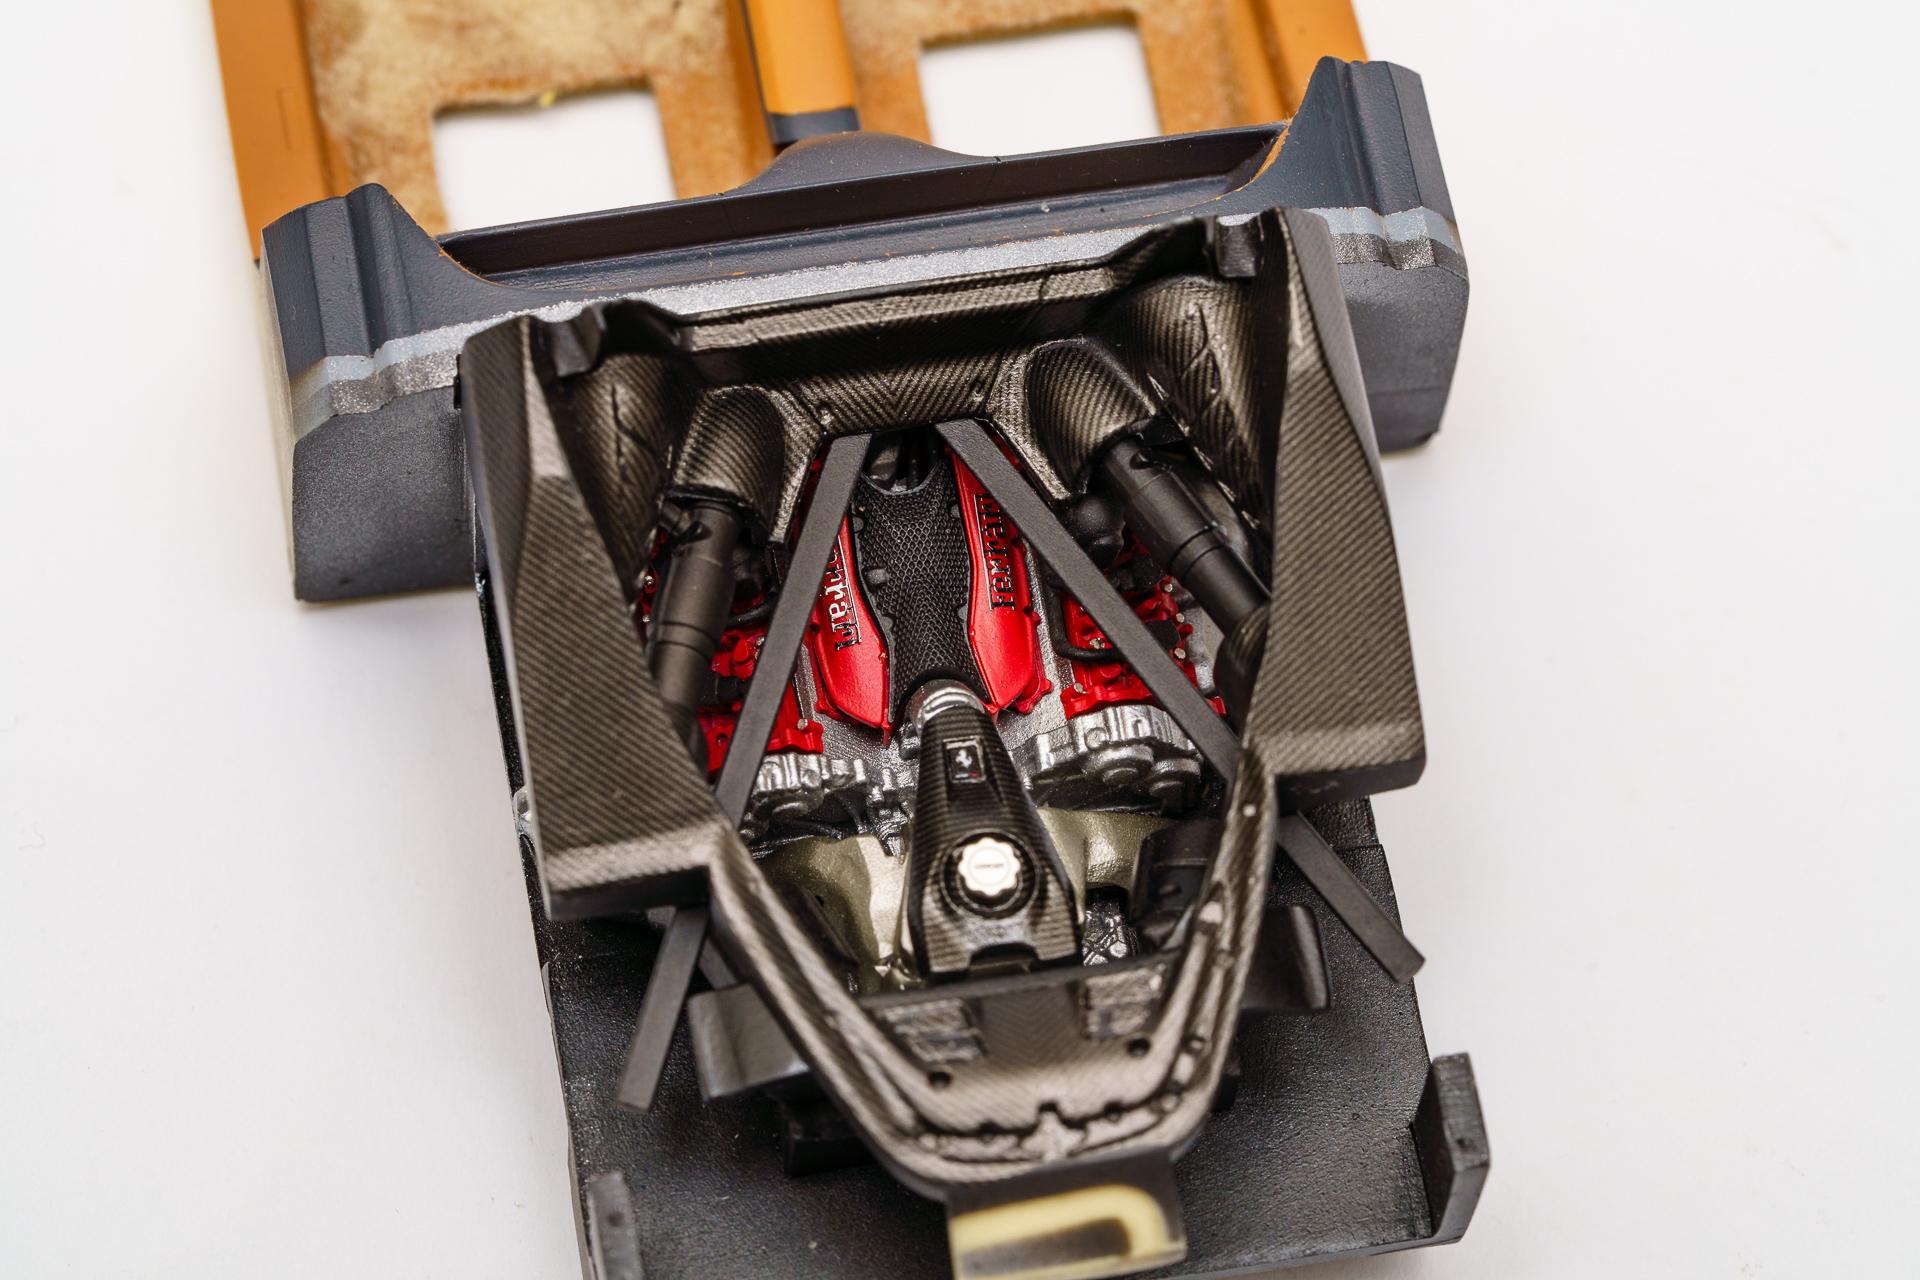
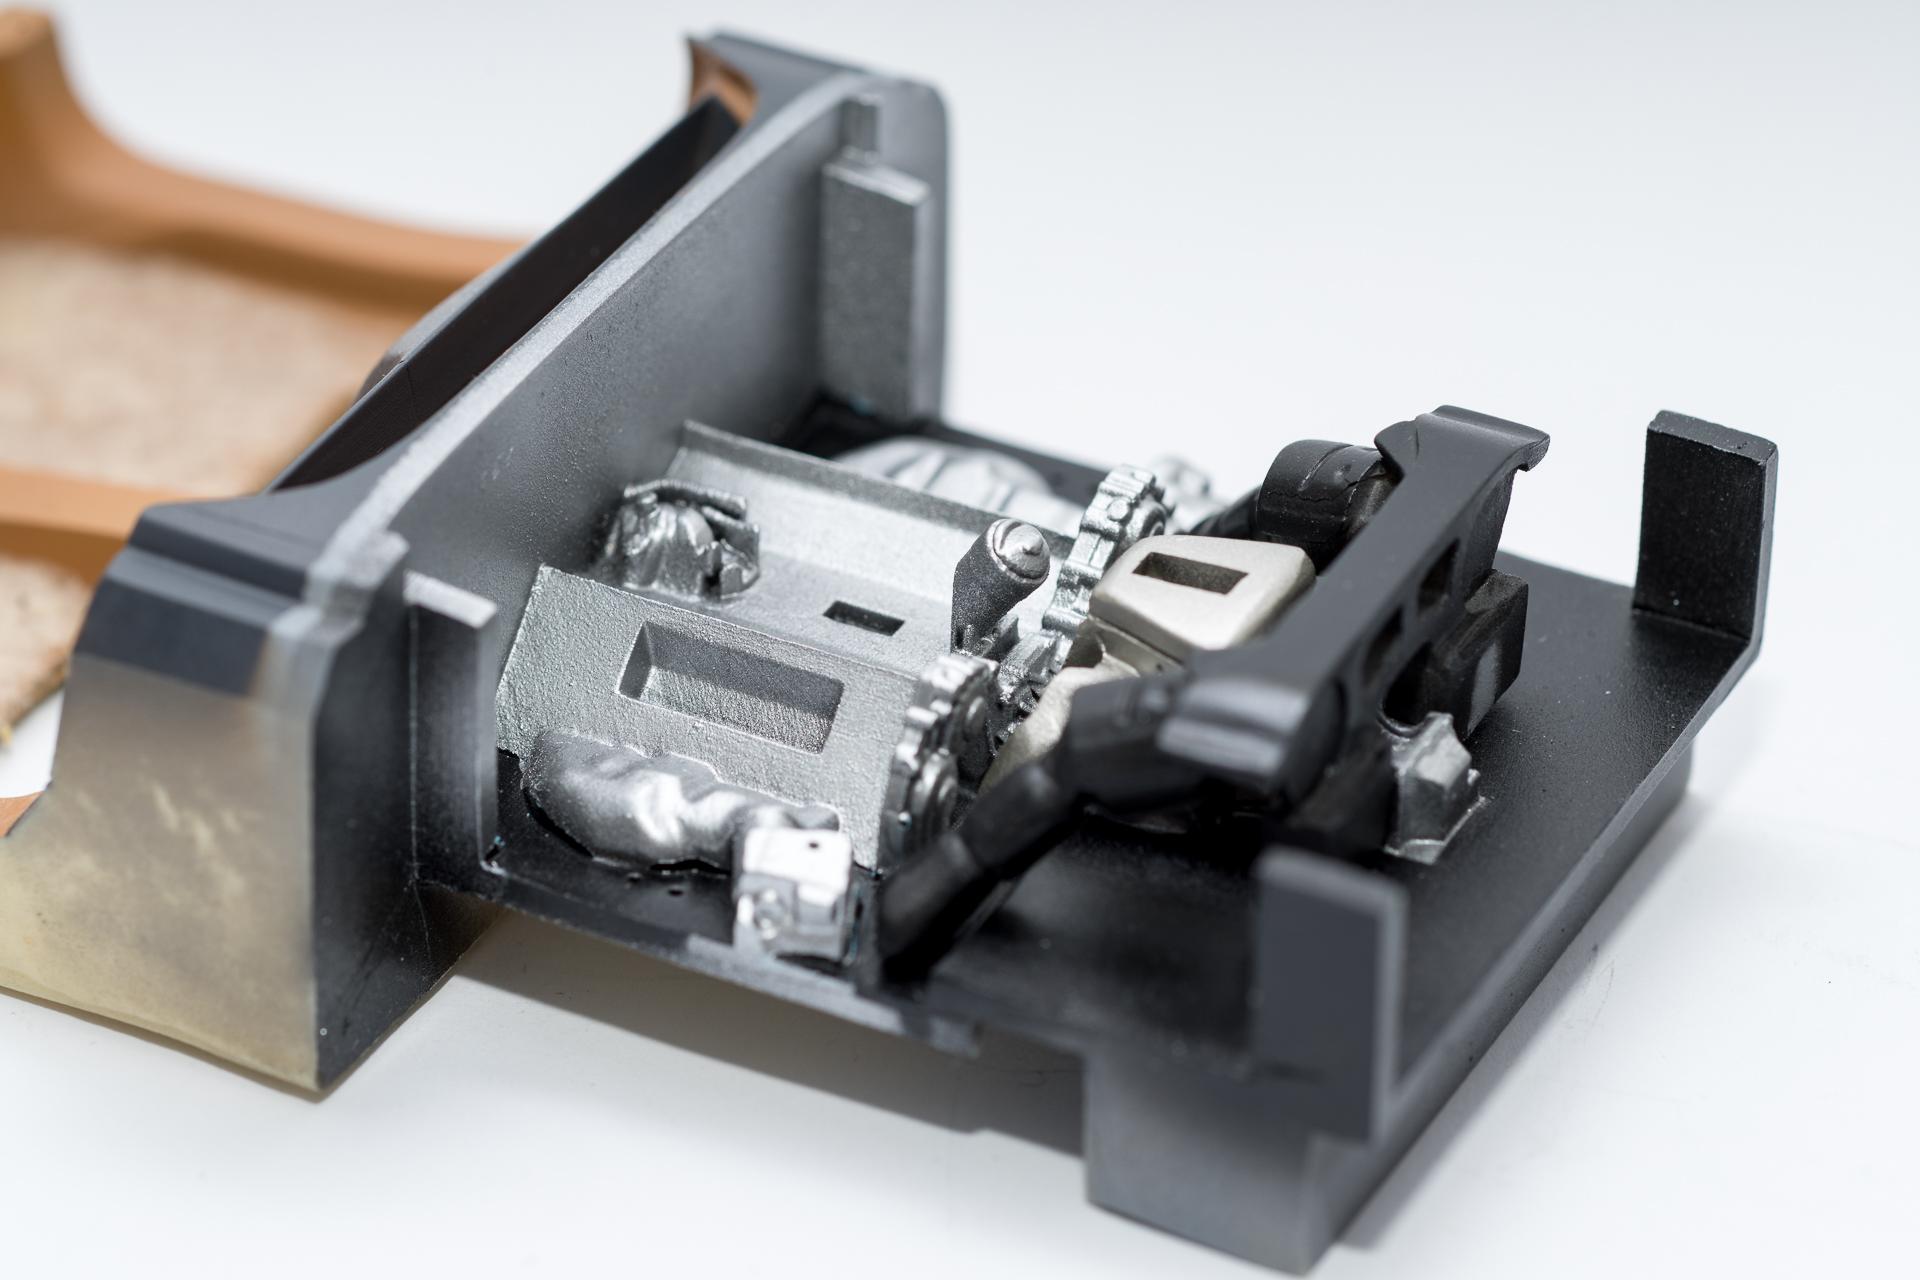
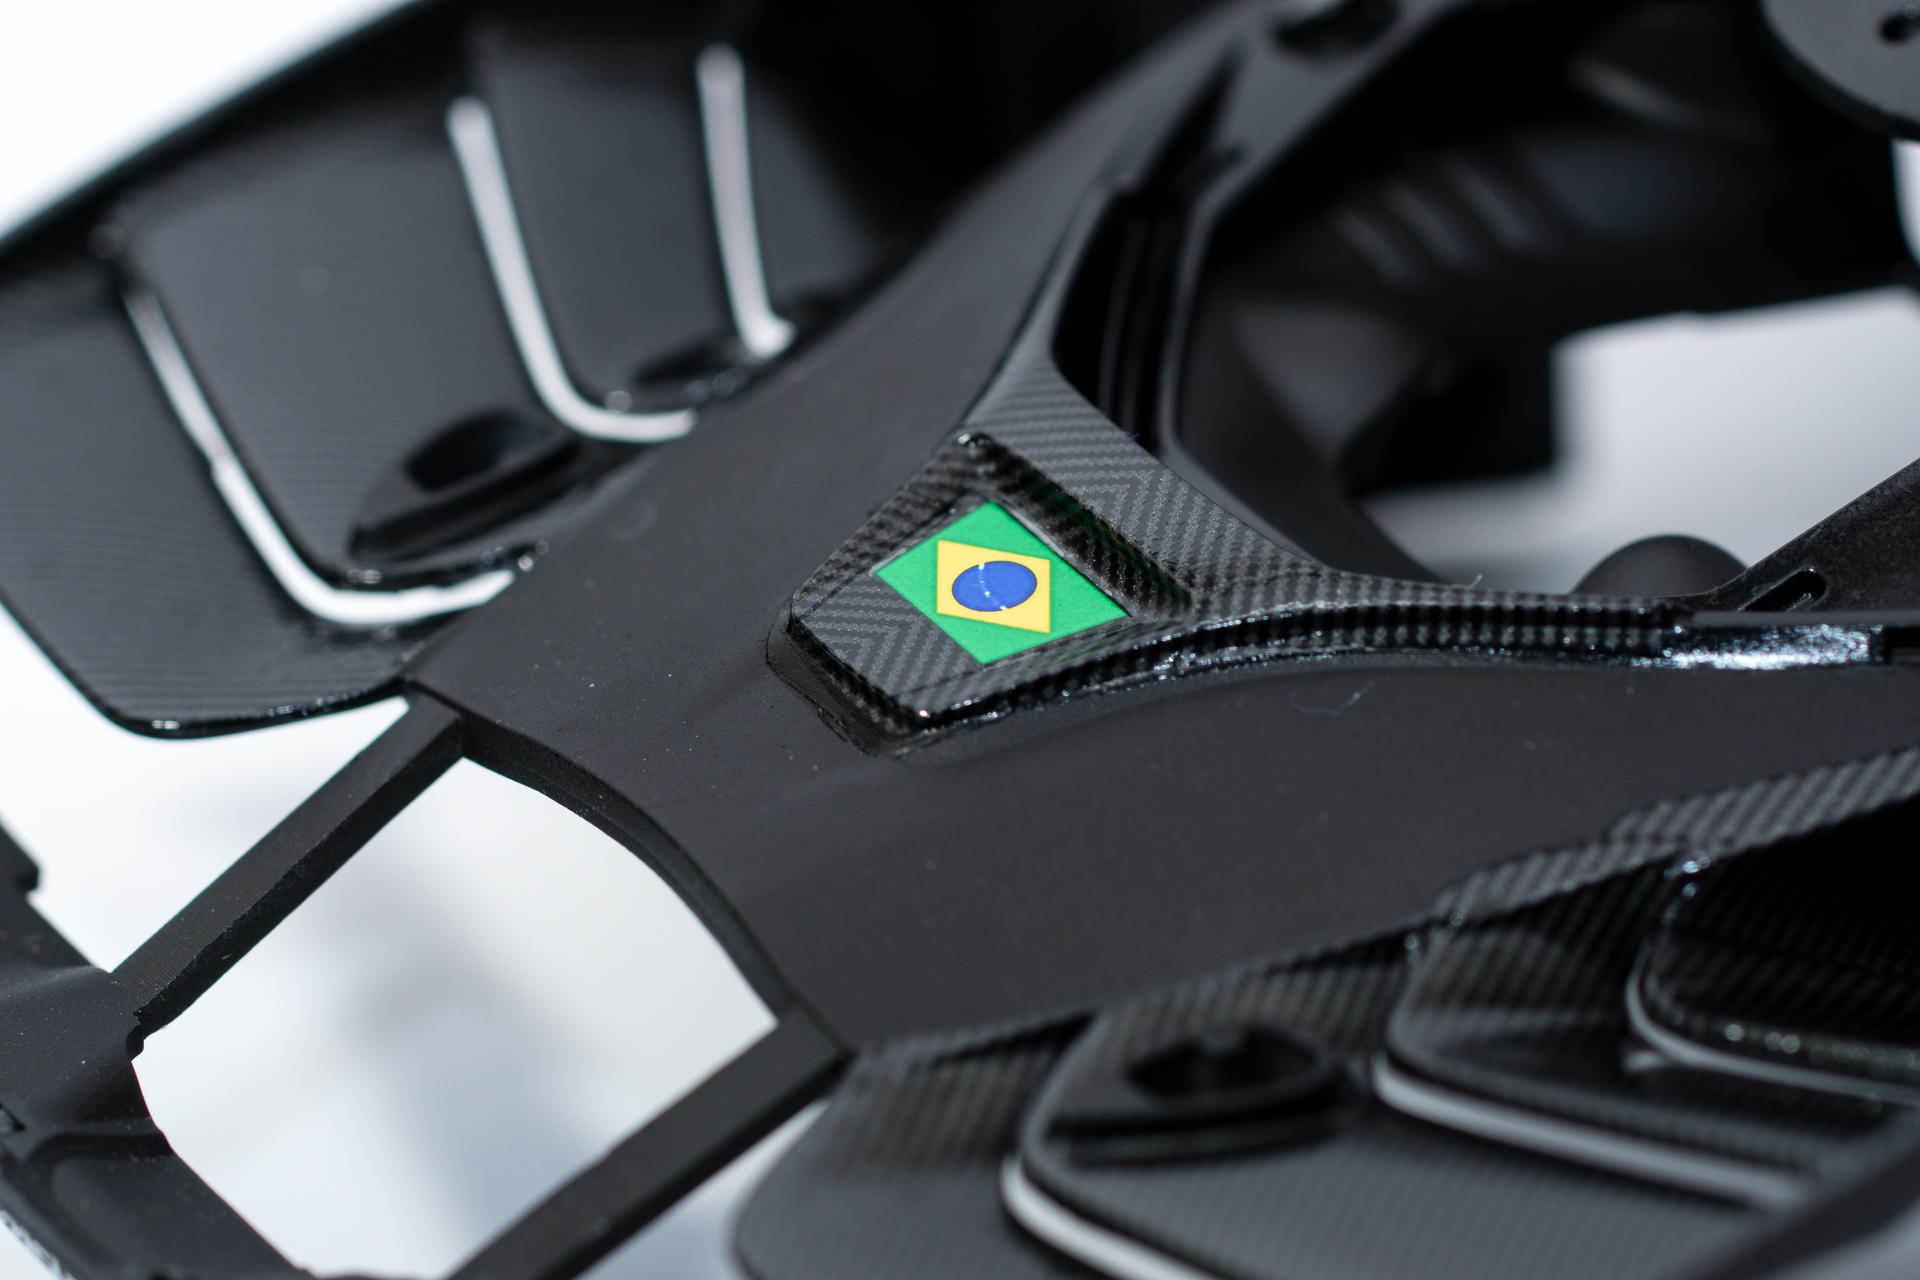
Hi all Thank you very much ?And I leaned more towards the wheels on the left, as I thought the ones on the right were rather generic and old-school ? This week I finished the first of the two seats. I started decal work on the second one, but after the first carbon decal applied I had to do something else ? Main work this week was on the engine / engine compartment Here I'll have to apply another decal with the Ferrari logo and attach a cap from PE parts on the round thing in the center Regarding the firewall I'll check if it can be seen once the model is finished. If yes, I'll apply some carbon as well, otherwise I'll leave it the way it is ? That's it for today's update Urs
-
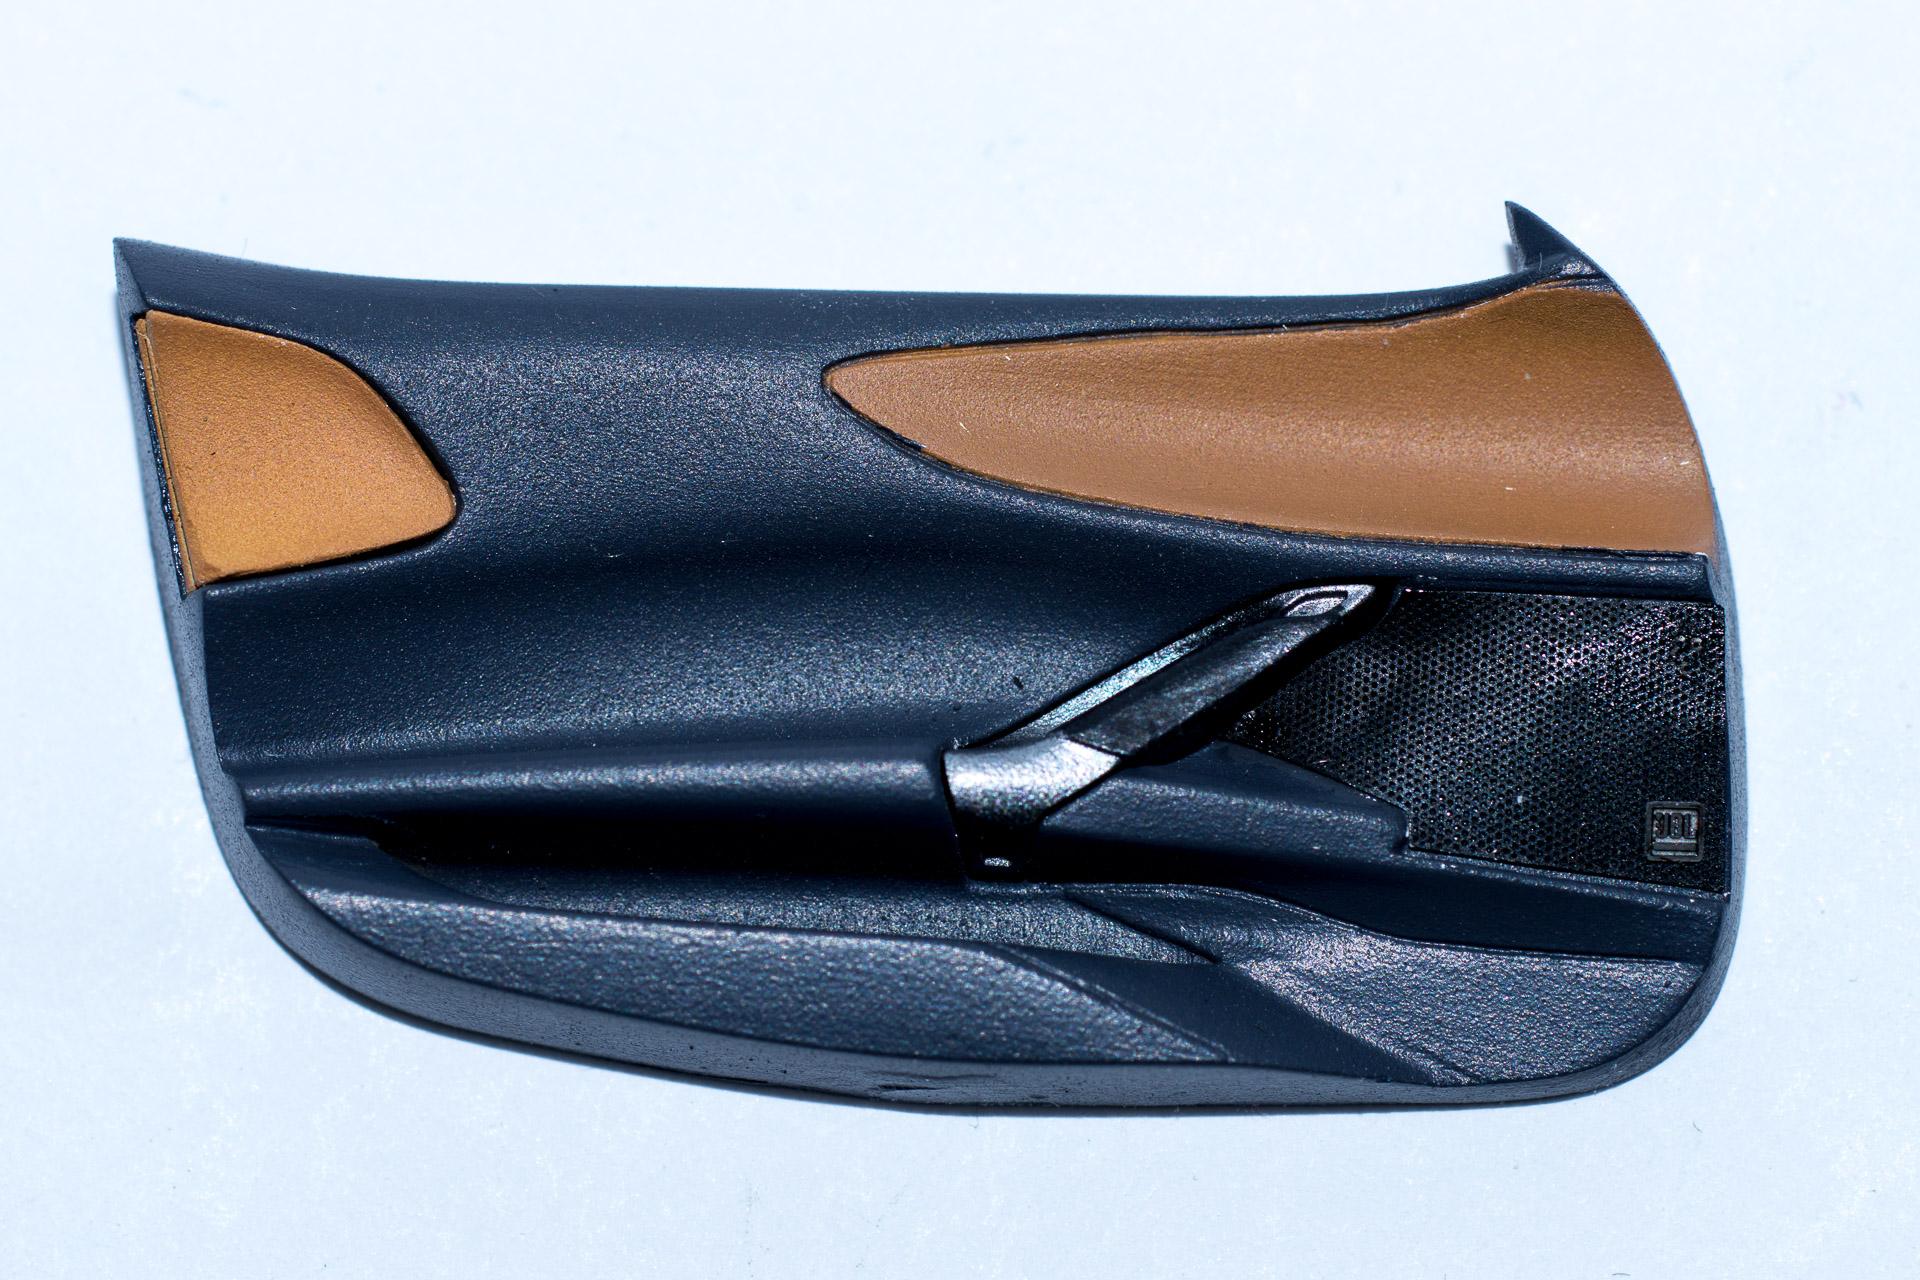
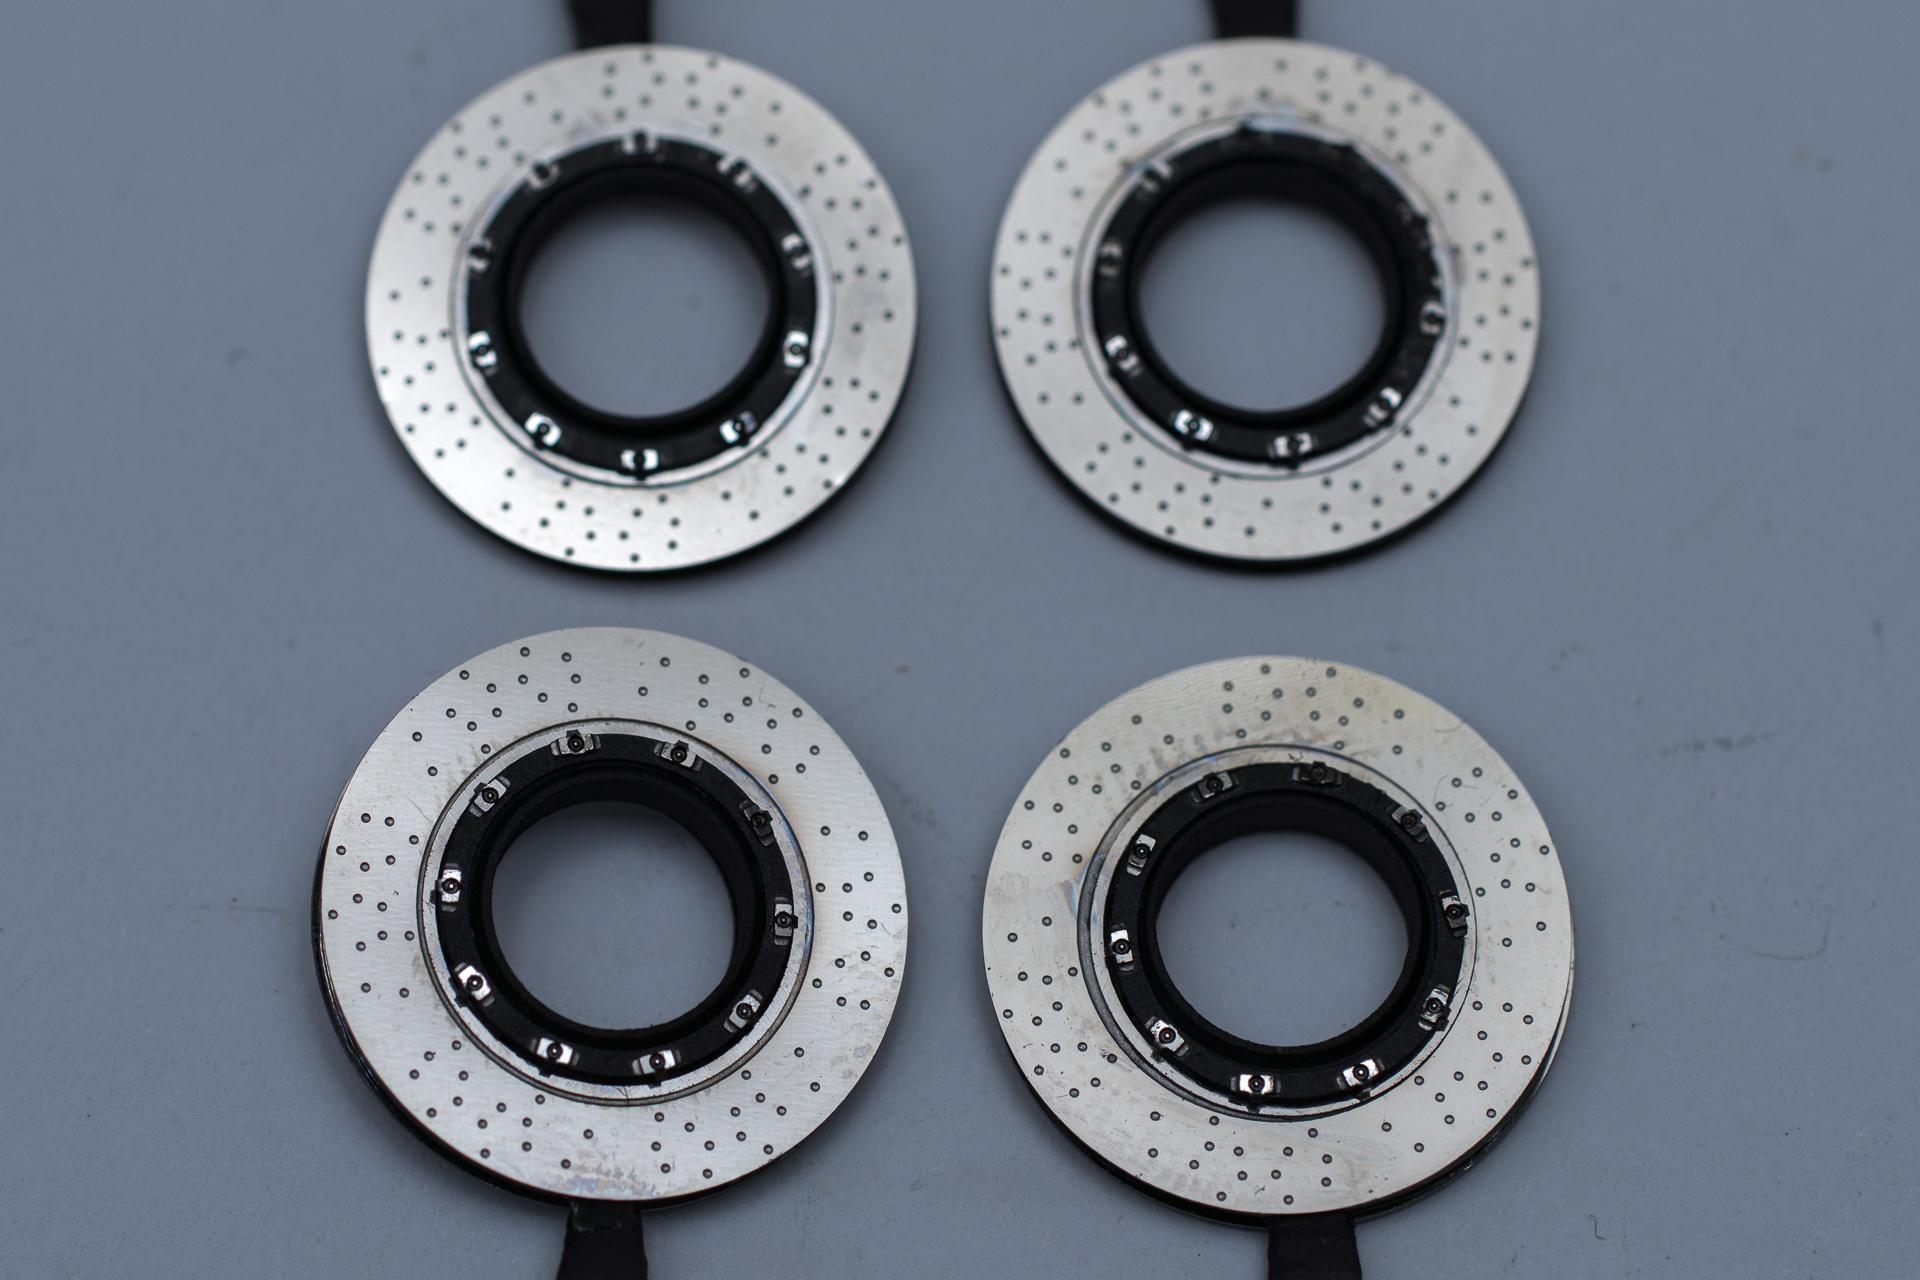
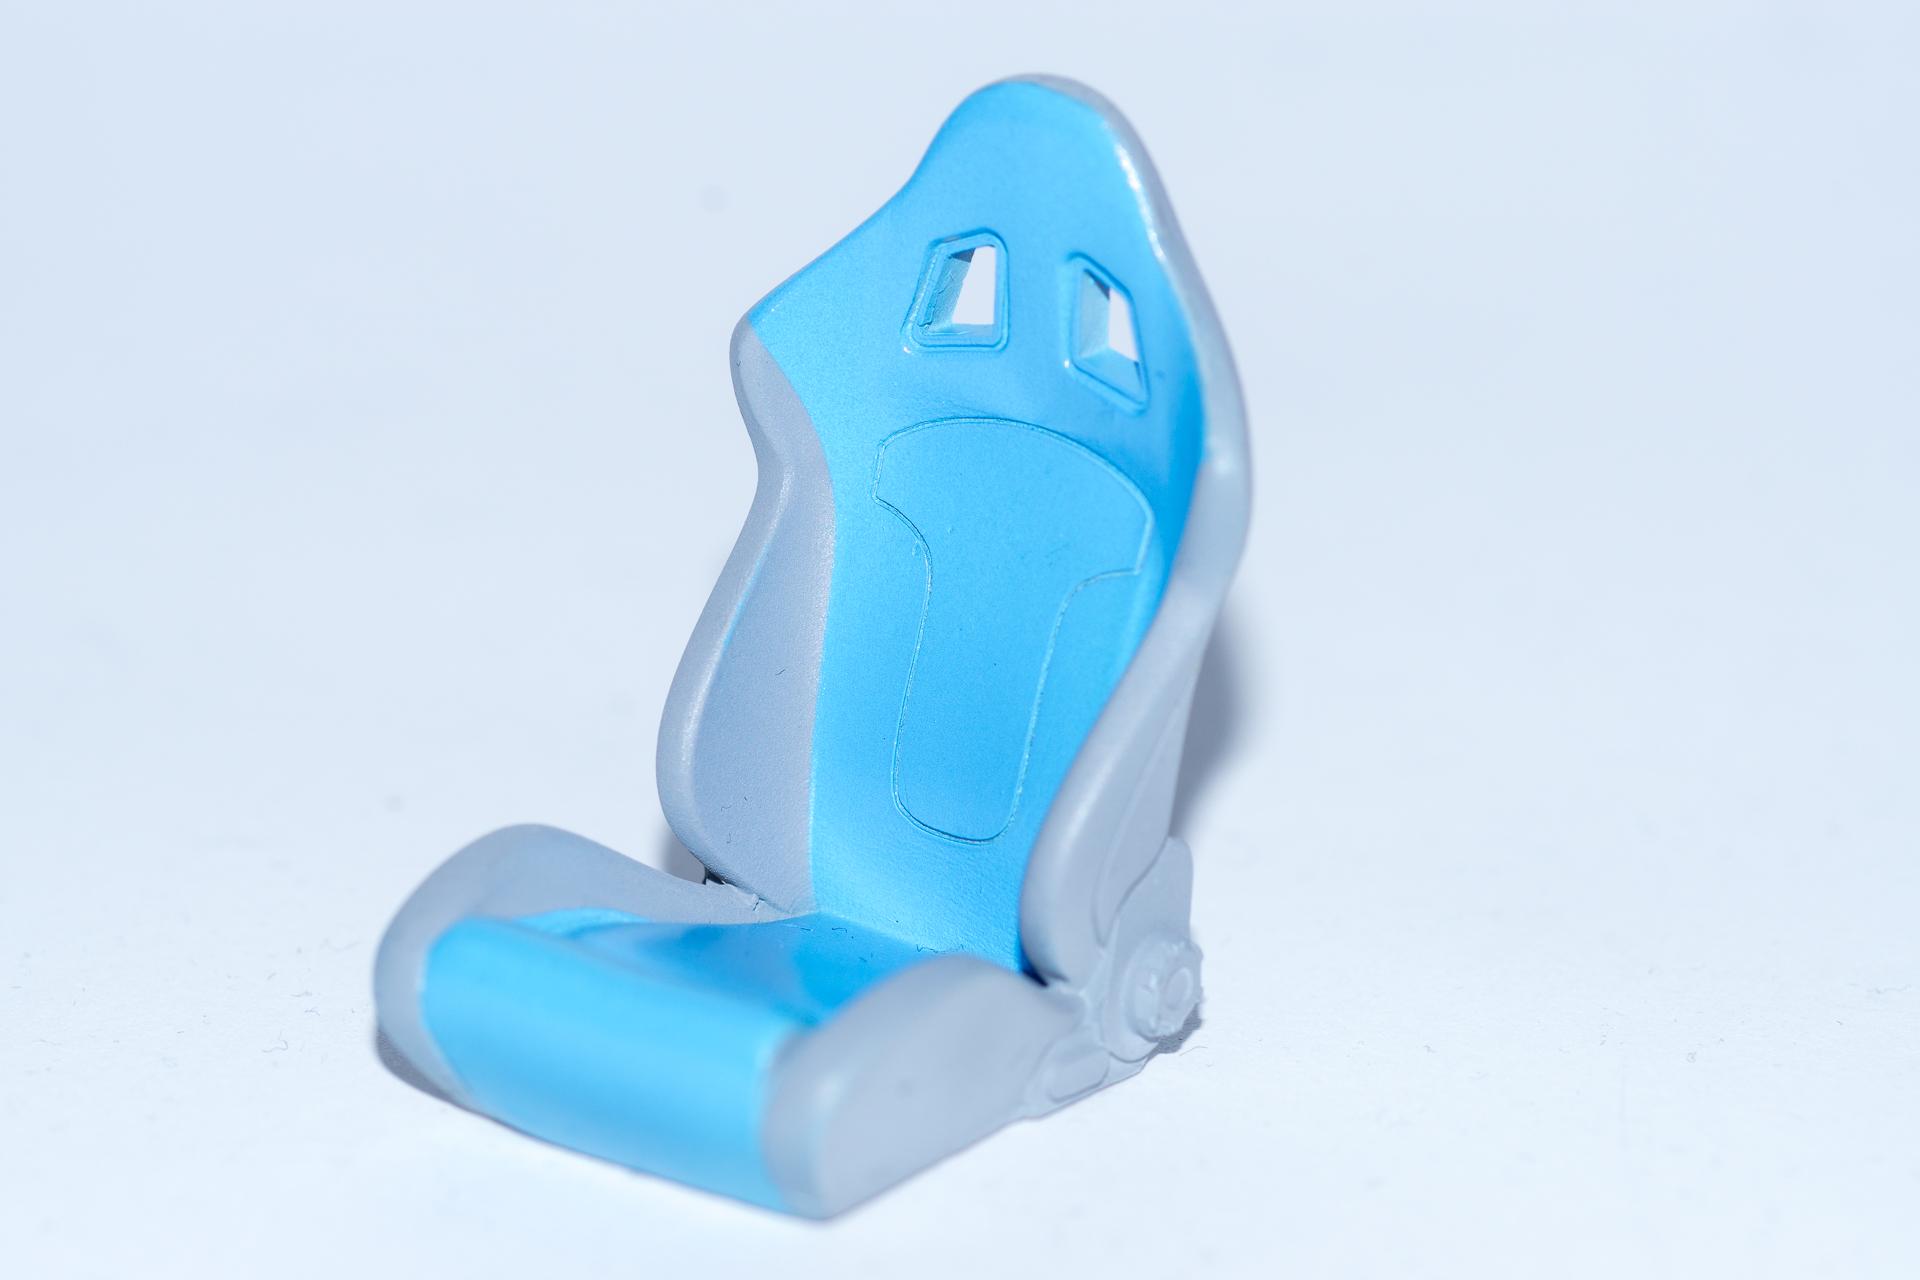
Hi all I think, I might have expressed myself somehow unclear. I meant that the 1:1 car I took as reference was in black. I knew that you could choose from a broad range of interior colors when ordering your car. Never heard of the one on one program though. That makes it much easier for future builds, so I won't have to worry, whether a color scheme would really be available ? Regarding the primer, I only have one 2K primer which is a quite dark grey and I didn't want to buy another one. Usually I would always go from light to dark, but doing it this way was much easier to mask off in this case. Unfortunately I didn't have that much time on the work bench as I wanted, also due to my son's school holidays where we preferred to day-trip when the weather was fine. But a few progress can be shown anyway First of all the door panels have been finished After that I tried to apply the carbon decals contained in the alpha model kit on one of the seats. I don't know if I just had a bad decal day or if the decals really are this bad, but right after applying them, I stripped the seat and started over, priming and painting it. While the paint was drying, I made my own template with the help of the second seat and cut them out. I used alpha model's decals as an inspiration regarding the shape and layout and ended up with quite similar, but way smaller decals. Last saturday I started with one of the self-made decals and it turned out much better. Now I'll have to apply the decal on the front and the one going from one side to the other and look how these turn out. Then the break discs have been painted and assembled And finally the rims have been painted using Tamiya's LP-63 Titanium Silver. As you can see alpha model provided two different sets of rims which all have been painted, as I couldn't decide yet which one to use. Right now I'm leaning towards the ones on the left side of the picture. That's it for this week's update Urs
-
Hi all Yesterday I tried option number 2 from my last post regarding the damaged carbon-decal on the front and applied small patches to hide the defects. I think I can live with the result and will leave it this way But before applying the stripes for the second time, I'll clearcoat it first to seal everything in Also yesterday I finally managed to apply transparent carbon decals to the middle console. It's not 100% perfect as there are some spots on the edges where the decals overlap and being transparent it is much more visible than with non-transparent decals. But I think, I'll leae it this way now. After a coat of gloss clear I'll paint the oddments tray to clean things up. It may not be 100% accurate this way, but as I already decided on the rear view mirrors to go my own way, that's fine for me That's it for today's update. I hope that my motivation got a boost from these two successful steps, so I'll take some time to continue with this build Urs
-
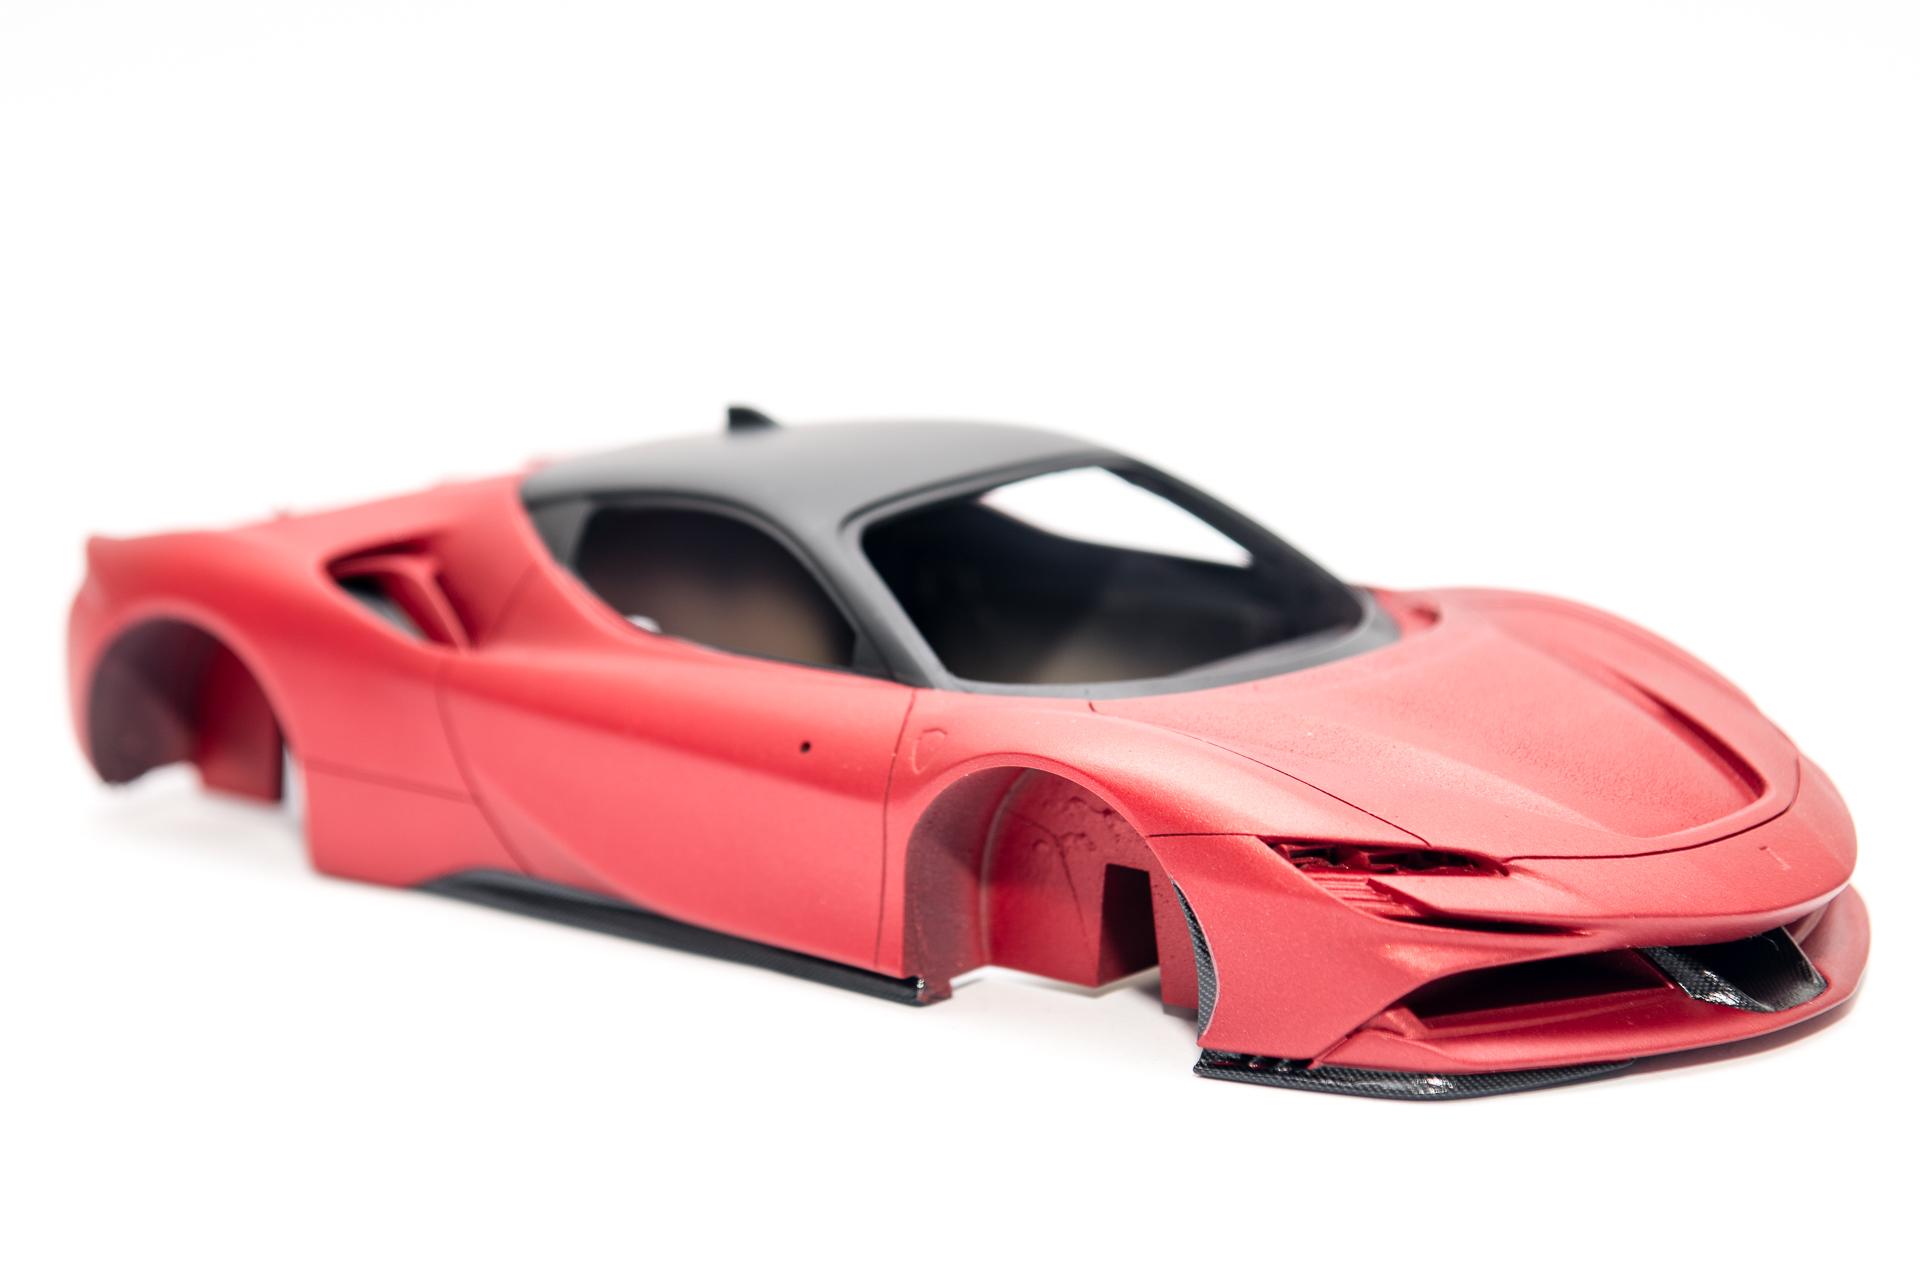
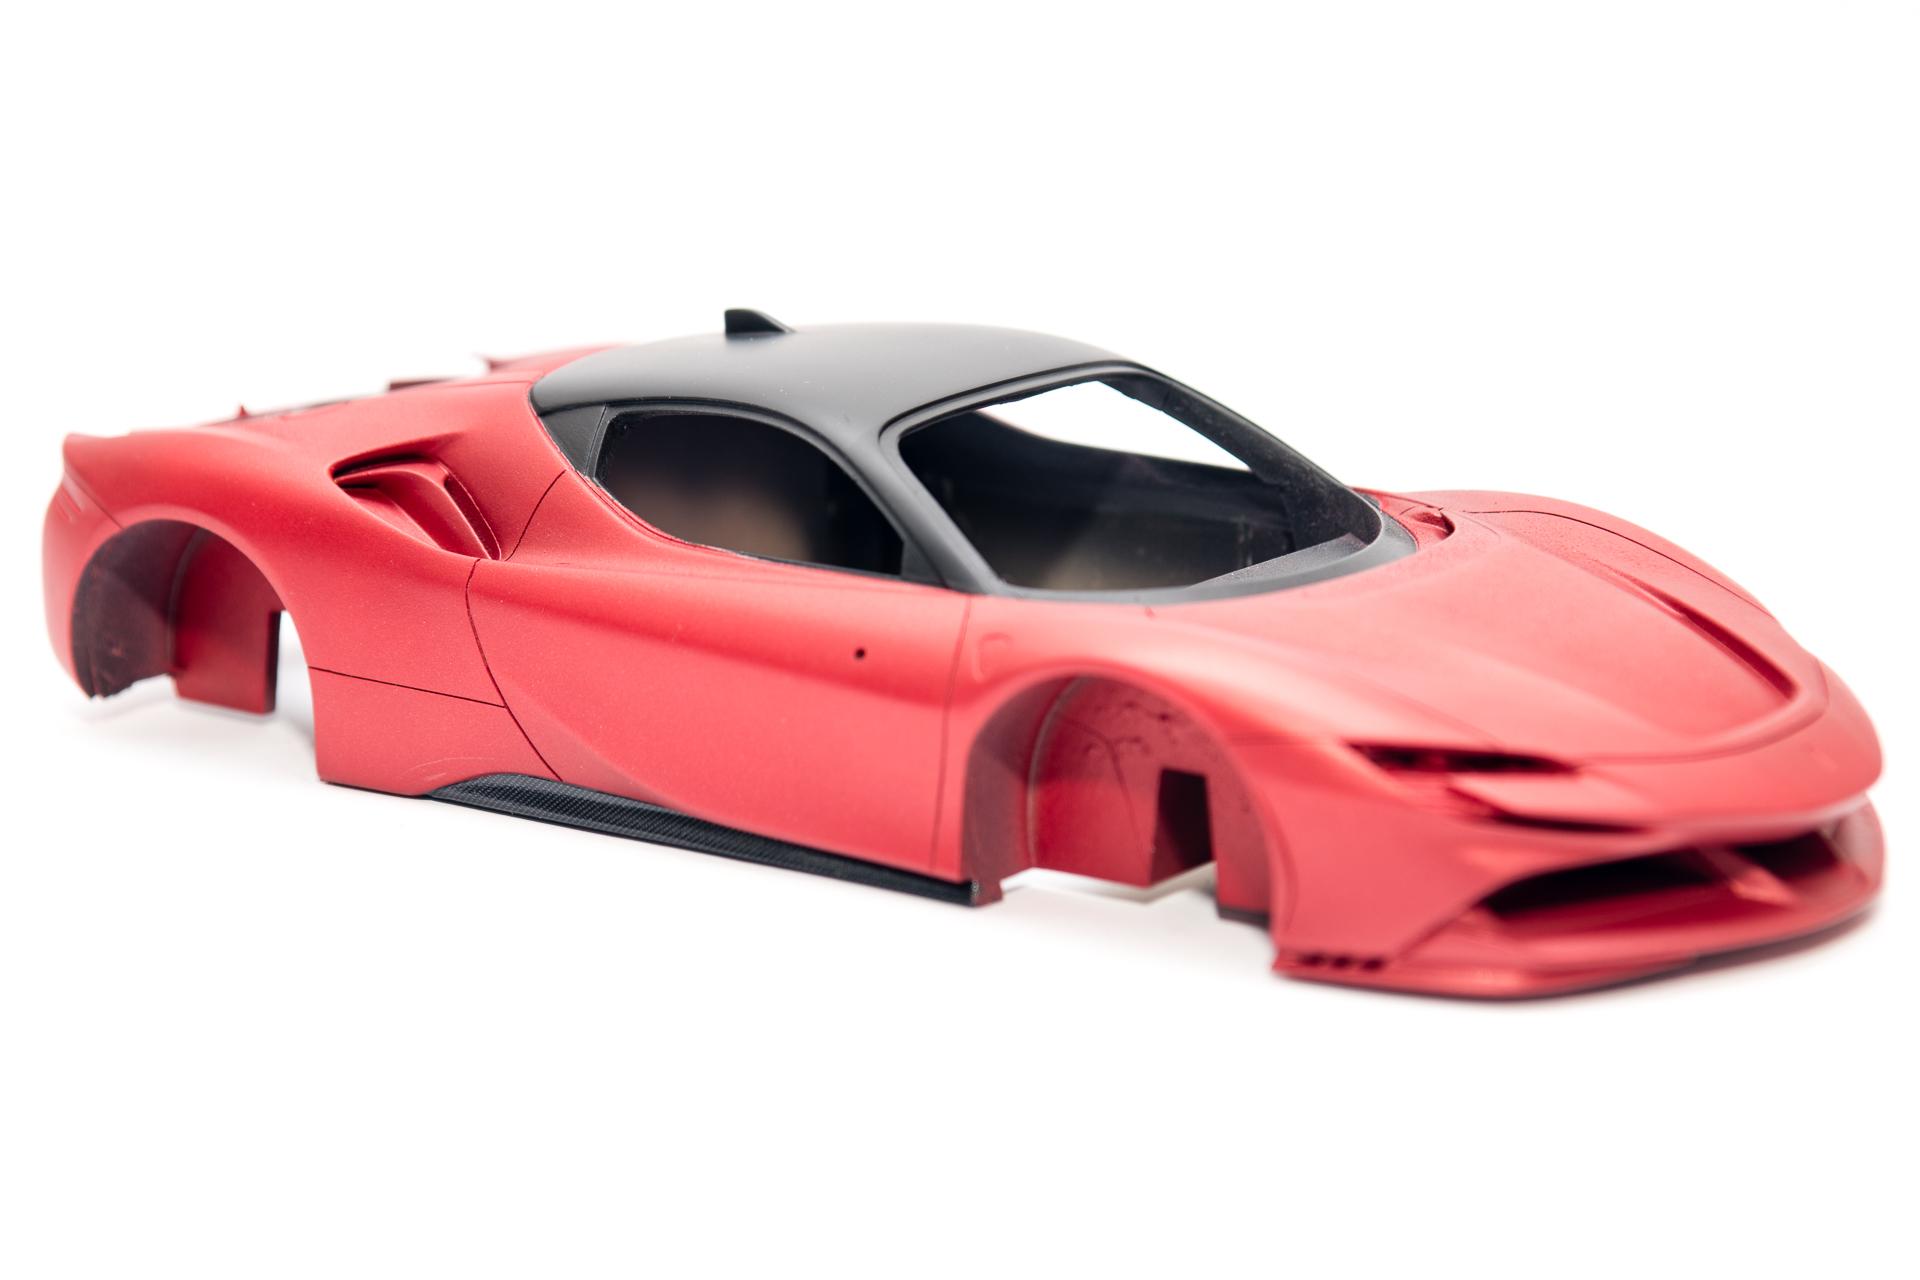
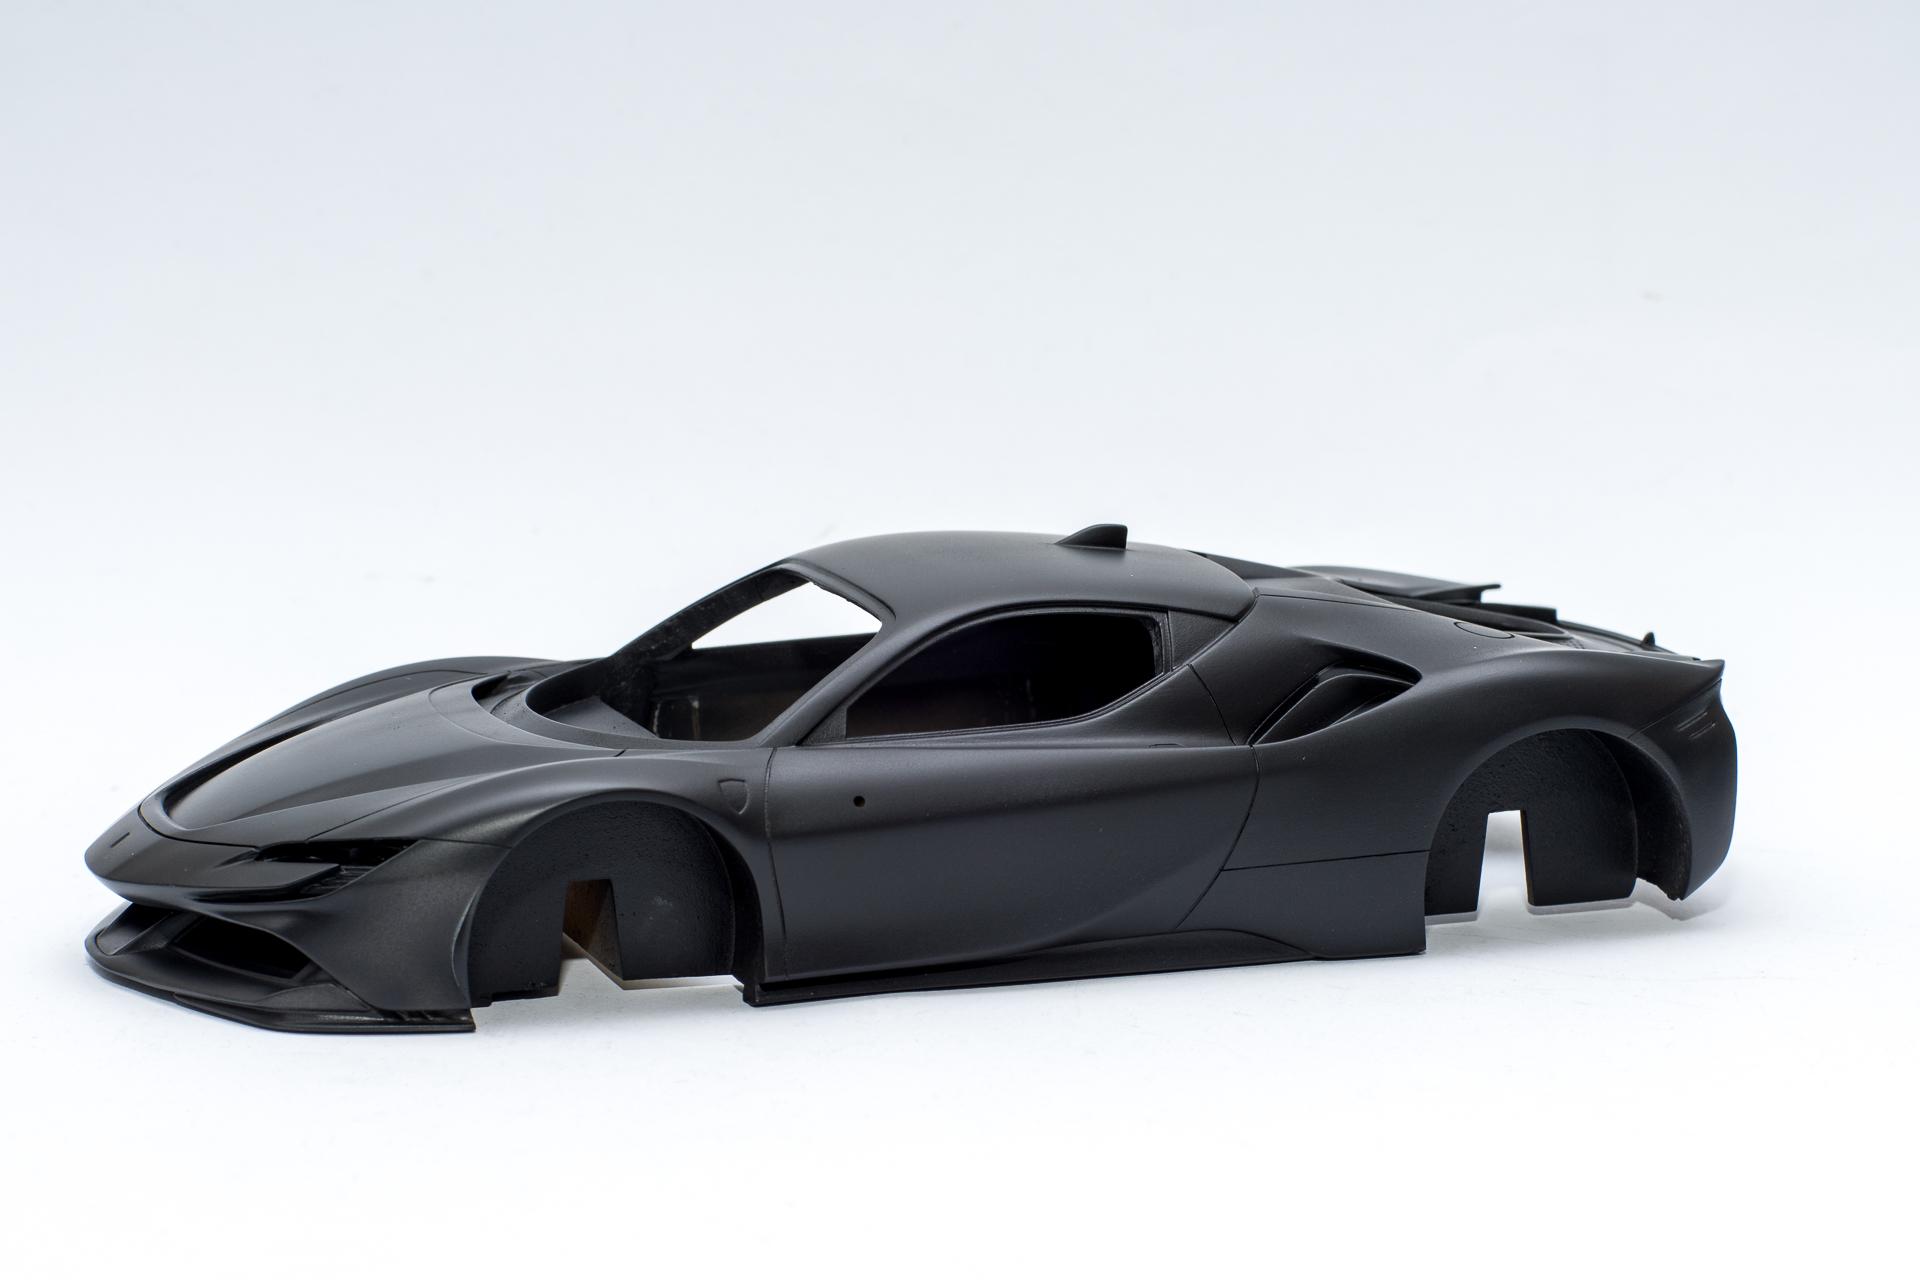
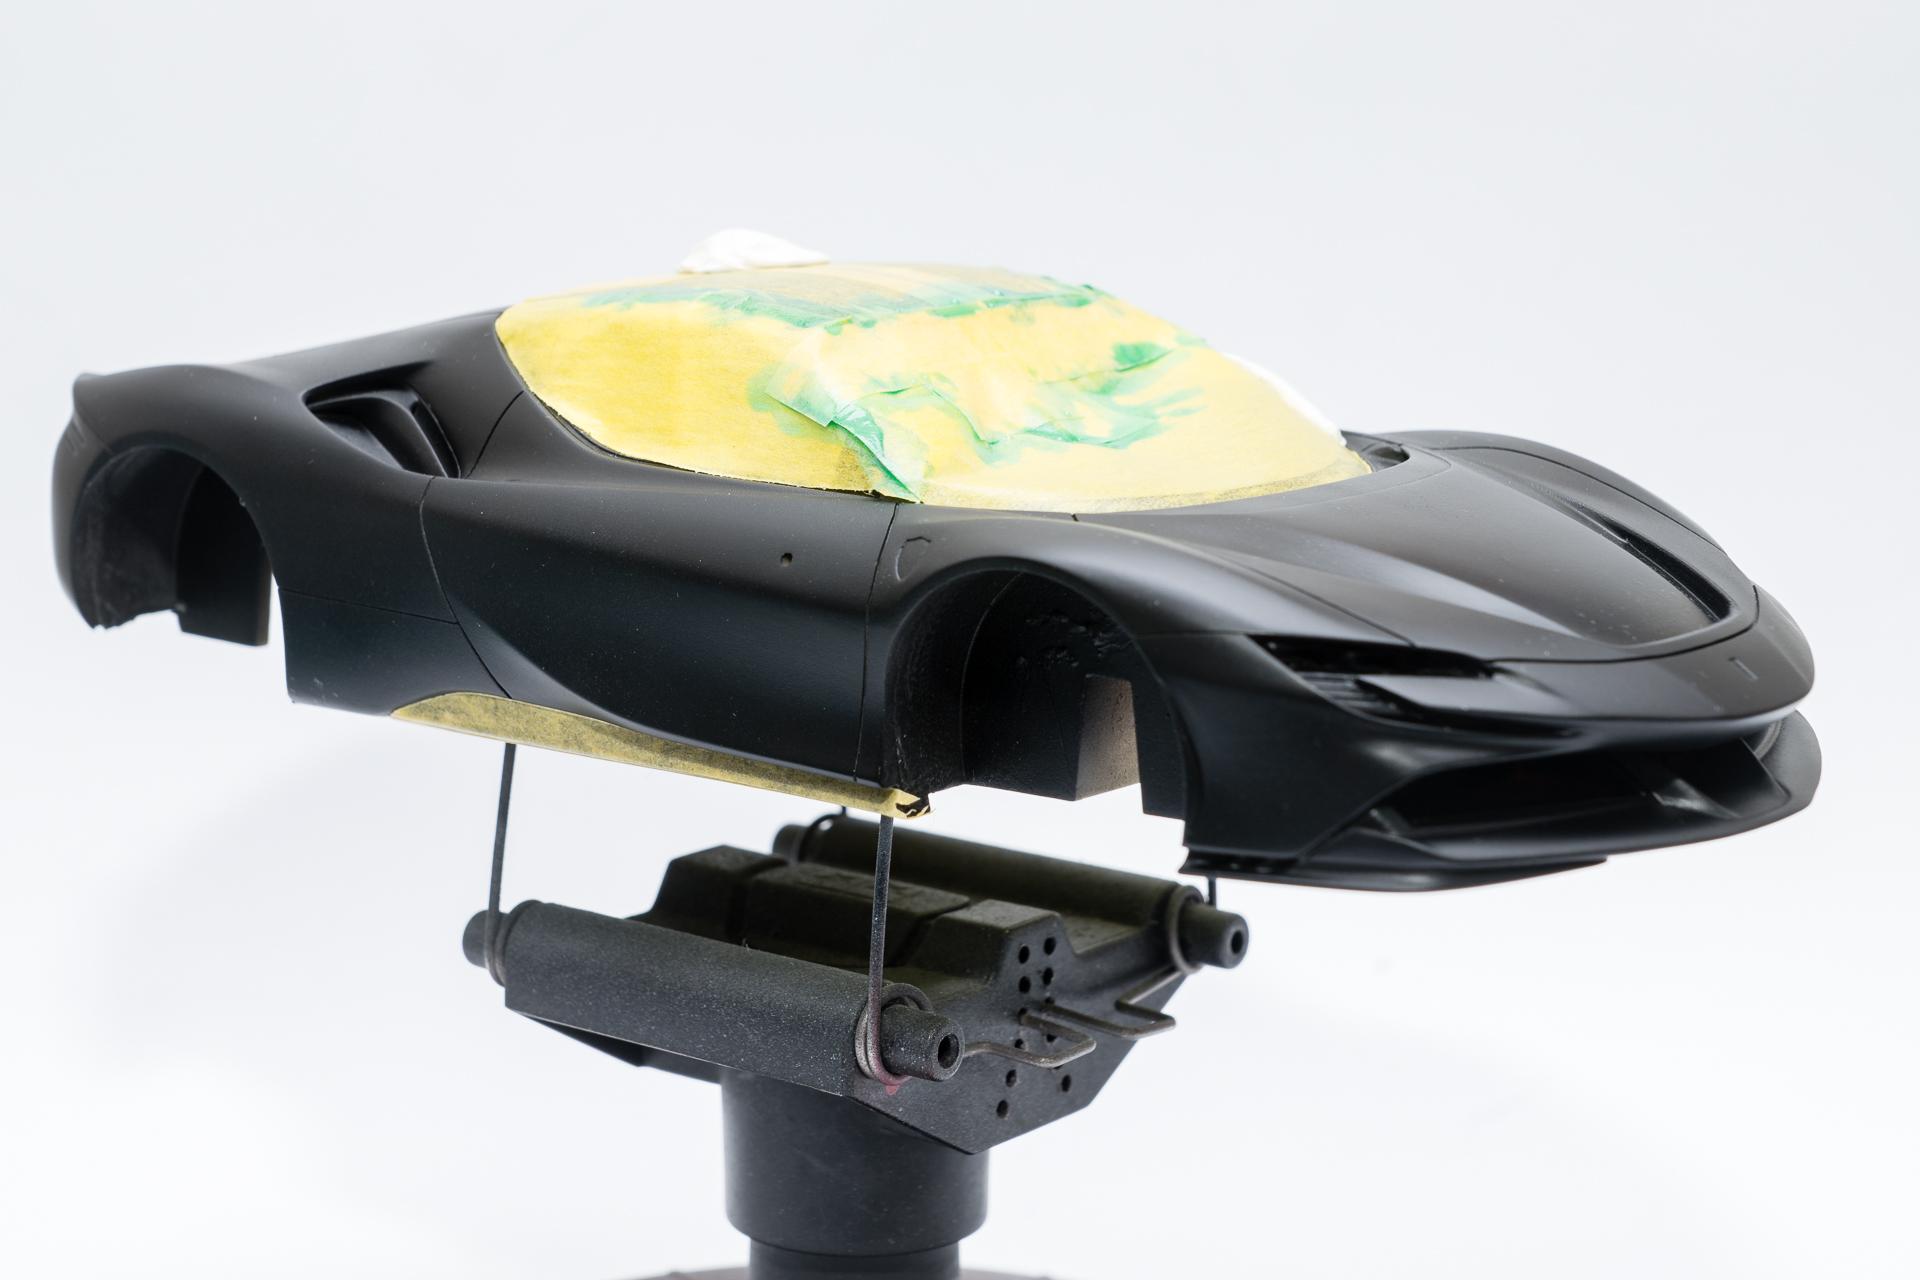
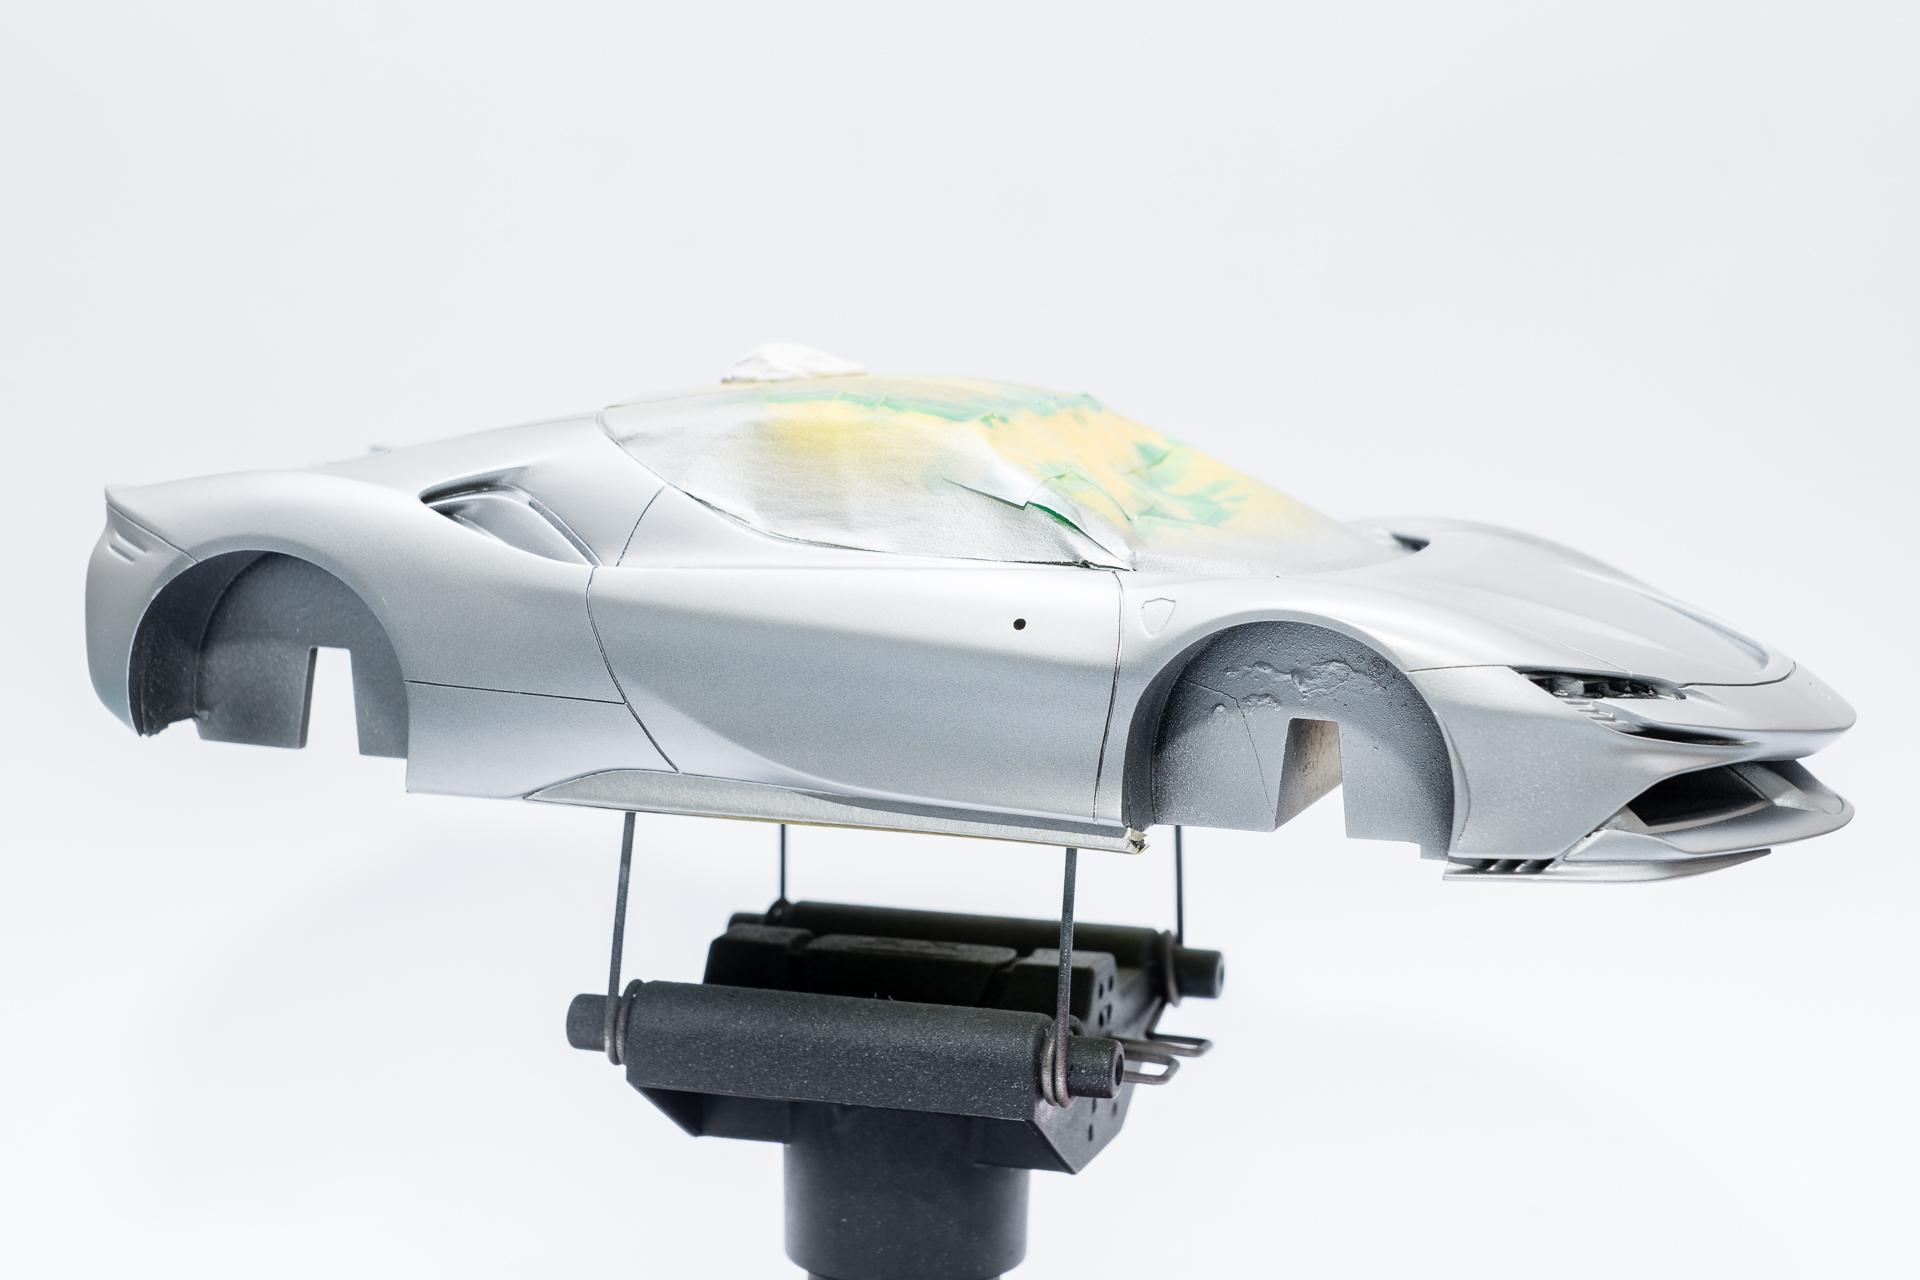
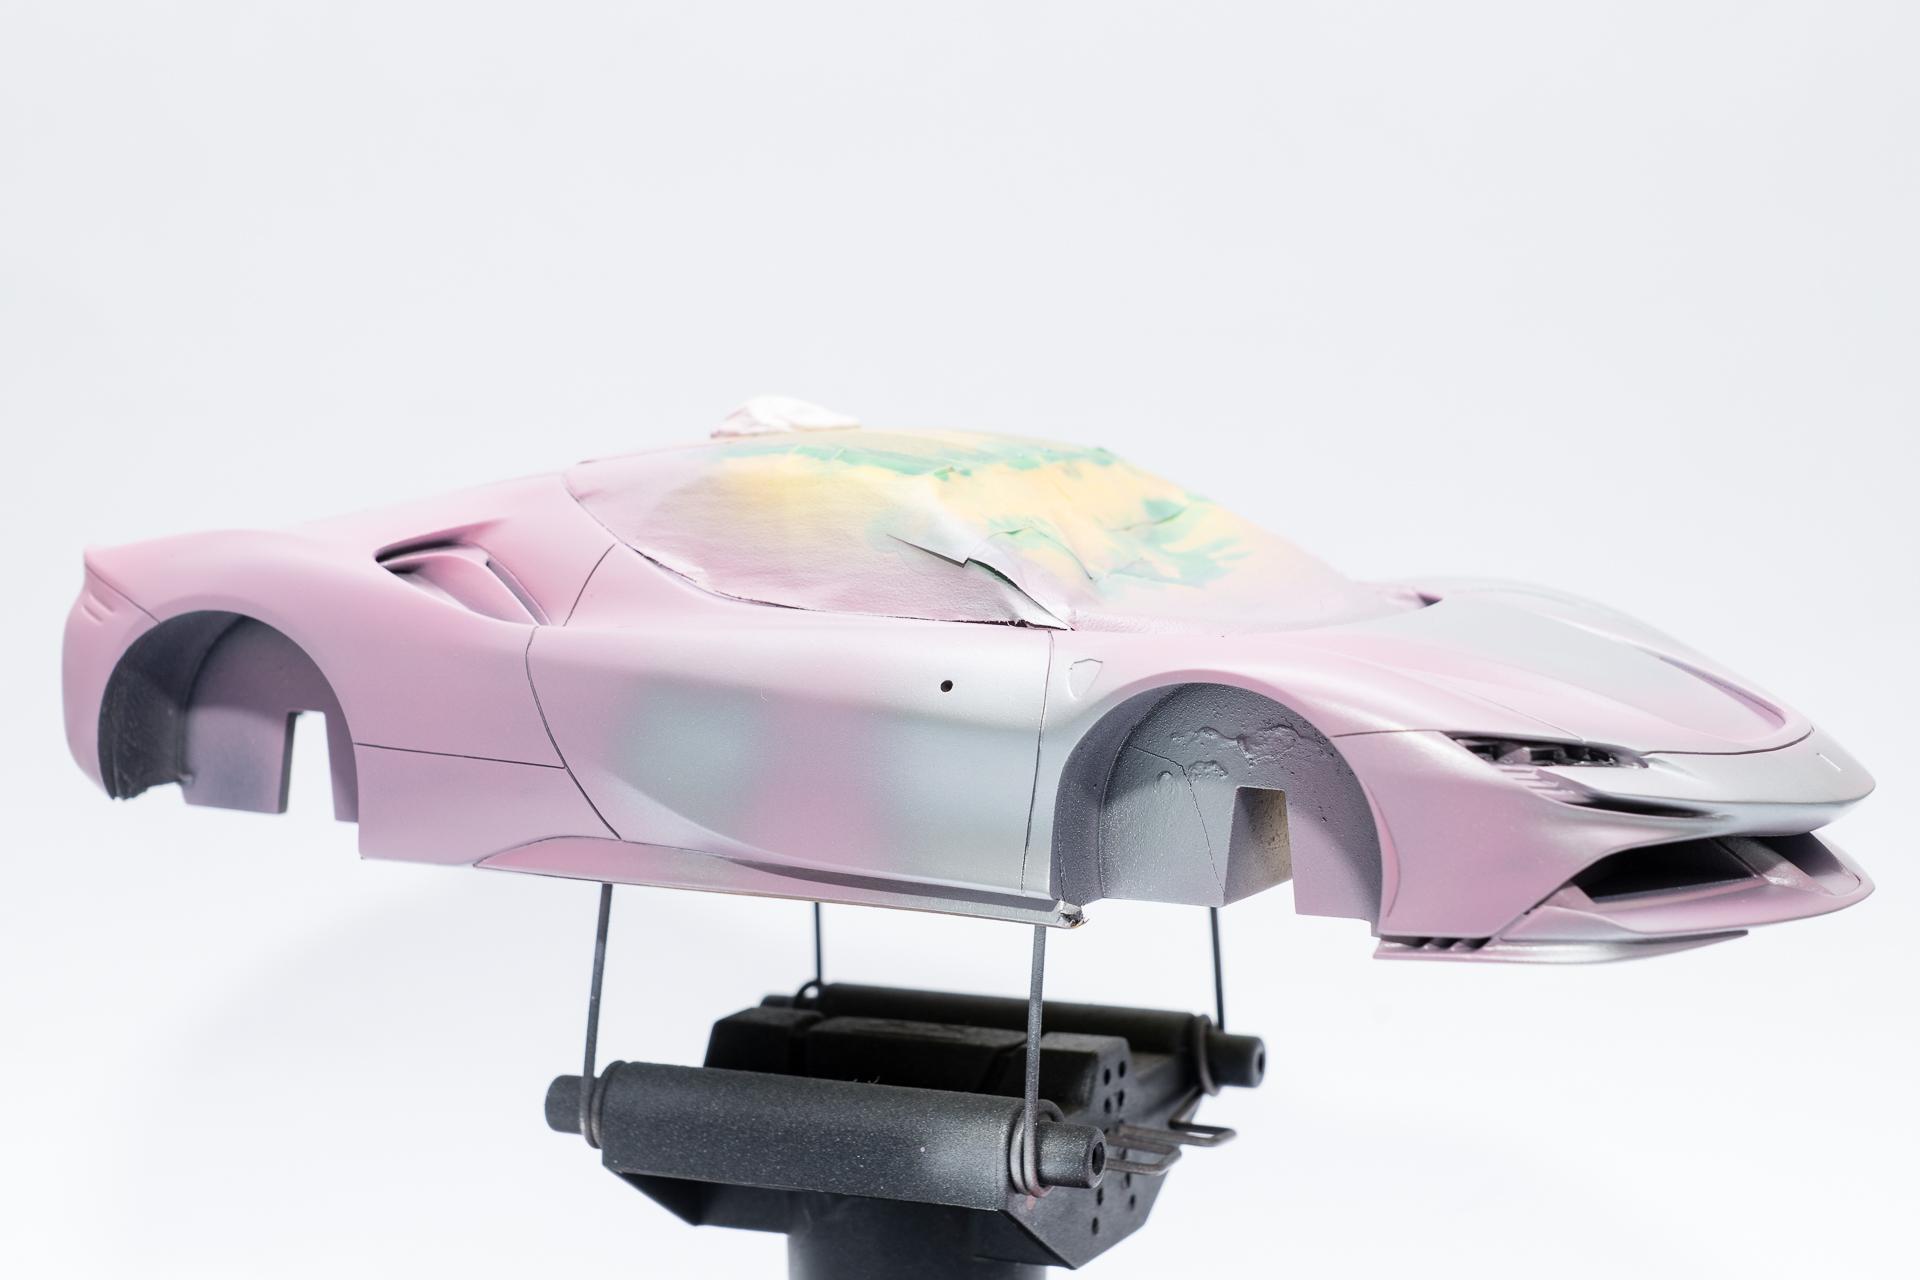
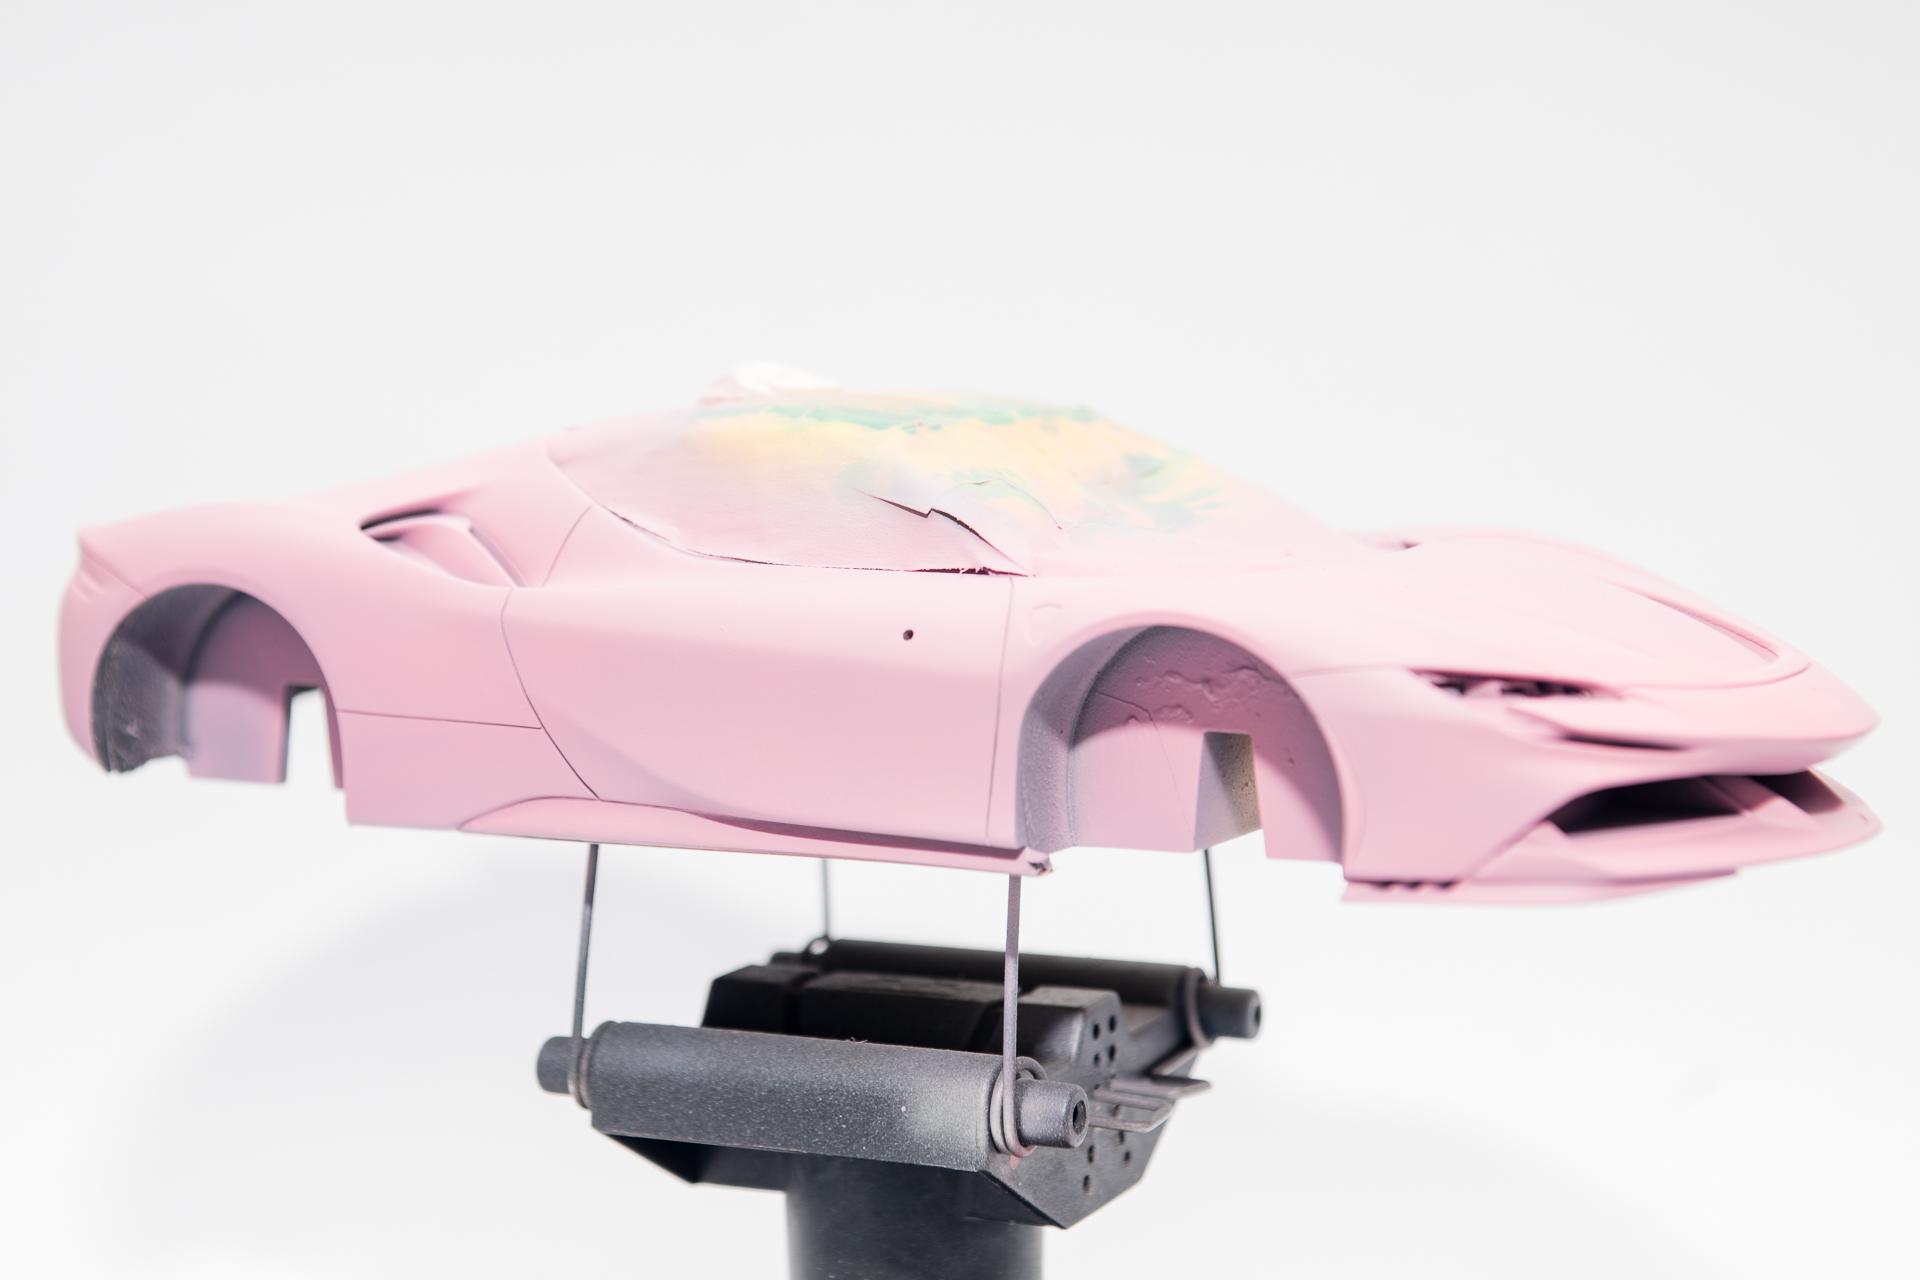
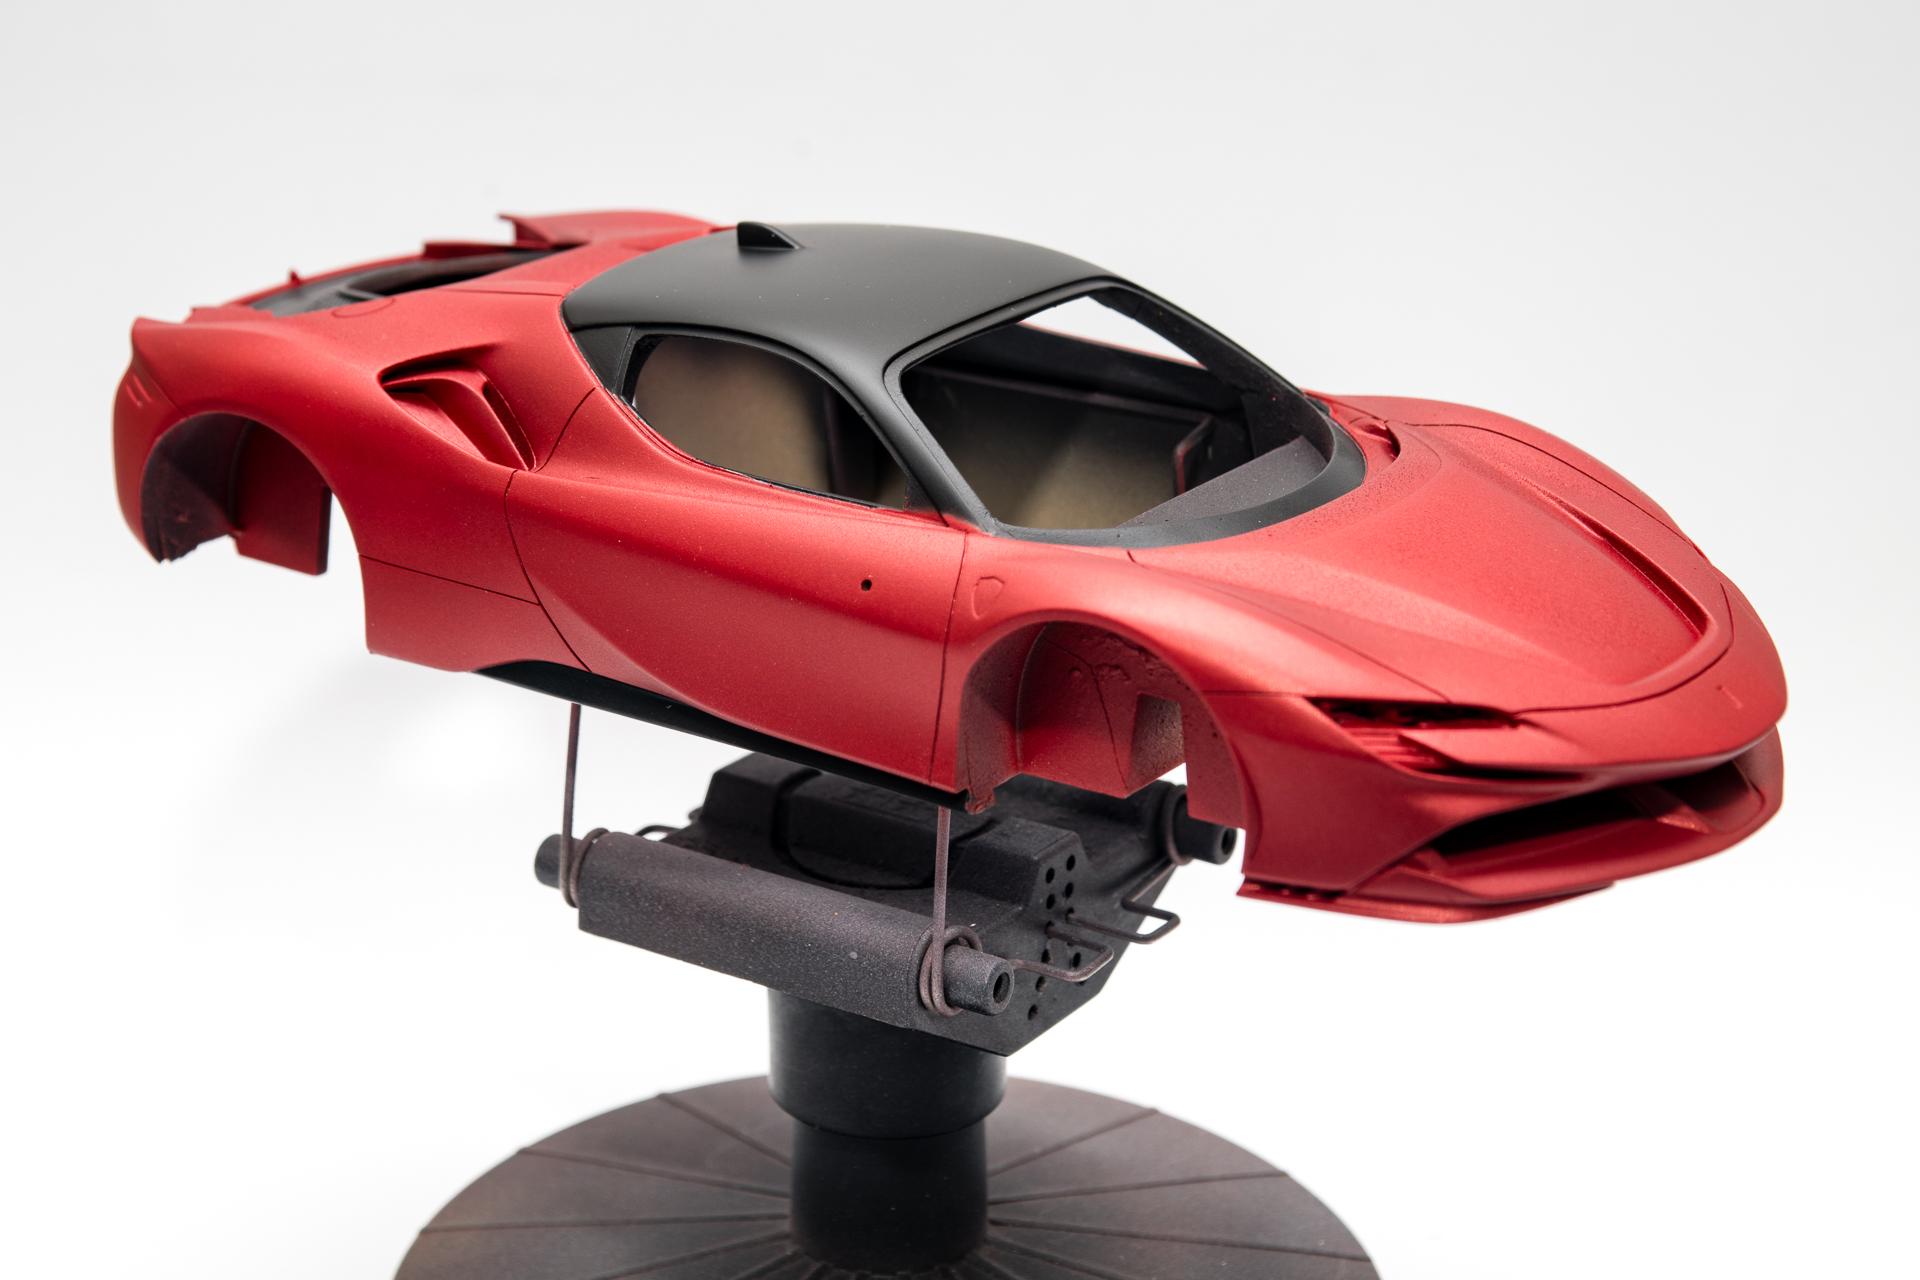
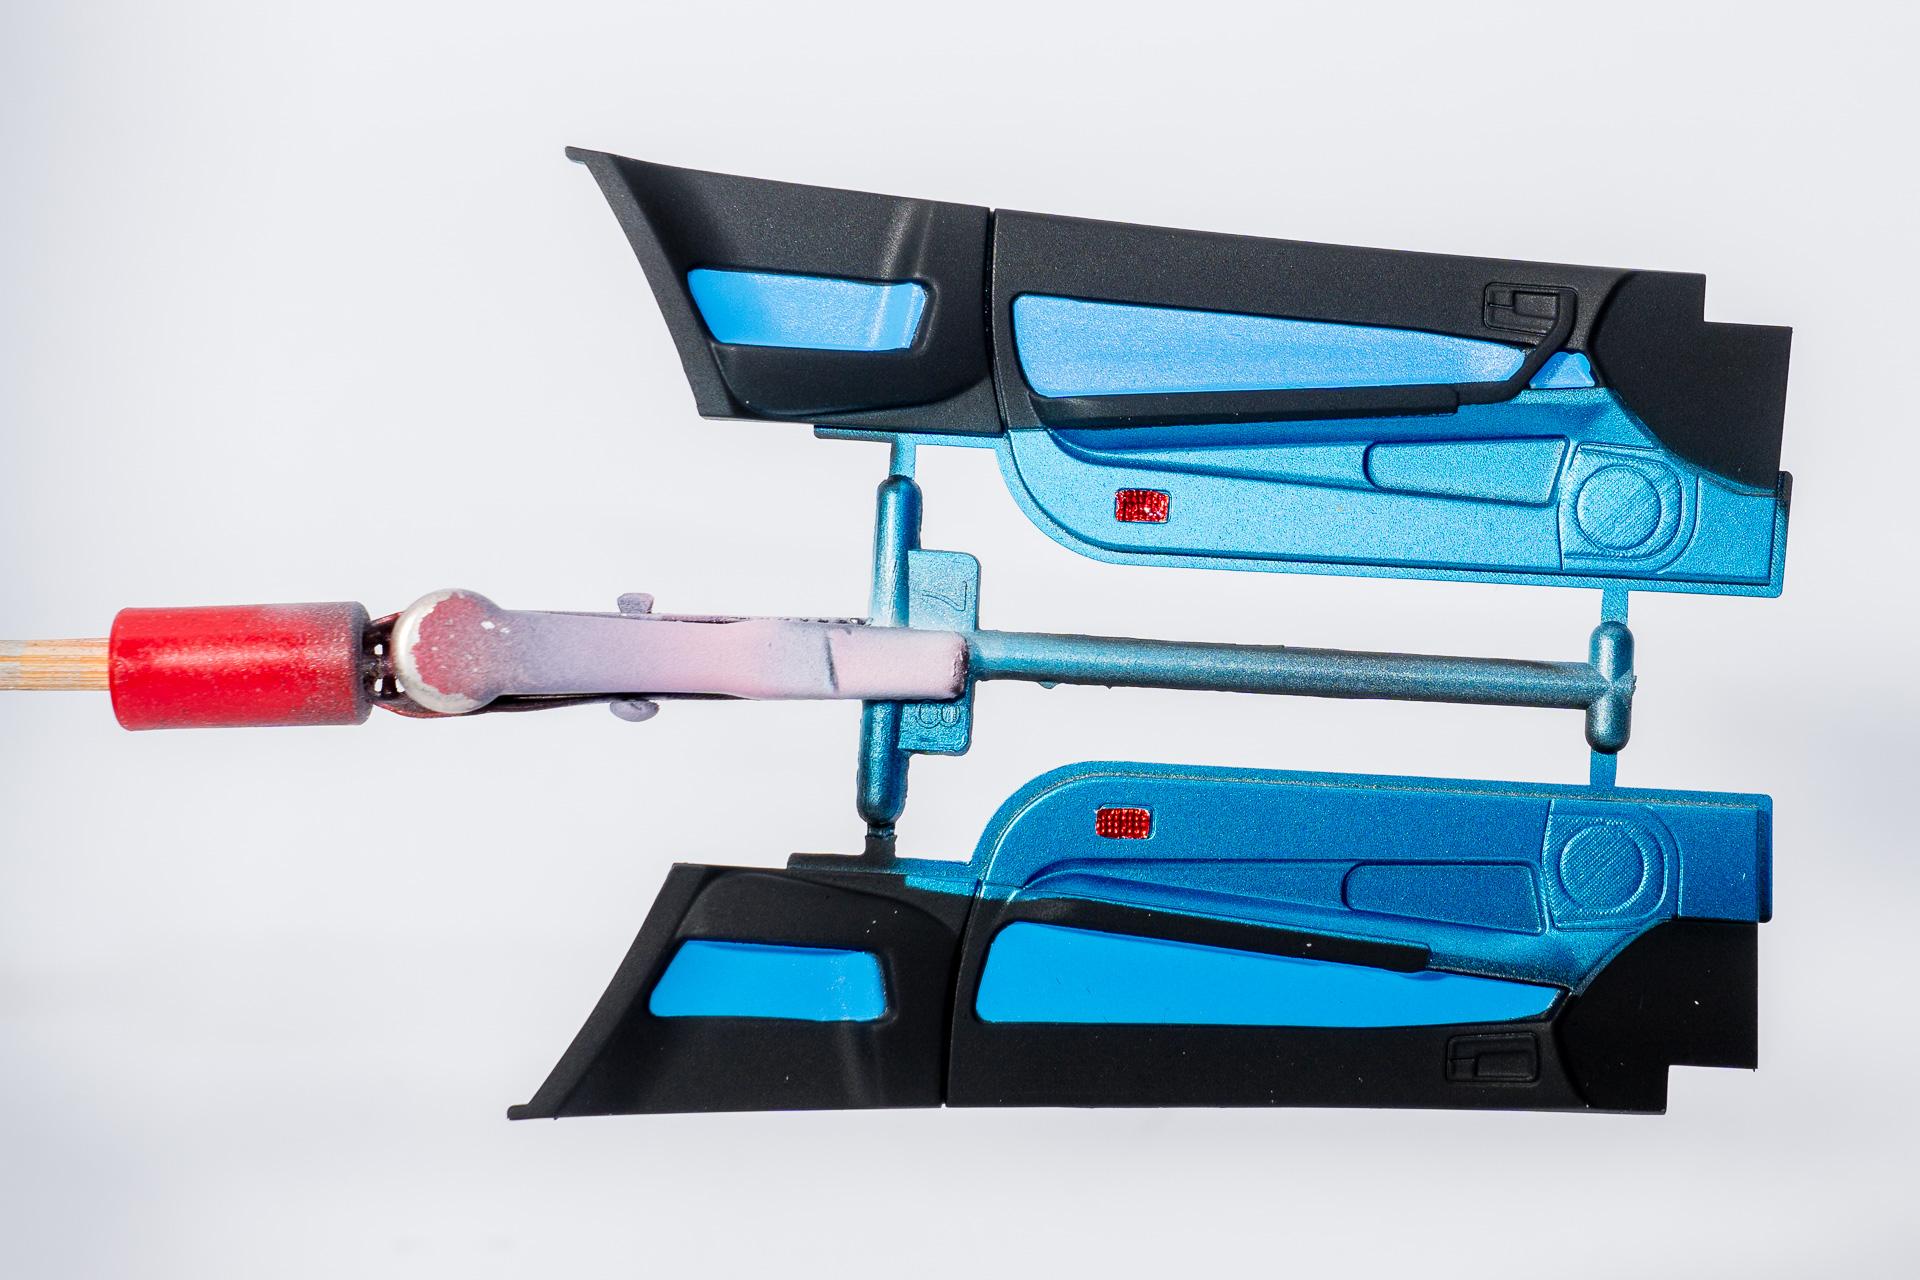
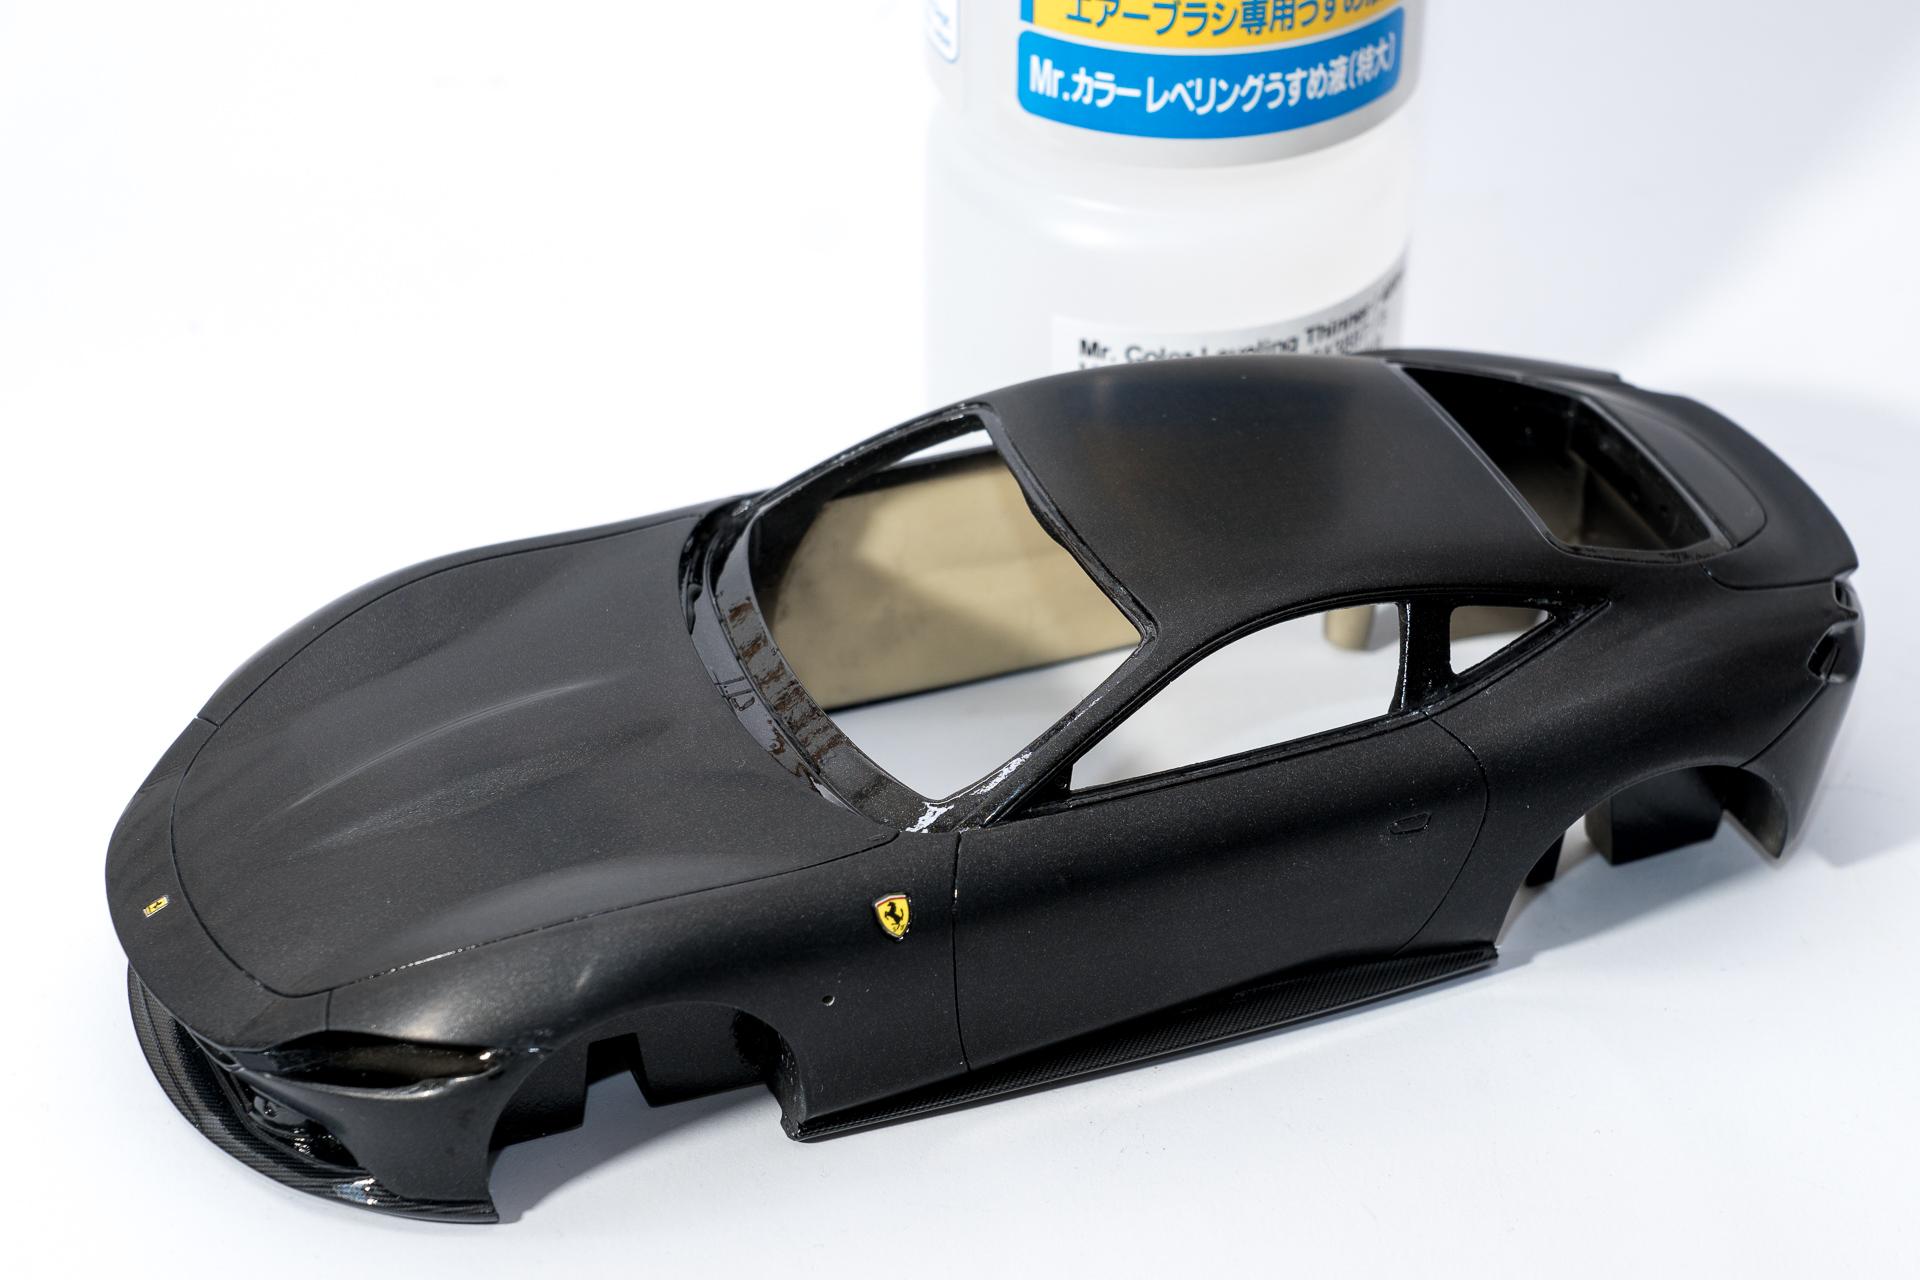
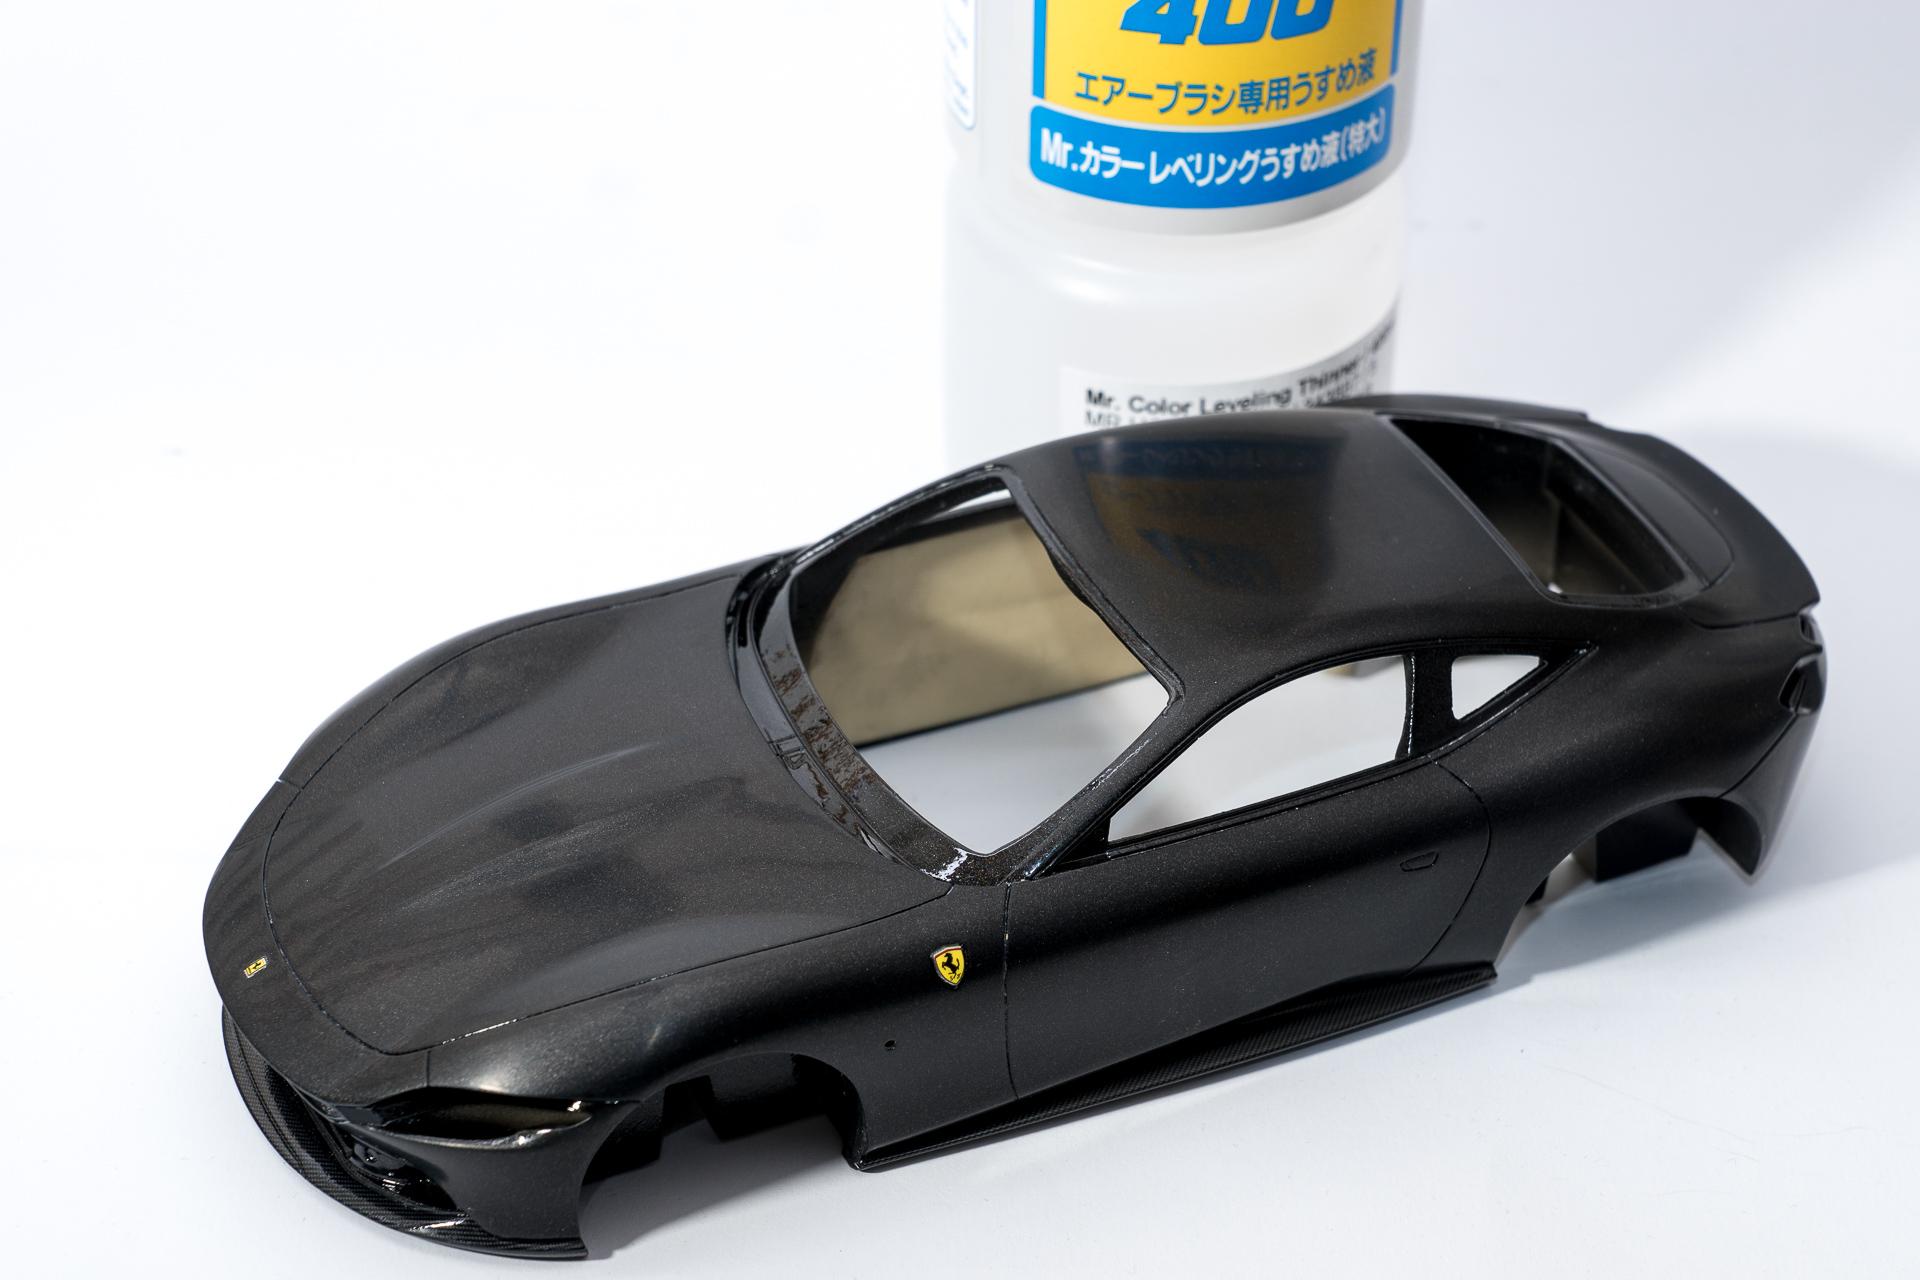
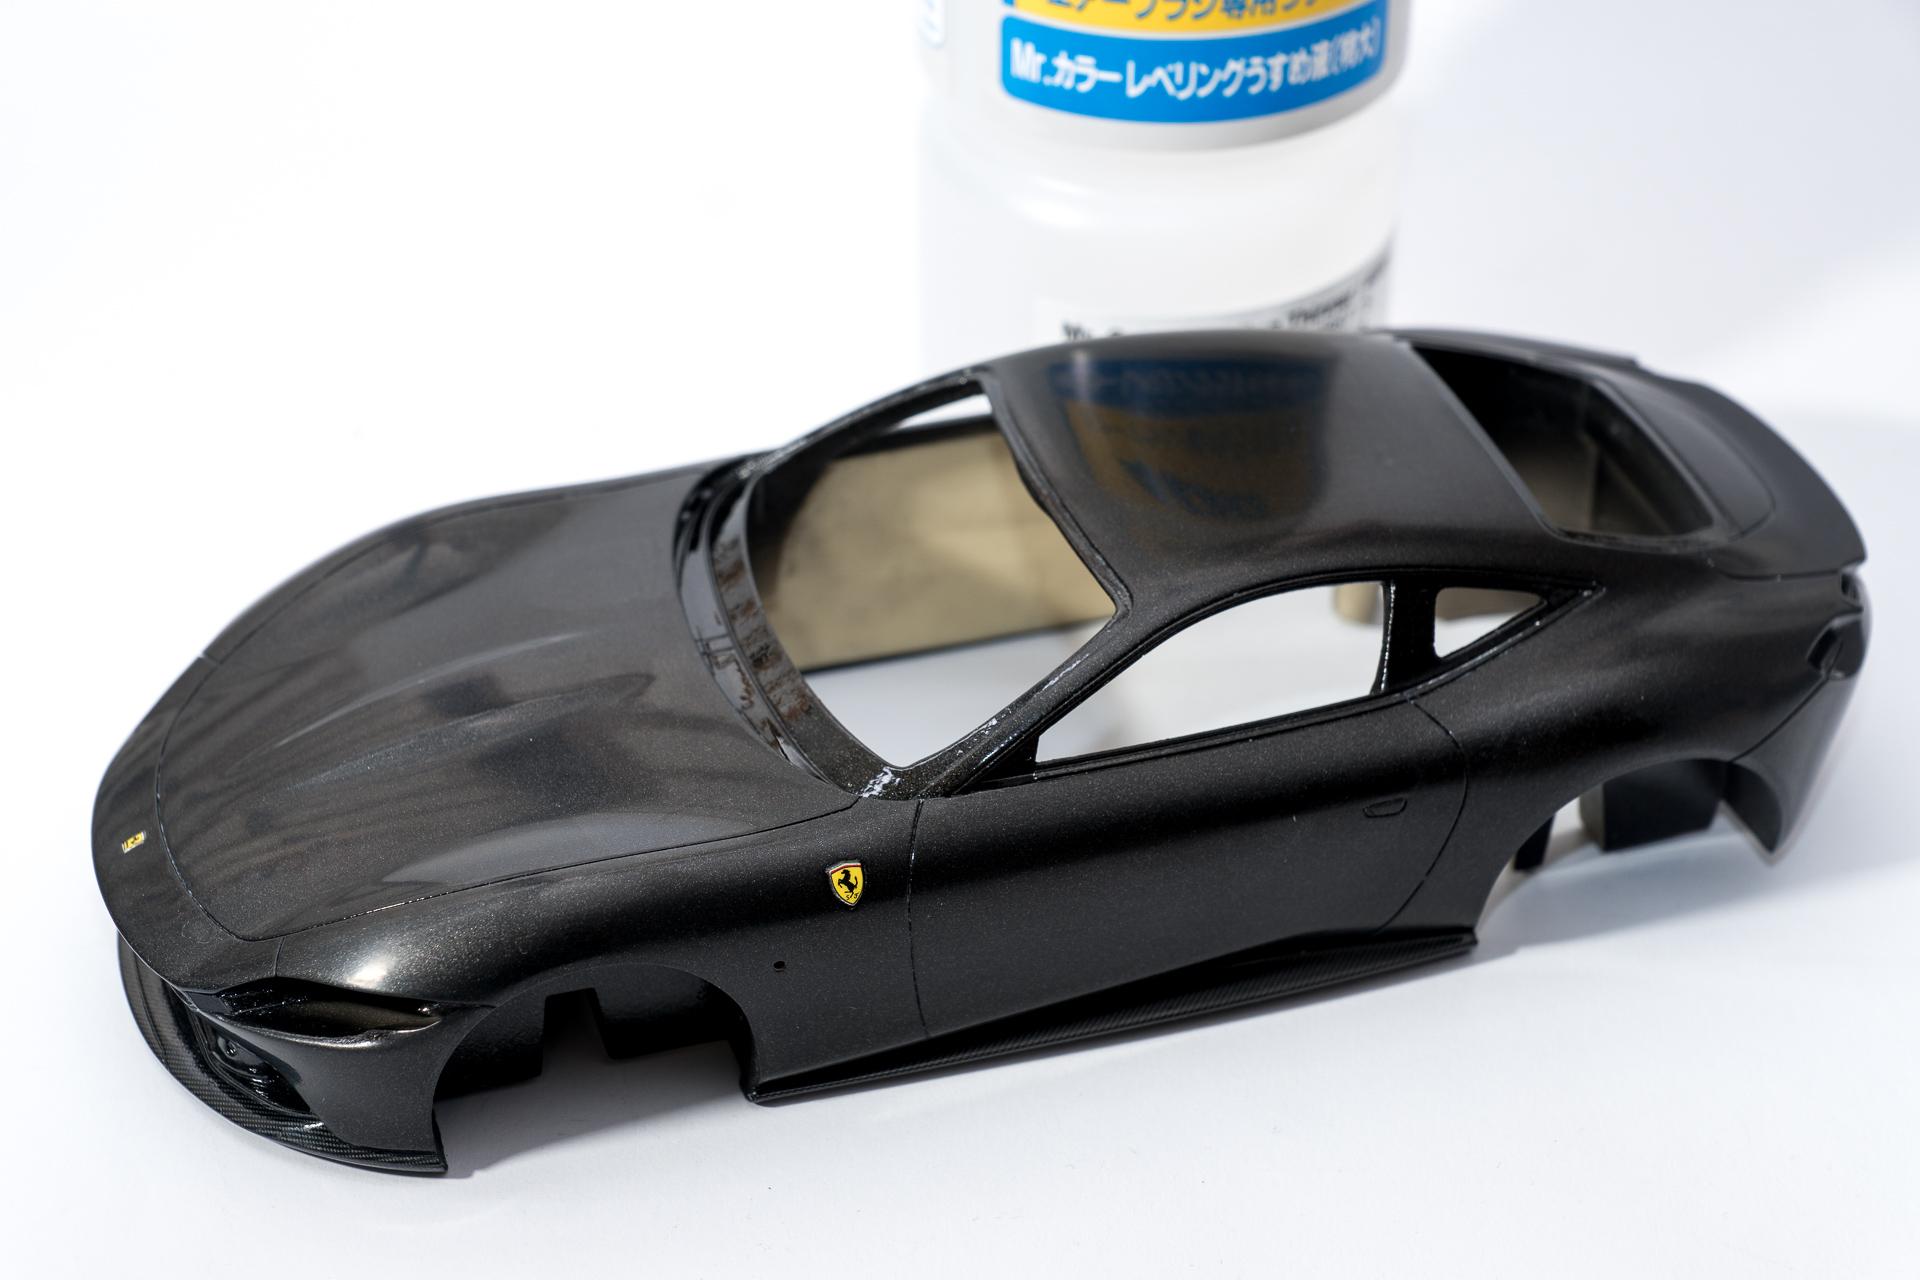
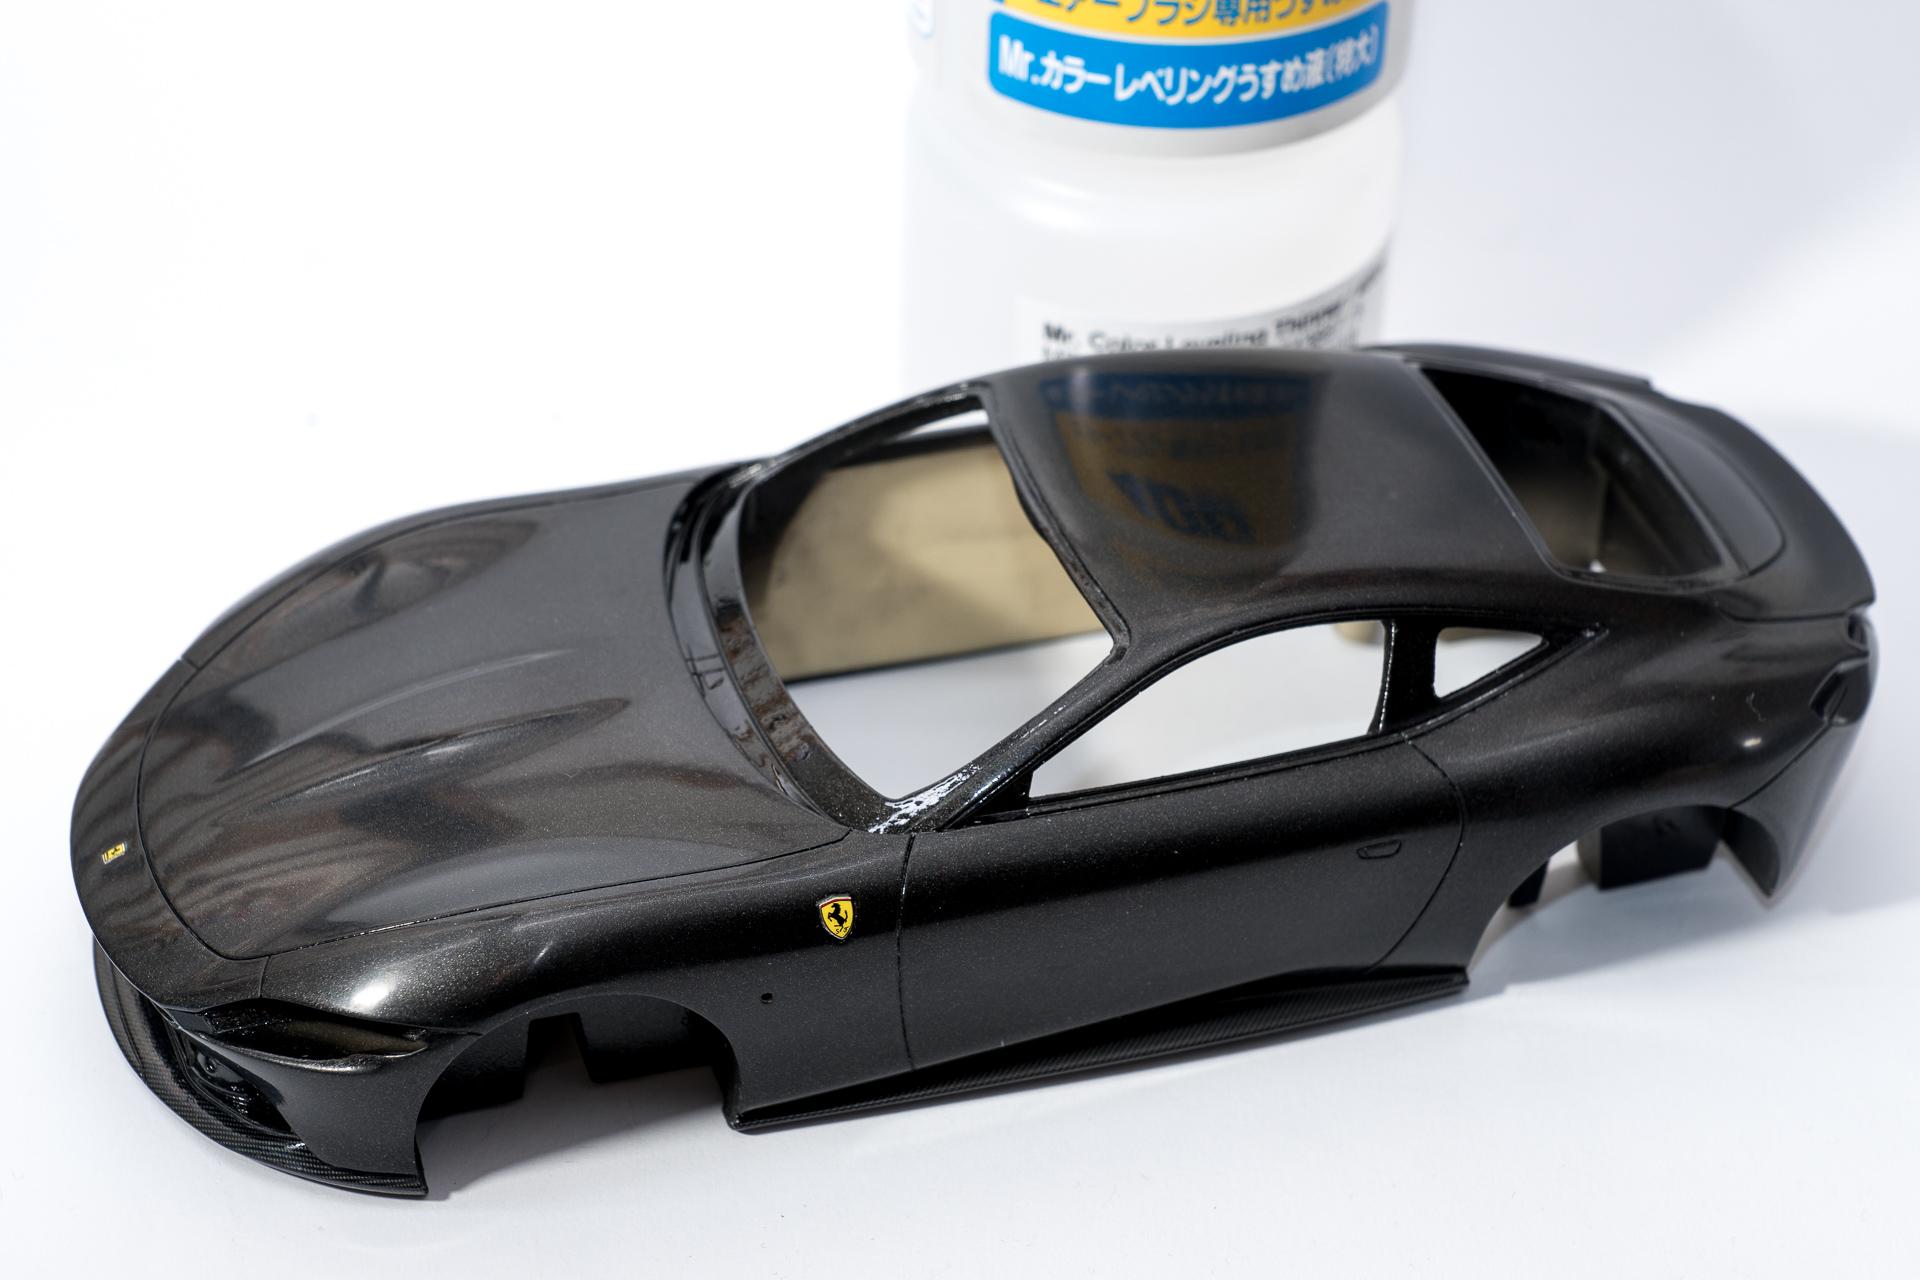
Hi all After having finished the Skyline and because I lack motivation to continue on the McLaren Senna, I took the Ferrari SF90 from the stash A few parts for the interior are painted already, they will still get some decals and PE parts, then they are ready for assembly. First the middle console, which isn't really available in this color scheme from Ferrari. In fact everything would be one color, but I decided to add some color to it. On the original part the main color would be black, but here I opted to use Zero Paints' Dark Interior Grey to see something from the interior once the kit is finished. Dashborad is finished too in regard of the painting. Here I mostly stuck to pictures of the original Now let's move on the the body. For this I used Zero Paints' 2K Etch-Primer, as I already had some good experiences with it with resin kits. Also this time I got a very smooth surface. But as the primer has a quite dark shade of grey, I decided to first paint everything in black, as the roof and some other parts will be black anyway in the end. As I wasn't sure whether it would be possible to use Zero Paints over Tamiya Acrylics, I used the black from Tamiya's laquer line (LP-5). After that, the parts that needed to remain black have been masked off. These parts where I thought it would be easier to do it the other way round (first paint red, then mask and eventually paint black) I did without masking and will do it later Subsequently everything was painted with Tamiya LP-11 Silver to have a light base for the following layers Once the silver has dried, I used Zero Paint's pink primer which was quite a PITA this time. I spent a whole afternoon only painting the body in pink. Again and again the airbrush spit large blobs of paint on the body, which had to be sanded smooth afterwards. By sanding I also removed the paint around the blobs, in one case down to the bare resin. So I always had to repaint the spots around these blobs in silver to have an even base for the pink. Applying the primer was easier when I thinned it down with some Mr. Color Levelling Thinner, but then the coverage was almost zero, so I used undiluted primer in the end, controlling the needle tip of my airbrush every few seconds to see if there was some paint buildup already. Here you can see, how the body looked most of the time But at the end of the afternoon I finally had an even, smooth pink surface and let the body dry over night Today I painted everything in red. This time I didn't use the traditional Ferrari Rosso Corsa, but Ferrari's Rosso Fiorano, which was applied in about 8 to 9 very thin layers. After the second to last layer I sanded everything smooth again with some 4000 sanding sponge. That's how it looks right now. The A pillar and the window seal will have to be repainted, but as there are other parts which will need some black paint, I can fix that in one go. So much for the start to this W.I.P. I hope to have piqued your interest and am looking forward to your comments, critiques and plaudits ? Urs
-
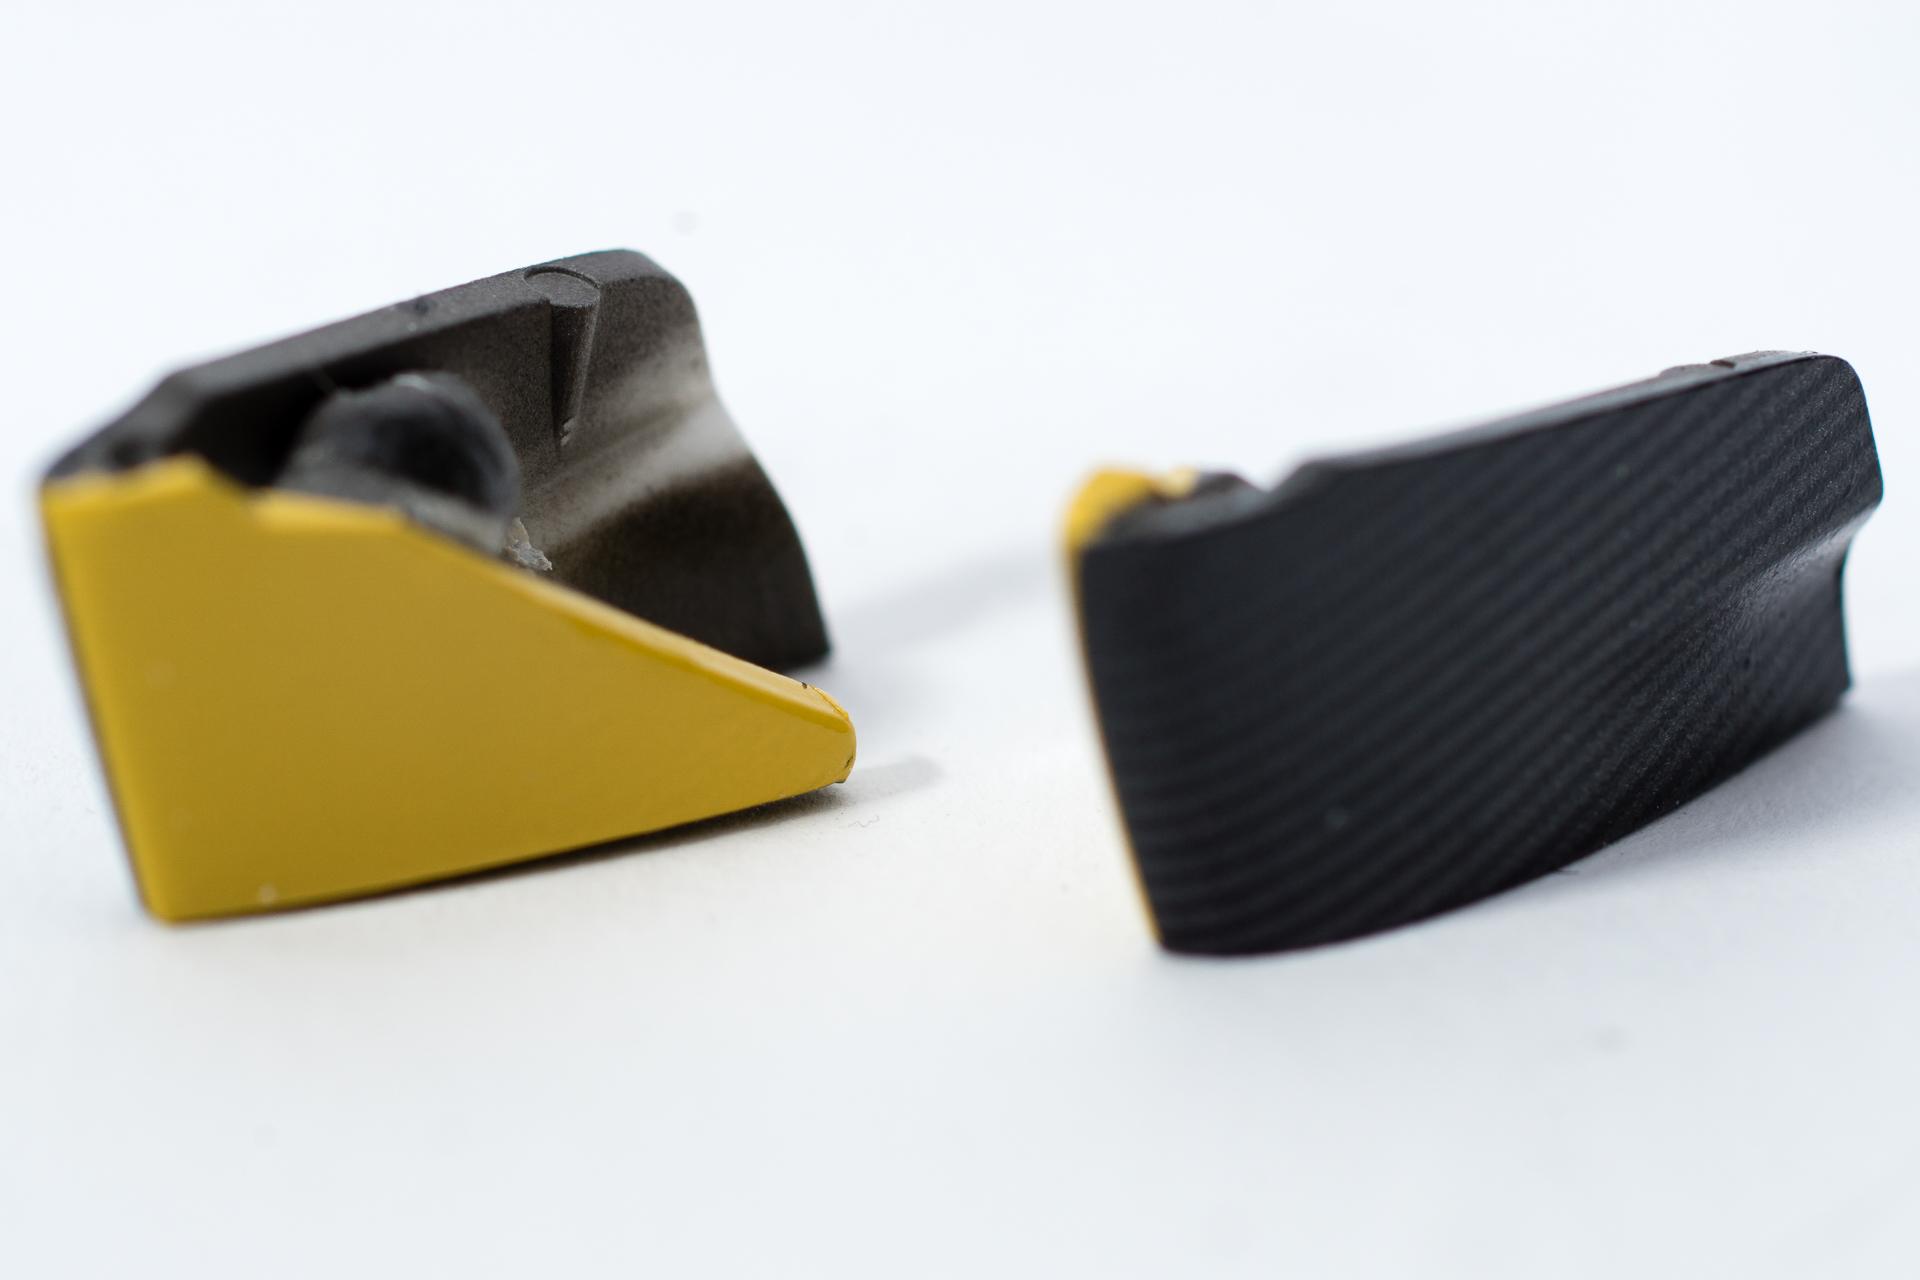
Hi all Not much has happened here. The incorrectly applied stripes and the fact that I just can't manage to cover the seats with carbon in a reasonably attractive way have dampened my motivation somewhat. But at least I've made some progress with the incorrectly applied strips. A friend gave me the tip of using a brush dipped in lukewarm water to brush over the incorrectly applied decal again and again to soften it and from time to time carefully try to get underneath the decal with a sharp knife to lift it up a little. If you succeed, use a brush soaked in water to get under the decal and remove it piece by piece. After half an hour I had removed about 1 cm of the first strip. After another half hour I was still the same distance away... I then put everything aside and tried again a few days (maybe even weeks) later. The second time I used slightly warmer water and made much better progress. After about 90 minutes, I had removed the strips on both sides, except for a small piece on the far right at the front, which just wouldn't come off. A day later and after another half hour of brushing and trying to remove it with a knife, this piece also gave up its resistance and could be removed. At the moment I still have a few small pieces that have crumbled away during removal and have settled somewhere on the carbon decal. But they can be removed easily with a little water. What bothers me more are the few places where the carbon decal has suffered a little. At the moment I'm still a bit undecided as to whether I should remove the carbon decal in the same way and attach a new one, whether I should simply stick repair patches over it, or whether I should leave it as it is. I'll probably try the repair patches first and see how noticeable they are. But now a picture of the current state Unfortunately the damaged spots are not that clearly visible in this picture. It's the bright spot on the left bottom corner and the two larger bright spots on the very right, close to the edge. I bought myself a new camera a few weeks ago and still have to get used to it Urs
-
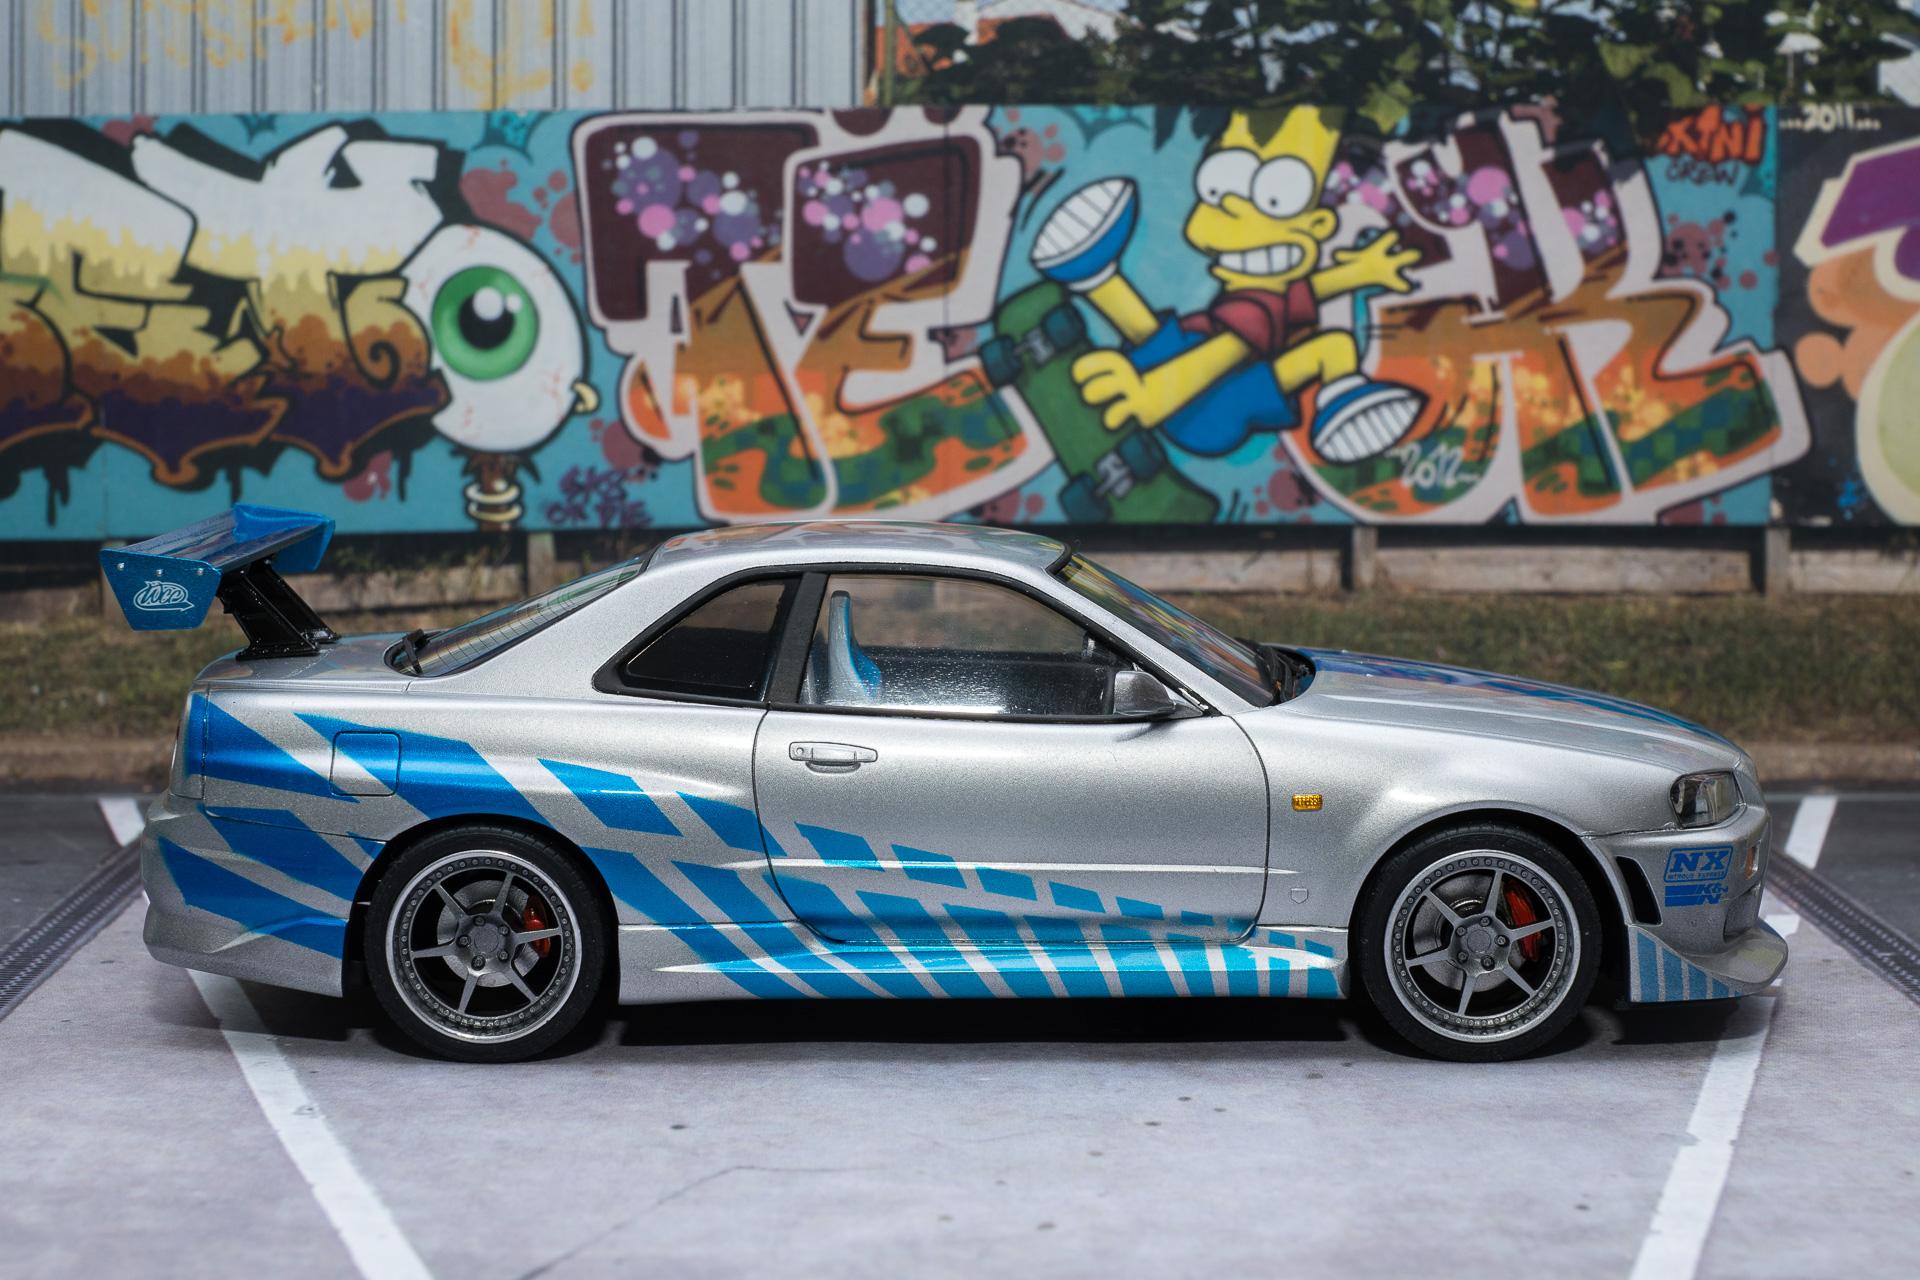
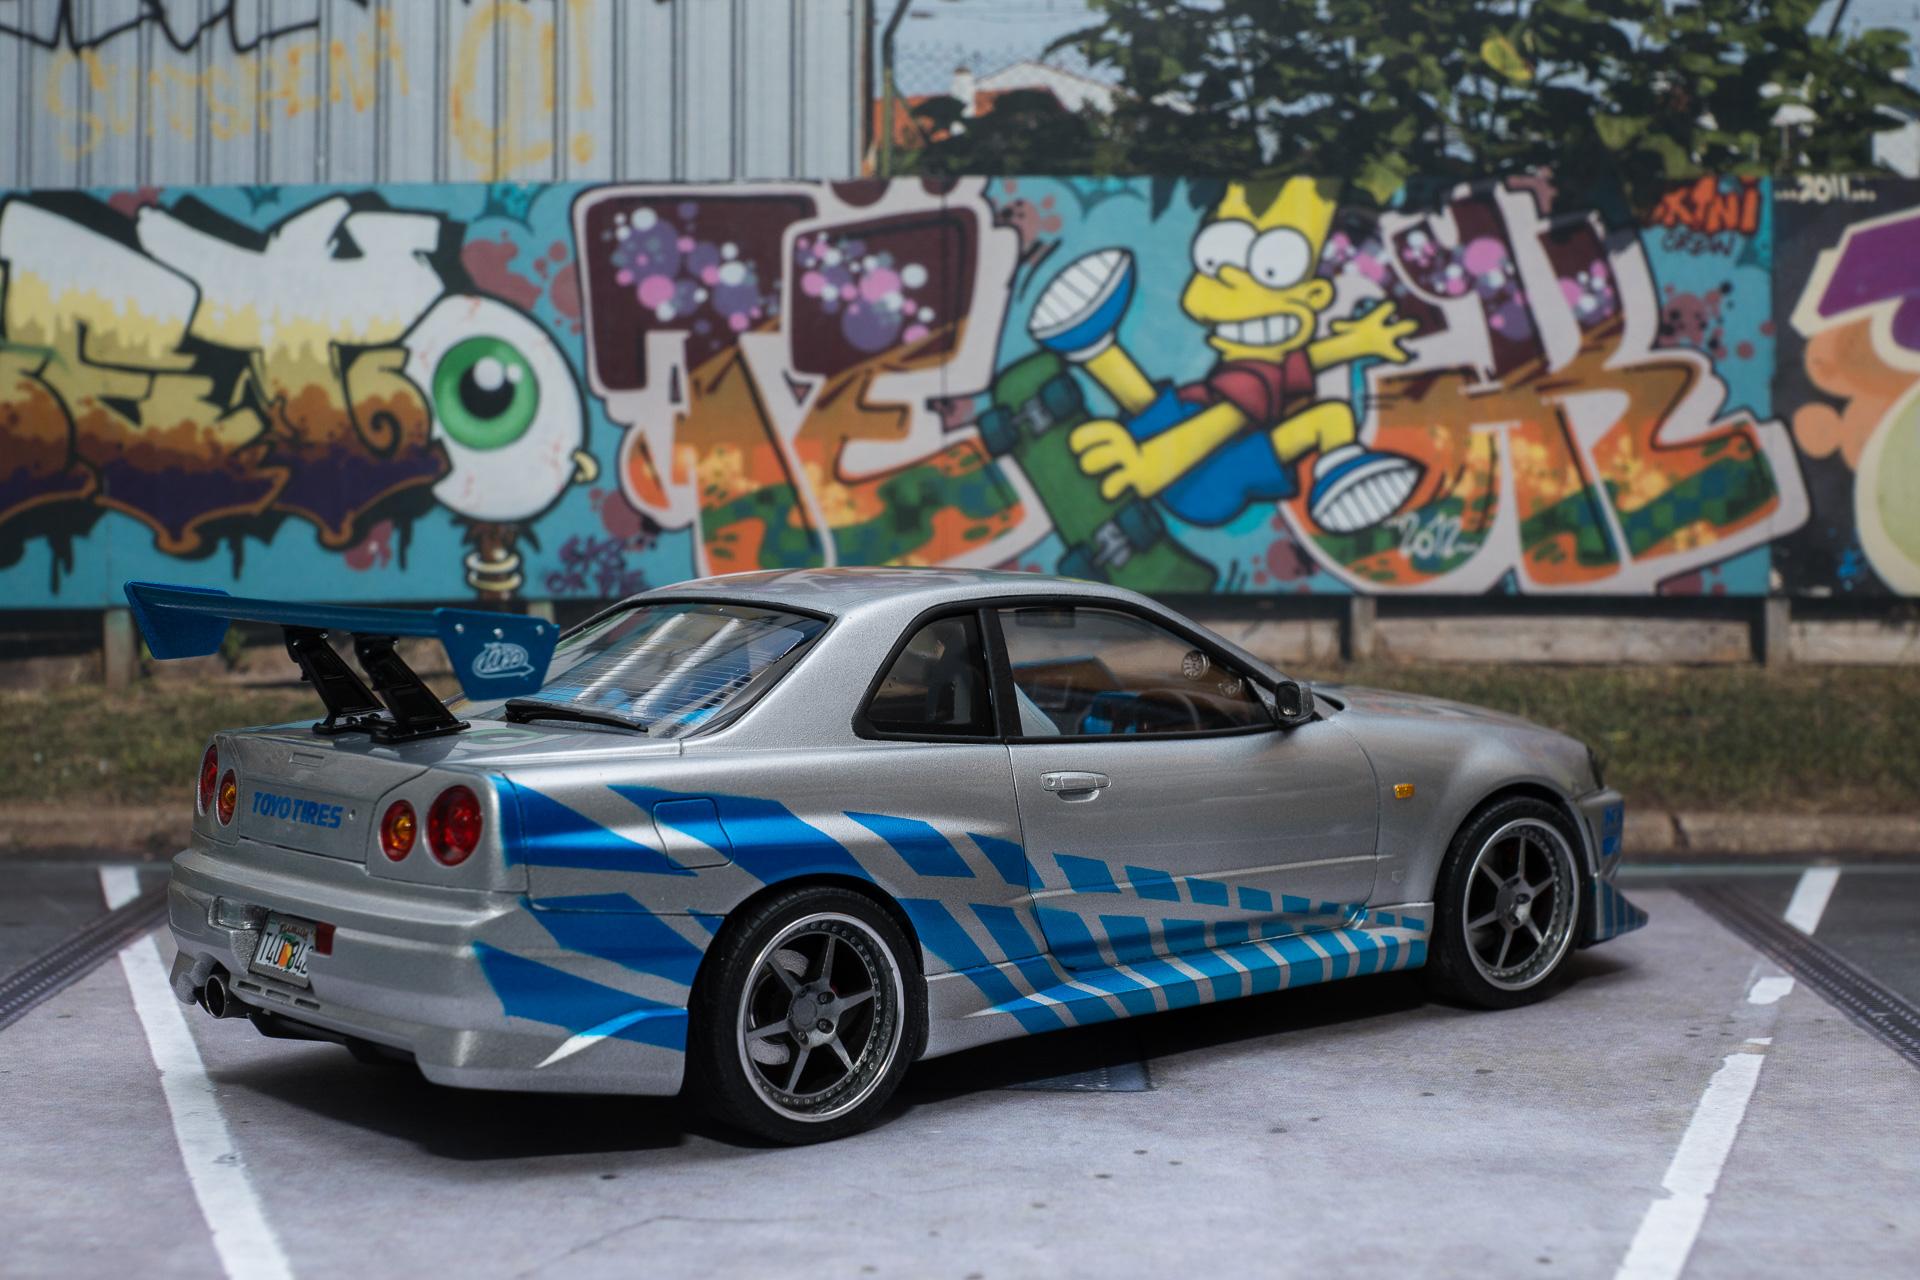
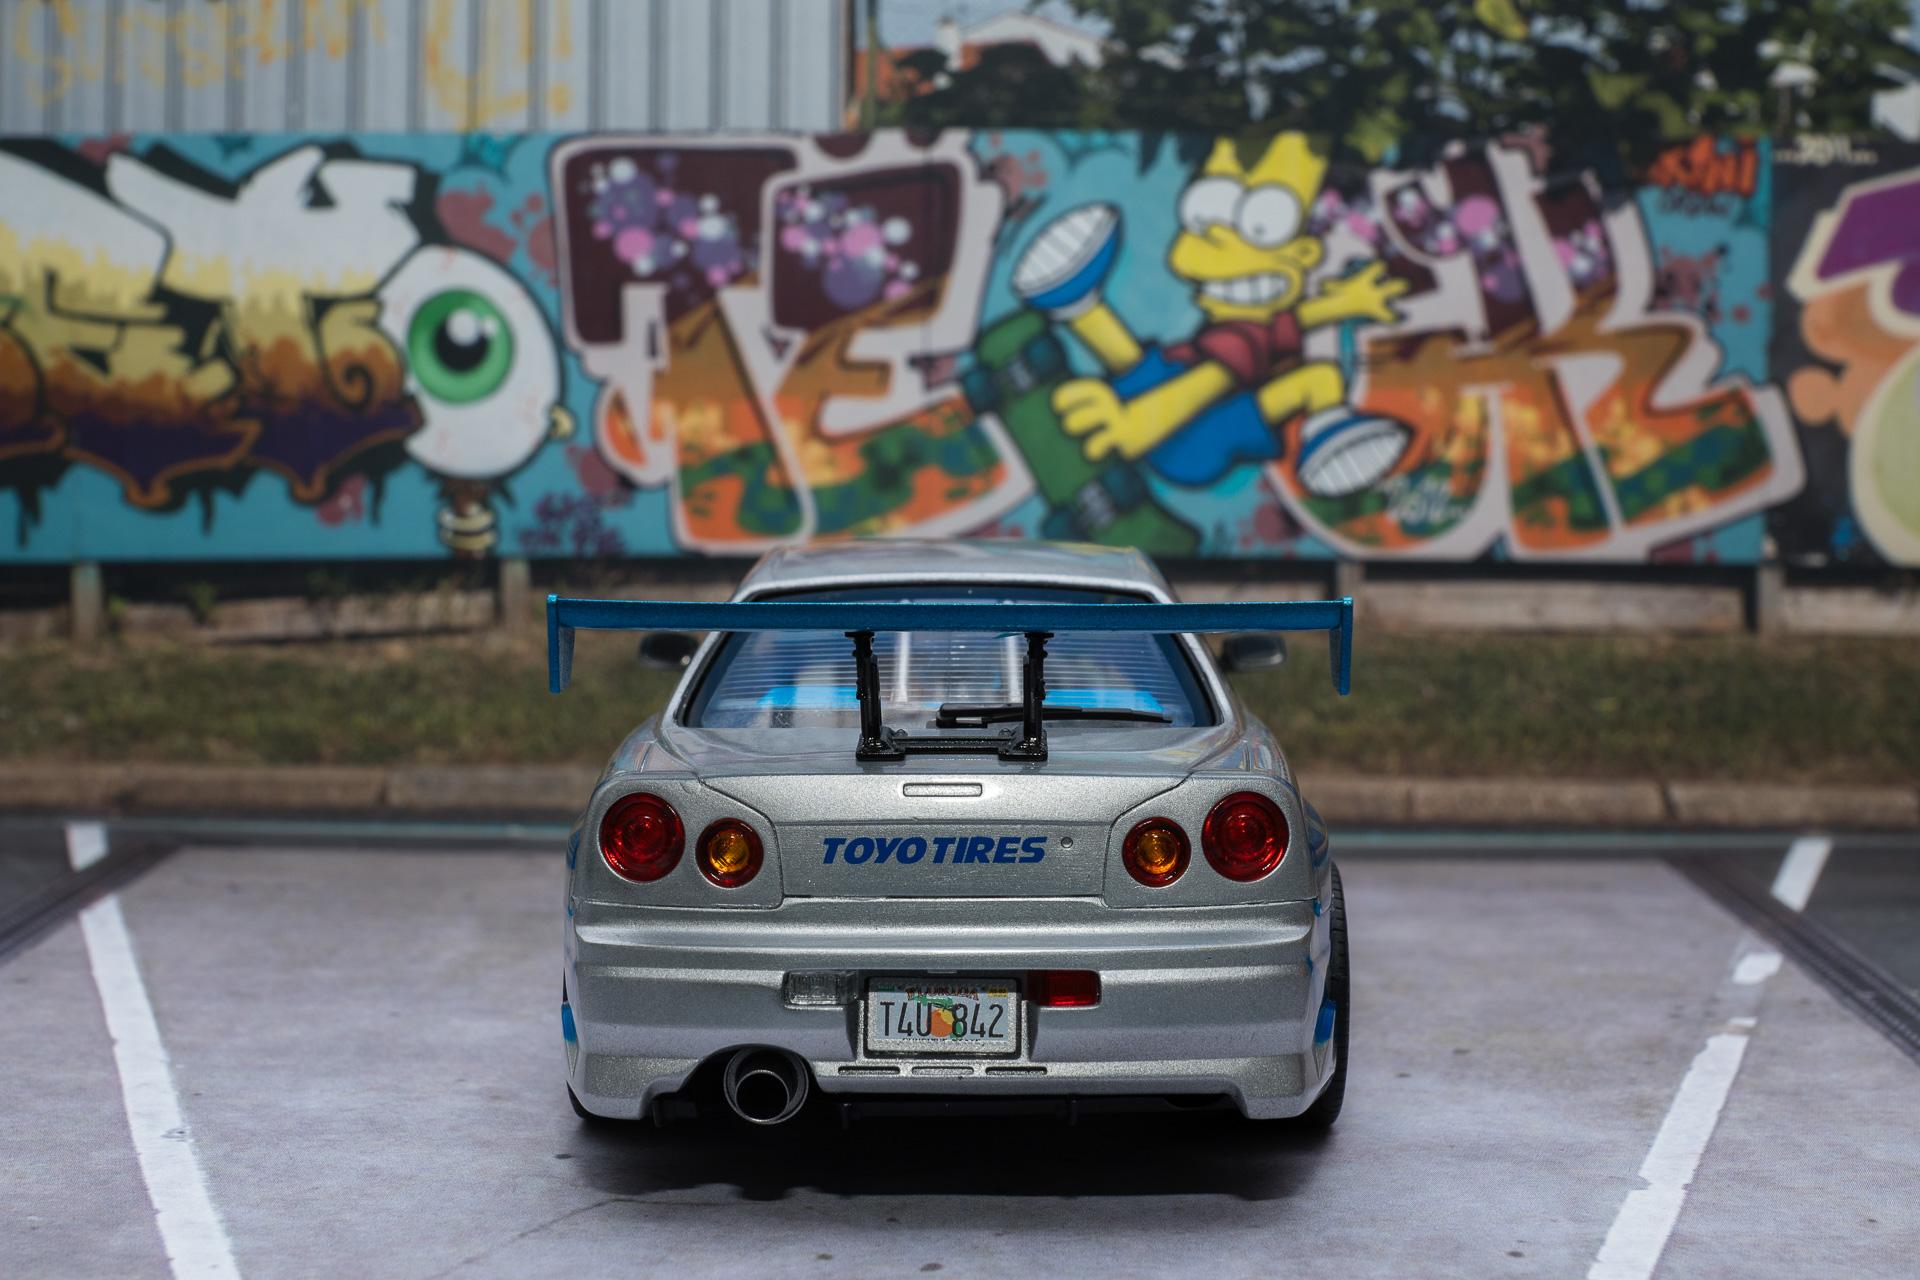
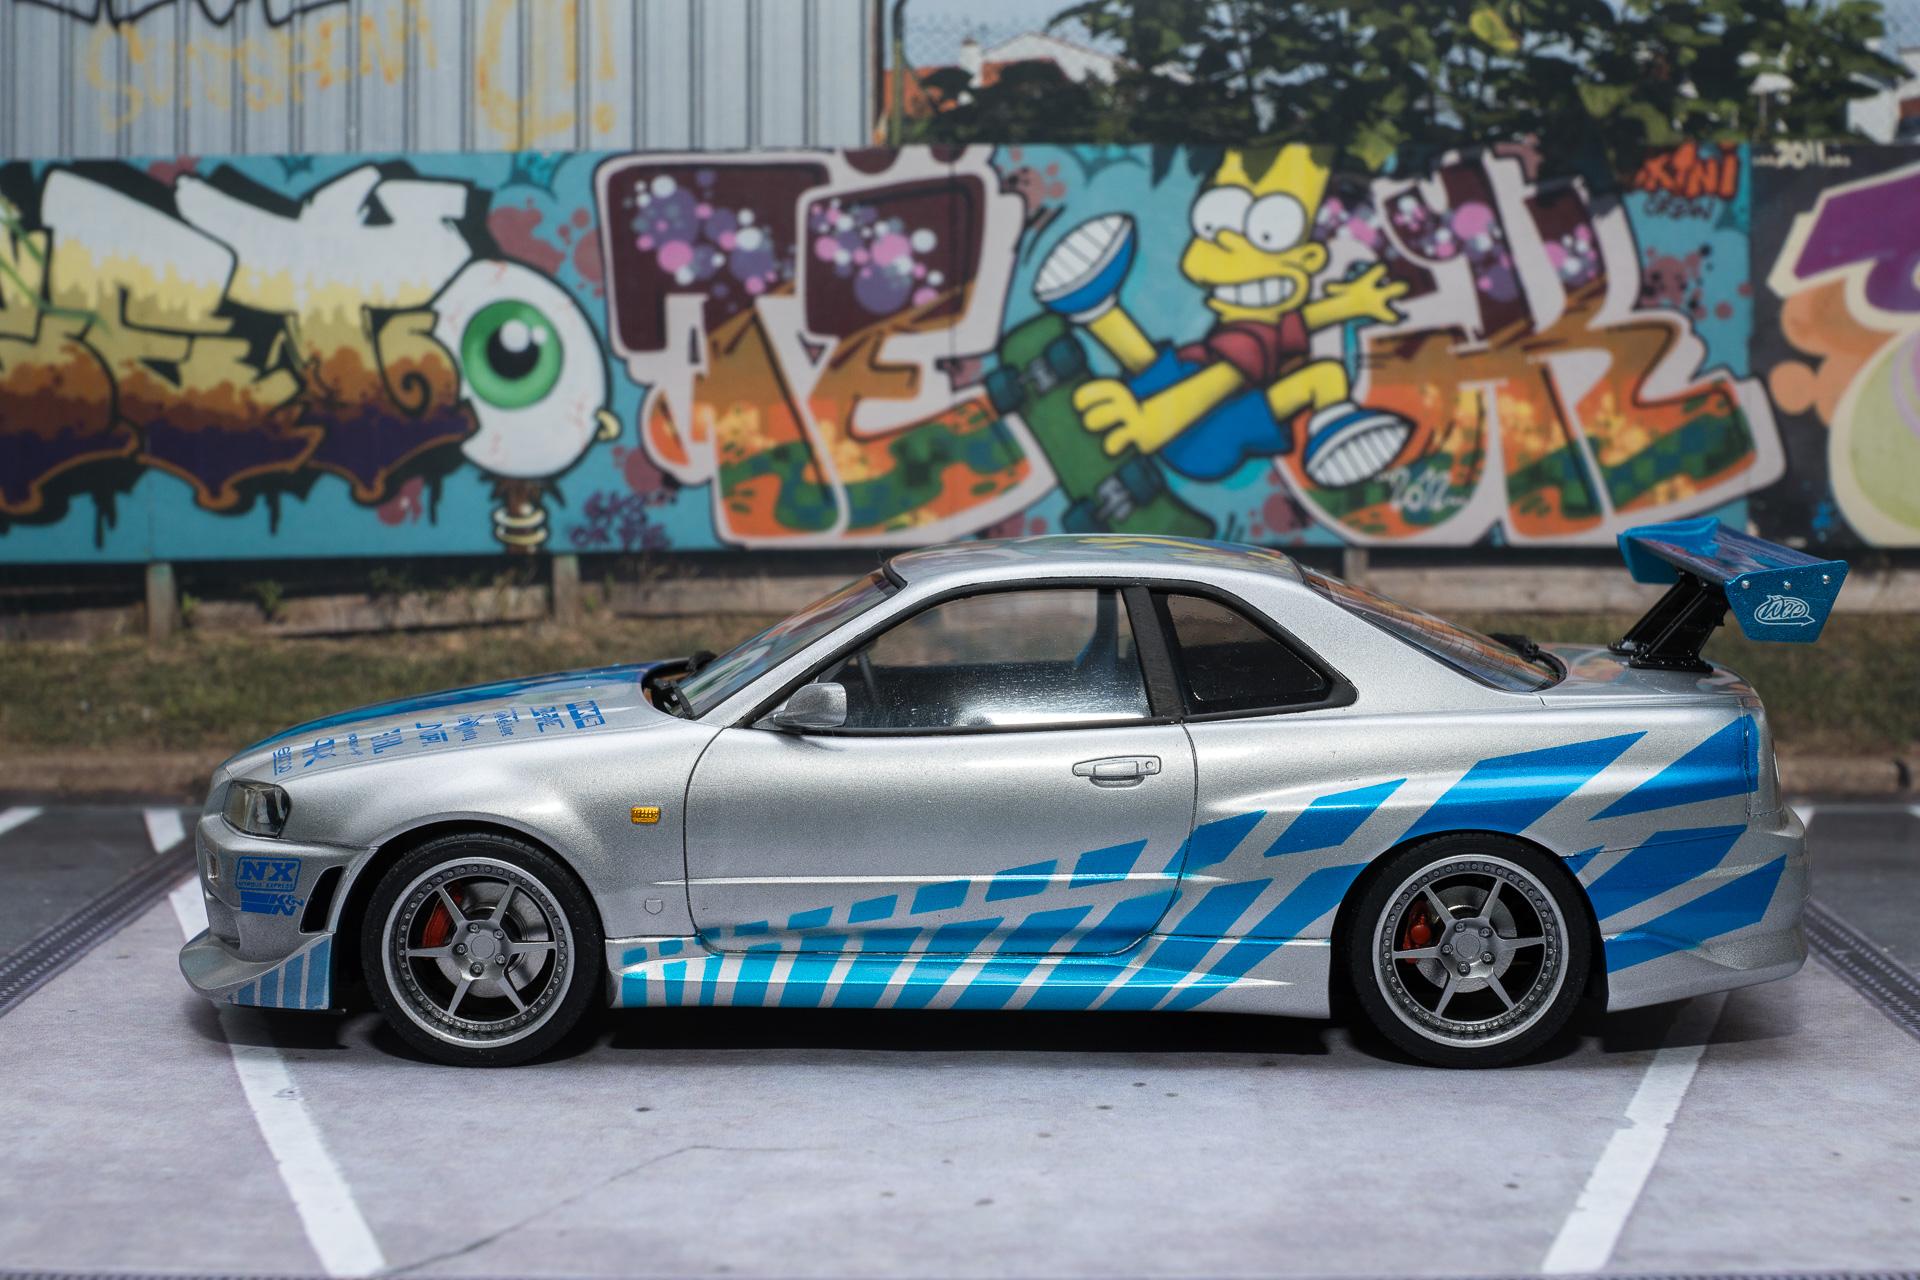
Brian's Nissan Skyline GT-R R34 from 2 Fast 2 Furious
harti20 replied to harti20's topic in WIP: Model Cars
Thank you all for your kind comments Urs -
Brian's Nissan Skyline GT-R R34 from 2 Fast 2 Furious
harti20 replied to harti20's topic in WIP: Model Cars
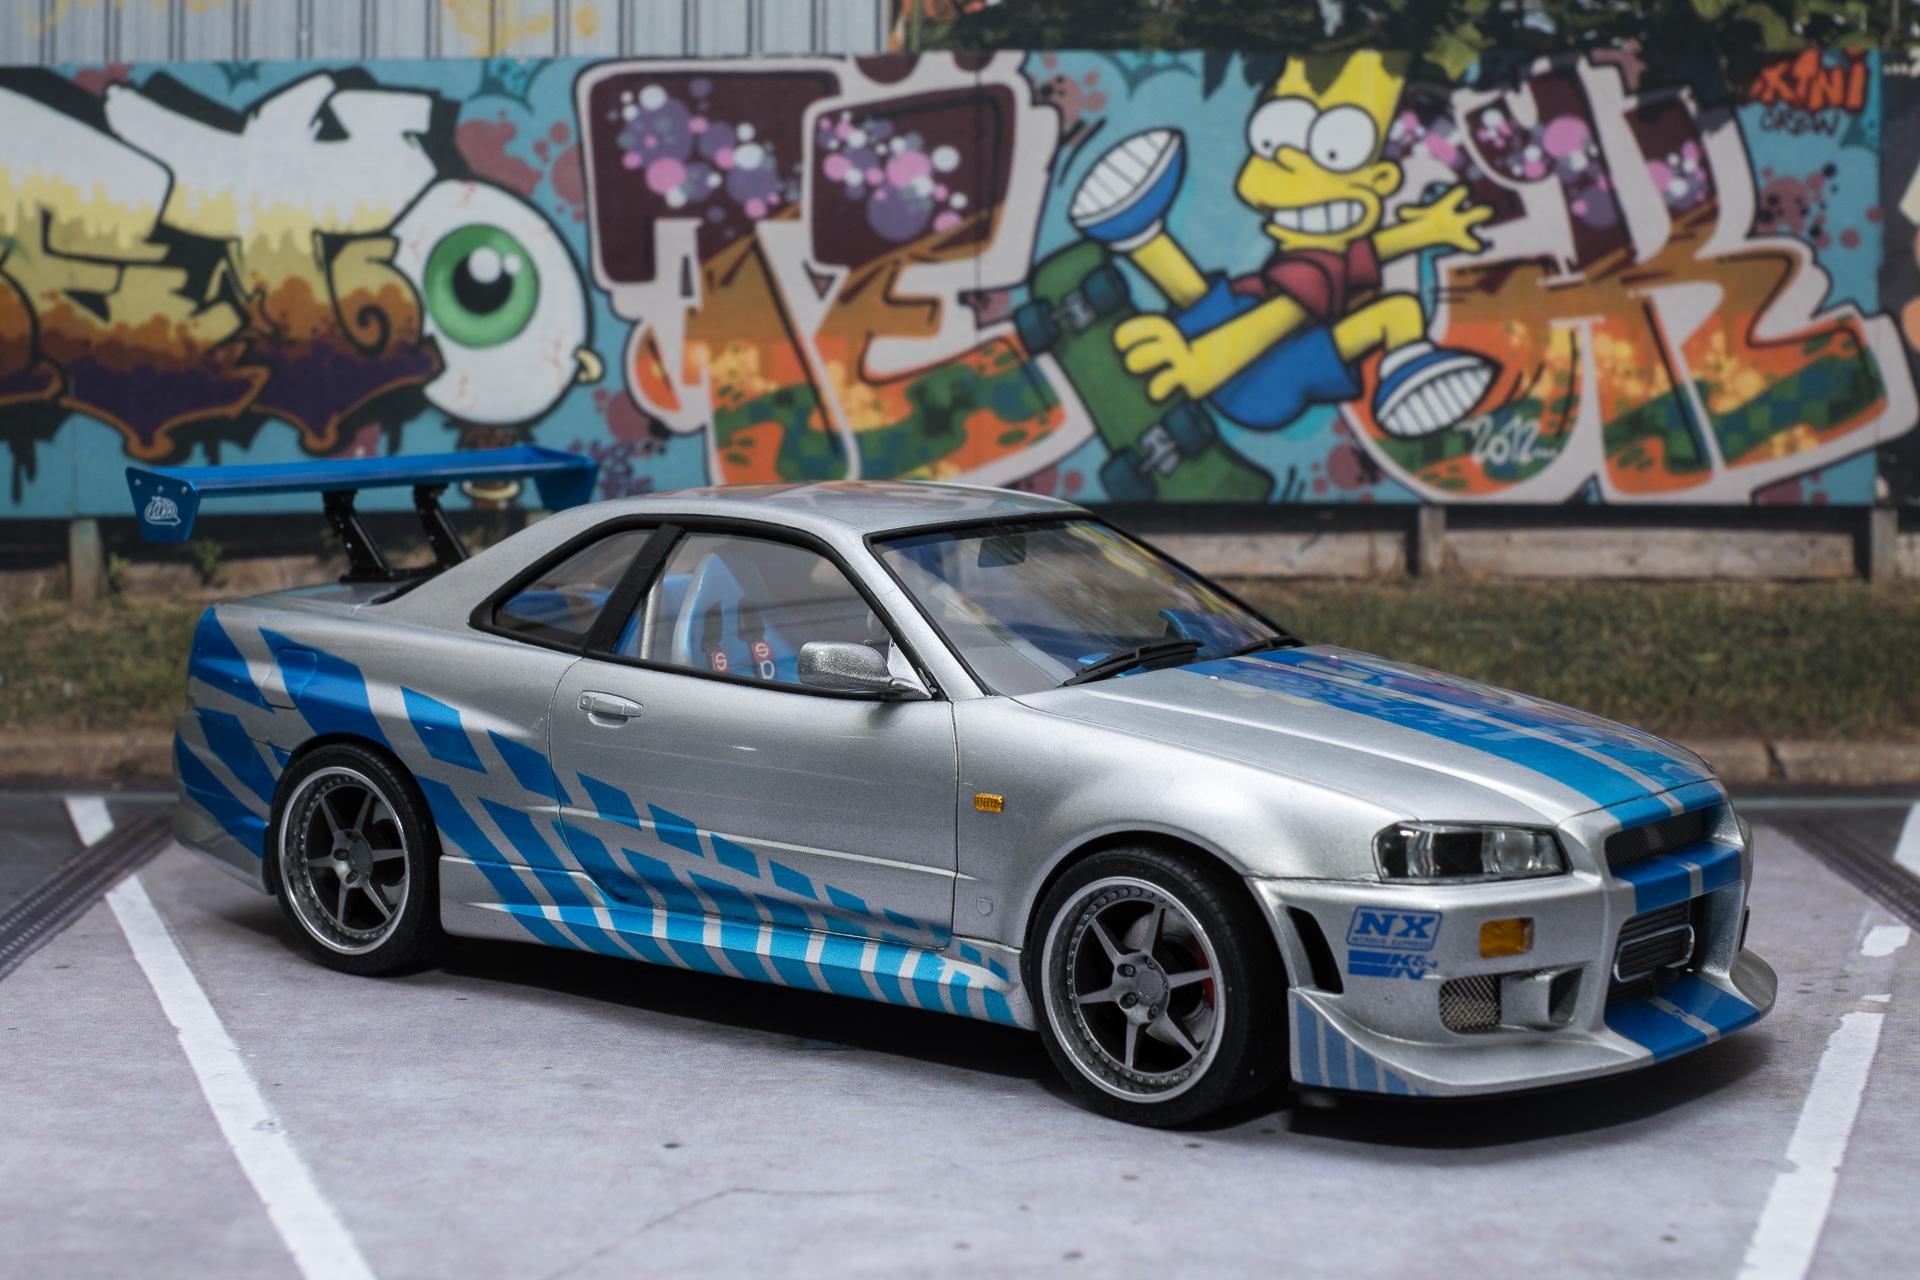
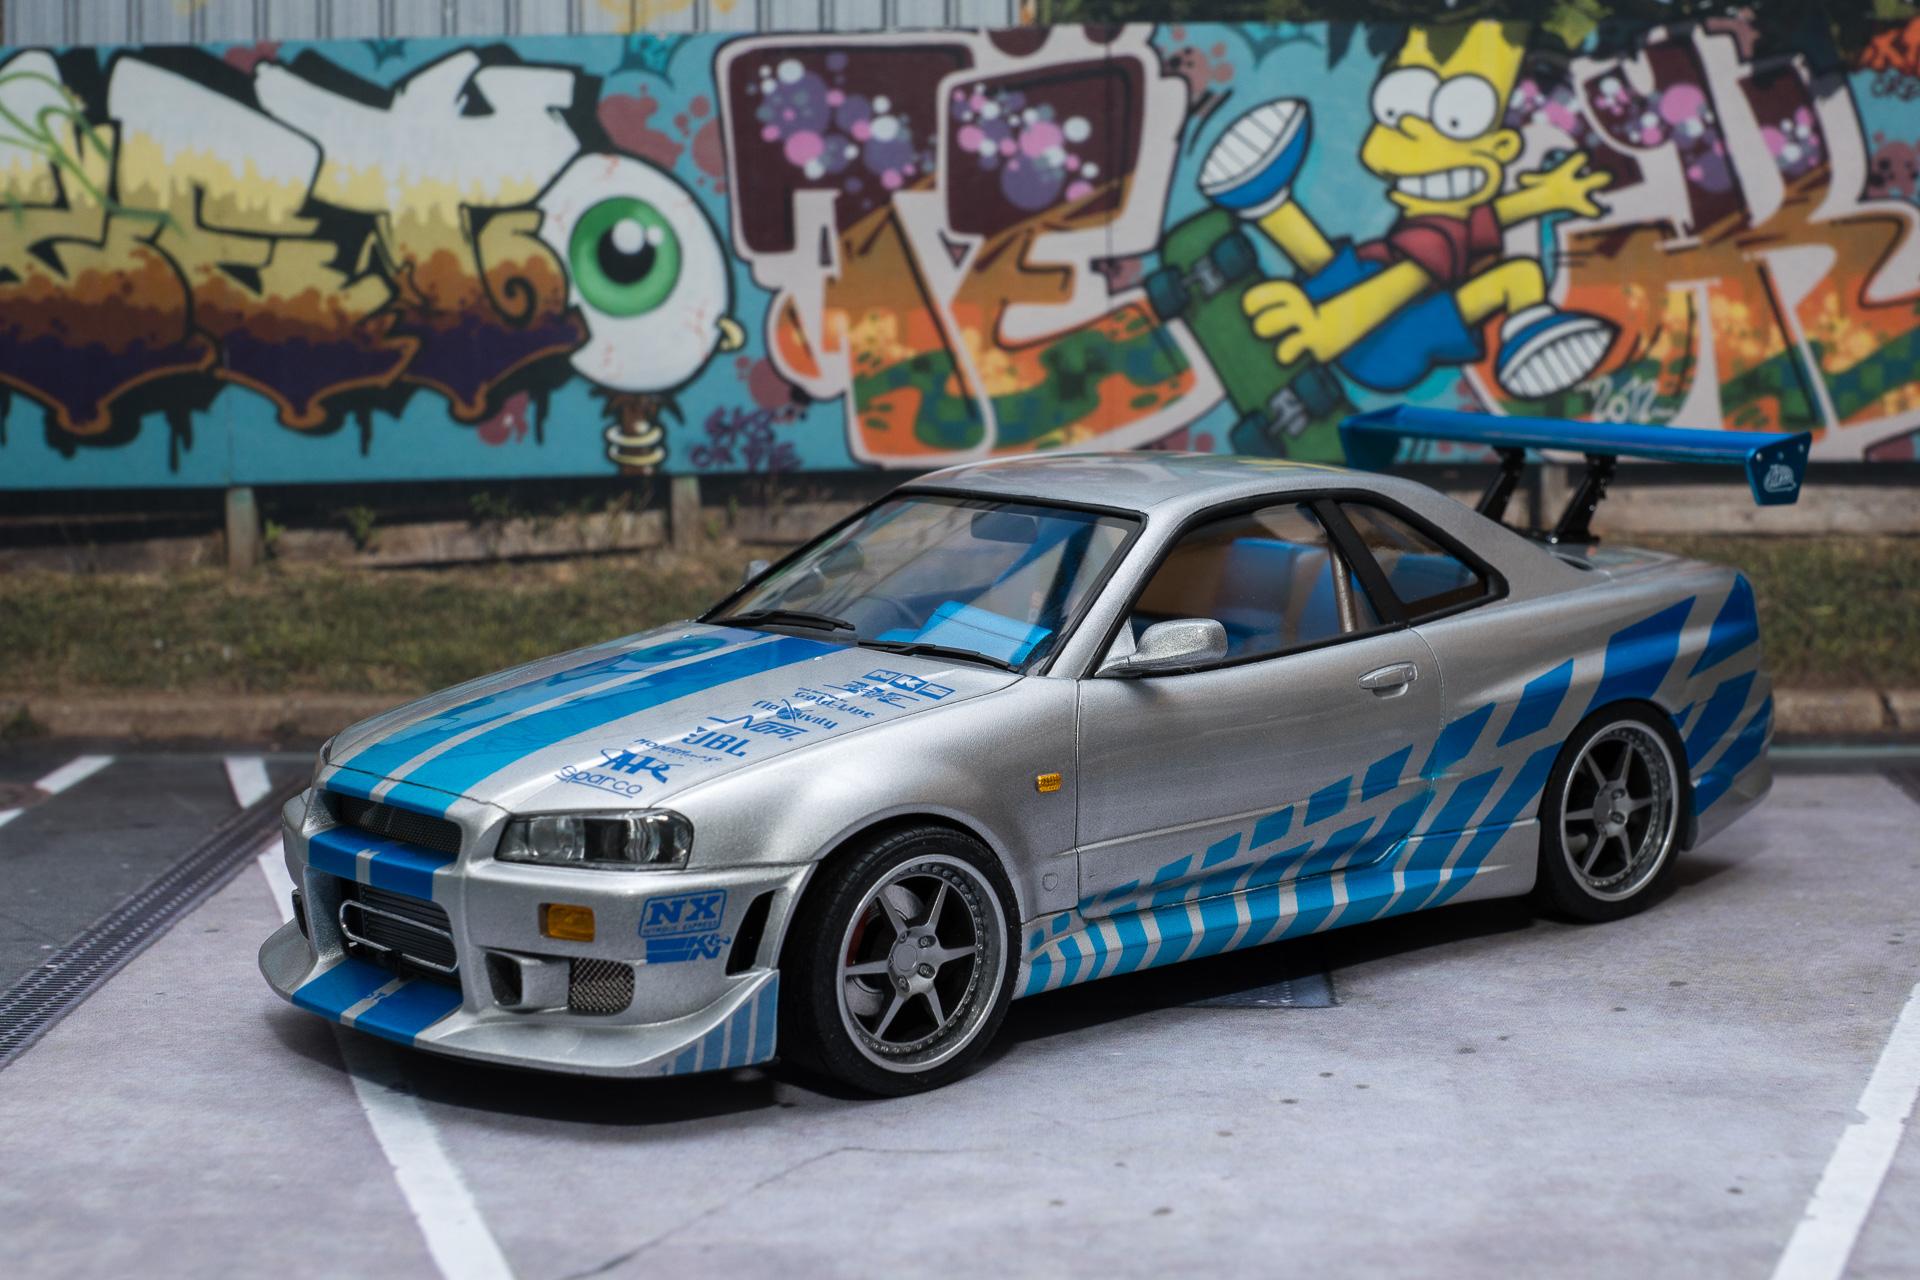
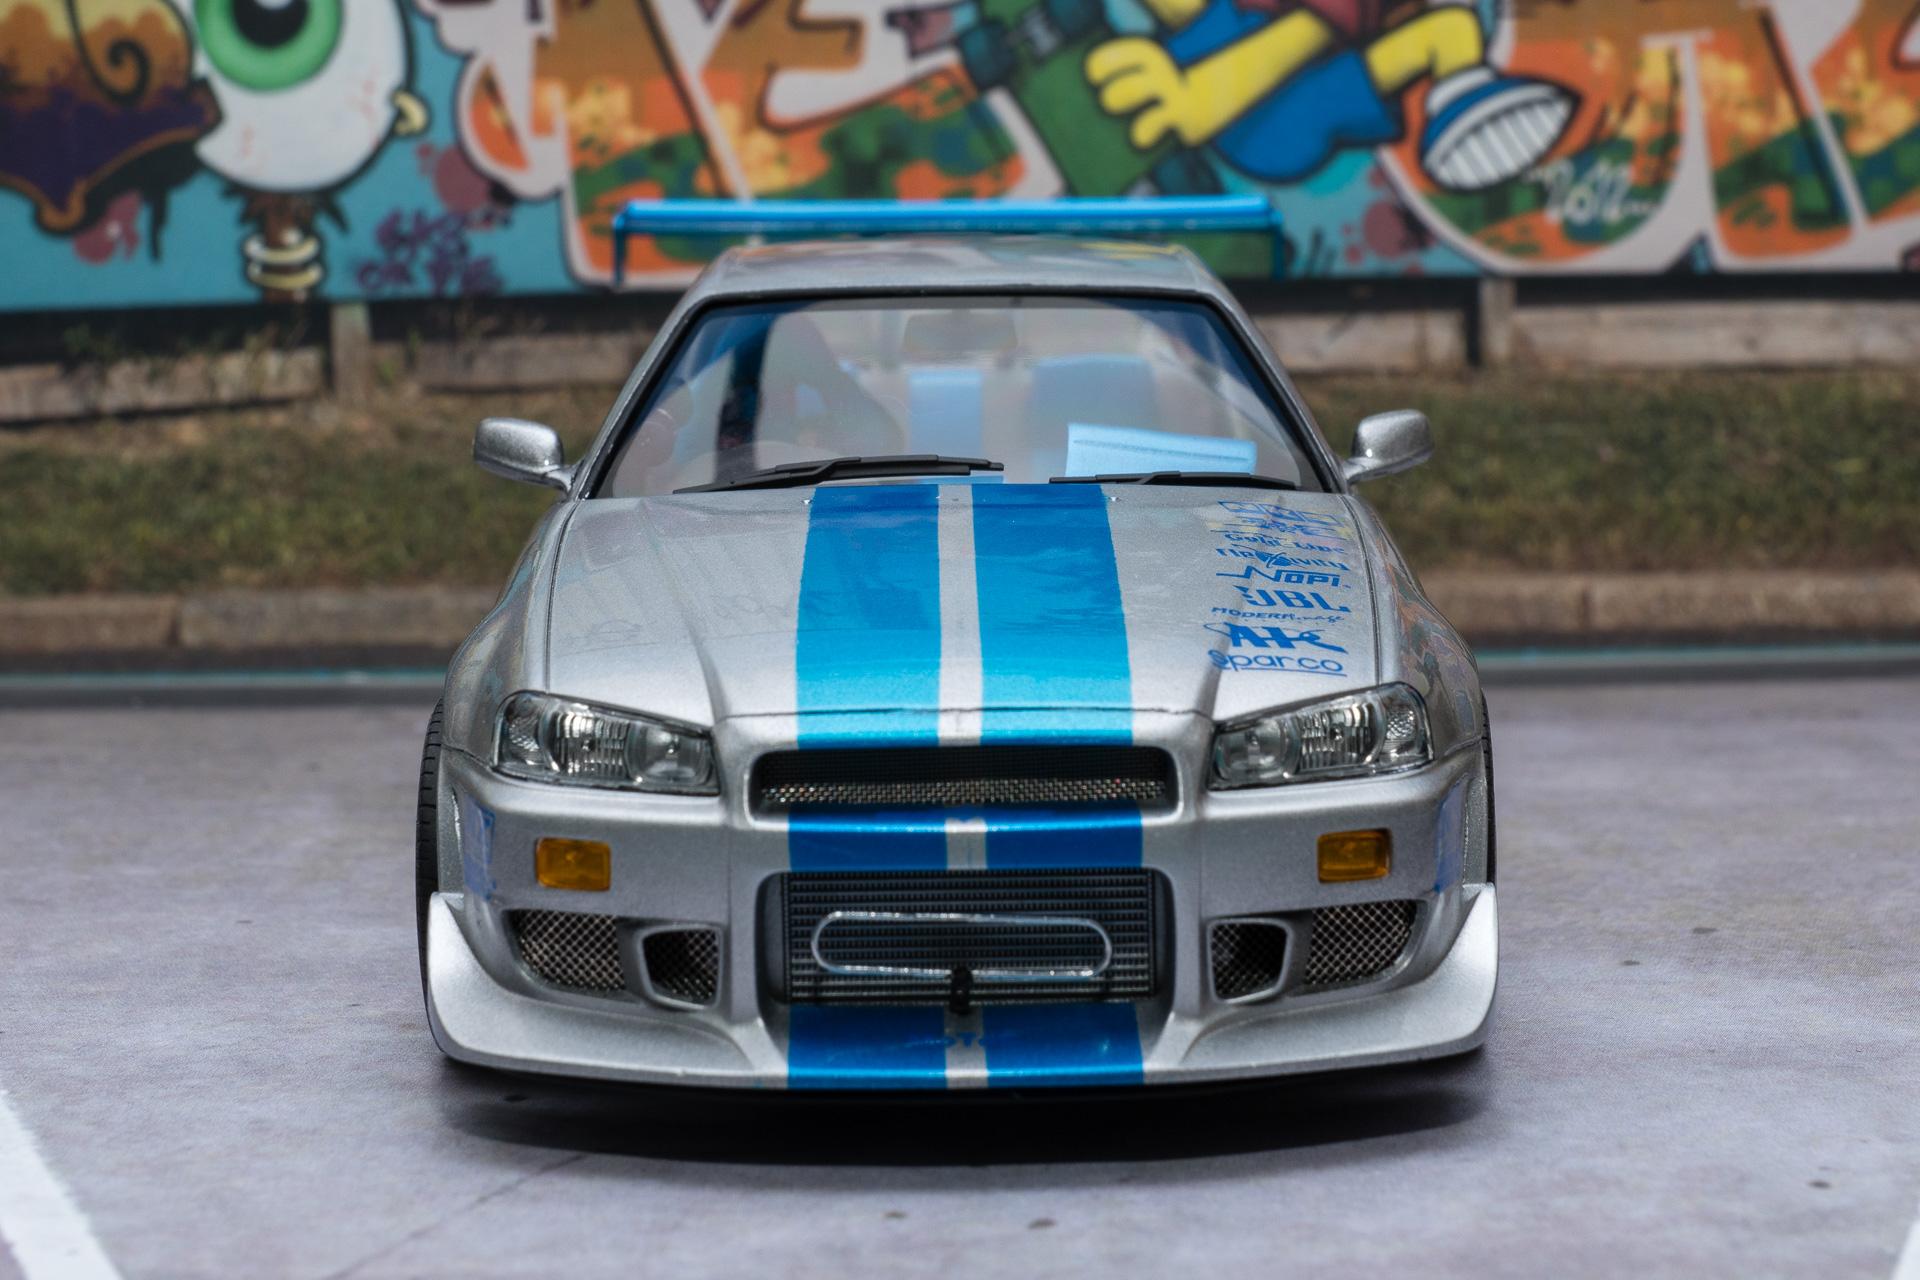
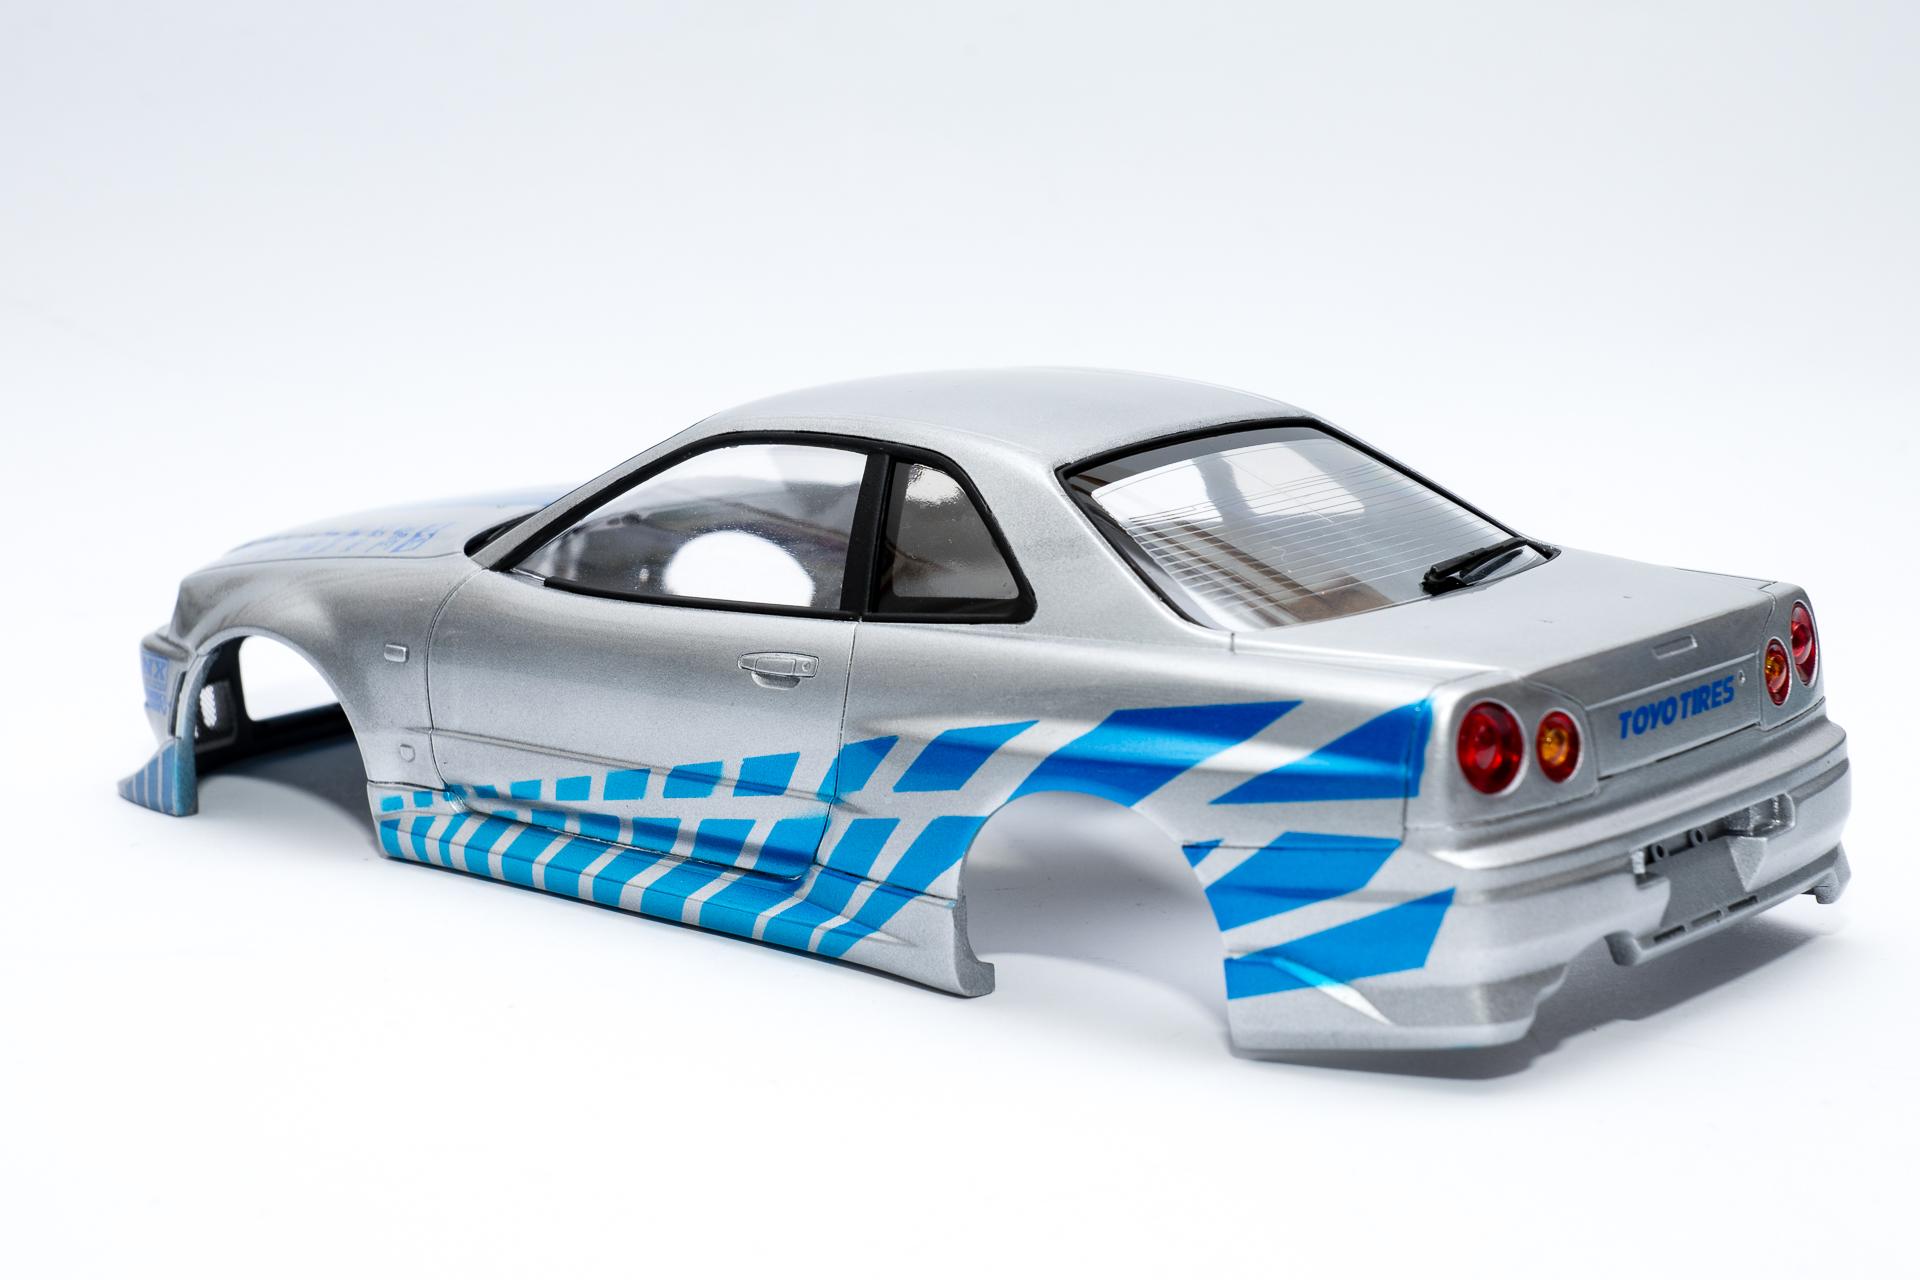
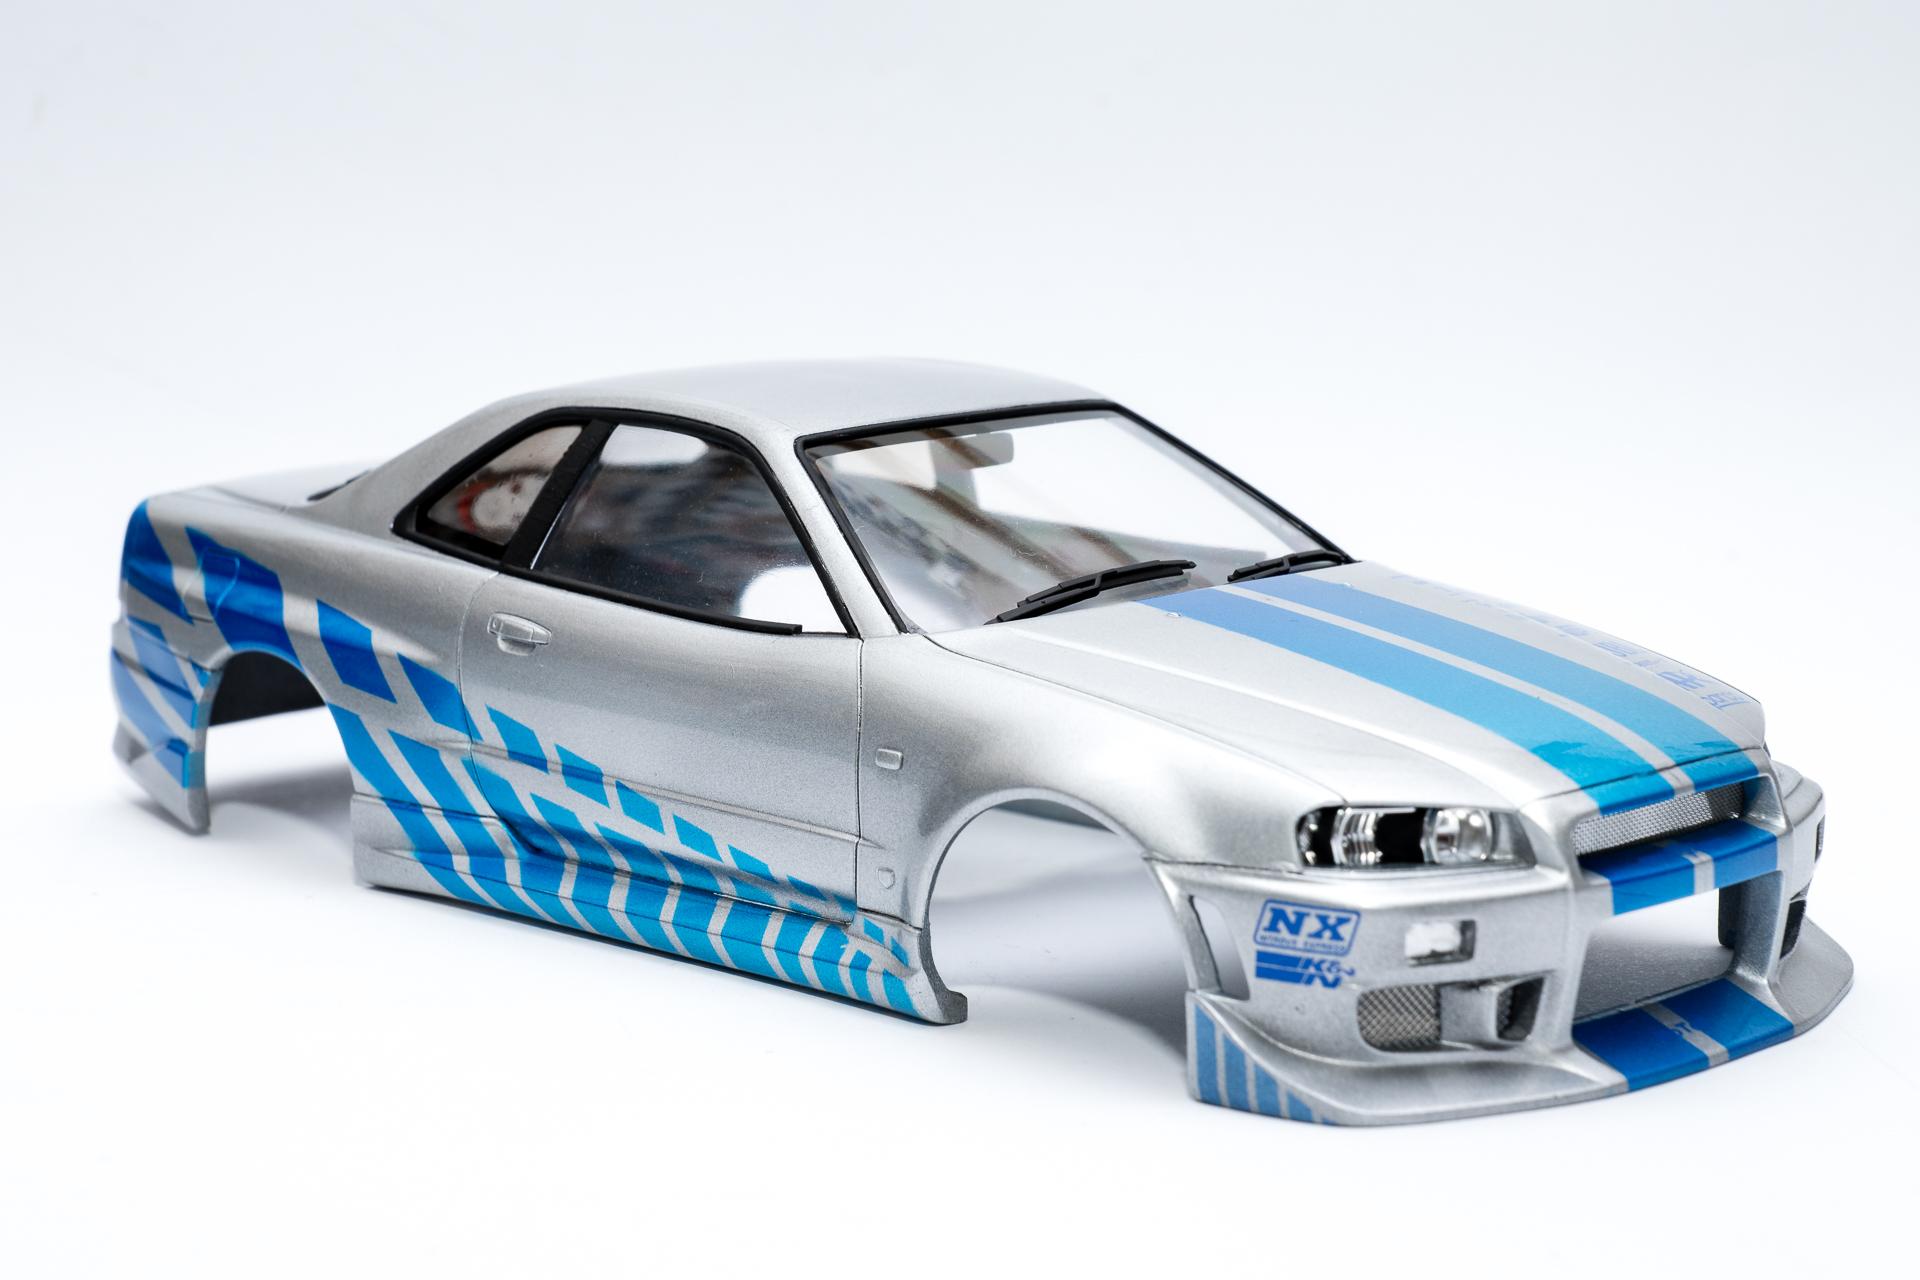
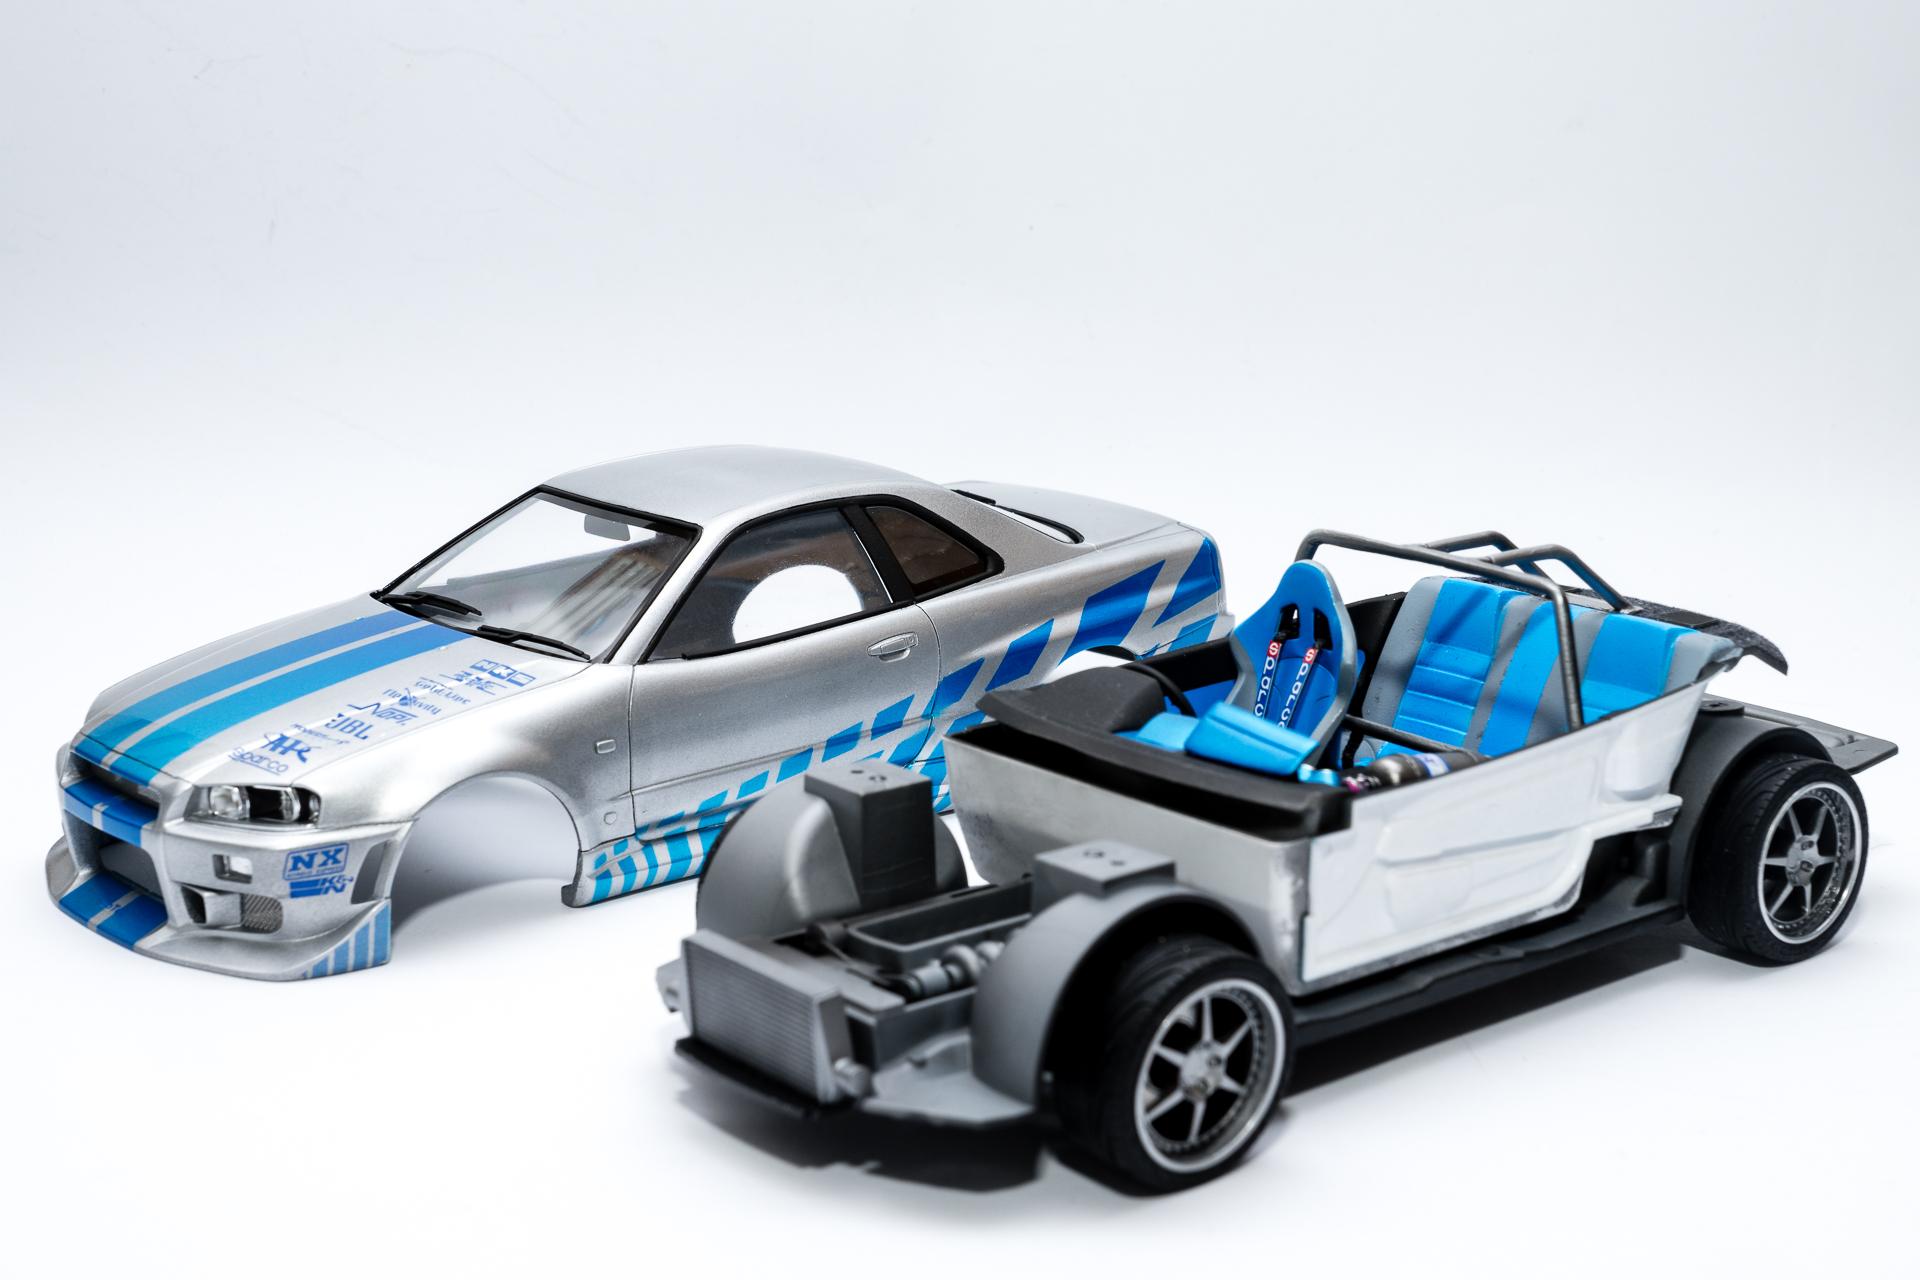
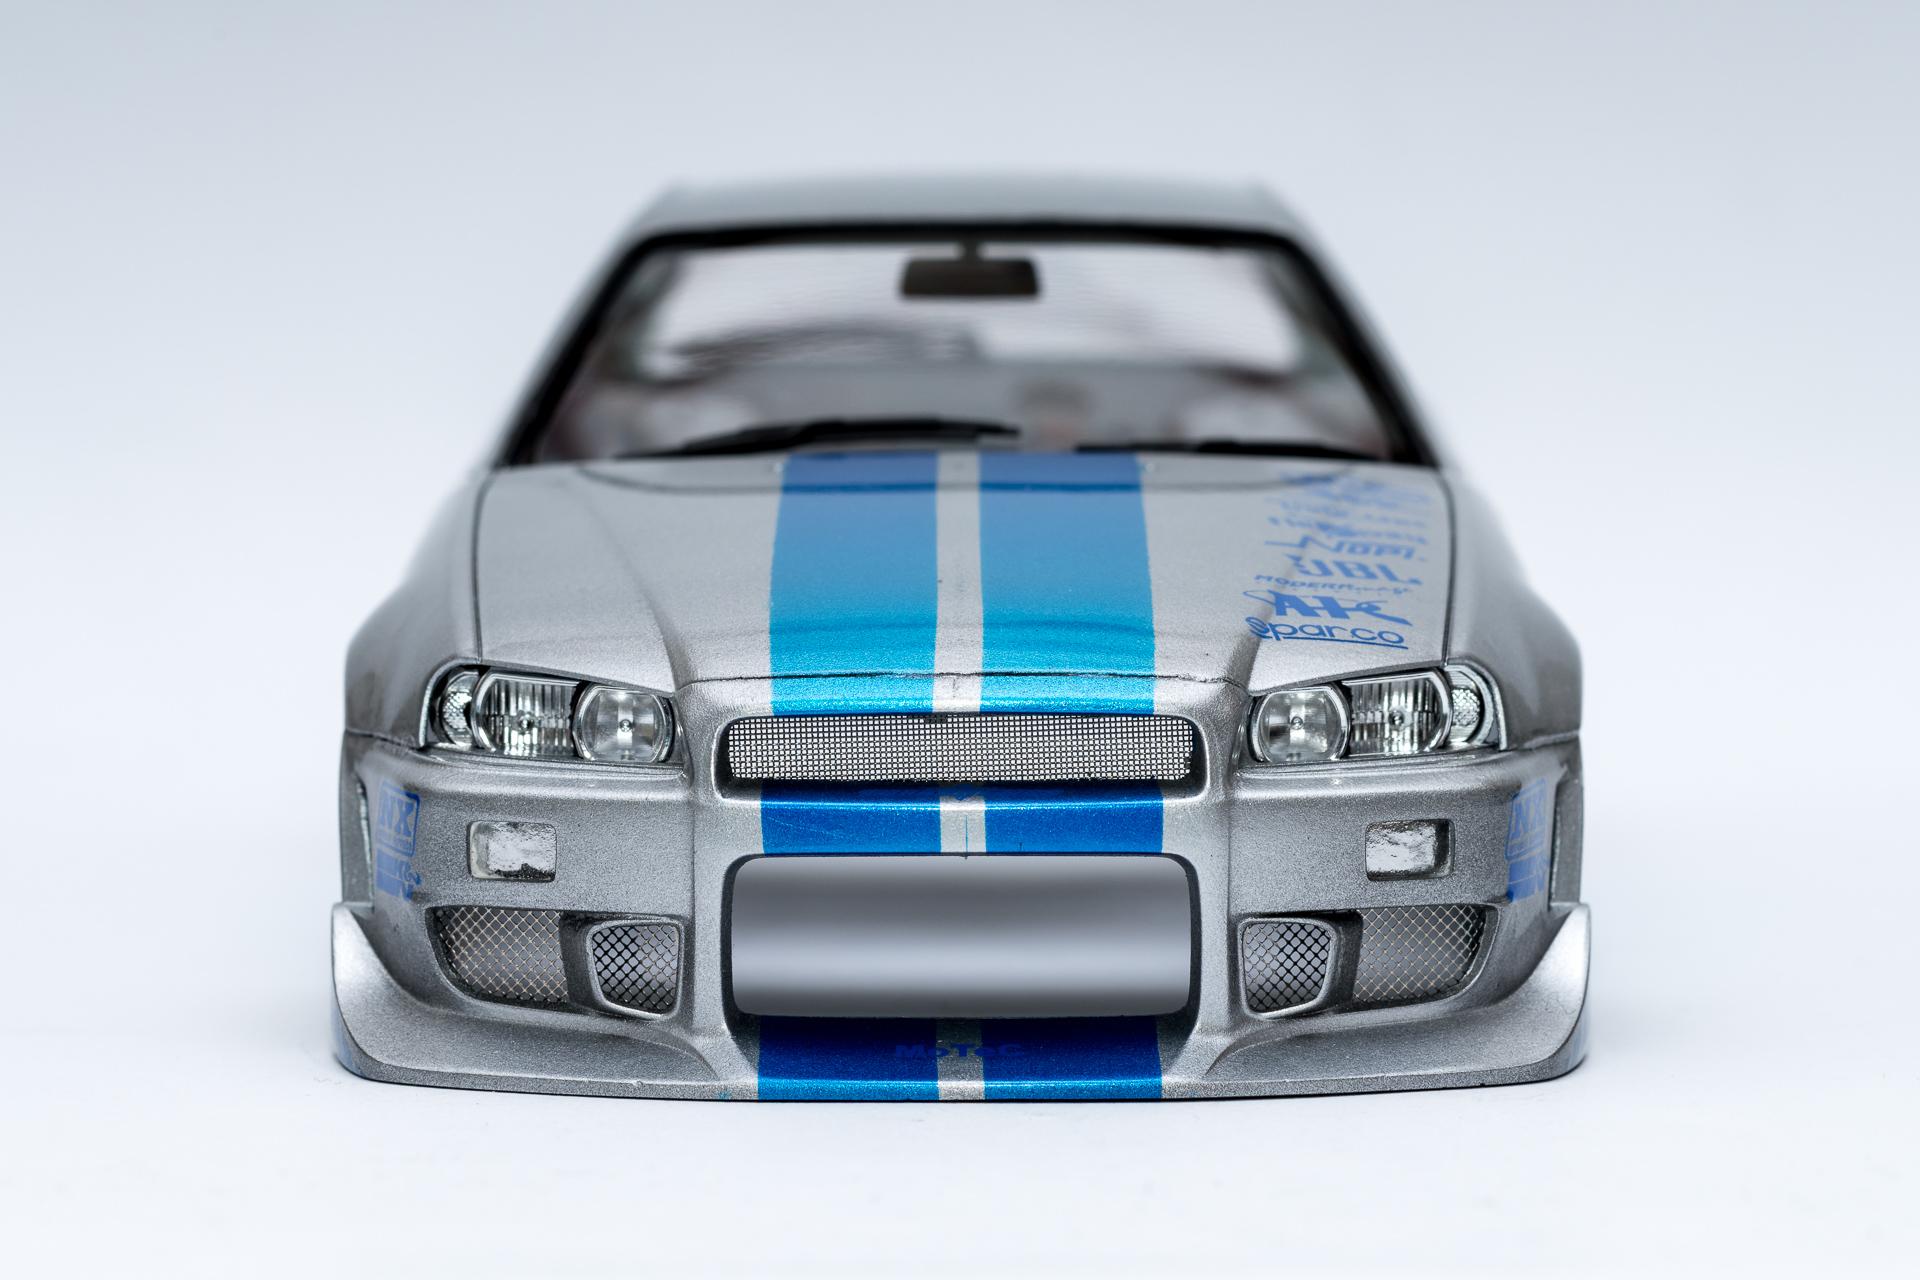
Hi all Thank you very much By the end of last week I attached the last few parts on the body. After that the final assembly could take place. Happily without any issues, so I got it finished on Thursday already. The only thing that didn't really want to stay where (and how) I wanted it, was the small oval bit on the front. But if you don't look straight from the front, it won't stand out that much. But now let me show the pictures of the finished model That's it from this WIP. Soon I'll (hopefully) continue on my McLaren Senna. In addition I just started alpha model's Ferrari SF90 Stradale. A new WIP covering this build will be started soon Urs
-
Brian's Nissan Skyline GT-R R34 from 2 Fast 2 Furious
harti20 replied to harti20's topic in WIP: Model Cars
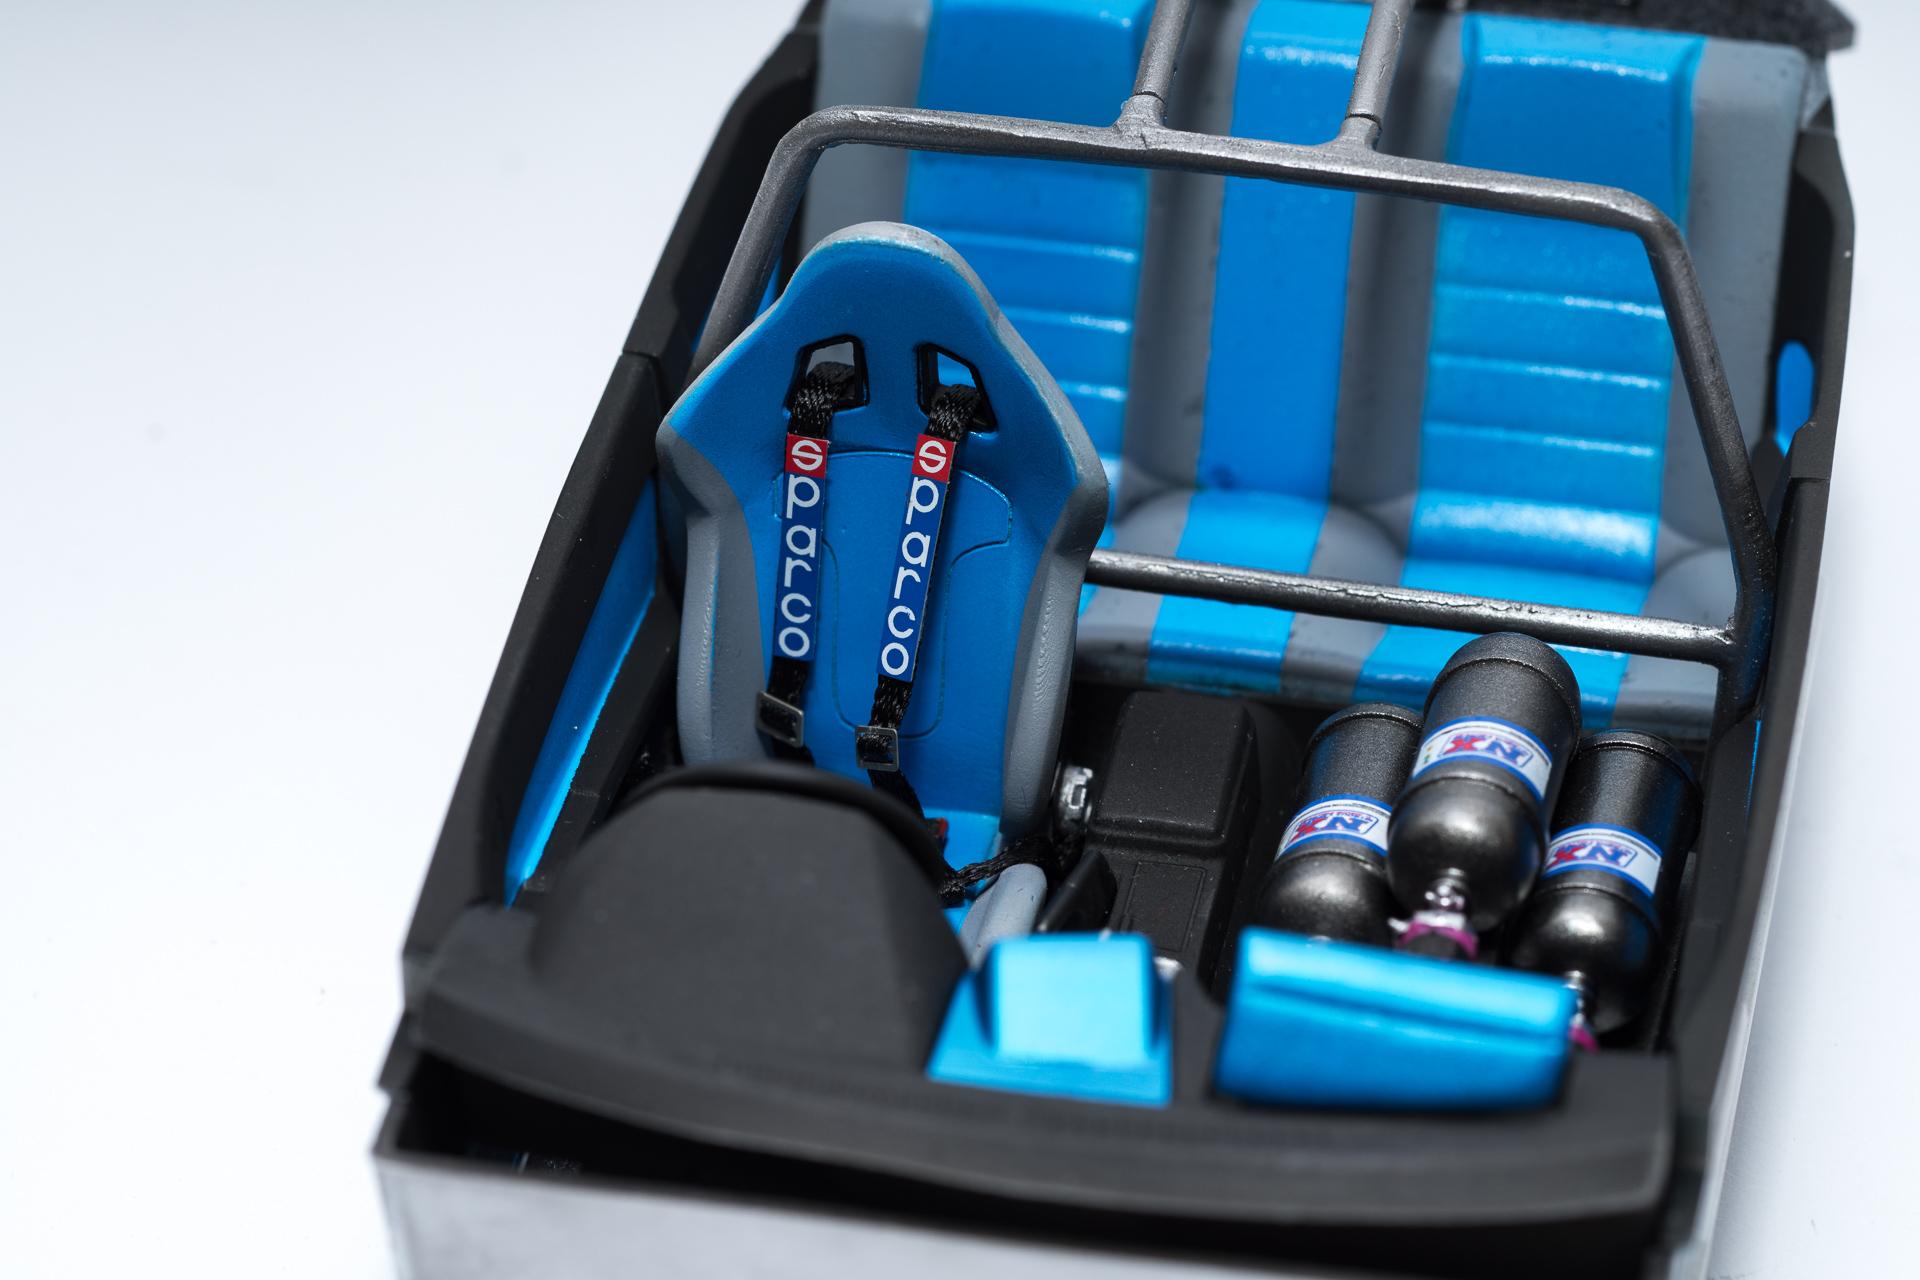
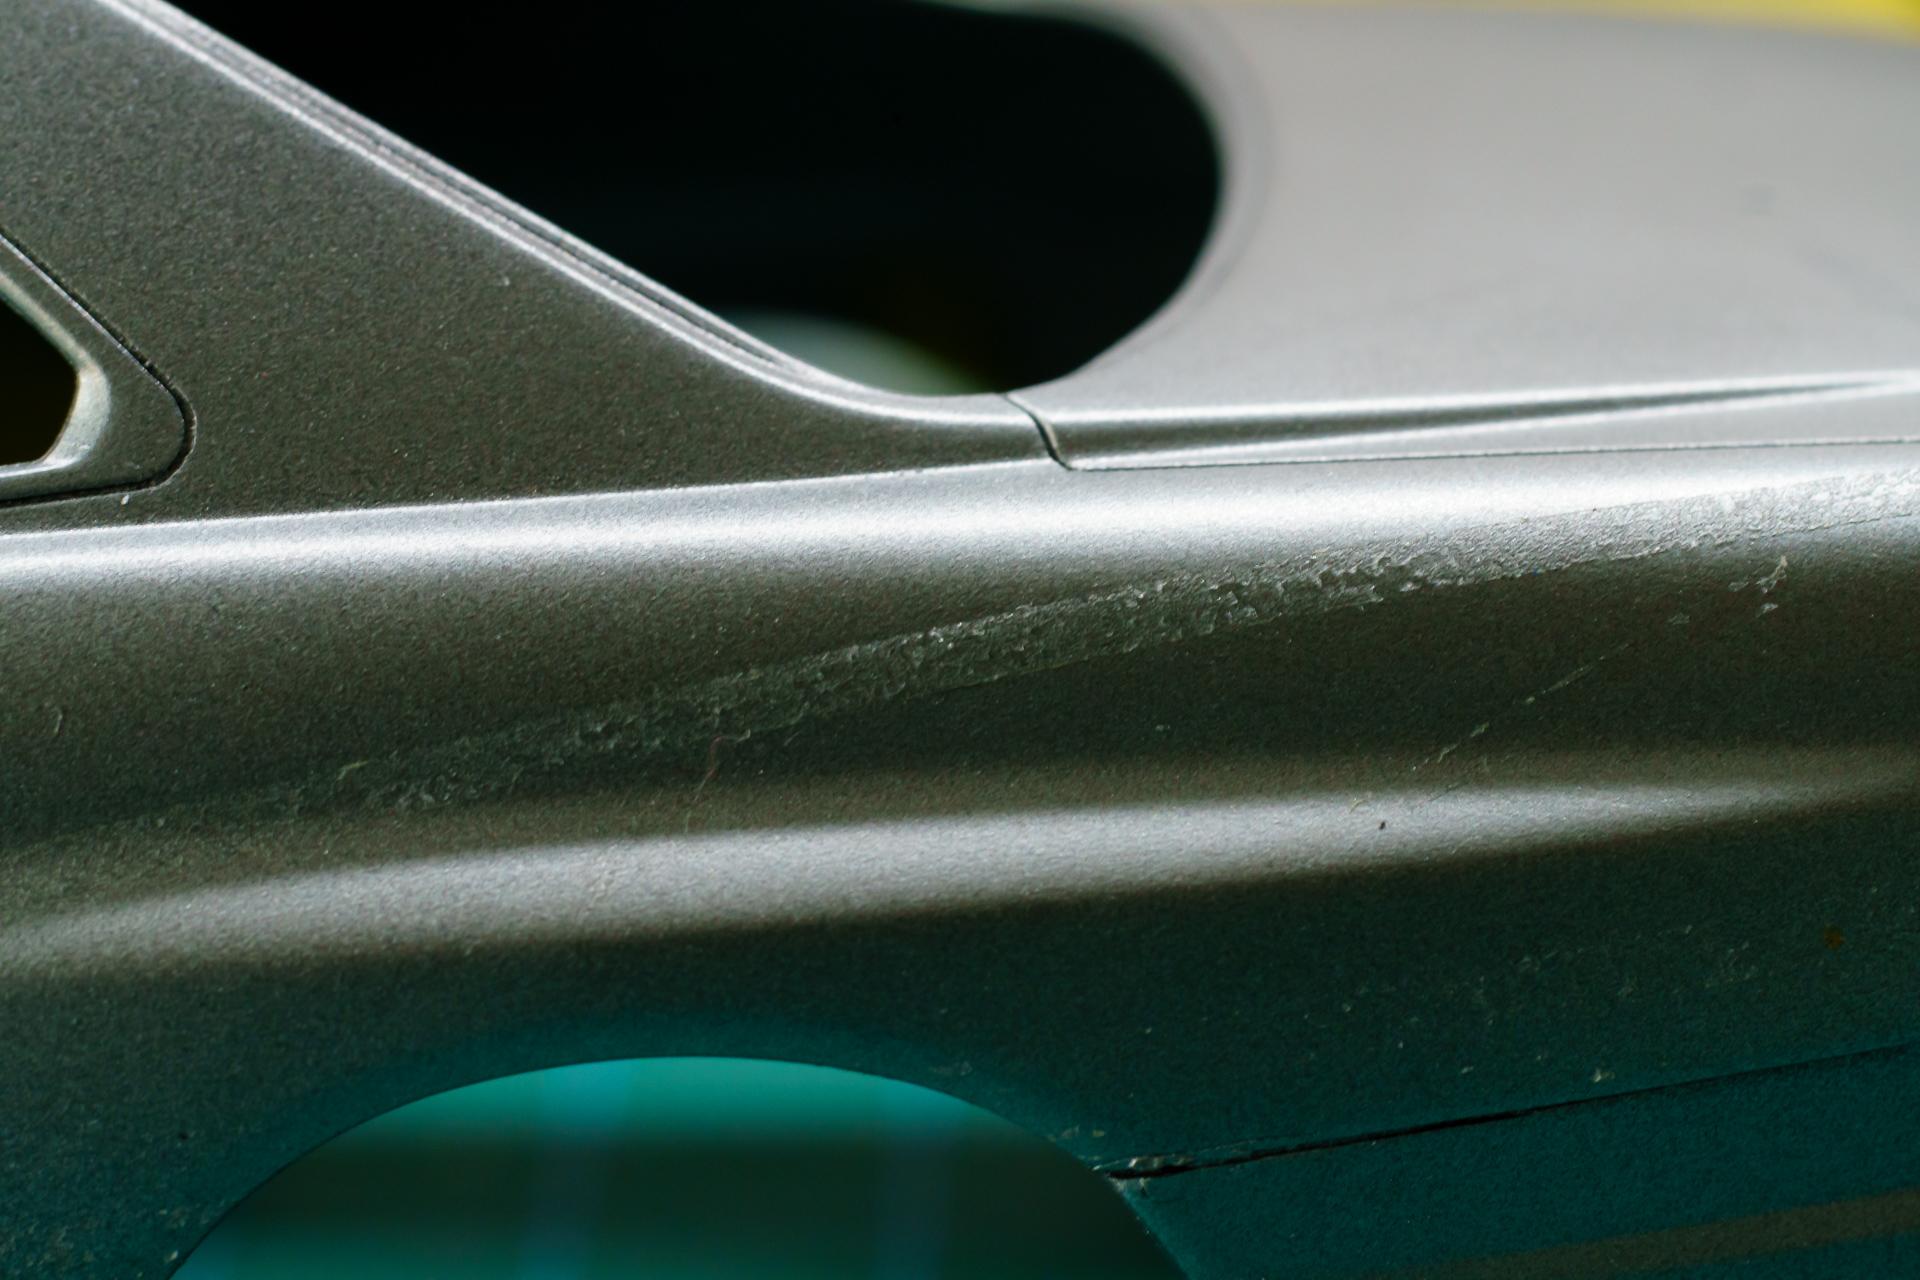
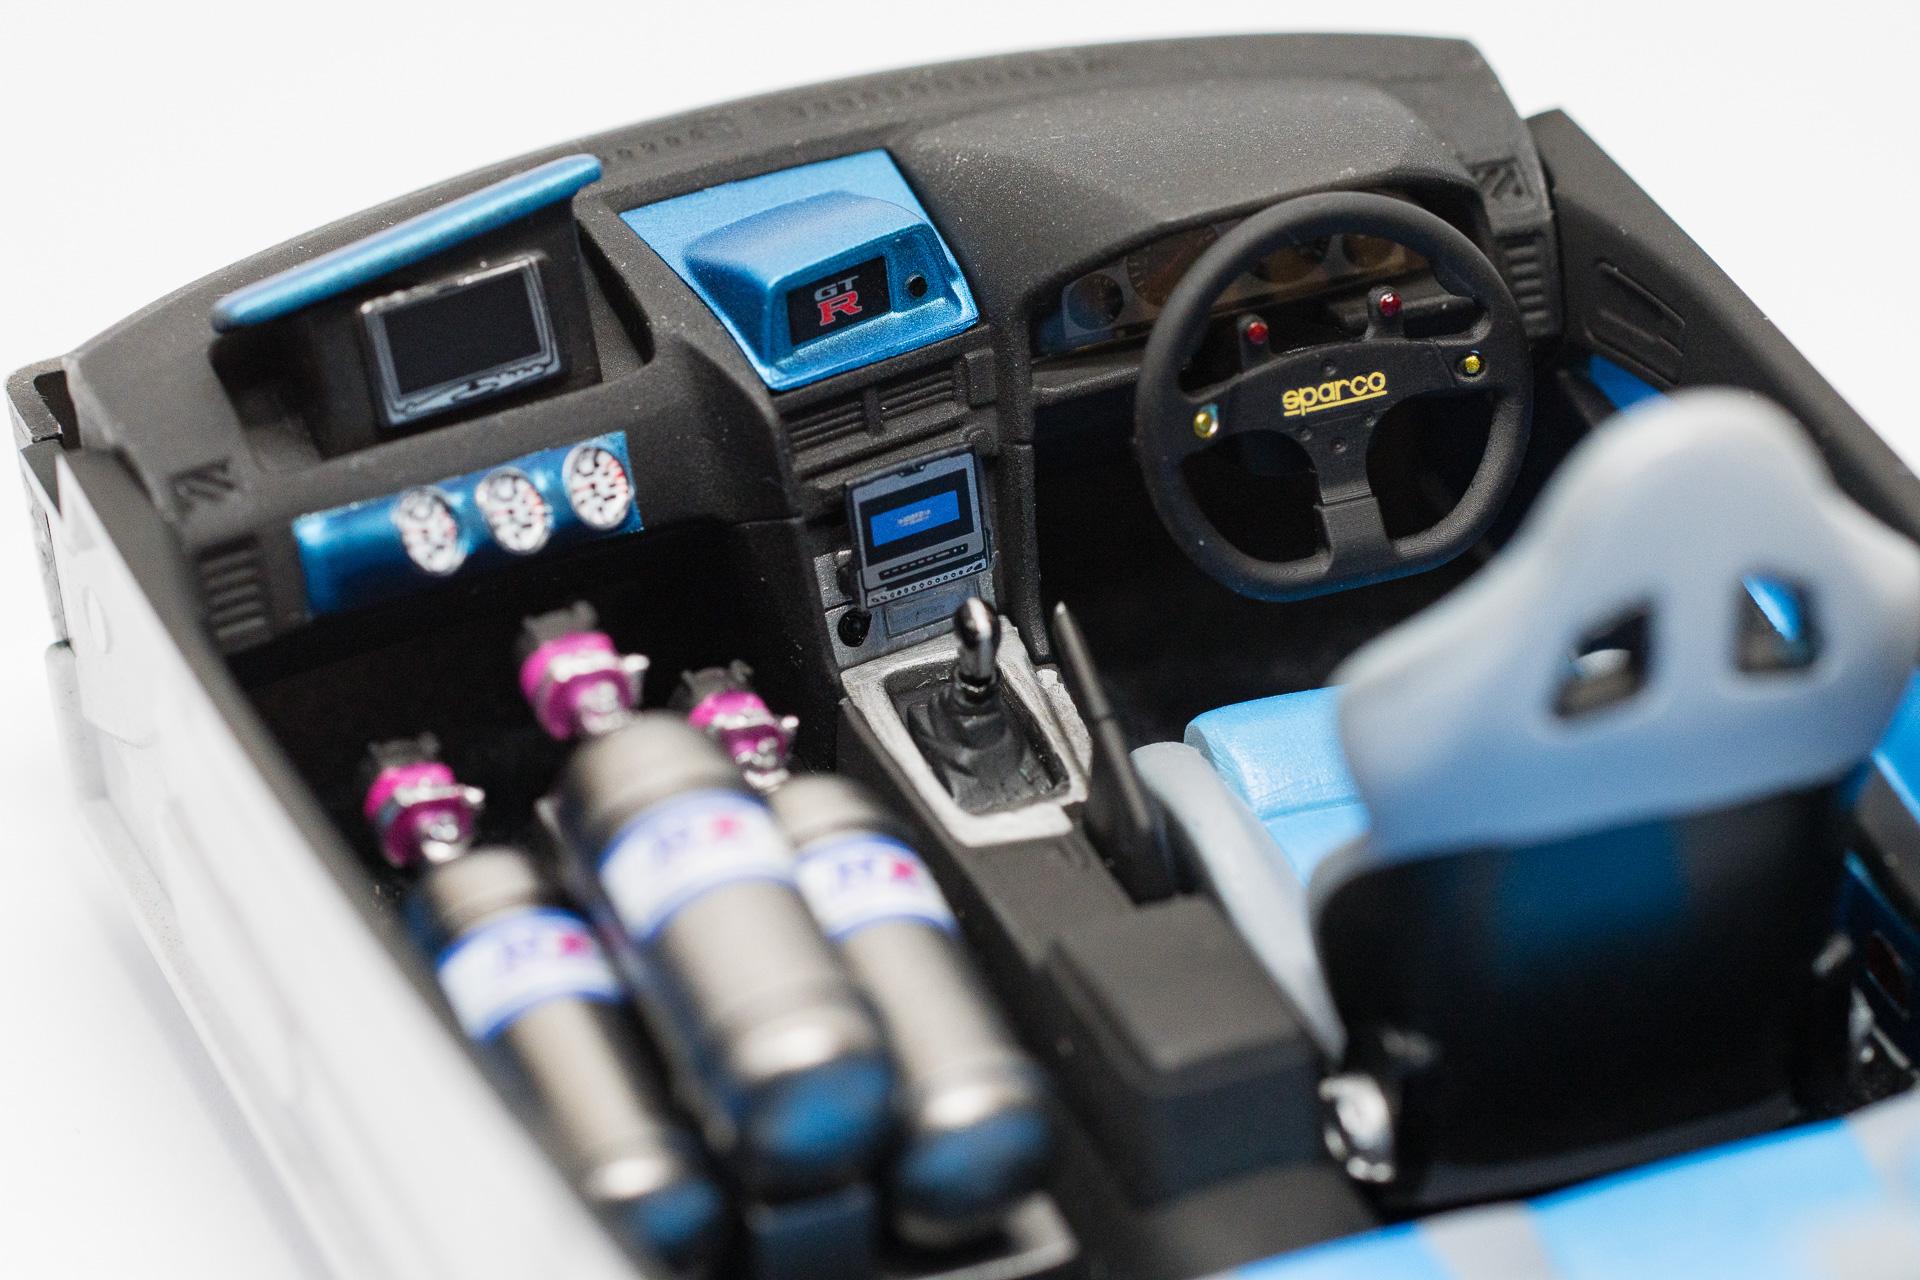
Hi all The clear got delivered by thursday already, together with some spare primer. Therefore I had enough time to clear coat the body and let it dry / harden for 5 days before starting the sanding and polishing process. One thing I learned from this: when you're already under time pressure on a build it isn't the smartest idea to use a clear coat you don't know yet and apply it with an airbrush you hardly know... ? The surface came out very rough and sturdy. I got proof that it wasn't the clear's fault a few hours later when I clear coated the first few parts from the McLaren Senna (with my "old" airbrush I'm used to). After trying to sand it down starting with my usual 3000 grit on the roof, I soon decided to start with 2000 grit instead on this build as I almost despaired of it. After several hours of sanding and polishing I can say that the body looks quite acceptable now... But to keep the tension high, let me first show you the completed interior with the 4-point seatbelts installed ? Now, as promised, the pictures of the almost finished body For the front grilles Tamiya enclosed the usual black nets. After some searching through my leftovers from several PE sets I found something that convinced me way more, so that's how it looks now from the front So there shouldn't be too much standing in the way of an early wedding. A few parts still need to be attached, then the wedding bells can ring. The bride and groom have already gathered here for an engagement photo ? There have been times where I doubted to be able to finish this kit in time for my son's birthday next saturday, but now I think, this shouldn't be too much of a problem ?. So, the next update will definitely be with the finished Skyline ? Urs
-
Brian's Nissan Skyline GT-R R34 from 2 Fast 2 Furious
harti20 replied to harti20's topic in WIP: Model Cars
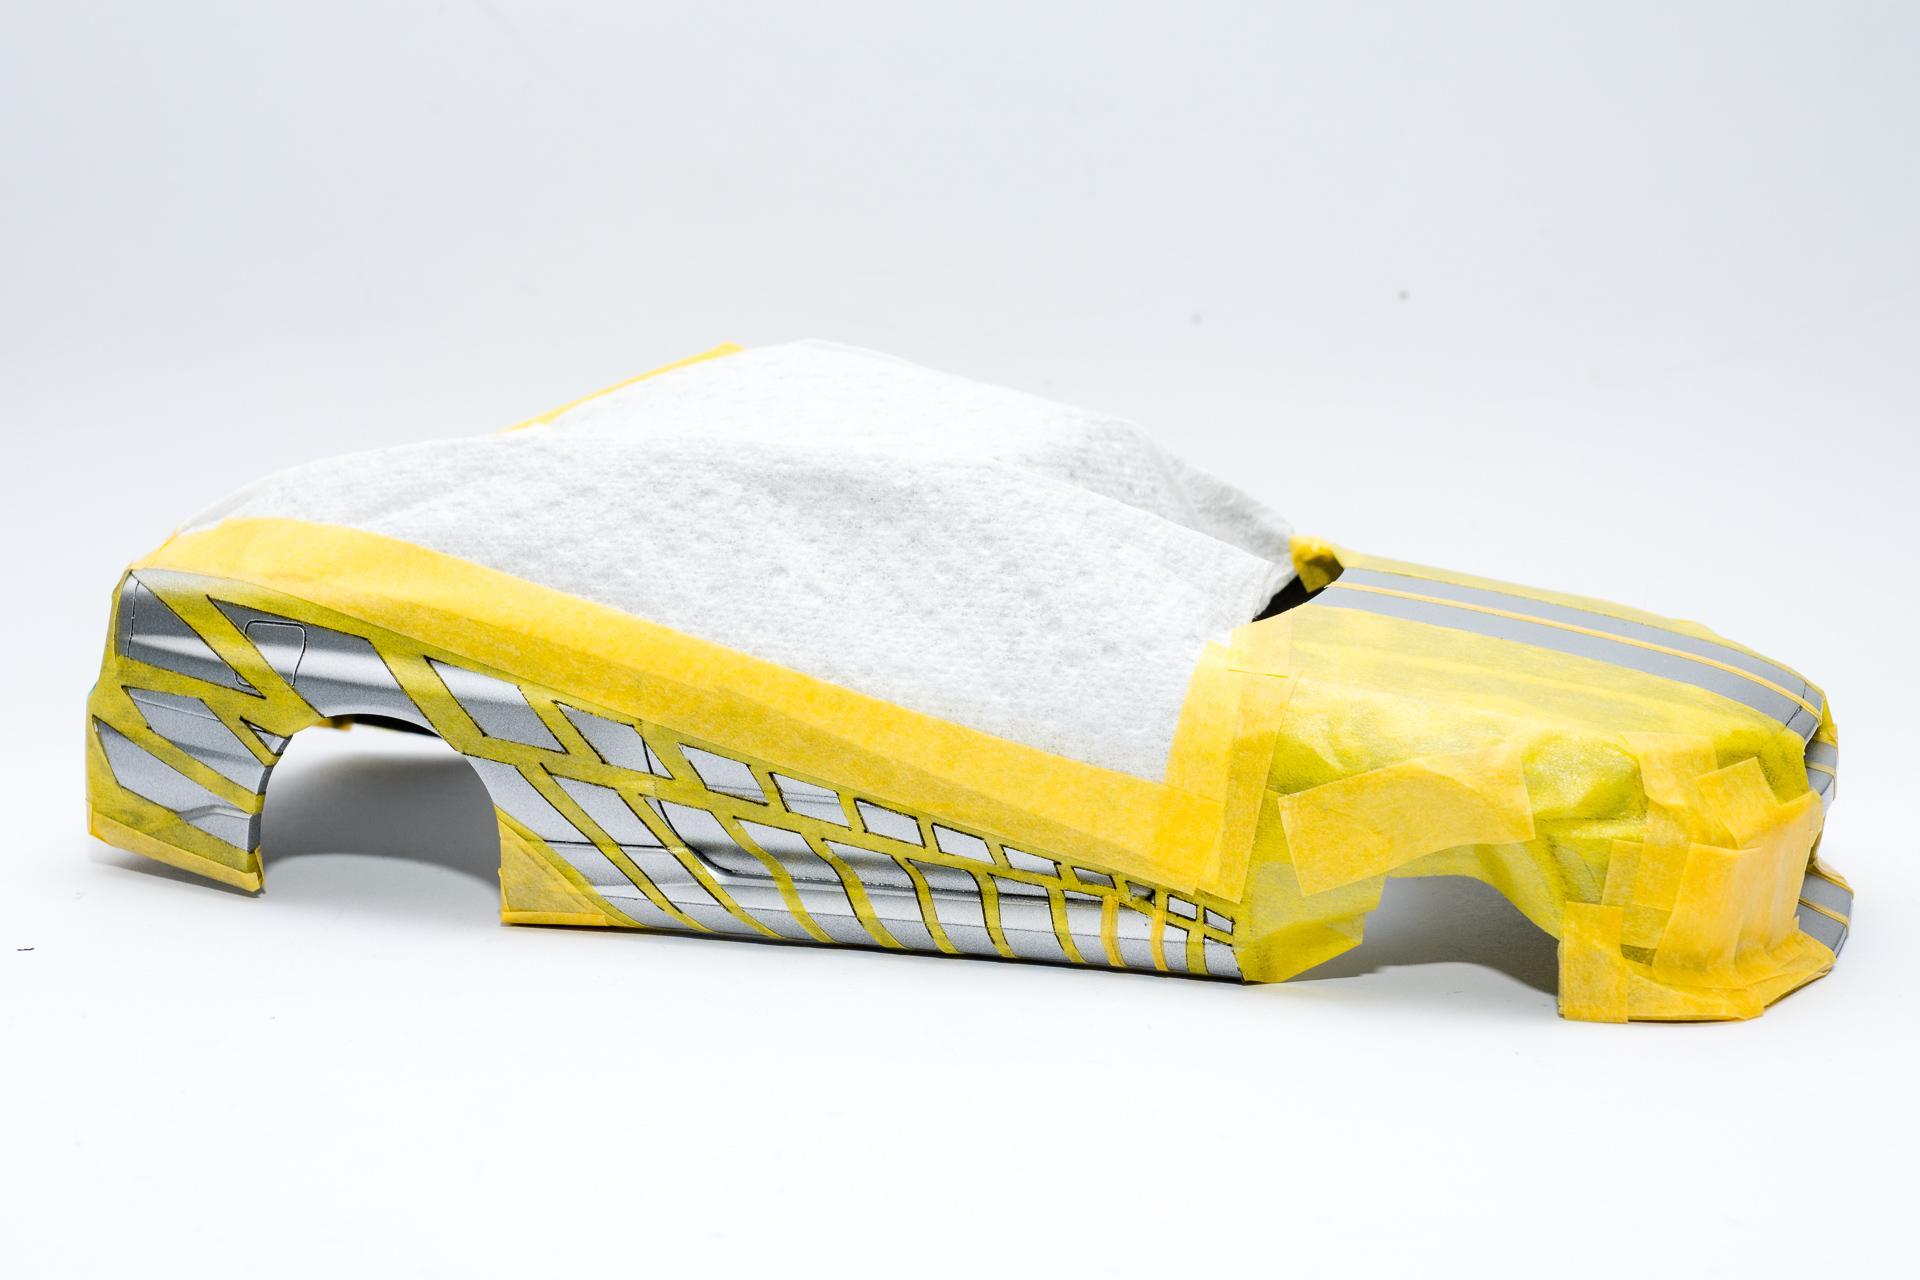
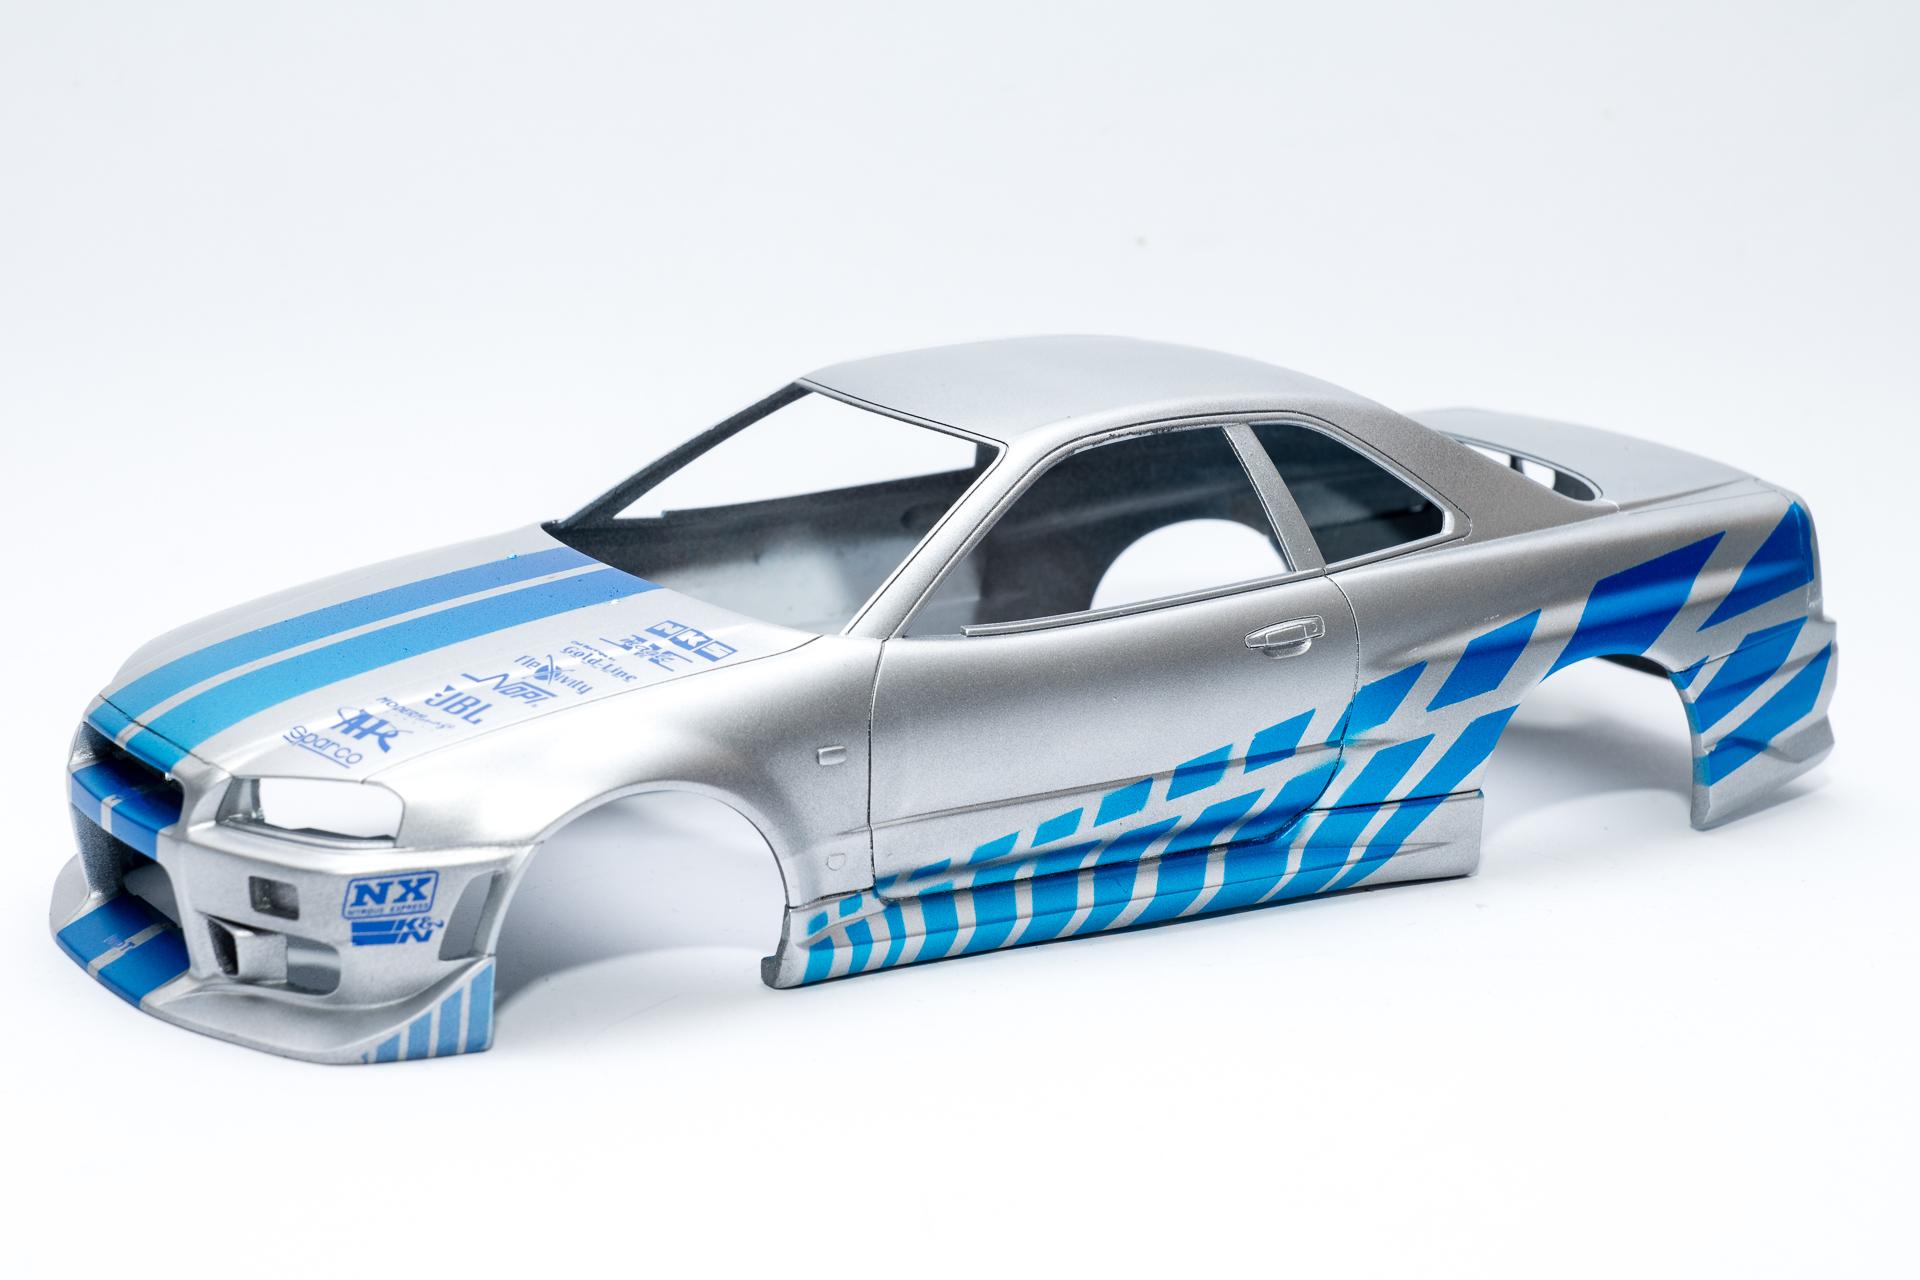
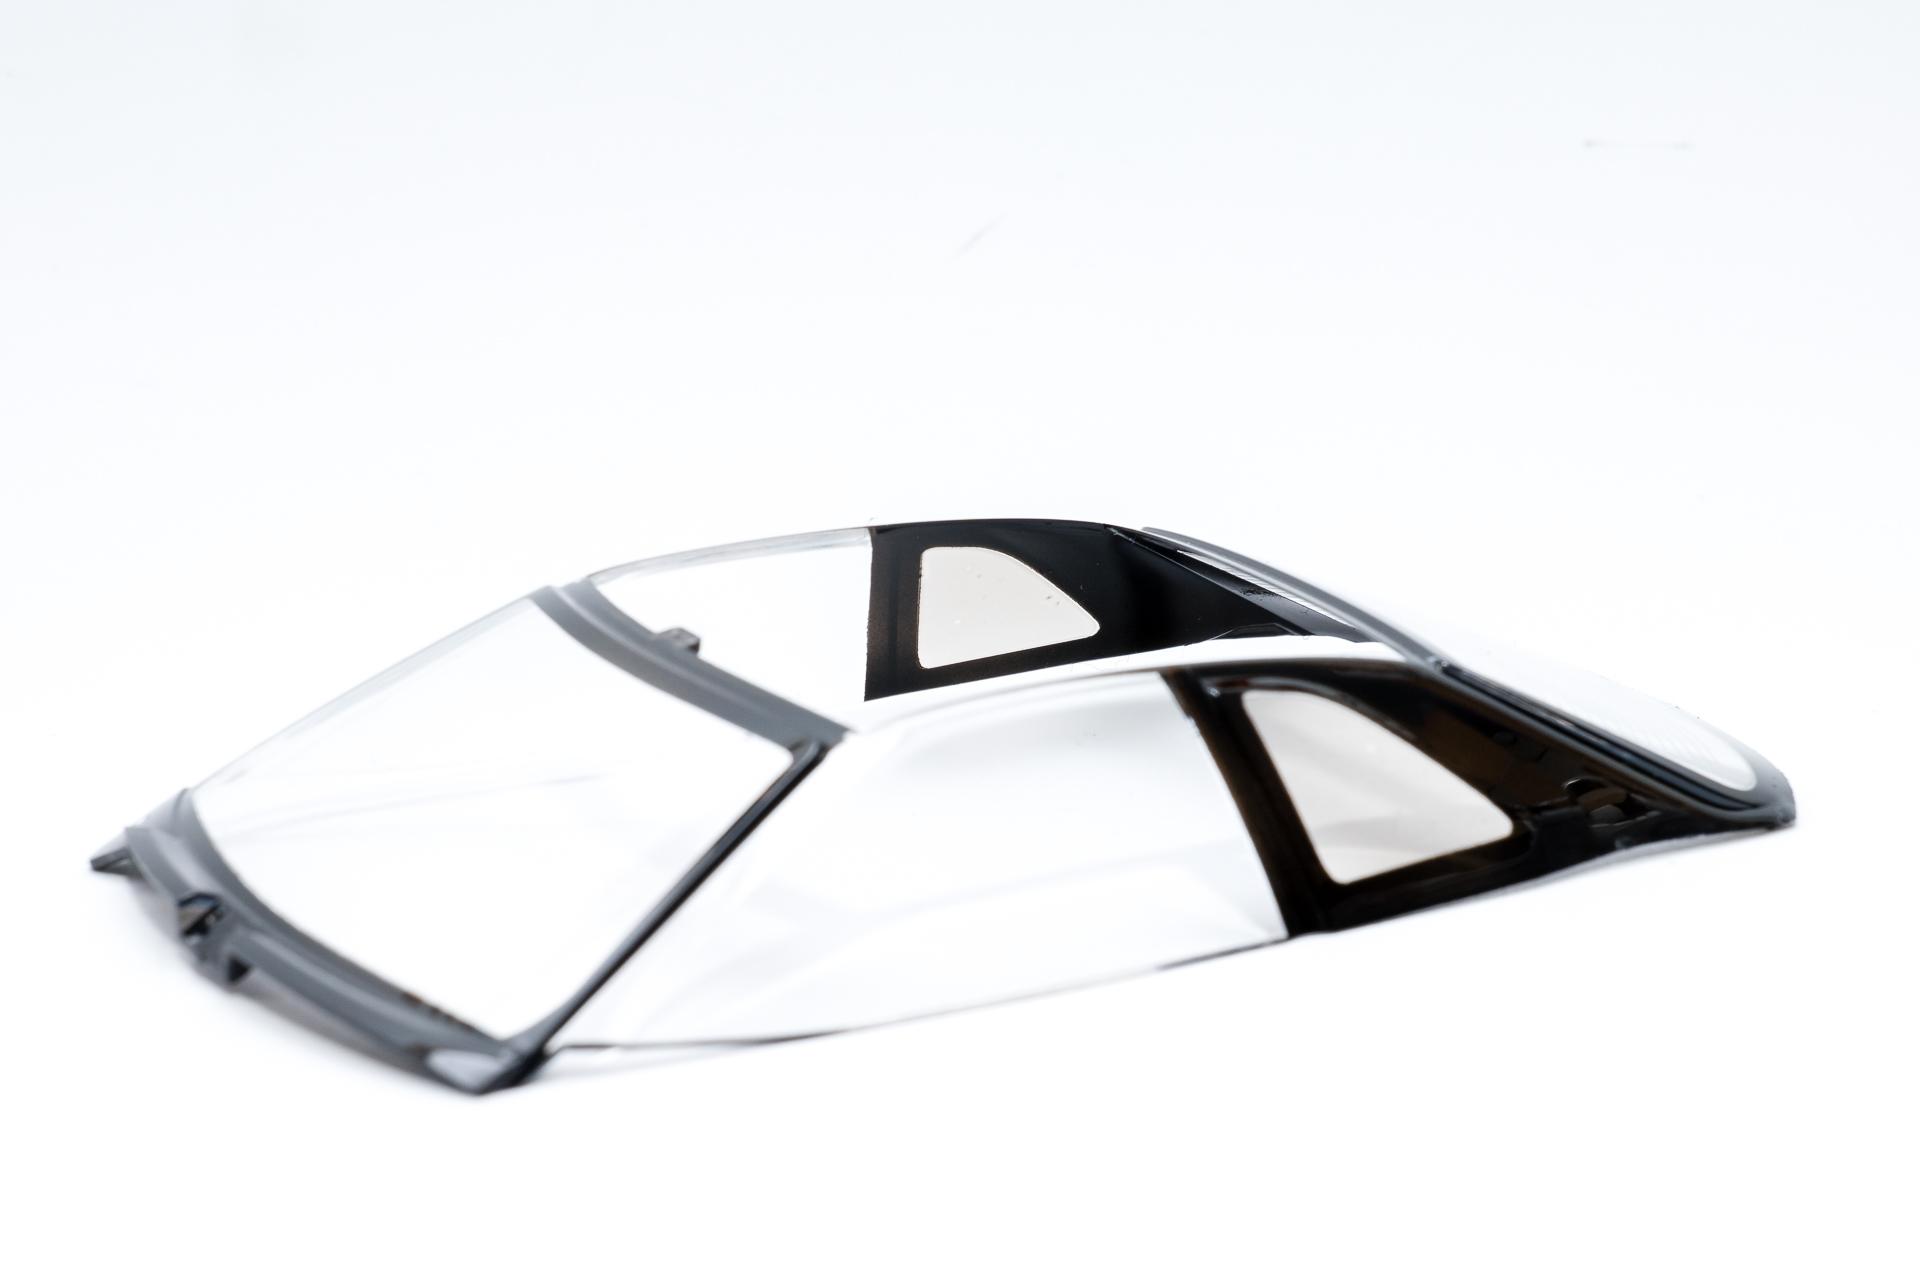
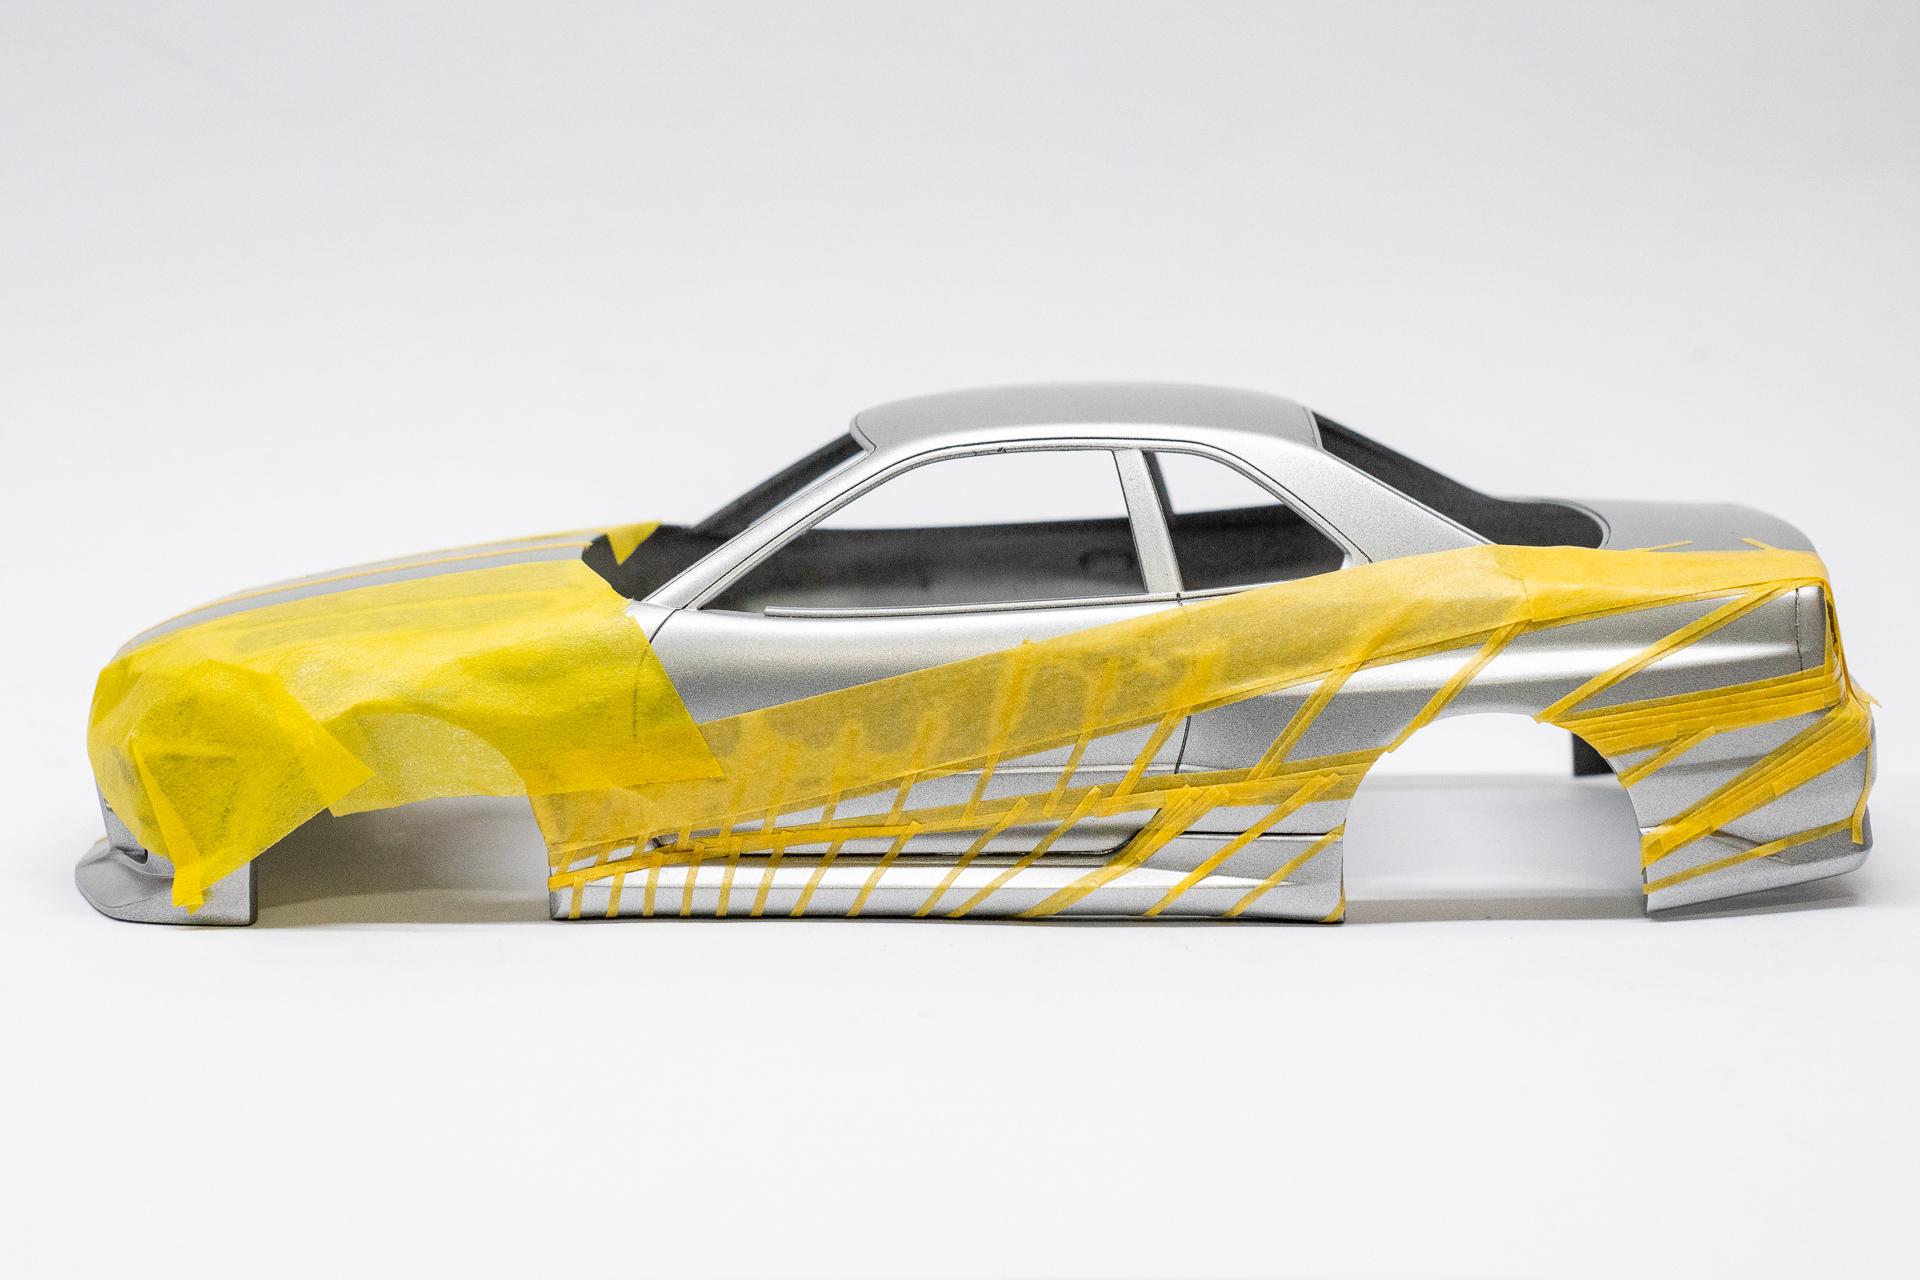
Hi all Thank you very much Last week I started masking the second side as well, but soon realized that this would be much more difficult than initially imagined. I managed to get the rough subdivision into upper and lower strips (I think). Then I wanted to mask the top strip from the back to the front and already had the problem with the second field that, despite measuring on the finished side and transferring the measurements to the right-hand side, the field looked much smaller than on the left-hand side. The surprise for my junior was planned either as a reward for a good school report or as a present for his birthday. School reports are due in two weeks, his birthday is in three weeks... So I'm slowly getting a bit pressed for time and have therefore been thinking about how I could simplify the whole thing a bit and therefore speed it up. It occurred to me that the decal from USCP would have been suitable in terms of length, but the height was far too short. As I had only tried to apply the strip decal on one side, I still had one left, which I then traced, transferred to masking tape and simply extended downwards. After this attempt was successful on the right-hand side (and surprisingly easy to apply), I removed the existing masking on the left-hand side again to apply the mirrored pattern there. When I removed the tape, I was left with a nasty adhesive residue wherever I had used the 1.5 mm tape from Tamiya Normally I remove adhesive residues with 99% isopropyl alcohol, but as the Zero Paints do not react too well to it, this was not an option in this case. So I decided to use scouring milk to polish away the residue. Of course, this also affected the paint around these stripes, so I had to paint them silver again before I could apply the new masking tape to this side as well. I then painted over the masking again with silver to avoid undercoating as far as possible and then started to paint the blue stripes. I soon found a technique that I think produced quite satisfactory results: Always start on the side where the color should be dark, move the airbrush slowly at the beginning and then speed up the movement so that less paint gets on the model in the front area in the same amount of time. After a few layers came the exciting moment: removing the tape.... The first side (left) was 99% perfect, only at the very front there are 1 / 2 fields that are not quite sharply defined. But this is so minimal that I can live with it. On the other side, there are a few more blurred edges and in one place, something small has protruded into the field that should actually have been painted, so that there is now a small silver spot in the blue. But again, it's not that annoying, so I can live with it ? After a few hours, the decals with the lettering were applied and now the body is just waiting for the clear coat. However, this is currently still on its way from England to Switzerland. If everything goes as the tracking currently predicts, it should arrive on Friday. This would also be the day scheduled for the clearcoat... I hope that the postman rings as early as possible on that day ? As I had the airbrush out anyway, I also masked the transparent part and painted it black. The rear triangular windows were then given a coat or two of smoke. This is the current status. At the moment I'm still working on the 4-point seat belts. When they are finished, I will attach them to the seat / roll bar and definitely install the roll bar, then the only thing missing is the body ? Urs
-
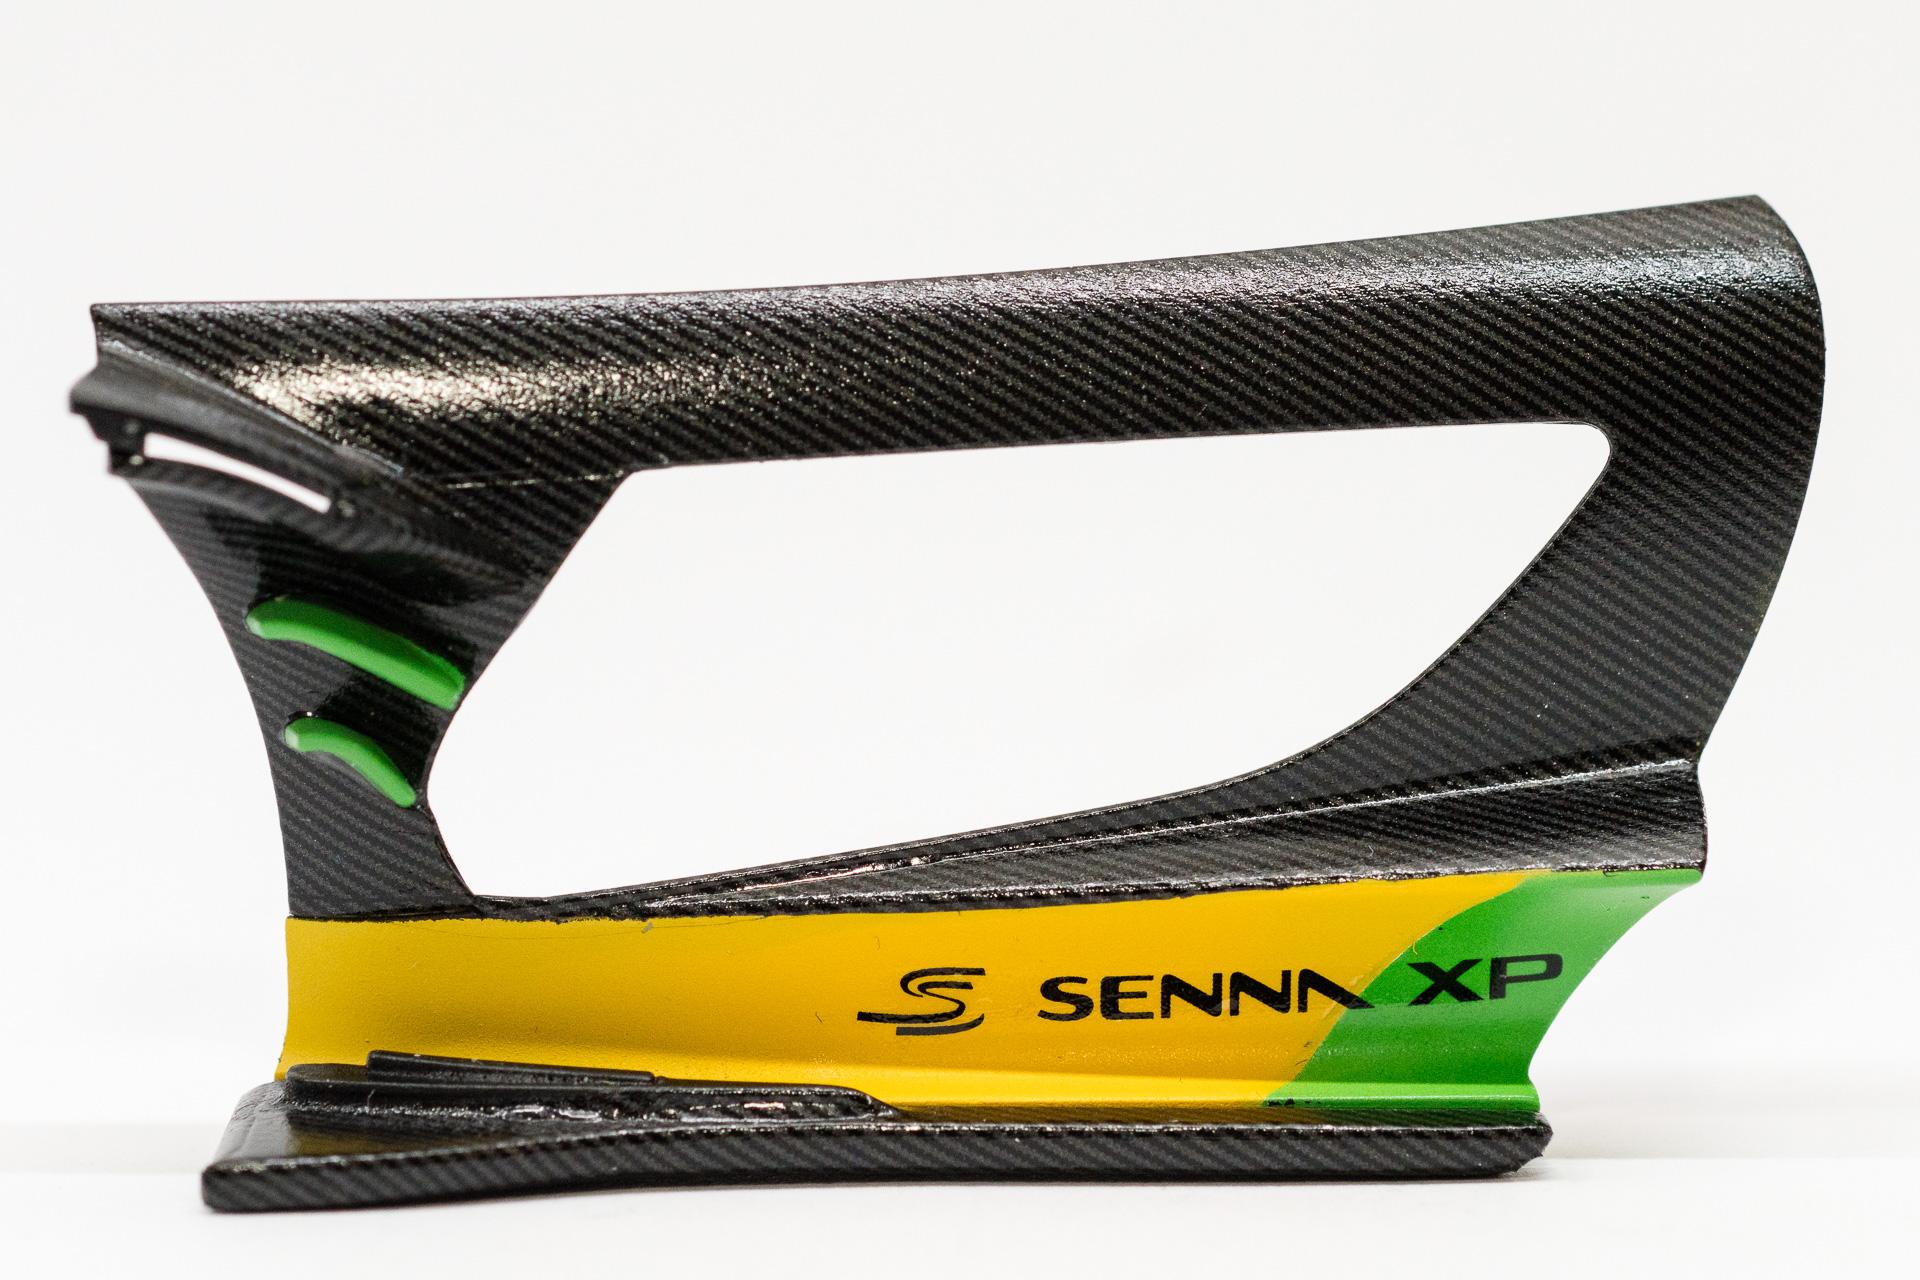
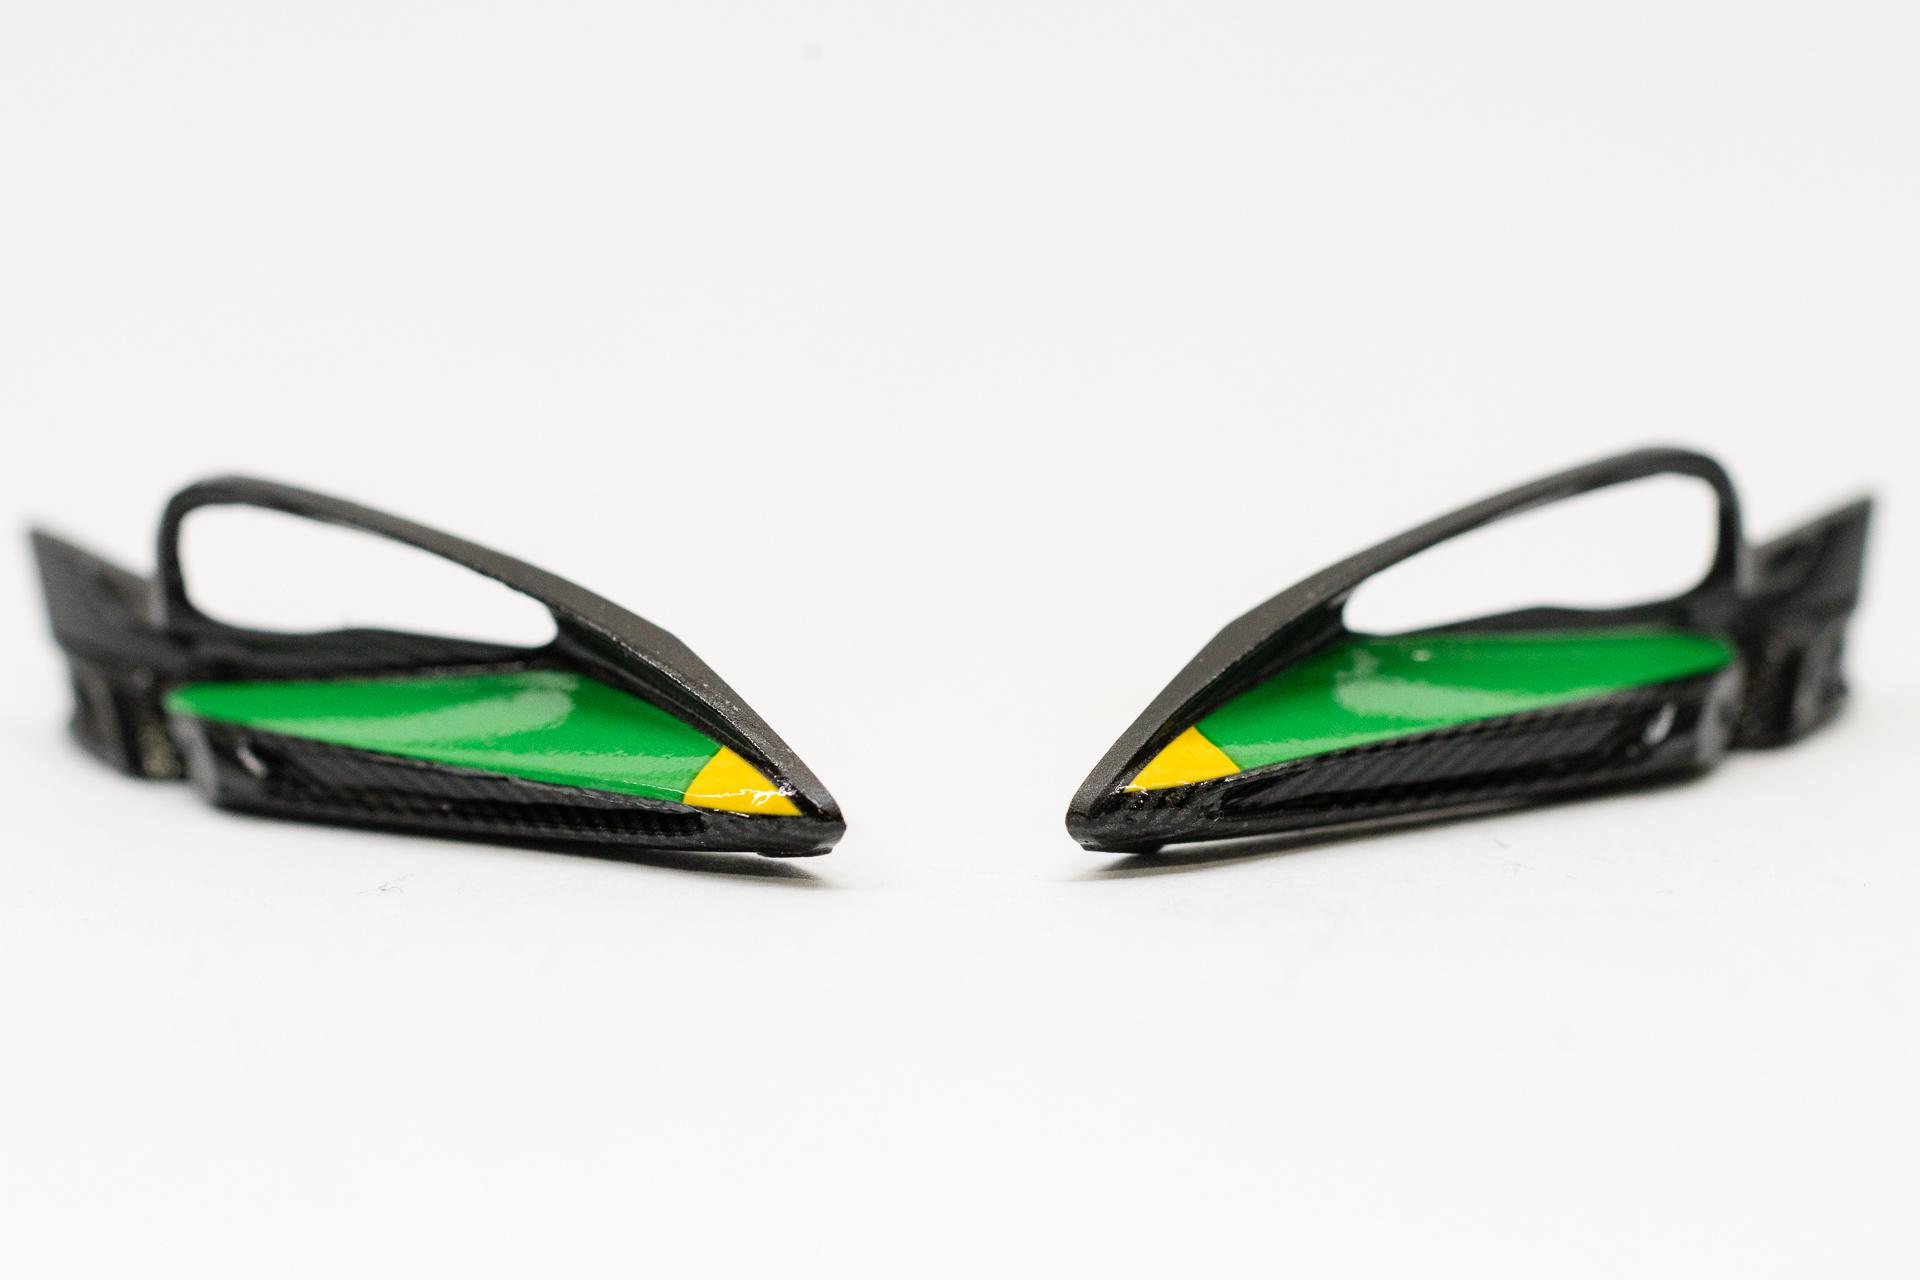
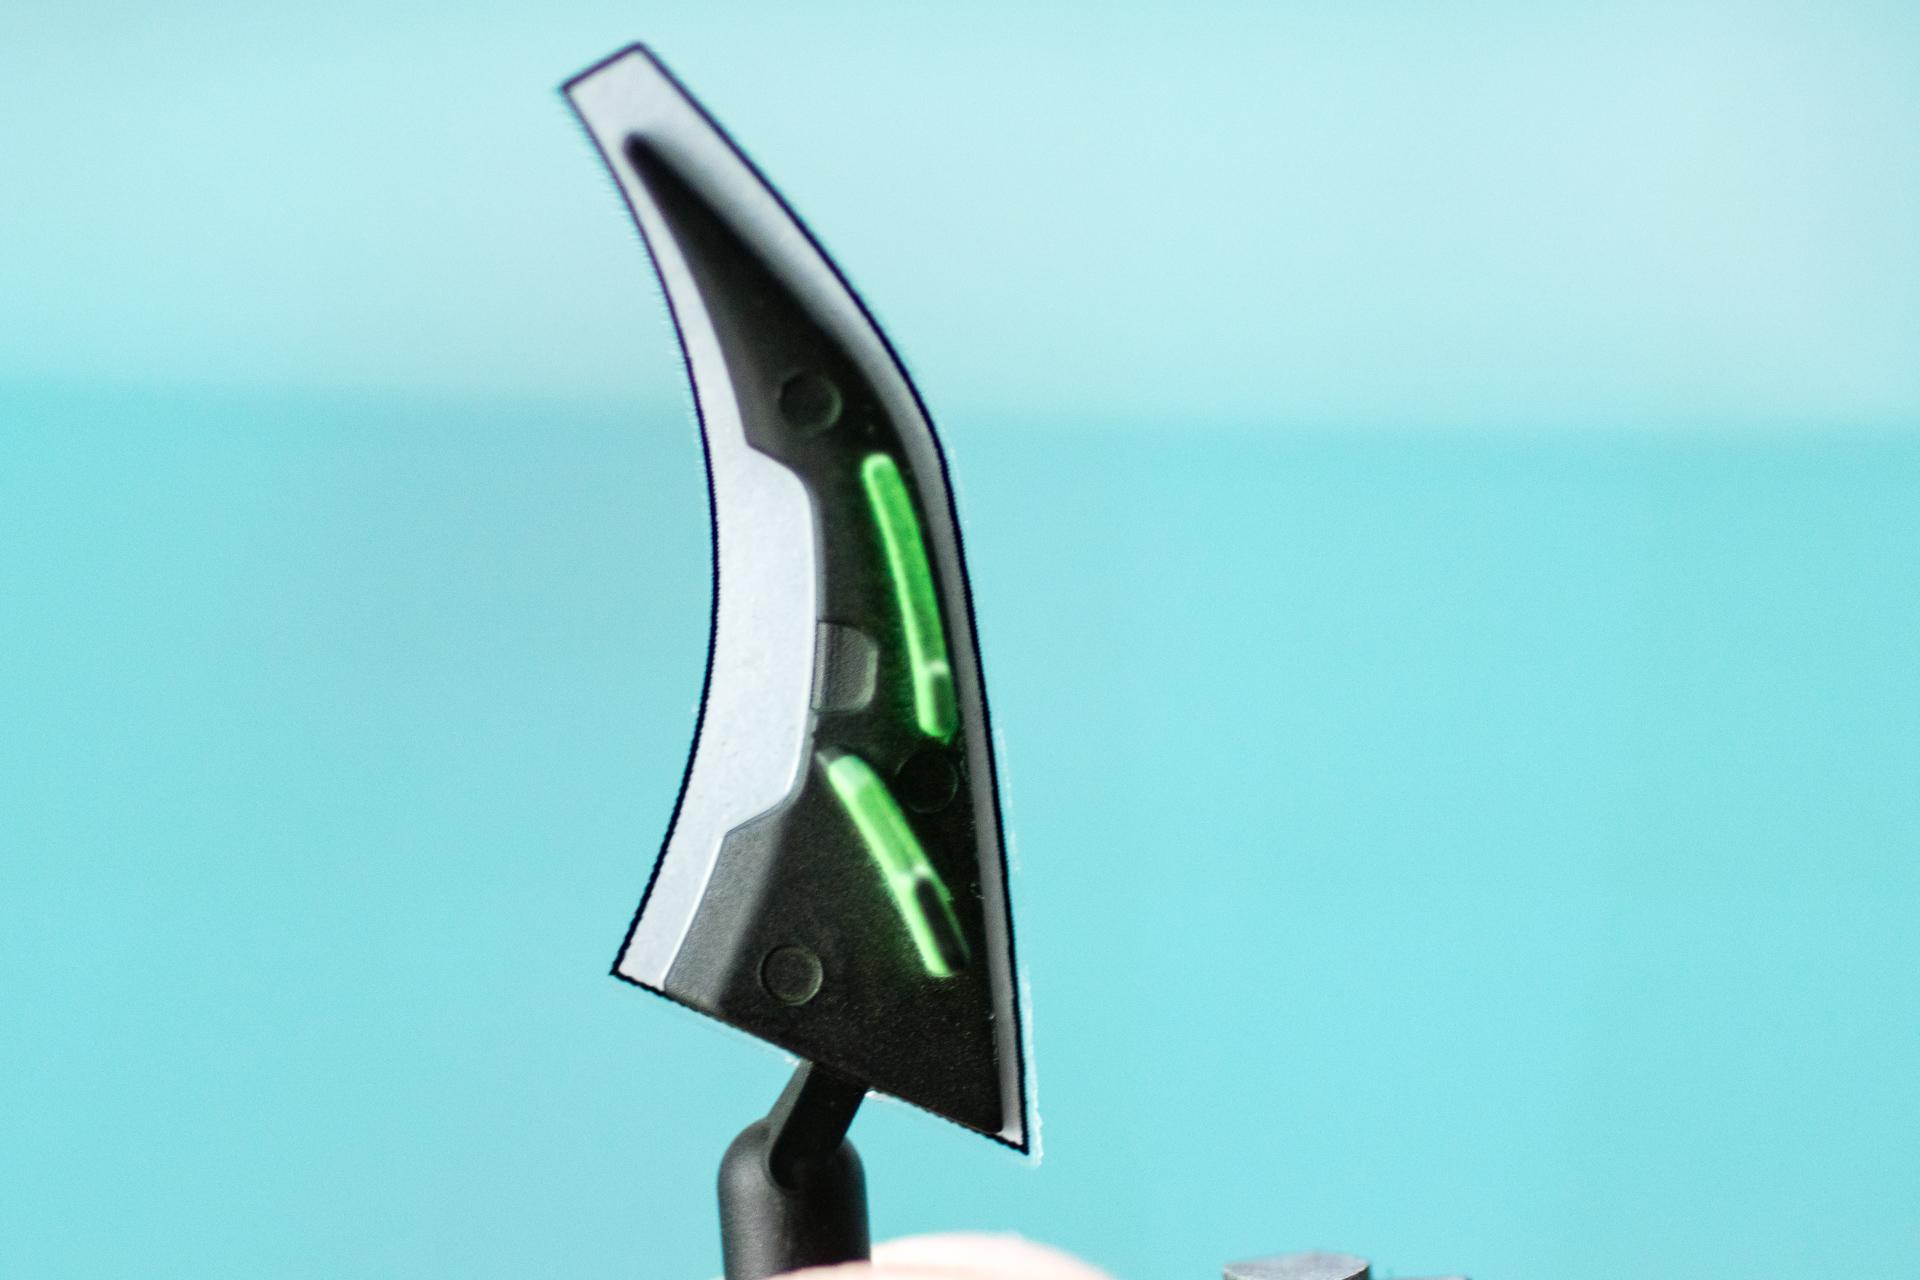
Hi all The decals of both decal sets are now used up ? However, shortly after applying the last decal I got quite annoyed with myself ? But first to the positive part of this update: the second door also got its lettering Then I tried my hand at the second wing of the spoiler and of course, as I feared, the decal tore in two places (the fear was not the number of tears, but the fact that it tore, just to avoid any misunderstandings ? )... But maybe I'll get another chance to repair it, because... After I had applied the final decals to the front (the two narrow strips on the left and right), I wanted to have a look at my reference photos of the interior and stumbled across the following picture: https://www.carpixel.net/wallpapers/19501/2020-mclaren-senna-xp-the-home-victory-us.html ? As you can easily see in the reference photo, the stripes should have been on the vertical surfaces (partly on another part of the kit) and not flat on top. Then the currently rather strange looking front end of the stripes would be logical and would merge into the vertical part of the splitter... At the moment I'm leaning towards somehow removing the two strips again. If the carbon decal underneath would also be damaged as a result, I would still have enough spare material from the S.K. Decals set to cut it to size and reapply it myself. Only the two strips I could possibly piece together from leftover decals from the Studio 27 set, as I painted some of them instead of using the decals. However, if the carbon decal also had to be replaced, then the Studio 27 set would probably have to be purchased again, as the McLaren logo also comes from there and would then probably be irrevocably destroyed.Fortunately, the Studio 27 set is a) still available and b) not too expensive. That's also the reason why I was talking about another chance with the spoiler decal. Between attaching the two stripe decals and realizing that they were attached incorrectly, I tried for about the third time to cover the outside of one of the seat shells with a transparent carbon decal and failed for the third time... That's why there's no photo, because the seat shell is still just a green-painted seat shell... ? So much for today's update. Clear coating before my junior's school vacation is definitely not going to happen, so the construction will probably take a little longer and will definitely see its second birthday... Urs
-
Brian's Nissan Skyline GT-R R34 from 2 Fast 2 Furious
harti20 replied to harti20's topic in WIP: Model Cars
Hi all Some more progress on the Skyline. First of all the interior has almost been completed. The only parts not yet installed are the safety belts and the roll bar. Then the masking of the first side of the body has been completed (I know, the lower part of the back has not yet been masked and the upper part will be masked once I masked the opposite side as well with some kitchen towel). For the stripes in front of the front wheel, I'll give the USCP decals another chance and hope that they fit better than the stripes over the main part of the body. And if some of the experts spots an error in the pattern, let him now speak or forever hold his peace ? That's it for today's update Urs
-
Hi all Not much progress made over the past two weeks, mainly because of two surgeries I had to undergo, where especially the second one kind of knocked me off for a few days. But this weekend I had some time to continue work and used it to progress on the body work, because I would like to have everything ready for clear coat by mid july, otherwise I'd have to wait another five weeks for my son's school holidays to end, as I don't want to work with 2K clear when he's at home. Now it's time to add some color to the quite boring carbon grey ? First the front has been partially assembled to be able to apply some more Studio 27 decals Then the headlights received some color And finally the first door got the Senna XP lettering applied. Why Studio 27 decided to split the stylized "S" at the beginning onto two decals (the outer bows on the same decal as the rest of the lettering and the inner "S" on another decal) will remain their secret, I suppose... ? That's it for today's update. Now there are only four more decals on the front shown before, the lettering on the other door and the upper small wing of the spoiler (that's the one decal I fear most because of the part's curvature). Once these decals are applied, all the body parts will be ready for clear coating which would mean (at least seen psychologically) a huge step towards completion ? Urs
-
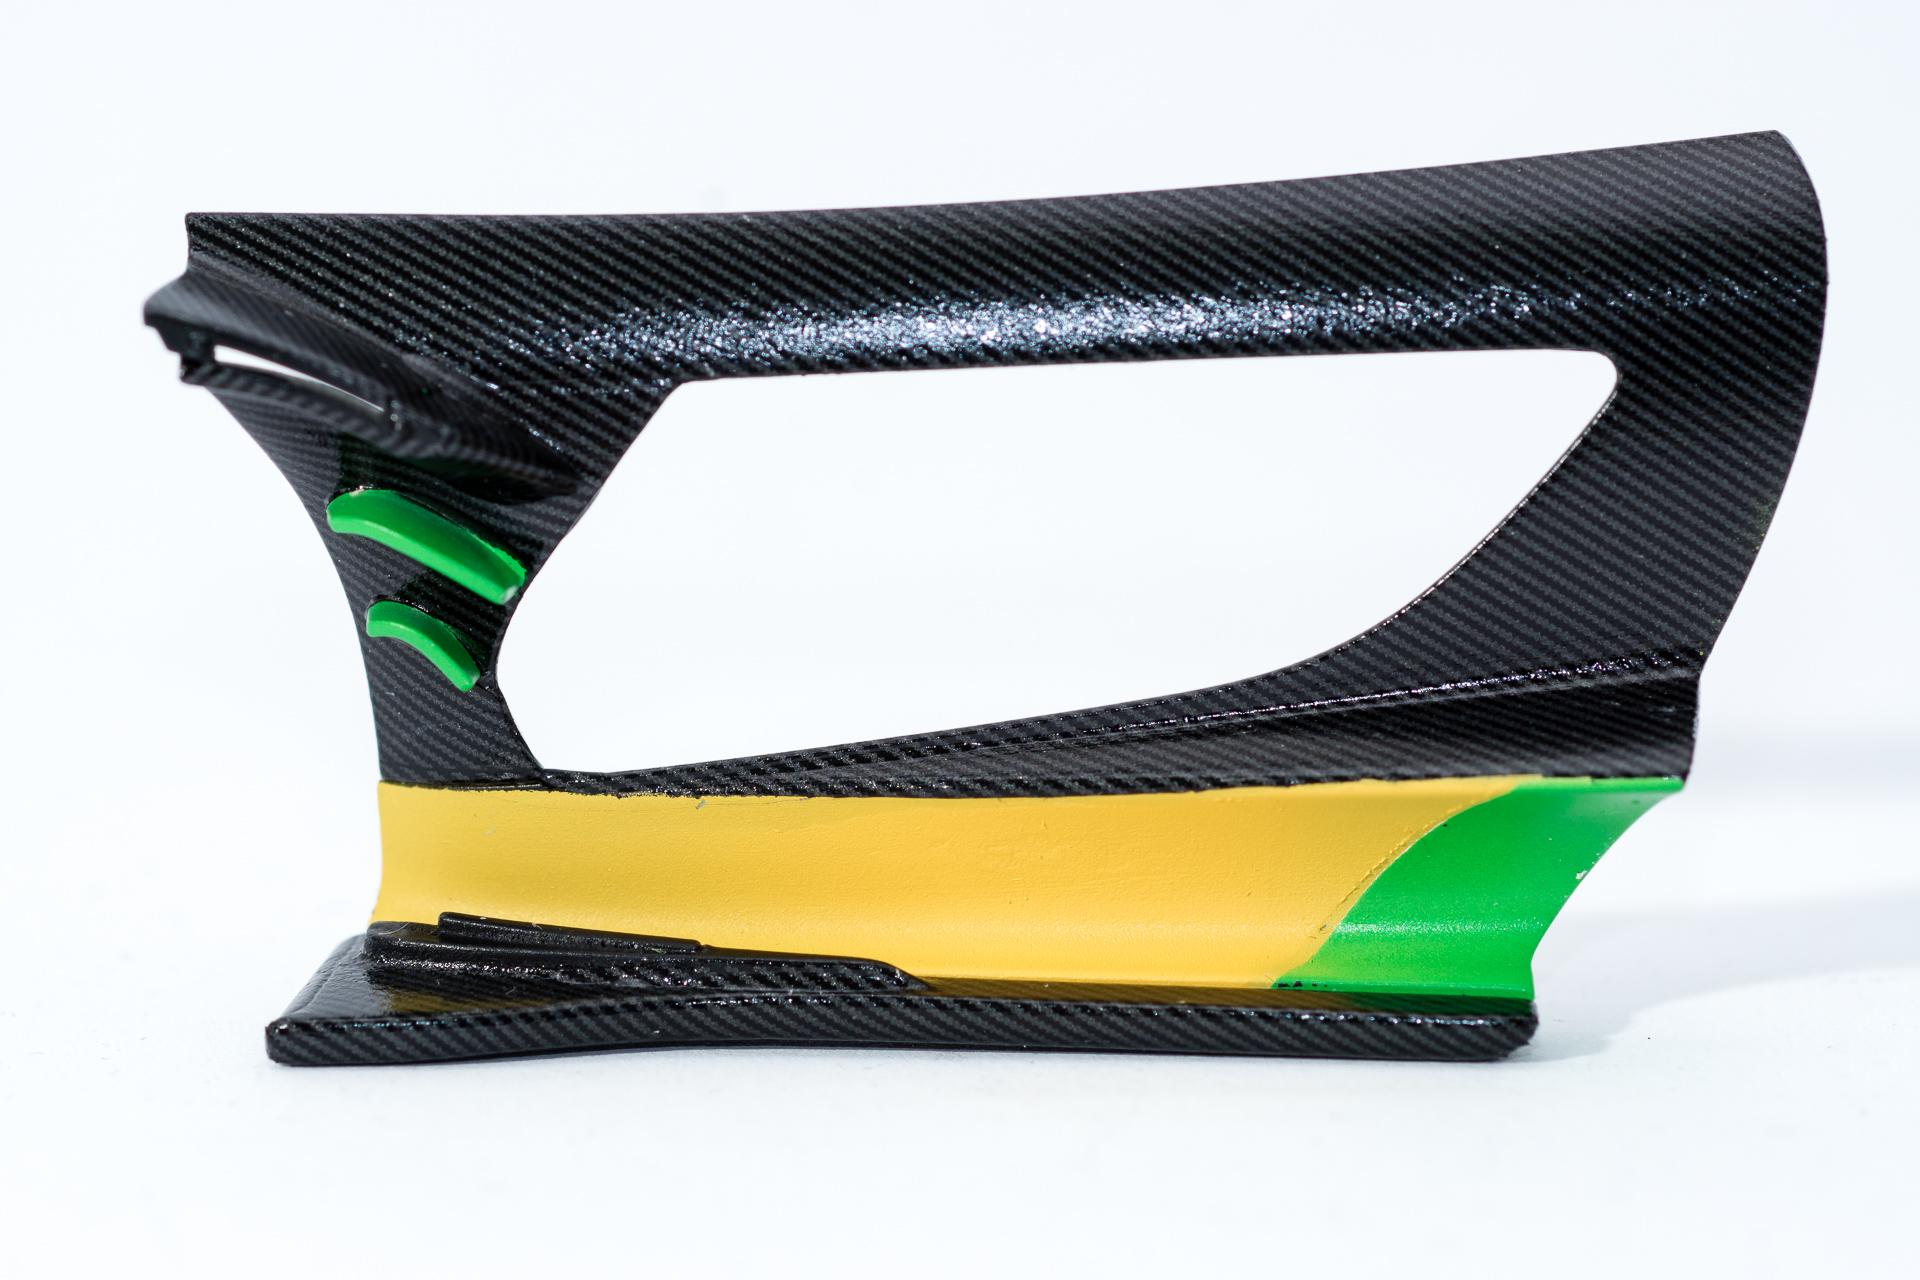
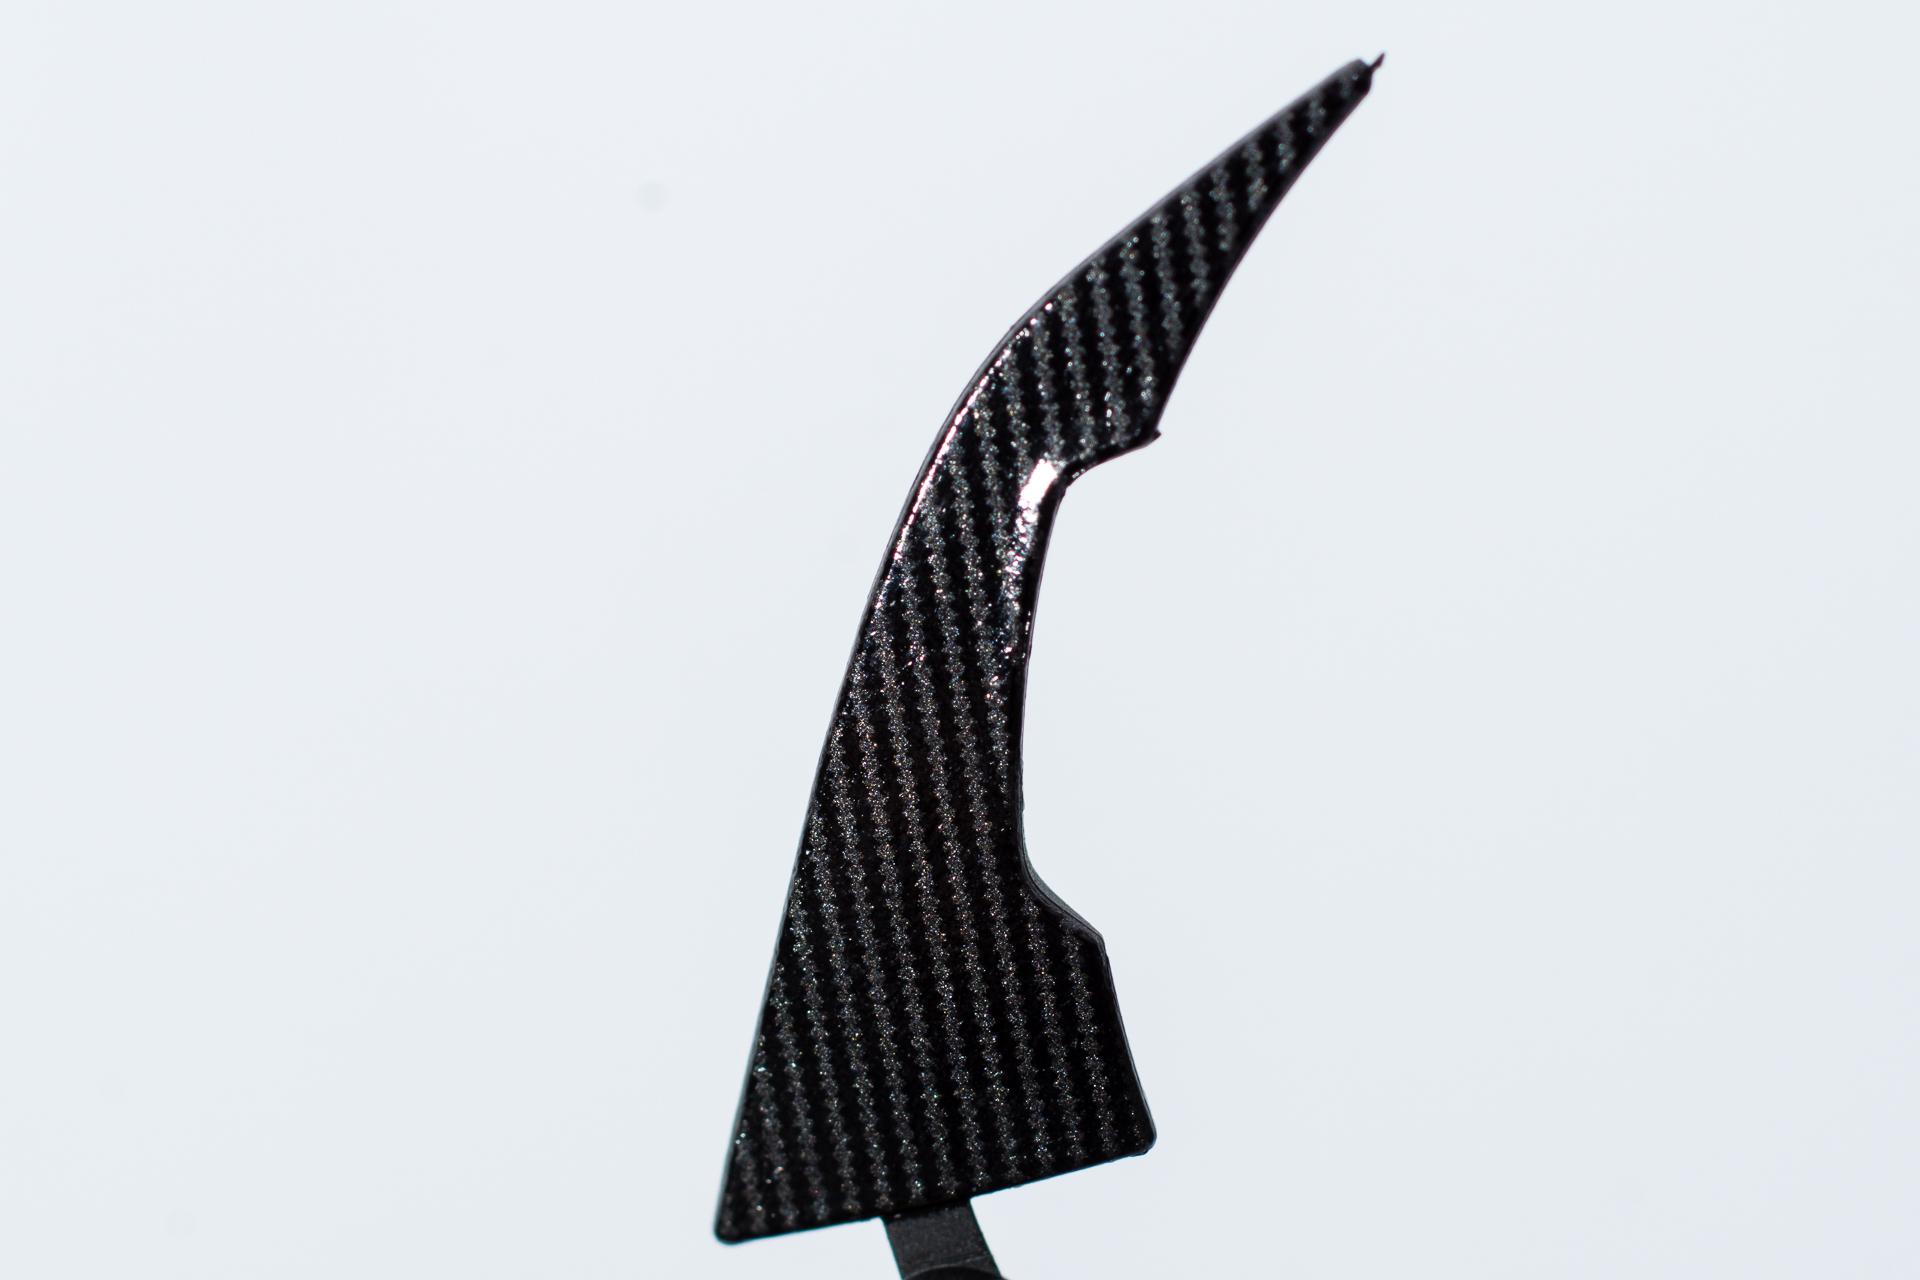
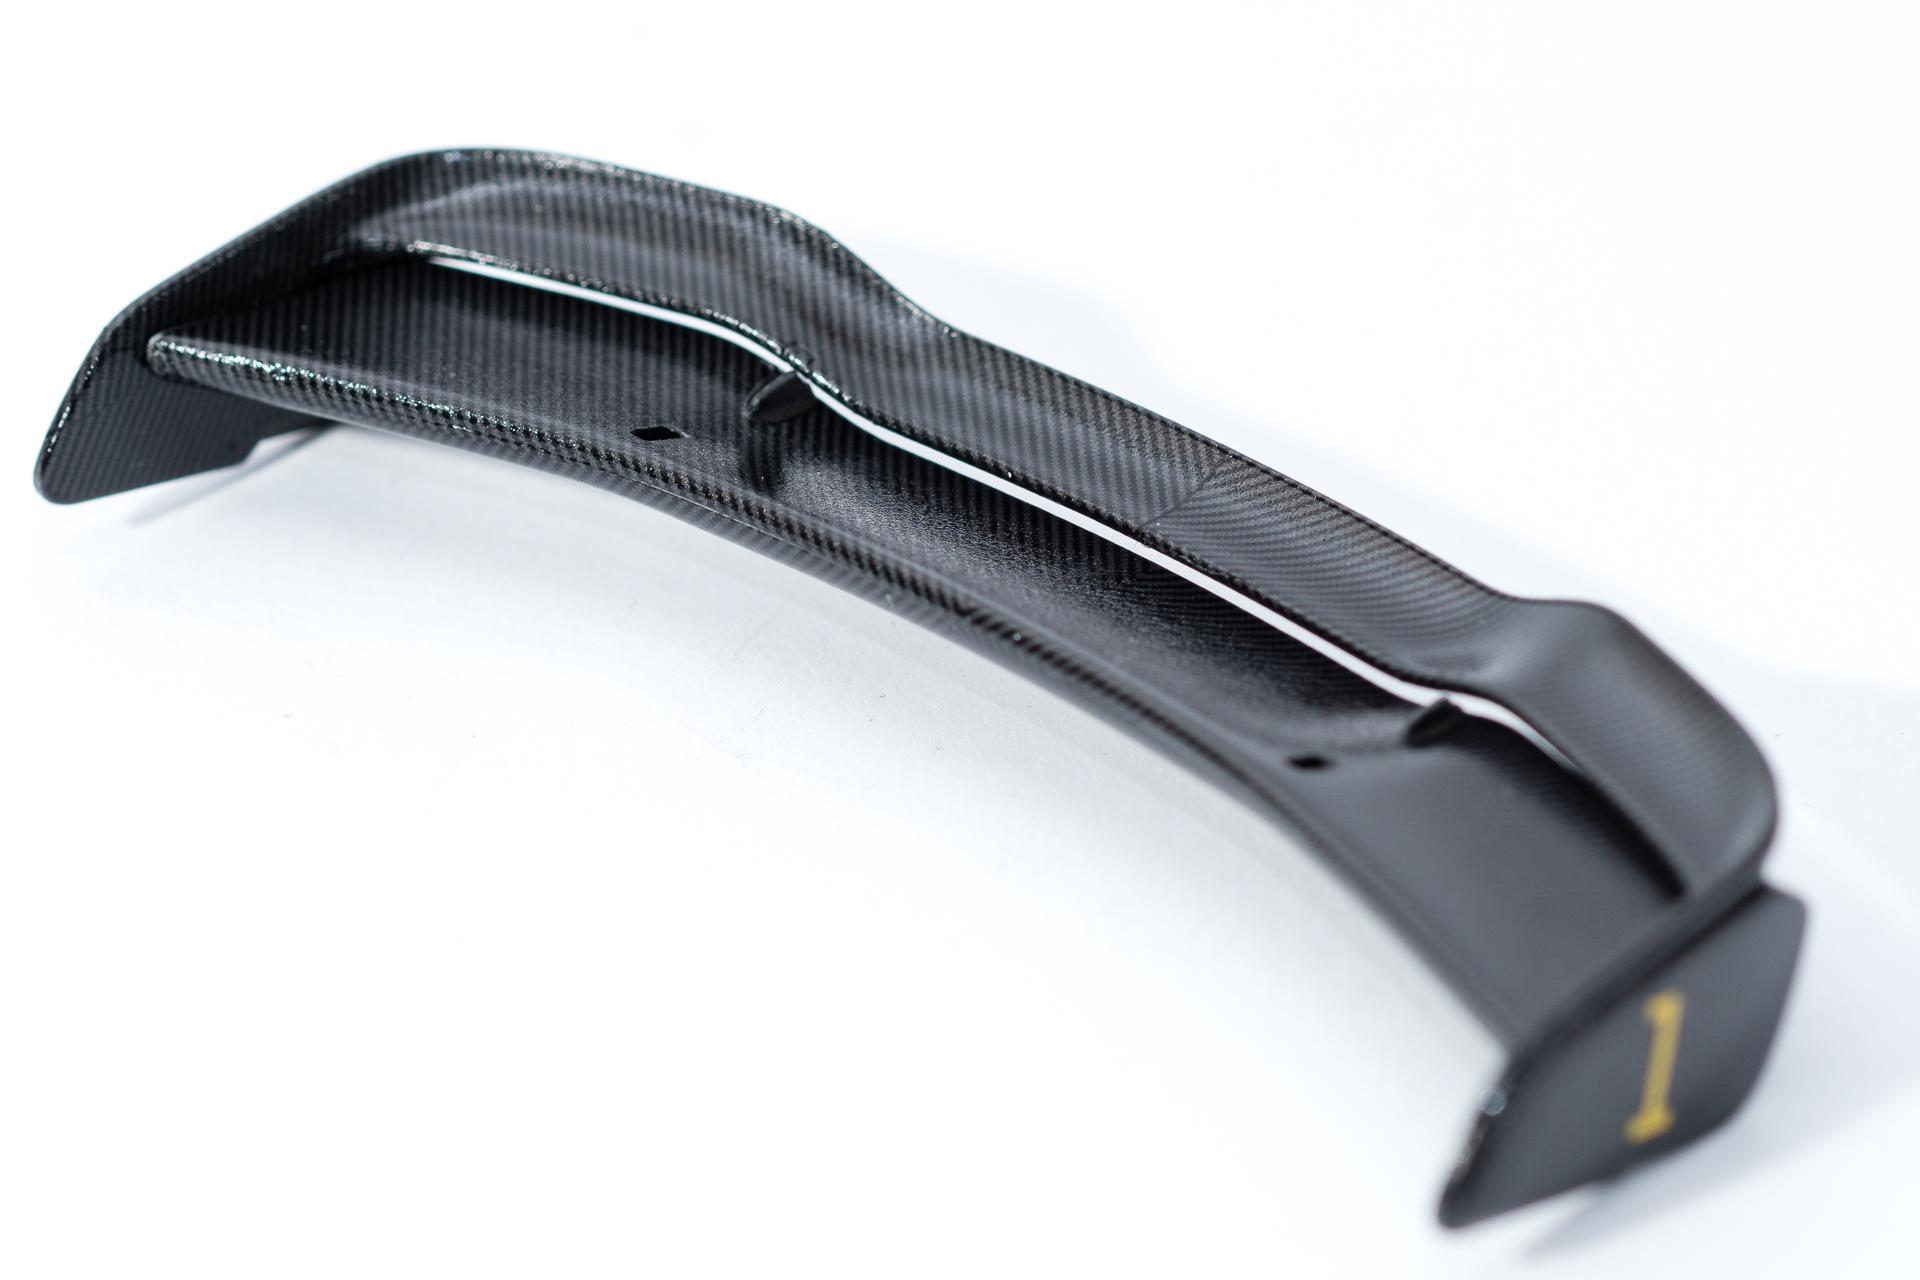
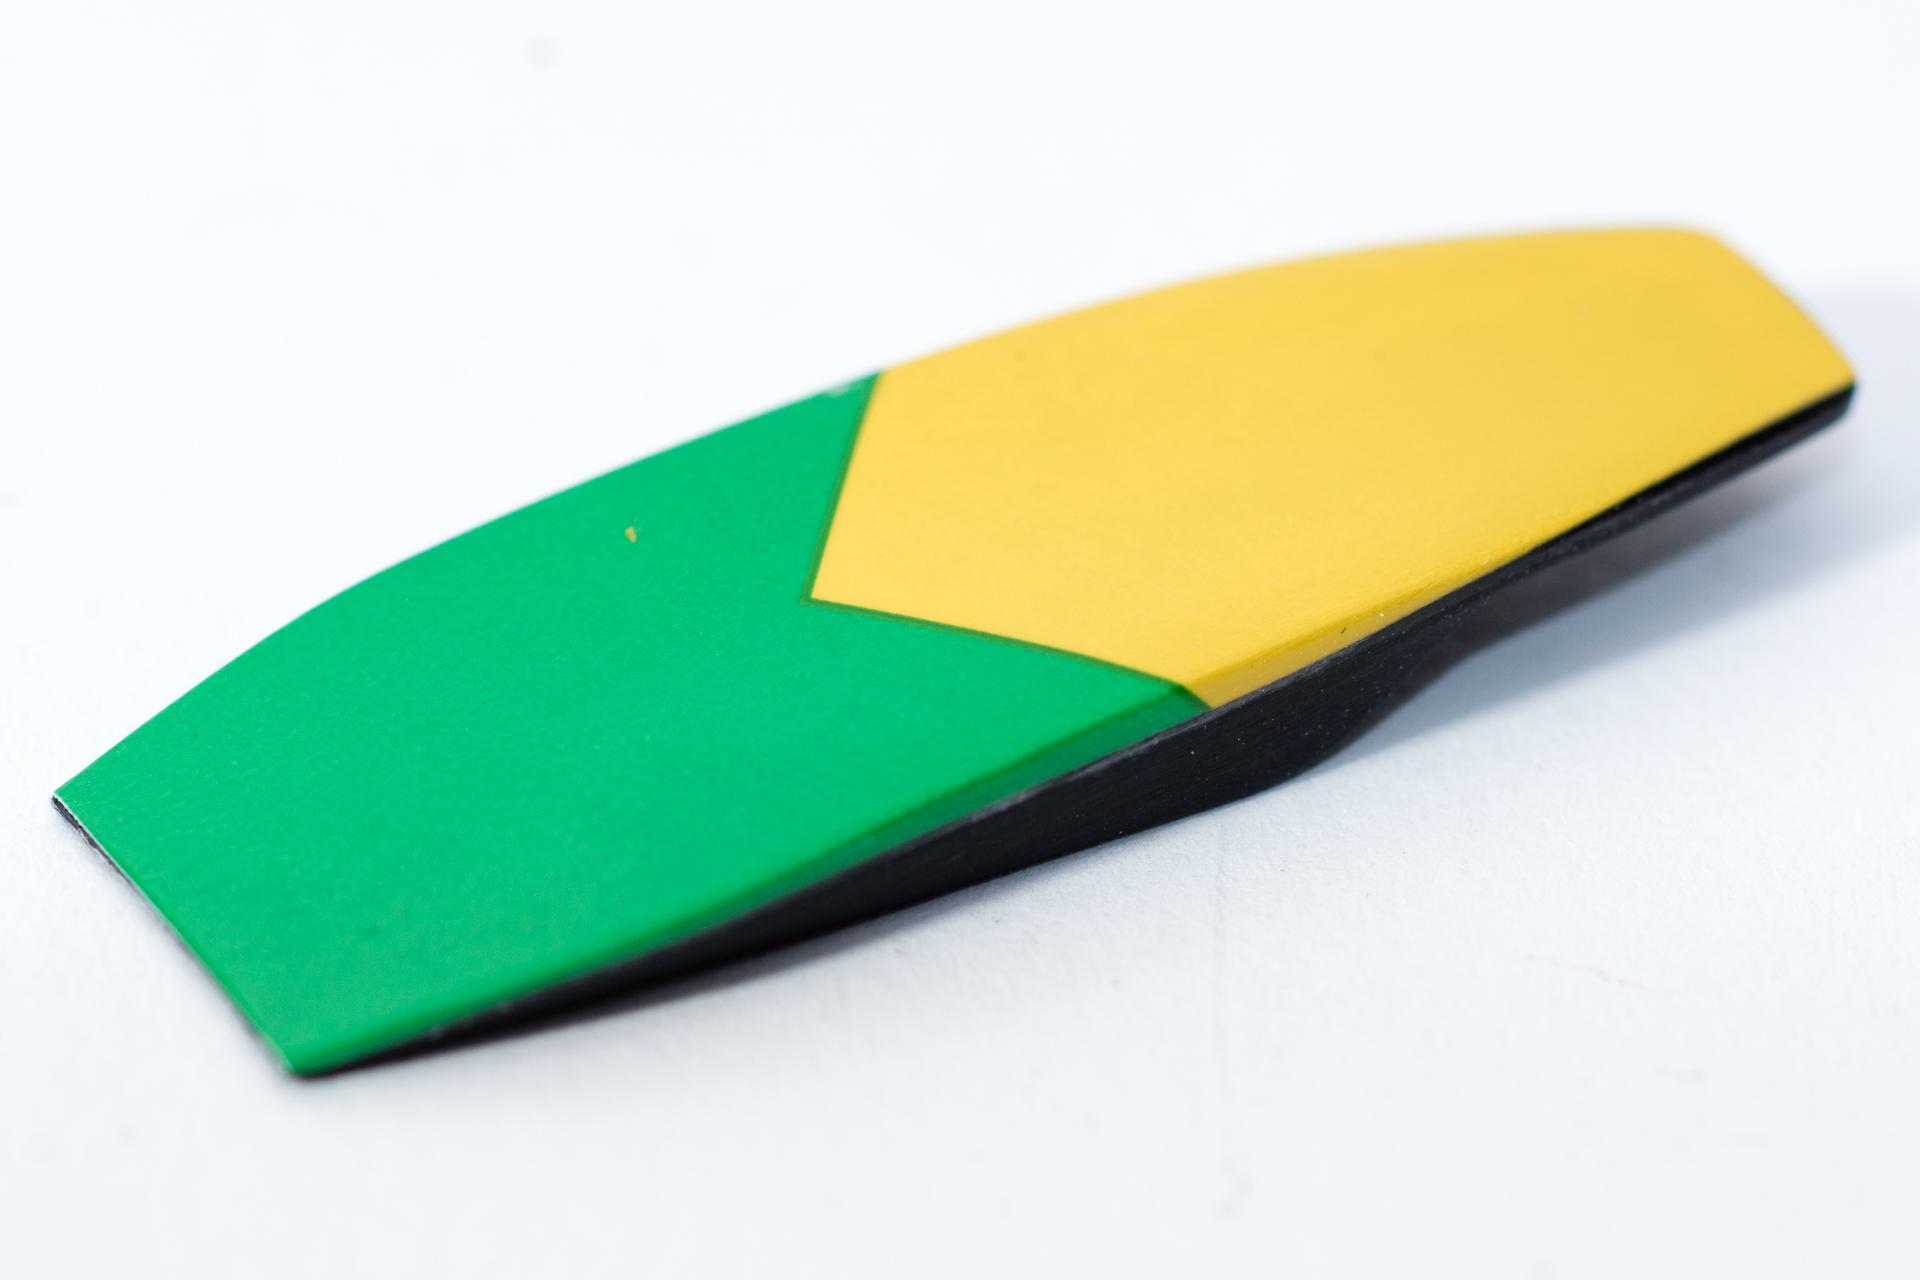
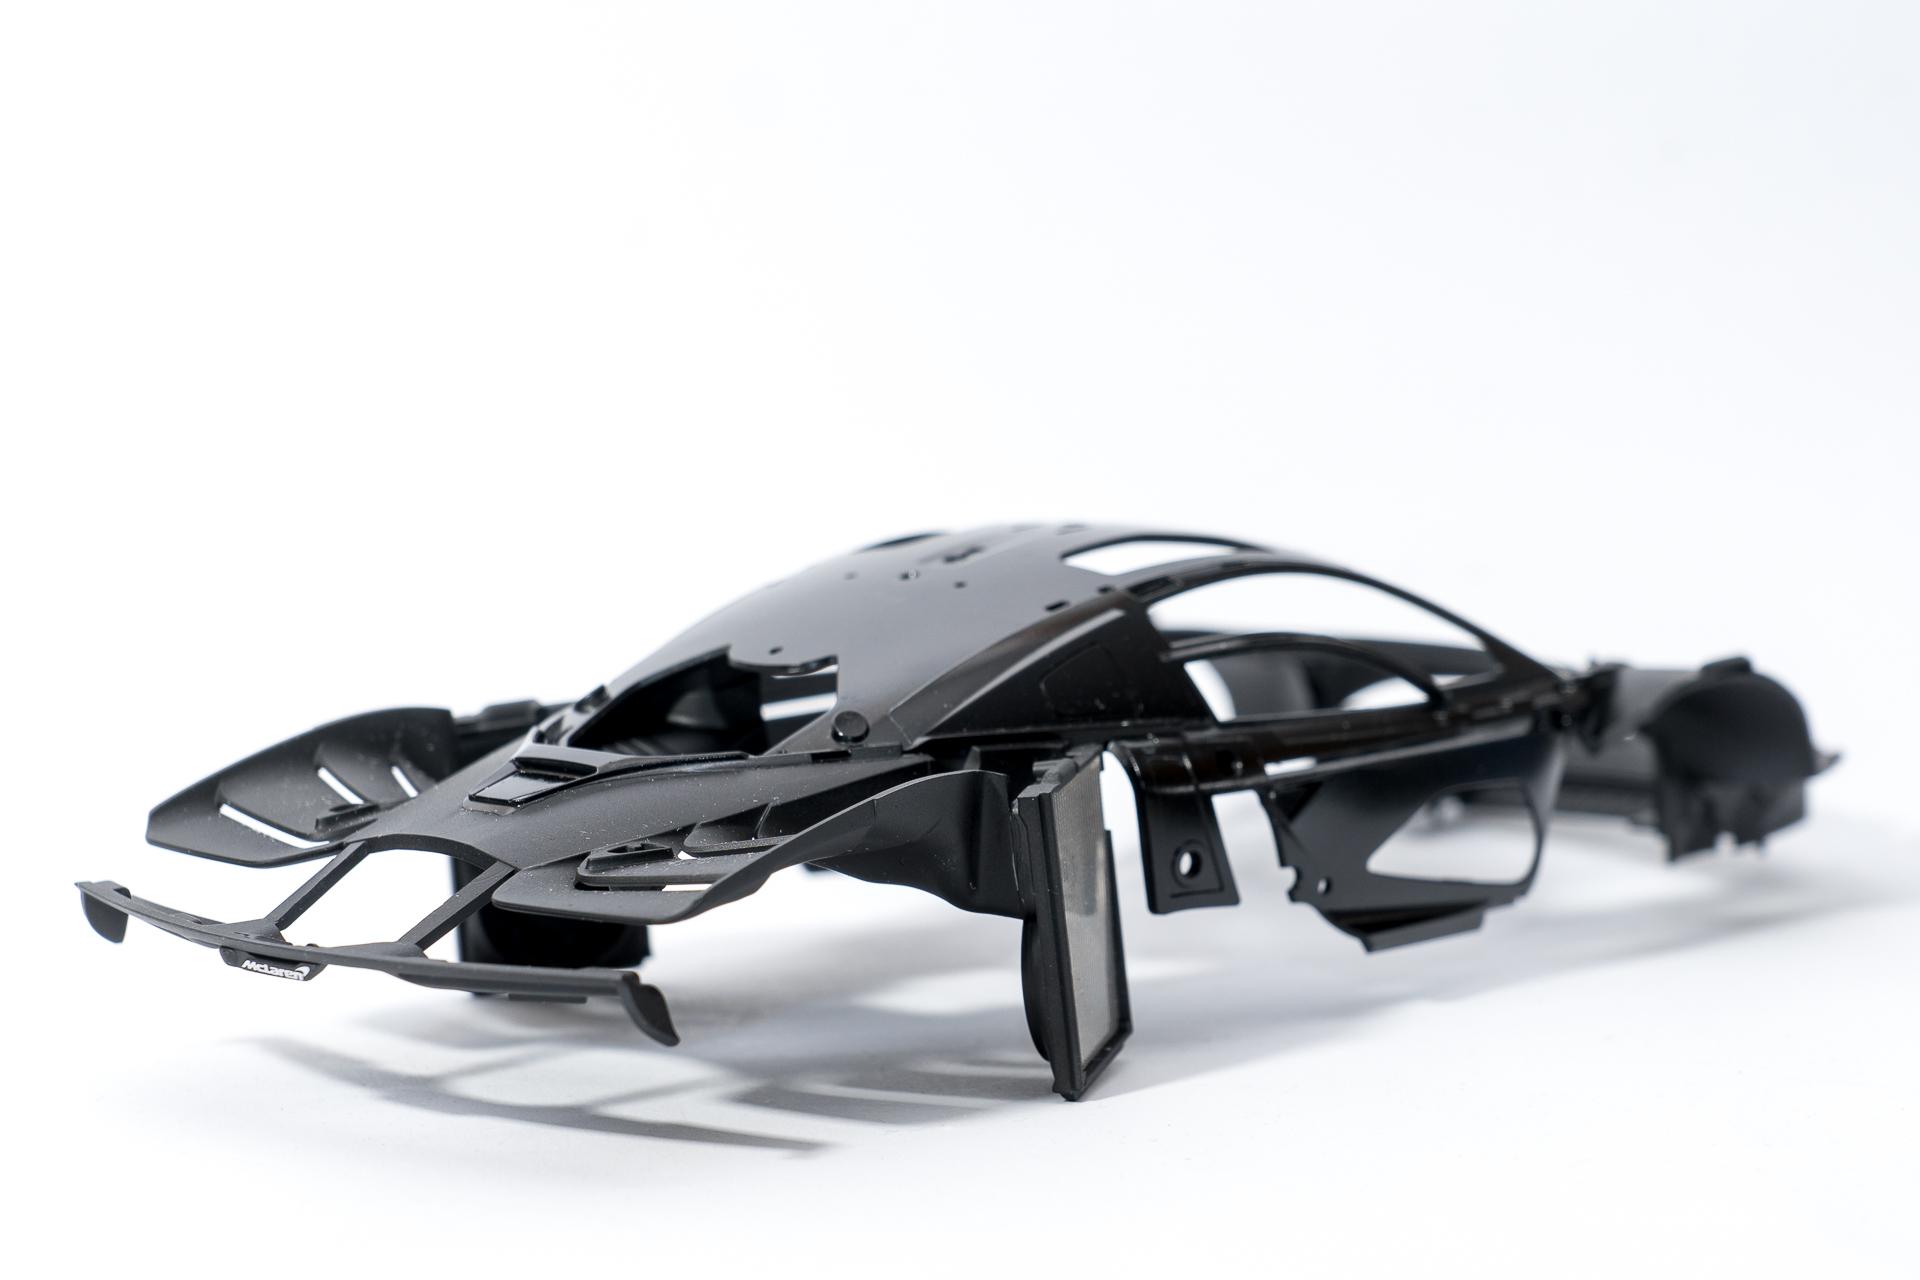
Hi all Thank you very much The carbon madness on the bodywork continued and.... I can hardly believe it myself... could be completed ? I left out the outside rear view mirrors though, as I didn't manage to apply the decals there without wrinkles. So I will deviate slightly from the original, but keep the basic color scheme In my last post I complained about the fact that most carbon decals are sometimes massively too large. Here is an example of a small (approx. 0.5 x 1 cm) part that was to be carbonized, with the decal applied to it but not yet wrapped around the edges This is what the part looks like (viewed from the other side) when the decal is finished Something that also caused me a bit of a headache was the doors, as they are provided in the decal set as completely carbonized, but I need a colored stripe in the lower part. This would have been included as a decal in the second decal set from Studio 27, but as the decal should have been curved inwards at this point, I preferred to paint the area. So I decided to paint the strip first and then apply the decal. Then it had to be cut along the edge. I did it exactly this way on the first door, which unfortunately resulted in a slightly wobbly edge between the paint and the decal. On the second door, I then cut the decal further inwards along the sharp edge and applied a triangular, self-cut decal, which led to a much cleaner result. Here you can see the first version And finally, the lower wing of the spoiler was given some color in the form of a decal from the Studio 27 set ? That's it again for this week. I should be finished with the bodywork soon (a few Studio 27 decals are still missing, then it will soon be time to clear coat it), then the carbon madness on the inside will continue... ? Urs
-
Hi all Carbon work on my McLaren Senna continues. After building my Mercedes GT3 in the Haribo livery I was very happy with S.K.Decals, so I didn't hesitate buying their full carbon set for the McLaren Senna once it came to market. But the longer I work with this set, the more tedious it becomes. The decals themselves still are of a very good quality: they adhere very well (in fact, once they touched the surface of the part where they should be placed, they almost won't move a single bit), are easy to apply and react very good to MicroSet / -Sol. But every single decal is too large for the part it covers. Especially with smaller parts it becomes very annoying when the decal is 1 to 2 mm too large on each side... But fortunately I'm coming to an end with the carbon work (at least on the outside). This week was completely dedicated to the spoiler Then I noticed that some parts I previously had covered with carbon decals needed some color from the Studio 27 decal set. As I never was able to apply any of their decals I had decided to paint all the unicolor surfaces instead of using their decals. But as these parts already had carbon decals attached I didn't want to risk ruining the carbon decals by masking them. So I decided to give it another try as I still could paint and re-carbon the parts in case I wouldn't be able to handle these decals again. But what should I say: I finally managed to apply them without any (bigger) problems ? After this success I became a little rollicking and decided to give it another try on a part I already had planned to paint it myself ? But there are still two decals I'm a little afraid of (these are the only ones I wouldn't be able to paint them myself anyway), as they will have to cover all the horizontal surfaces on the spoiler (one decal for the lower part and one for the upper one). As these parts have been quite tricky to cover with the S.K.Decals already I'm afraid it could turn into a nightmare... To finish today's work I applied one really easy decal ? That's it for today's update. As I'll be home the upcoming week I should be able to find quite some time to continue building. The goal for this week would be to finish the carbon work on the outside of the McLaren ? Urs
-
Brian's Nissan Skyline GT-R R34 from 2 Fast 2 Furious
harti20 replied to harti20's topic in WIP: Model Cars
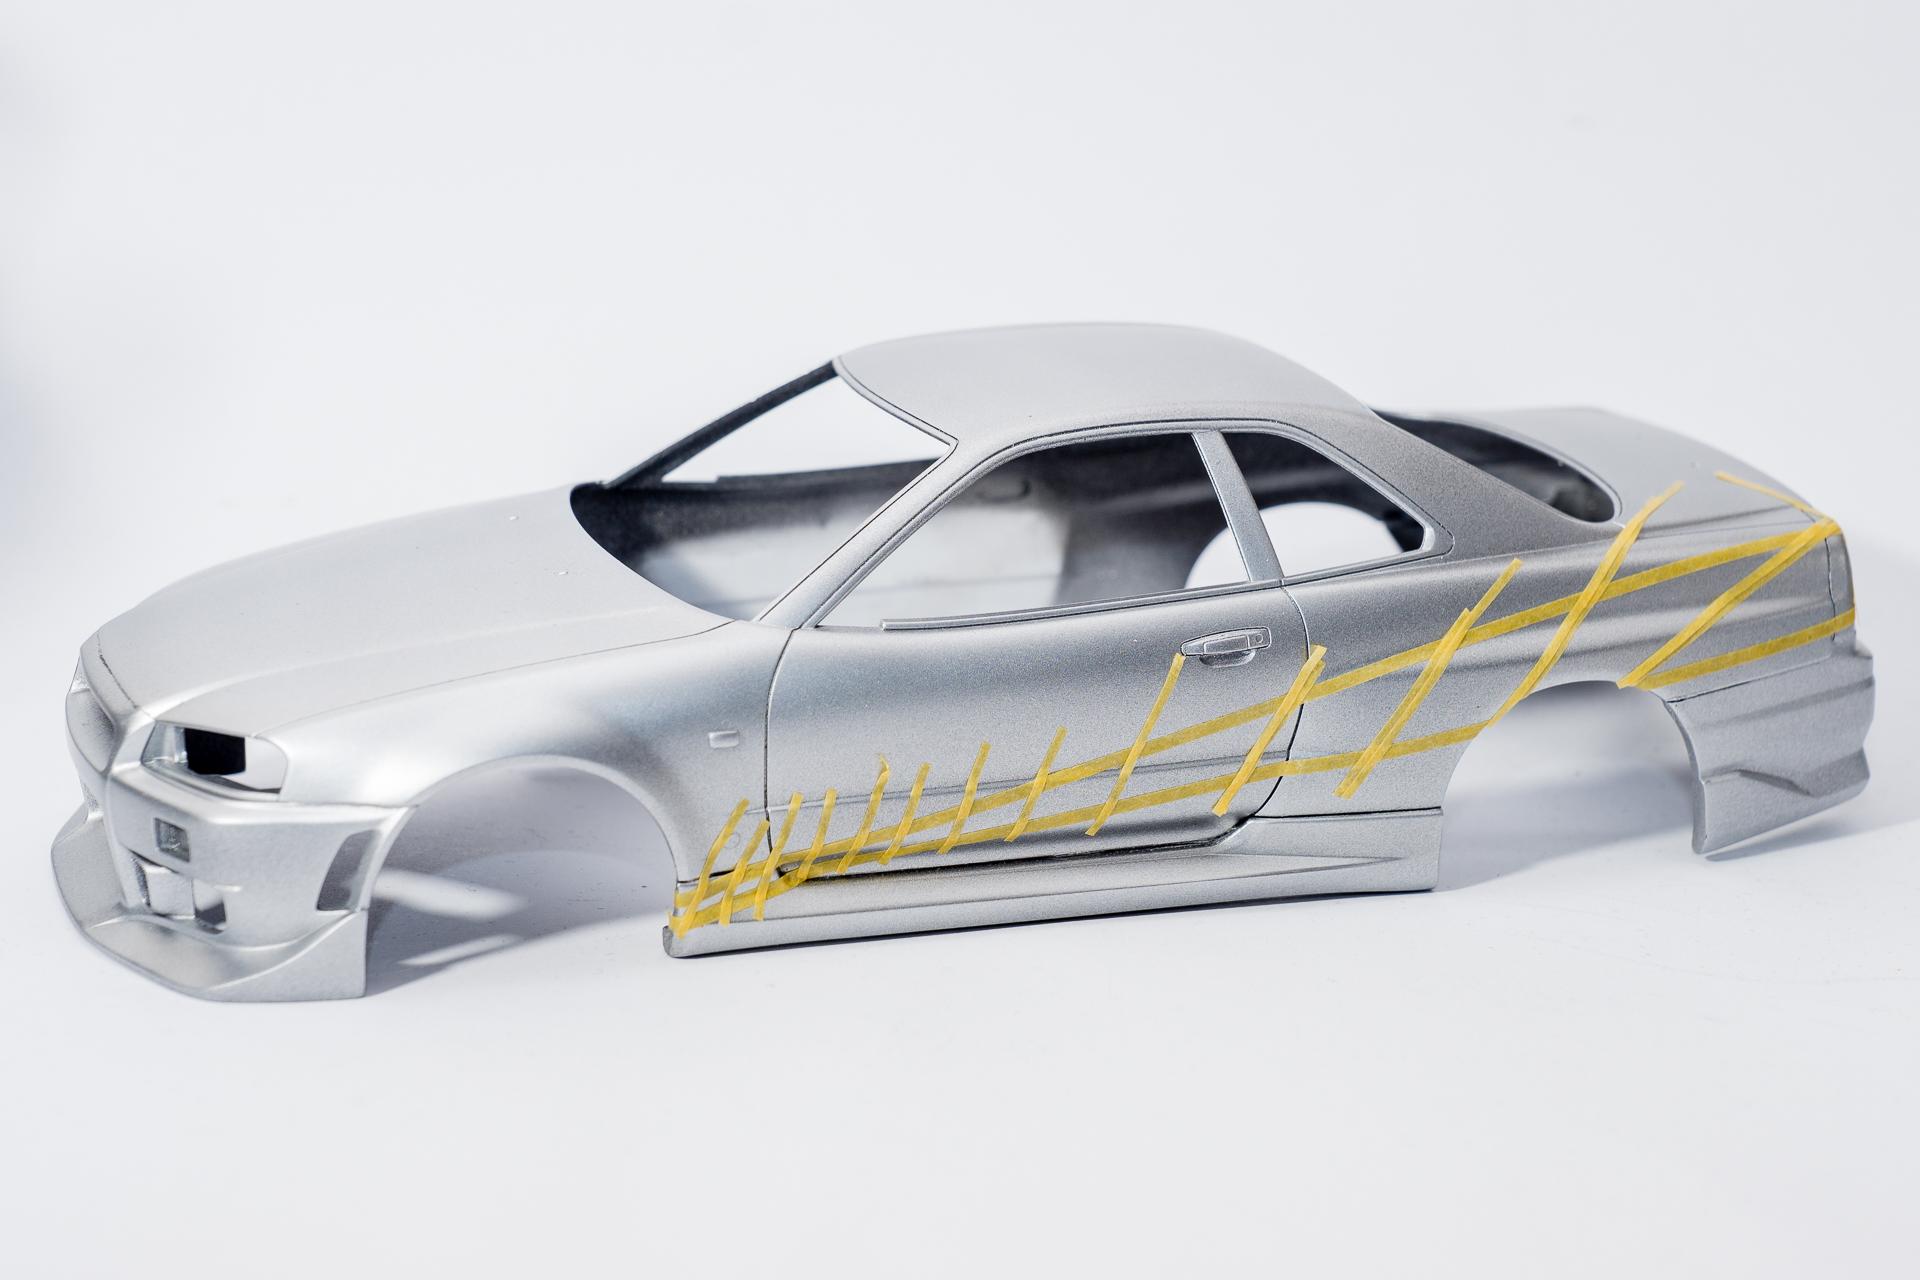
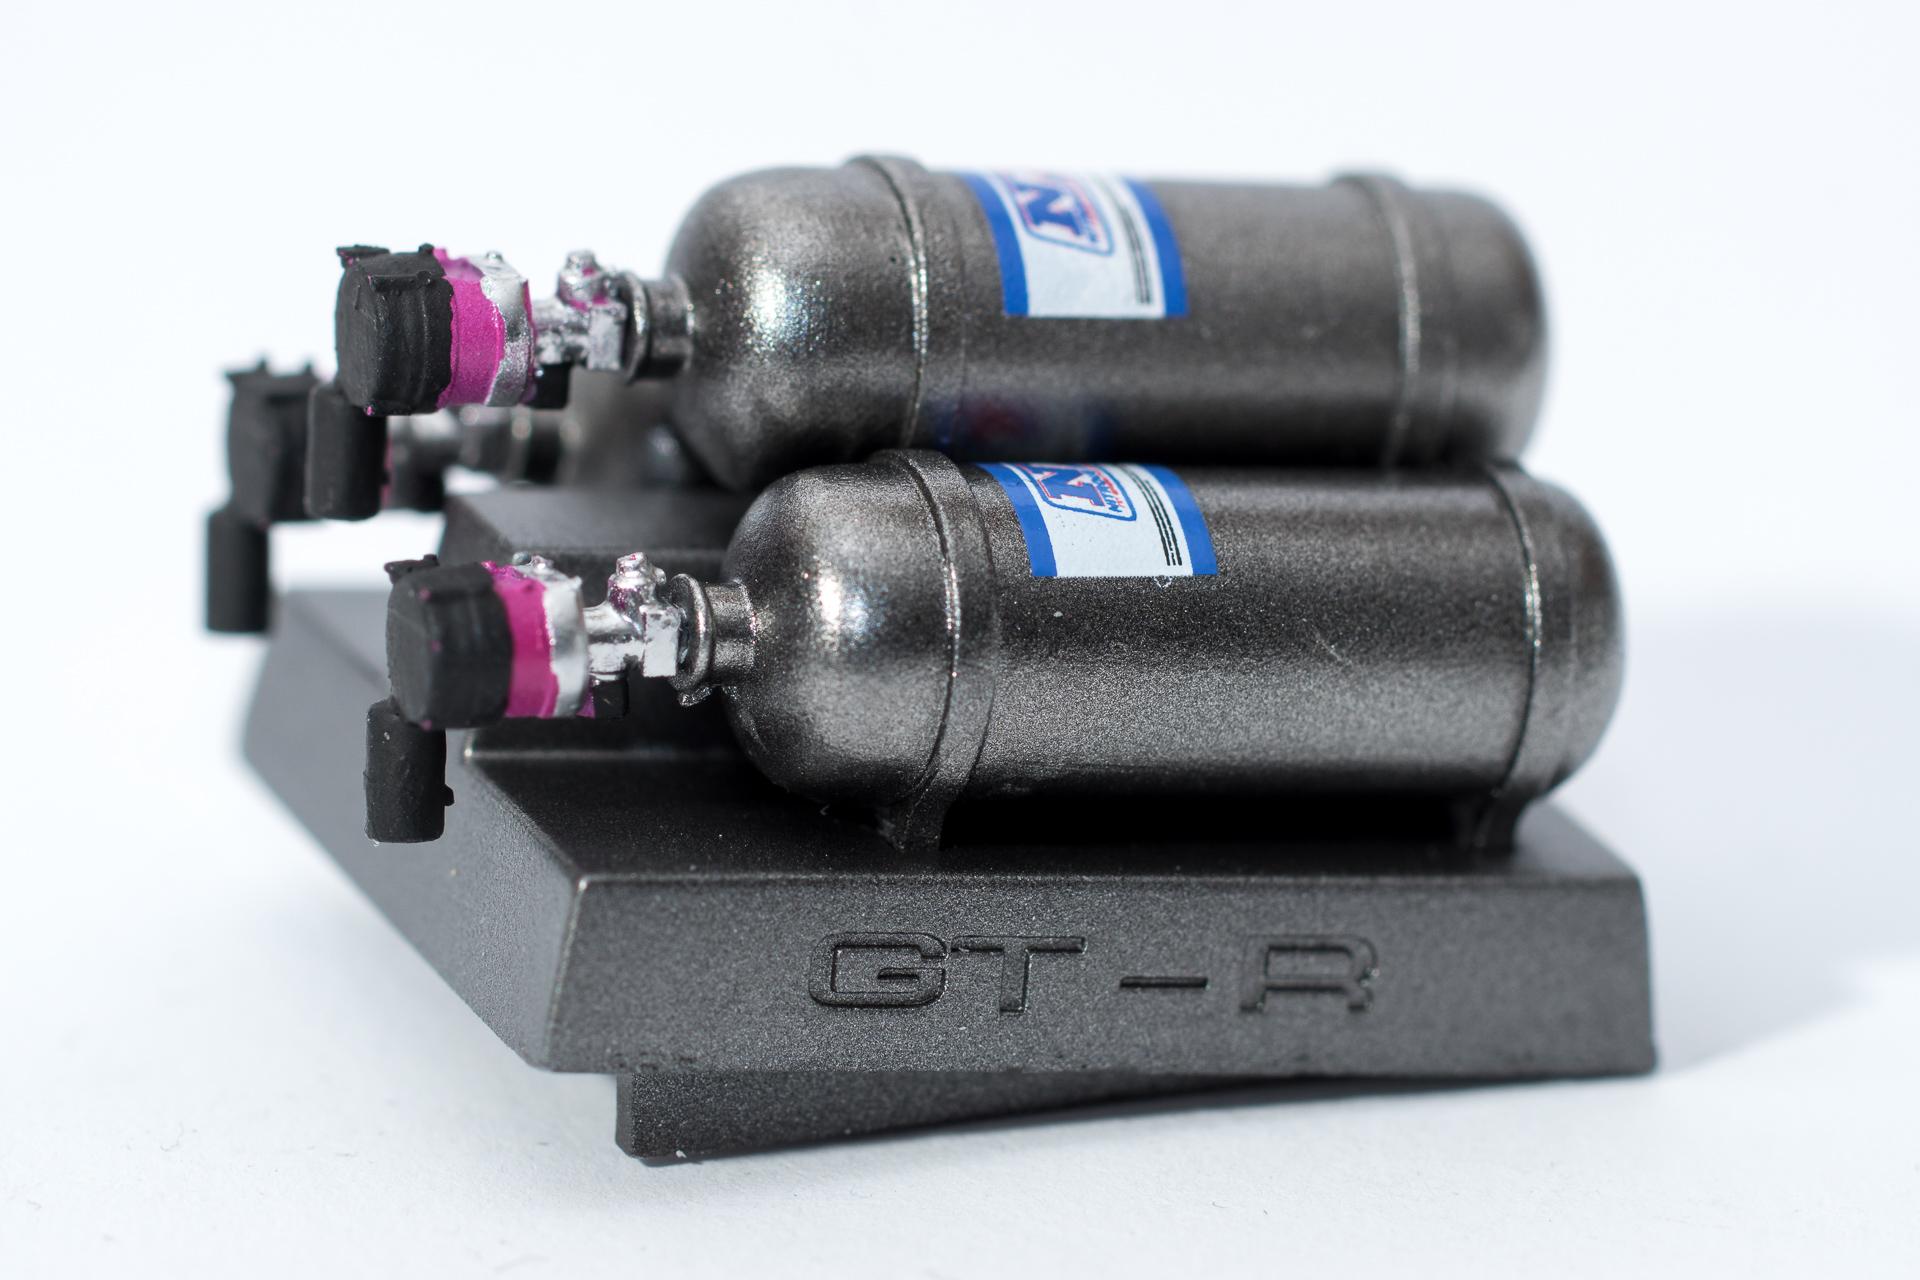
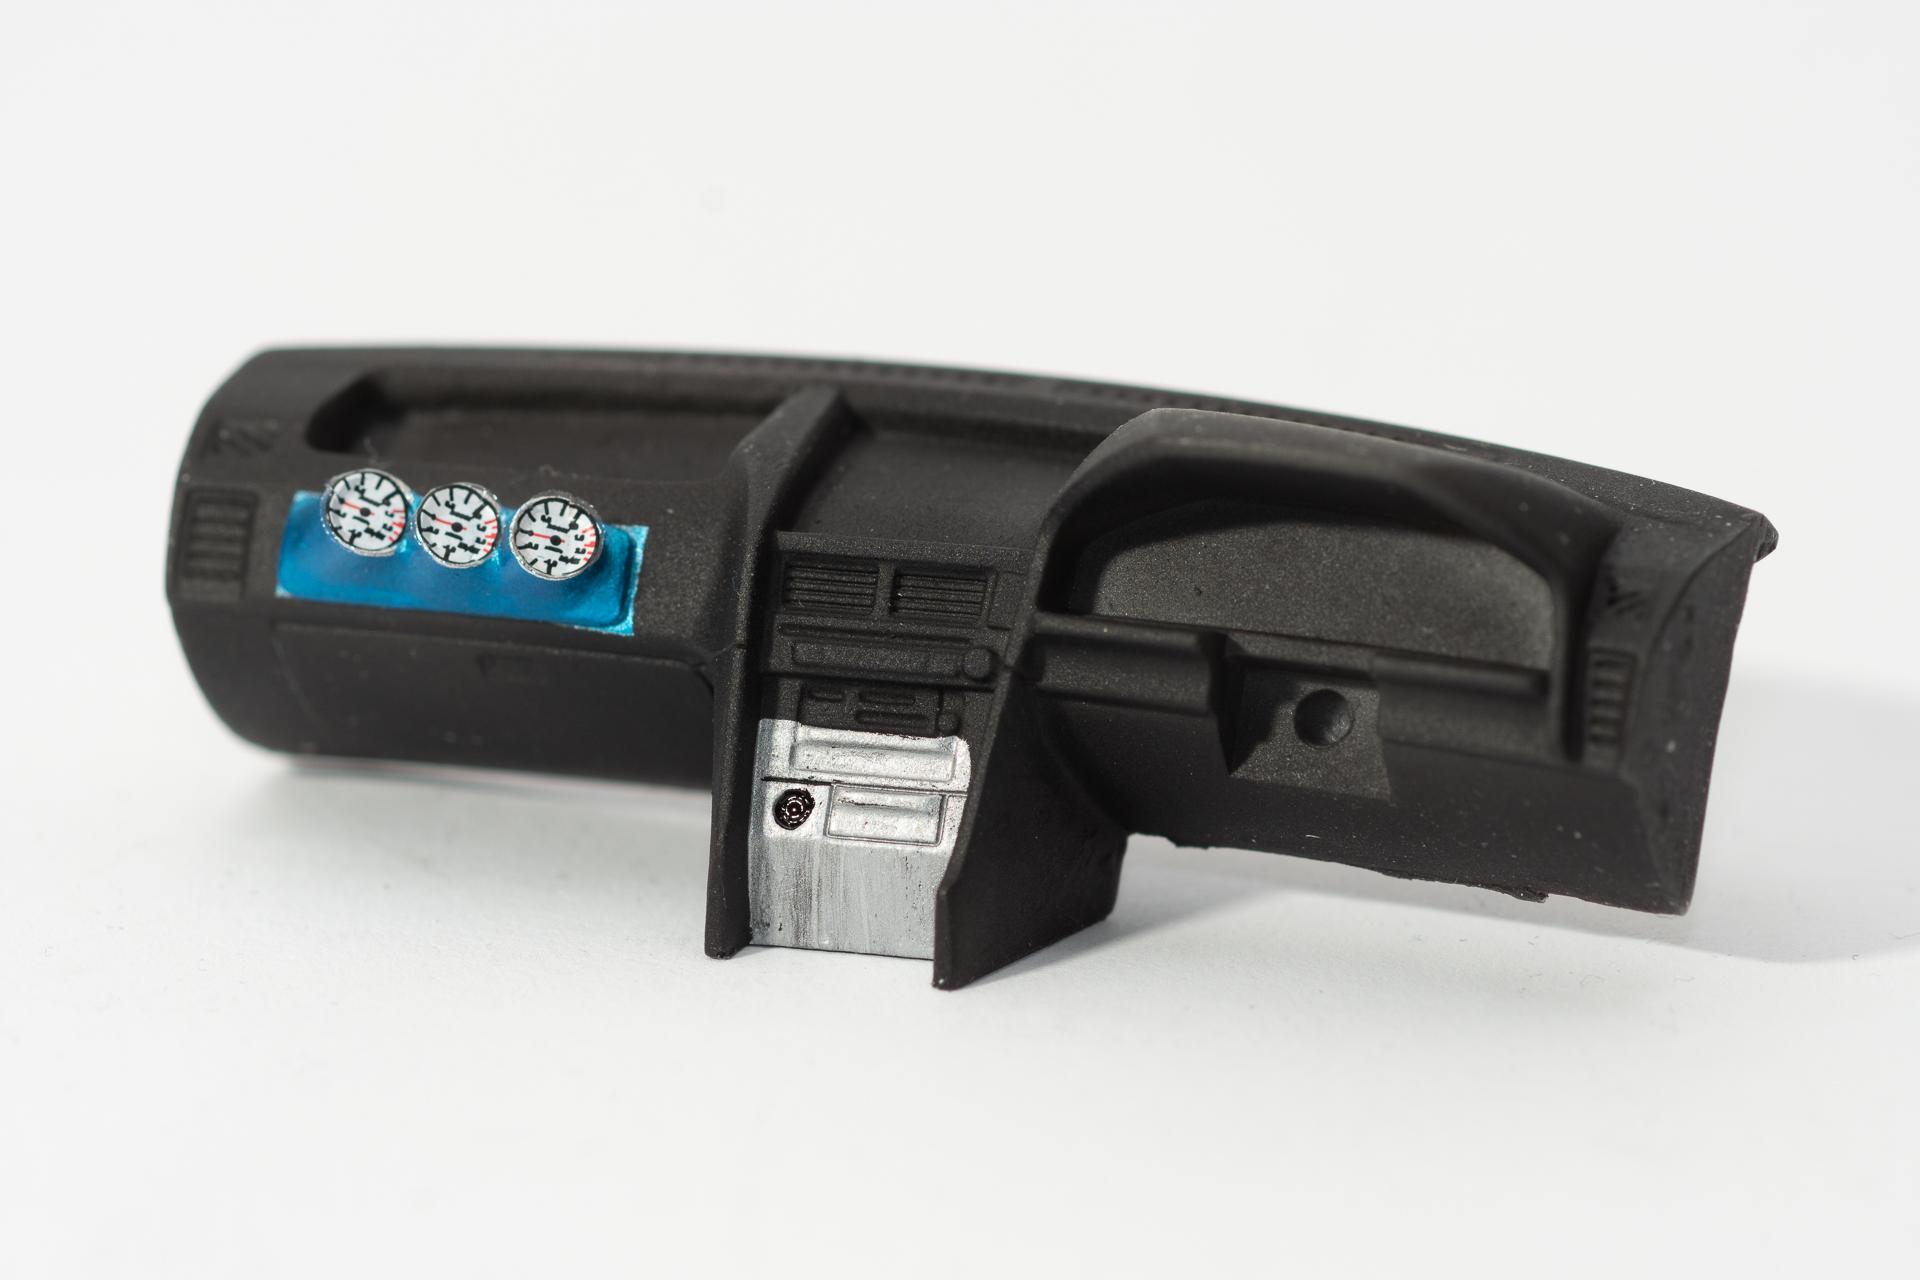
Hi all Since the motivation for the carbon decal work on the McLaren Senna was not too great lately, I made quite some progress on this build The dashboard was painted and has already received the first decals The NOS bottles were painted and assembled The seat has been painted and is now waiting for.... exactly: a carbon decal on the back ? And the doorpanels were also painted Then I wanted to apply the first decal to the body and chose the left side with the stripes. However, I soon realized that it didn't fit at all in terms of size ? If the position around the rear wheel arch fitted, then the stripes in the front area ended far too high up and if I had them fitting at the front, the decal would almost have come over the entire opening for the wheels... So now I'm masking the body based on pictures from the internet and will paint the stripes afterwards. So far I've done the masking for the upper part of the stripe, now I have to tackle the lower part and repeat the whole thing for the other side... All in all, I've come quite far and am now waiting for the bodywork to be finished. Most of the rest is already finished and waiting for the final assembly ? Urs
-
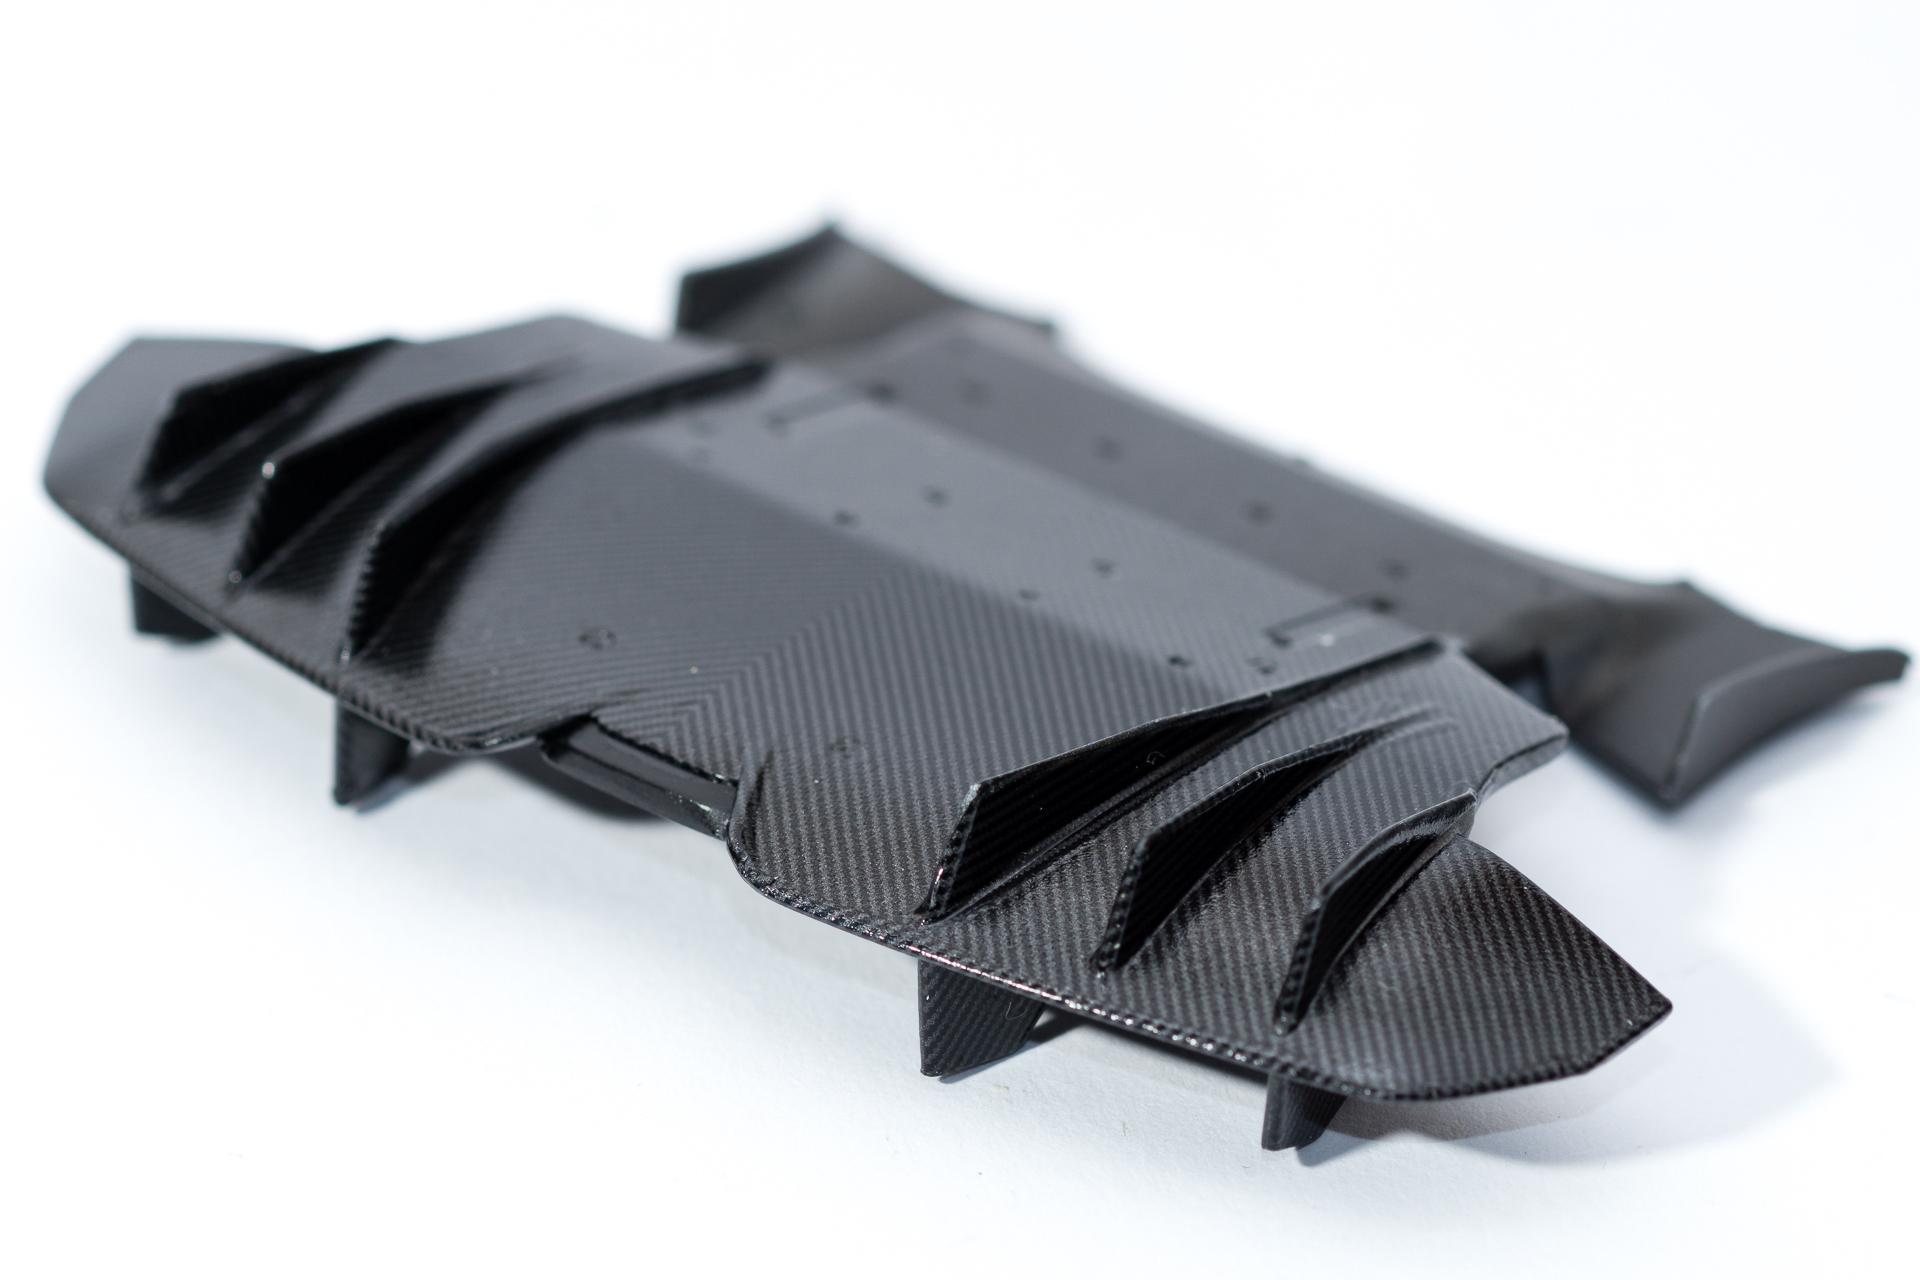
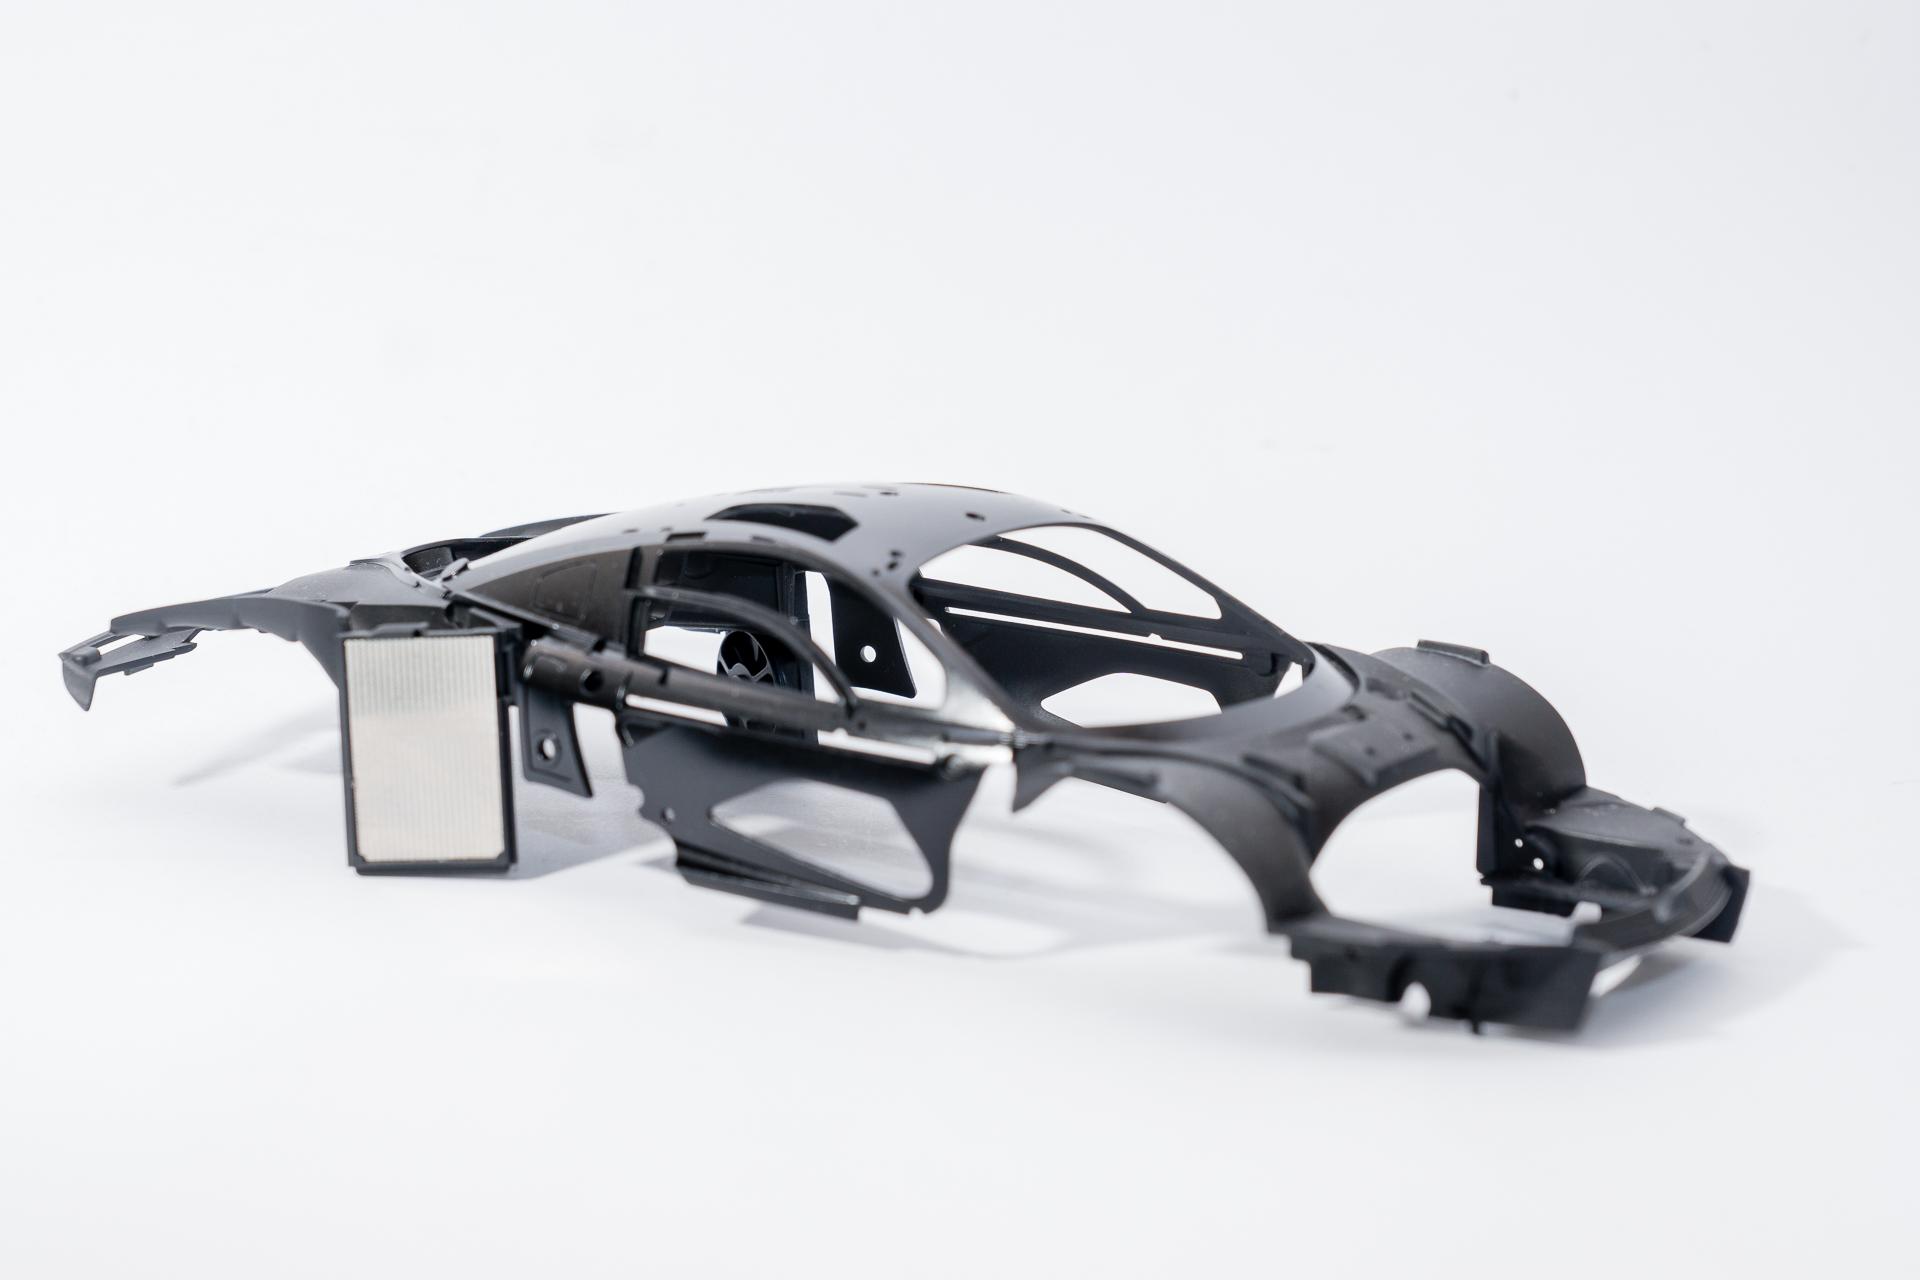
Hi all The carbon madness continues ? First the diffusor was carbonized Then I realized that some parts of the monocoque still need carbon, so those were also applied And finally the headlights Slowly but surely there is light at the end of the tunnel, at least as far as the carbon work on the body is concerned. The carbon work on the interior took another step back. I had started with transparent carbon decals from Scale Motorsports, but was never really happy with them. So I rummaged through my carbon decal stocks and discovered that I still had transparent carbon decals from Museum Collection at home that I had never used before. After a short test with them, I decided to switch to Museum Collection. The big catch: the Museum Collection decals have a slightly different pattern to those from Scale Motorsports, so the decals I had already applied had to come off again... As the adhesion of the Scale Motorsports decals was one of the things I was never really happy with, they were fortunately quite easy to remove with a bit of sandpaper and a pair of tweezers. Simply sand one corner with sandpaper, at some point the decal will detach from the part underneath and then you can pull it off with tweezers like a skin until it tears. Then the whole game starts all over again... Here is an example of the center console after removing the carbon decals: Meanwhile all the components treated in this way have been re-primed and painted and are now waiting to be carbonized again. There may now be a delay, as I only have one sheet of the Museum Collection decals and am now waiting for supplies, which are currently waiting for an airplane in Japan after being cleared by customs. However, as there are still some decals waiting to be applied to the exterior, I think I should be able to fill the waiting time ? So much for this week's update ? Urs
-
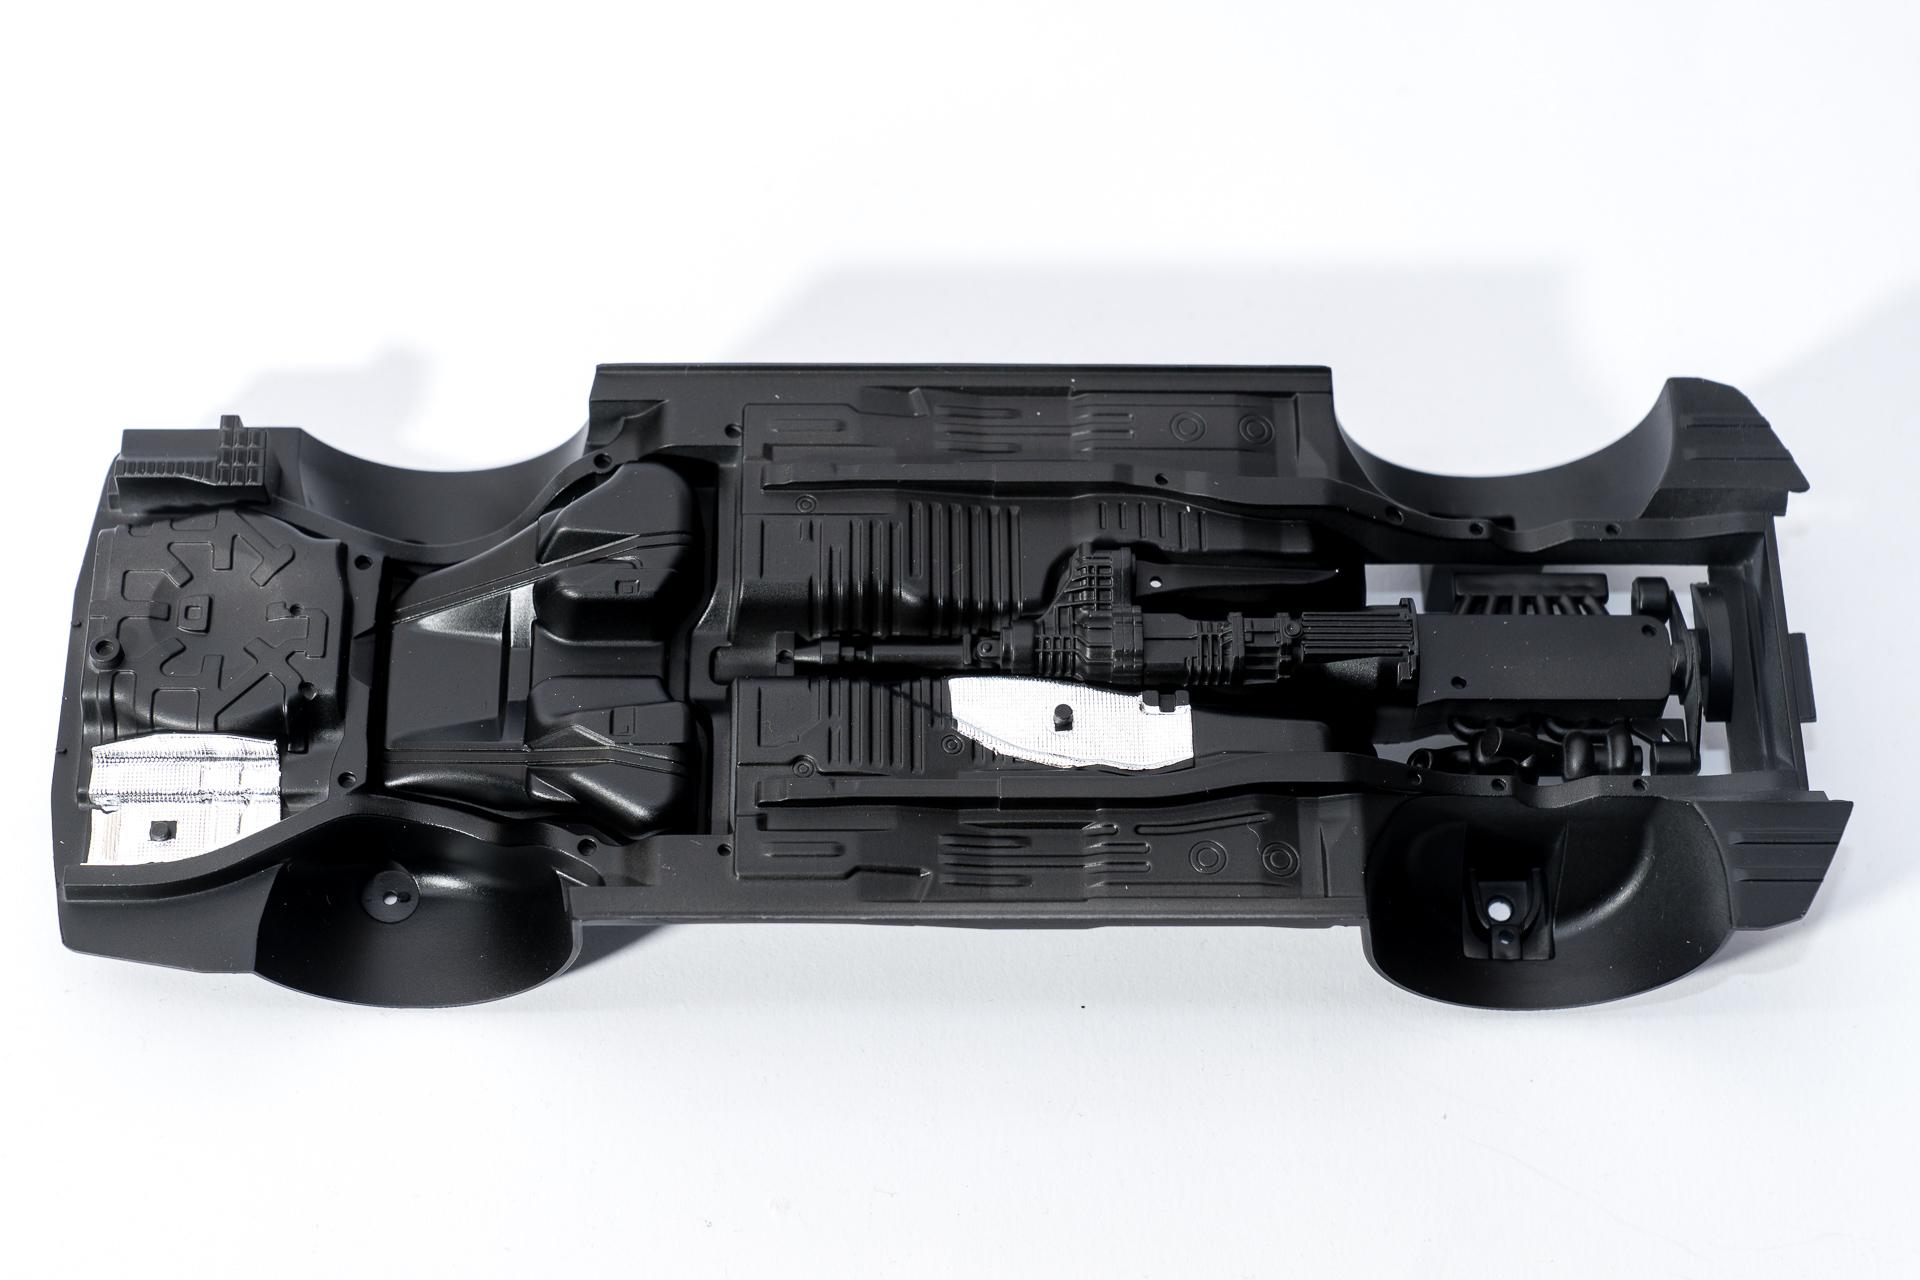
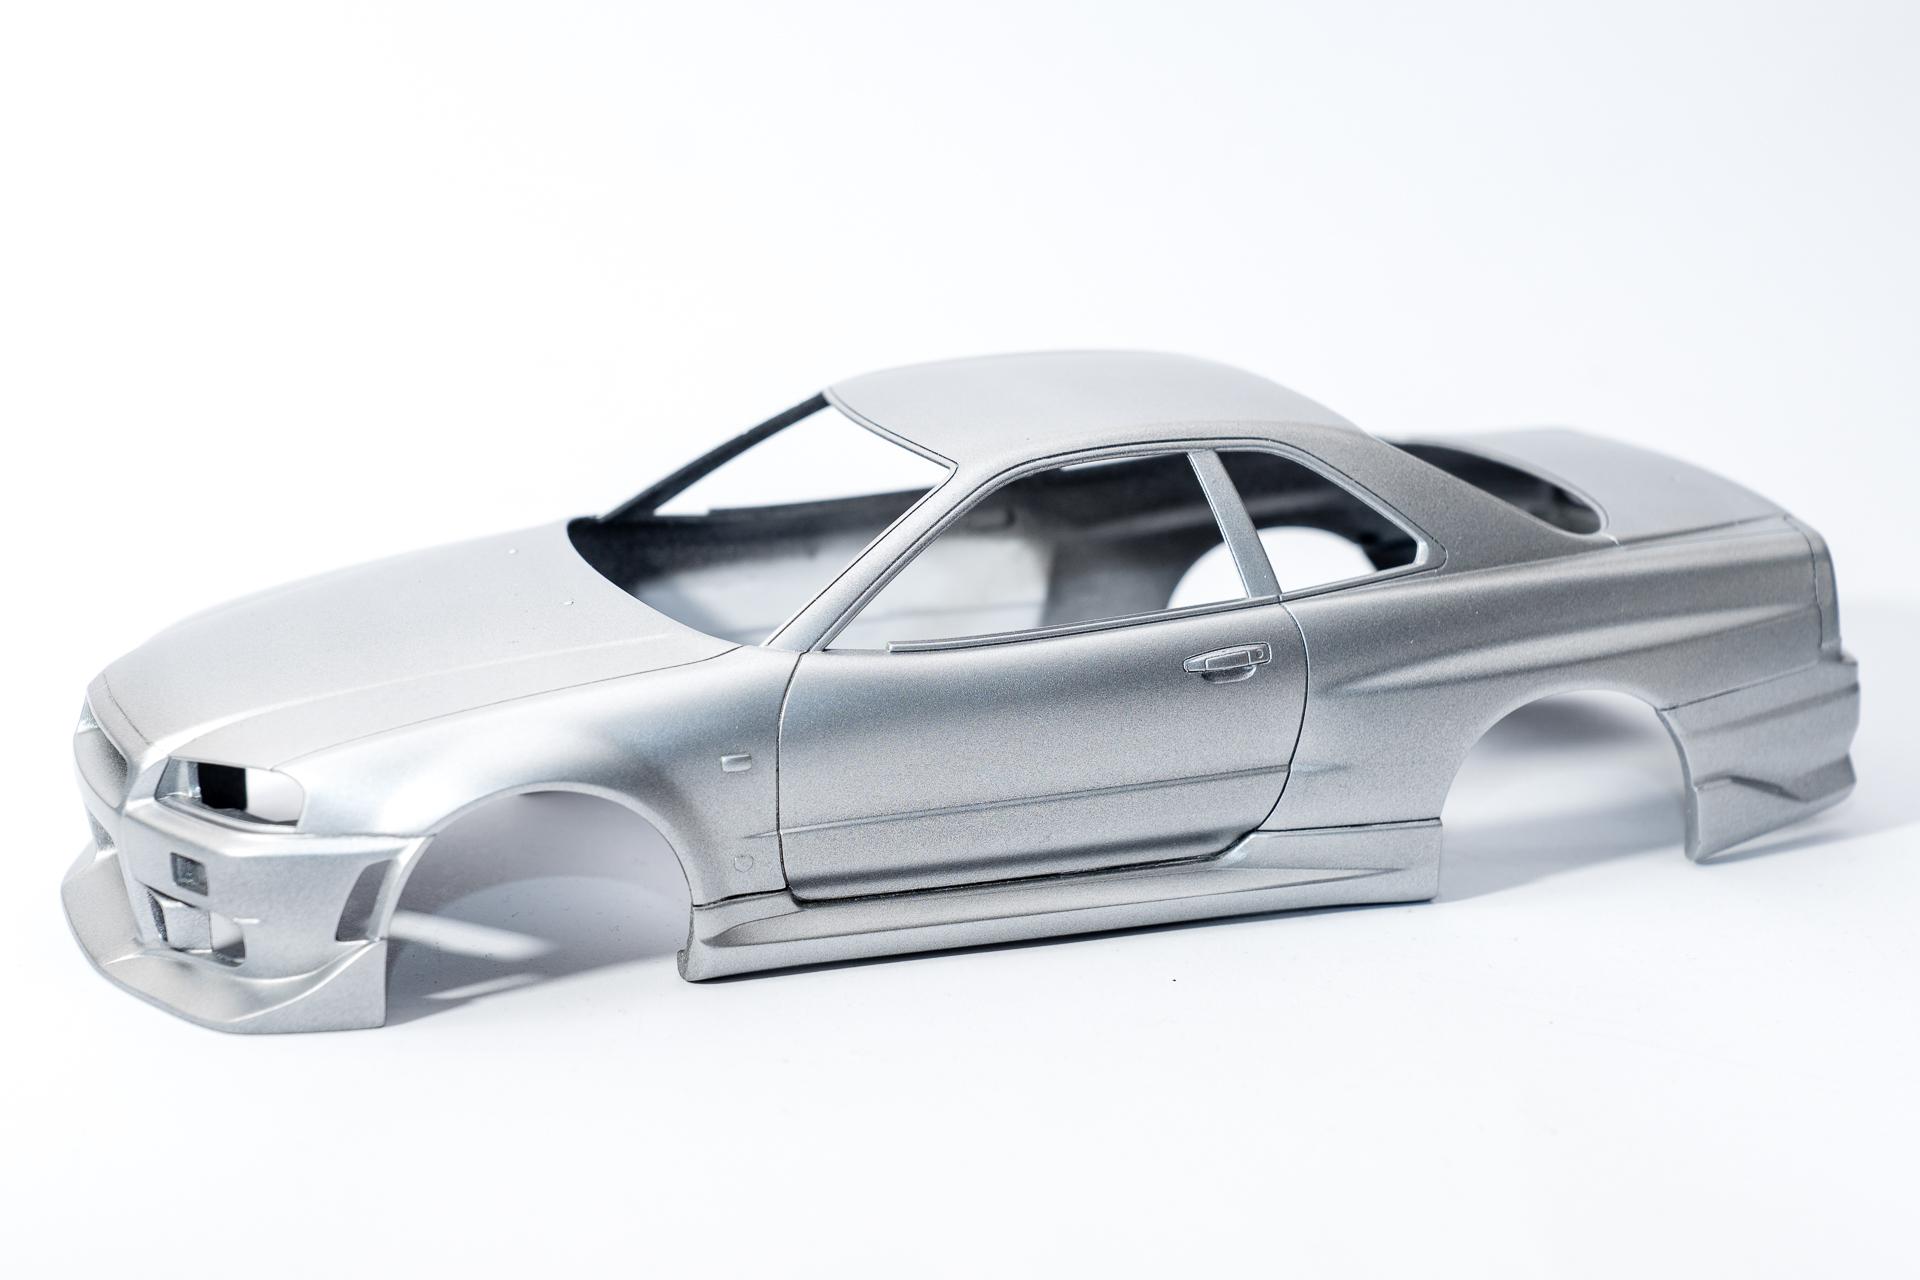
Hi all In my McLaren Senna thread I promised to show you why I didn't make that much progress in the last two weeks. This project is the reason why My son asked me a few times why I wouldn't build Brian's Nissan Skyline and I always answered that to mee this car was just boring. He always gave me a mixed look of disappointment and "you don't now what looks good" after that ? A few weeks ago I decided to build it for him, but without telling him, so I will only be able to work on it when he's outside playing with his friends or when he's at school. For this build I'll use Tamiya's Nissan Skyline GT-R together with USCP's transkit. The body parts from the transkit took me quite a while to remove from their supports, but in the end they fit really well. Here you can see the body assembled, primed and with a few layers of Zero Paints' Platinum Pearl. Together with the body I also started work on the undercarriage According to Tamiya's instructions the silver parts should have been painted in Tamiya X-11 Chrome Silver, but when I took a closer look I had the impression that these parts should depict heat shields, so I decided to use MFH's heat shield foil instead. That was the first time I used it and I really like how easy it is to cut and apply. The only downside is that you can't really press it into crevices as the texture is quite fragile. The rims have first been painted with Alclad Duraluminium. Once the paint had dried I masked the center part and painted the outer rim with Molotow Liquid Chrome. That's it for today. I hope to have piqued your interest and am looking forward to your comments, criticisms and plaudits Urs
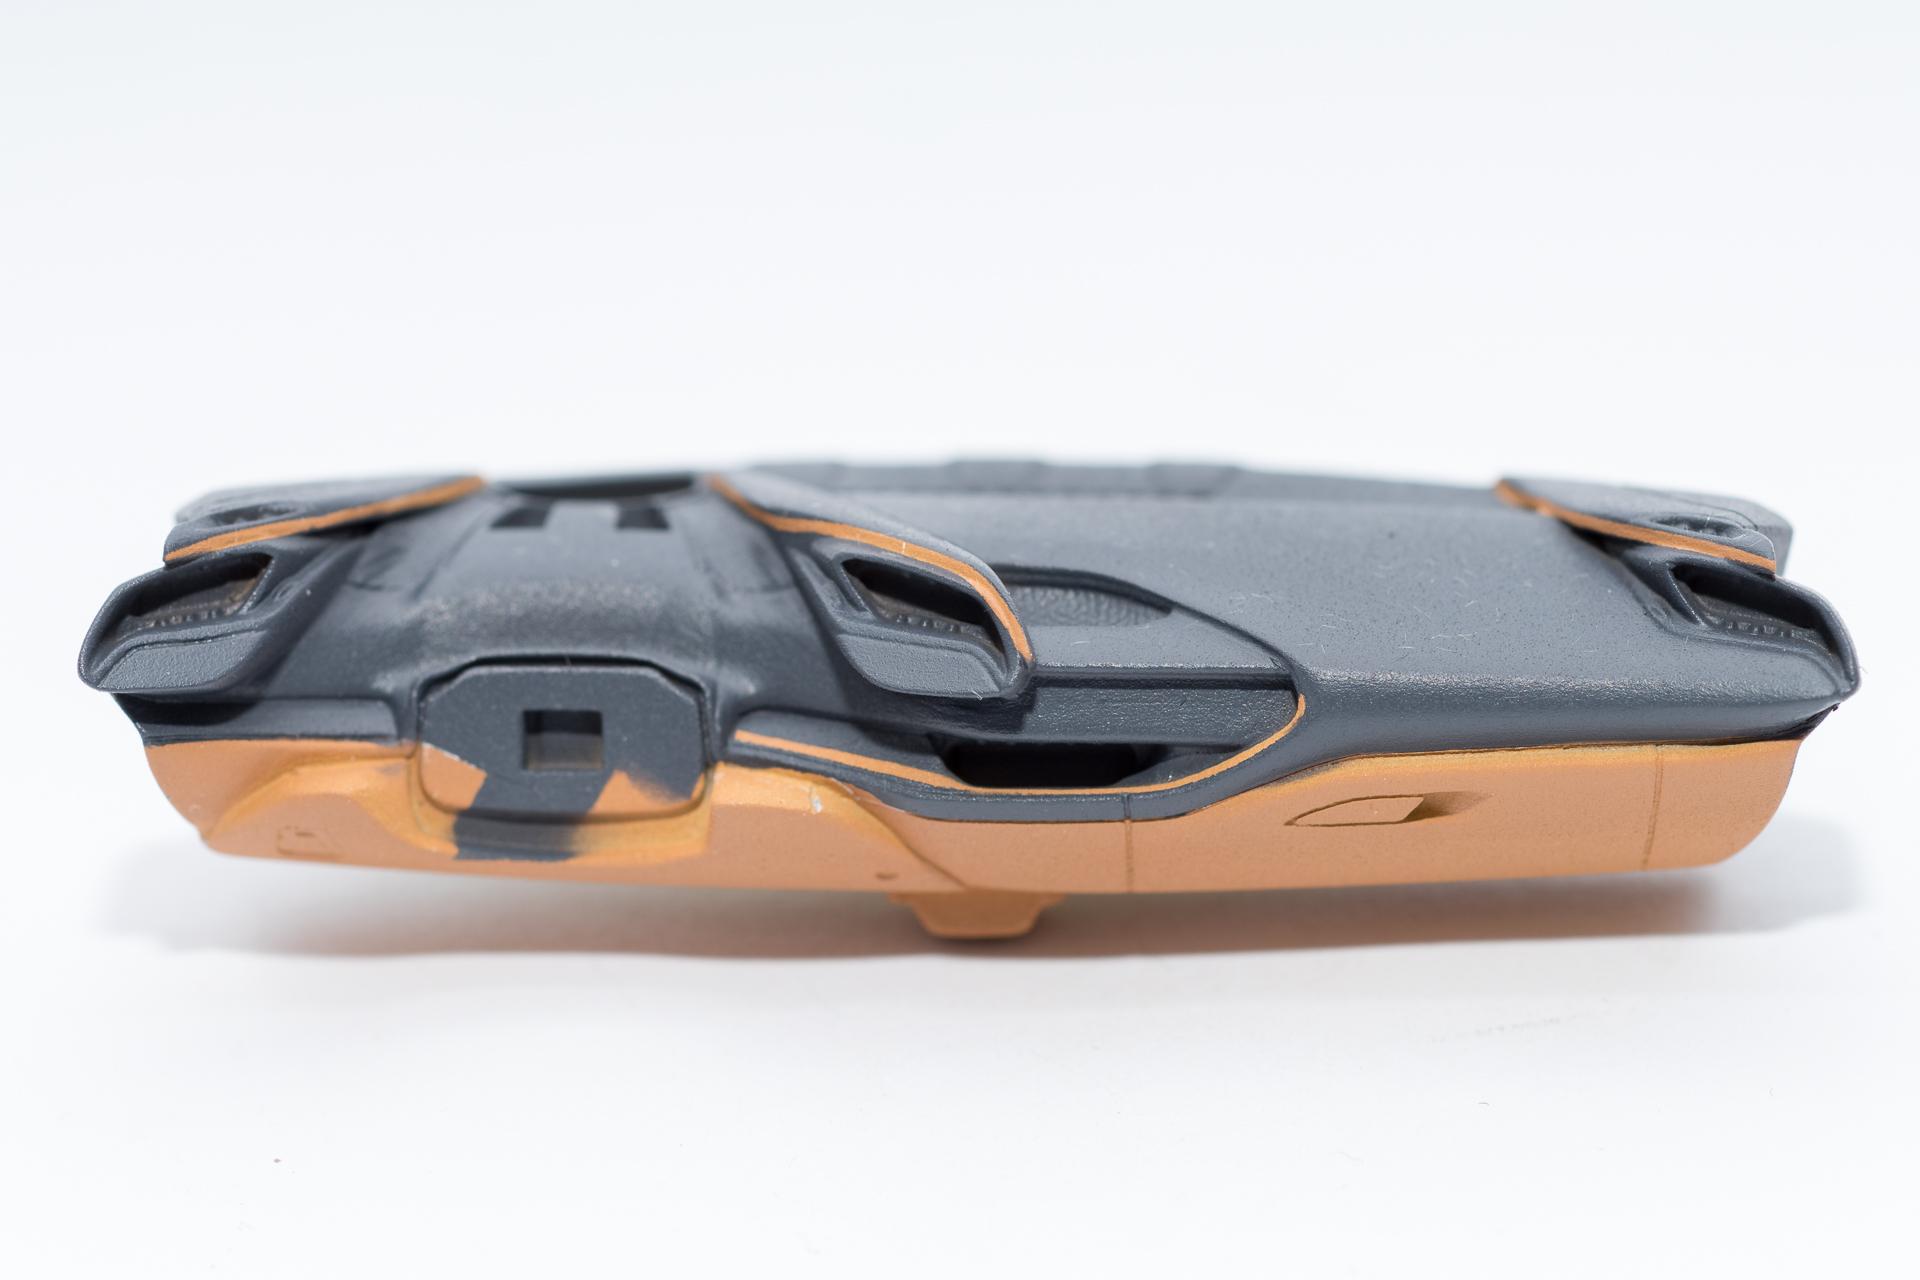
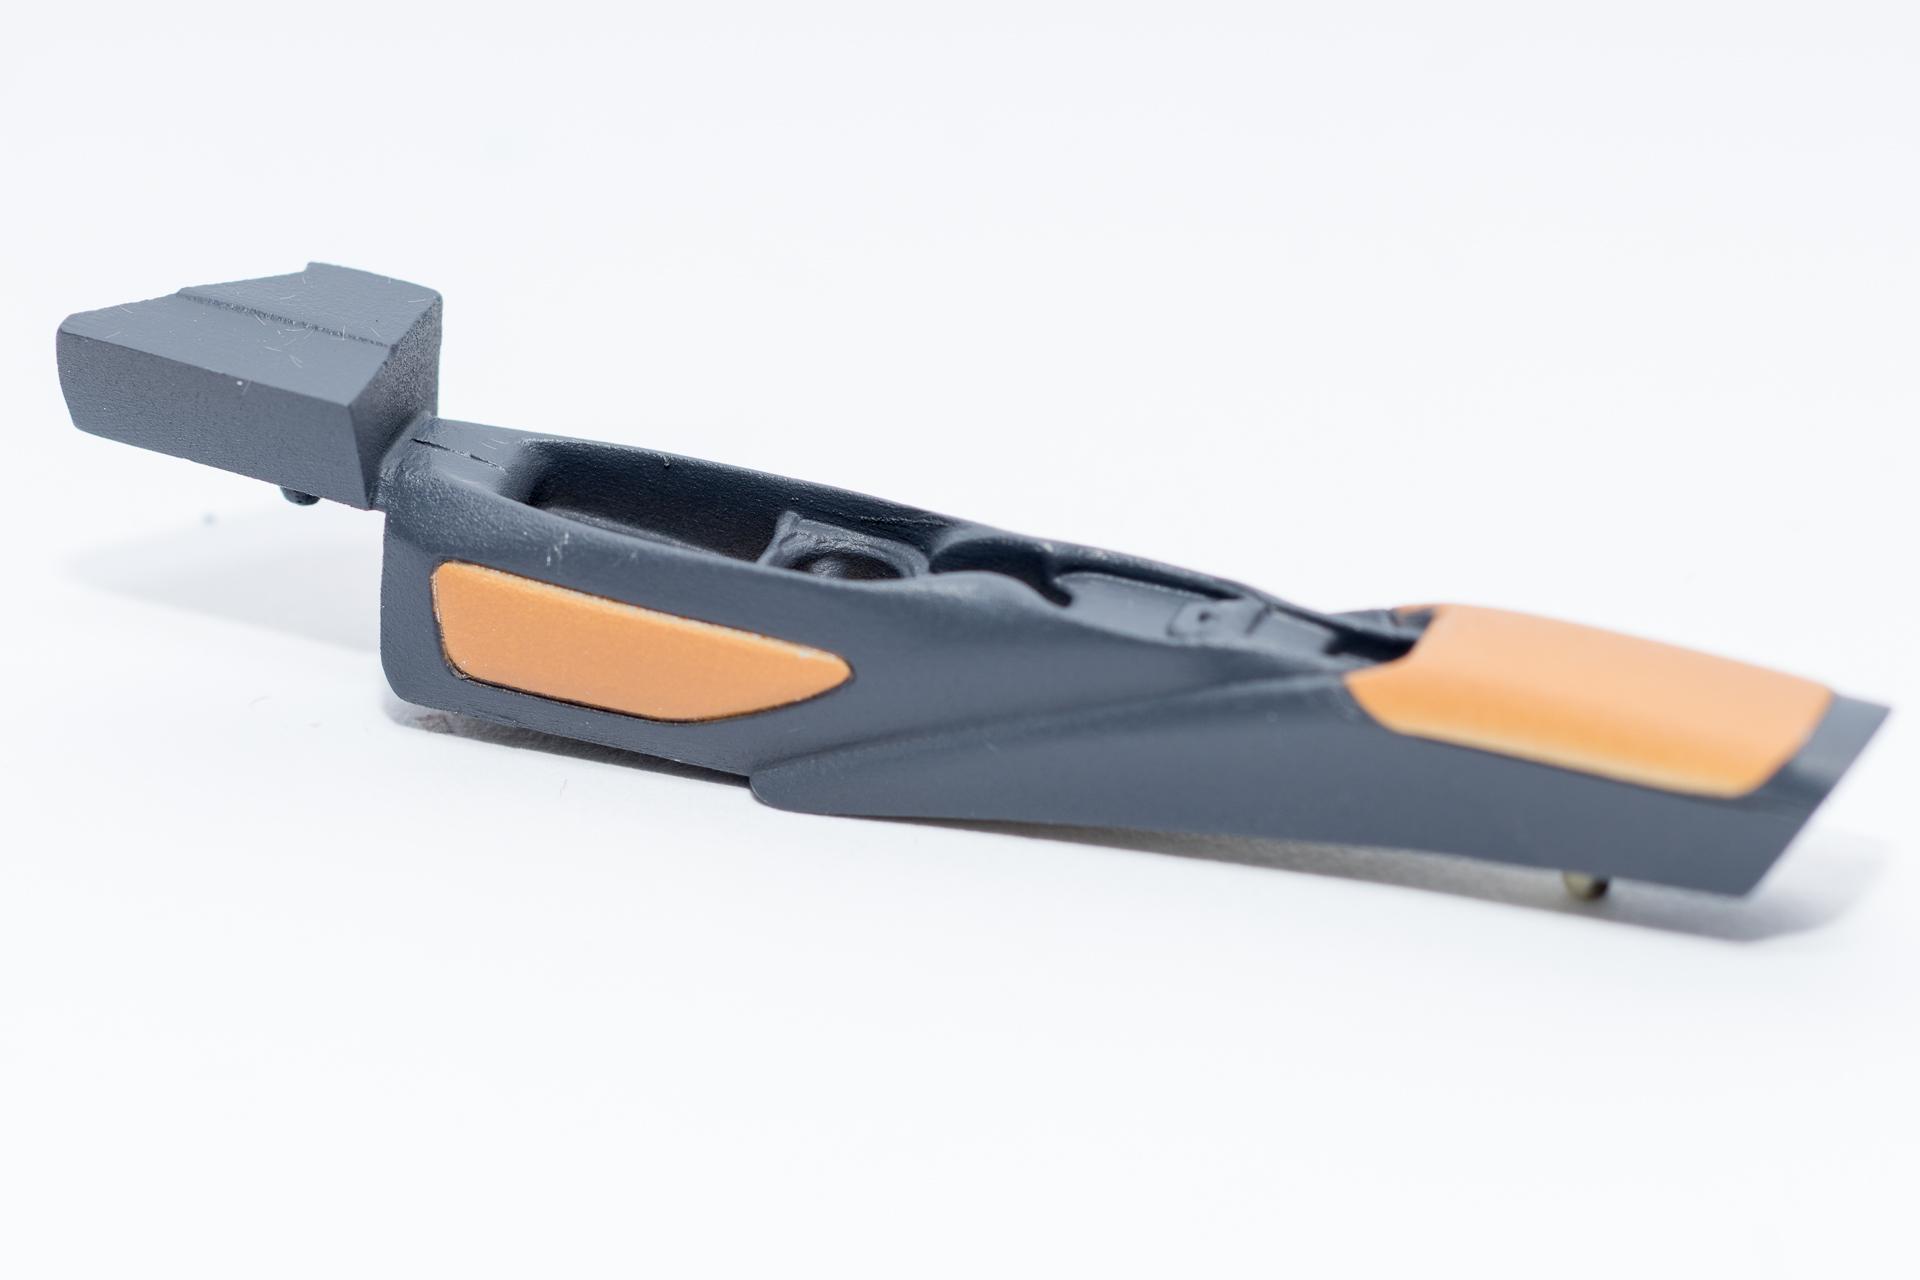
-
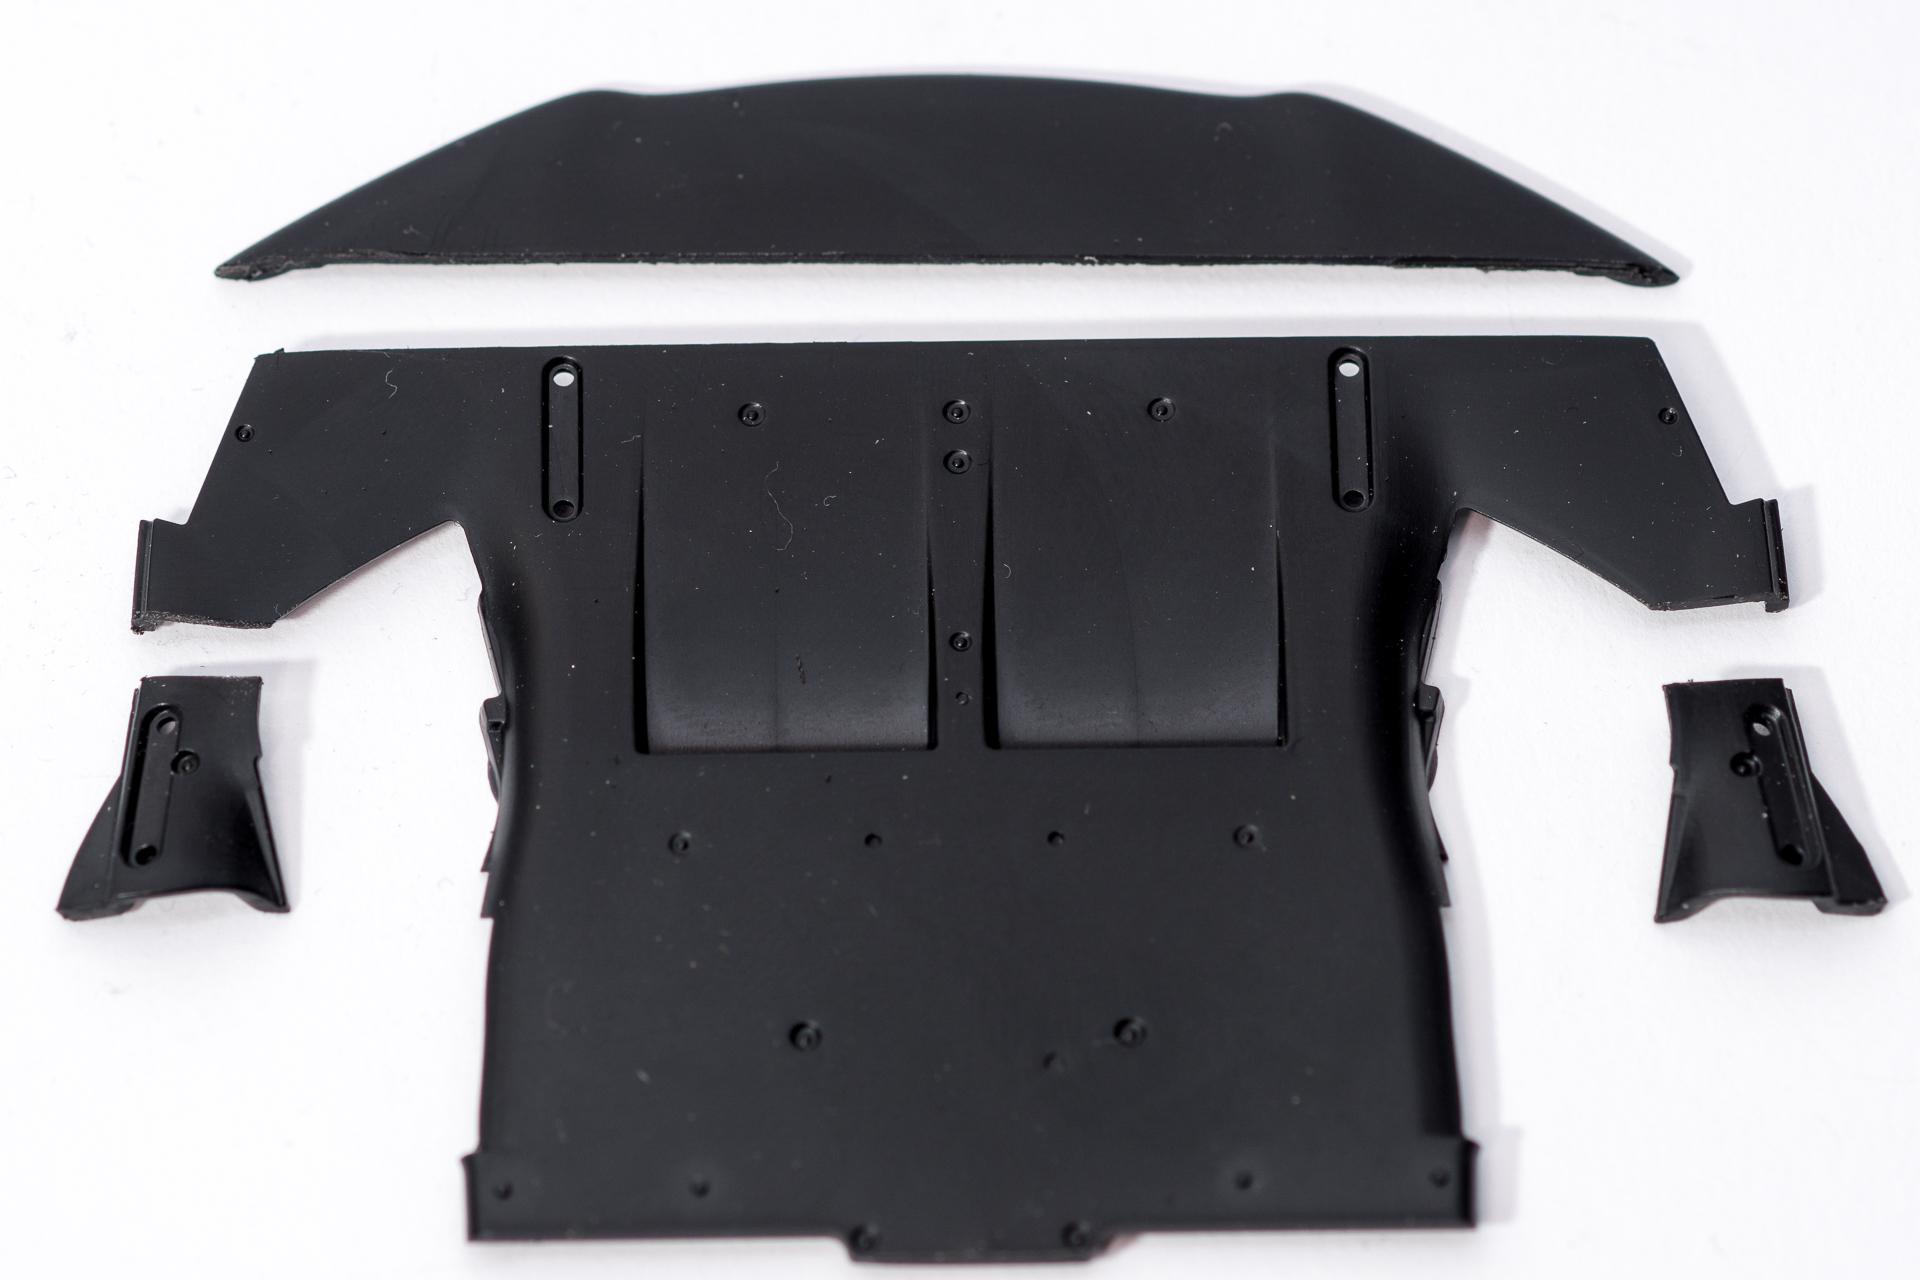
Hi all Thank you very much Only a minor update today, but one that caused a lot of scratching my head, trying to find a clever way to apply the decals on the splitter section. The instructions for the decal set tell you to first assemble kit parts B27 (upper part for the splitter) and B33 (lower part for the splitter), before applying decals 24L and 24R. The problem is, that B27, according to Tamiya's building instructions has to be glued to the underside of the body in step 12, whereas part B33 has to be attached to B27 in step 44. If they're glued together before step 12 it won't be possible to put the body on the undercarriage, as B33 would then block the front axle. After quite some time of thinking and turning the pieces around, I found a way by cutting B33 into four pieces. Here's, how it looked before I cut anything And the same part after cutting This way I was able to glue the smaller three parts to B27 and have the area assembled where the decals should be applied to. So I glued them together, primed and painted everything black and started applying the CF decals. I'm not finished with them yet, but a large part has already been covered (without applying decals 24L and 24R so far...). After I applied some of the decals I looked ahead in Tamiya's building instructions to look what could be done next to get some relief from applying more CF decals. And there I saw it... A few steps later there are four smaller parts (two on each side) which have to be glued to the splitter and therefore should be from underneath into a cavity... You might already guess it: the two smalles parts from B33 are now closing this cavity... ? Fortunately I already found a solution to this problem: I'll only have to shorten the four horizontal pieces on the side where they should reach into the cavity a little bit to fit them between the vertical faces of the splitter... That's it for today's update. Soon I'll reveal in another thread the second reason why I didn't make that much of a progress since my last update ? Urs
-
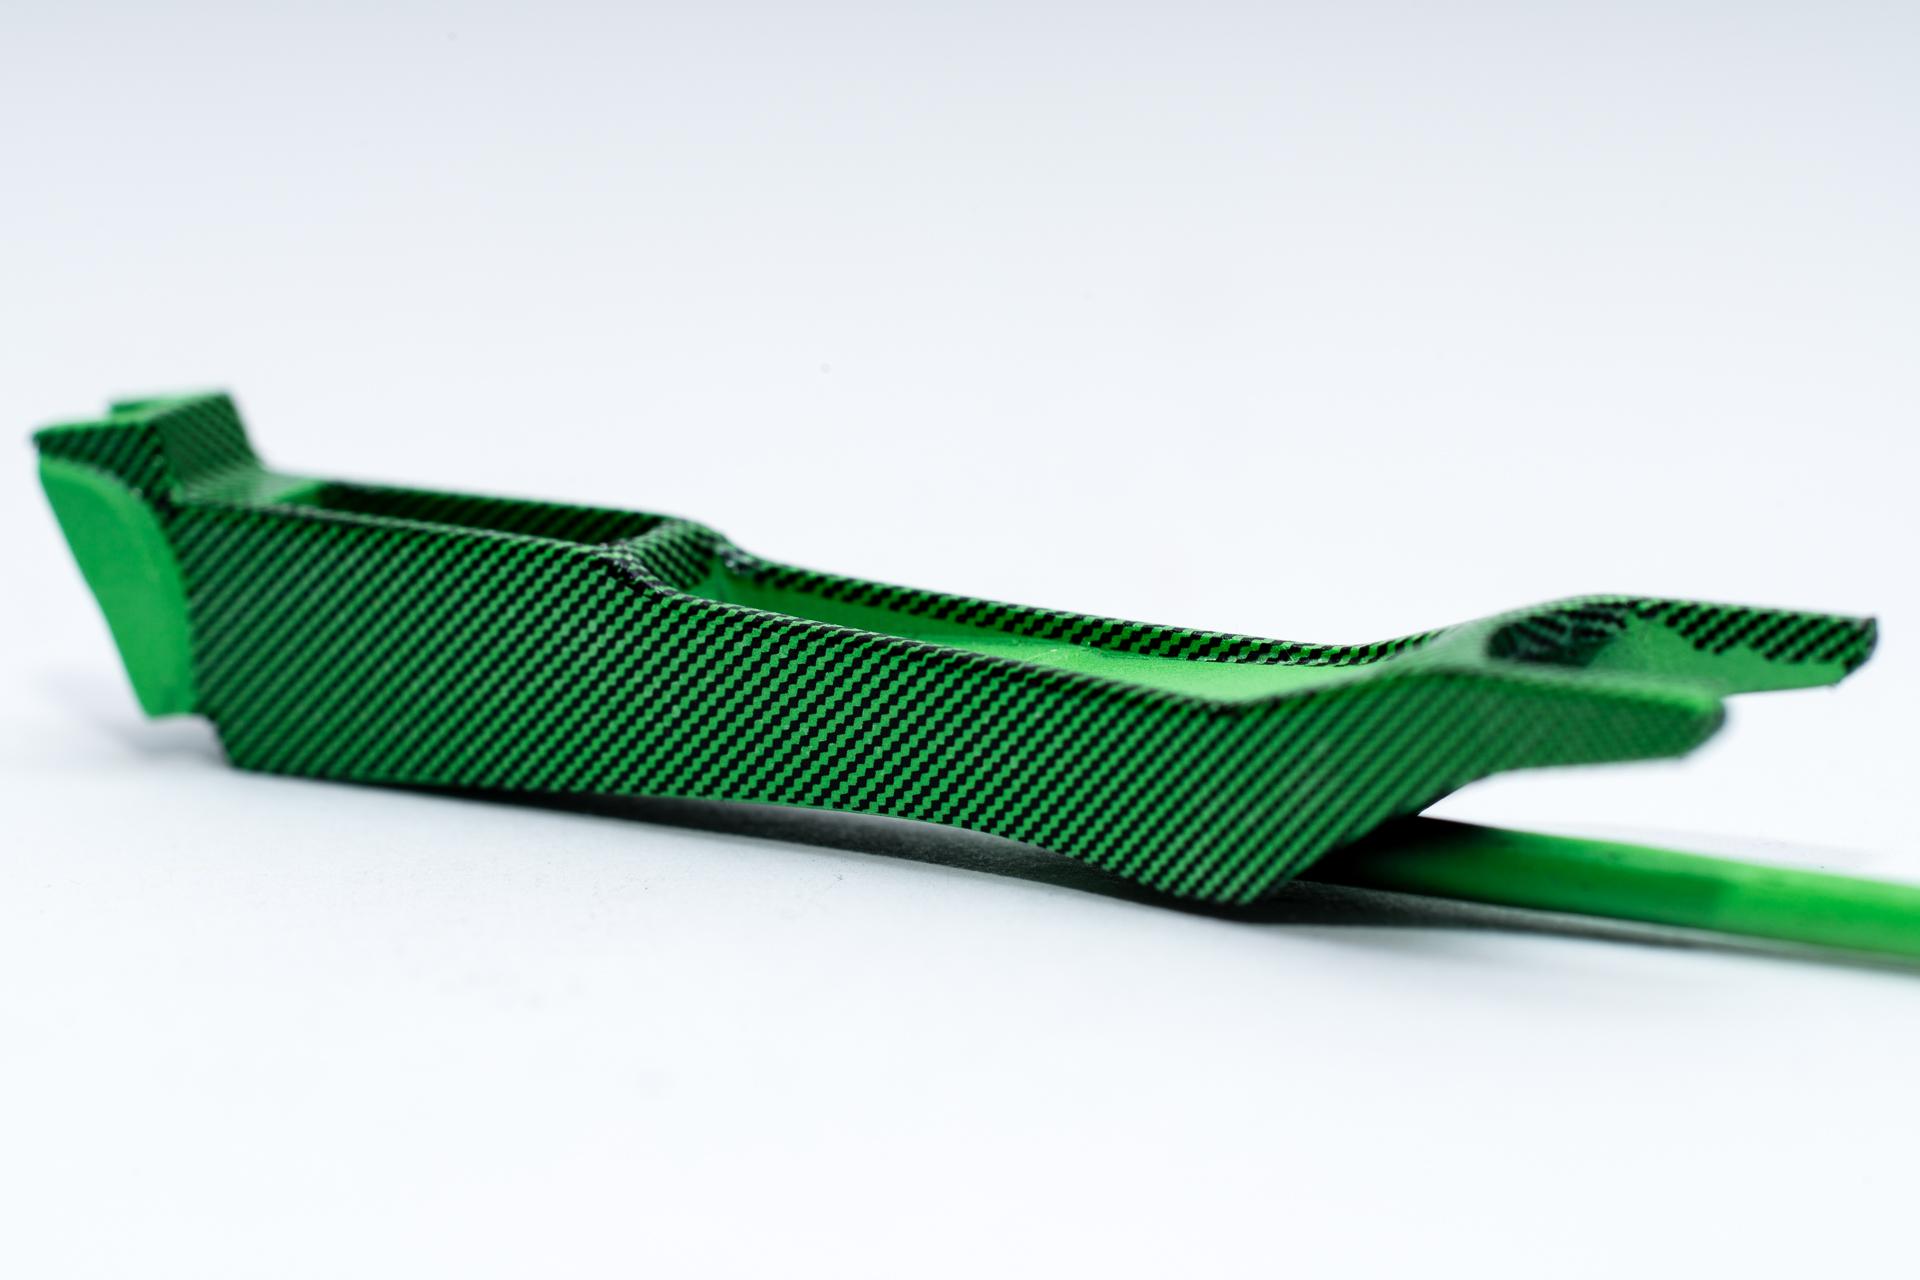
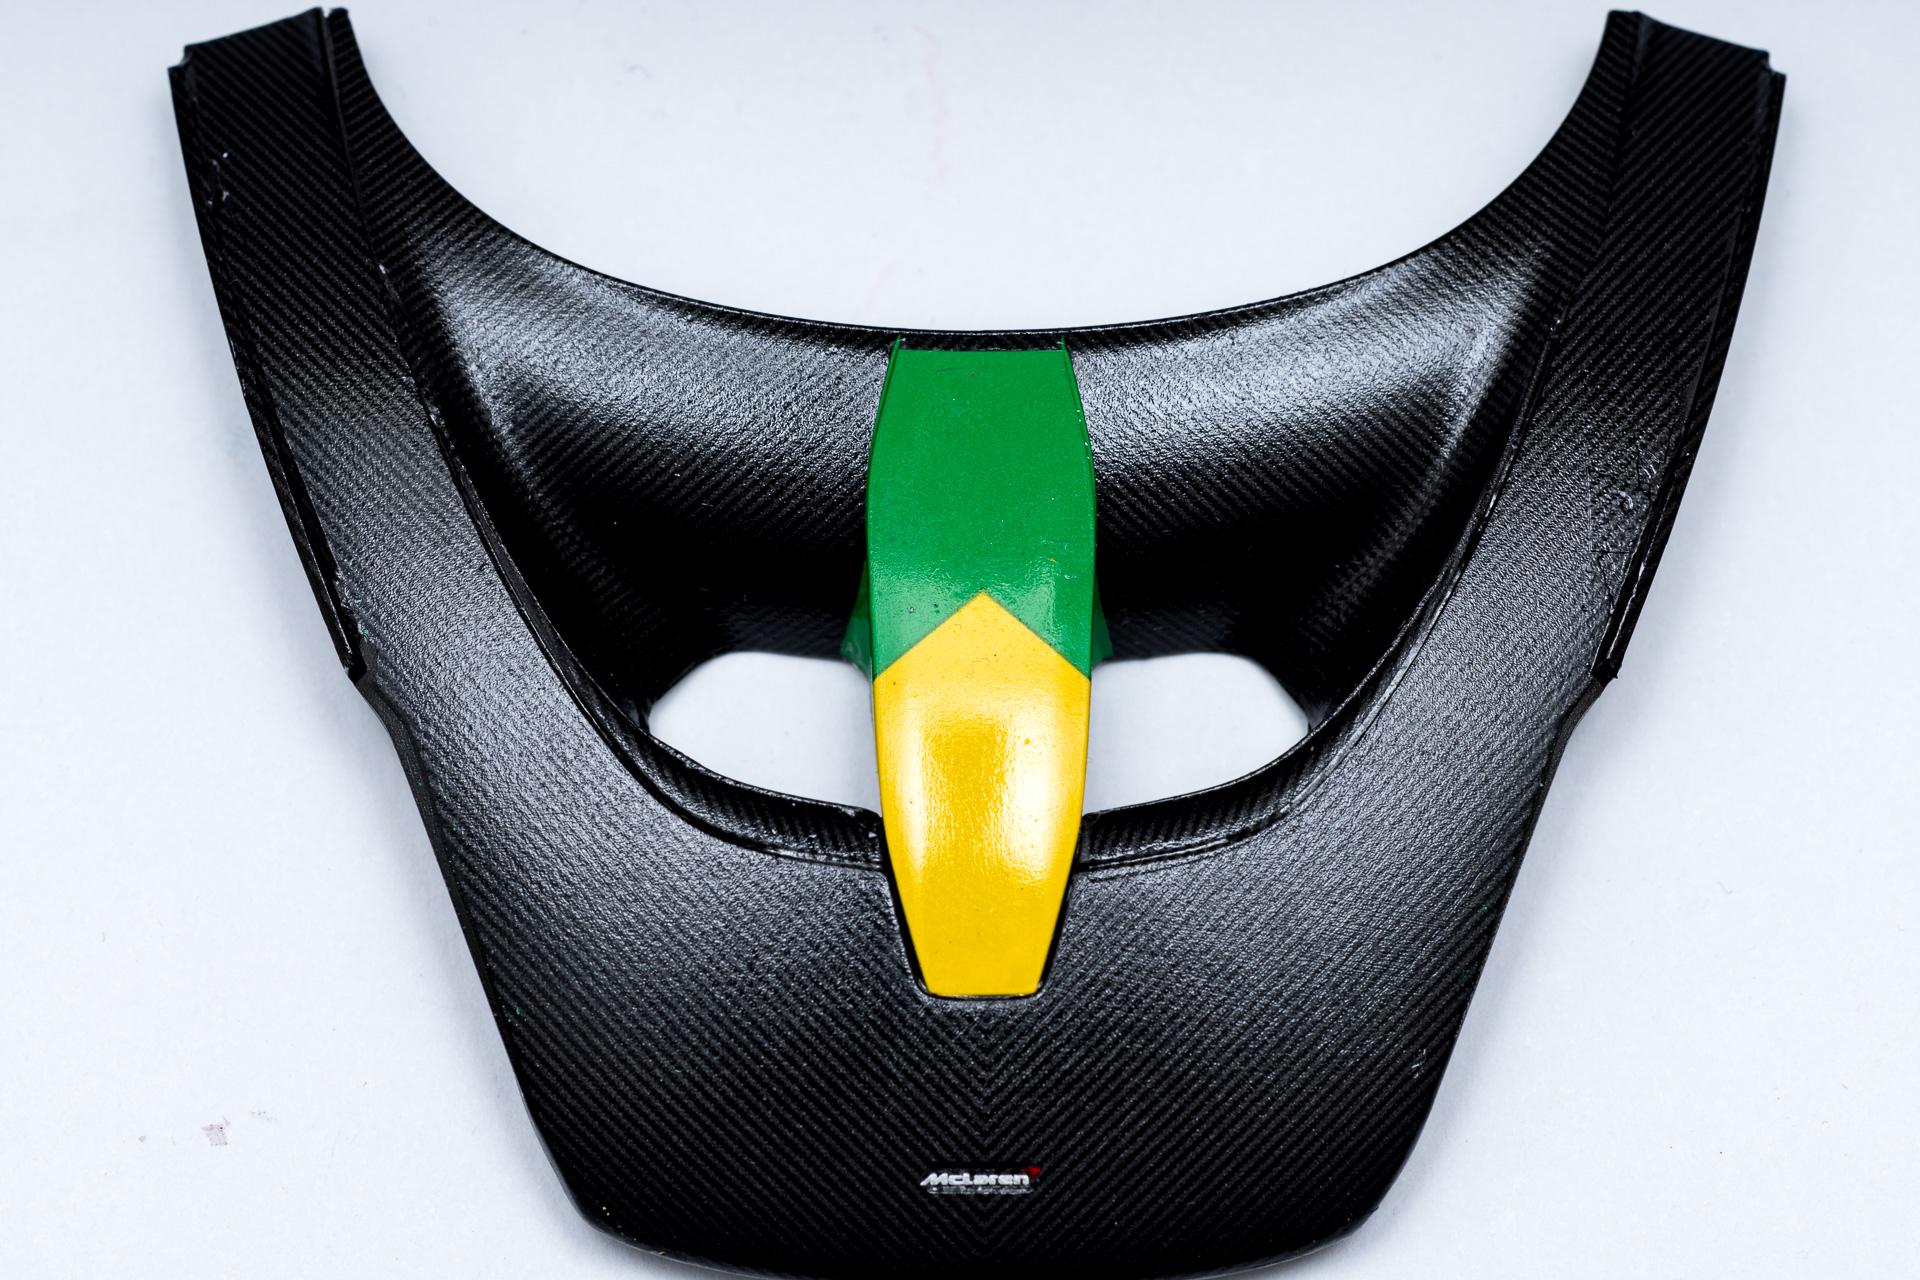
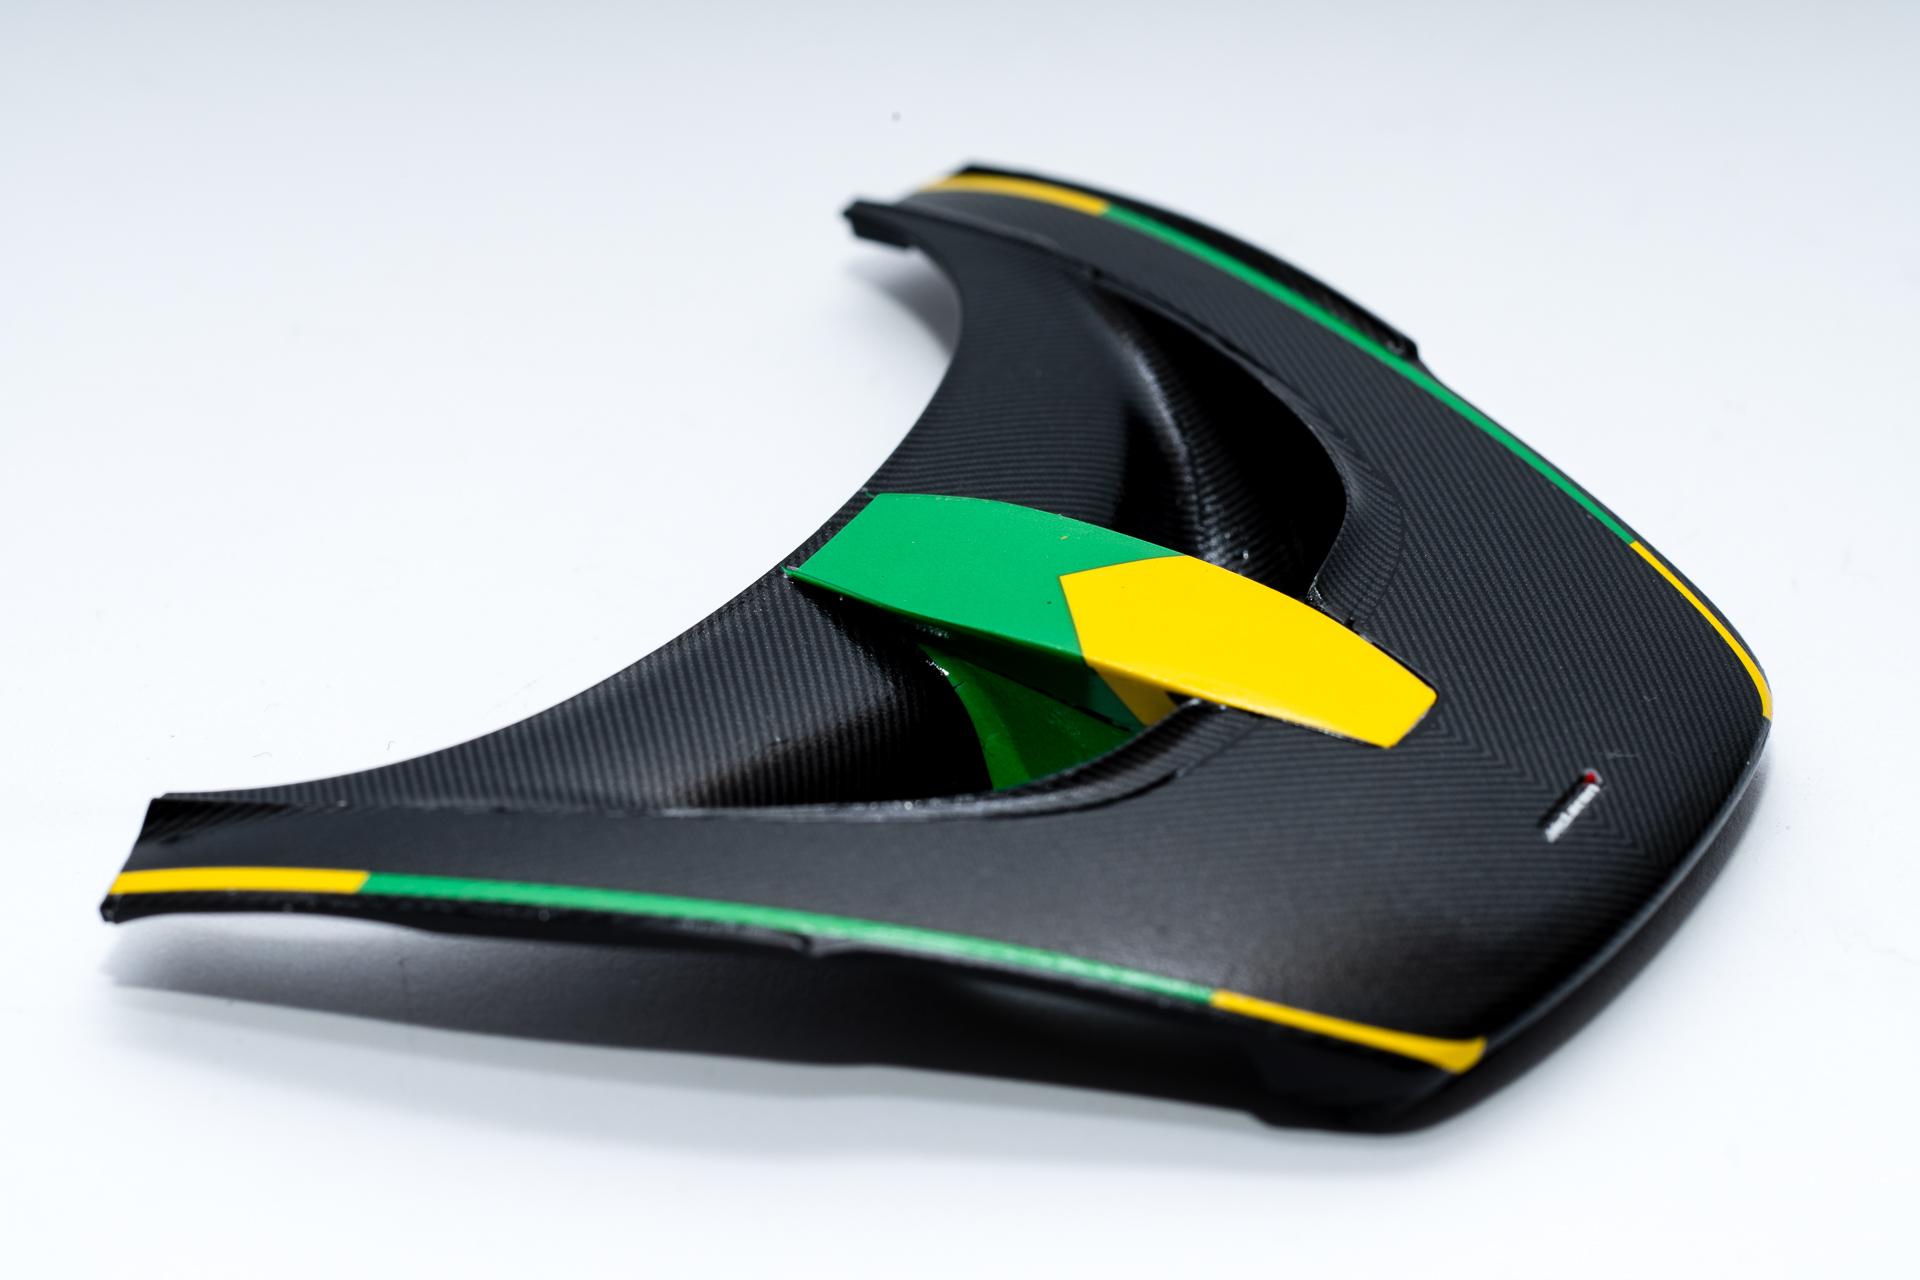
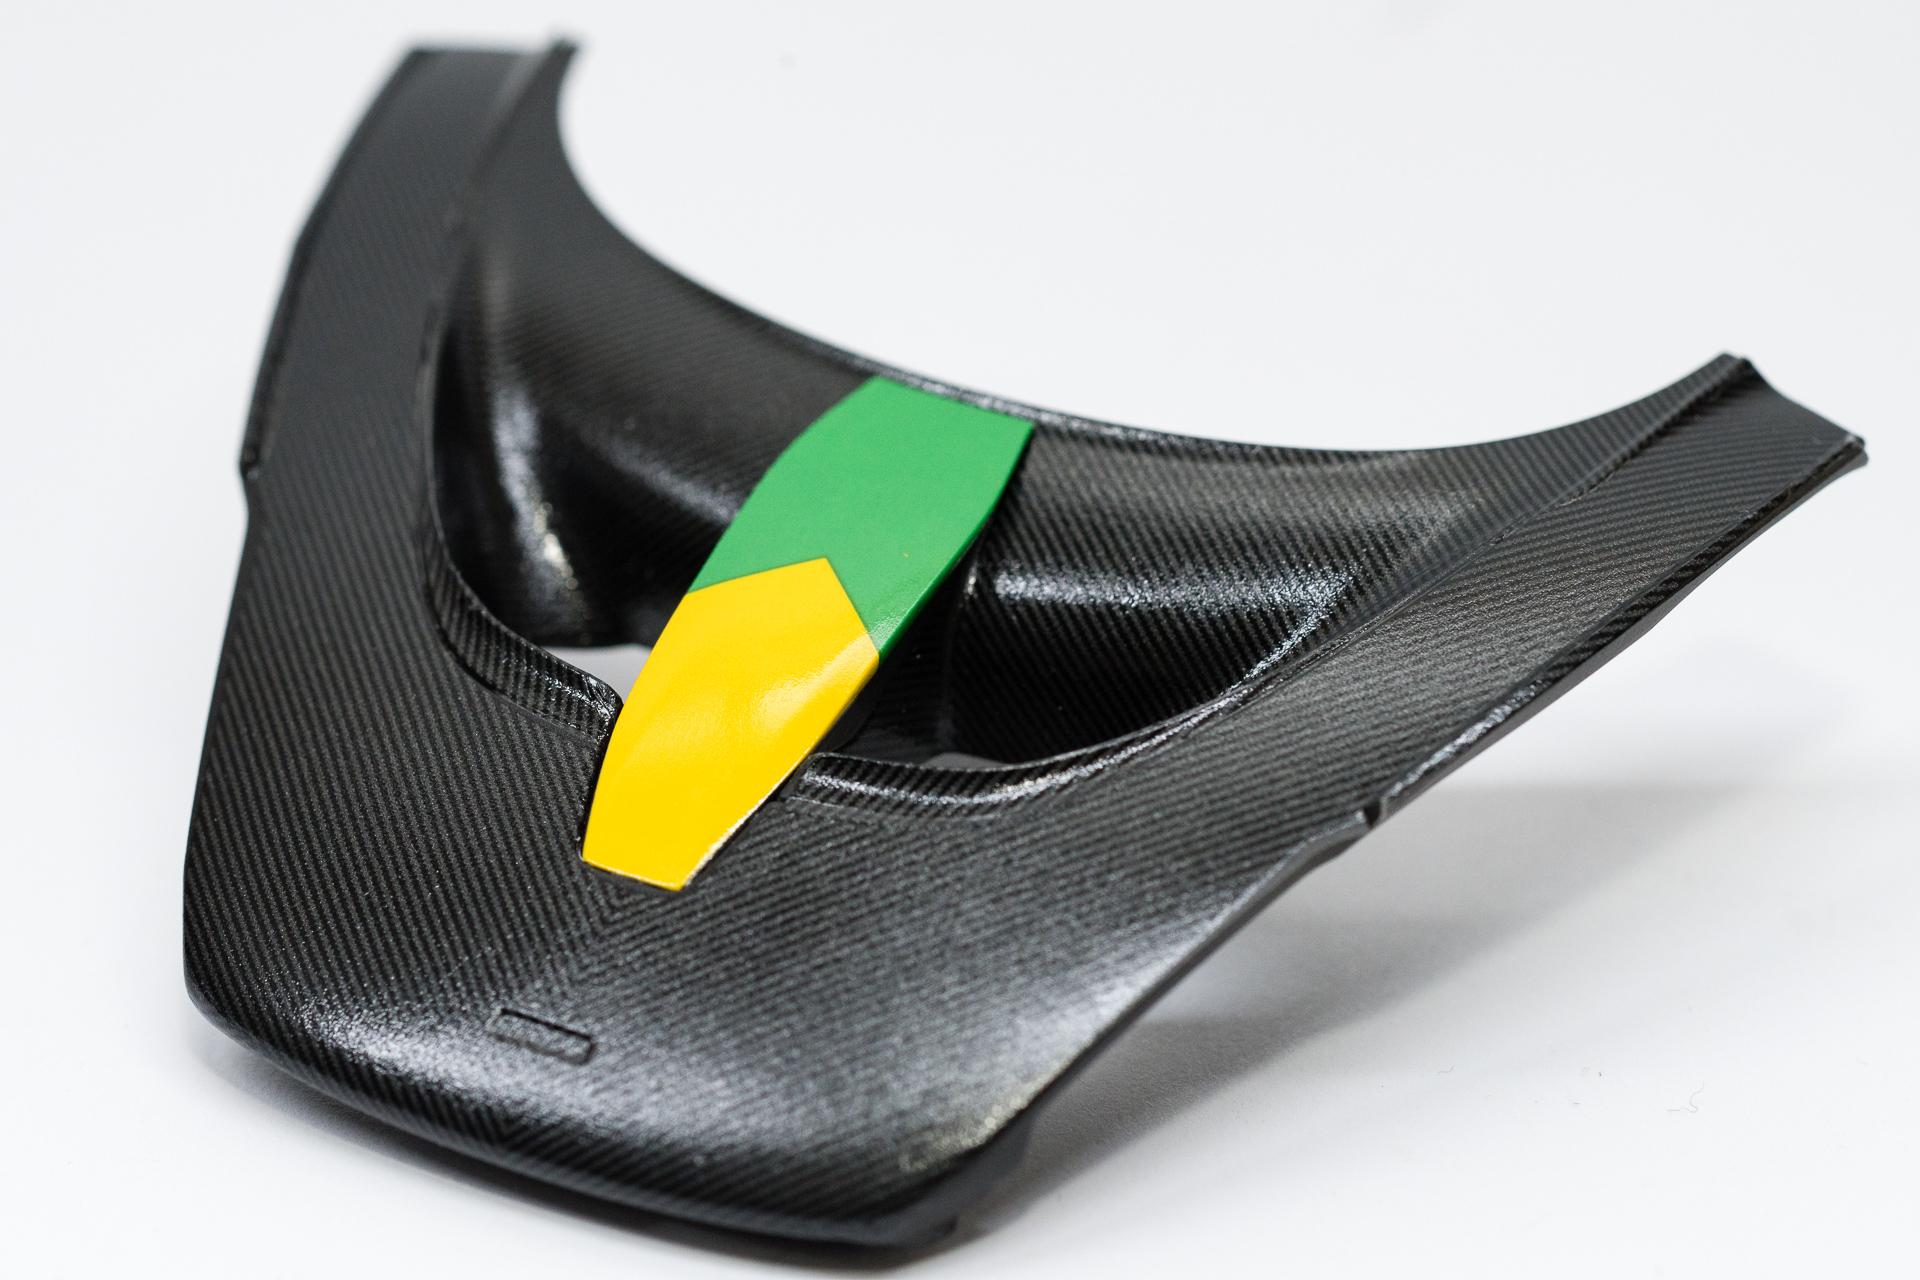
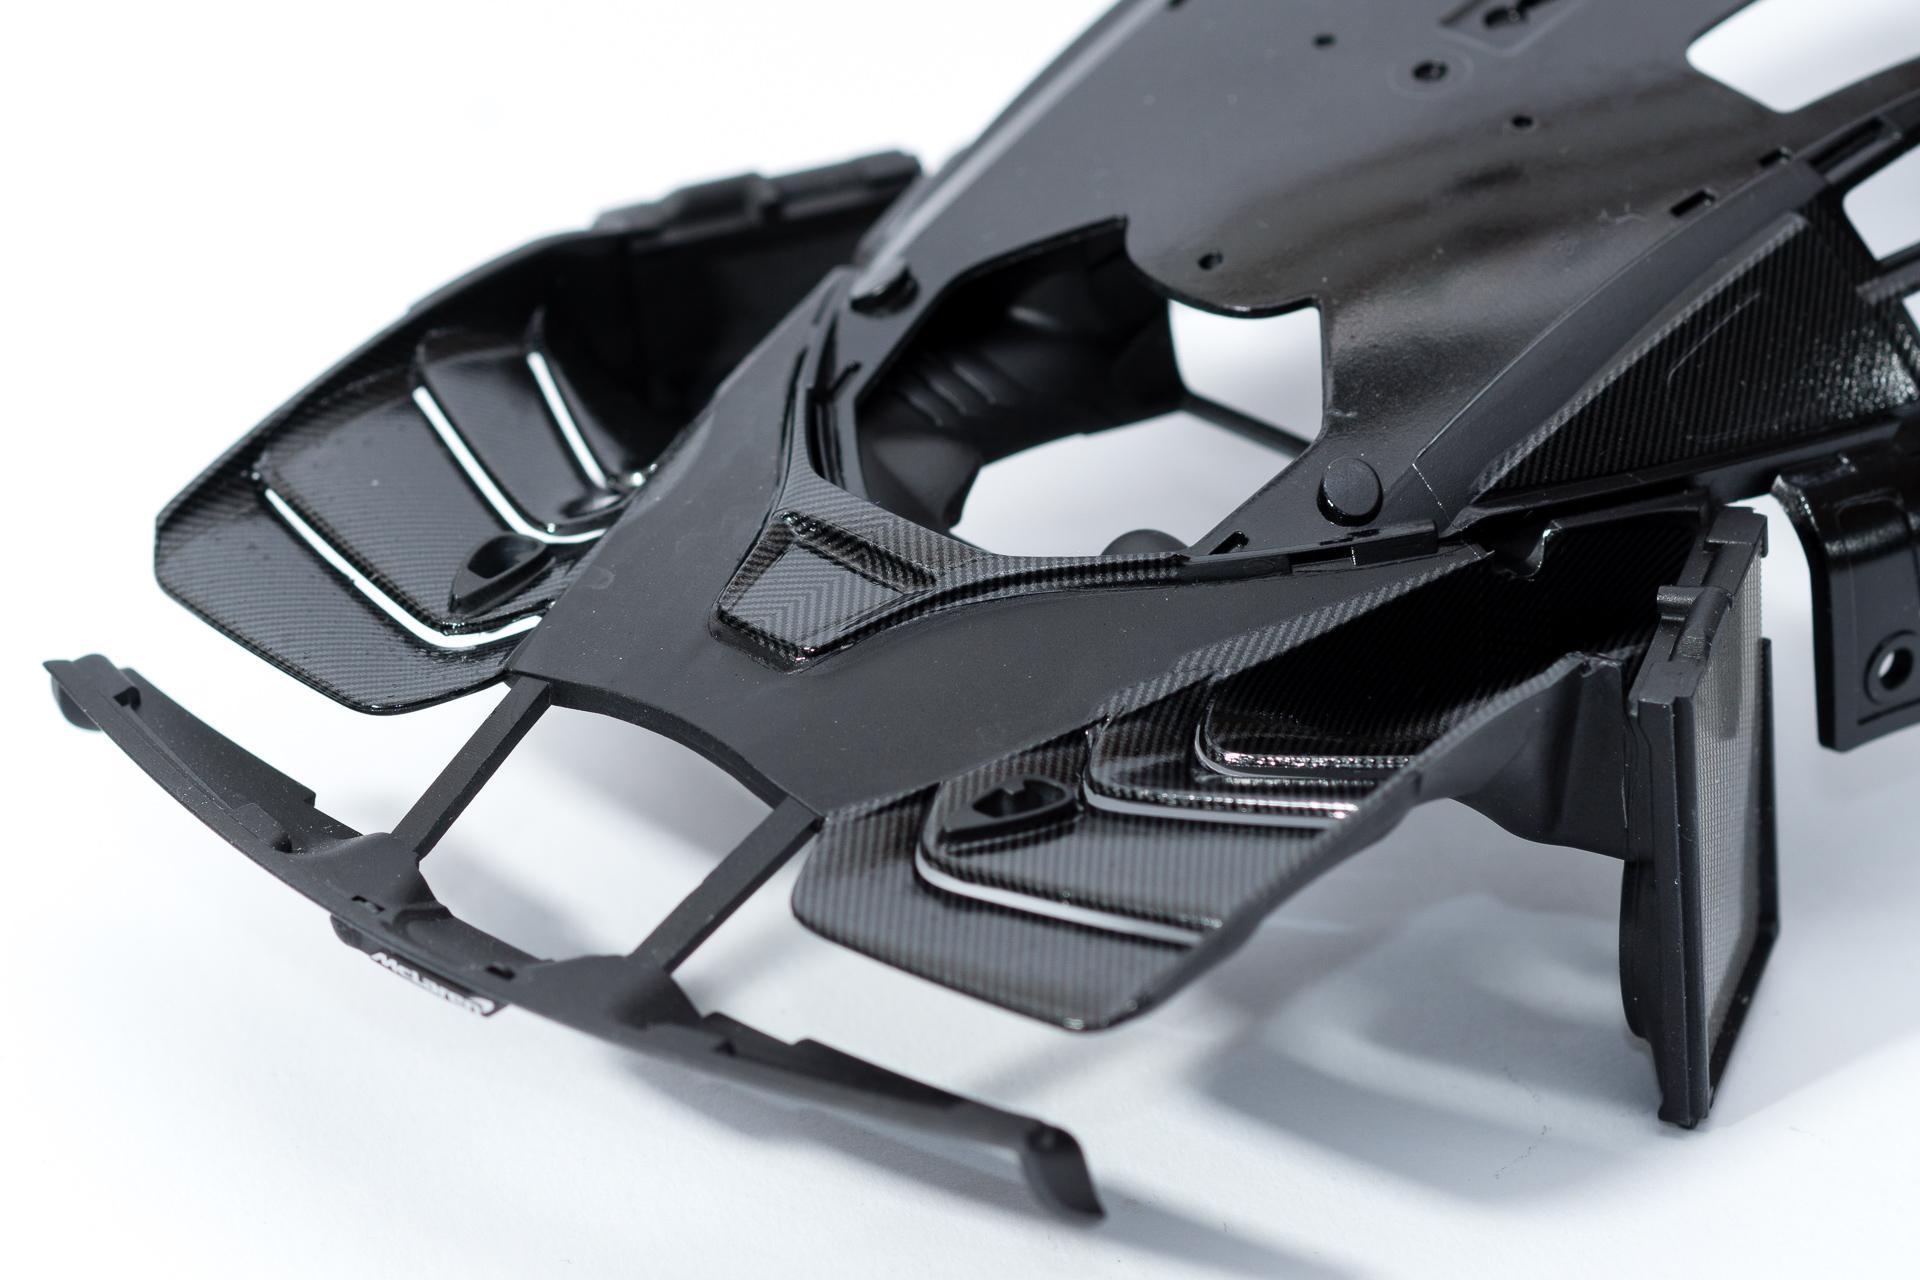
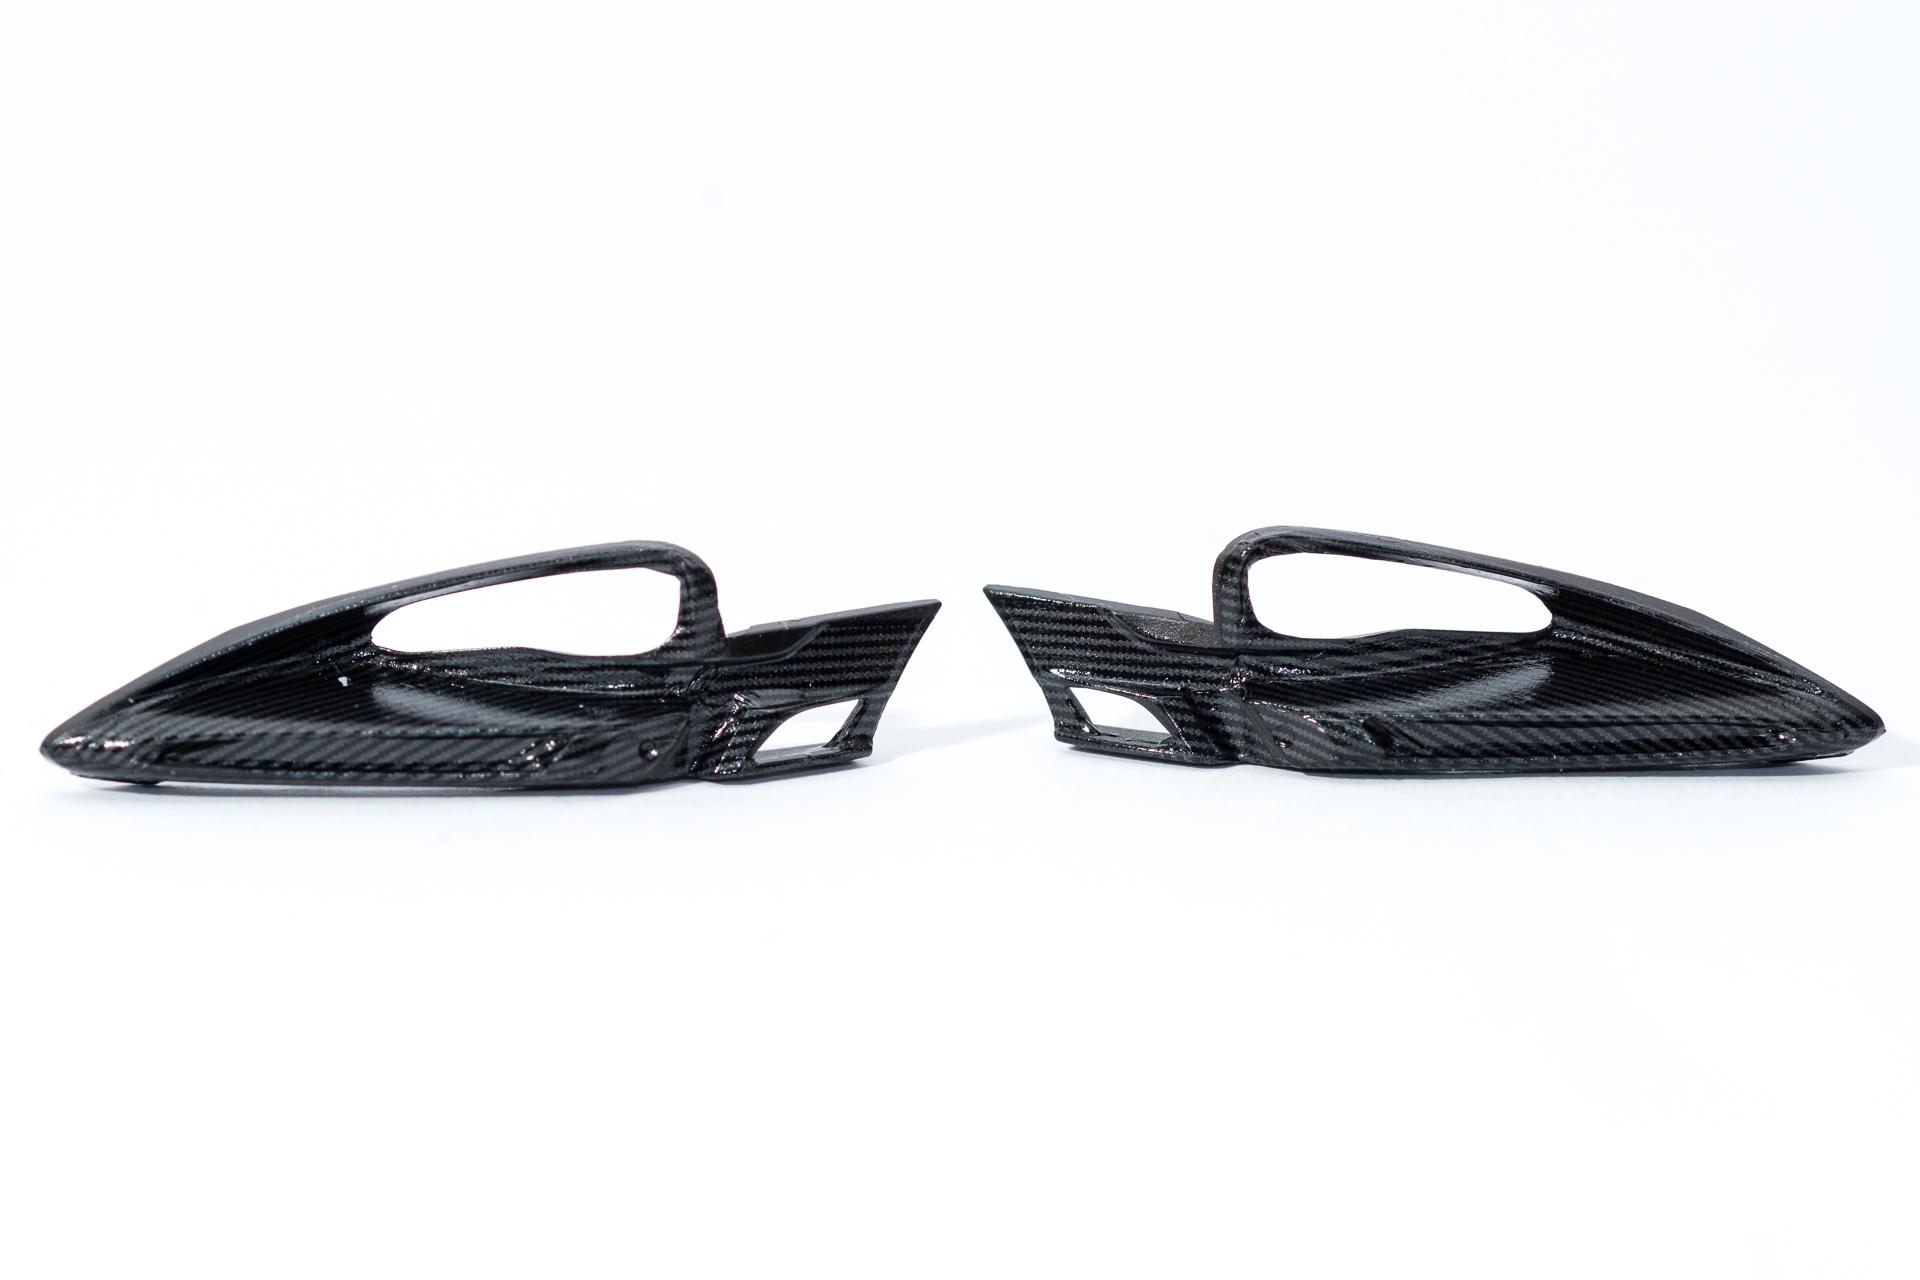
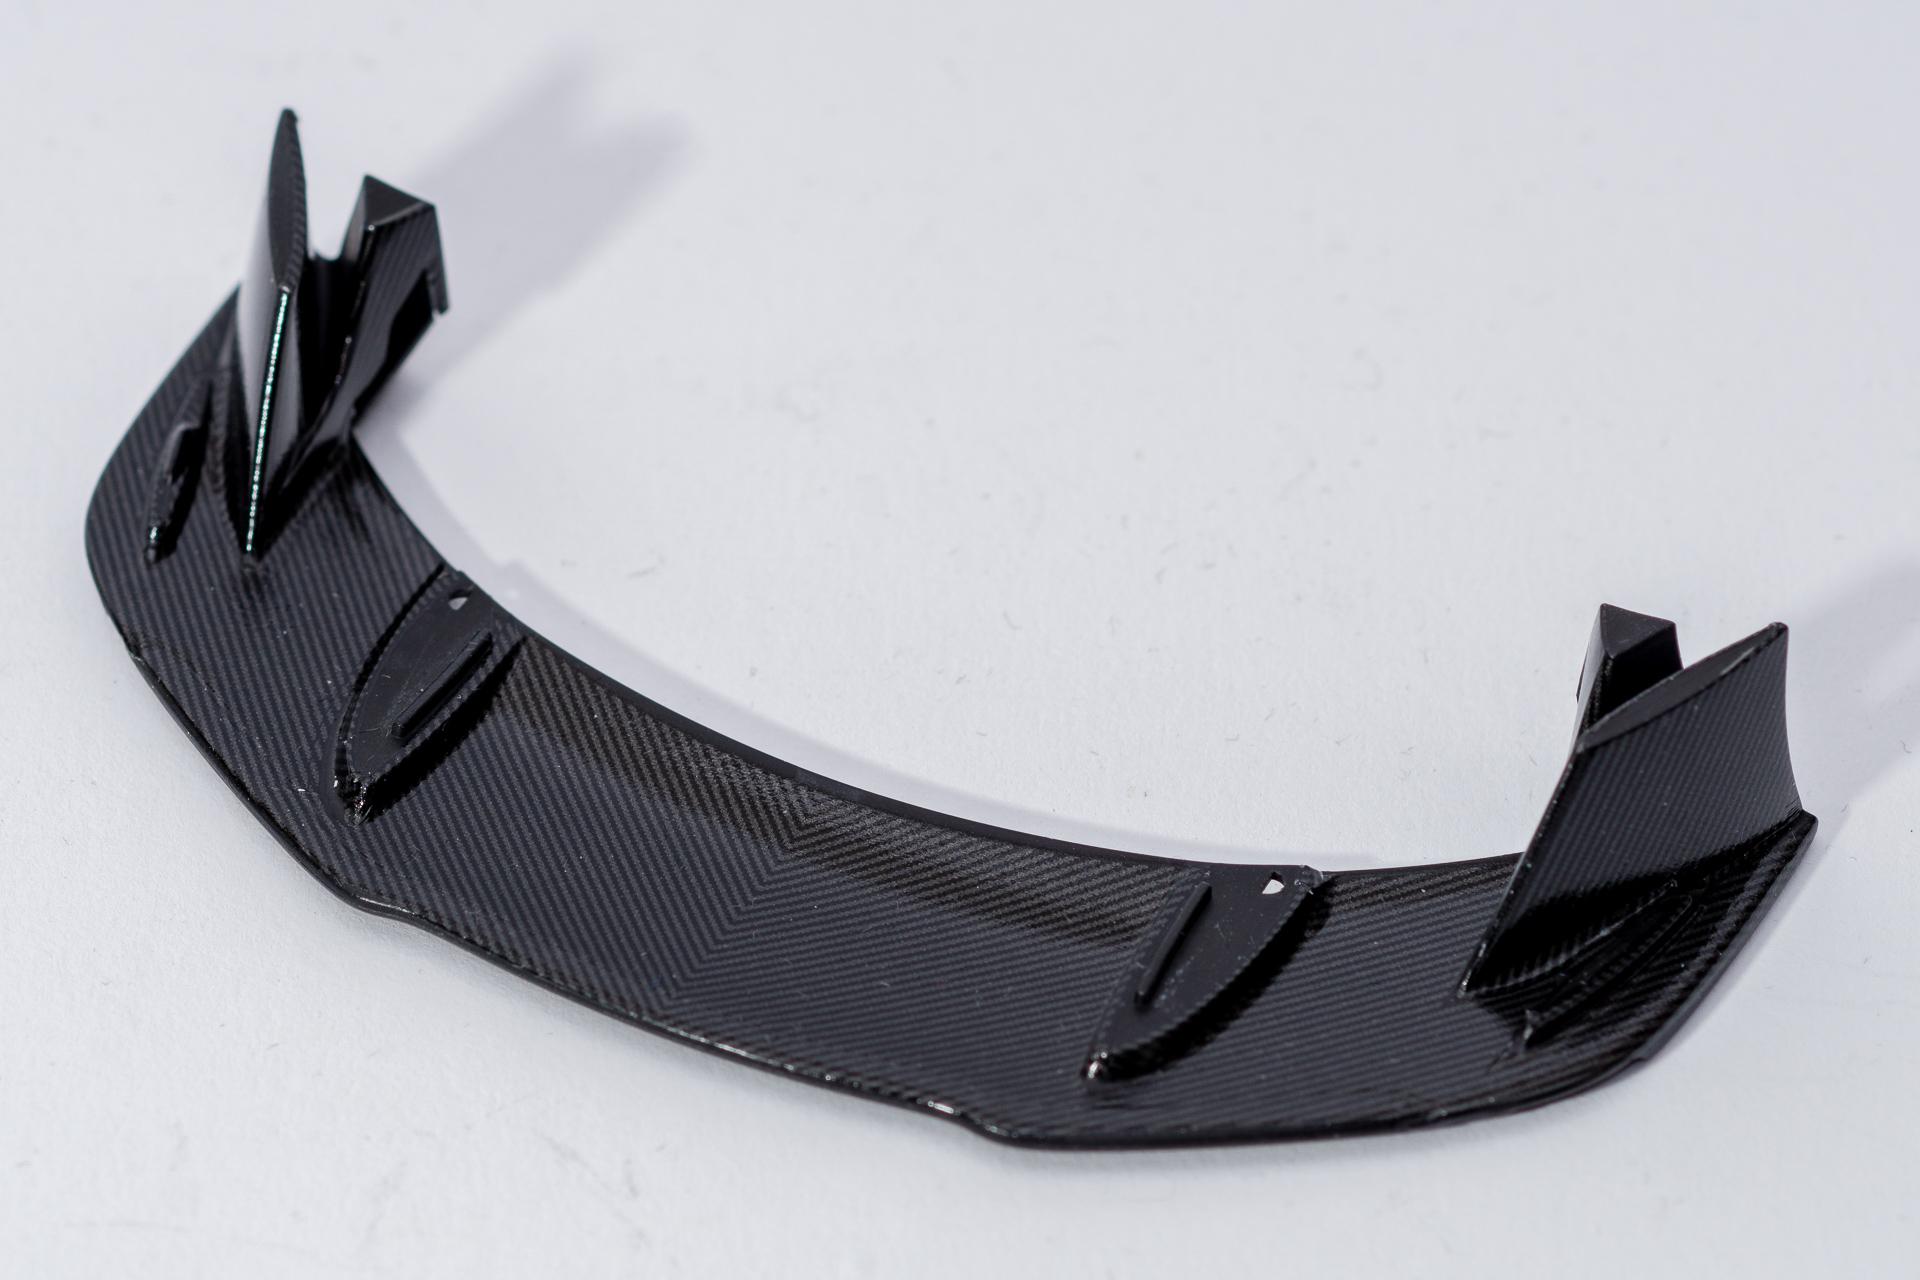
Hi all After having finished the Morgan and a Shelby Mustang it was time to continue with my McLaren Senna. In my opening post I wrote, that I didn't manage to add CF decals to one part at the back of the car. As this very part is quite large and therefore will be noticed if not decalled, it was crucial for this build to get this covered. Otherwise I would have had to switch to another color scheme for this build. So I first tried to finish this part. For this reason I made my own stencils a few weeks (or months, I don't really remember exactly) ago. Last weekend I tried it and was quite successful. The difficult spots are the ones in southwest, resp. southeast direction from the silver exhaust opening in this picture. The curve is so extreme that it's almost impossible to cover it completely. There is a small triangular spot on each side where there is no decal, but for the moment I can live with that. If necessary I think it would also be possible to cover that up with small patches. As this part turned out so well, I decided to continue with more CF decal work on more body parts and finished some of the front parts Then I masked off the monocoque and painted the upper part in gloss black. After that the first metallic sticker and the PE grilles have been applied. That's it for today. I think that now, where the most complicated part (at least on the exterior) has been completed, the updates will follow in a more timely manner Urs
-
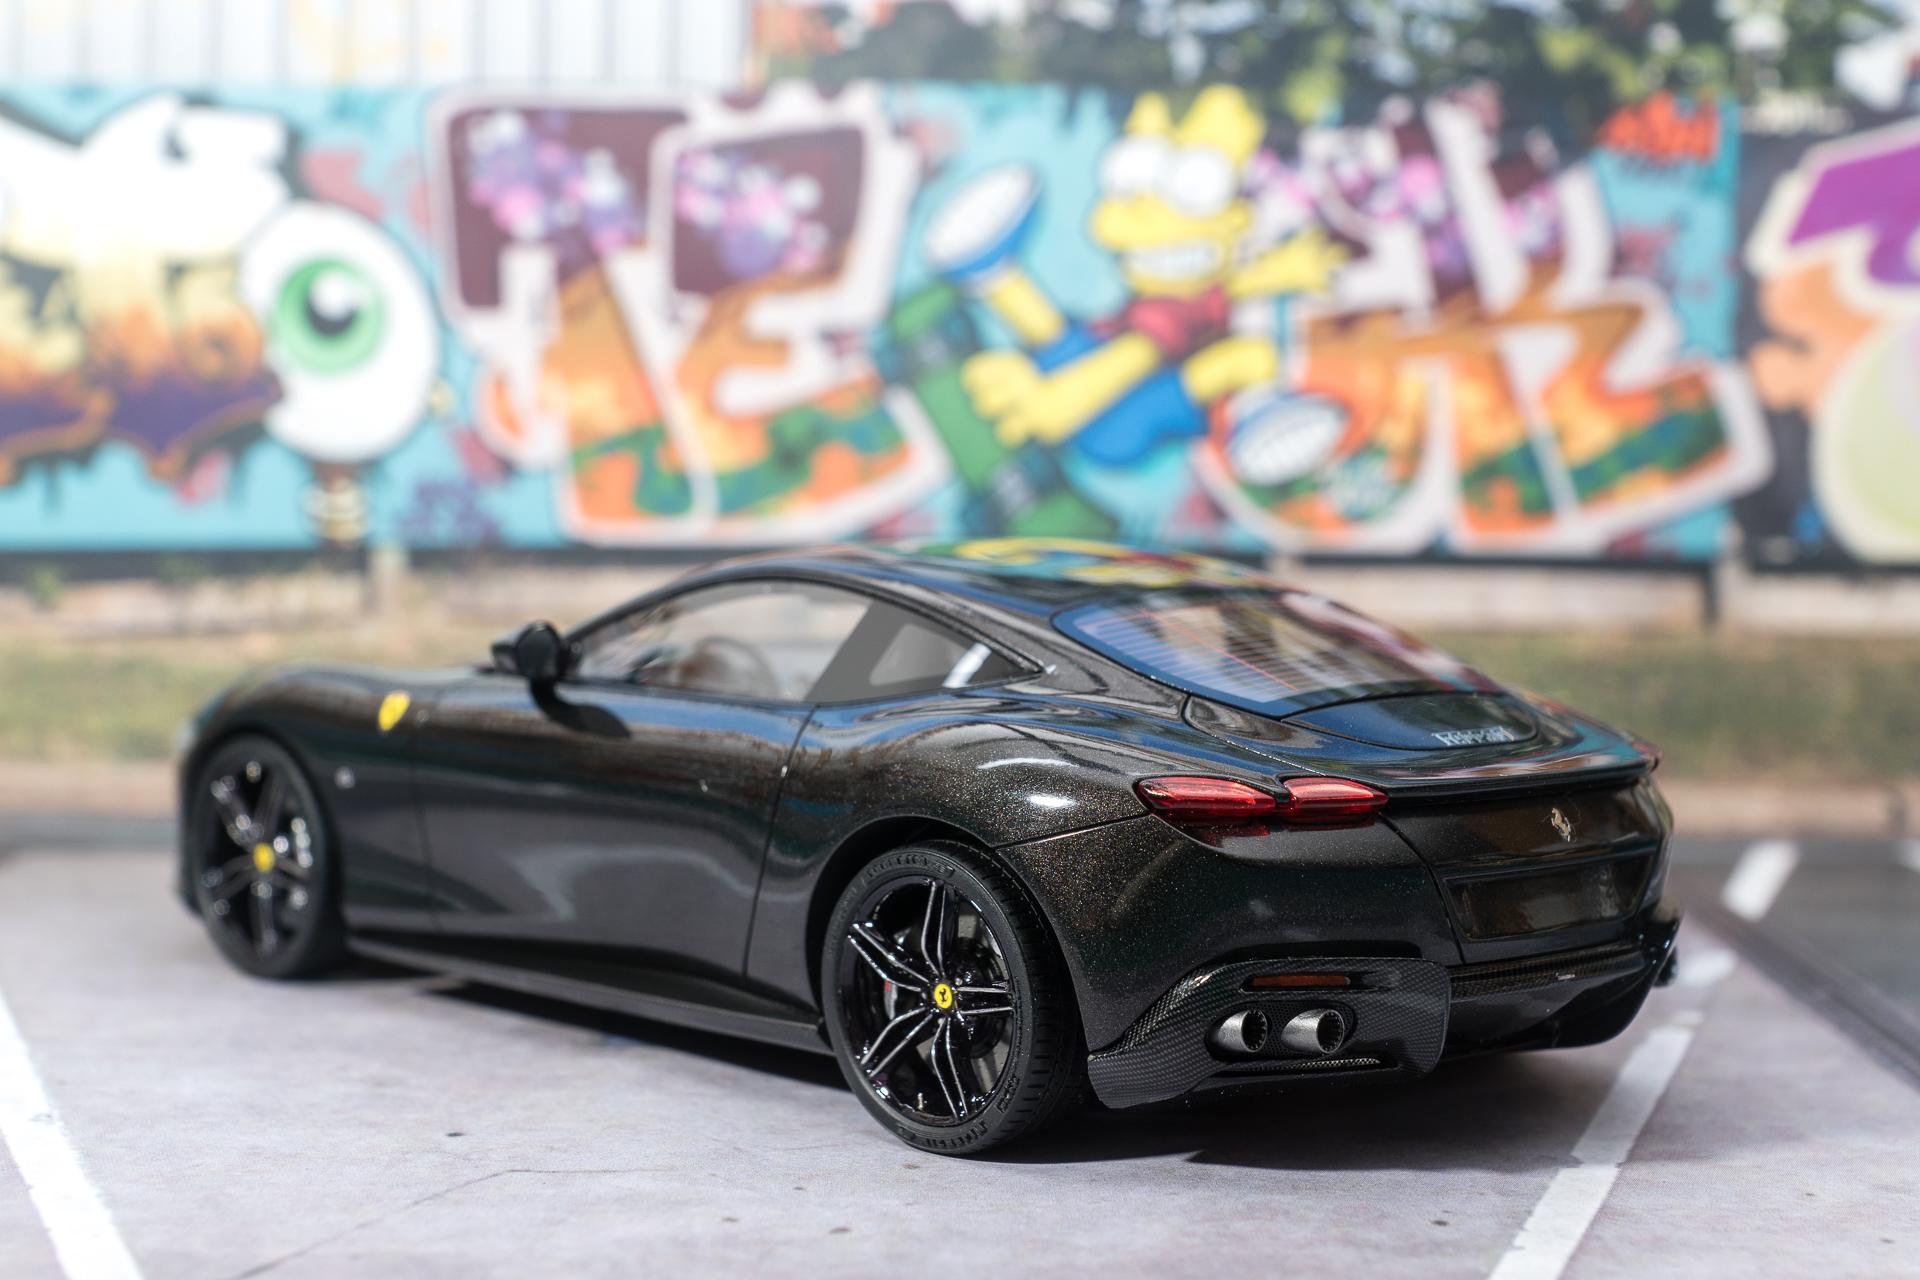
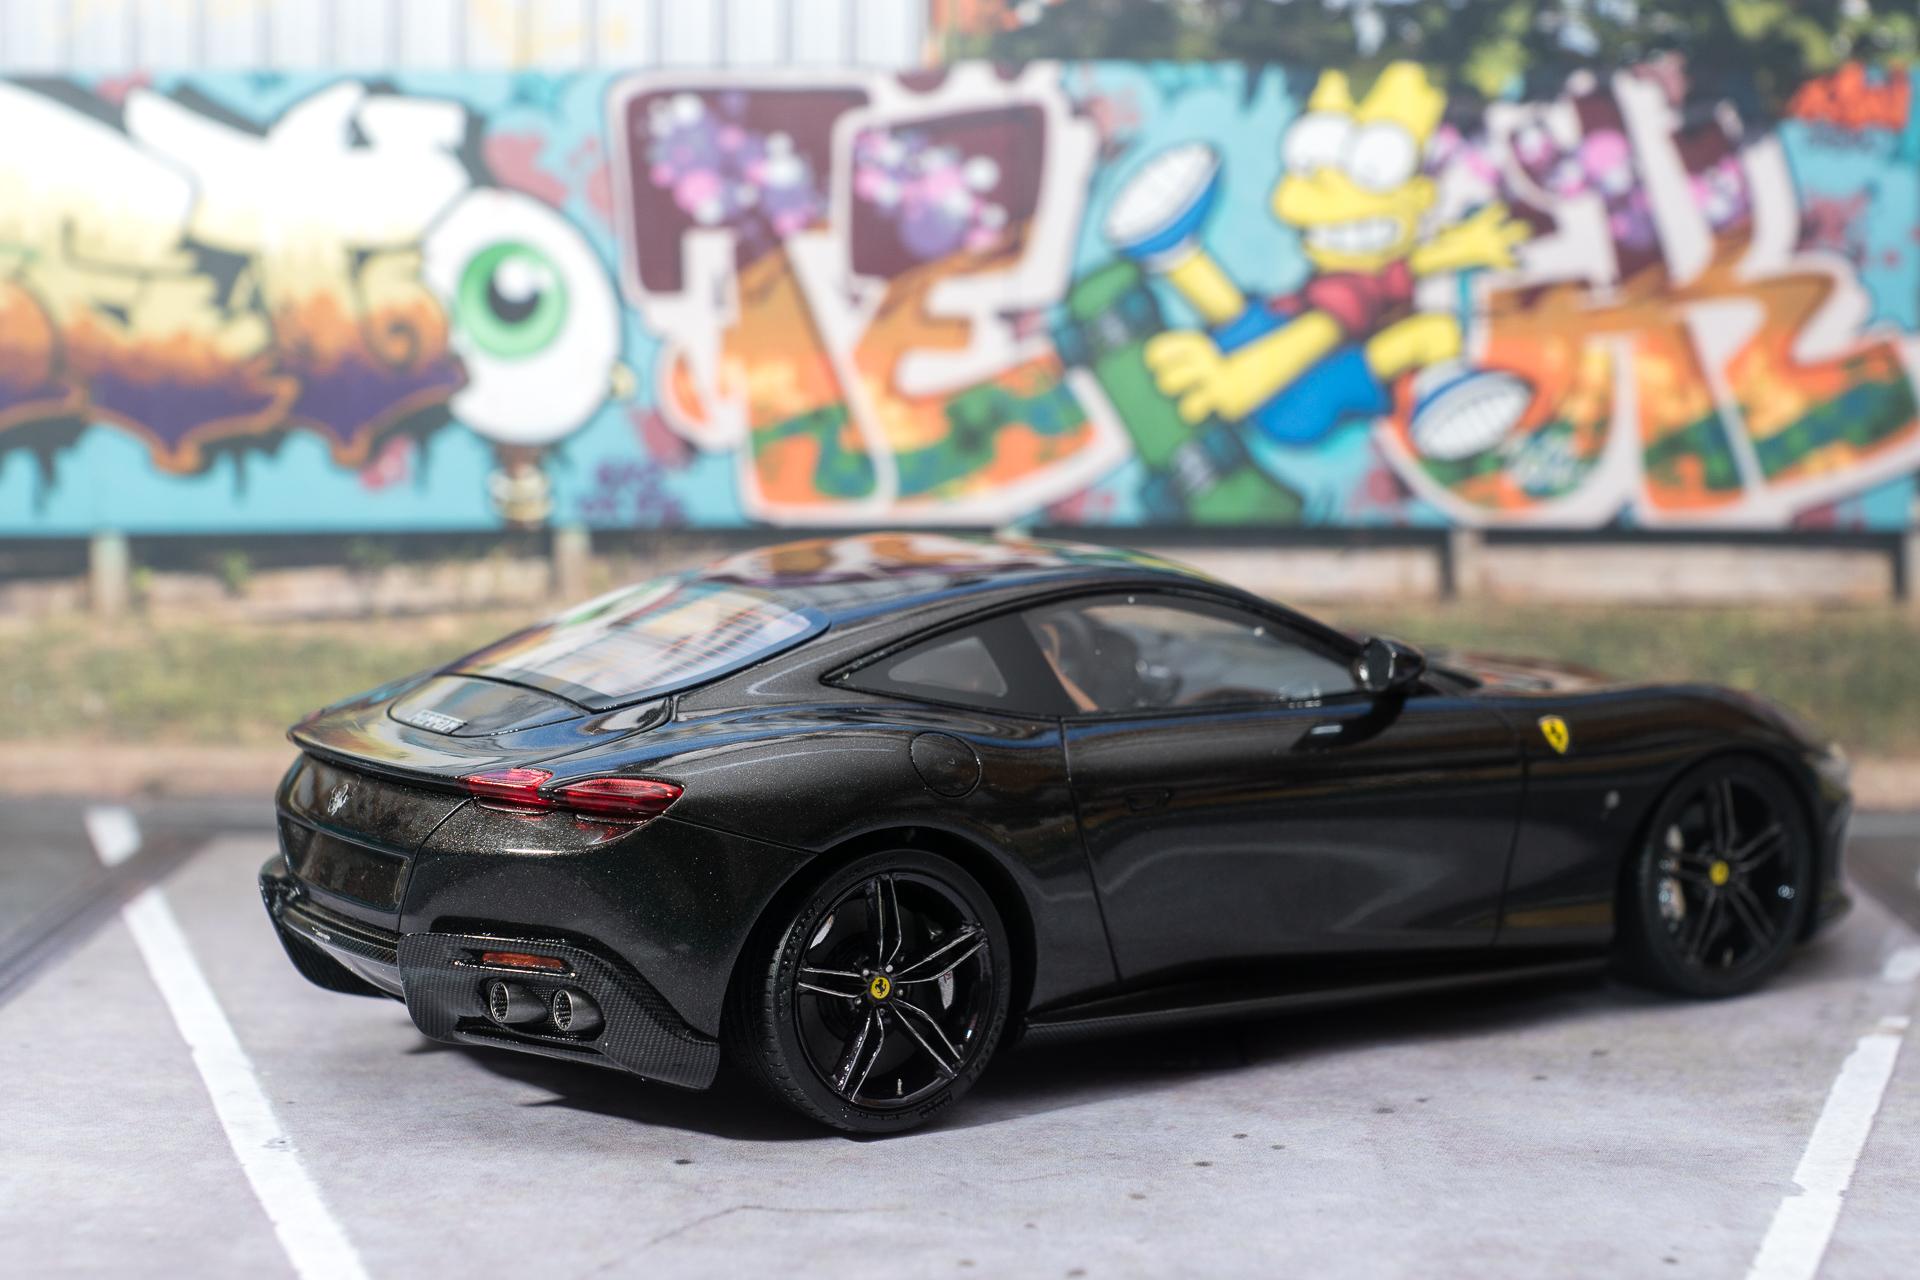
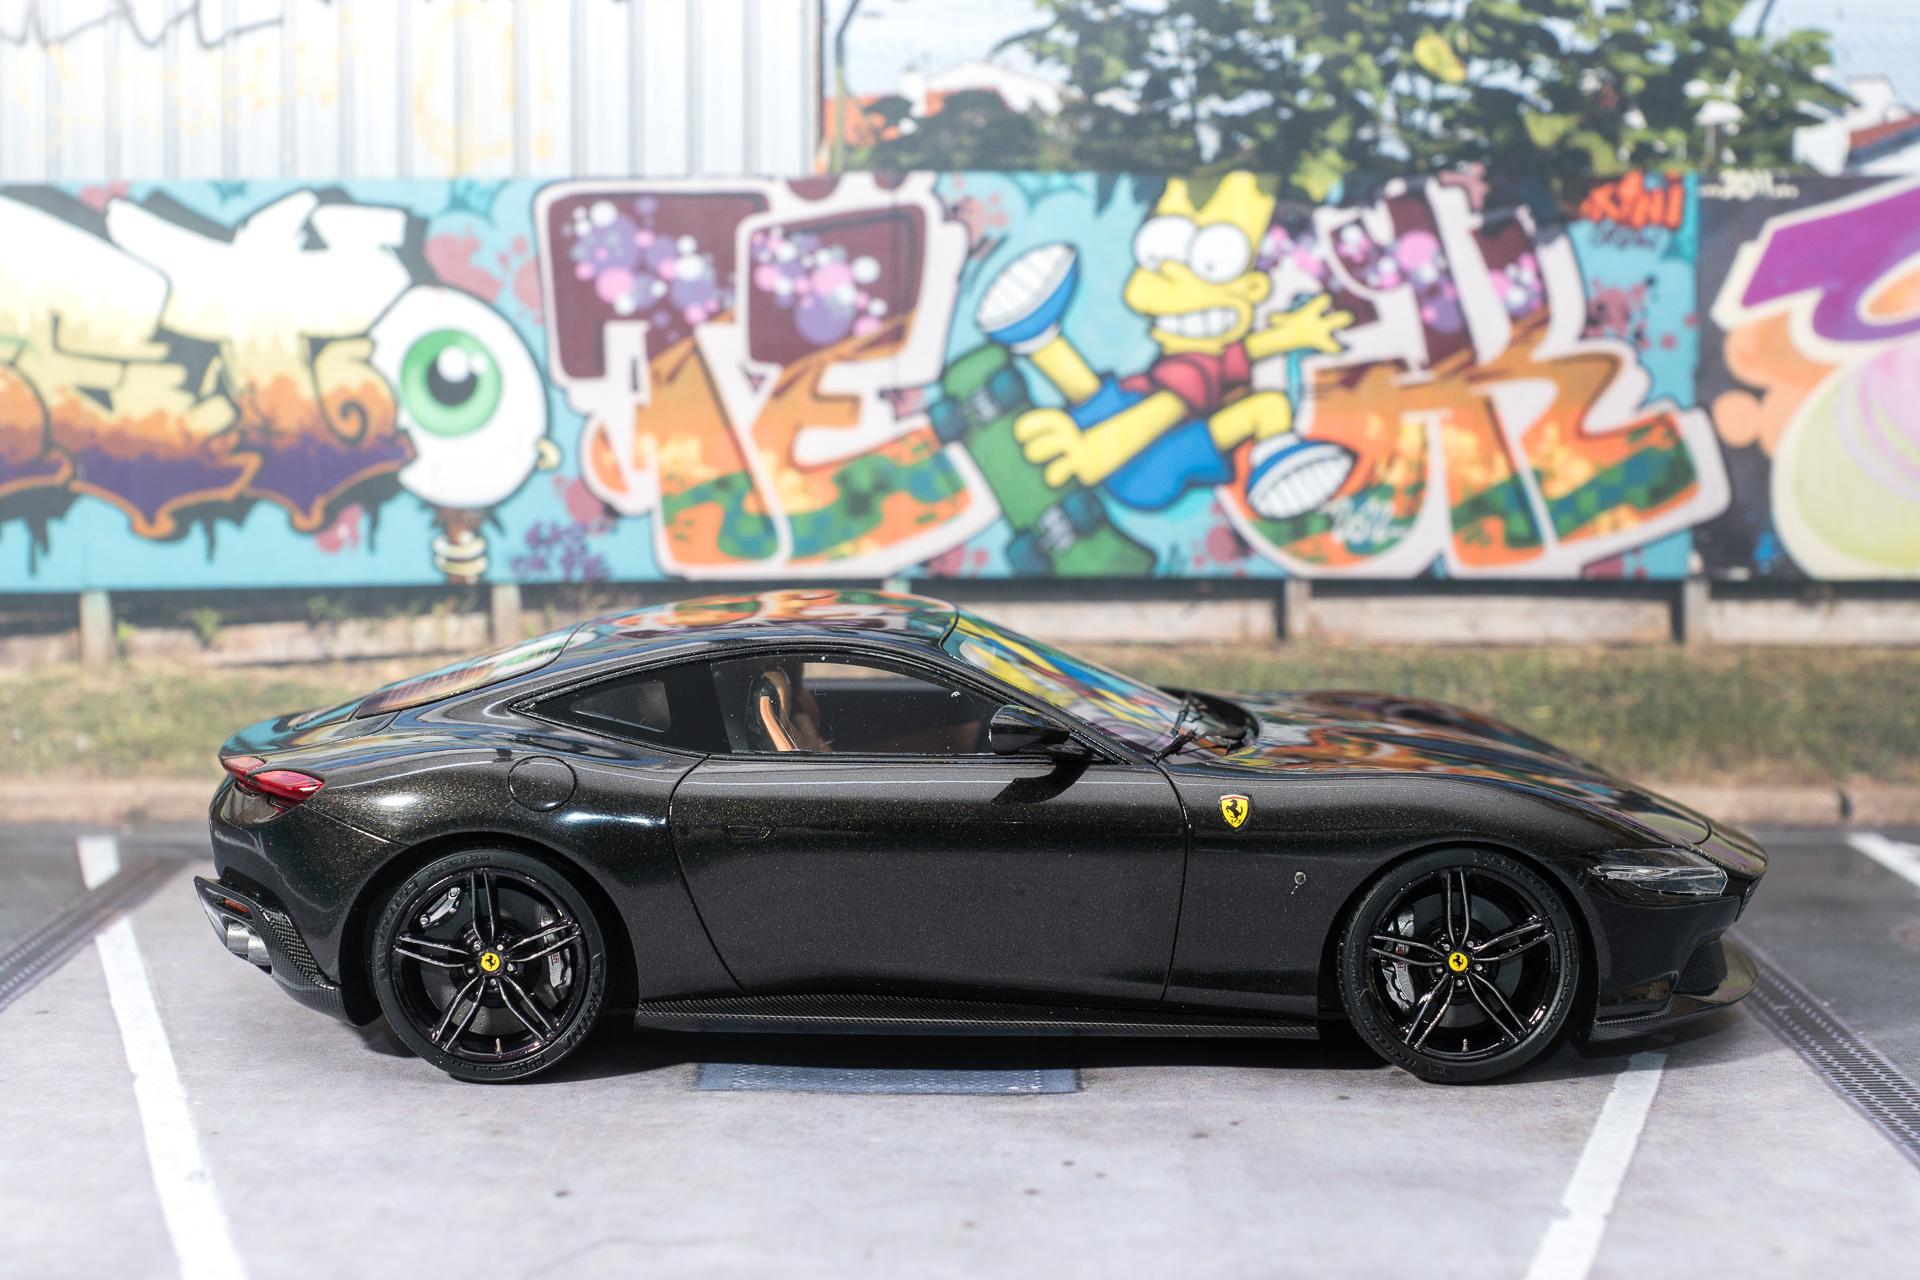
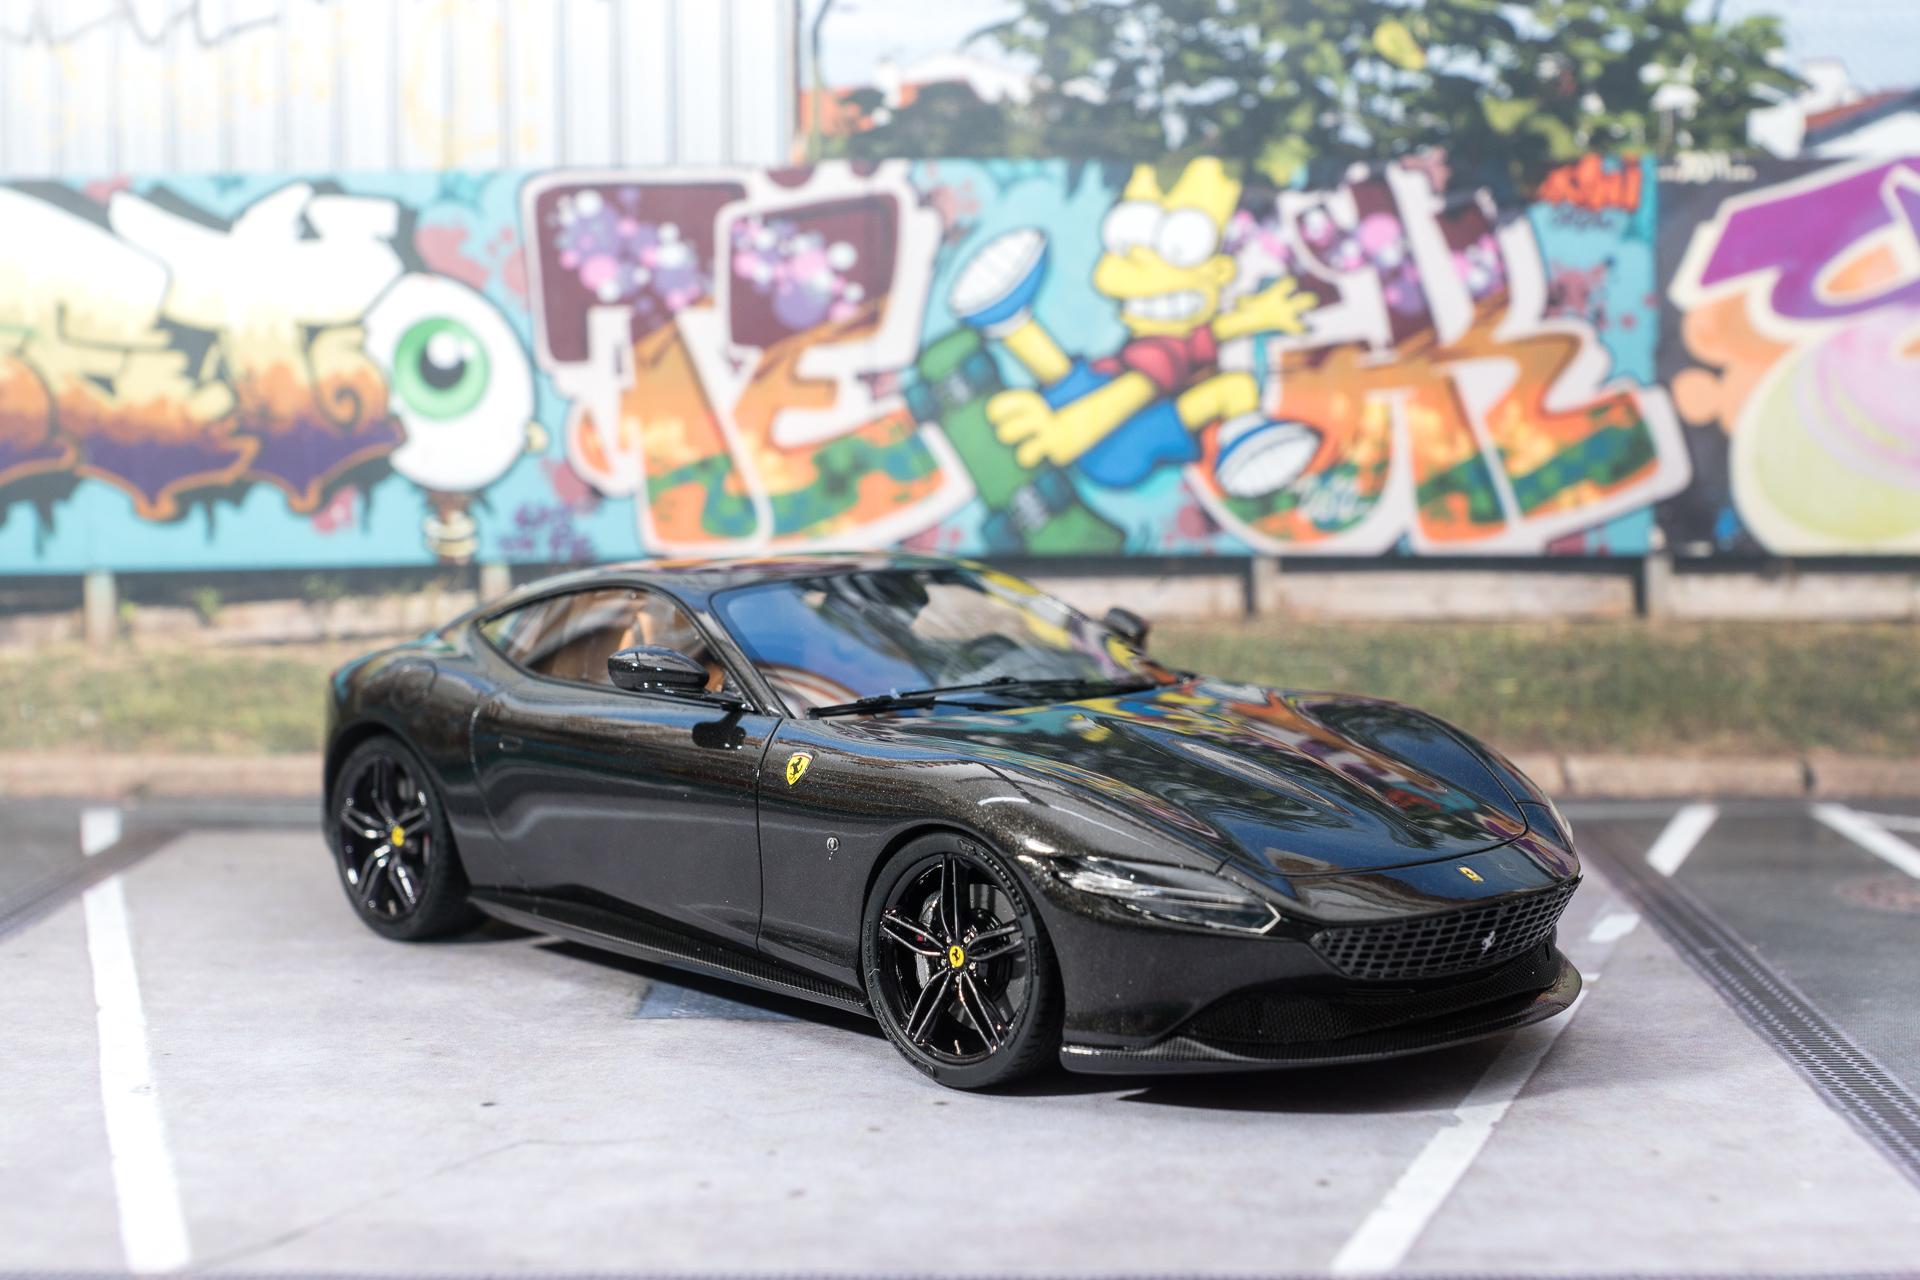
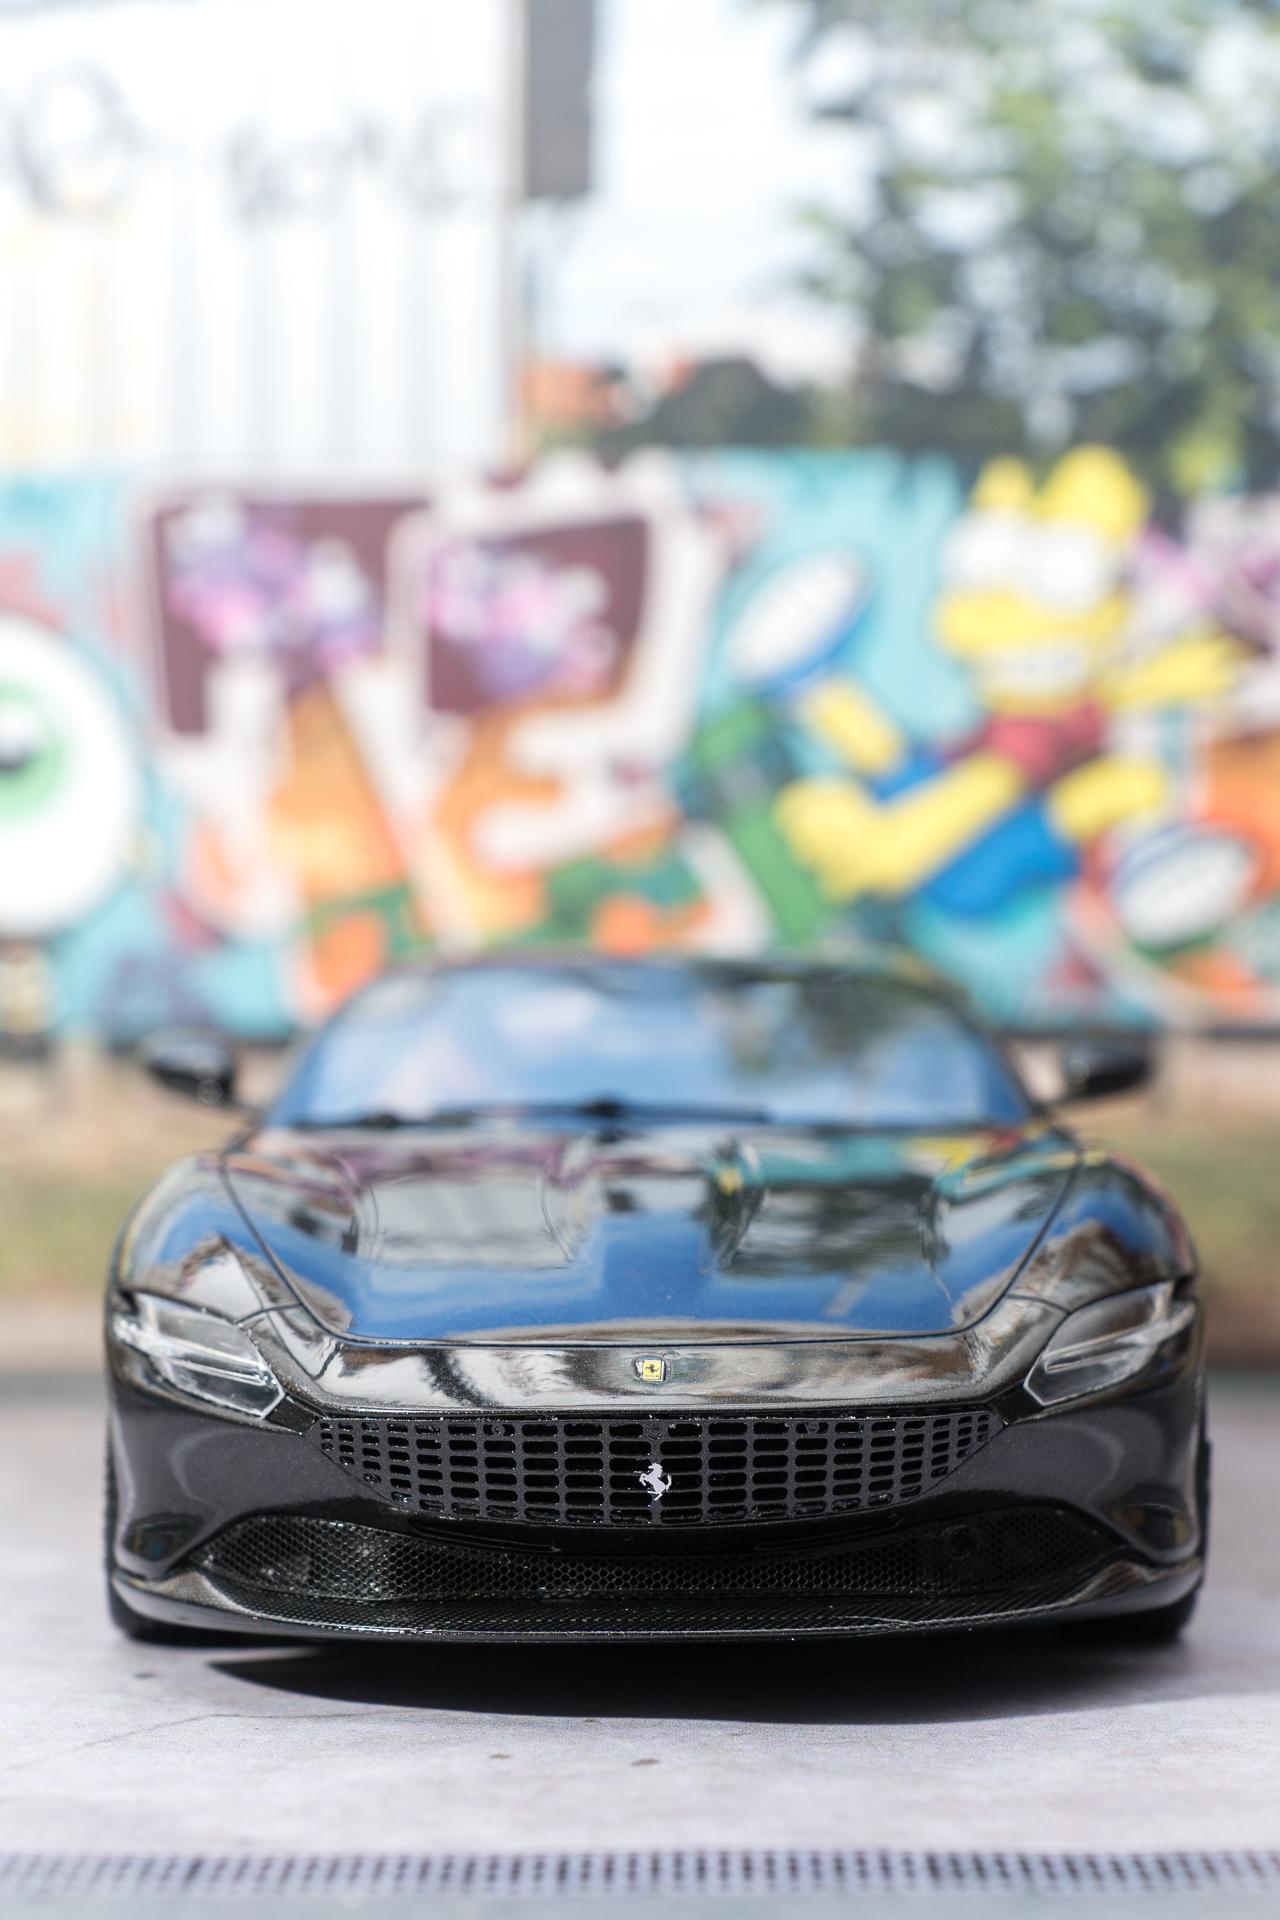
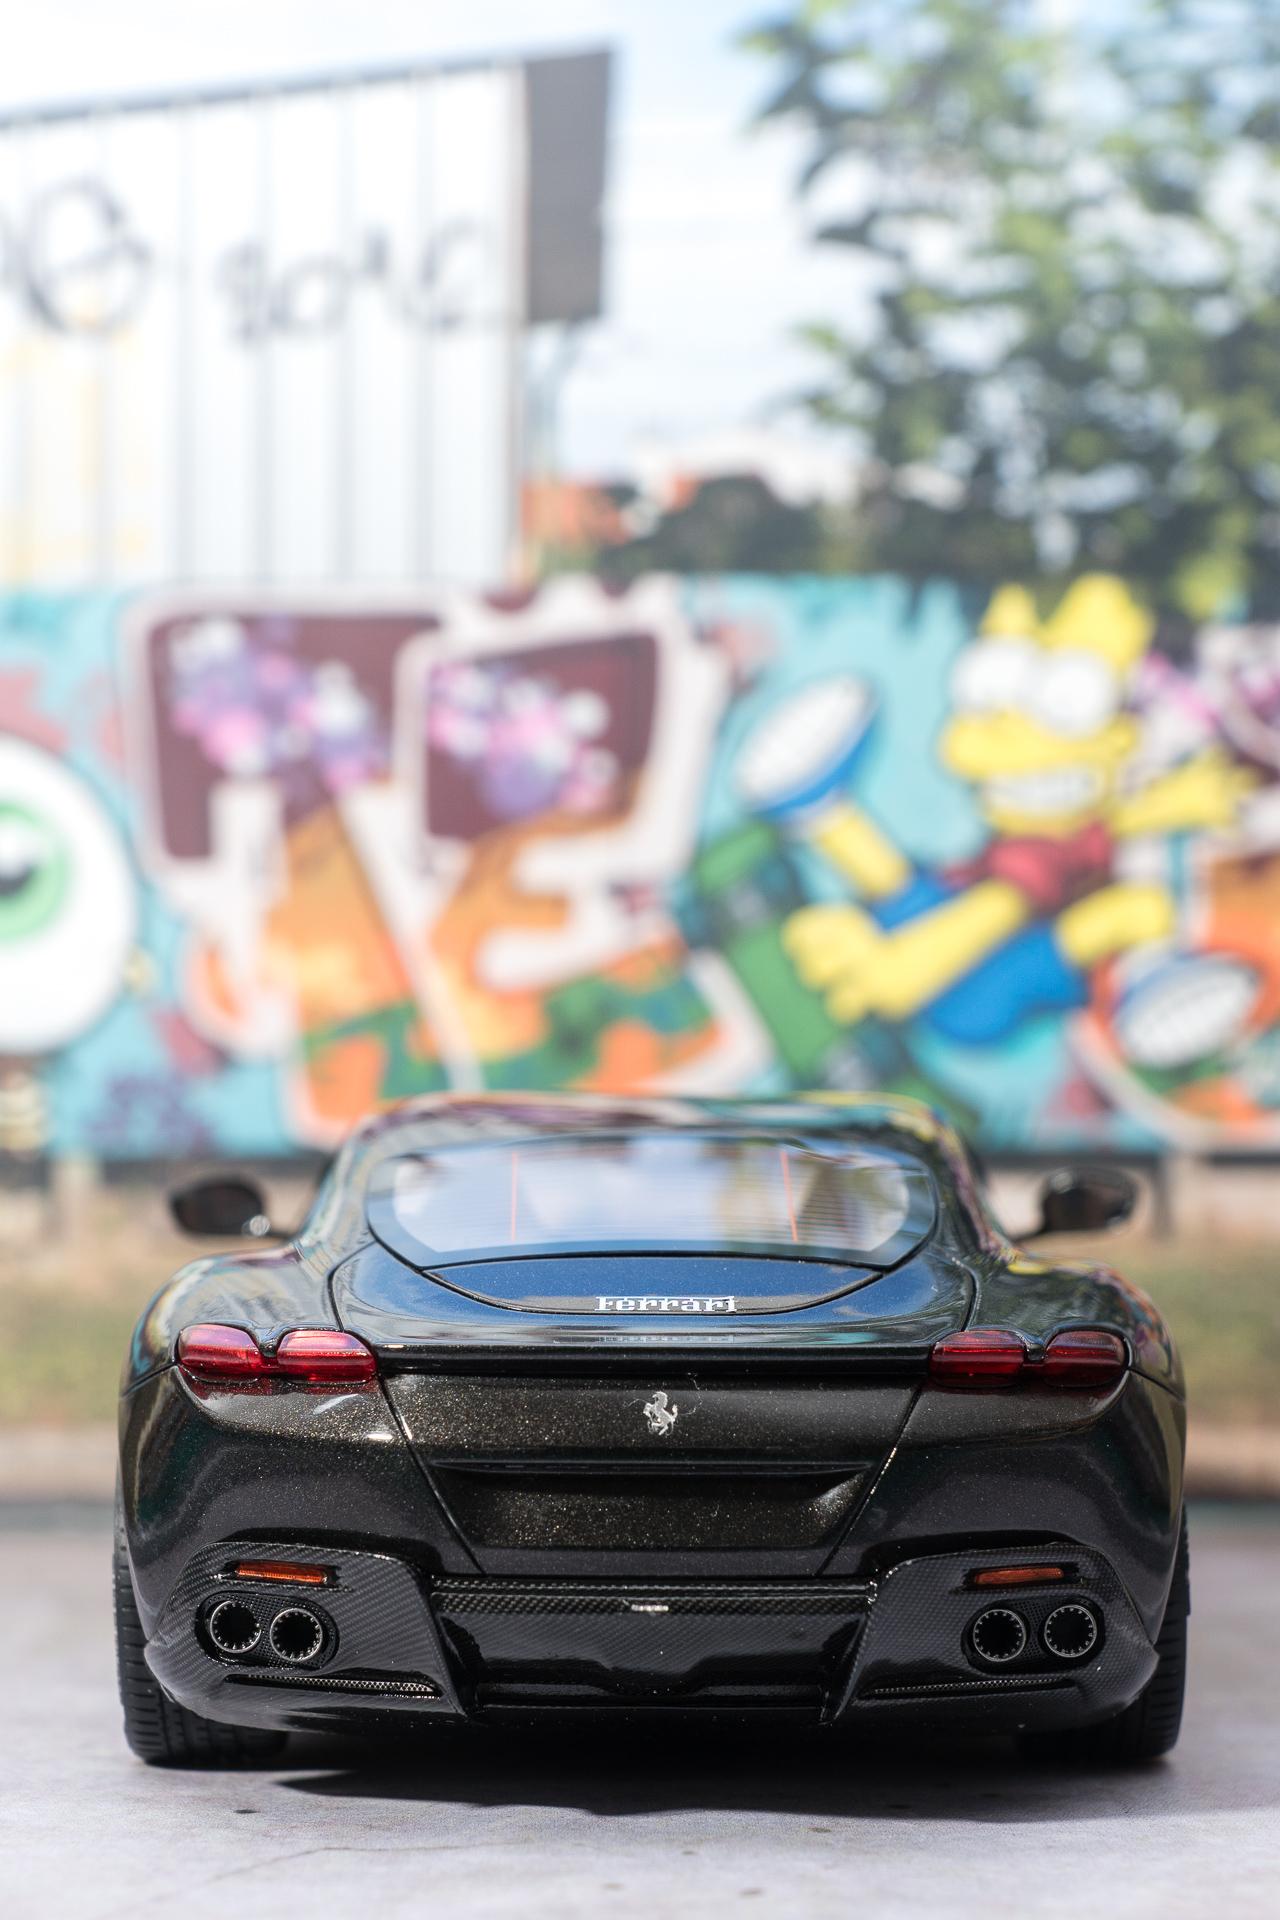
Hi all Thank you very much for all your kind comments As I mentioned in my last update on Good Friday, there was a relatively high probability that I would be able to finish the Roma over Easter. In fact, I was able to fit the last parts this afternoon and complete the build. The assembly was actually quite relaxed from A to Z and was a lot of fun. The only exceptions were (as usual for me with the alpha model kits) the windshield wipers, where I still haven't found a clever recipe for how to assemble them, and the underbody. However, the problems with the underbody were self-inflicted, so I should have known better. Traditionally, the underbody of the alpha model kits is attached with screws. Just as traditionally, however, the holes in the body provided for this purpose are firstly too narrow and secondly too short for the screws supplied. As I'm always worried that the body might crack if I just throw the screws in, I always drill them out a little. Of course, I only think of this when the underbody needs to be attached, i.e. at the very end. One of the last things I did today was to widen the holes and fit the underbody. While drilling, I kept removing the chips from the drill bit and blowing away the loose ones. After the car was back on its wheels, I noticed drilling residues on the windshield, so I took the anti-static brush to wipe them away and found that they couldn't be wiped away because they had somehow gotten into the interior and were stuck to the inside of the windshield... ? I didn't dare to wipe the window again, so now I have to live with the yellow resin residues lying around in the interior... But enough talk, here are the pictures of the finished Ferrari Roma. As usual, better ones will follow the next time I was in the studio Urs
-
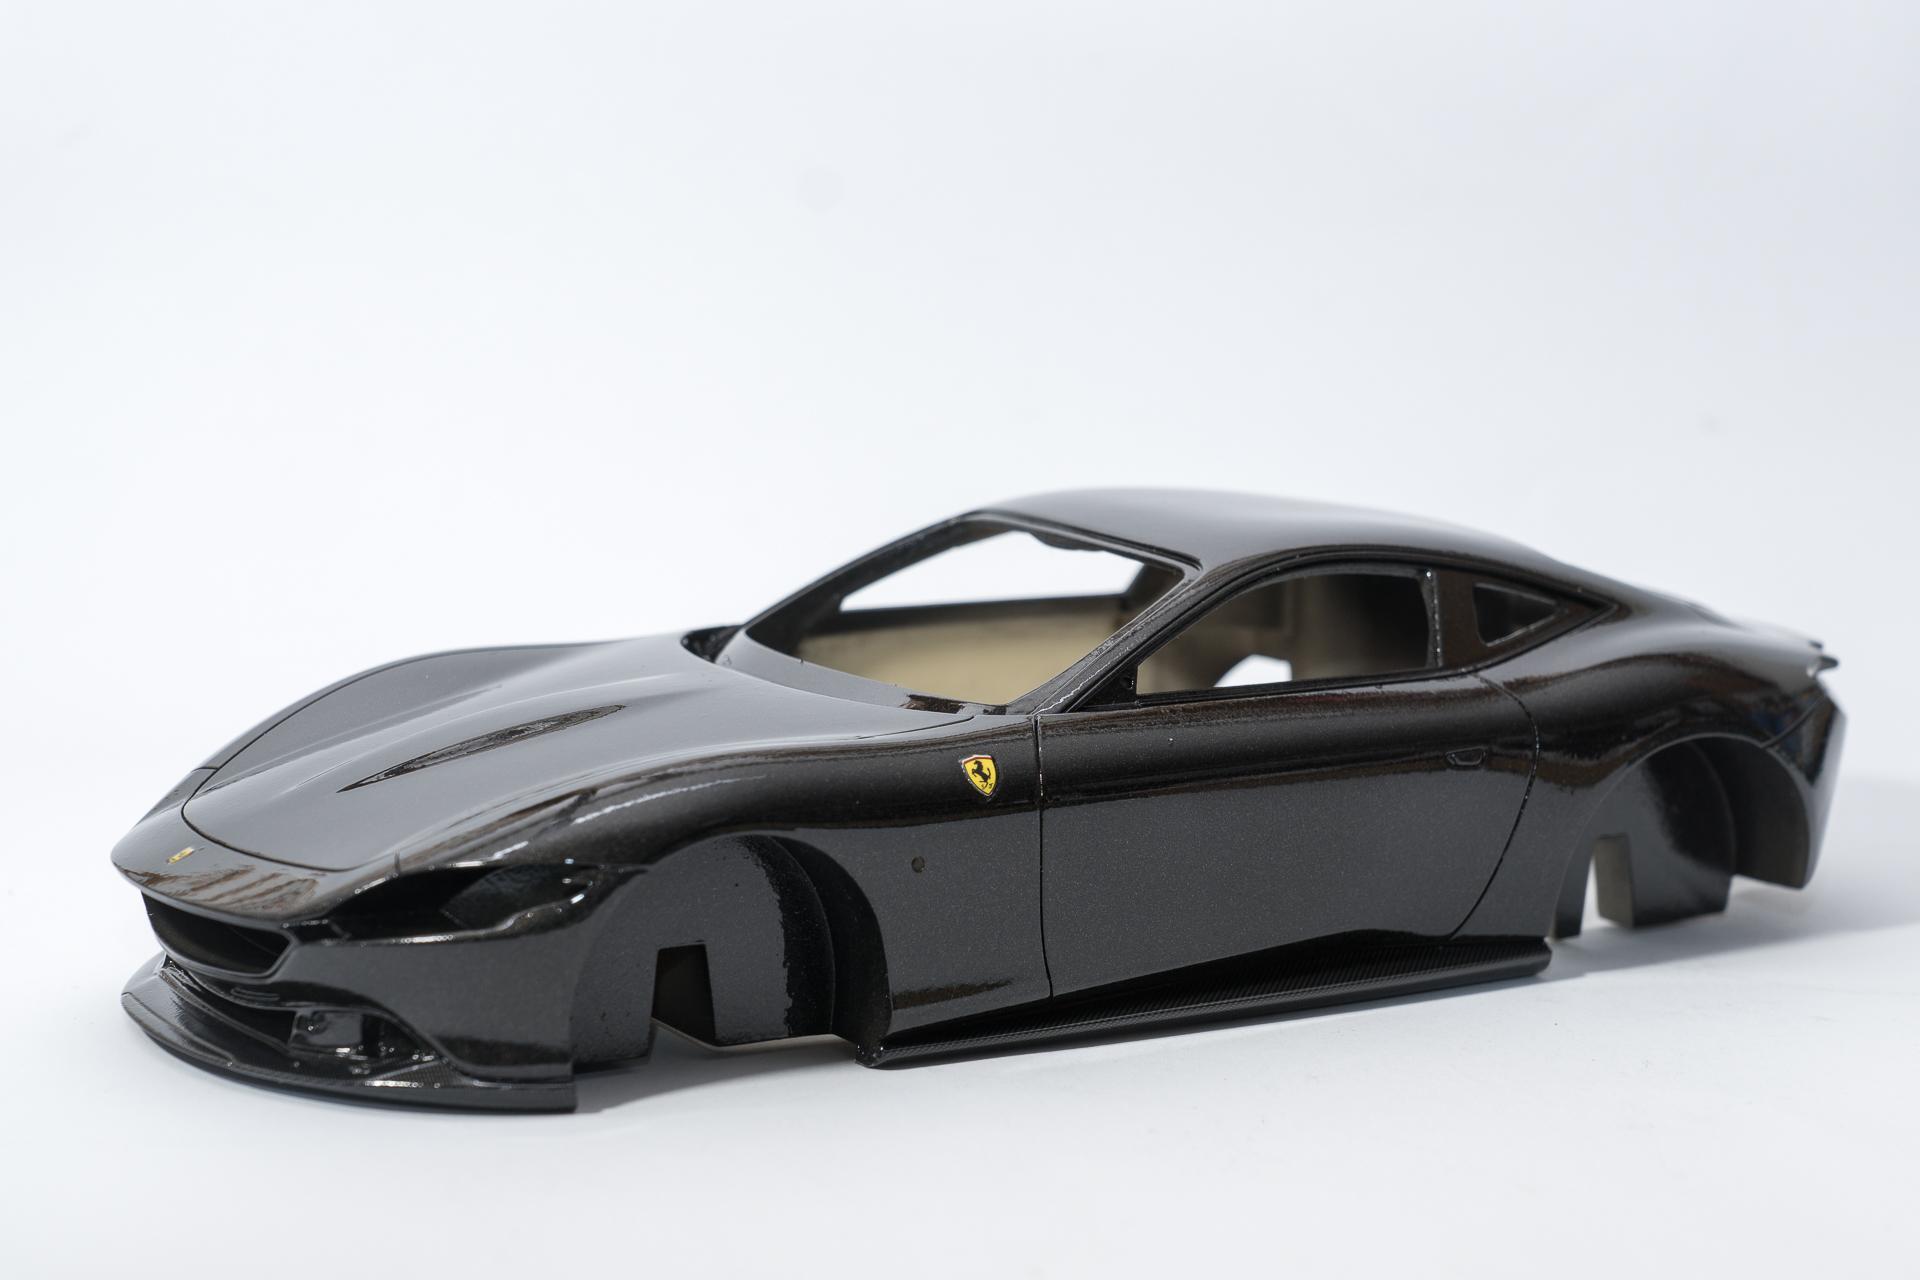
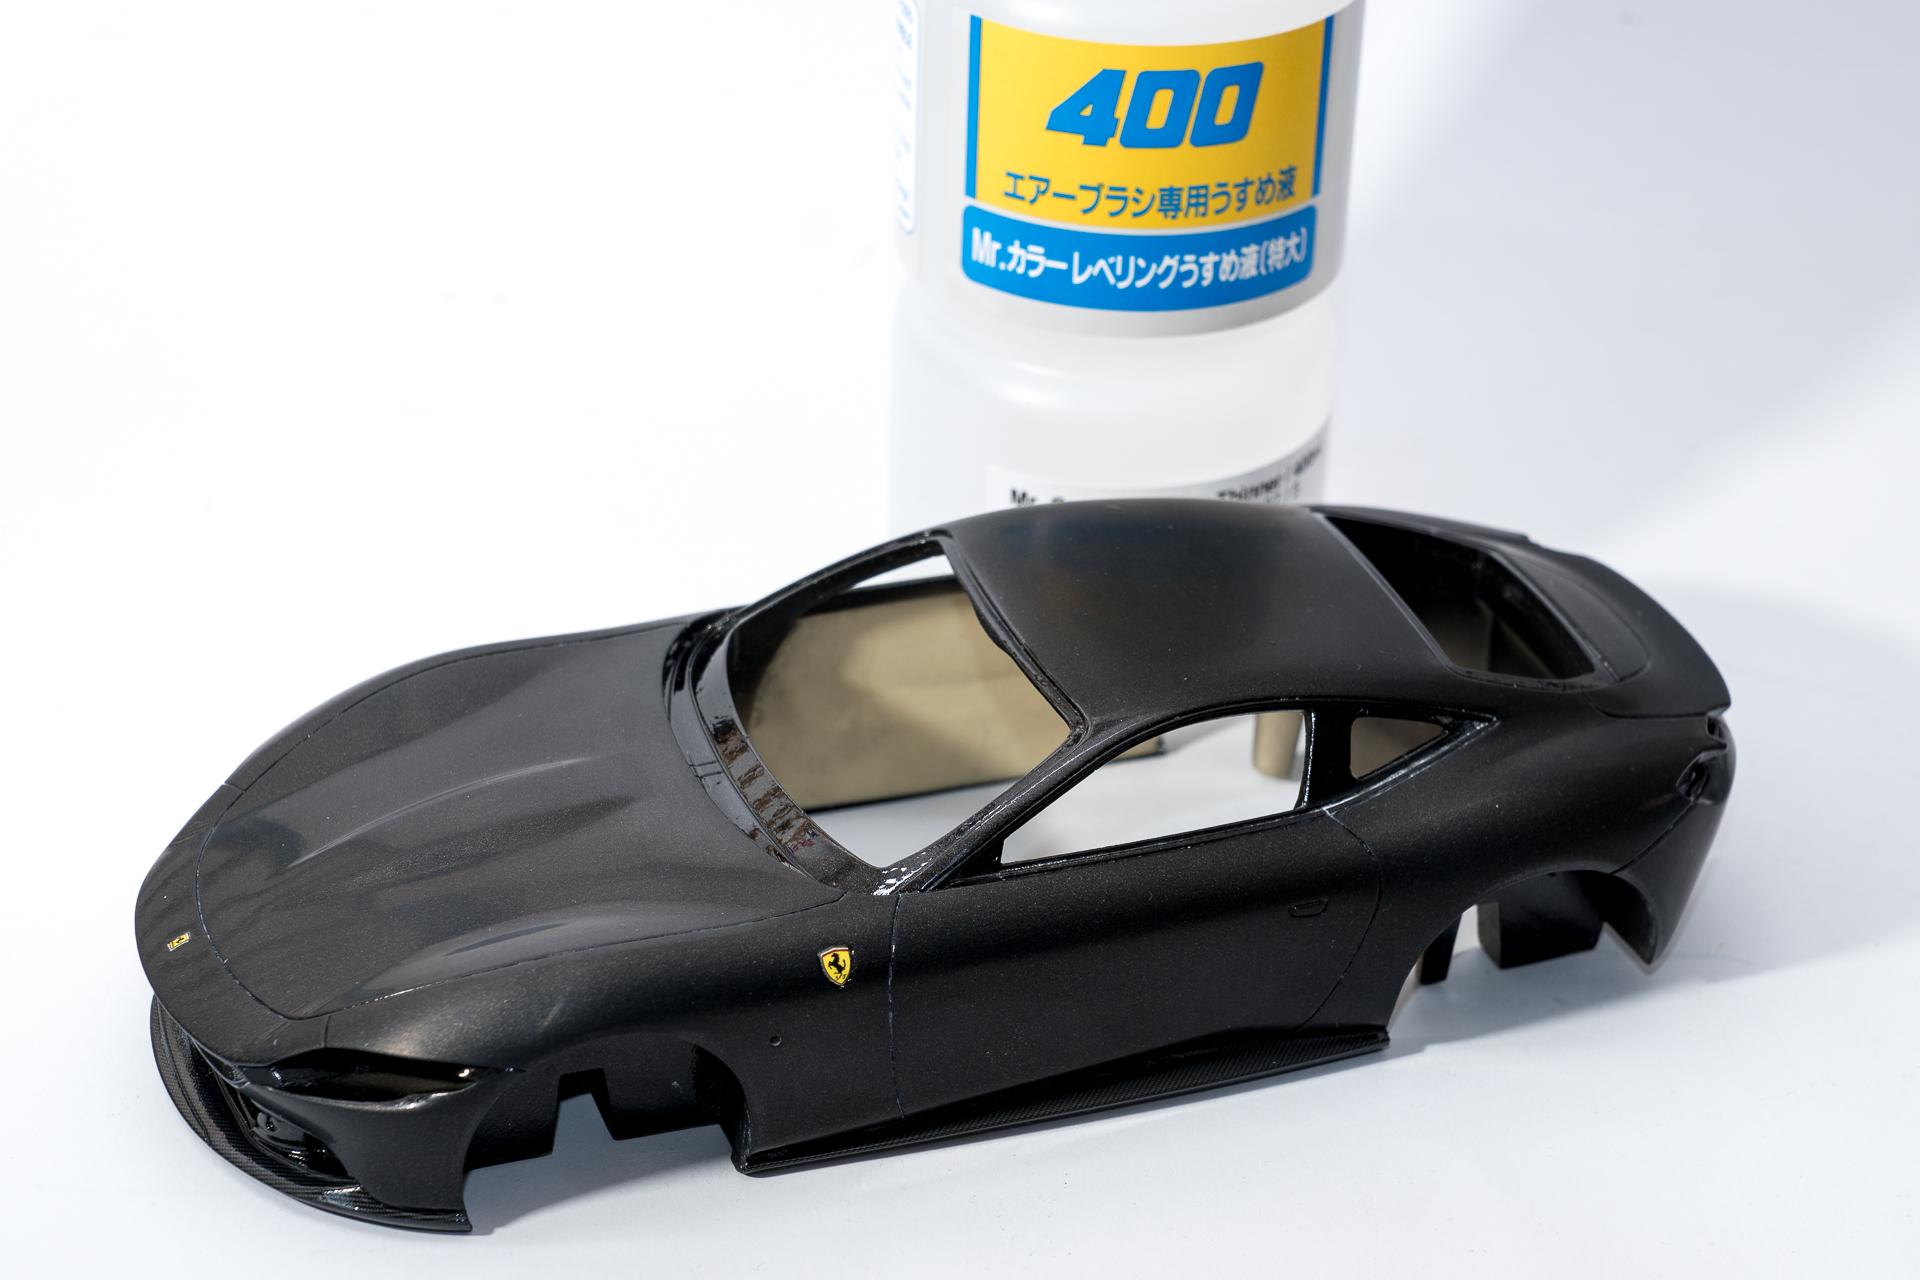
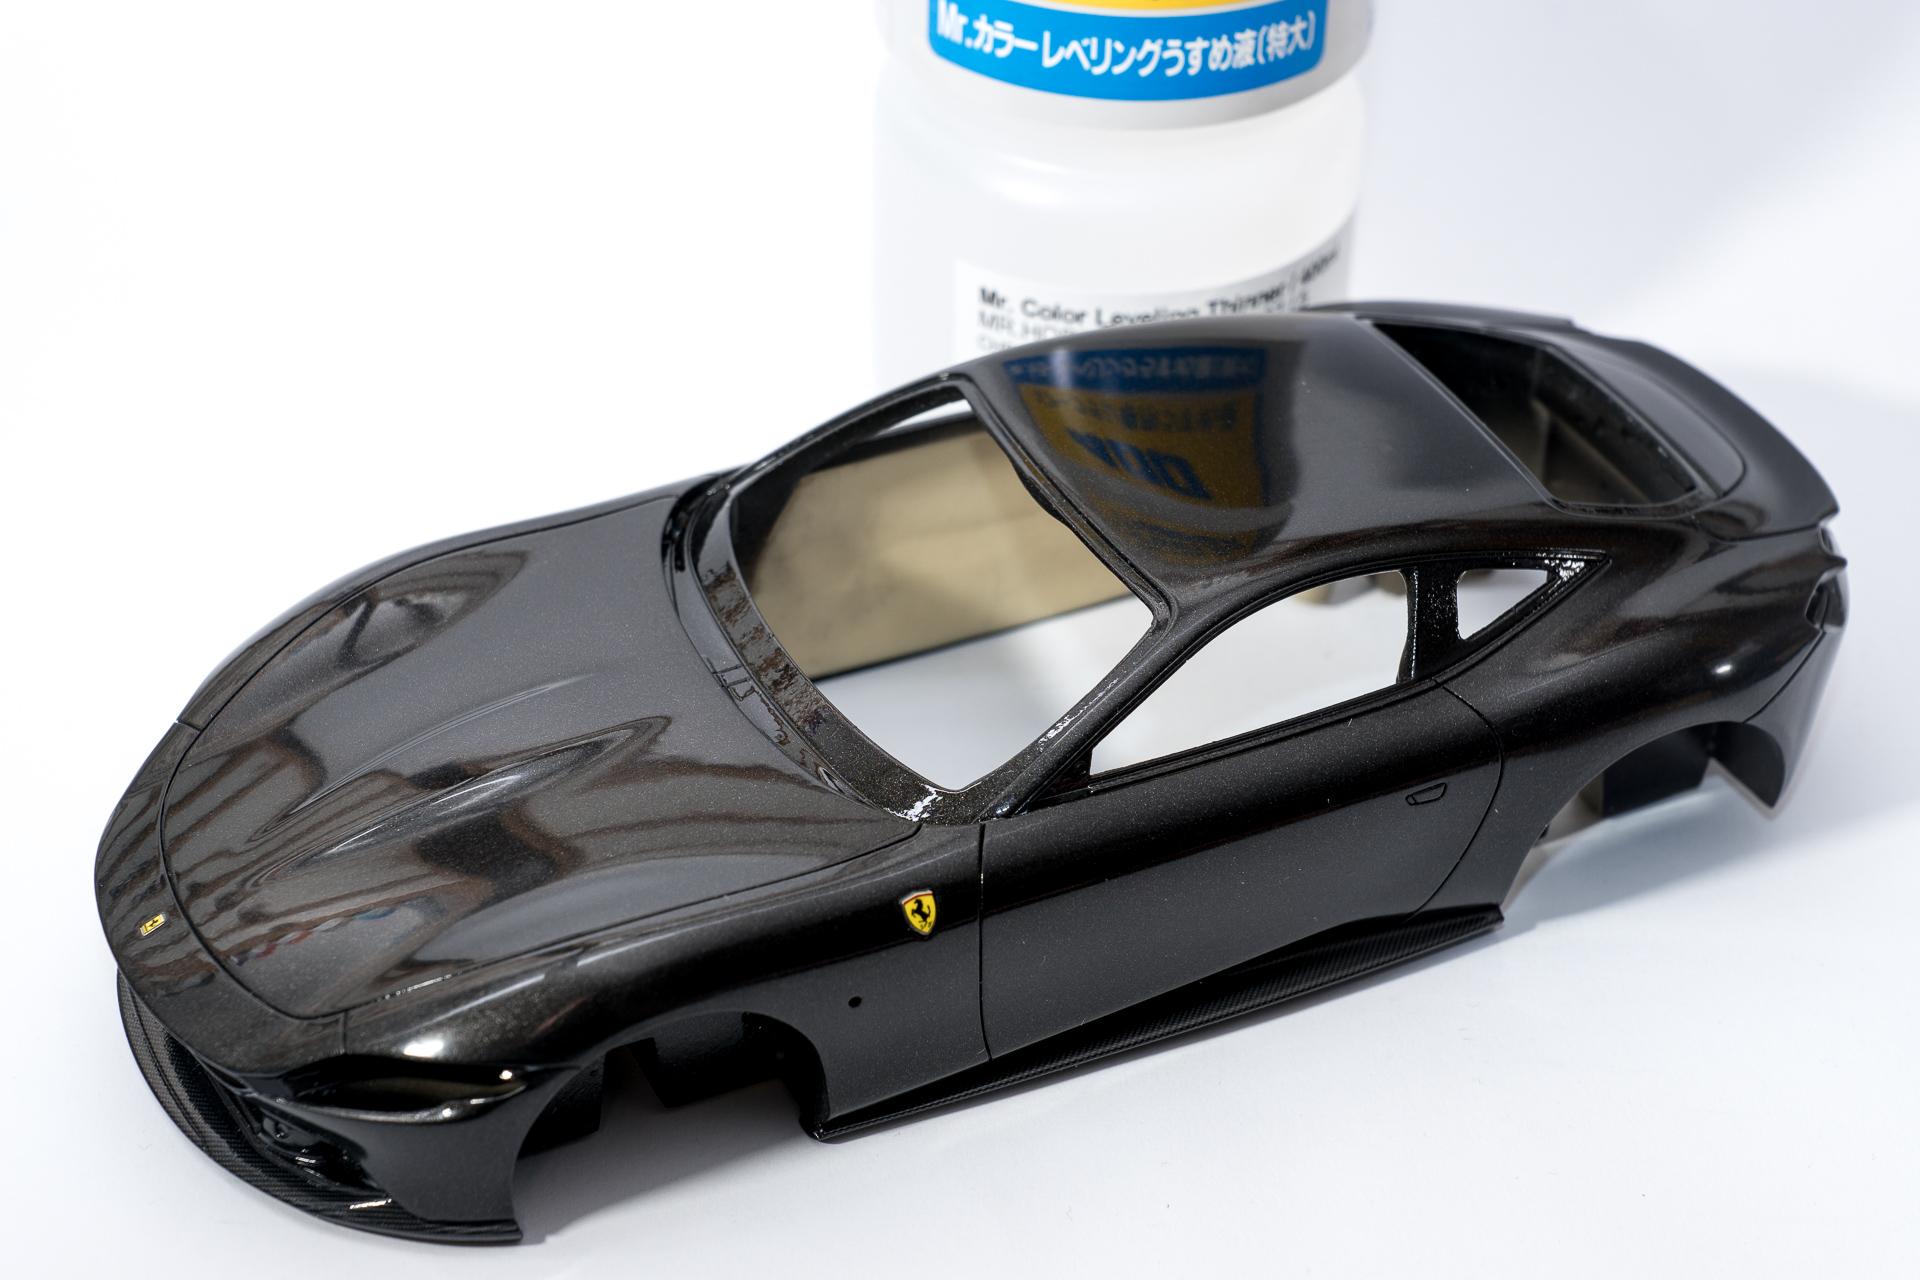
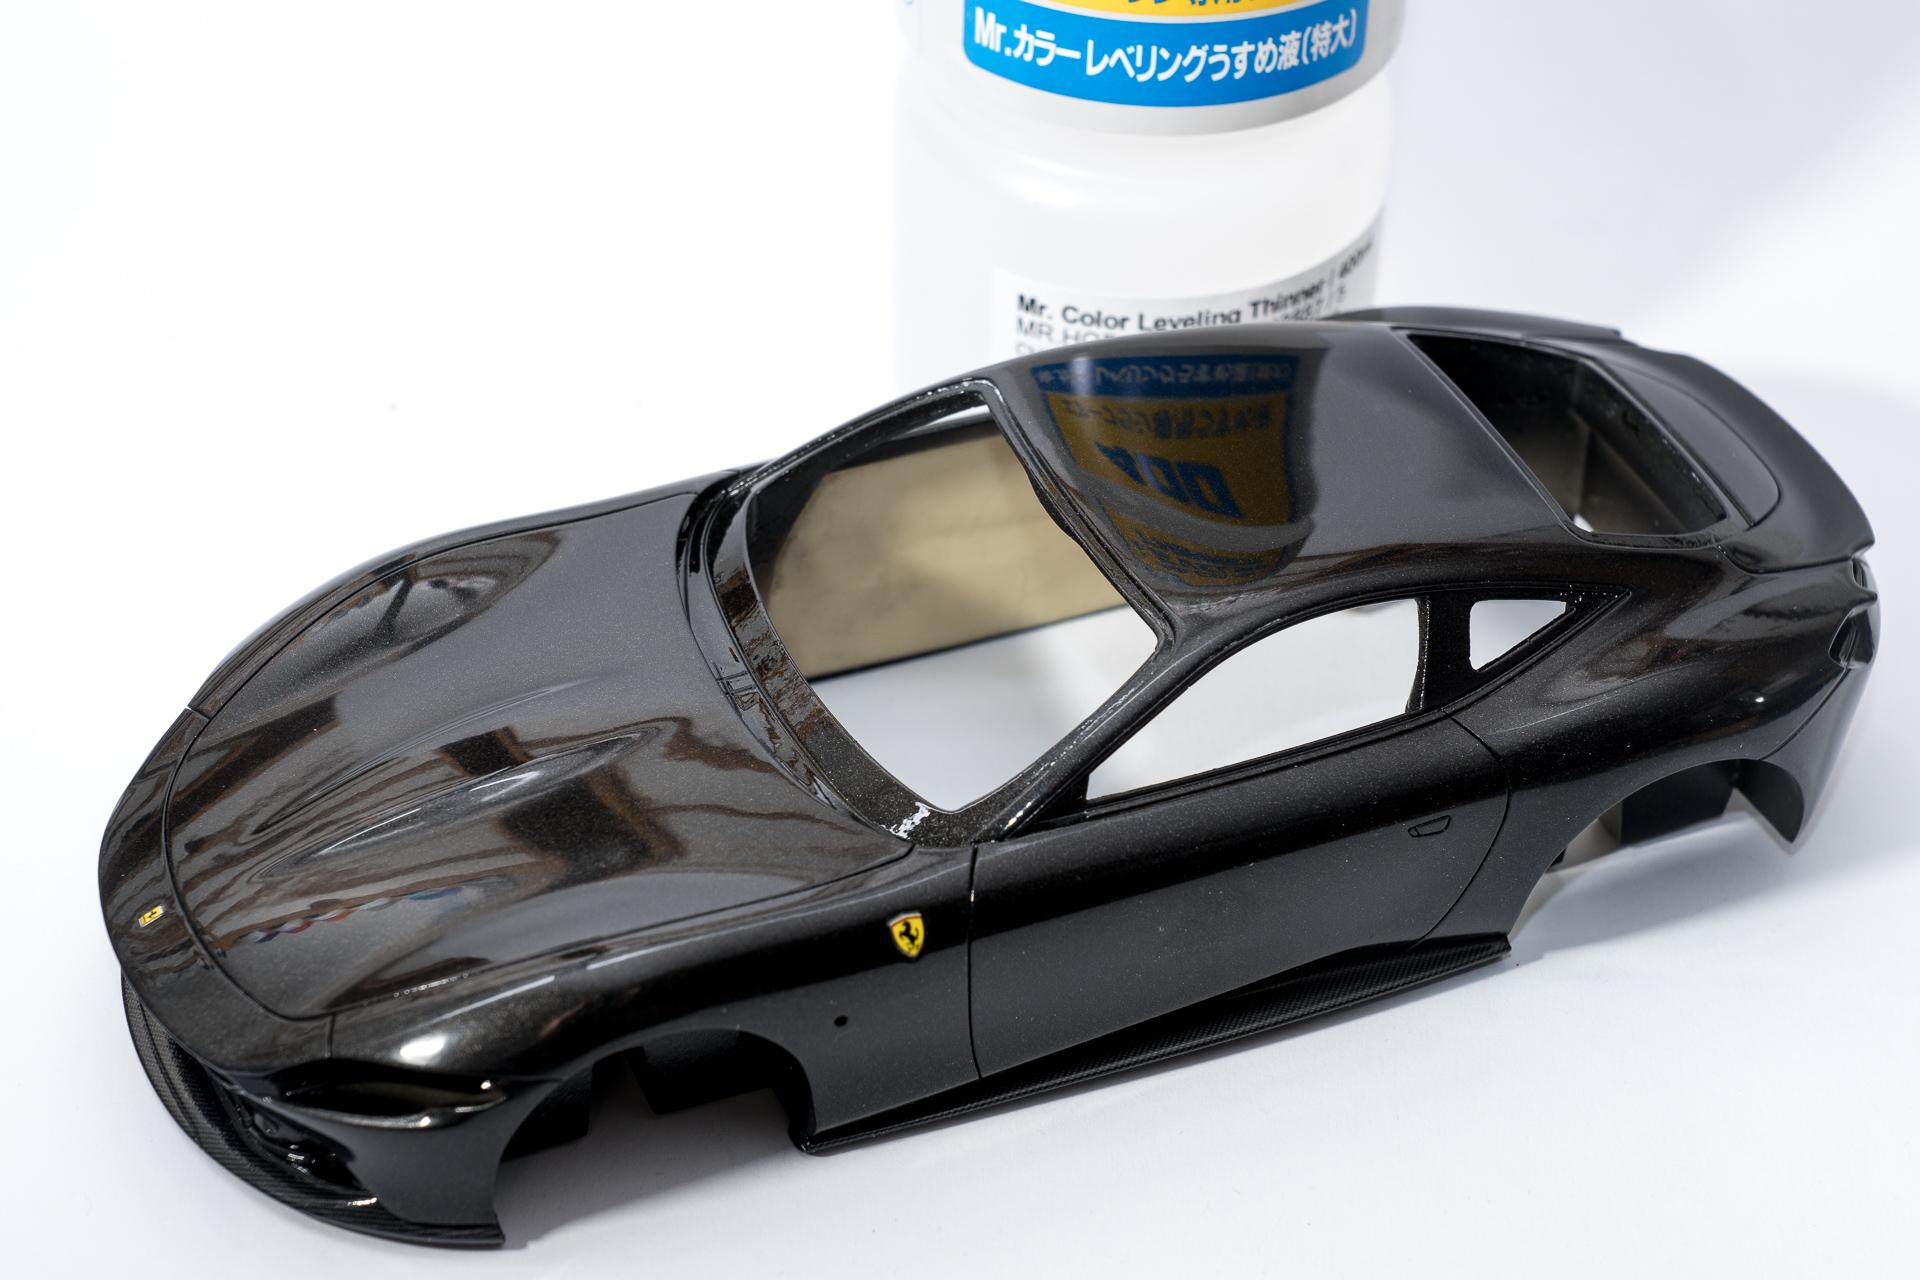
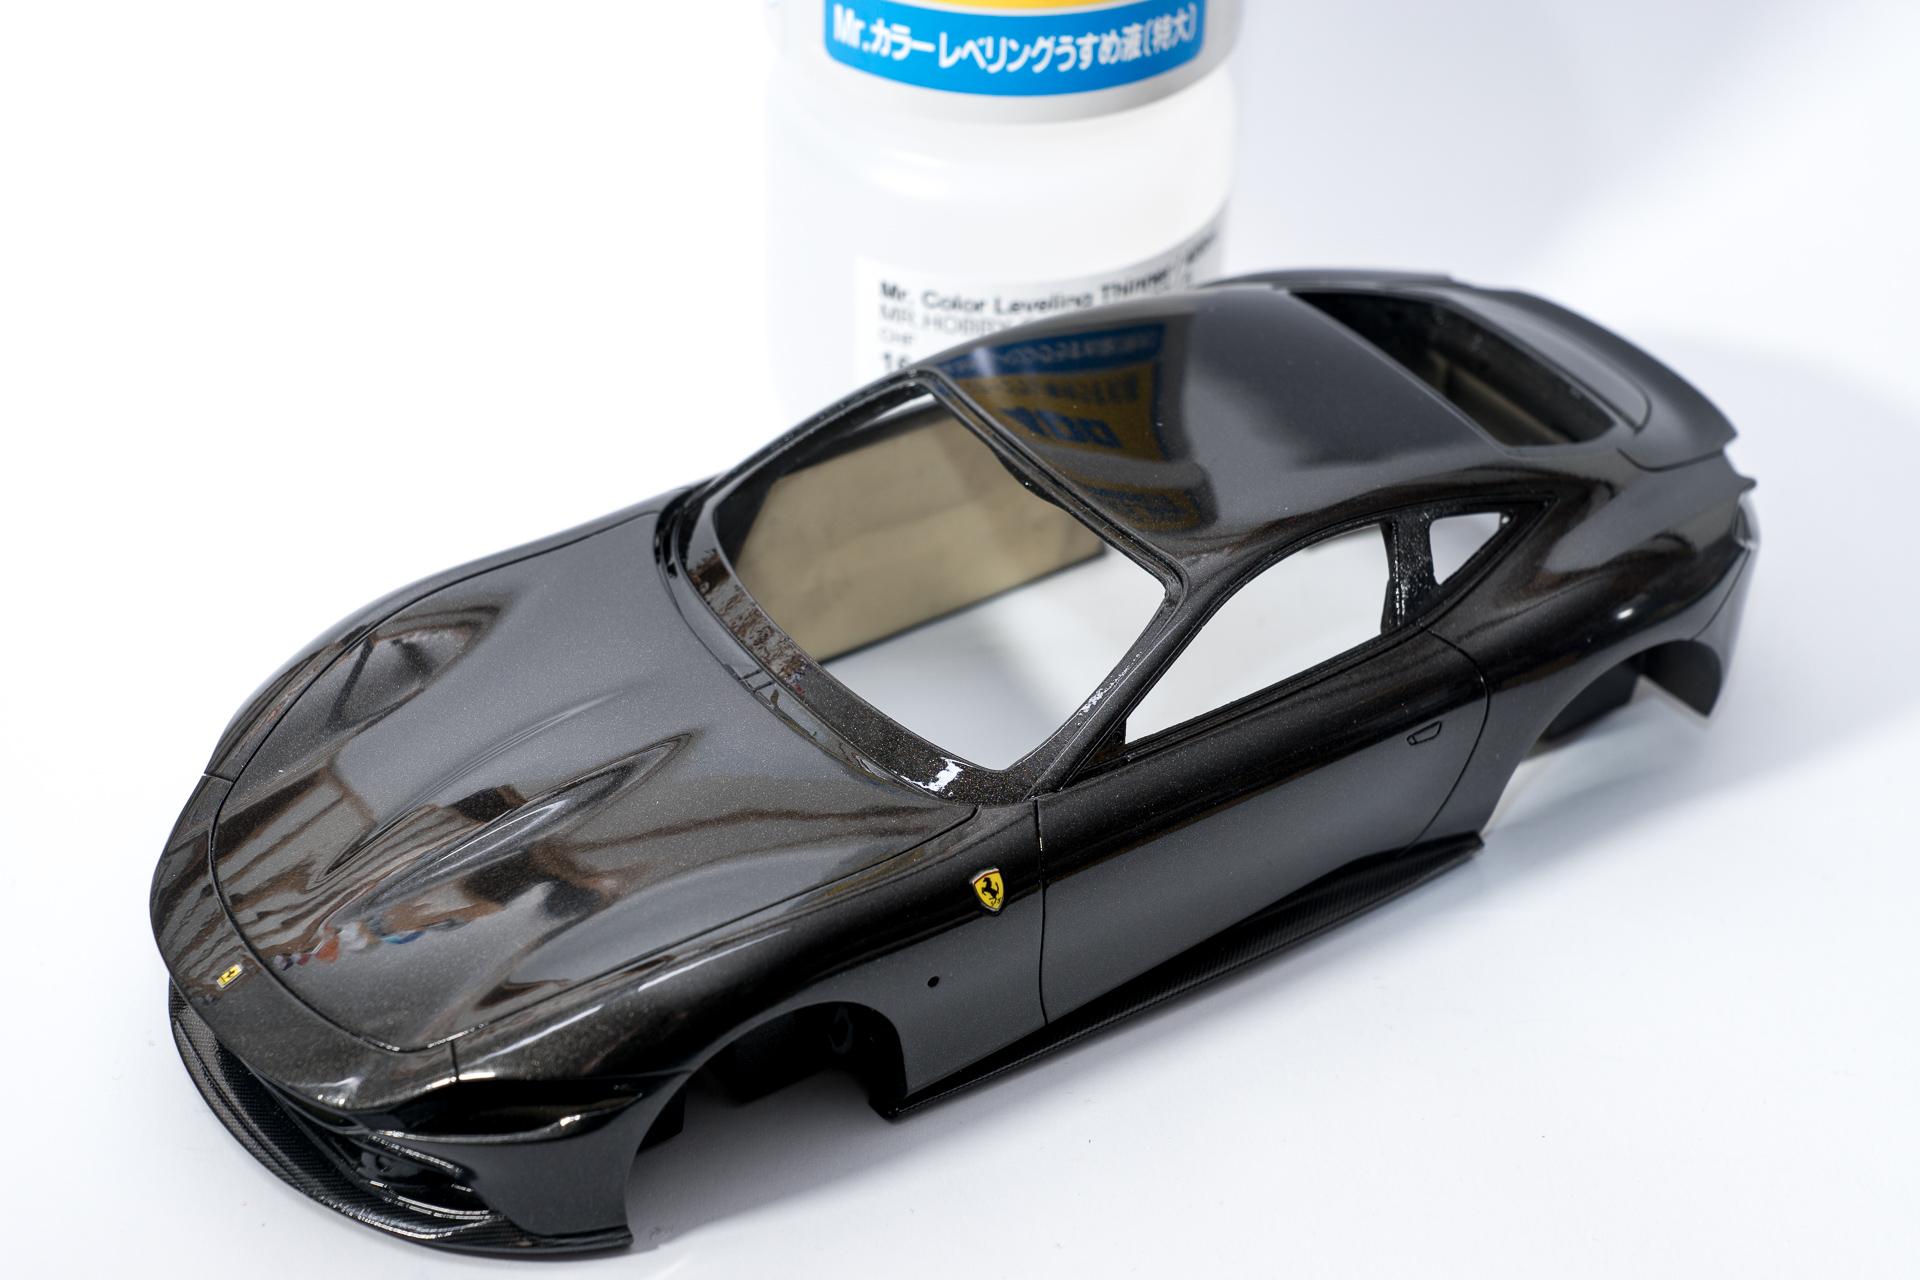
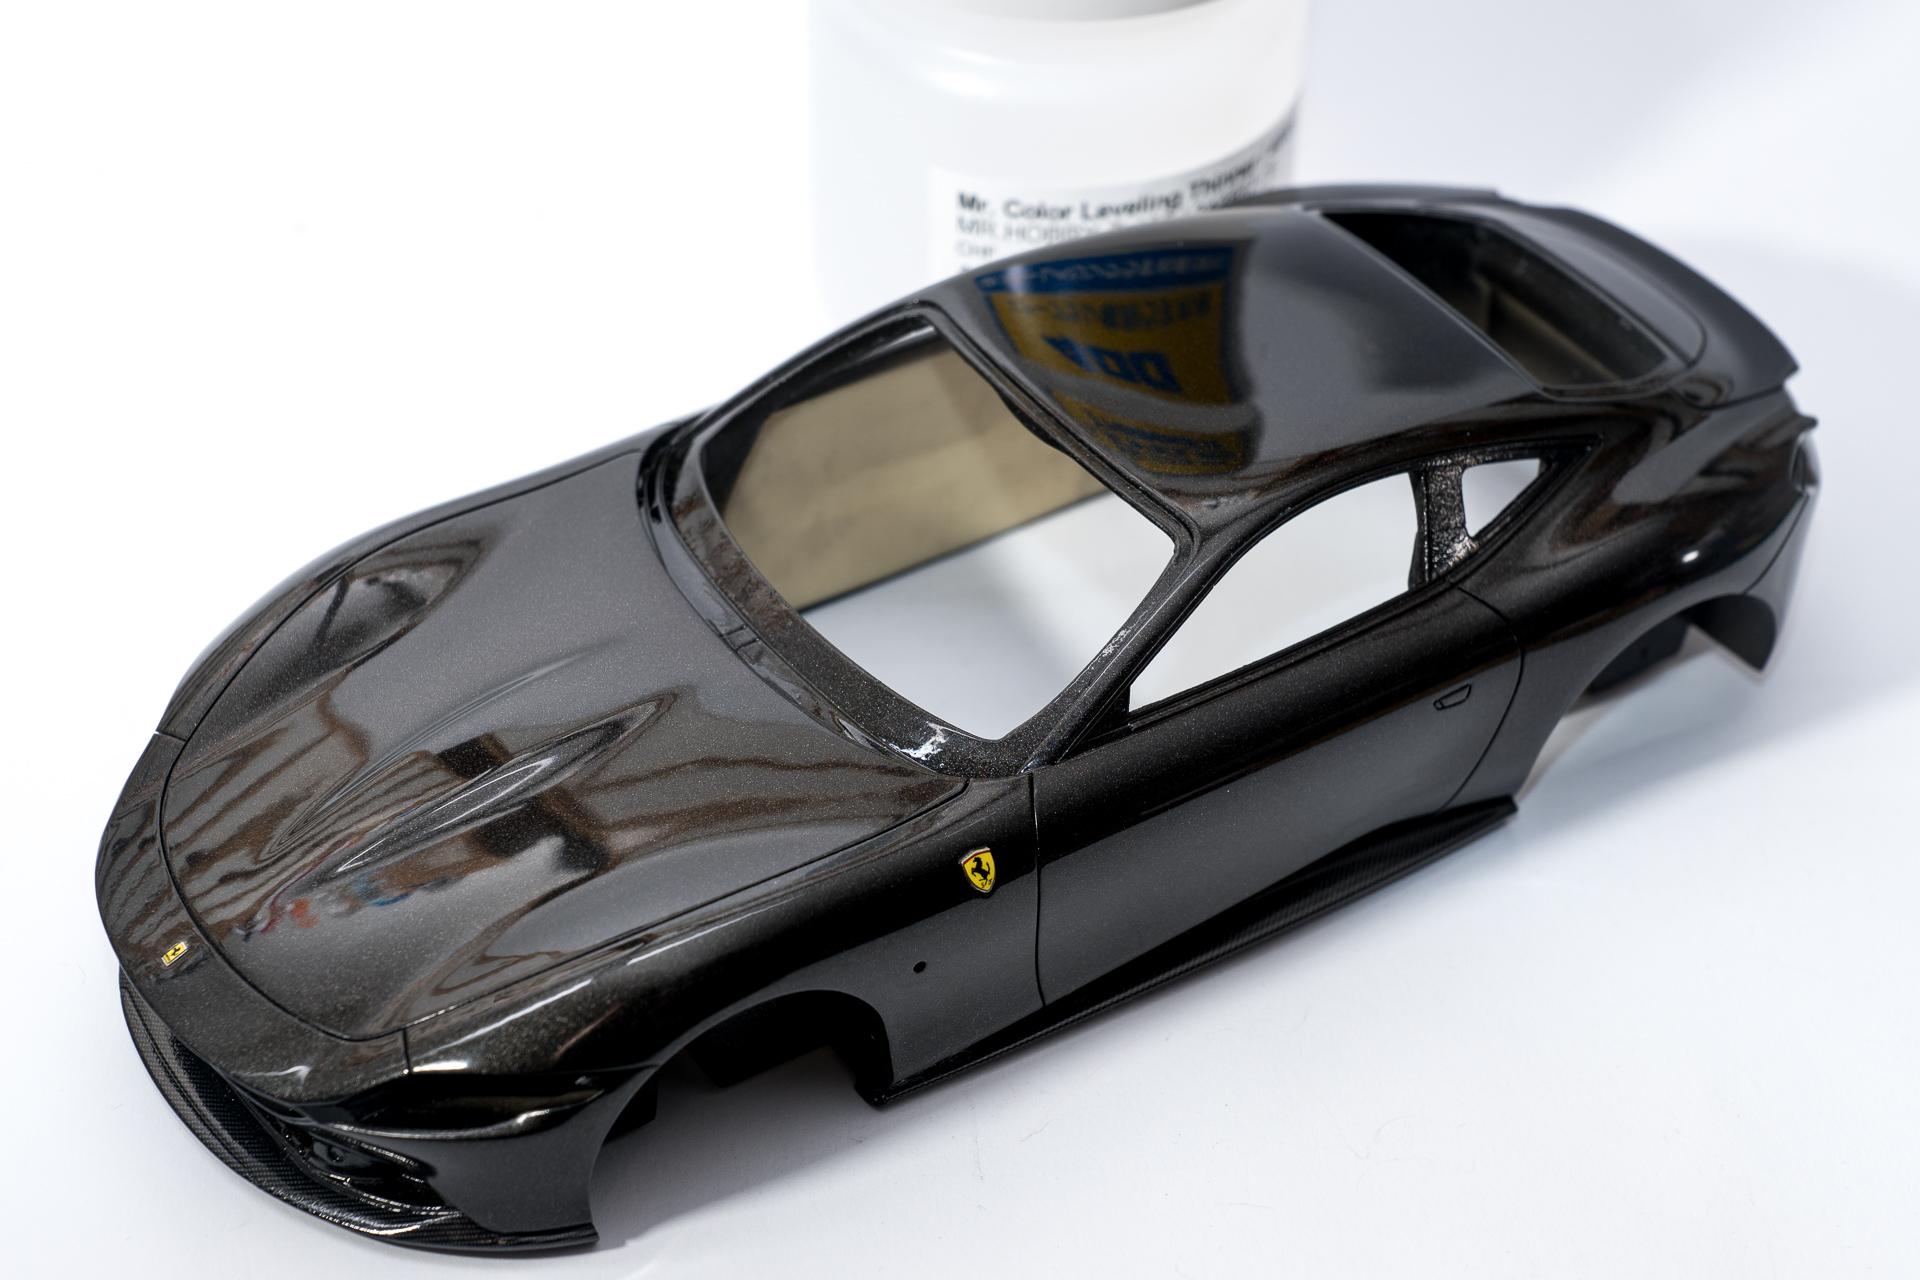
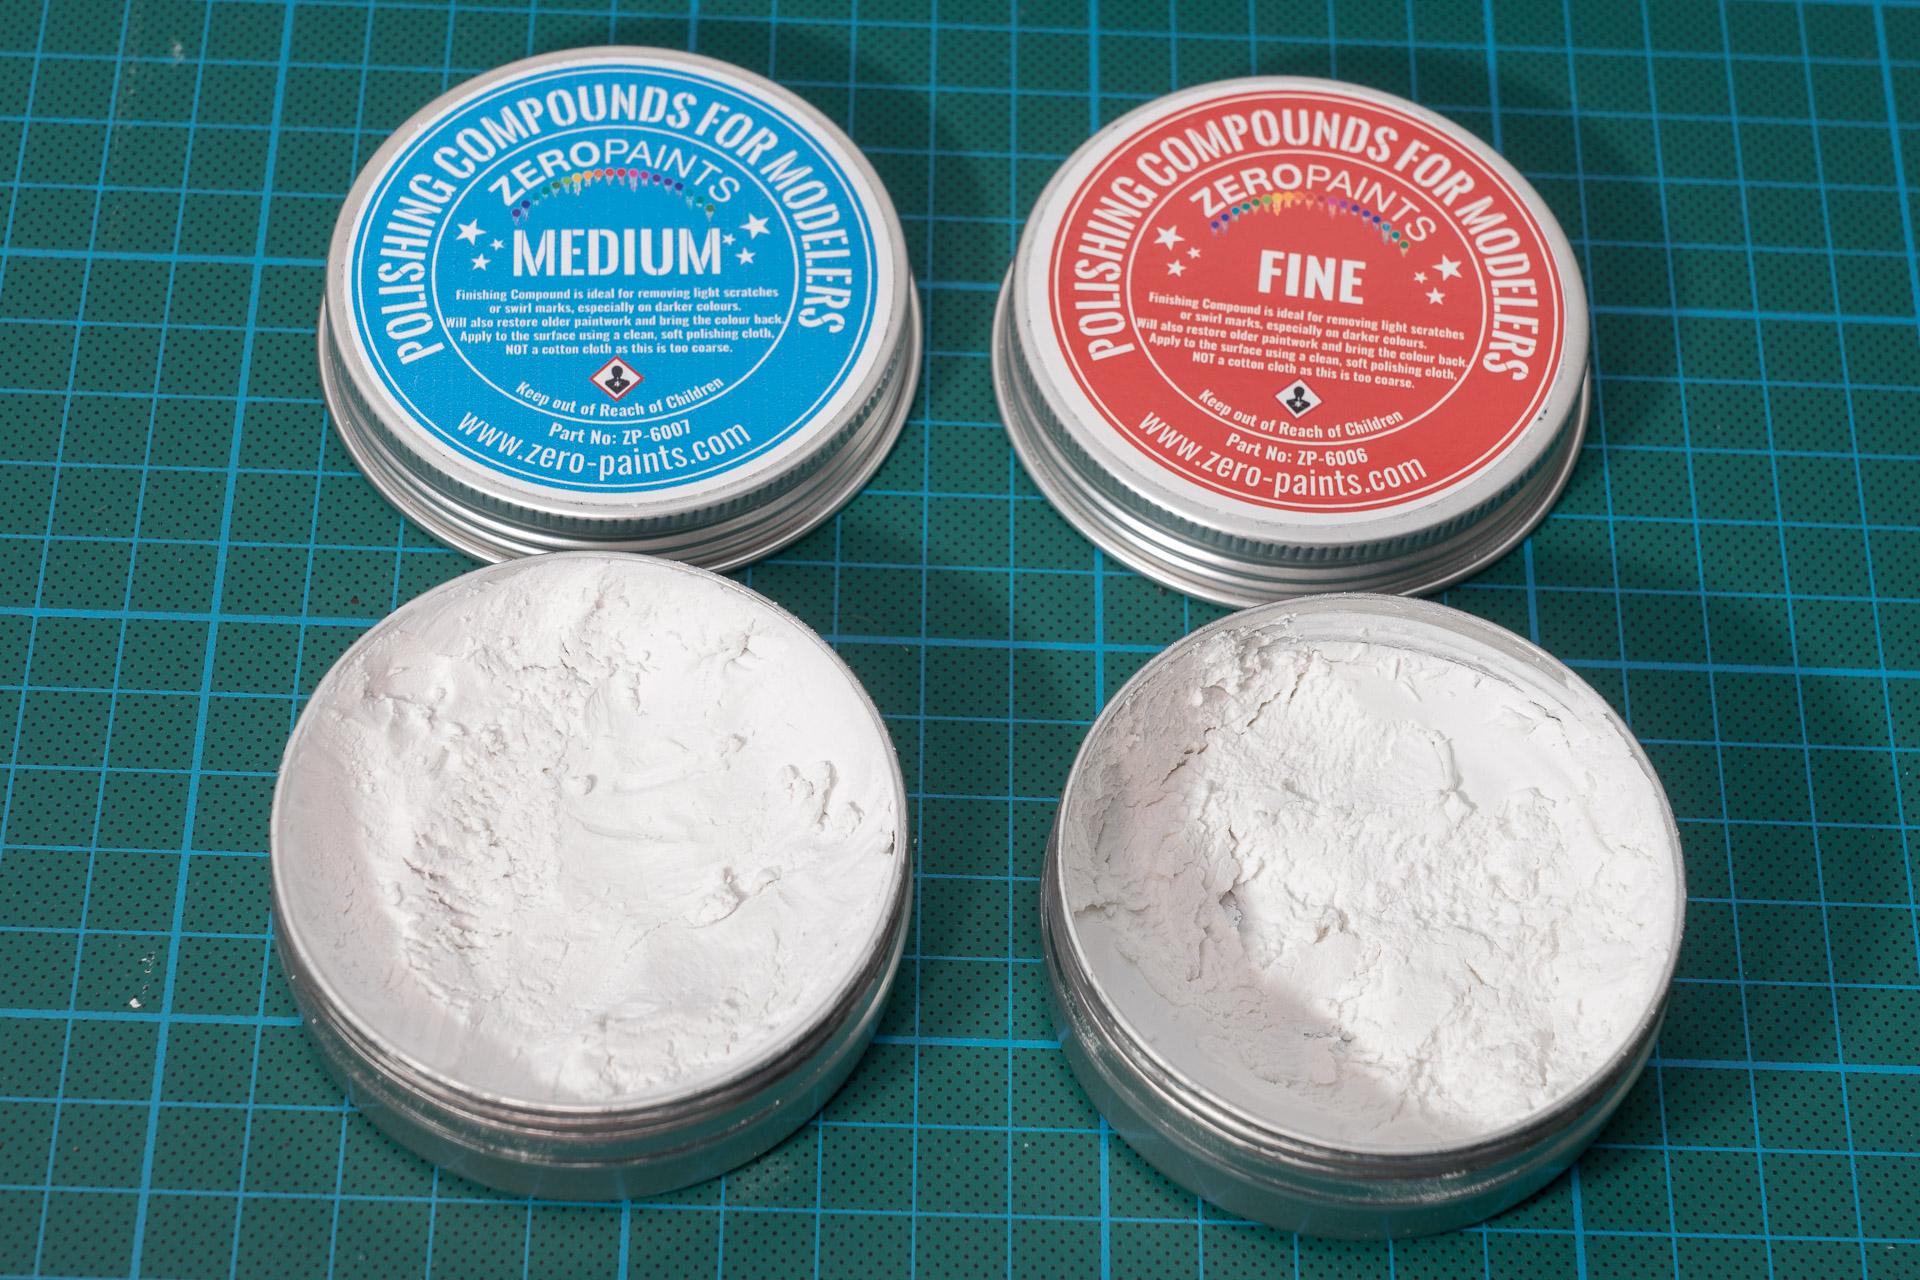
Hi all Thank you very much. Today I only have a small update, but one that was quite time consuming. To remember again, how the body looked like after 6 coats of clear After letting the clear harden for a few days, I started sanding and polishing the body to get that deep shine I am looking for. After about 2 hours of sanding with 3000 grit Tamiya sanding sponge it looked like this. The goal of this sanding step is, to get an even, flat surface which looks quite dull compared to before After this I continued sanding with some 4000 grit sanding pad from GodHand Followed by 6000 grit sanding pad from GodHand Increasing the grit to 8000, again with sanding pads from GodHand And finally with 10'000 grit sanding pad As you can see in these pictures, the shine is gradually coming back. Every grit took me another 30 minutes to sand the whole body. After that I started polishing using the coarse polishing compound from Zero Paints After this step I wanted to continue with the next step, the medium polishing compound by Zero Paints. Unfortunately I noticed too late, that the compound had dried out too much and made some deep scratches to the roof, so that I had to start over sanding the whole roof from 3000 grit all the way up to 10'000 and polish it again with the coarse compound. Happily it was only the roof, so I could finish it quite quick and then continue with the blue polish from Tamiya. To finish the polishing process I wanted to give the fine compound from Zero Paints a chance, but when opening the container, it looked even drier than the medium one... So, I decided to use the white Tamiya compound instead, which was still fine even if I bought it long time before I bought the Zero Paints compounds. That's the second time I bought polishing compounds from Zero Paints and the second time this happens (well.... the first time they already arrived like this...) ? However, after polishing it with the Tamiya compound it looked like this Every polishing step took about another 30 minutes (well, the second one took longer, as I had to re-sand and -polish the roof). To finish the treatment of the body, I eventually applied some Tamiya Modeling Wax and that's the way how the body looks now. I have to say, I'm quite happy with the result So much for today. I think that maybe I should be able to finish this build during easter Urs