
RatRod
-
Posts
866 -
Joined
-
Last visited
Content Type
Profiles
Forums
Events
Gallery
Everything posted by RatRod
-
Here's a cool new product.....3D decals that go under paint!!! http://www.archertransfers.com/catSurfaceDetails.html
-
1/12 Scale Scratch Built Street Rod (Updated: 12/19/06)
RatRod replied to GTmike400's topic in WIP: Model Cars
He did the same thing on the Scale Auto forum.......POOF, he was gone.. -
Another great build Brendan!!! I love these, and the older GTP cars. I used to do all of 'em in 1/43, but have pretty much gave up on that scale lately (old age, and eye's.... ) I always love watching you work your magic on these things!!! Do you ever go the the NNL in Portland?
-
If you could only choose ONE photo of any of your builds, wich would it be?
RatRod replied to JAFFA's topic in Model Cars
Man, there's some beautiful stuff in here!!! I'll join in with two, no fancy photography, just two good shots. Favorite bike shot..... Favorite car shot..... -
I love it pro streeted, but think these big birds fit into the more modern pro touring catagory better. With that out of the way, this is a beautiful build!!!! It looks real, and to me that is an accomplishment in itself. Very nice build all the way!!!
-
Thanks Ken!!! The paint I used on it was Tamiya TS-49 bright red (I had it left over from my Hot Dogger.... ) After decals, I cleared it with Dupont 2 part clear. Hmmmmmm, where to begin with problems...... OK, to start with getting the tracks together, after trying several adhesives ie: super glue gel, vinyl cement, etc, I finally got Loctite super glue to hold them. Then the "bogie wheels, I made retainers out of plastic tubing to get all the little wheels held in place, and still stay movable. The rear axle needs to be replaced with aluminum, or even steel rod for stength. The front axle, and body need to be modified so that the axle sits lower into the body itself as to not interfere with the upper body. I fixed that with a round file to the body, and the frame where the tie rod set. When assembling the engine, lose all the mounting pins, they don't line up. For the most part, test fit everything at least twice....lol. My body is all epoxied together, because of poor fit, but the detail isn't really there anyway. The engine when detailed makes the whole show. I added spark plug wires, made new fuel logs w/aluminum fuel lines, and used nothing but metalizers and semi gloss paint. I also drilled out all the velocity stacks, and honed the insides out with a couple dremel tool bits for better realism. The sky's the limit there. Remember, the body needs to be painted before any assembly begins, so an almost complete mock up is mandatory prior, and you will find where most of the problems are, and as you get more involved, you will find other small fit issues. I'm NOT trying to cut this old kit down at all, I love that it made it back, I love a good challenge too, but if it had a rating, I would put it at a "Skill 5" It wasn't for me when I was a kid, but as an "old" guy with many years building experience behind me.......it STILL fought me every step of the way..... Looking at the parts in the box, it doesn't look intimidating, but once you commit to it, well, you'll see. I do however challenge everyone to build one!!!! I triple dog dare ya......
-
Dan, it a 1/20 scale kit, and was talked about in another thread. If MPC would have made this kit in 1/25 scale, it would be small. To bad they didn't opt for 1/16, or 1/12!!! Thanks guys for the comments!!!
-
A bunch of excellent builds!!! I really dig the Starliner!!!
-
Another great custom Mark!!! I love the "Slightly Altered", and big plans to do some off the wall stuff with 'em too when I bought my lathe & mill. Plans changed, and I now have about ten of these things I picked up on clearance......LOL. It sure looks better than the originals when customized!!!
-
This being one kit I remember having as a kid, and knew I never finished it either...... I was excited to see it reissued, and couldn't wait to finally tackle it again as an adult builder. When you open the box, and view the kits contents, it doesn't look intimidating at all, but let me tell you what, it will fight you every step of the way. I'm happy with the end results though...... One thing I wish I would have done though, is replace the plastic rear axle rod with an aluminum rod for added strength. So, after a week of cursing, and grumbling, here is proof that it can be built!!!
-
NEW SABA CLUB WEBSITE
RatRod replied to E St. Kruiser50's topic in General Automotive Talk (Trucks and Cars)
Thanks for the update Dave. Glad to see SABA get a new one after the last one went down with the Naplak ship. Here's one I did in memory of Bob, and I'm getting everything ready to do a Dodge Revellion too!!! Hope to see you at NNL!!! Here's the link to SABA.... http://www.sabanw.org/ -
Daaaaaamn...... Very crafty build man!!!
-
Sure why not? I never thought of that..... Another beautiful build Mark!!!
-
Great stuff James!!! It makes a great hauler like that, and the stance is perfect!!!
-
I know this won't be everybody's cup of tea, but at 50, I grew up back in the early golden years of models, and these goofy, crazy show rod models were a big thing. With the recent reissue of the AMT Lil Stogie, and one of Dave Vans laser kits of the Lil Hot Dogger body, I set out to do a clone that is as close (if not better) to an original as possible. Armed with the above mentioned kits, and a copy of an original instruction sheet I set out to Git-R-Done!!! Several key parts had to be scratch built such as the steering wheel, bone shaped seat, pad lock, shifter, radiator cap bone, air cleaner, and fire hydrant tail light. Dave's body kit is excellent as is, but needed a few things to make it more correct such as the extra framing around the front windshield, and adding the center post for the rear doors (both were easy using Plastruct stips) I then scribed door lines, and made hinges & handles. I used the original box art as a painting guide. Love it, or hate it......The final product.
-
This is very cool Mr McGowan!!! Seems like I've seen it before..... I LOVE THIS THING!!!
-
I don't think I've ever built a factory stock model, but those are very nice, clean builds!!!
-
WOW!!! Very impressive Chris!!! I was building at 8, but never painted anything until later on, so that put's you a step ahead already!!! Tell Dad you need more kits for Christmas!!!
-
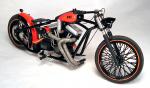
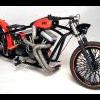
There has been lots of conversation on that very issue!!! The way I put mine on is the way the instructions call for, and the way the headers are designed. I have seen pictures of these with the headers put on over the frame, but they need lots of modification to look right. I thought about making a new set out of solder, or modifying the kit headers (and I still might) but I was trying to keep it as box stock as I could. I'm getting ready to build the Dodge Revellion next, another Bob Paeth design!!! The above poster picture is borrowed from Bob Black
-
It's a great kit to have back, but it does have a few issues, here's my build, and what I did..... http://www.modelcarsmag.com/forums/index.php?showtopic=16180
-
That is awesome!!! I'm not likin' the hood treatment that well, but the rest is just beautiful!!!
-
That is bad ass!!! That candy green is getting to be my new favorite color!!! So where did those awesome tri-rib wheels come from?
-
Thanks everyone, for such great comments!!! This one was a slight challenge, but everything fell into place in the end.....Man, I love it when that happens.....
-
'40 Deluxe, '59 Style! AMT Trophy Series Coupe finished...
RatRod replied to John Goschke's topic in Model Cars
John, your builds always amaze me!!! I enjoy the way you build very much, always clean, and simple, yet very eye appealing. Very nice '40!!! -
Revell Discontinuing NASCAR Model Kits
RatRod replied to larrygre's topic in General Automotive Talk (Trucks and Cars)
Oh darn....... Now what do we do? LOL, I gave on Nascar long ago.
