
RatRod
-
Posts
866 -
Joined
-
Last visited
Content Type
Profiles
Forums
Events
Gallery
Everything posted by RatRod
-
That is gonna be bitchin' when it's finished!!! I really like wheel #2, gives it that old school kustom feel!!!
-
Just gotta love that one!!! I have almost gathered everything to build this, and Pure Heaven, but have had it it for years, and still haven't done it yet. I guess I'm happy with the 1/18 Precision Miniatures replicas.... At least for now. Your doing a great job so far. I think those aluminum rims are from Detail Master.
-
I've been waiting for that one to surface again Tom, it's great!!! I was going to ask if you omitted the clear to keep the duller HOK, but you already answered it... I do like the satin finish on this one, they can't all be shiny!!!
-
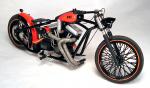
Got the injection unit all finished today!! This is made up from plastic & aluminum rod, and tubing, with a touch of sheet aluminum & wire.
-
That looks perfect Raul!!! I can't believe the old Revell 29 ford PU mags look so dang good on that truck. Great gesture to do what you did, now let's see what do I need?
-
I dunno Mike, something just doesn't look right, maybe it's the wheels on this particular build. I think the wheels & tires from the Revell '29 pick up, or '31 sedan would be the way to go here. Just thinking.
-
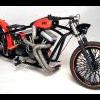
Yeah baby!!! Your getting a wicked stance on your bike Ken, I really like it!!! The rear fenders from the hard tail kits can be made to fit the soft tail kits pretty easy by moving the upper mounting pins, and they bob, and just plain look better than the kit supplied fender. Both these bikes have the hard tail fenders on them.... Whatever you do, this is going to be a cool bike!!!
-
Well, the wheels look fantastic!!! This will be a good one to watch. You know, the 1/16 MPC 427 Cobra also has an up top, and the Sunburst wheels included in the kit. Just a thought if you ever wanted an older brother.....
-
Aftermarket Parts Suppliers?
RatRod replied to Rudy's topic in General Automotive Talk (Trucks and Cars)
The best link in the world!!! Save it..... http://www.rocketfin.com/model_car_links.html -
Tony, your correct on the handlebar size 3/32", but most of the frame work is the thicker, nicer pieces of sprue from the kits!!! I do use 1/8" rod, like the support under the seat, but the Revell frame is bigger than 1/8", so the sprue plastic seams a tad closer. I don't think either company Plastruct, or Evergreen make a rod 5/32" (which might be a little to big) It works!!!
-
These are neat Lil trucks huh? People are really getting the bug to do them after Kenny did his. Let's see what you come up with!!! Are the newer issues molded in white? I have a bunch of the old Lindberg reissues that are molded in that gawd awful high shine yellow plastic.
-
Very nice!! I'd really like to see more pics of it in a little brighter lighting!!
-
Man, your catchin' on quick weedhopper!!! I think you got a winner in the making Ken. One thing to remember about the seams in the crankcase.....a real bike has a seam, otherwise how would you get it apart? After I get the block/heads together, and smoothed, I scribe a narrow seam back in the crankcase.
-
Good start, let's see what you do with it!!! I actually liked the trike version too!!!
-
Got a little more done on the mock up today. Scratch built a seat, handlebars, small headlight, and that wicked fuel injection unit!! I also got the fuel, and oil tank caps turned. Still have several small details to make, the it's off to paint, and final assembly.....
-
At least it's a Tamiya kit, and their decals are nicer to work with than most. So, how many months/years did it take to get the guts to build this one? I've done many 1/43 art cars where the entire bodies were decal, and it does take a little courage, skill, & talent!! Yours looks awesome, fantastic decaling!!! I always wished they would have modeled that last body style of the CLK (You know, the one that liked to fly) That was the best looking one of all, to bad it failed. Oh, everybody knows the best way to sell clothes is with naked people....
-
Geeeee, I guess there's just not many kustom bike lovers around..... Your making great progress Ken, I think it looks great so far, and it looks pretty low to me!!! Let's see where you go from here. BTW, thanks for all the kudos Ken, I'm glad you like what I do, and I'm always willing to help a fellow modeler out!!! Now......get back to work on that one....
-
That one is looking good so far!!! I agree, needs a white firwall, interior, and bed cover.
-
That is freakin' awesome!!! I have the Red Porsche Killer, and and have been eyeballing that one, now I know I need to get it.....Thanks a lot Curt.....
-
Not perfect? What's not perfect about a polished, bright red 427 Cobra..... Looks like a nice clean well built model to me man, great job!!!
-
Very, very nice Merc!! I'll have to check that body out, I love that side trim!!! Way to stun us all with the subtle colors Tom, and great idea adding the bullets to the polished MCG sombreros.
-
I was lookin' at that one in your eBay store this weekend.....Nice clean build. It great to see a good modeler that pays attention to all the details!!!
-
Very nice build Chris!!!
-
Tony & Ken, I'm glad my builds inspire you, and anytime you have a question, feel free to ask!!! Ken, your bike is looking great!!! Love the tank work. To lower that soft tail cut a 1/8" section out of the upper bar, and make a pie cut in the lower joint, and then put it back together, that will lower the rear of the bike. The forks your using have really long legs, you could probably take a good 3/8" out of just the legs alone (I took a 1/4" out of the legs in the above bike) Just remember that when you start lowering take small amounts until your bike sits level and balanced. I got faith you can do it!!!
-
Thanks guys, this one will be wild!!! I cut the frame apart, and stretched it out quite a bit, the entire upper frame is scratch built, along with the oil & fuel tank mounts. The forks were shortened in three places to get the right ride height. The aluminum oil & fuel tanks were turned in my Makita gear drive drill using a good file, sanding sticks, and triple grit polisher, but I'm keeping a spun look to all the aluminum. Also the wheels were made by cutting out the centers, and making solid thick sheet plastic centers, with aluminum sheet inserts that were spun in my drill.....and away we go!!!