
landman
-
Posts
7,695 -
Joined
-
Last visited
Content Type
Profiles
Forums
Events
Gallery
Posts posted by landman
-
-
Jaguar SS.
-
Reduced a photo of the 1:1's actual dash and fitted it to the model's. Not perfect but at least it looks like a Master.

-
More sanding & putty. We're getting there with the door seam. The seam would be easy if all was molded together but the door and body are on slightly different planes. So I have to level it all off. Started looking through my models for one willing to sacrifice its spare tire wells. Finally found a Monogram Metal Master kit someone had given me. That will be the donor.
Took an outline of the well opening and transferred it to the Chevy. Now that is cast metal. This is where I need suggestions on how to open this up. I am thinking of drilling a hole at each end and cutting the sides with a cutoff wheel on a rotary tool. Any other ideas?
-
Love this one. Eye catching results.
-
Well, there are days like this. I figured I'd give a coat of primer to the seat and body to see the effect of the filler on the seat and how the sealing of the door opening line is coming along.
The seat, not being hard plastic turned gummy with the primer.
As I was turning the car around in the spray booth, it fell to the ground and broke in three pieces.
Put the body back together , put the seat aside in case it needs more time to cure and started playing with a fuel line for the engine.
-
As a relief to the putty and sanding I took out the seat and compared it to the 1:1's. To approximate that look, I decided to fill some seams to create alternating narrow and wide pleats.
Made a paper pattern of the Standard's dash surface and transferred it to styrene which I glued in place. A reduced photo of the Master dash will go there.
-
More sanding, more putty.
-
I believe the F-100 is the old AMT kit as it has an AMT number, if it was the flip nose kit it would most likely have been listed with a MPC number as Round 2 release old kits under their correct lables nowadays...not like under the AMT/Ertl and Racing Champions/RC2 time when everything was released under the AMT/Ertl lable regardless of what maker originally did the kits.
I remember seeing all these manufacturer's names as a kid. And some of the combinations (AMT/ERTL) later. I'd be interested in seeing the "family tree" of the model cpmpanies, if it exists.
-
Love it. especially the engine.
-
John, is that a Shelby in the background or a regular Mustang with an aftermarket hood?
-
Sanded yesterday's putty application and added more.
-
Thanks Gary. One of the members on this forum, Mr.Fractalign is making me a proper rear window. Thanks for the kind words.
-
I wonder what happened above? Probably tried to quote and it didn't work. Using a support to keep the frame level I attached the wheel arms to the suspension units. Had to have the fenders on too to get the clearance right.
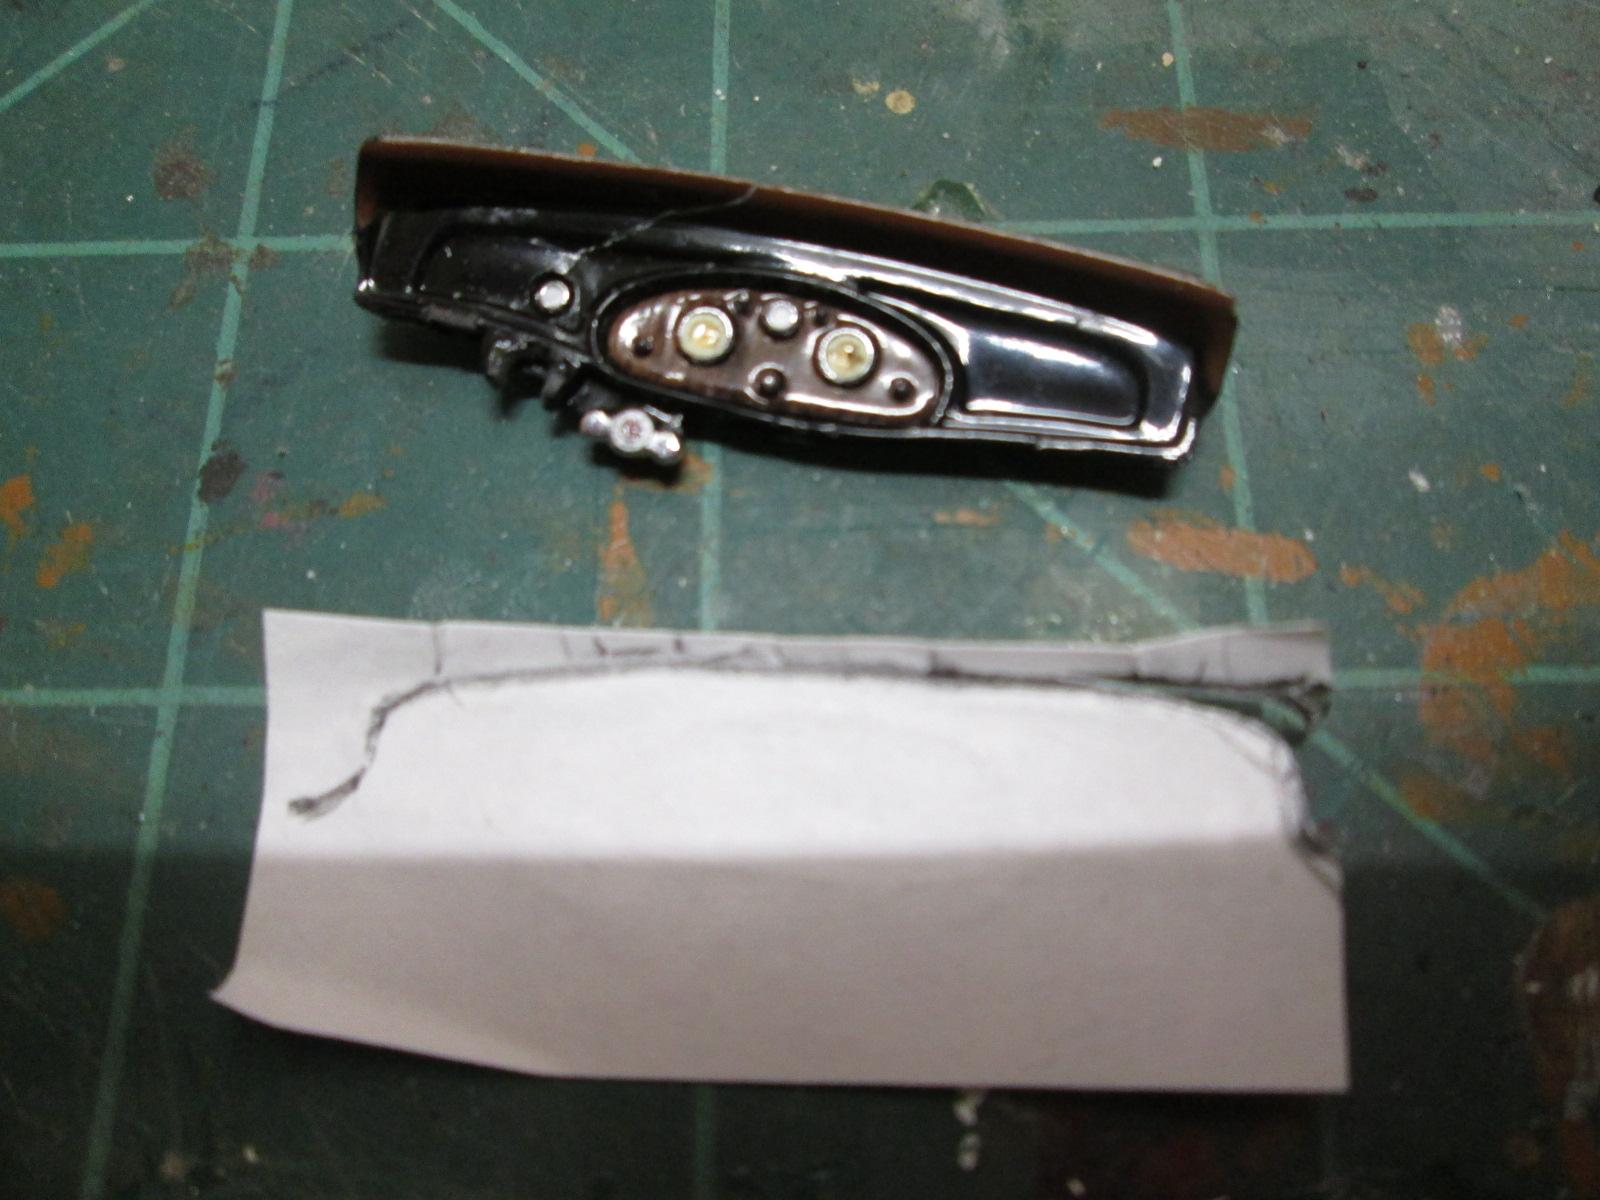
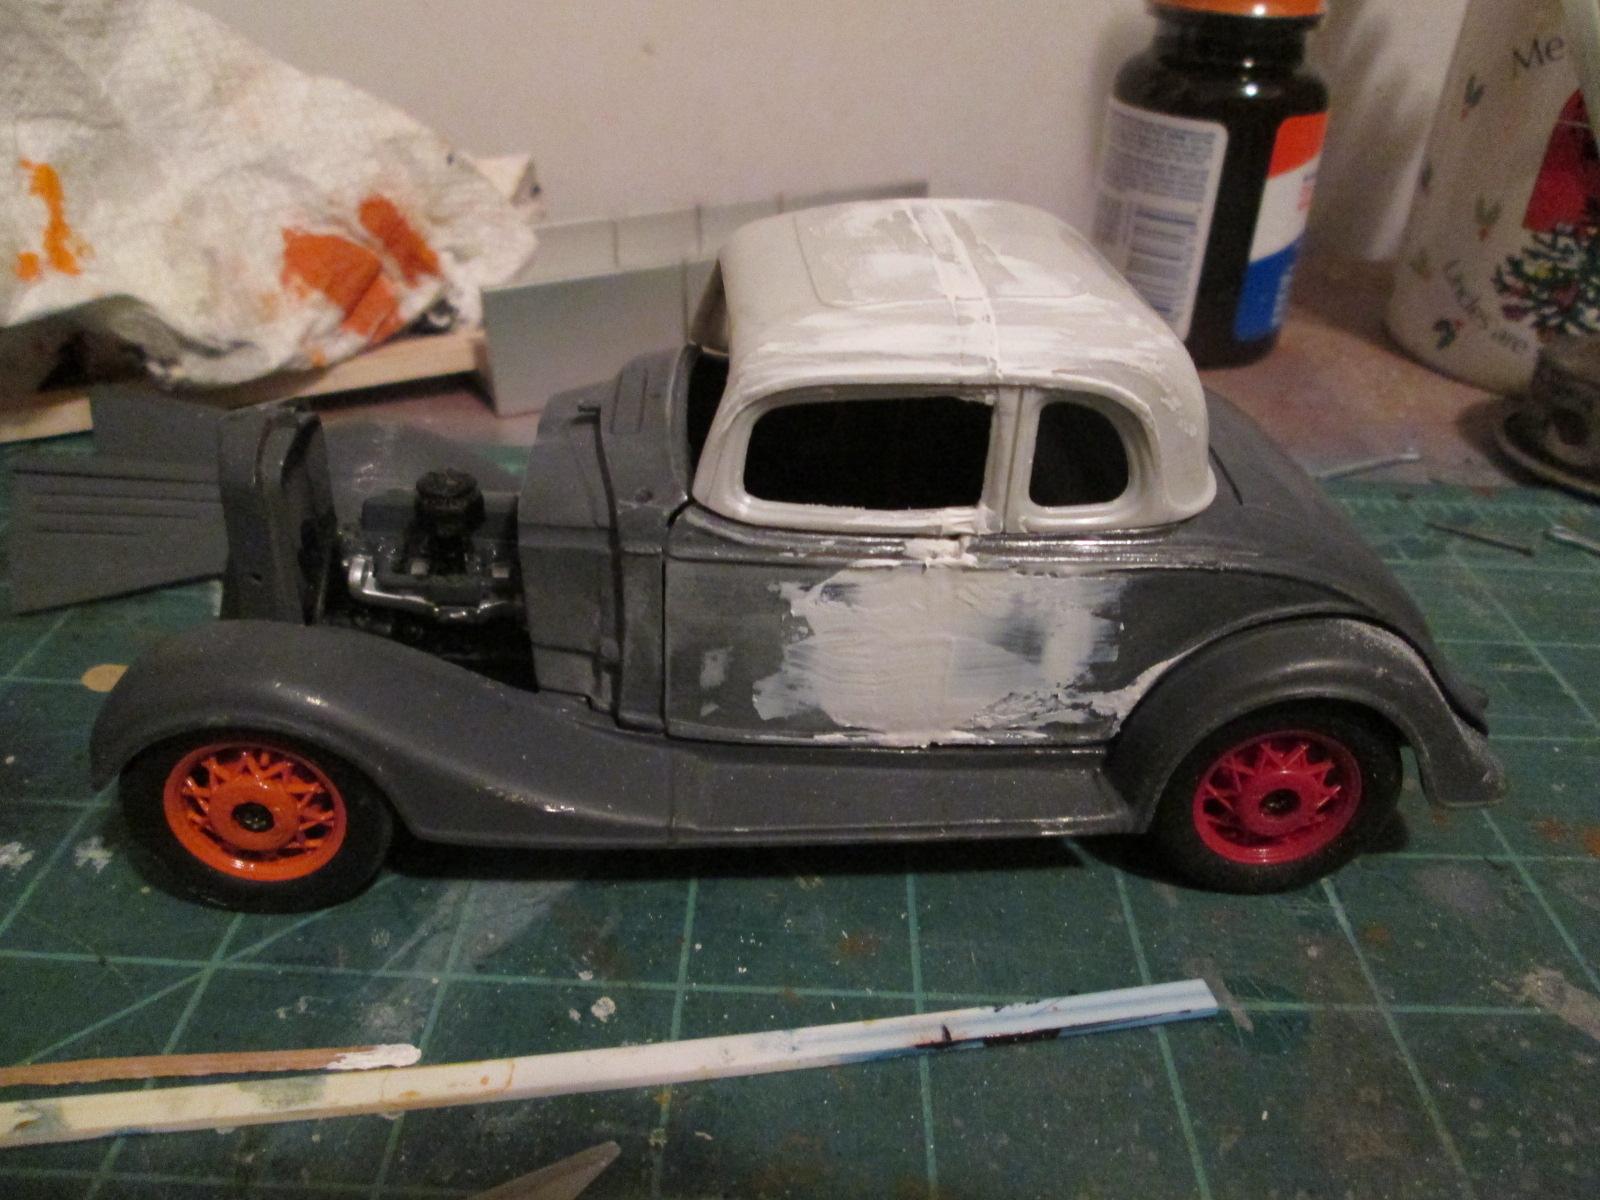
So, following on my idea in post #84, I decided to put the roof back to its original length. Luckily, I still had the strip I had cut out of it.
Once it was back together, I started filling gaps and holes.
I think these proportions are closer to the real thing.
-
Dave, it is a 1962 Dodge Dart 440, 440 being the series and not the engine in this case.
-
Not boring at all, it's like a journey of discovery and it's great to see these models enjoying the light of day once more!
You are absolutely correct. As I dig, I find several that I had forgotten about. the Saran Wrap saved the parts but stuck to the paint here and there. Most of them will require some sort of touch up. I'll also need to design & build some storage. In any case, I likely have modelling work for the rest of my days. Here's a few more.

-
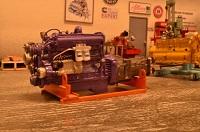
Love it. Paul, I am curious about the battery cable ends, the rad hose clamps and the rad cap. How did you get them so realistic?
-
I remember seeing a black one sitiing under the canopy of the hotel I was checking in. It was around '78. That image create an intense desire to own one. It wasn't until '95 that I got the one above. And what a car it was!
-
J.B., it was $80 and yes, it is very nice. I want to replicate the '64 I once owned.
Kris, the Hawk will be stock, like mine was. But I was thinking of turning the donor '53 into something fearful I once saw at an all Studebaker show in Peterborough. Someone had taken a '54 and installed the drivetrain and interior of a Buick Grand National and painted the car black. It was so well done, it didn't look modified at all.
-
Hey Pat, I've done that! You think "Ooooh, I'll just paint those parts while I've got a minute" and then you have a little brain fade and then you're back to the whole strip, clean sand routine. Stuff happens!
I have done a bit of work on diecast before, though not as extensive as what you' re tackling, and I use either a razor saw or a junior hacksaw to cut a new door line into the surface of the diecast. The razor saw does a better job but it does take the edge off the teeth somewhat. The junior hacksaw is better cutting but has a wider blade.
Run a couple of strips of masking tape down each side of your line to protect the surface and stop the blade skipping.
If you are not using it already, JB Weld is a metal based expoxy in two tubes that is simply the best product for gluing and filling diecast.
Good luck with your project _ I have wanted to tackle a 34 Chevy street rod for years and I didn't know this Danbury diecast existed til I read your post.
Cheers
Alan
-
Got it today. Turning this into a '64 likely is my next project.
-
Took the wheels out to the garage and gave a shot of orange paint to the insides. Paint recedes on a few of them. I suddenly remembered I forgot to wash them as they had oil in them to turn freely. Goes to show how rusty I am at all this.
-
Which gave me another idea. Now that the doors are glued shut, it would theoretically be possible to fill in the trailing edge opening line and score another one further back. Then I'd have to get another '34 Ford to get a full length roof. I think the proportions would be better. However that is easier said than done. Your everyday scriber wouldn't catch it here. I'm open to suggestions as to how to do this.
-
Sometimes I go over my threads to see if I missed anything. In post #20 I had mentioned looking for my old styrene stash to modify the frame and not finding it. Well I found it...looking for something else of course.
The stash contained some tubing that would be more appropriate for the driveshaft guard underneath the frame. So I made a new one.
Then I saw Brewster's suggestion of using the '36 Ford's roof. I suddenly remembered I had bought the Dick Tracy version. So I set out looking for it. With all this rummaging, things are slowly migrating to the same place.
I tried it on to see. That would likely be a lot of work and the rear would have tobe replaced with that of the'34 which is more square. -
That's one heckuva spray booth! Does it work well?
It's an old microwave oven. I have a fuzzy cotton batting taped behind the fan. In theory it is supposed to catch the overspray. In practice, it does catch it but creates a blockage for the air and there is some blowback when using a spray can. Not as much when using an airbrush.
.JPG.766b3d15a8d0a837db4e08527015abd0.JPG)
.JPG.158b7029fc68d2f0919ea565c0e594a8.JPG)
.JPG.a1db6bae88ad570771e53721d0f99d98.JPG)
.JPG.7a86143993da6e256836b15df7e0a0d4.JPG)
.JPG.739f57542145ffda797d8017d50d7e61.JPG)
.JPG.b5646edad29a8a243052cefbfc04df3b.JPG)


.JPG.5e2002f9561efcfafe9c842a9bb4dfd2.JPG)
.JPG.255b2a542cd58a8bebb3d09718888284.JPG)

.JPG.3a61f4fd946898af36c0b32937194496.JPG)
.JPG.f399d69f75dd4dfe53de6f136b9b4b23.JPG)
.JPG.add9530cc4ba69fdb3f25cf3541cacaa.JPG)
.JPG.1776bac1e989562d5657686d547a9226.JPG)
.JPG.3da7072b24f305a233459fa066e5185b.JPG)
.JPG.ce75b5c47eb0799d0b79db9fba2c368b.JPG)


.JPG.972e82aa01457c82e6c04da631584c92.JPG)
.JPG.0e946015328be977142c7a1dd3a1ce2a.JPG)
.JPG.76160934819f99aaefc92b3d292cd914.JPG)

.JPG.fa124ff1ceb19d29d91678c035a7c31f.JPG)
.JPG.630d02add8549aecf44d5e70089a6b21.JPG)
Any Future Truck Projects or Goals ?
in General Automotive Talk (Trucks and Cars)
Posted
I'd like to do a Mack B61, A Ford N600, an old Kenworth and some sort of transporter to put car models on. I'd also like to build a replica of the IH 4700 my daughter's father in law built to tow his 5th wheel camper.
The same daughter's husband is service manager at a Kenworth dealership and I may end up doing a display model for him.