
landman
-
Posts
7,695 -
Joined
-
Last visited
Content Type
Profiles
Forums
Events
Gallery
Posts posted by landman
-
-
After a huge battle to create something that would allow poseable steering, I just gave up and glued the front suspension units in place.

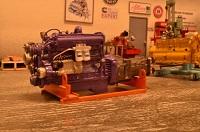
I retrieved my state of the art spray booth from the attic and gave a first coat of primer to some of the parts.
-
THIS is the ultimate Raiders' Coach: http://www.woodworkingtalk.com/f13/build-thread-raiders-coach-54632/
I'm sorry to hear this. I too listened to them back when my Mustang was new. I still have the albums.
-
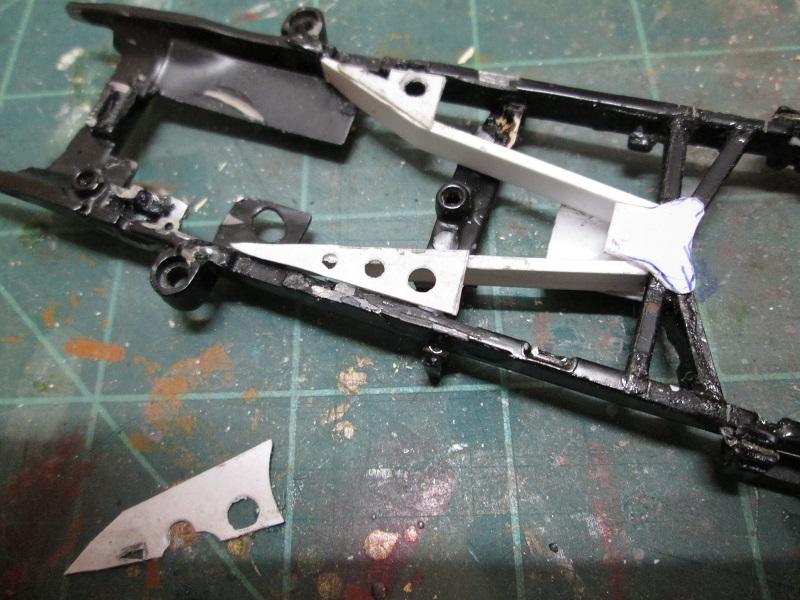
More work on the front suspension units. I find the wheel support arms too thick in the middle. Will have to whittle them down.....gingerly. At least you can see how it all goes together.
-
I didn't like the driver's side frame gusset, so I made another one.

Drilled some holes in the suspension units for the king pins and the wheel support arms.
Mocking it up I realized my crossmember is too short to allow the units to turn properly. Back to the drawing board....
-
Hey Sam,
I might be interested in that Mack if you decide to get rid of it.
-
Hola Moses...as my German brother in law used to say. Astounding!!!!
-
This is modeling at it's finest
Thank You so very much for sharing this project
Watching with much interest
Later
Russ
Hey Russ, thanks for the exaggeration. I'm actually getting back in after many years off. I must thank you for the link to the "U". I found how to make the character lines on the body.
-
Ground off the leaf spring mounts.
Measured & reduced the front suspension crossmember.
Set out to reproduce it or something like it in 1:25.
-
Belle job Martin. Beautiful background too!
-
Dug out a few more today. While the plastic wrap held the pieces that fell off with the right car they messed up the paint on several. If I'm boring people with this, PLEASE let me know.
-
While the photo of the rear window in Posting # 67 is making its way to Australia to get turned into a rear window I finished stripping the frame. Removed the engine, exhaust, battery and front suspension. The front suspension was held there by minuscule rolled pins.
It will be replaced by the "Knee Action" hydraulic suspension. I took a photo of the crossmember it mounts to in order to duplicate it to scale.
-
Thanks Paul. Much appreciated.
-
Dug a few more out of the box in posting #9. A '32 Cadillac and a racer I had made out of the Packard Speedster kit.
-
To be continued after supper
Please give me some response. I would like to know how many users will follow this topic. If anything is incomprehensible, if any questions occur please let me know as soon as possible. This contribution will require more than one evening, so I want to be sure that everything is understandable. Thanks!
I'm definitely interested Jurgen.
-
I've been looking for a thread/tutorial/video on how to do this.I think I'll need to do some when restoring models with damages windows. I'm interested in the HOW but also the equipment, materials etc.
-
OK, thanks. Must've read too fast. Those wheels make the car I think.
-
Are those wheels from the kit? Or are they those machined rims with custom laced wires?
-
Are you going to insert the windshield through the door window?
-
Terry, did you machine the rods & bushings in the winch or are they simulated with wire & tubing? Nice job, by the way. Love it. Always wanted to build an oilfield rig. I'd have your thread in front of me all the way.
-
Thanks Richard. I'm talking with someone who can cast a piece in the shape of the rear window complete with the inside reveal. Looks like that will be the way to go.
-
Here's the photo of the 1:1 car's rear window reduced to scale.
-
About the one above. Again this forum won't show what I write after a quote. What I thought I had posted was this, "Are the makings of a Hot Rod Lincoln model available?" As far as the song go, I'm torn between Hot Rod Lincoln and Maybelline.
-
I love all three but I have to go with Hot Rod Lincoln it was based on a real car (currently in a museum in Washington State). I am not sure which one had the most covers but would put my money Hot Rod Lincoln by Charlie Ryan
The real Hot Rod Lincoln . Originally it was black but Charlie updated it a few years before he passed.
-
It wasn't today, it was Tuesday. But I was passed by a goegeous silver Aston Martin, likely a DB9. Niiiiiice!


.JPG.e8bea1f357a70d3fccdb3473155bc1d8.JPG)
.JPG.ff185af30ad6397606d7cd60fce3a552.JPG)
.JPG.bdec0778790ad50ad45c5a9b394c761a.JPG)

.JPG.bffc667ab20ad81e2885fbbec0313b7a.JPG)
.JPG.1e3e610f1ca784cc0ac1bf15a1dd66a2.JPG)
.JPG.ffd49ce5a382bd930648e736ba581166.JPG)


.JPG.1601665cf230b5d143cb5556e73a1438.JPG)
What did you see on the road today?
in General Automotive Talk (Trucks and Cars)
Posted
Yes, they made a few like that for the movie.