microwheel
-
Posts
1,358 -
Joined
-
Last visited
Content Type
Profiles
Forums
Events
Gallery
Everything posted by microwheel
-
Hi Kevin, I usually make my tie down brackets out of the the scrap frames from photo etched parts.. the area of any photo etched stuff that holds the parts.. using a pair of spru cutters, I cut the the straight areas that have little to no ticks left from holding the photo etched parts.. then I cut them to what ever length I need them to be and to get them into shap I carefully lay them over a straight pin and using a pair of hook tipped tweezers I bend them over the straight pin with it laying flat on my work table.. this makes the sides and the curve over the pin gives the shape needed for the wire Im tying down. And give you self plenty of extra if you can cuz you will loose a few in the process.. and if you dont have one... get yourself a good table top based lighted magifier. You'll be glad you did. To make the holes on each side.. if you want them.. I usually just dip a tooth pick in flat black paint and touch the sides with it after I have it glued in place.. to glue them down use either 2 part 5 minute epoxy glue (my preference).. or clear laquar paint. If I have time before the end of this build.. I will try to take a few pics of the process if it will help.. since I have to make a few more for this build as I go. Jim
-
This is my 60 Ford Starliner RestoMod I worked on back this past winter. I combined AMT's 60 Ford Starliner with the engine, running gear and suspension from Revell's 2010 Mustang GT 500. Not sure where I got the wheels from now. I opened the doors and did a lot of aftermarket and scratch-building and detailing work on it as well.. The paint is Tamiya's british green and silver leaf with clear pearl and then testors clear laquar over all that. There were a few flaws here and there, but it turned out ok for me.
-
Competed the Cuda Interior this morning. Added the seatbelts and a couple goodies to dress it up.
-
Great subject for a summer project Eddie, and nice paint work on the engine. Jim
-
Sorry for the delay in posting progress on the cuda. I want to thank everyone for their well wishes for my son. He went through his opperation and everything went fine. He had a few complications afterward so he isnt home yet. But he is improving day by day. I did get a little time over the past few days to get some work done to the cuda's chassis. So I thought I would share where Im at with it so far. In this fist pic I have the rear brake line run and the fuel and vapor return lines done. I also made the exhaust heat shields by the gas tank as well as gas tank straps, since it seemed to me to be the one area of the chassis that revell didnt spend much time on. I also added a inline fuel filter, even though, one wasnt really present on a fresh from the factory cuda. I just thought it looked good. Sorry for the pic quality in some of the pics. In the next 2 pics you can see the work I completed on the rear axle assembly. I mounted the brake line and rear parking brake cables. In the next pic is the exhaust system, cleaned up and painted in testors metalizer dark anodinic grey on the pipes areas, and the mufflers are done in testors metalizer stainless steel. This gets everything ready for assembly on the cassis and the resaults are in the next few pics. Oh and also I painted the shocks Tamiya silver leaf and then overcoated them with testors clear semi-gloss top coat. This was to give them the factory gloss siver look that the mopar shocks came in, but semi gloss black was also a correct color for mopar shocks for the cuda. I just like the looks of the silver shocks. I hope to get started on the front suspension to complete the chassis, as well as the final details for the interior, in the next few days. Then on to building and detailing the engine. Bare with me if things go a little slow on the updates, Im running to the hospital alot to spend time with my son during the day. And the hospital is almost 40 miles away.
-
Thanks Guys. Things are going a little slow right now, time wise, my Son had to go into the hospital and have a section of his colon removed. He has crons and he had a flair-up that wouldnt stop. They decided there was too much scaring to take care of it with medication. I did find a little time yesterday to start some work on the cuda chassis. I plan to detail it out with brake and fuel lines and parking brake cable. There were 2 different type parking brake systems offered on the barracudas, so Im including a couple pics of the type Im going with on this build. my aftermarket parts will be here today and tomarrow so I plan to finish out the dress up on the interior this weekend, time allowing. I will post pics once I get the interior finished. This is the style of parking brake system I am using on this build. I was also thinking about adding the seat mount bolts, but it might be a little too much LOL. Start of the parking brake cable system. I made the bracket and pull linkage out of styrene plastic, and the cable is scale dreams crome hard line wrapped in a thread of copper wire, then painted metalizer aluminum and coated with dull coat. I will make the cables coming from the rear hubs as I work on the rear end. I painted the gas tank tamiya flat aluminum and plan to make and add heat shields for the exhaust on each side of it. And since the fuel lines go into the car near the front of the passenger side leaf spring , I have to test fit the leaf springs to check for clearence before running the fuel line. In the above picture, you can see I've also started on the rear suspenion. The rear end was painted semi-gloss black and the hubs were painted steel. If you look at the hubs you will see the parking brake linkages I made for the parking brake system. The little square you see near the bottom of the pic, is the bracket for the parking cables that will run from the wheels to the cable and linkage already on the chassis. Two small holes were drill in it to accept the parking brake wheel cables and it will be mounted to the chassis once the rear end is completed with the cables. I also made the brake line, and the tee fitting is scratch made from a styrene square and drilled out for the lines. It will get painted brass once the line is attached to the rear axle and hubs. I will also run the chassis brake line going to the back axle at that time, but I still have to make it and add line hangers for it. Though you dont see the leaf springs in these pics the are painted but still drying and will be detail painted before everything is assembled. I also am making gas tank straps out of styrene strips to give the gas take better detail. Sorry about the slow going here, and hope to have time to get more done over the weekend.
-
More interior work the past two days.. The interior is about finished with just a few details I will be adding once my aftermarket supplies arrive. Waiting on seatbelt hardware cuz I ran out of them, and a few other goodies to dress up the interior. In the mean time here is a few pics as I was working on it. I will be starting the chassis and engine soon.
-
Hi Earl, they open to the inside of the fender. See if this link works for you and hopefully it will be a clear enough image for you to get the idea: http://www.cardomain.com/ridepost/1677261/5464898/1966-chevrolet-nova/ Hope was able to help. Jim
-
Hi John and thanks for the info link. I remember seeing some of this info back during my years working for chrysler. Though I didnt work for them durning the muscle car years, alot of the info for the cars was still floating around corprate.
-
The version your talking about whould be the base model without any of the trim packages. The base model was built with the drag racer in mind with all the go power, but with alot of the extras deleted for weight management. So you would be correct in your version to delete the wheel well trim and door trim. Also no vinyl top, no power steering, and some really base models even deleted the radio. The drag racers loved getting them this way, it made less work for them to have to strip them down for the track. And the budget buyers loved them cuz they could get a powerhouse street machine on a base model budget. How I remember those days back in my teen years, strolling the streets of my old east coast home town and seeing some of my highschool friends whos' daddys' bought them the dealer budget versions of the cudas and challengers and camaros and mustangs and even catching a ride with one of them once in a while and envying them for what they had.. Aaaa Youth!
-
Hi Lee, As far as sanding down the fender flairs, The first thing I did was to find alot of pics of 70 cudas from different angles to get a idea of how they should look. There is no exact measurement to go by, so with a small peice of wood block to wrap a sanding sheet around.. I held my breath and, using a 400 grit sanding sheet to start with I began sanding the over flaired fenders. Using light sanding and taking just a little at a time. It's all eyeballed work.. Sand a little at a time and work slow. When I had them close to how I wanted them to look, I switched to 600 without it wrapped in the wood block to smooth down the sanding marks. I wanted mine to look like most of the pics I have of the 70 cudas, which seem to show the fender flairs a little more prominent near the top and tapering down to almost nothing near the bottom of the fenders. Very time consuming, and easy to mess up. Be very sure to have good refference pics and do not sand to much at once. It's better leave a little to much flair than to take off to much and end up with a useless body. Also remember if your going to go for the chrome trim look on the wheel opening as I did, ther will be no mold lines as a guide for foiling. I had to be very careful and light handed when doing the foil trim.
-
There are alot of pics that reference chrome trim on the top of the doors if that's what you mean. It was a option for the cuda. a google search for "70 hemi cuda" should provide you with lots of images of them. building it with or without the top chrome door trim would be correct as it was a factory option.Here is a image of a Hemi Cuda that where through a Barrett Jackson Auction: And here is one that went through a Barrett Jackson Auction without the chrome door top trim:
-
Thanks alot Glenn
-
Thanks Mike, just be careful as you sand the back of the grill.. Take it slow, and use a good lite to hold it up to, every so often, as you go, so you can see how close you are to sanding it through. When it starts to look really thin at the grill grates switched to 400 grit, and then just as you are about to sand through to the grill grates switch to 600 grit. And another thing I did was to use my air brush as a blow gun to keep the sanding dust down. Also when using the 400 and 600 grits.. use them wet. Keep everything as flat and even as you can so it thins out even and sands through even. Extremely light sanding the closer to the end you get. It took me about 2 hours to get it, and I only did one side of the grill area at a time.
-
Started work on the interior for the cuda today. Dont have alot of time cuz I have a graduation to go to this evening for my step-daughter. But I thought I would share where Im at so far. The Interior of the cuda will be done in all black. I started out by painting the floor of the interior tamyia flat black. Next, after the flat black dried, I re-masked it off with masking tape and then masked off the foor matt with bare metal foil, this is to prep it for a clear dull coat that will be sprayed on it, and before that dries, I will appy MCG black flocking material to simulate carpet. After applying the flocking, and giving it time to dry, I unmasked everything. Next I installed the core support and the firewall, though I did not add the firewall detail yet as I am waiting for a few aftermarket parts. I like to bare metal foil my door panels before painting them and then clean them off after painting, I find this makes them look a little cleaner then trying to foil them after painting, I also like to do them one at a time to completion in case I run accross any issues with them during the paint and detailing. Thats why you only see one here. And though it's harder to work with, I like to do my interior trim in the ultra-bright bare metal foil. It makes them look more like chrome,espically in a black interior. I painted the first door panel tamyia semi-gloss black as it seems to give a much better leather look. That, and its laquer based so it dries quicker. Once the panel was dry, I used tooth picks soaked in laquer thinner and cleaned the paint off the door handles and cuda emblem. I think it turned out pretty good. I will work on the other side the first of the week since I have a busy weekend ahead of me. I want to thank you all for your comments so far on this project. Its really great to be back into modeling again. MORE TO COME.........
-
Nicely done, I like the color choice.
-
Thanks guys, I have a graduation for my step daughter to go to tomarrow and then got to start getting the garage cleaned up this weekend to get ready for her open house. So work on the cuda might be a little slow for a few days.I got a few aftermarket parts odered for it anyways that I have to wait on before starting the engine, but I'll be starting on the interior in the mean time.
-
Love this build aready. The chassis looks amazing.
-
Good Job Andre.
-
Outstanding and clean build John
-
Ok time for another update. Glenn, I haven't started on anything else yet, other than to base paint the chassis body color. I will be starting on the interior and engine with in the next few day. I got alot of the body finished today. I stripped the chrome off the rocker trim and painted them metalizer aluminum plate and then clear coated them with testors clear gloss laquer. I installed the door handles, and added the side marker decals and rear quarter panels hemi decals I also painted the rear taillights with tamyia clear red and gloss white trimmed in flate black, then over coated them using two part 5 minute apoxy to give them the look of real lenses. I also added a photo etched trunk keylock. The cuda emblem was bare metal foiled prior to paint and then cleaned off with a toothpick dippped in laquer thinner. I sanded the back of the front grill using emry boards until I was close to having them sanded through, (this took awhile), then switched to a 400 grit sanding stick until the grill was almost sanded through, then finished it off till it was all the way through with a 600 grit sanding stick. Once the grill was opened up, I primed it with taymia fine grey primer and then painted it with testors metalizer stainless steel and painted the grill grates with flate black. Then using the finest tipped brushed I had, I painted the red strip on the grill. I set the grill in place but it is not glued in yet. As you can tell I still have the emblem to add to the grill and turn signals and headlights to install yet, but I think it is coming along. I trimmed the wheel wells out with bare metal foil and with no pre-molded trim lines as a guide it took a while. Remember, I sanded the wheel wheel flairs down to correct them.... More to come..................
-
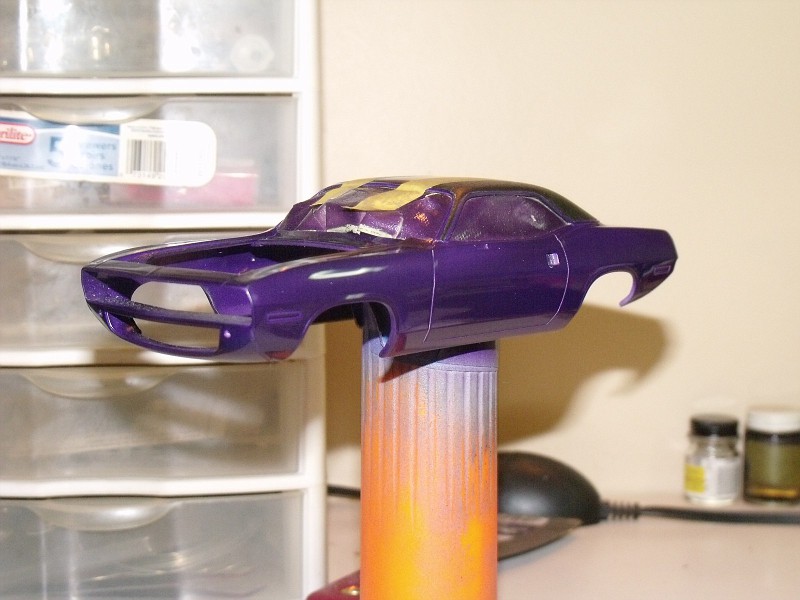
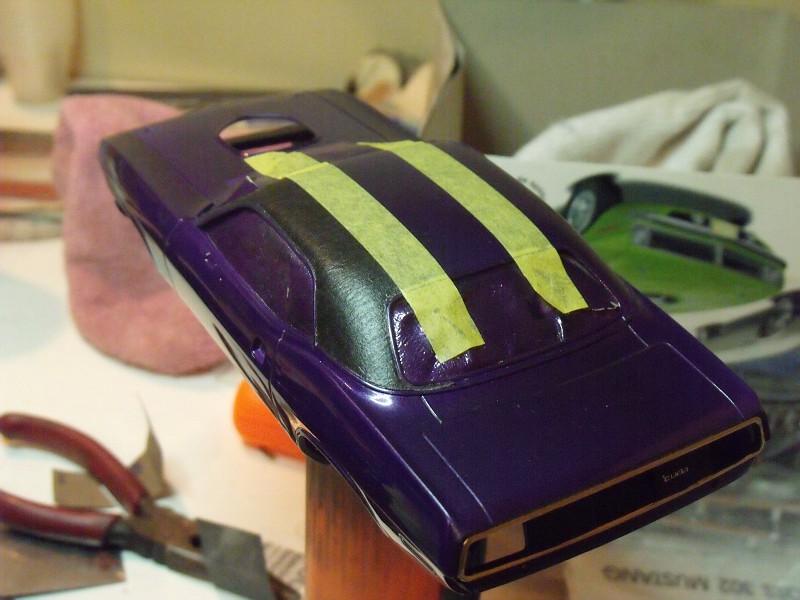
Update for today. I finished the vinyl top- And took care of most of the Bare Metal Foil work. I plan to order some better tires than came in the kit. The ones I plan to use are the BFG Radial TA tires from Fireball Modelworks Stay Tuned. More to come.
-
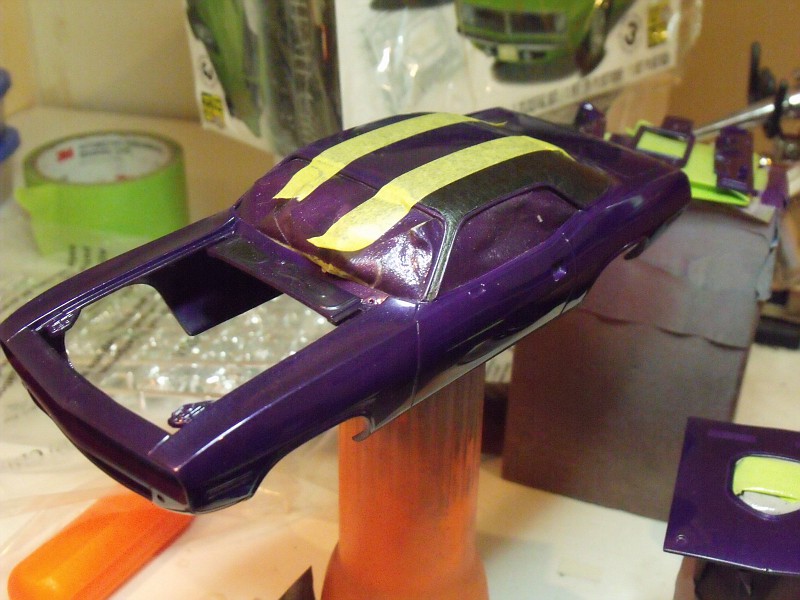
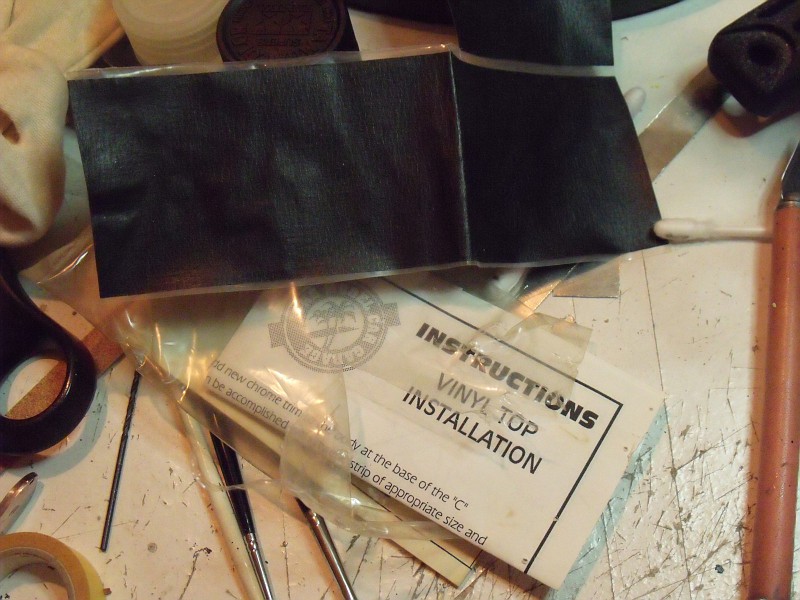
Thanks guys, and Glen, The Vinyl Top material can be bought through the Model Car Garage Website. You can get it in Black or white. You get enough material to do 2 to three cars with it, provided you follow the instructions for it carefully. One thing I do that they dont tell you to do, I give the top area a good coat or two of wax to make the material easier to remove and ajust as is needed. This is because it sticks down really really good, and in the past I found that not laying it over a waxed area, it can be hard to lift and adust if needed. here is the link to the top material they sell: http://www.modelcargarage.com/store/pc/viewPrd.asp?idproduct=63&idcategory=9 I wanted to correct the name of the paint . It's actually called Testors Plum Crazy enamel. It did go on a little darker than I would have liked, but it still turned out pretty good. Todays tasks are to finish the top, and bare metal foil the body. I'll post pics later this afternoon.
-
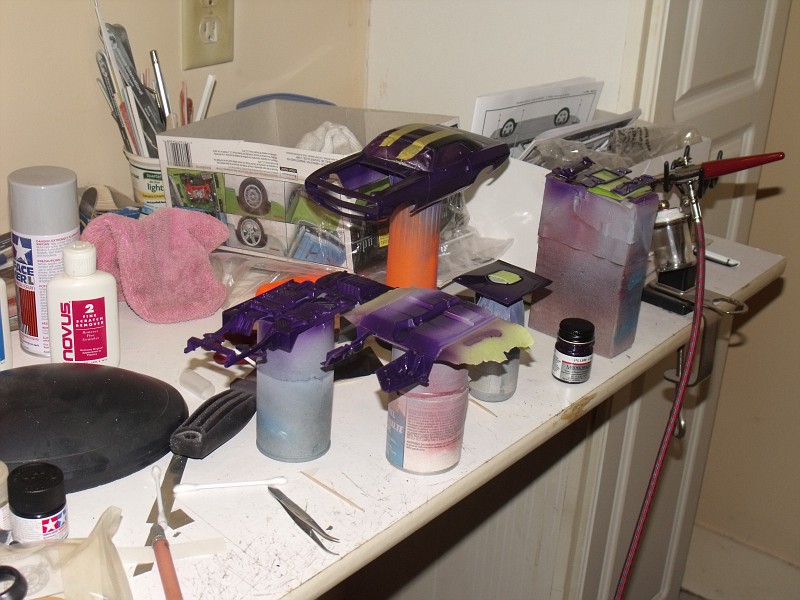
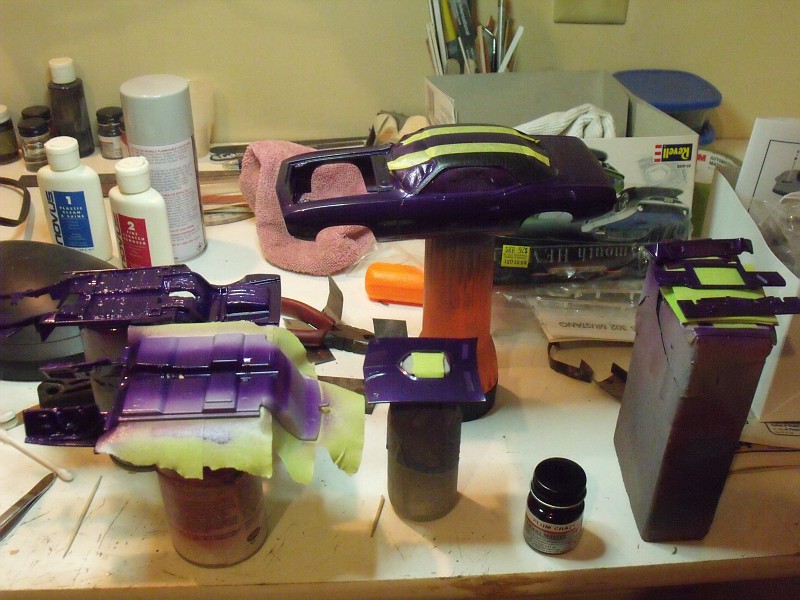
Howdy, Im new here, but have actually have been a visitor many times this year. I started building model cars back in the late 1980's and then got away from it in the mid 90's until recently. I used to travel arount the mid-west and even a little on the east coast, back in the day, attending model car shows. I just started back up building this past year. Boy have I missed it. I have already completed a few builds and at some point will post them for you all. I recently bought the new Revell 70 Hemi Cuda kit and wow do I like it. I know there are a few issues with it, but, hey, there are with most kits anyway. And besides thats why they call us model builders. Right? Part of the fun in building kits for me is correcting what I can, and adding and changing what I want. Well for this build I decided to do a vinyl top verson. It will be painted testors plum crazy purple enamel. I'll be posting a few pics along the way. I have already corrected the wheel openings, built the side window trim out with evergreen strips, instead of etching them deeper- this helps with the thickness of the vinyl top material I am using from the model car garage. I, also, have already scratch built the molding, below the rear window, for the vinyl top from evergreen strips. The body in the first few pics has already been painted, clear coated and polished and I have already started applying vinyl top meterial. I primered the body with tamyia thin grey primer. Then mixed my paint as well as my clear coat at 50/50 with hardware store laquar thinner. Excuse the pic quality, my camera is almost as old as I am LOL. I'll be posting more as I go along. Thanks in advance for checking this post out.