bh1701
-
Posts
389 -
Joined
-
Last visited
Content Type
Profiles
Forums
Events
Gallery
Everything posted by bh1701
-
Beautiful build! Congratulations!
-
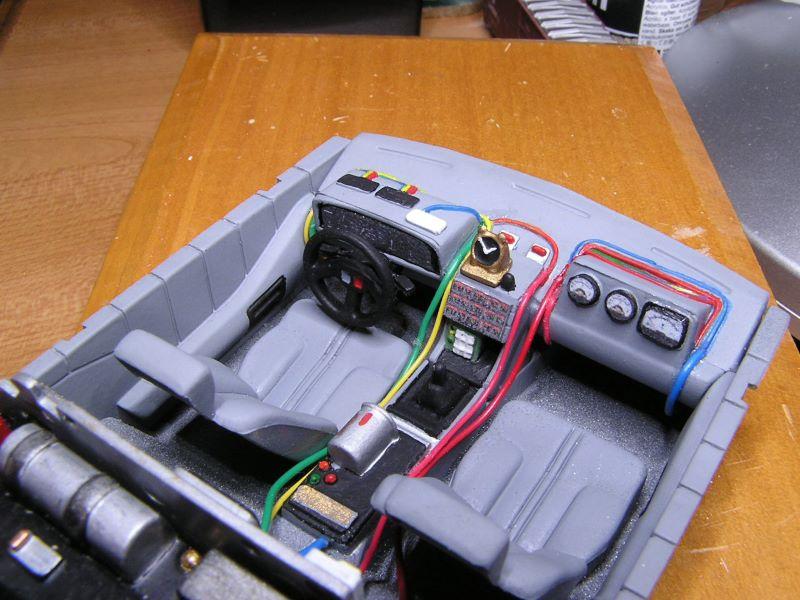
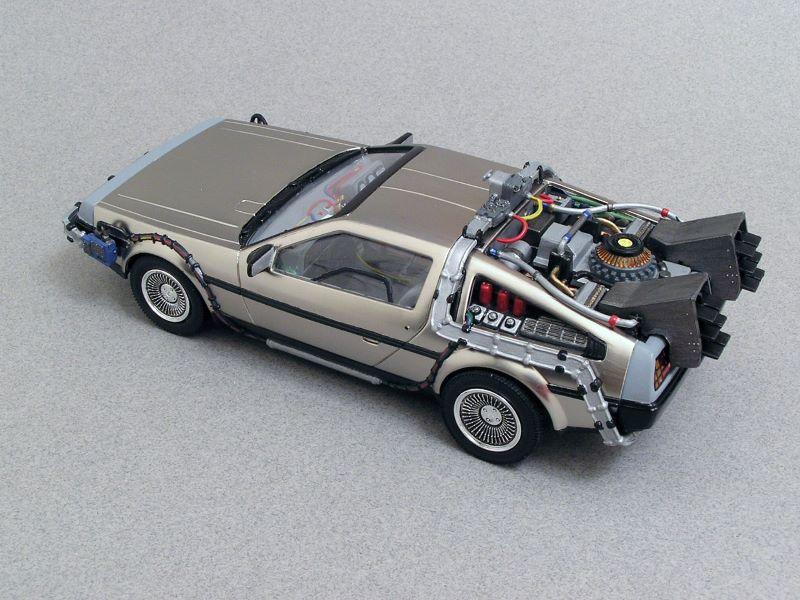
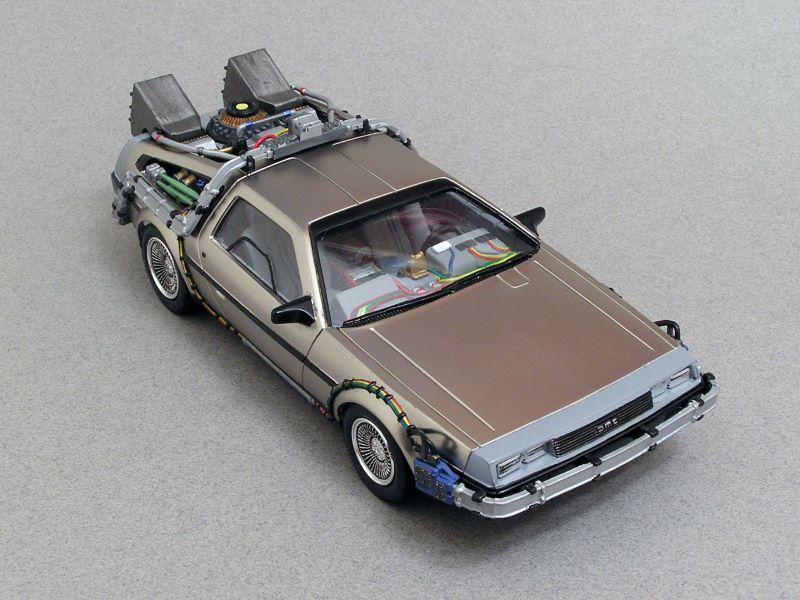
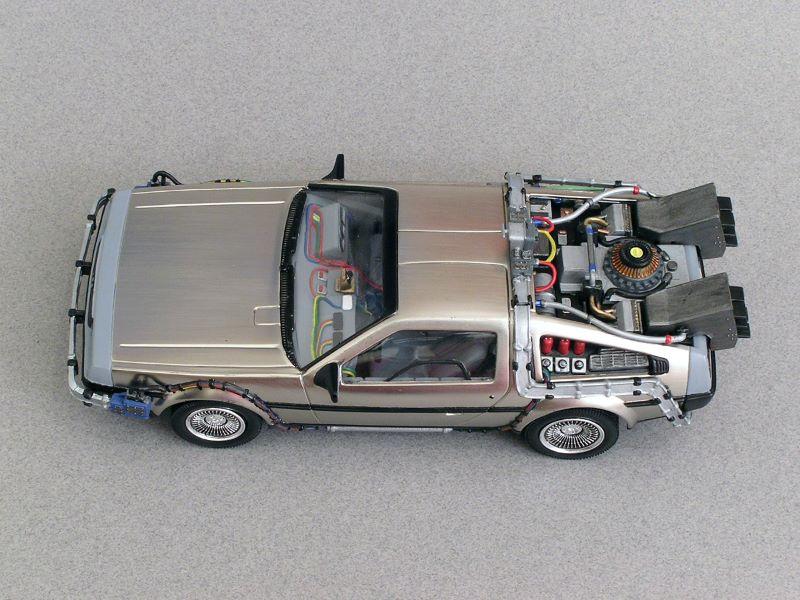
My latest completion - the 1/25 scale Back to the Future DeLorean from Polar Lights. Painting all of the colored wires on the exterior and interior was a lot of fun! I added a few more wires to the interior going from the dash back to the flux capacitor. Besides the painting of the wires, the hardest part was getting the chassis/interior assembly to snap into the body. The interior is much wider than the narrow lower part of the body, and getting the back of the "engine area" platform to go over a little lip by the rear of the car was not easy - probably spent 15-20 minutes and a bit of swearing to get this done! Thanks for looking! Bart

-
Steve, That is an outstanding build! I also read through your WIP post and was impressed with all of the work you put into this. I urge folks to look at that post, too, to see the incredible work you did on the interior (especially the dashboard). The shine on this model is amazing, so here is my one question for you. What's your process for polishing the model? What kind of polish do you use, what do you apply it with, and what's the technique? (Sorry, I guess that was more than one question!) Thanks, Bart
-
Thanks! The exterior color is Tamiya TS-15 Blue over Tamiya gray primer. The interior was sprayed with some metallic blue from an old can I had laying around - it was a big spray can that I probably got at a K-Mart or hardware store many, many years ago. Bart
-
A nice, clean build. I like it!
-
I like the custom plate, and the model, too!
-
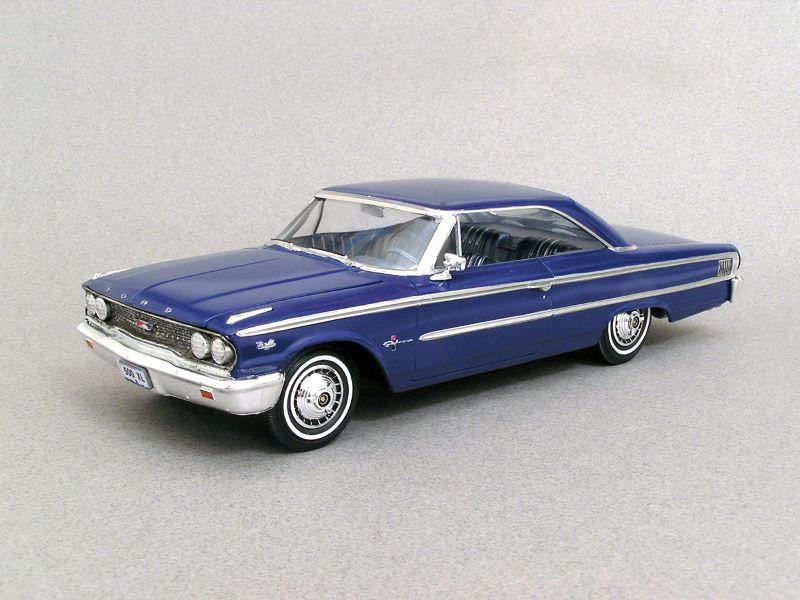
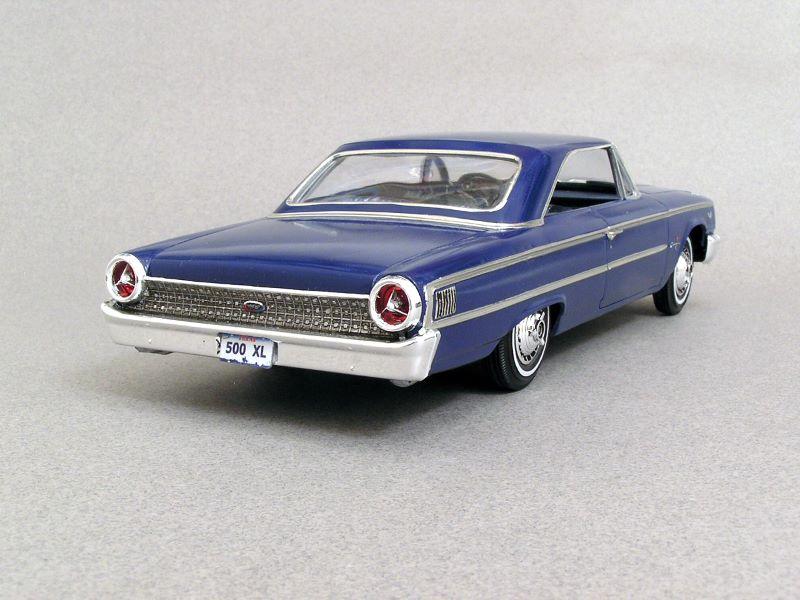
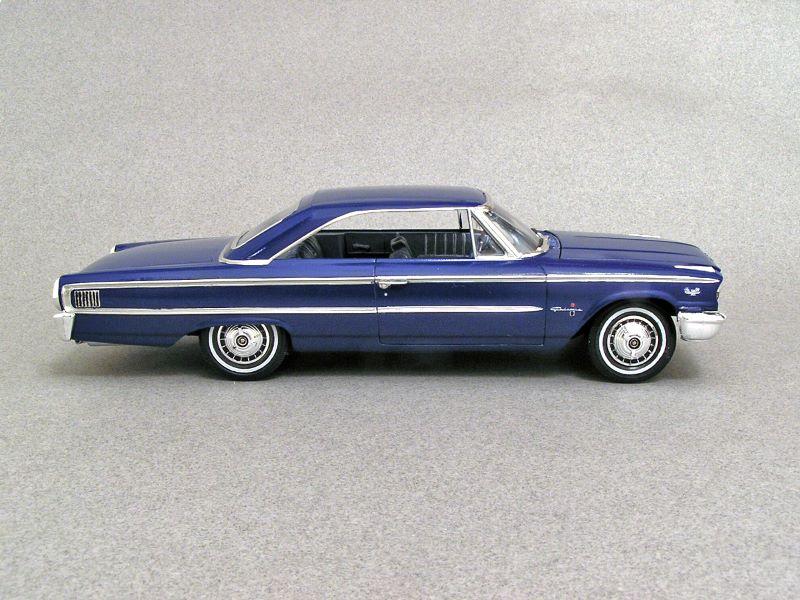
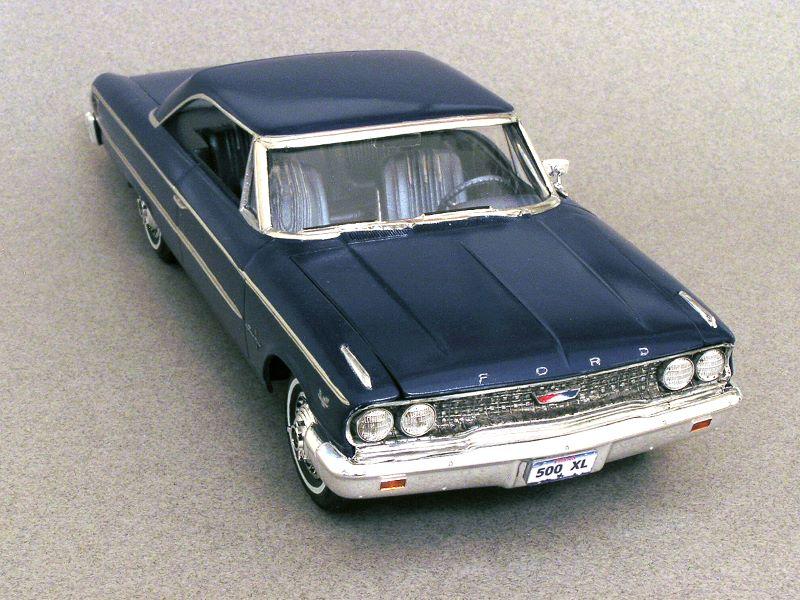
Yes, the kit did take some liberties with the actual car! When I got ready to put the chrome stars in the taillights, I was surprised to see that they were not like the real car. I had my painting notes that mentioned the backup light which was nowhere to be seen on the model. I think the actual cars also had the letters GALAXIE on the trunk lid. The model omitted this detail, too. However, I was OK with that since it eliminated hand painting 7 more letters on the model! You're in Sweden with a classic American car? Are there a lot of collectors with classic US cars over there? Bart
-
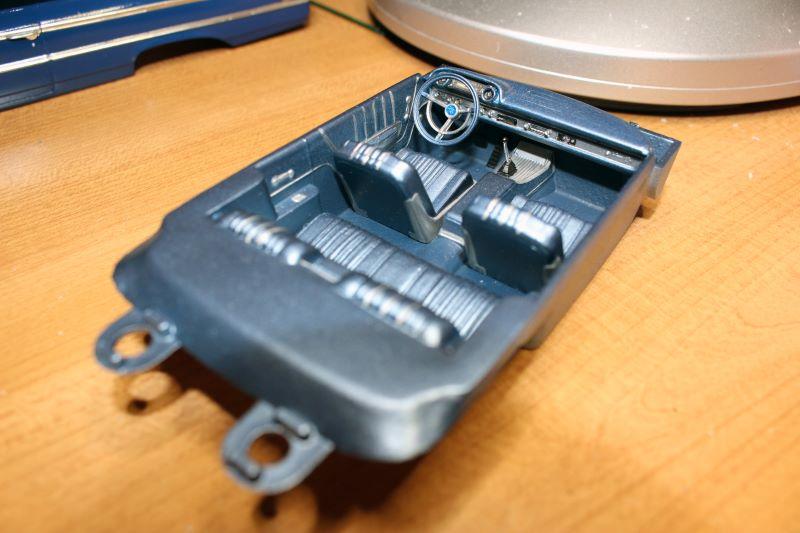
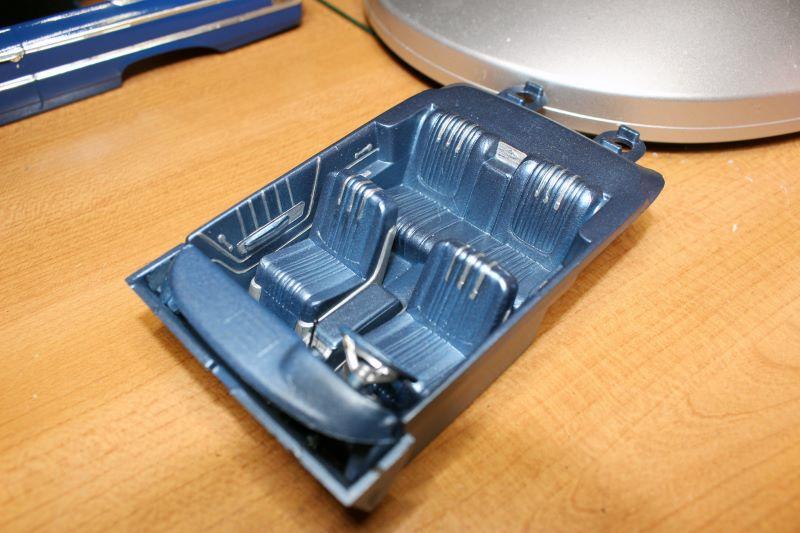
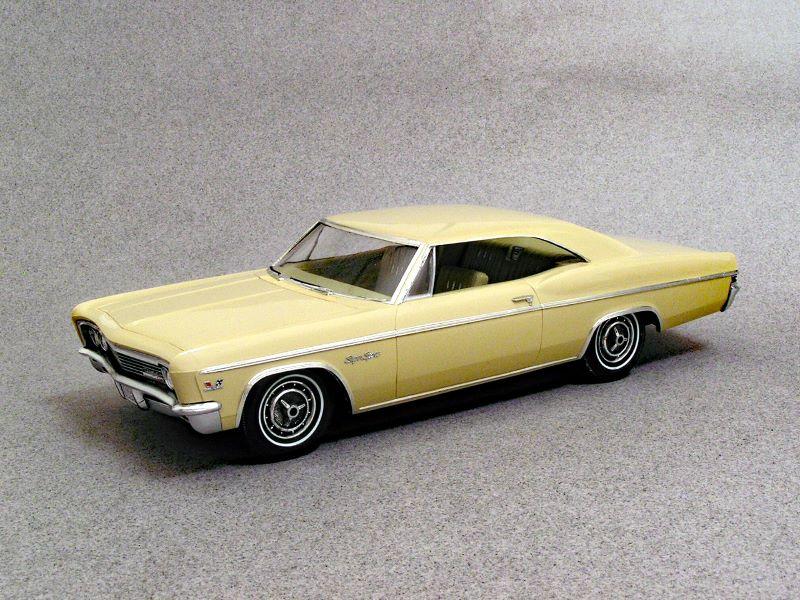
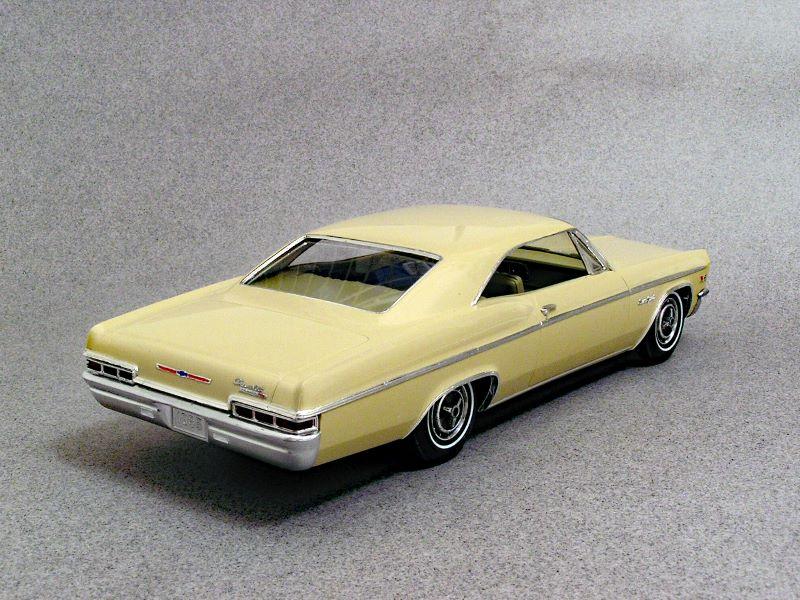
I recently completed this AMT 1/25th scale 1963 Ford Galaxie 500XL. It was an older kit (the box called it a "Prestige" kit). I had in my stash and finally decided to tackle it. This is also my 2nd attempt at using Bare Metal foil. My first attempt was on a model that was molded in color. This is my first try on a painted body. I ran into a few issues at the beginning, but managed to figure things out. All of the scripts and emblems are hand painted (still not ready to try doing these with BMF!). All of the silver trim on the interior was also hand painted. Not entirely pleased with the black wash on the grill - my usual approach was not working and I tried some other methods. Eventually I just gave up trying and figured this was as good as I was going to be able to do. Thanks for looking, Bart
-
Excellent work! I have a 60 Starliner waiting to be built - I hope mine comes close to what you have achieved!
-
Yes, I am here, too! N Gauge trains and Model Cars - 2 of my hobbies! I did some internet research on TX plates and discovered that my info was out of date. Back in 2015, the plates on my 2007 Mustang hit 7 years and I got new plates sent to me with a new number. This is what I found for the current process: As of November 1, 2016, the State of Texas will no longer automatically replace your General-Issued plates after 7 years. However, you may still apply at your county tax office for replacement plates if the license plate needs to be replaced for cosmetic or readability reasons. Specialty license plates (vanity plates) with personalized numbers are issued for a one, five, or ten year term. At the end of each term, prior to expiration, your annual registration renewal notice will remind you that it is time to renew. If your specialty plate selection is not renewed within 60 days of expiration, the TxDMV system will automatically cancel the specialty plate selection, making it available for anyone to order. Looks like vanity plates remain the same as long as you remember to renew them at the specified interval. The vanity plates are not cheap - otherwise I would have tried to get some for my Mustang! The rate for the 5 year subscription is $495. As far as the "replacement" plates for the general issued plates, I couldn't determine if the replacement has a new number on it or if it stays the same. Bart
-
Thanks, Peteski! I decided to go with a "vanity" plate in place of the actual plate that's on the car. In Texas, your plates are automatically replaced every 7 years and you will be assigned a new plate number. So the plate on the model would have eventually fallen out of synch with what was on the real car. ? Good to see you on this forum and the Railwire forum, too! Bart
-
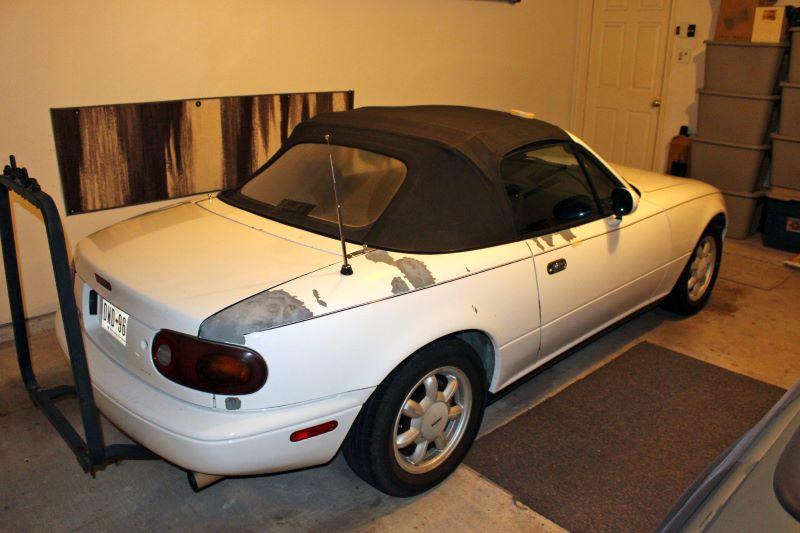
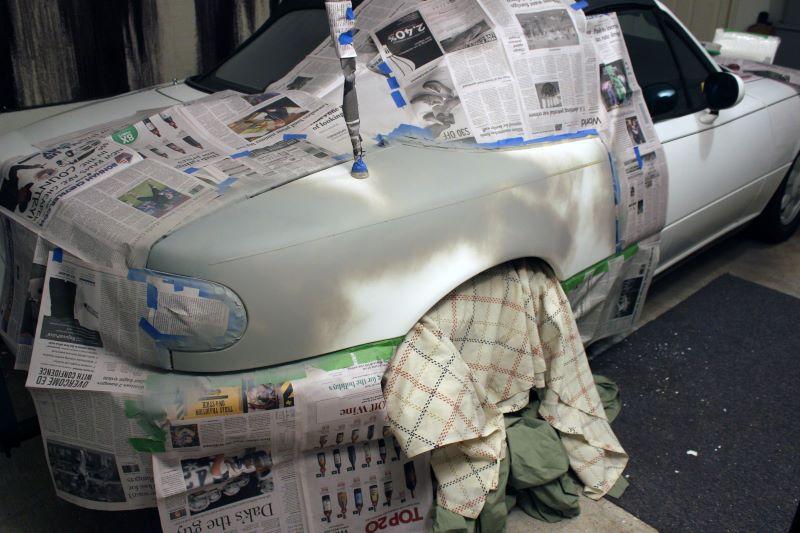
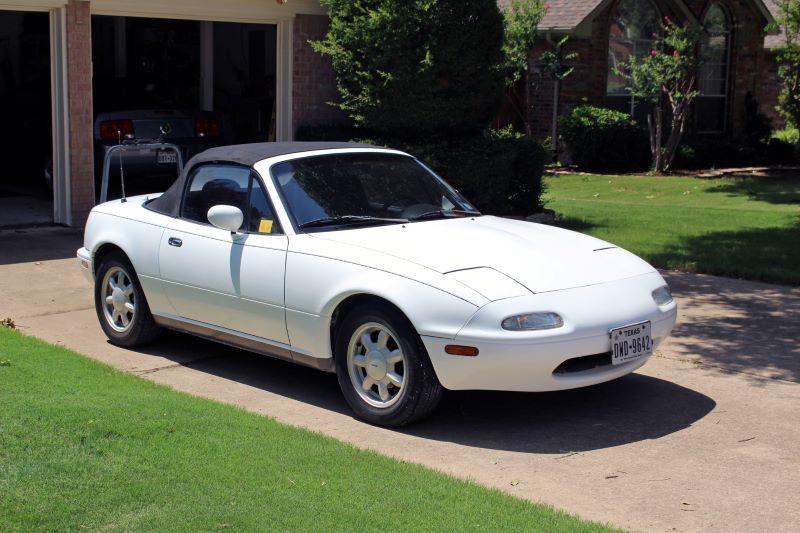
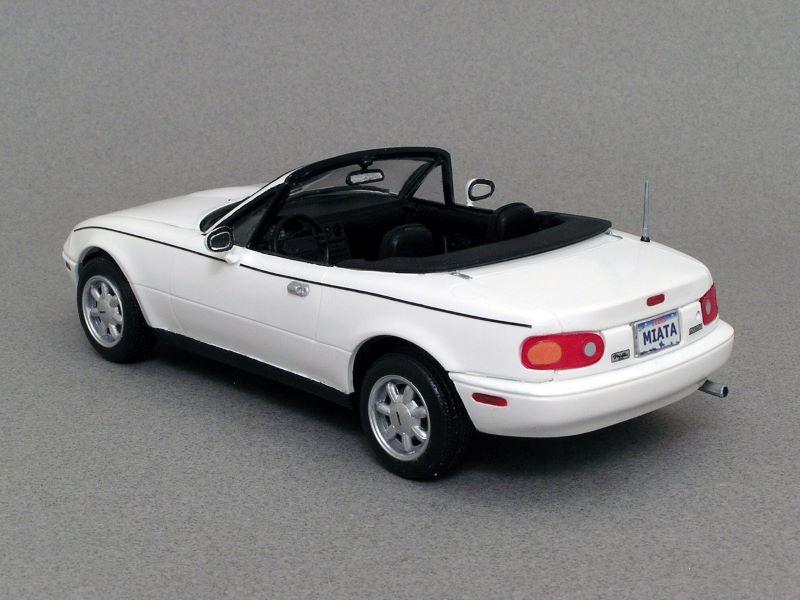
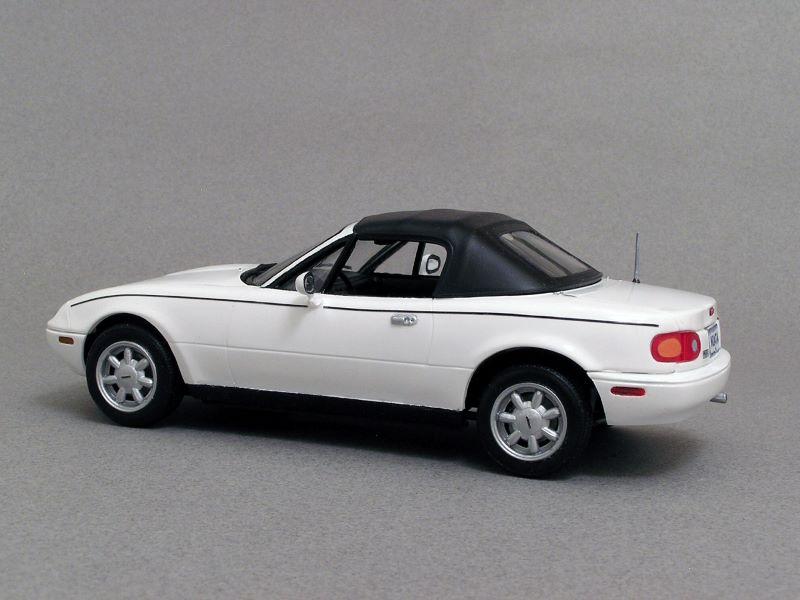
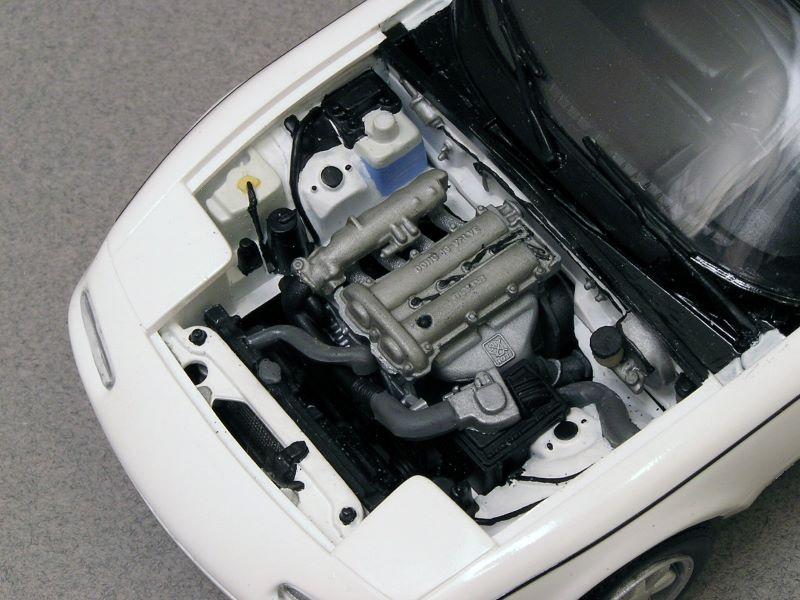
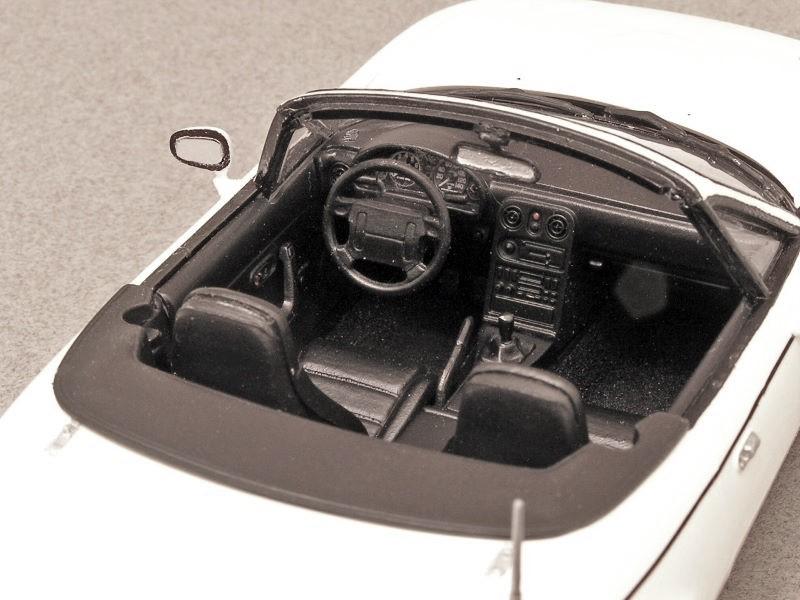
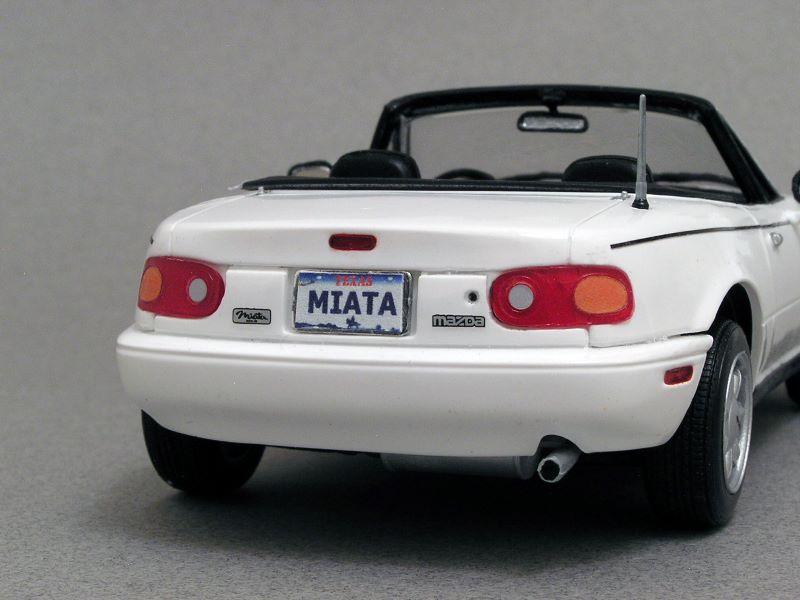
I completed my Revell Mazda Miata kit. This is a replica of my neighbor's car. I presented them with this model the other day. I also worked on their life-size Miata recently since the paint was flaking off on the fenders and doors. The paint on the real one isn't perfect, but it's a great improvement over what it had looked like! The Revell kit has a lot of good detail, but it definitely took a lot of patience and some swearing to get this to go together. A lot of trimming and shaping of many parts to get them to fit cleanly. For example: front and rear bumpers, windshield wiper frames to get the hood to sit flat, radiator, mounting tabs on the bottom of the engine, trimming the dash and interior side panels to get the interior to fit flush (another option is to trim the bottom of the windshield and vent windows, but I had those glued in by the time I noticed the problem). Also a lot of clamping when gluing the chassis to get it to fit tight with the bottom of the engine compartment, and clamping on the front and rear bumpers to eliminate as much of the gaps between them and the body, too. Thanks for looking! Bart
-
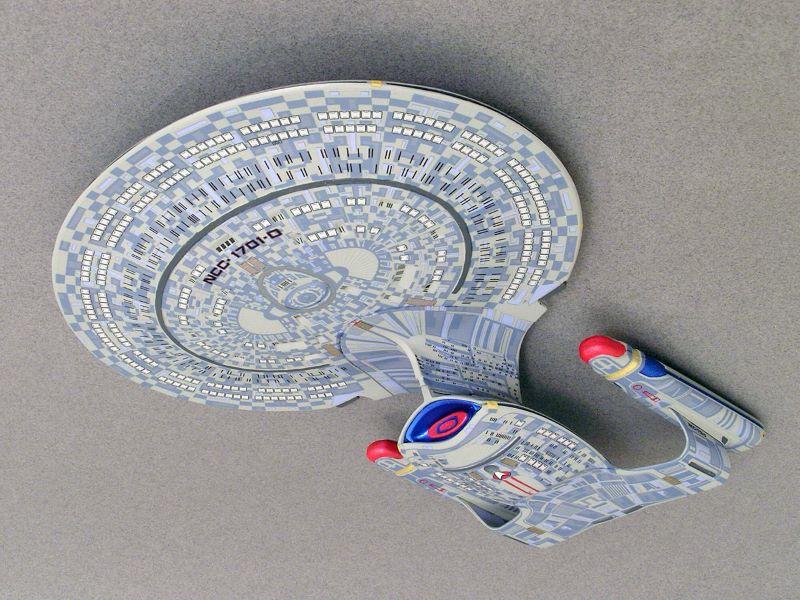
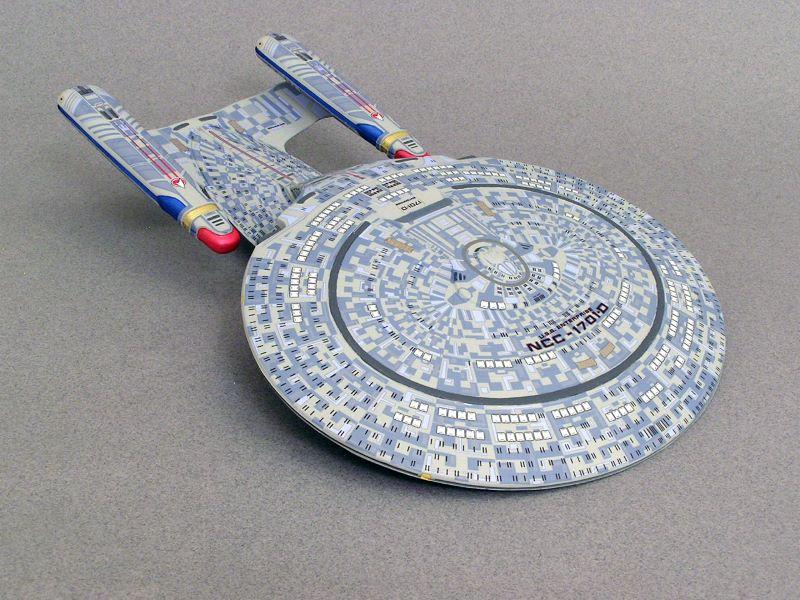
Thanks! Yes, the largest one is probably the most "right" to me, too. On the kit I just finished with all of the decals, I think the gray on the aztec decals is way too dark for me. (Too much contrast between that gray and the lighter gray I used for the hull's base color). On the production model used on the show, the difference between the base color and the aztec panels was very slight. The largest one has aztec detail on it, too - each one of the thousands of panels were all hand painted. I created a custom color that was just slightly darker than the base color. It took me months to paint all of the panels. I could only do so much each session before I'd go crazy! In person, you have to look closely at the model to even notice the 2 colors, but they are there. A funny story about the larger kit is that I finished the painting, and then got busy with other stuff for a while before I finished building it. When I did finally start working on it, I noticed there was a section on the upper saucer that I had missed painting the aztec color on. I opened my old bottle of custom color and it had dried up. ☹️ I had no idea what colors I had used to make this color, so I did my best to match it. Not a perfect match, but I think it was pretty good since I have to look really hard to identify that section. Bart
-
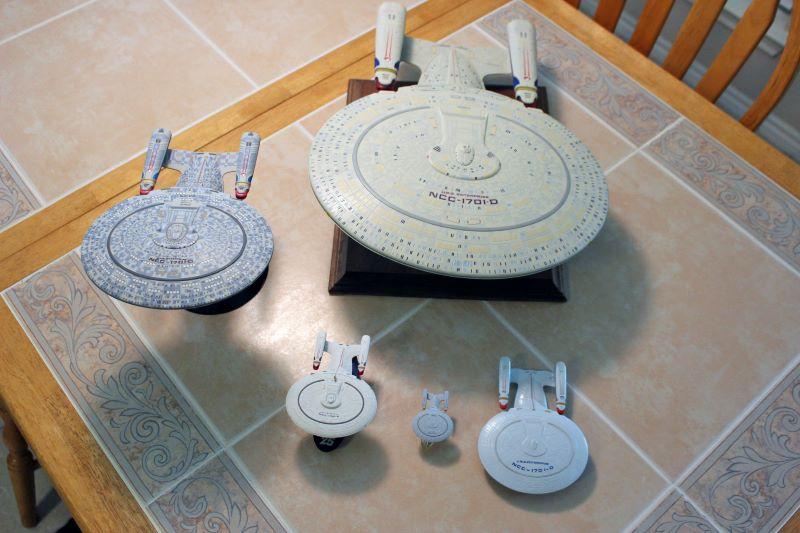
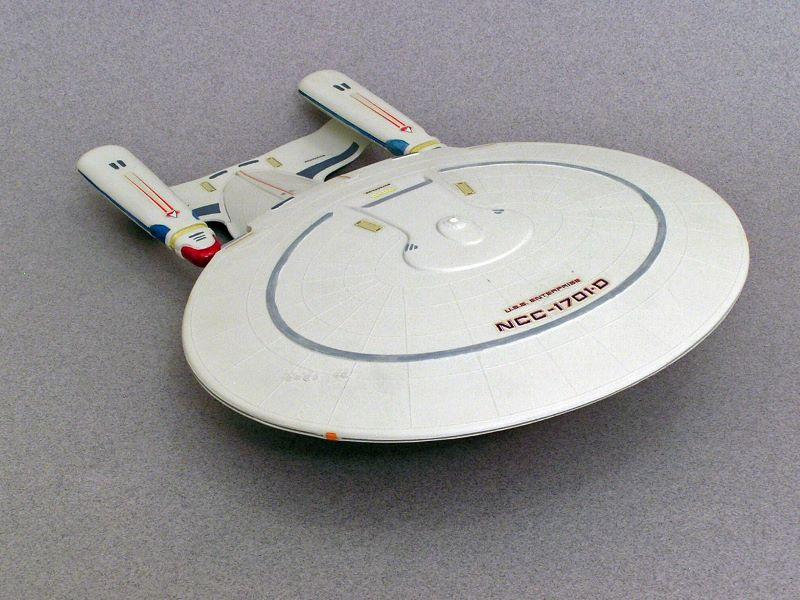
I completed my Polar Lights USS Enterprise NCC-1701-D. Here are some shots of it, as well as my collection of other 1701-D's. This kit was previously released in the 1980's, but with far fewer decals to apply (photo provided). Thanks for looking! Bart The original release of this kit from the 80's.
-
Applicators for solvent cements?
bh1701 replied to bh1701's topic in Model Building Questions and Answers
Do you need to clean the brushes after use? If so, what do you use? Bart -
I use Plastruct's Plastic Weld Solvent Cement. Can I get some recommendations on applicators (other than the brush in the cap) that can be used with this? If you can provide the manufacturers and any info on where to get these, that would be great! I think I'd be looking for something that has a fine tip that could dispense the solvent - both as a "stream" of solvent or as individual "drops". I've seen various tools online, but want to know what everyone uses and prefers. Thanks, Bart
-
Looks good! Congrats! Bart
-
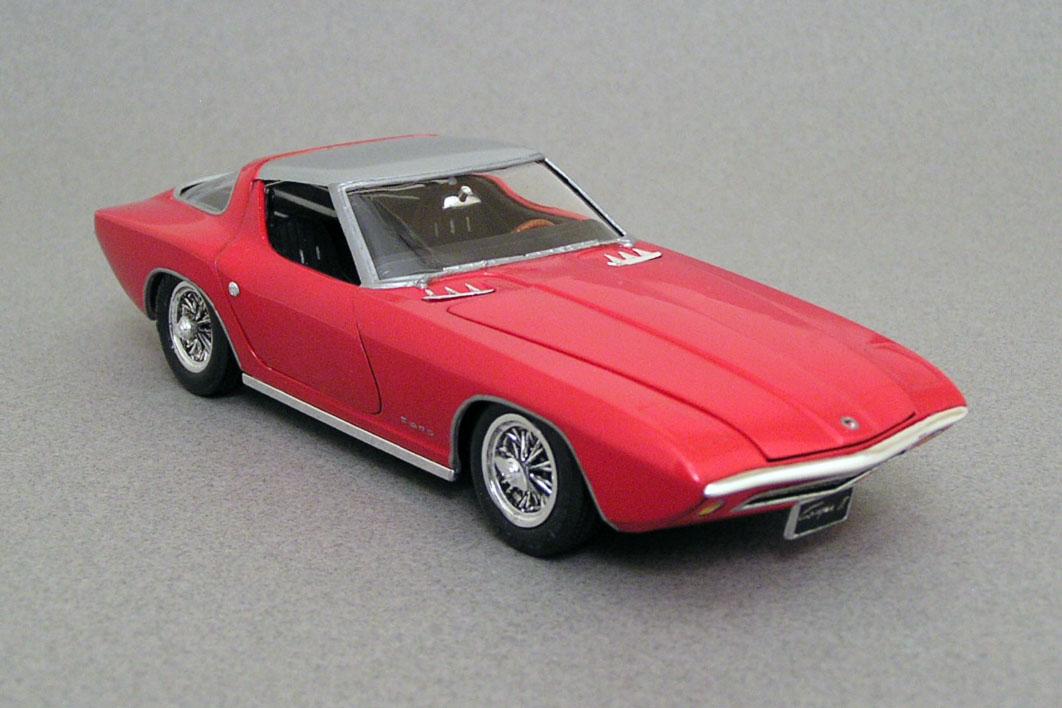
I've always liked the Cougar II and the Bordinat Cobra. I wish Ford would have made both of these. They could have been a worthy competitor to the Corvette. I spent a lot of time building my Cougar II model (a challenging kit to build!) and will be watching this thread for your progress. Good luck! Bart
-
I totally agree that these kits are a good size! I have several of the larger kits (the ones that are about 18" to 24" in length) - a couple have been completed, and others are still in the boxes. The larger kits are nice, but it's a lot harder to find a space in my display cases for them. Bart
-
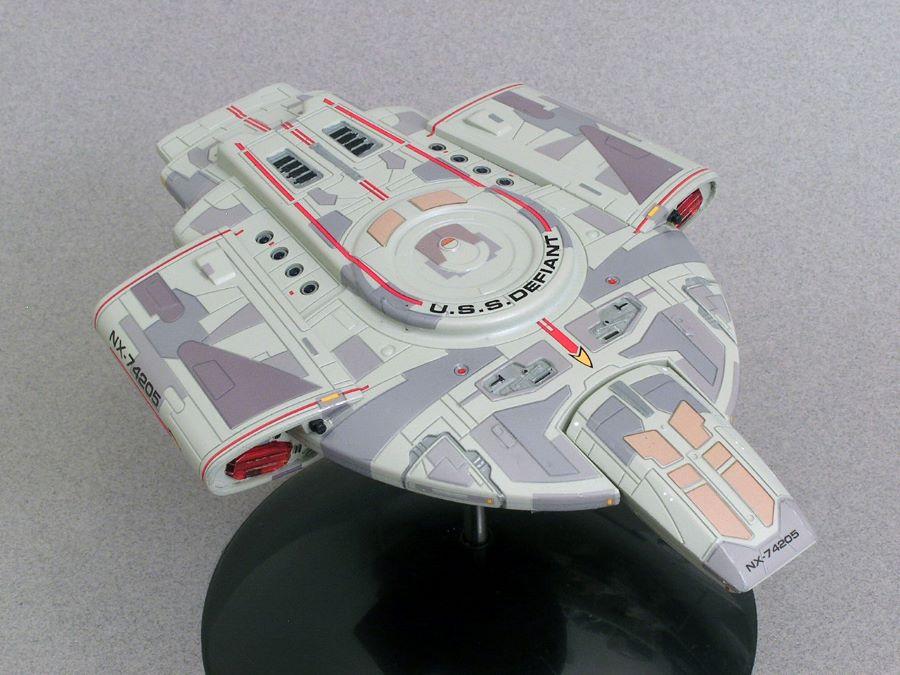
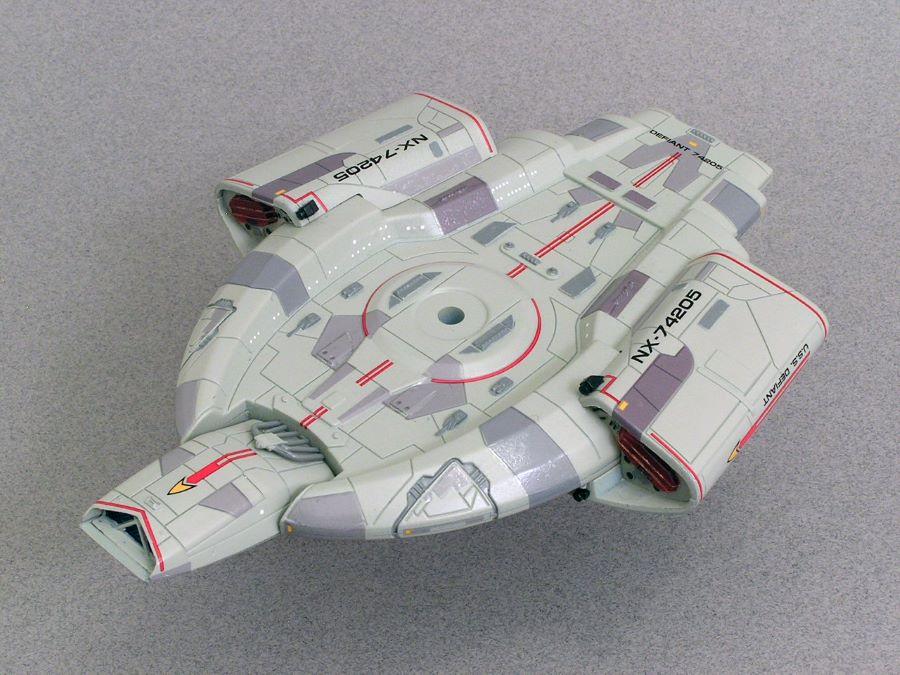
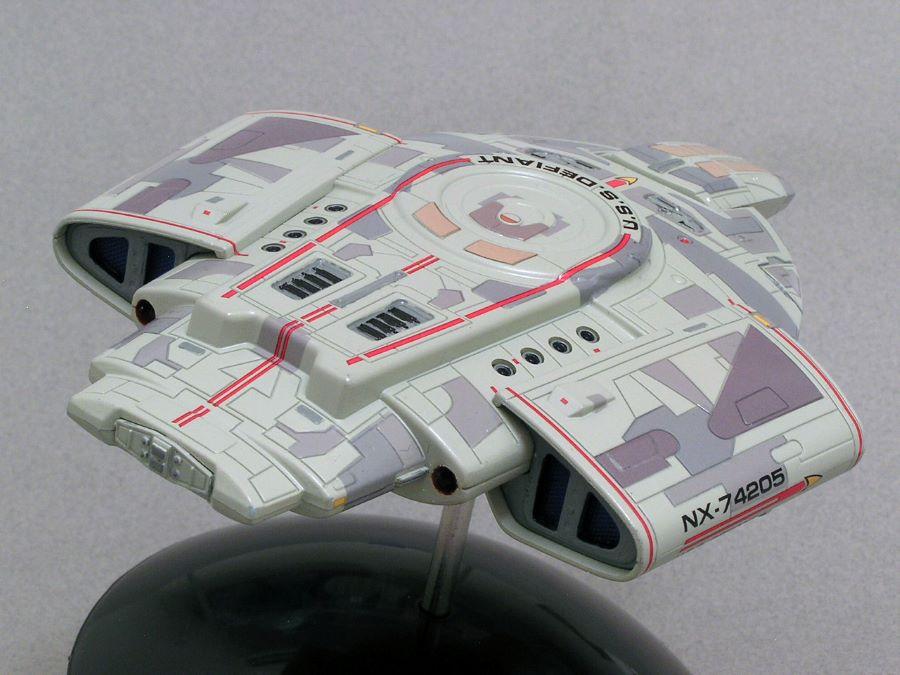
Finished my Polar Lights model of the USS Defiant starship from Star Trek: Deep Space Nine. It's a 1/1000th scale model, measures about 7 inches long, and had over 80 decals to apply. I have built several of the other 1/1000th starships from Polar Lights and they have all turned out well. These are very nice kits to build! Thanks for looking! Bart
-
Looks great - especially like the pattern on the seats. I recently completed one of these kits - built pretty much as stock. It is a nicely detailed kit for its small size. Bart
-
Thanks, everyone! A lot of good ideas here. I'll definitely give some of these a try with the kit I am working on (a 1963 Ford Galaxie 500XL) I had seen the posts that described foiling the scripts before painting. Not ready to try that yet - but I'll get there someday when I feel brave enough. I usually paint the script and other very small details and have gotten good results - my hands are still steady, my toothpicks are sharp, my patience is good, and my magnifier lamp is extremely helpful. Bart
-
Double Survivor Resto/Rescue: Two Original AMT '67 Impala Promos
bh1701 replied to Snake45's topic in Model Cars
Some great restoration work on these promo kits. I like the solution you came up for the taillights - plus I hope you got to eat some Valentine's chocolates, too! Bart -
I did my first attempt at using Bare Metal foil on this 66 Impala. I did not paint the Impala; the color is the color that was molded into the original plastic.I was pleased with the results and will be working on another kit I'd like to use Bare Metal foil on. This new kit will be painted. I've got a few questions I could use some help with: Question 1: Is this the right (or best) sequence for applying paint and the foil? My understanding is that clear coat over the foil can cause the finish to dull a bit. Primer coats Mist coats of body color Wet coats of body color Painting any body details that I will be doing by hand Clear coat Apply foil Question 2: When doing the Impala, I noticed some "adhesive residue" from the foil on the body when I removed it from the unneeded areas. Since the Impala was not painted, I was able to use some lighter fluid to remove the adhesive residue. Is this residue normal, or am I doing something wrong (maybe burnishing the initial pieces of foil too strongly with my Q-Tip and fingers)? If it is normal, then how should I remove the residue without destroying the paint/clear coat on the model? Thanks for the help! Bart
-
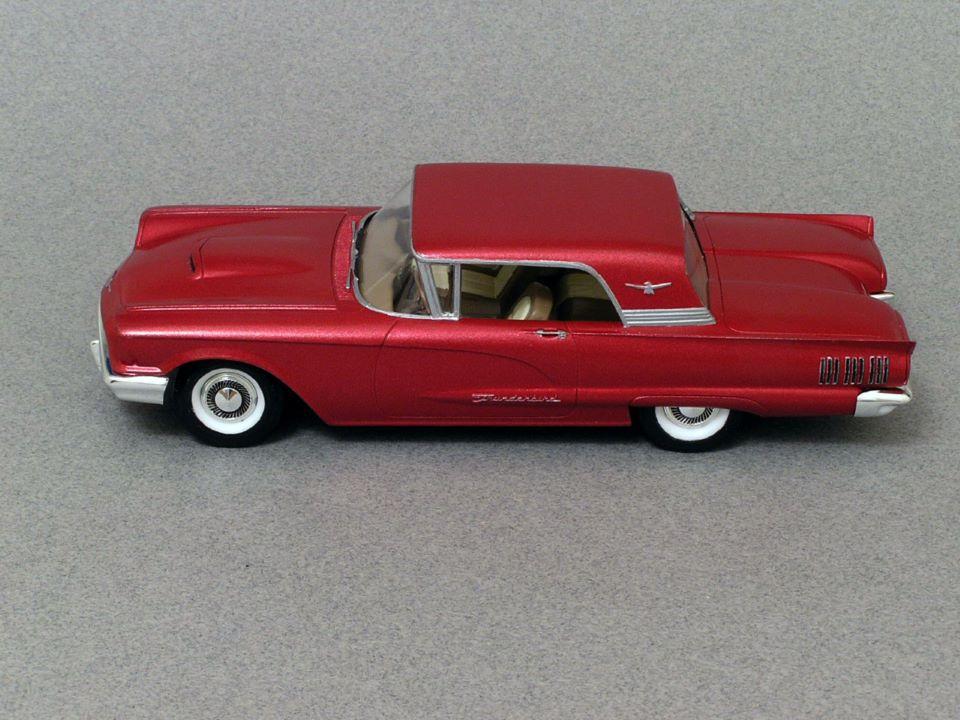
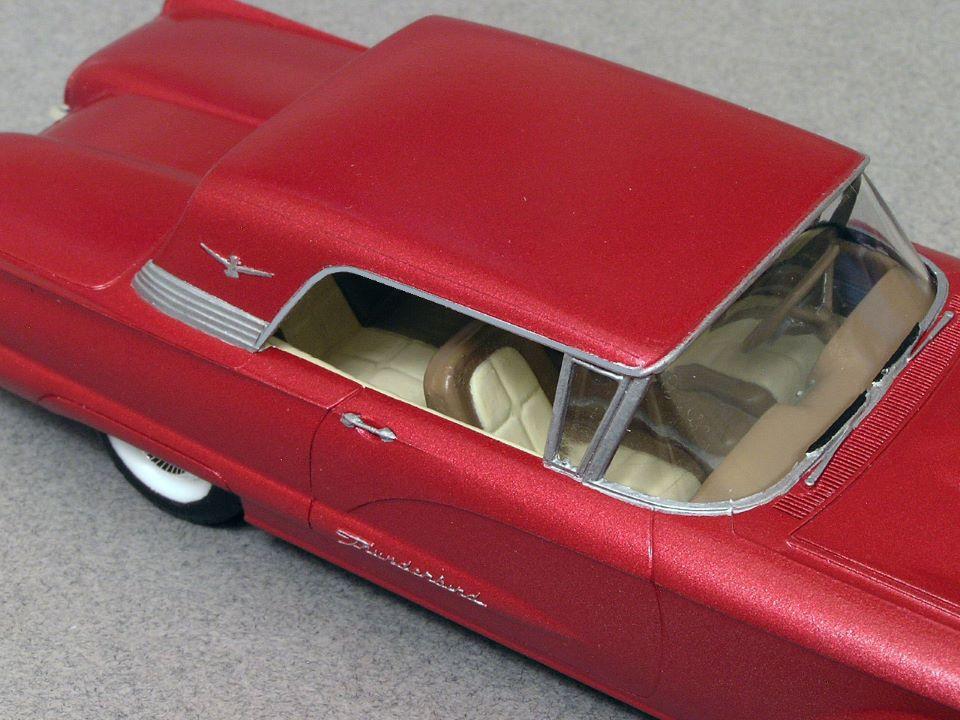
I completed my 1960 Ford Thunderbird - a 1/32nd scale AMT kit. The exterior is Testor's Honduras Maroon. Only 20 parts to this kit. All of the chrome details were painted by hand. The hardest thing about this kit was the white plastic tires - painting them black while still leaving the base white color of the plastic to represent the whitewalls. Thanks for looking! Bart