bh1701
-
Posts
390 -
Joined
-
Last visited
Content Type
Profiles
Forums
Events
Gallery
Everything posted by bh1701
-
That's cool that you own a real one! I am jealous! You are right that the stripes under the trunk do not go down far enough. Also the one on the left side under the trunk (not visible in my photos) has a more correct curve at the top corner to my eyes. The one on the right is a bit more angular at the corner. I remember that I had to make each of those corner strips using 3 different components - some of it Photoshop and some in PowerPoint. I am also not convinced that the proportions on the AMT kit in several places were a 100% match to the real thing. And I can also be a critic of my own work - as you will now see: 1) The stripes on the side of the real car appear to be thicker in height towards the front and become slimmer as they work towards the rear. Mine are uniform in height all the way. 2) The stripe on the front fender that drops down was also a pain. The side marker lights on the AMT model didn't look to be as wide as they are on the real car, so I had to alter those stripes to be about the width of the marker light on the model. 3) You'll also notice that the stripe doesn't extend below the marker light on the front fender; that was going to way too small of a decal to work with. When you print your own, you have to cut the decal extremely close to the size of the actual decal shape. Remember that the entire 8 x 10 sheet is just one single, giant decal! Finally, I don't think the proportions of / details on the AMT body are all 100% accurate. That makes it hard to shrink an image of stripes for a real car down for a model that may be off in some places. But, I am very happen with the overall model the way it turned out and most people wouldn't pick up on some the inaccuracies that exist with the decals. Thanks, Bart
-
They can print in color. That's what I generally do since I will also load the decal sheet with decals for other kits that I may be working on. The only color that they cannot print is white - since the assumption is that you are usually printing something onto a piece of paper that is already white! Here is a sample of the decal sheet file that contained the Mustang Decals, as well as decals to replace some old, yellowed decals on my USS Voyager starship. Use every available space for decals! The Voyager decals were scanned from an original decal sheet from the Monogram model of the Voyager. My neighbor had this kit and never built it. That hardest thing about the Voyager decals was removing all of the blue background that was on the entire decal sheet. That's where a lot of patience is needed, as well as using something like Adobe Photoshop and their "eraser" tools! Thanks, Bart

-
That looks amazing - especially the stubble on his face and the colors on the wall behind him! Bart
-
I create the decals using PowerPoint and/or Adobe Photoshop. I found images of the stripes on the website of a company that makes them for the actual 1:1 cars. Photoshop is primarily used to erase any background colors that may be on the original image. White backgrounds are OK to leave since printers do not print white. The final decal images are placed into a PowerPoint slide that I then export as a PDF file. I will adjust the size of the images, as needed, so that everything is the right size. I will usually add a 1" x 1" square box on the slide somewhere. The reason for this is to ensure that the decals print at the correct size. I have found that when I print the slide from PowerPoint that the images are all a bit undersized. The PDF - when the printing option in the PDF viewer is set for "actual size" - prints them at the exact size needed. Checking that the dimensions of the box are really 1" x 1" will confirm that all is good. I will print the PDF at home and will check my measurements, and will adjust the images in PowerPoint if needed. The PDF will be loaded onto a USB drive and taken to the local FedEx Office. When I get to FedEx Office, I always work with an associate instead of printing them myself on one of their printers. The settings for their printer in PDF need to be "Actual Size" and the paper type needs to be set to "Transparency". Also, they need to print on the correct side of the decal paper - show them which side needs to be printed on and they will figure it out! I have them print a sample on plain paper so I can double check the measurements one last time. You will need to supply them with decal paper. Once last thing - I will fill the PowerPoint slide with as many copies of the decals as I possible can. There will be times that something goes wrong with the application/positioning of a decal and you will be glad that you had extras of that decal. Trust me on this! The cost at FedEx is usually in the $1 range. Sometimes they charge for the test print on plain paper, but I have done this enough times at my location that they know me now and only charge for the printing on the decal sheet. Hope that helps - let me know if you have any more questions! Thanks, Bart
-
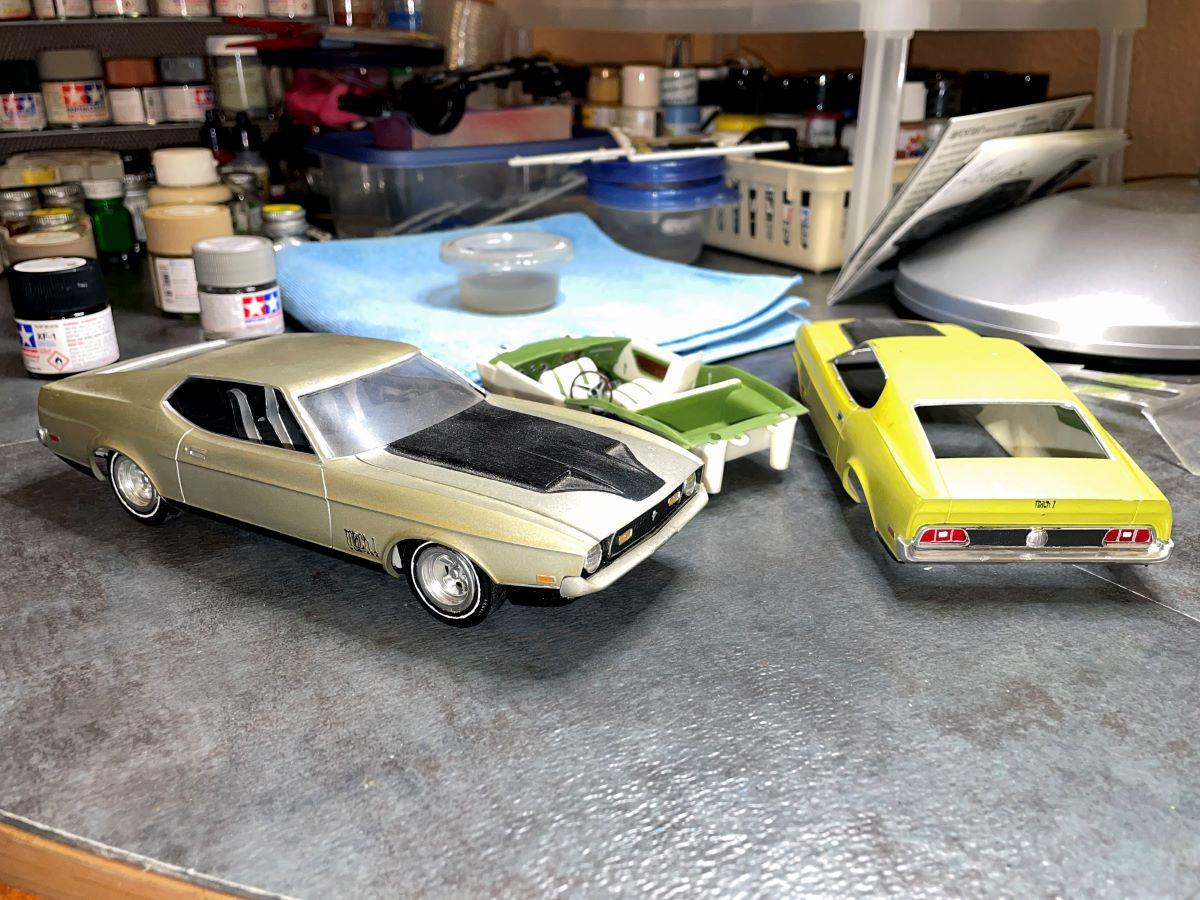
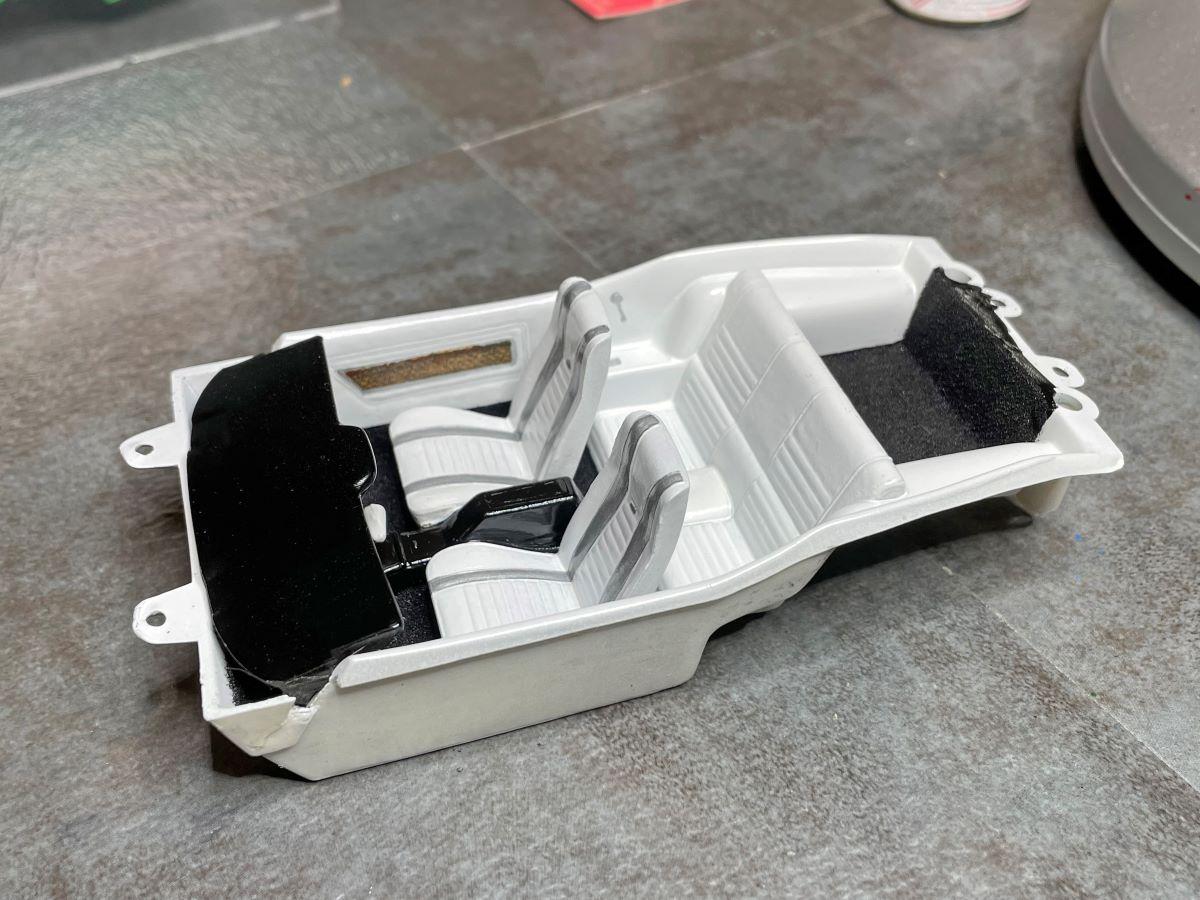
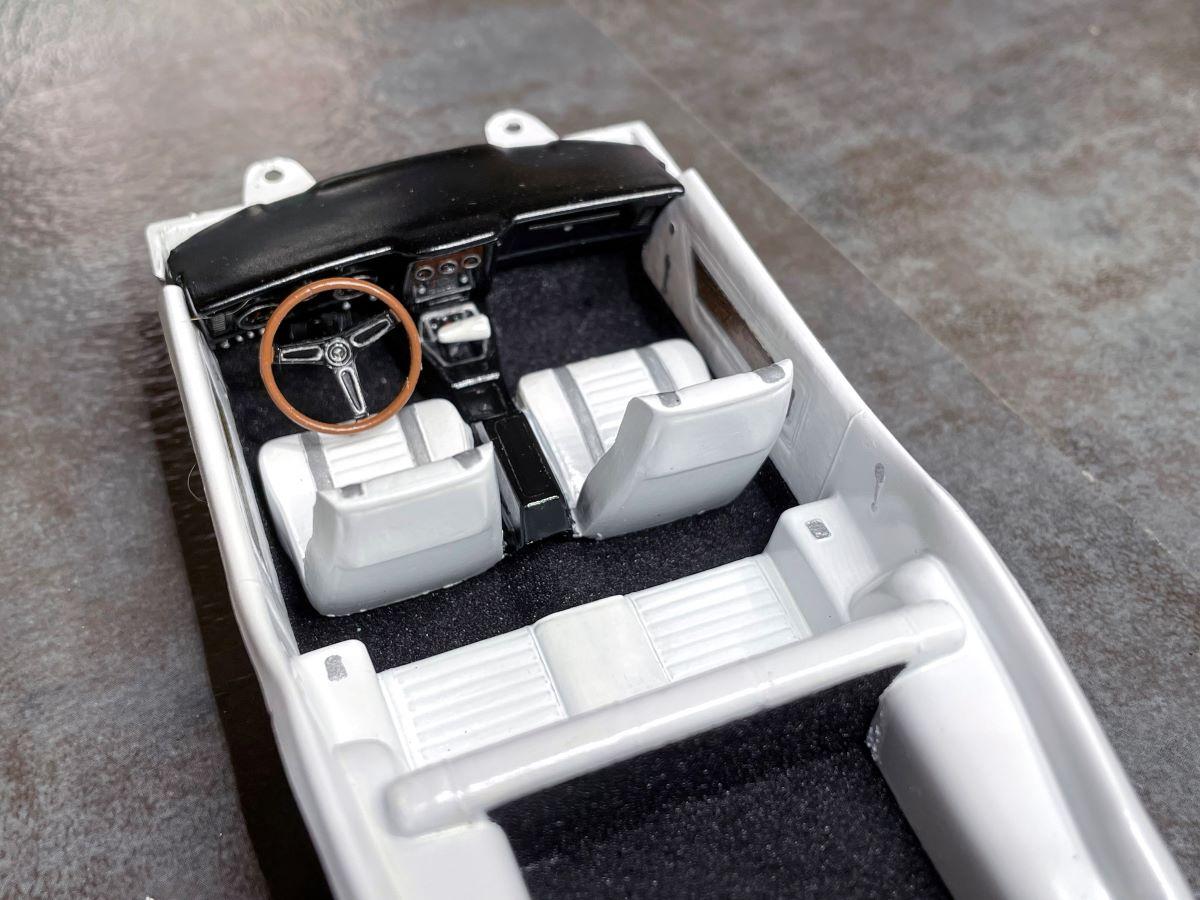
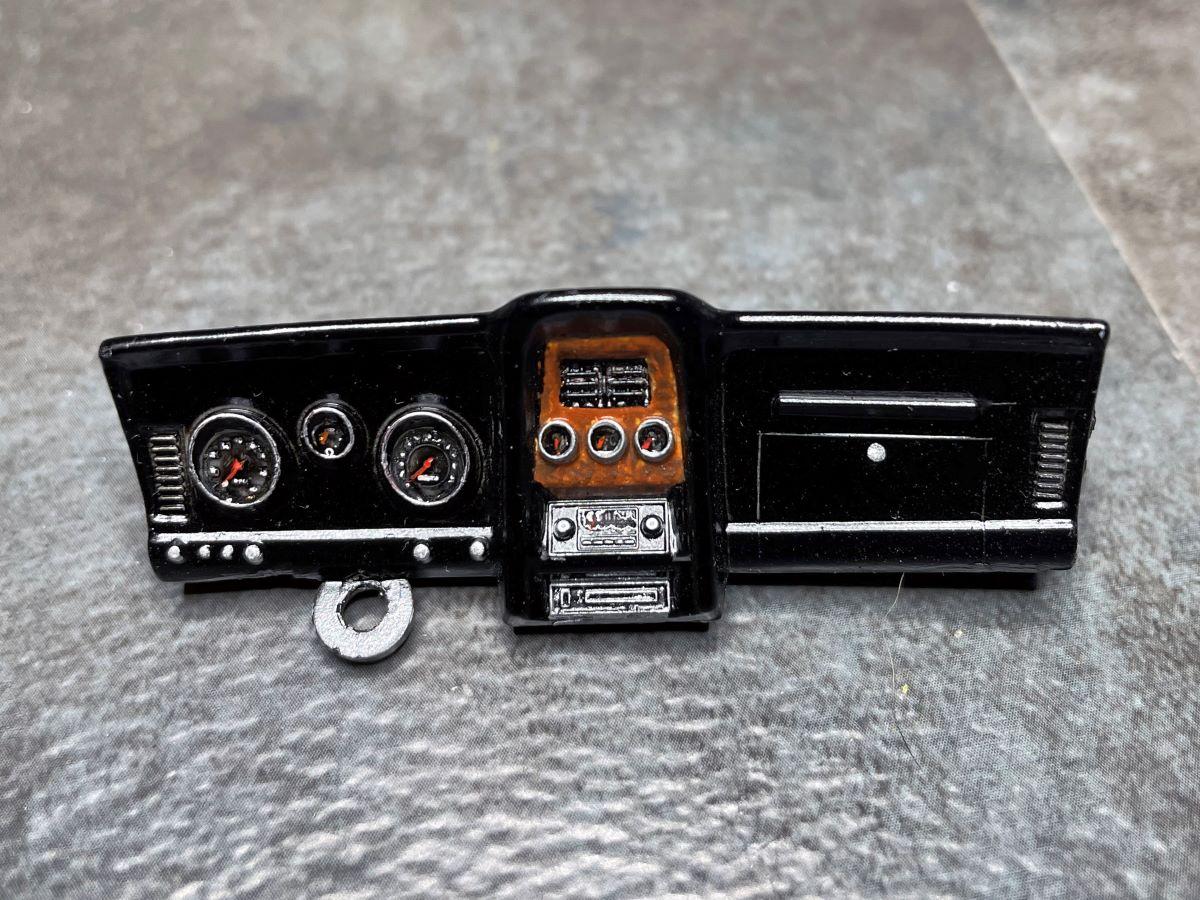
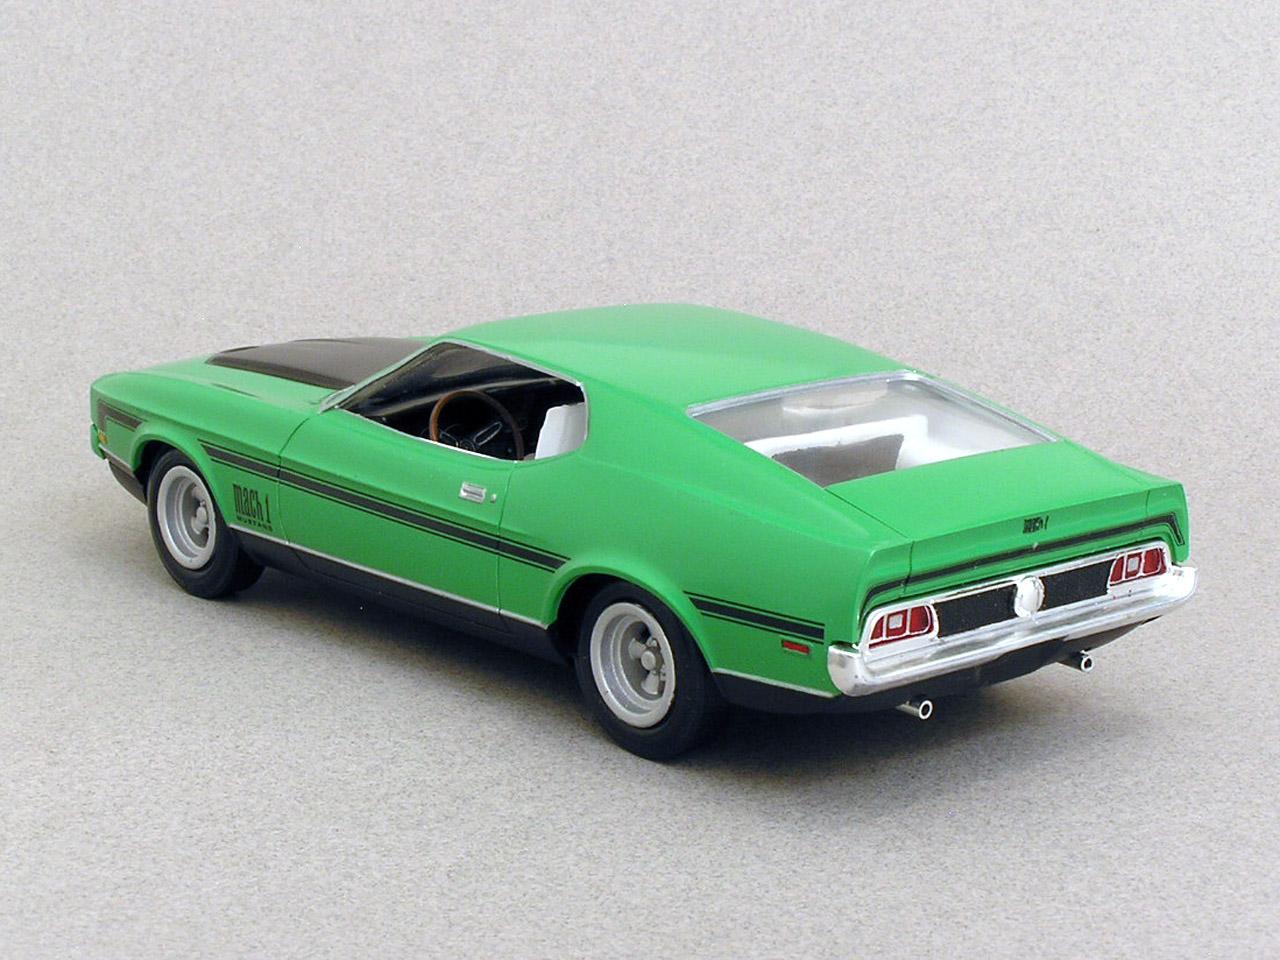
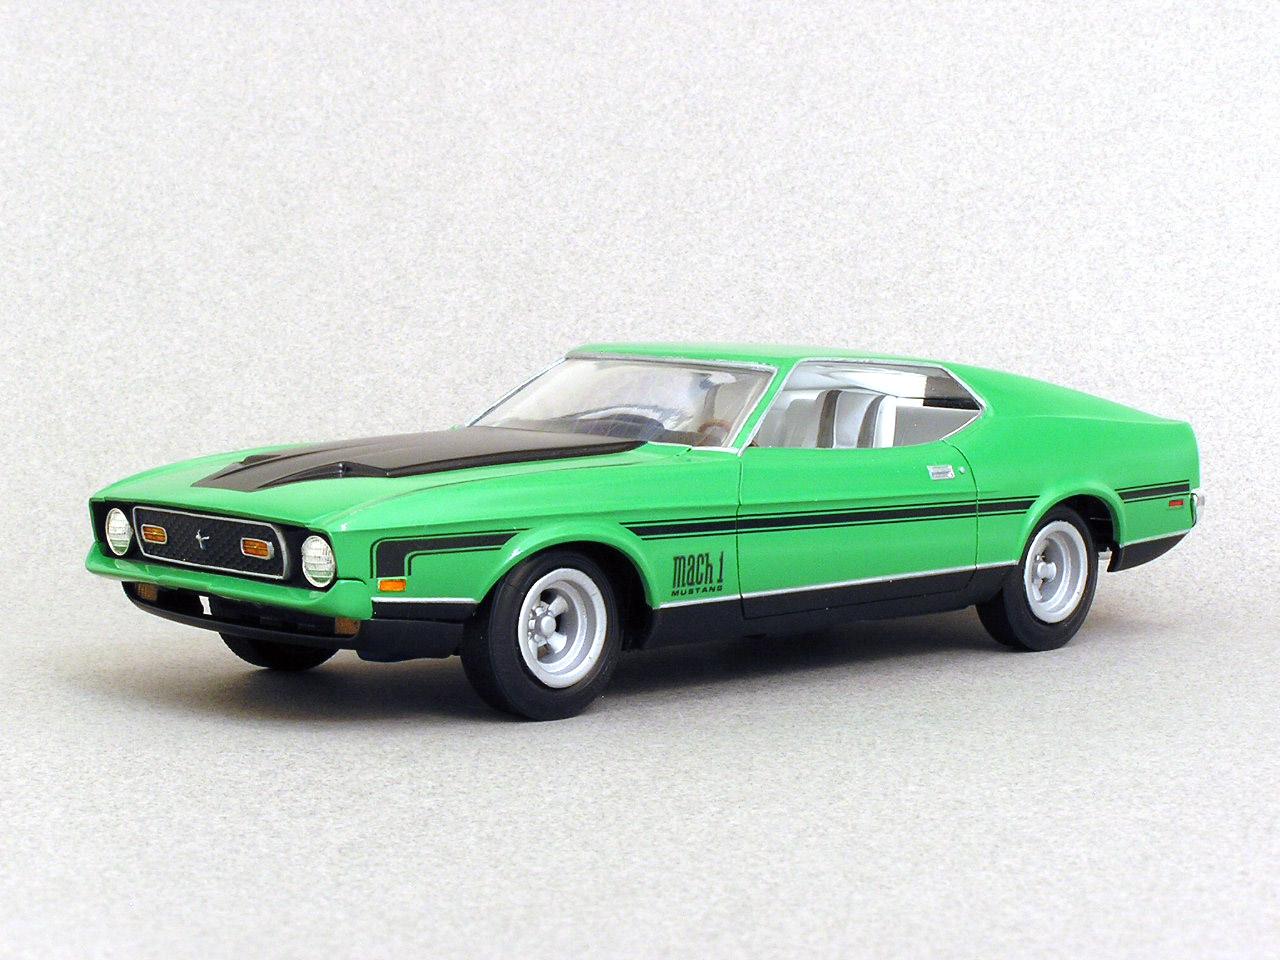
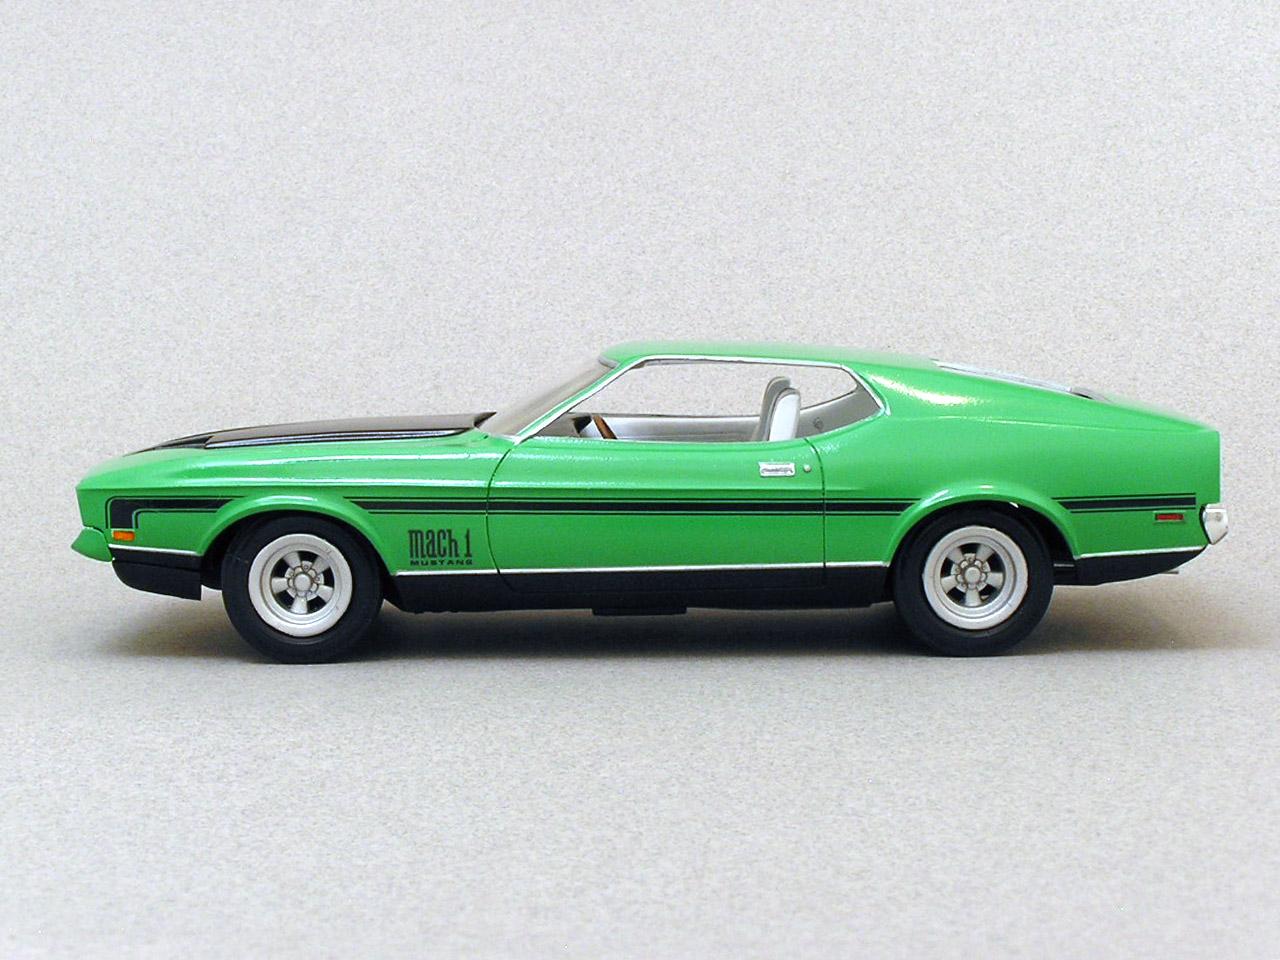
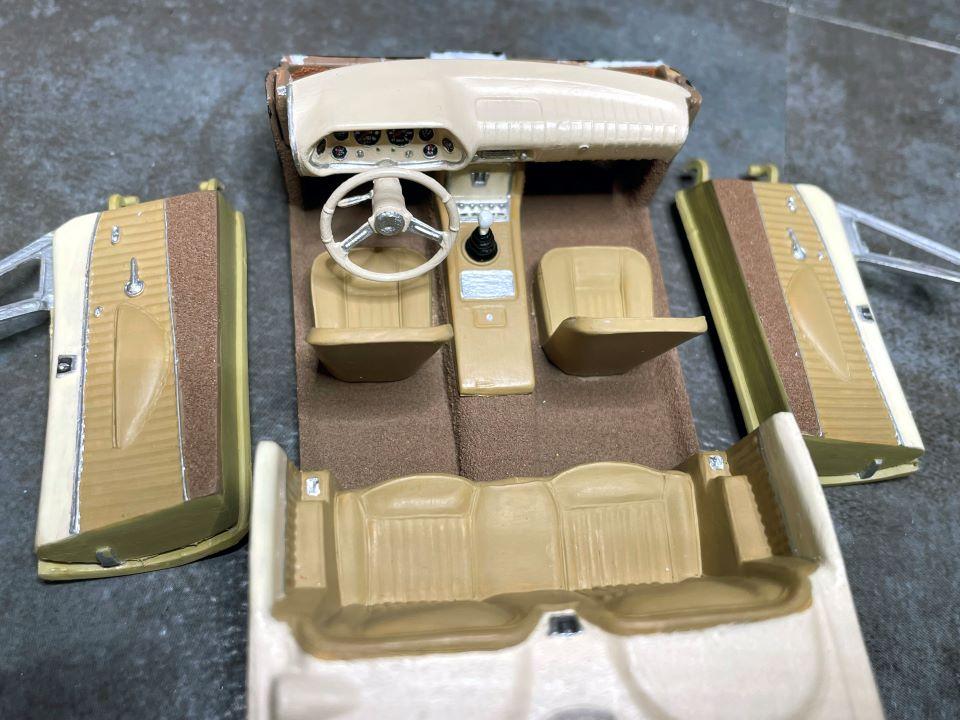
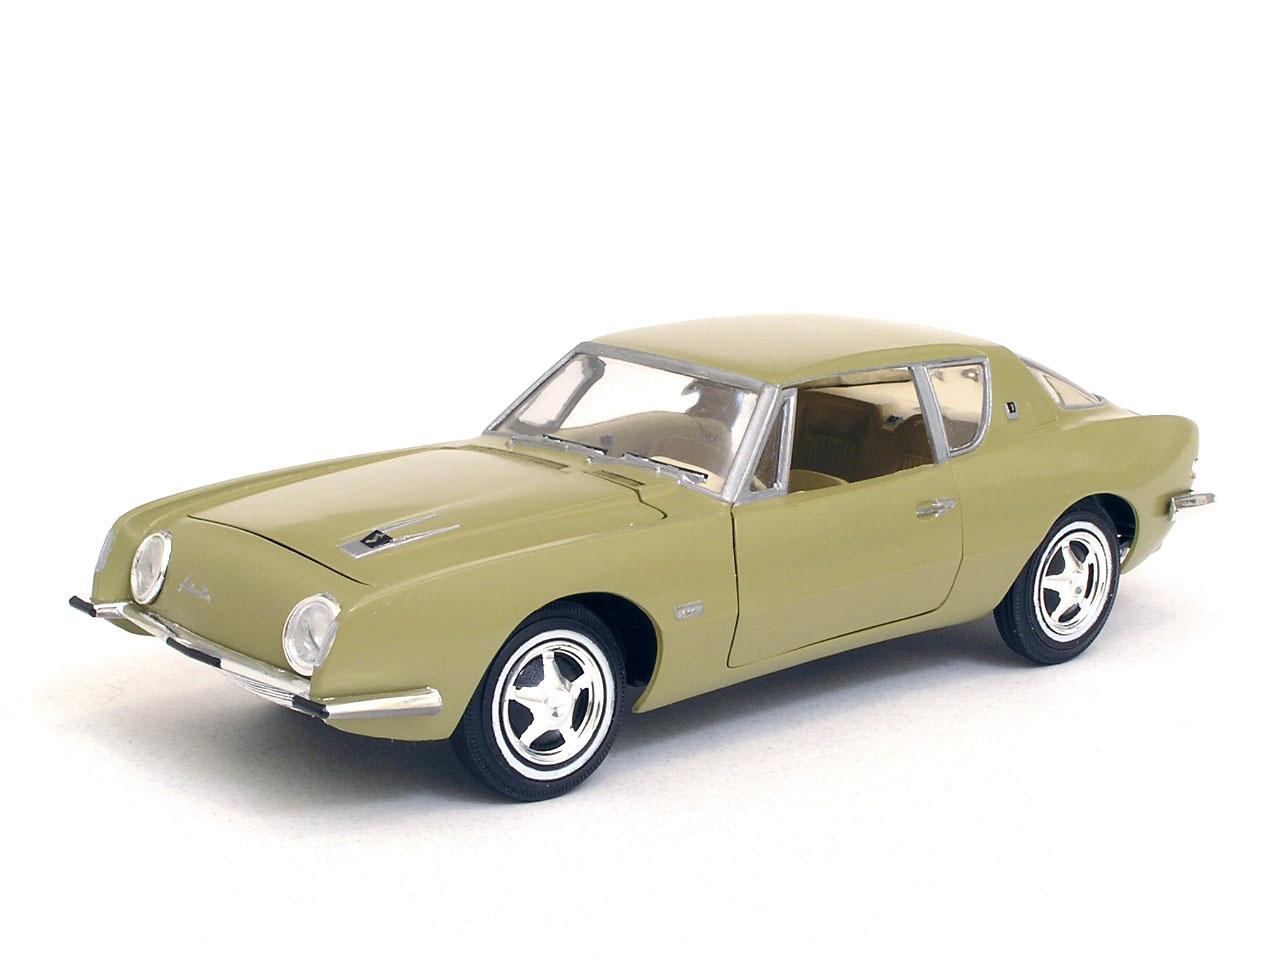
Here is my latest completion - an AMT 1/25 scale 1971 Mustang Mach 1. This was put together using 2 kits from the 1970's that I had built as a teenager. I included a photo of the original cars. The bright green one supplied most of the parts, but the silver one did donate some parts that were broken or missing on the green one. I used some aluminum tubing for the exhausts. Chrome trim is hand painted. The color is Tamiya TS35 Park Green. I designed the decals myself and had them printed on a laser printed at the local Fed Ex Office store. Thanks for looking! Bart
-
Best way to apply a black wash?
bh1701 replied to Brandon Miller's topic in Tips, Tricks, and Tutorials
Are you asking about the Tamiya Black Panel Line Accent? I use that sometimes to accent the door and trunk panels, but have never tried it as a wash. Hopefully someone else has some experience with it. Thanks, Bart -
Best way to apply a black wash?
bh1701 replied to Brandon Miller's topic in Tips, Tricks, and Tutorials
I use Vallejo Black Model Wash and just brush it on. It settles in the crevices very well. Sometimes may need to apply a second coat for a couple of spots where the coverage was not that good. I tried making my own washes and never had much success. I now use the Vallejo exclusively. I have used it on bumpers, wheels, and other places. Here is an example of a grill that I used the black wash on. Thanks, Bart
-
Some 1/160th scale vehicles I built for my N Gauge train layout. The PT Cruiser is a resin kit. All of the others are 3-D Printed Plastic kits. All were hand painted. Thanks for looking! Bart
-
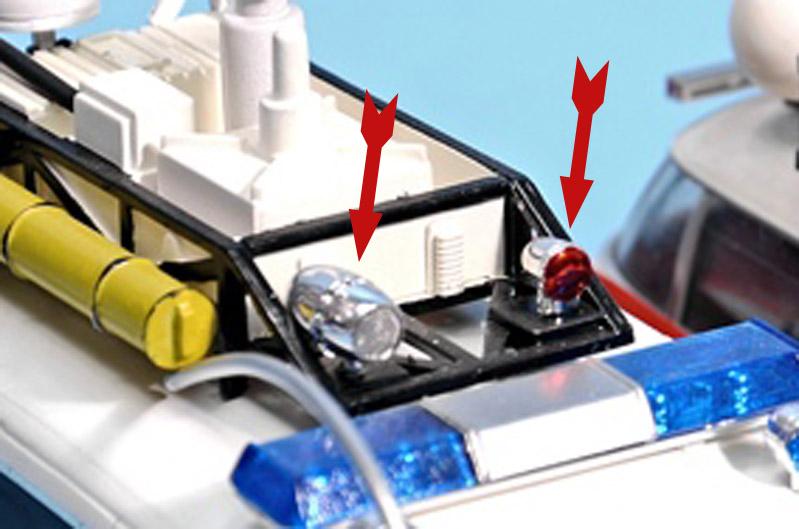
Thanks for the ideas! The stuff from "3 Inches Under" looks good. I found some custom side mirrors in my stash that should work as a substitute for the spotlight. I will look at pen tops (and odd little things I might find at Home Depot) to see if I craft a siren that looks good enough before investing much $$. Bart
-
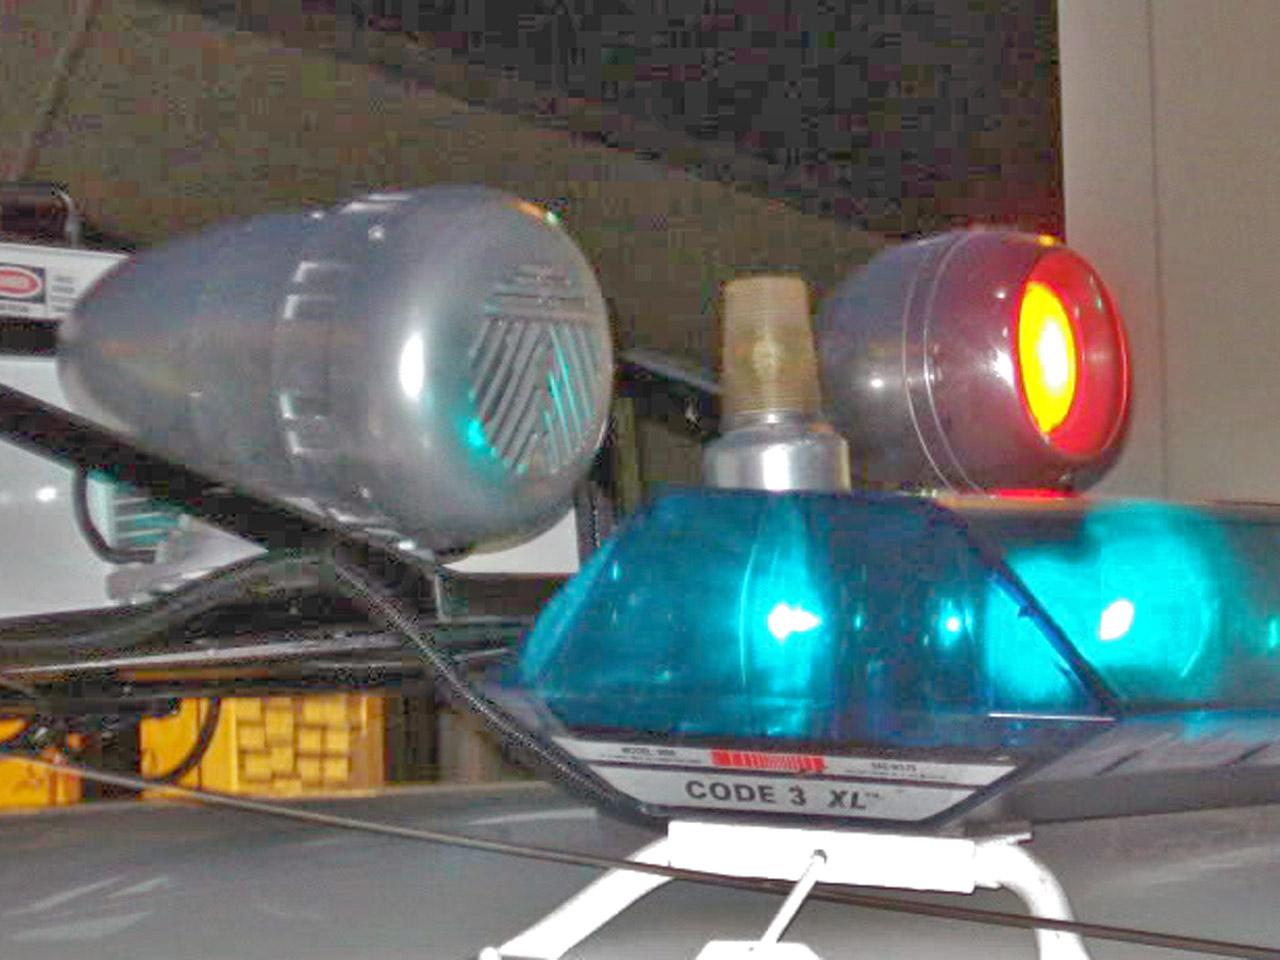
I posted this in the "Wanted" section, but thought I would also post here. I have a 1/25 scale model of the Ghostbusters Ecto-1A Cadillac from the second movie that I want to make look closer to the Ecto-1 from the first film. I never realized how much different stuff was added to the roof of the 2nd car until I started doing my research. I think I have everything figured out on what I need to do, but I need some help finding a siren and spotlight for the front part of the roof. Any ideas on where I might be able to find these, or ideas on how you might build them from scratch? Thanks, Bart
-
Questions - brush painted chrome
bh1701 replied to bh1701's topic in Model Building Questions and Answers
Tim, That looks really good. I ordered a bottle of the Green Stuff World chrome today. Did you brush it on or dab it on? The host of the video referenced earlier was not in favor of brushing it on and showed a spoon where the chrome had been brushed on. Thanks, Bart -
Questions - brush painted chrome
bh1701 replied to bh1701's topic in Model Building Questions and Answers
Tim, That looks really good! I did order a bottle of the Green Stuff World chrome today. Did you brush this on like paint, or dab it on? In the video link from an above post, the host was not in favor of brushing and showed a plastic spoon that was brushed on to. Thanks, Bart -
Questions - brush painted chrome
bh1701 replied to bh1701's topic in Model Building Questions and Answers
I have masked and sprayed Tamiya silver in the past and that has worked well. The model I am working on is a 71 Mustang Mach 1. There is a small chrome strip that runs above the black areas on the lower parts of the side. I had painted these strips by masking the area and brushing on Testor's chrome silver enamel. It looked great. I later applied the Mach 1 decal and stripes to one of the sides, and noticed that the silver had worn off in a few spots as my fingers had been in contact with these areas while I was positioning the decals and handling the model. I would be worried about applying any masking around the Mach 1 decals for fear that they would get damaged. Would several coats of Tamiya clear over the decals protect them from being pulled off by masking tape? (FYI: I use the Tamiya masking tapes) If the clear would protect the decals from being pulled off, then I could consider masking/reapplying the silver. If I had to brush paint the area under the Mach 1 decals without the use of masking tape, it's such a small area under that decal that I could probably free-hand the painting. My hands are very steady and I have a very fine brush and a lot of patience to use! In retrospect, I think I probably should have used a different approach and done the following sequence. Does this make sense? Mask and spray paint/brush paint the chrome. Put several clear coats on to protect the chrome. Apply the decals Put some more clear coat on to protect the decals. If we can learn from our mistakes, that's a good thing! Bart -
Questions - brush painted chrome
bh1701 replied to bh1701's topic in Model Building Questions and Answers
The Green Stuff looks interesting. I may need to give this a try. I watched the video and saw that you dab it on as opposed to brushing it on. That might work for what I need to do. Is there a US source to order this from? Does it need a black undercoat, or could you dab it over other colors and still get a chrome look? My concern with Molotow is that it doesn't seem to like to be handled or touched. It seems to lose its shine when this happens. Since I will be painting on the exterior of the car body, it would be prone to being touched (during or after assembly). Not sure if a clear coat over Molotow helps or not. The Testor's Chrome Silver never seems like it thoroughly dries and hardens up. I had painted some of the side trim already (quite a few days ago), but while handing the car to apply decals I saw that the chrome was getting rubbed away. Thanks for the ideas, Bart -
I've got a car that was painted with Tamiya Lacquer spray paint. Since BMF has its issues right now, I will be hand painting the chrome trim around the windows, body side moldings, etc. Masking around these areas and spraying the chrome silver is not an option at this point (the tape would have to go over some decals that have been applied and I am worried about damaging them). What's the best chrome silver that I can brush on. Please note that I am not looking to use Molotow Chrome, so I'd appreciate other suggestions. I will be applying Tamiya Clear Coat (from a spray can), also. Is there a suggested sequence for painting the chrome? Before the first clear coat, between some of the clear coats, or after all clear has been added? If done last, will the chrome paint stand up when the kit is handled/touched? Many thanks, Bart
-
Front Grilles, Accent with Black
bh1701 replied to RT6PK's topic in Model Building Questions and Answers
I have also had good results using Vallejo Model Wash (76.518 Black). Like people had mentioned with the Tamiya product, sometimes additional applications may be needed in some areas. This is a recent kit done with the Vallejo wash. Thanks, Bart
-
The little Thunderbird looks really great! ... and also the Comet!
-
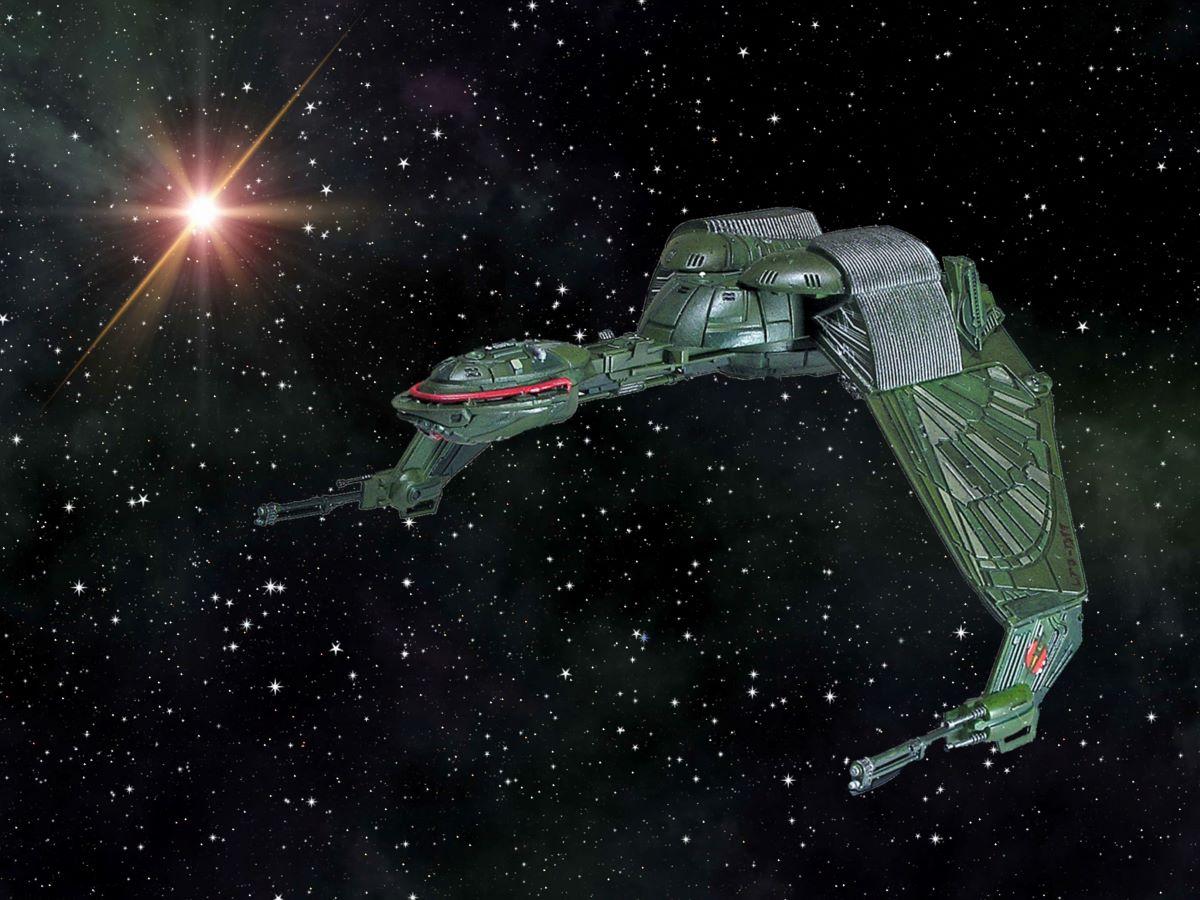
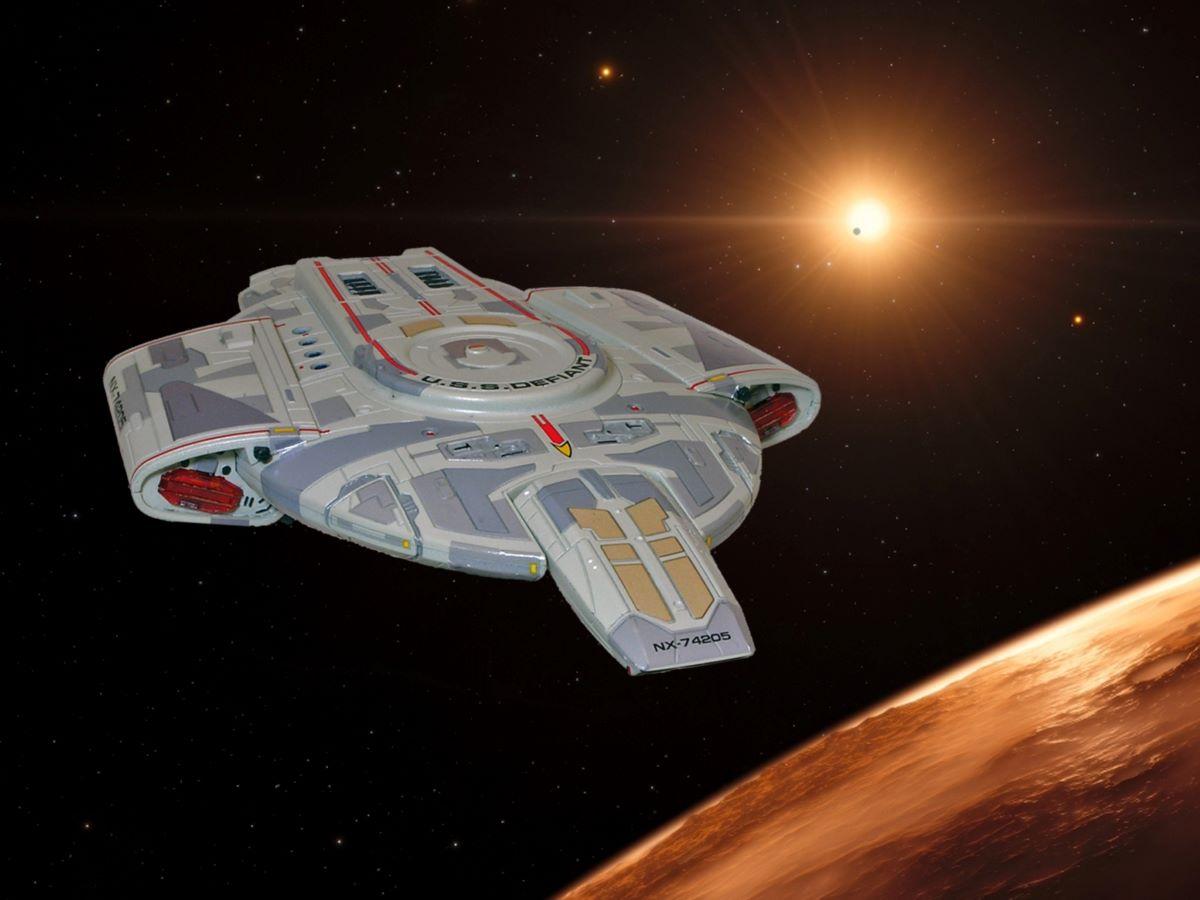
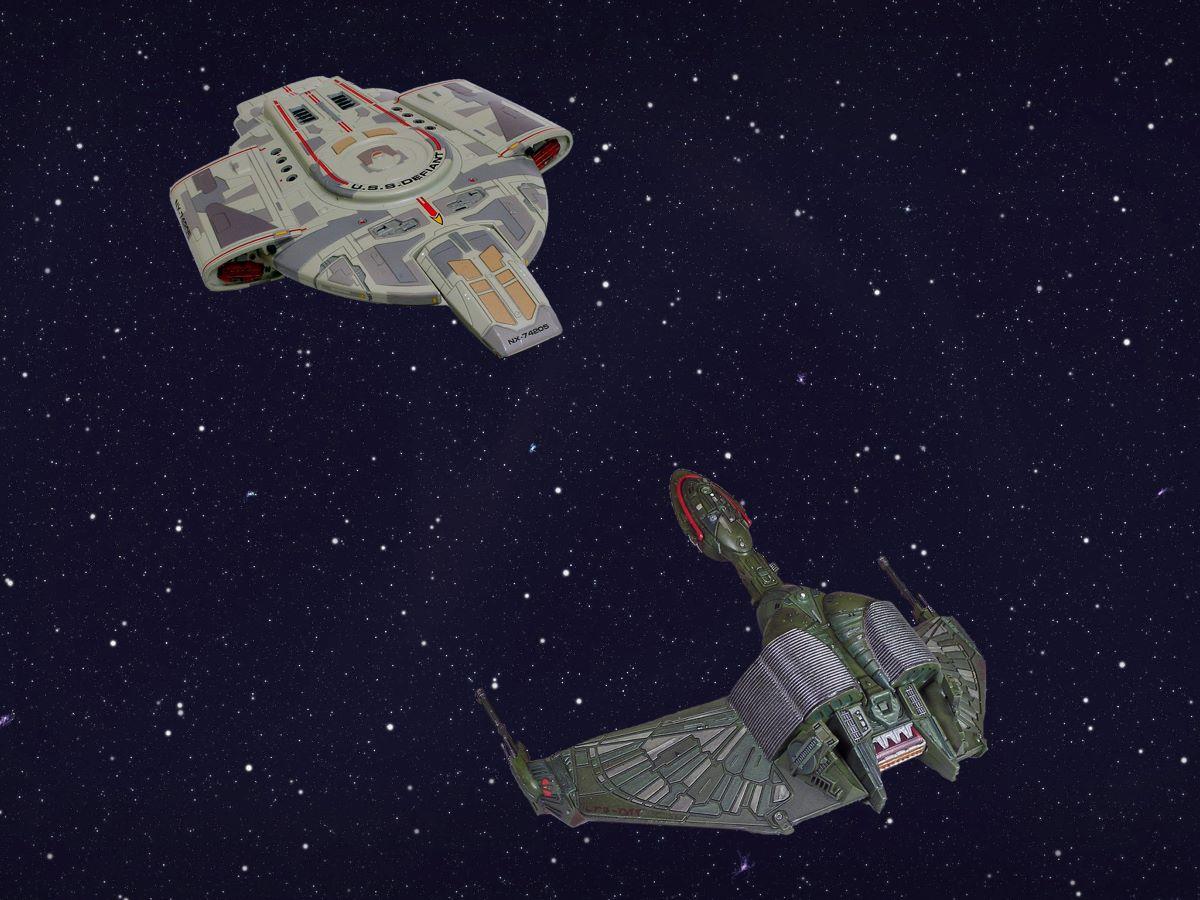
It's been pretty cold down here in Texas lately, so I have been staying indoors where it is warm! Decided to have some fun with a couple of my Star Trek ships by photoshopping in some star backgrounds. These are the small Polar Lights kits. The Bird of Prey is about 4" long, and the Defiant is about 6" long. Thanks for looking! Bart
-
Looks good!
-
That looks really good!
-
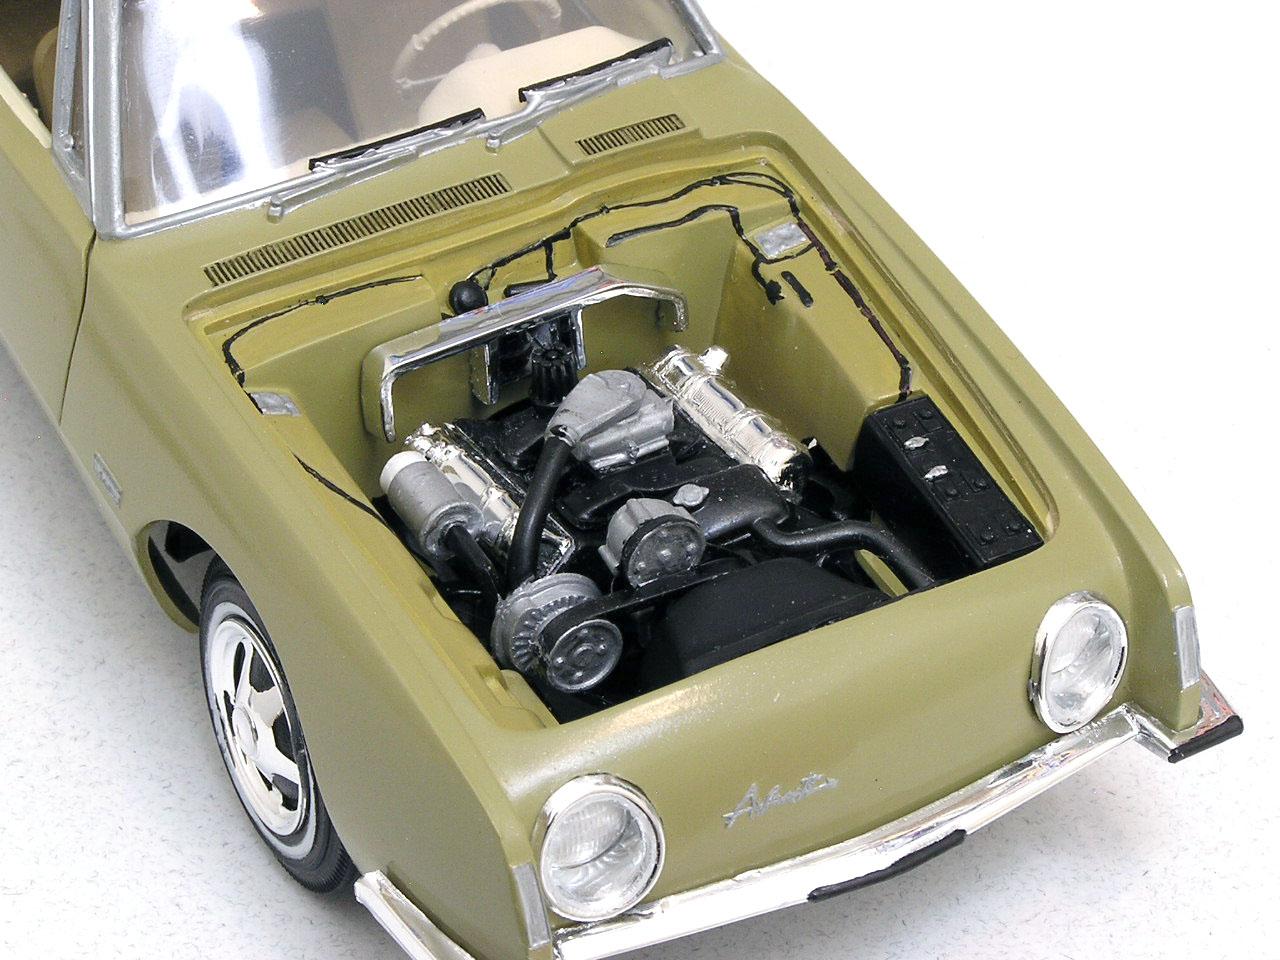
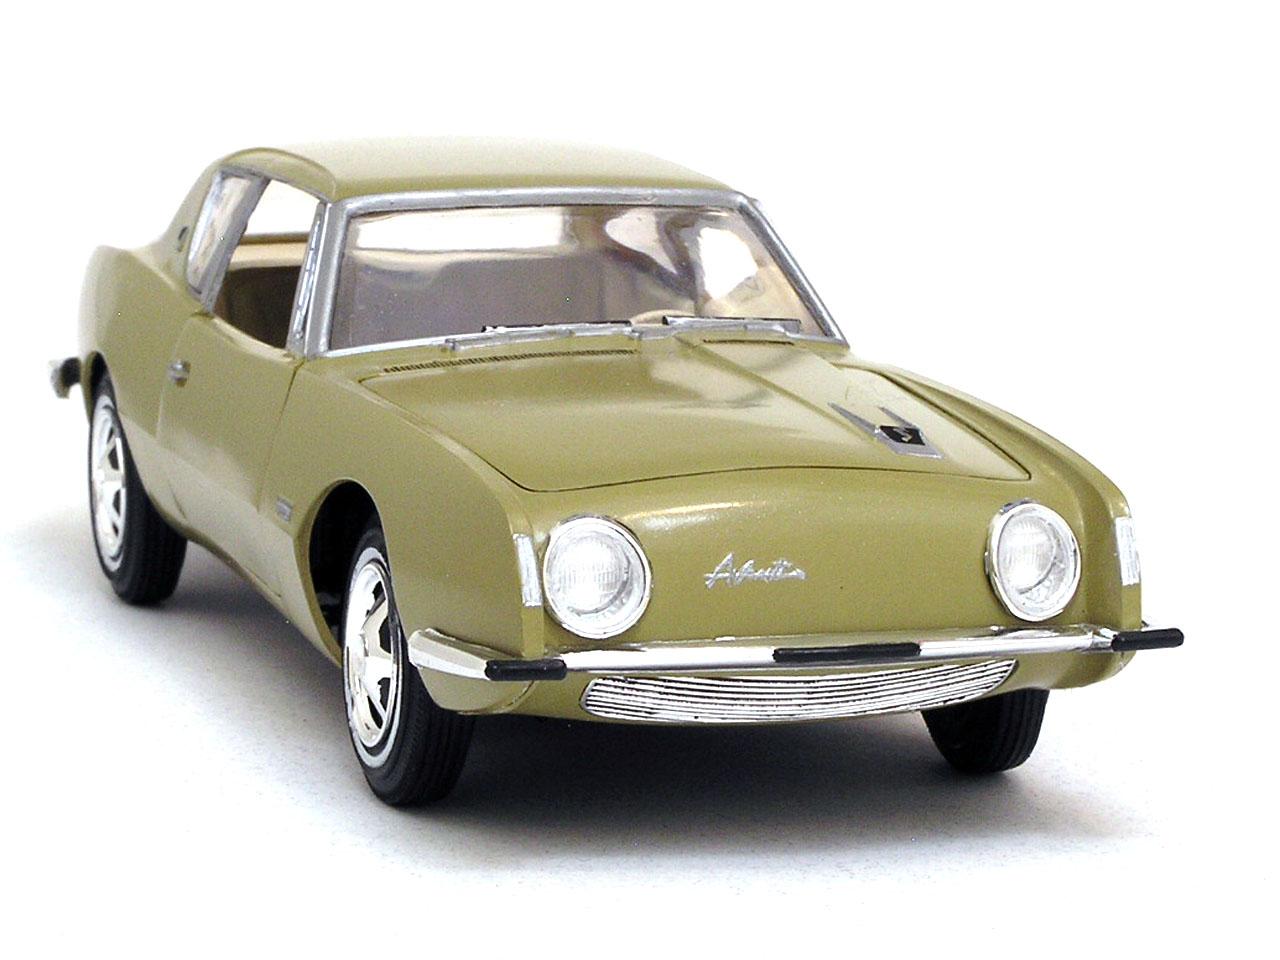
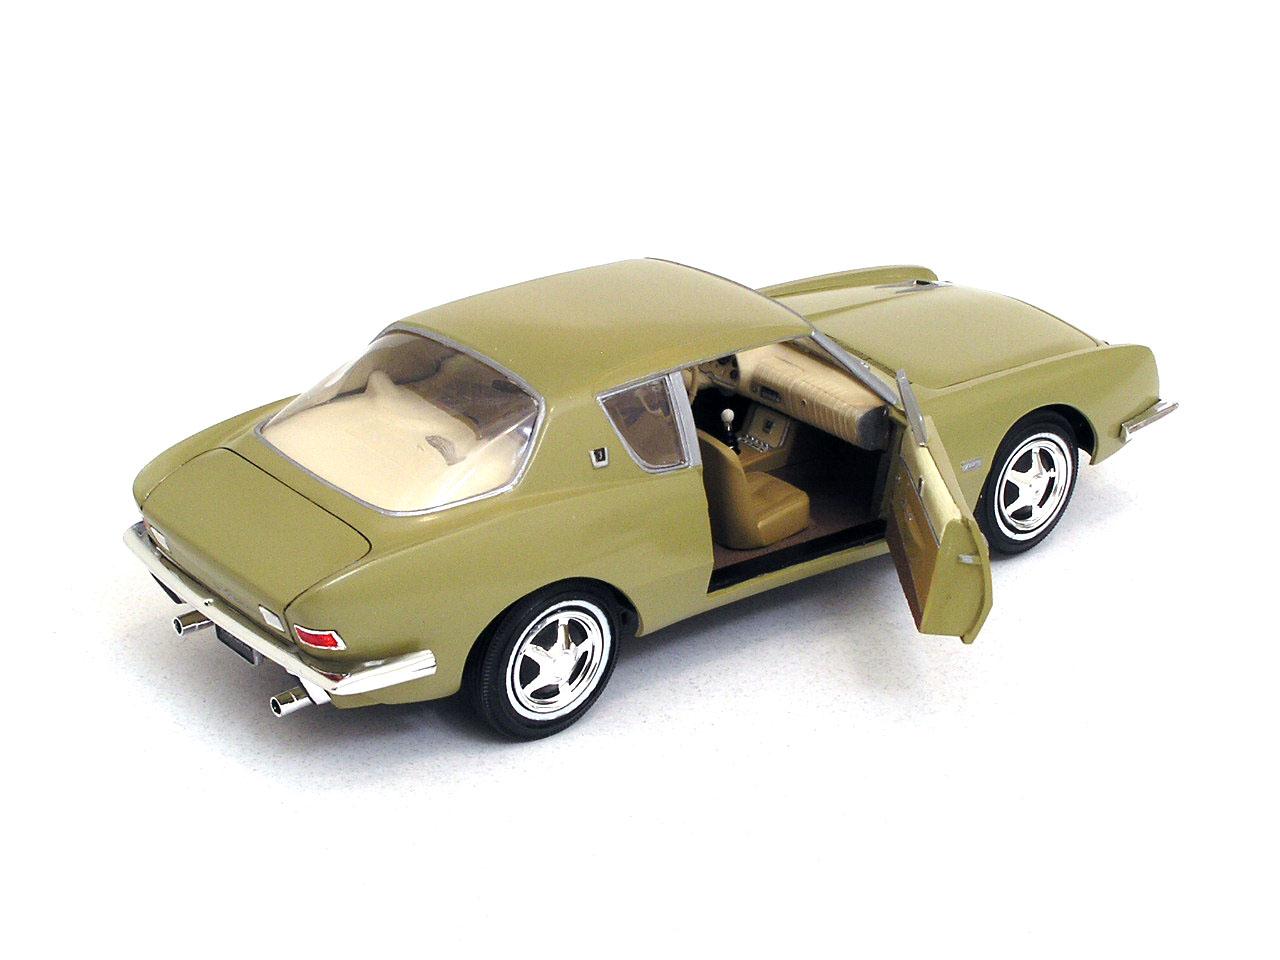
Here is my latest completion - AMT's 1/25 scale 1963 Studebaker Avanti. The exterior is Tamiya's Dark Yellow with a Clear Pearl and Clear Gloss over it. All in all, this was a nice kit. However, it did take quite a bit of work to get the doors to shut as well as they do now! All chrome trim and scripts are hand-painted. Thanks for looking, Bart
-
That came out very nice! I followed your Work-in=Progress thread and enjoyed seeing it come together. The coloring that they have added to their kits really improves the overall look. The pure metal ones are nice, too - but the shuttle kit wouldn't look as good if it were all shiny metal. Bart
-
Glad to hear that you picked up the train kit! Take your time and be patient with it. I would suggest building one of the freight cars first to get the feel of building these things first. That will help you refine your building techniques before you tackle the rest of the kit. Pick whichever freight car is your "least favorite" - so, if you screw it up, you won't be that disappointed! Save the locomotive and caboose for the last 2 you do. Find a variety of different sized tools to use to form the rounded shapes (axles, locomotive fans, etc.). Anything that has a round shape on it somewhere will work - paintbrush handles, screwdrivers, handles on small needles files, pencils, etc. Just look around the house and you'll be amazed at all the "tools" you will find! Post some pics when you get it done! Bart
-
Thanks - I'll hit the chassis and other parts with a hair dryer. If I wanted to use a primer under acrylic paints, what primers would you recommend? Airbrushed or sprayed from aerosol can? Would one of the Tamiya Fine Surface aerosol primers work under acrylic paint? Thanks, Bart
-
I am just starting to work with my Paasche dual-action airbrush and decided to try painting a chassis, the engine and some other engine compartment items using Createx Opaque Black. The paint looked like it went on well, but after a few days it still has a tacky (or rubbery) feel to it. As I was attaching parts to the engine block, I noticed that the paint was rubbing off the sharp edges and raised areas (like the bolt heads on the transmission). Any ideas on what I have done wrong, or does it just take a long time for the Createx paint to fully dry before you can start to handle it? Do you need to apply any sort of clear coat to the paint? Some info on my process: Thinned using Createx 4011 Thinner at about 10% ratio. Sprayed at around 30 psi Paint was applied directly to plastic parts. I did not use any primer (I usually don't prime anything except the body when I use spray cans and have never had any issues) Did not wash parts in dish soap and water (I usually do this for bodies, but not other parts - have not had any issues doing it this way) Sprayed in garage. Outside temp was in the 70's-80's. with less than 10% humidity. Any ideas or suggestions will be appreciated! Thanks, Bart