bh1701
-
Posts
390 -
Joined
-
Last visited
Content Type
Profiles
Forums
Events
Gallery
Everything posted by bh1701
-
F-14 Tomcat
bh1701 replied to JET.'s topic in All The Rest: Motorcycles, Aviation, Military, Sci-Fi, Figures
Simply amazing! Great work! -
Brush painting Tamiya acrylics?
bh1701 replied to Monty's topic in Model Building Questions and Answers
Andrew, You need to use only a little bit of retarder. Tamiya's website suggests the mix ratio is 10-1 (10 Paint – 1 Retarder). However, I am not as scientific about it. I usually put a little paint in a soda or water bottle plastic cap, and then add a drop or two of retarder and mix it together. If it still seems to be too thick to work with, I'll add another drop or two. Bart -
Brush painting Tamiya acrylics?
bh1701 replied to Monty's topic in Model Building Questions and Answers
As others have mentioned, use a Retarder. I use the Tamiya one. Makes a big difference - the paint flows on much better and doesn't dry as fast. I was originally not a big fan of Tamiya acrylics - until I started using their retarder which changed my whole experience. Painting over Primer is also advised. Bart -
Found this article on the 1949 (yes - 1949!) Mustang. Thought people might find it interesting! https://www.macsmotorcitygarage.com/a-whale-of-a-car-the-1949-mustang/
-
That's a really nice looking model. I wish someone would have made a nice plastic kit of the Mustang I. The Automodelo version is a little out of my price range! Bart
-
Looks great!
-
A very interesting model. Something you don't see every day!
-
Exceptional work!
-
Very nice builds! I have learned a lot from this forum that has improved my model building skills - and you will, too! Bart
-
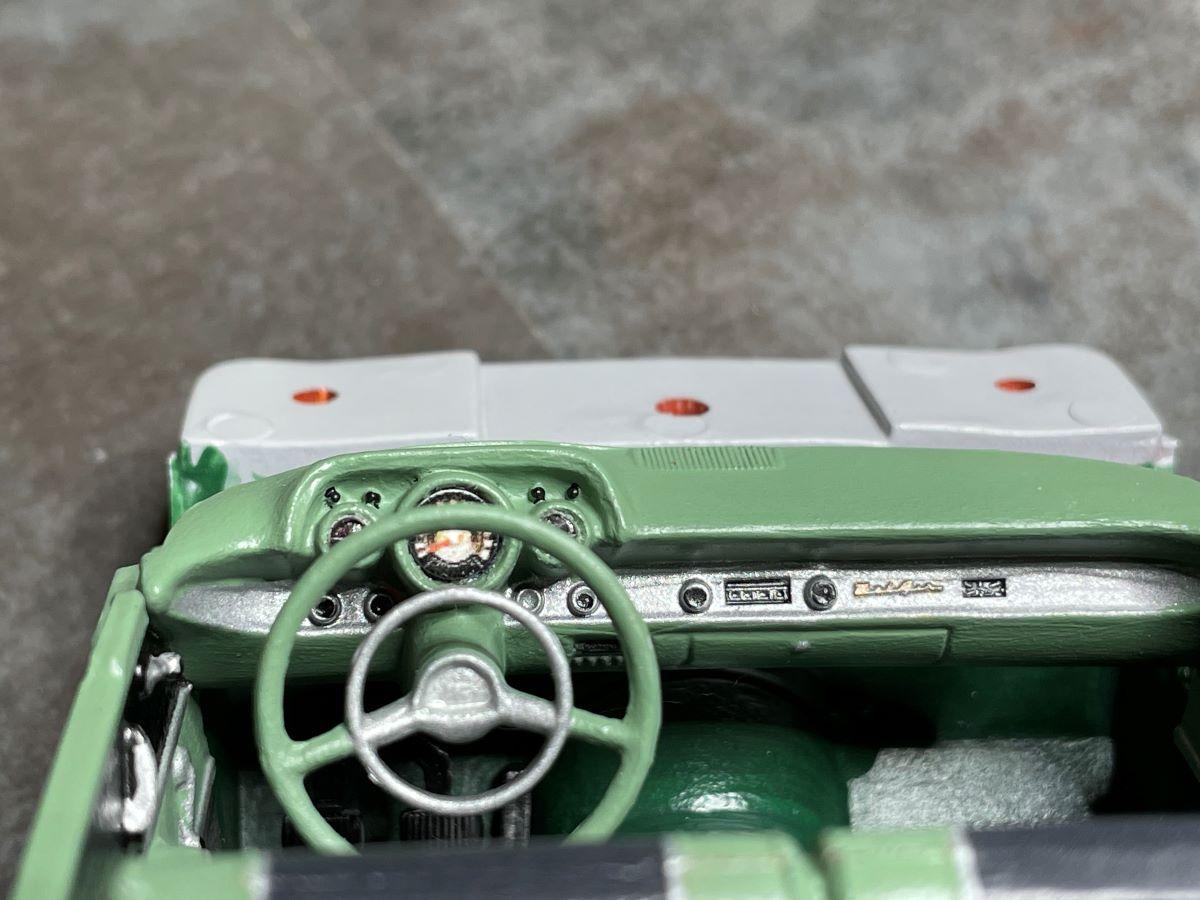
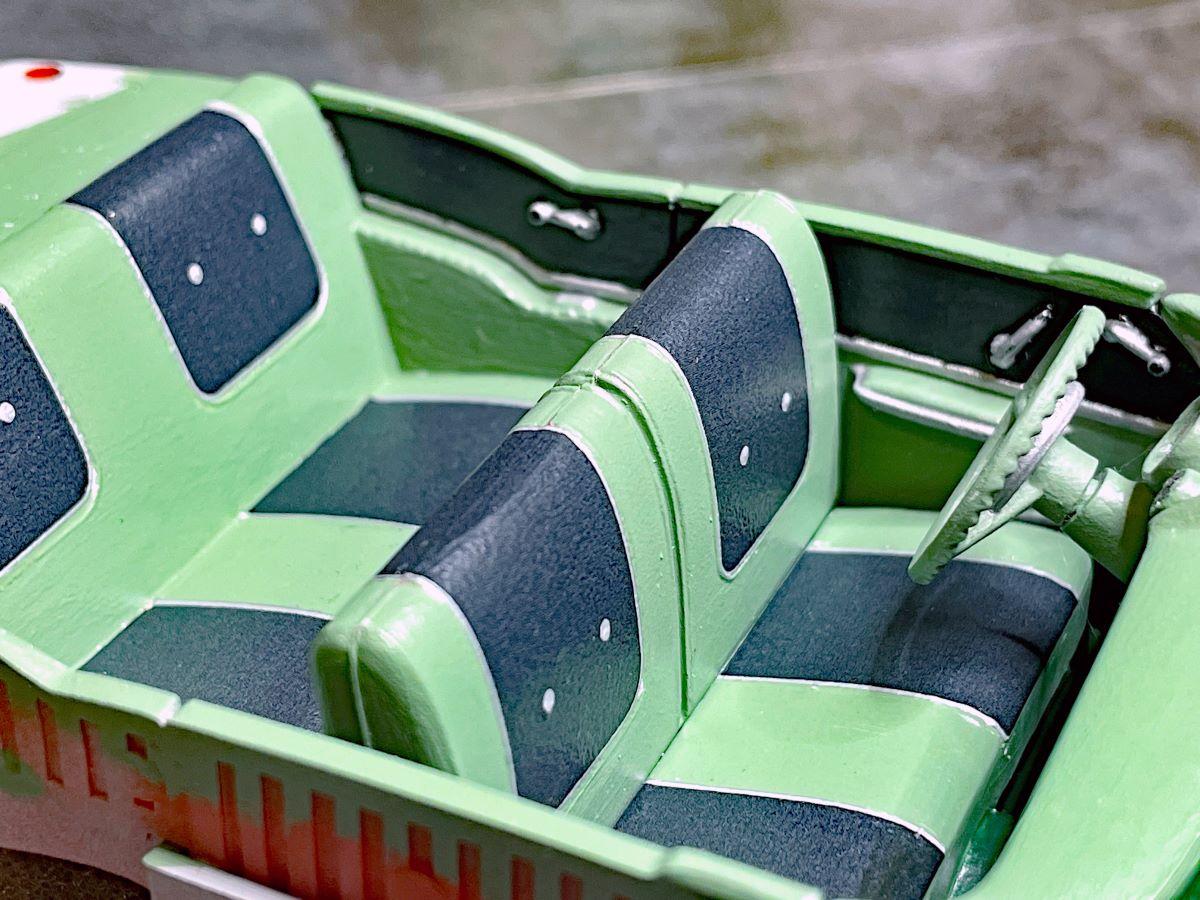
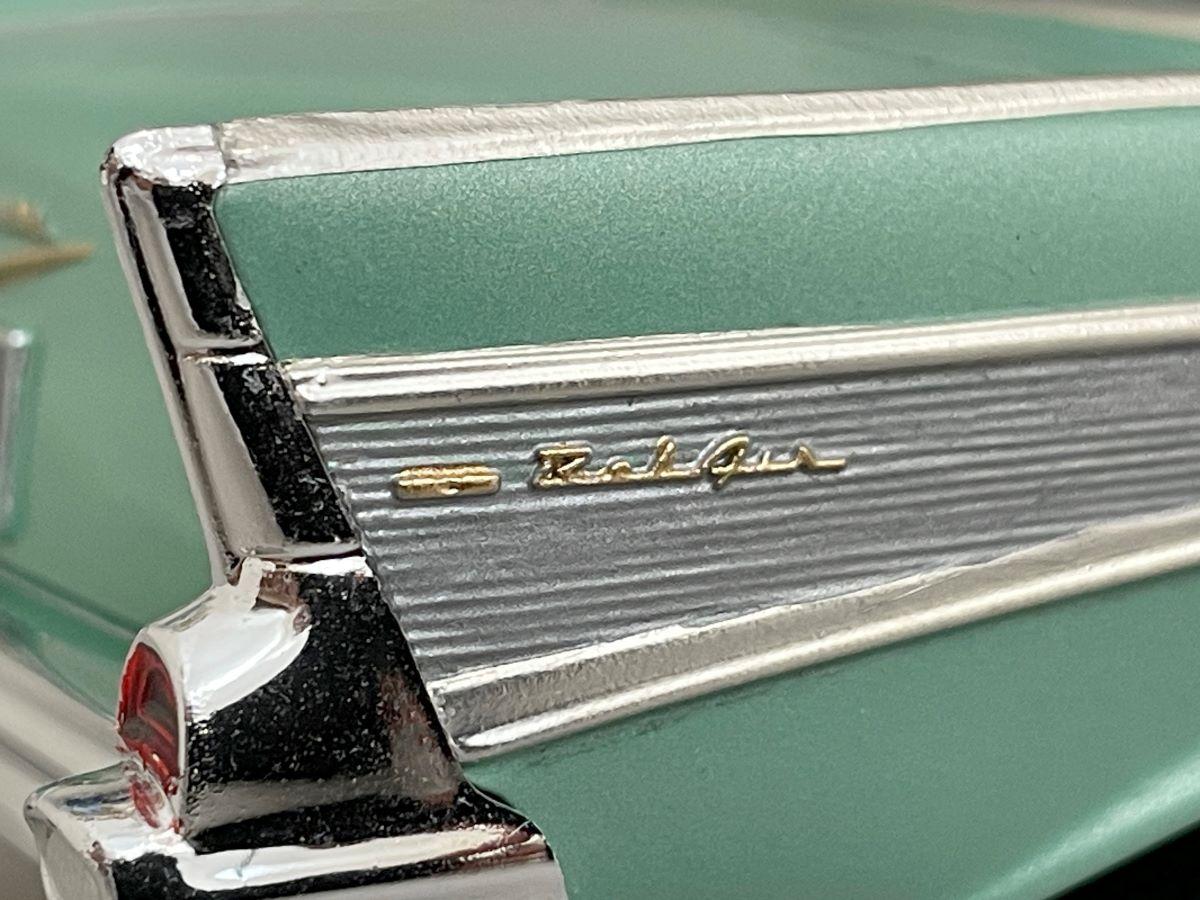
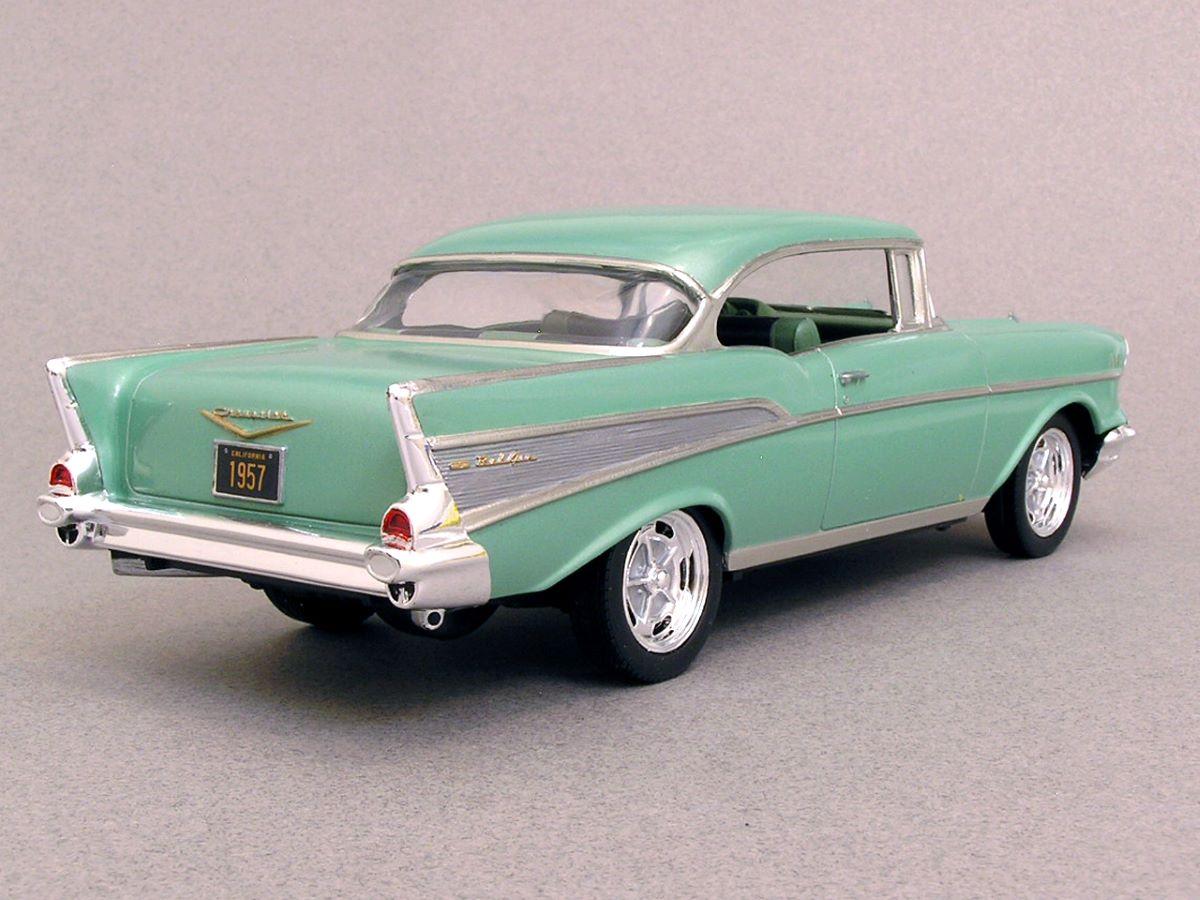
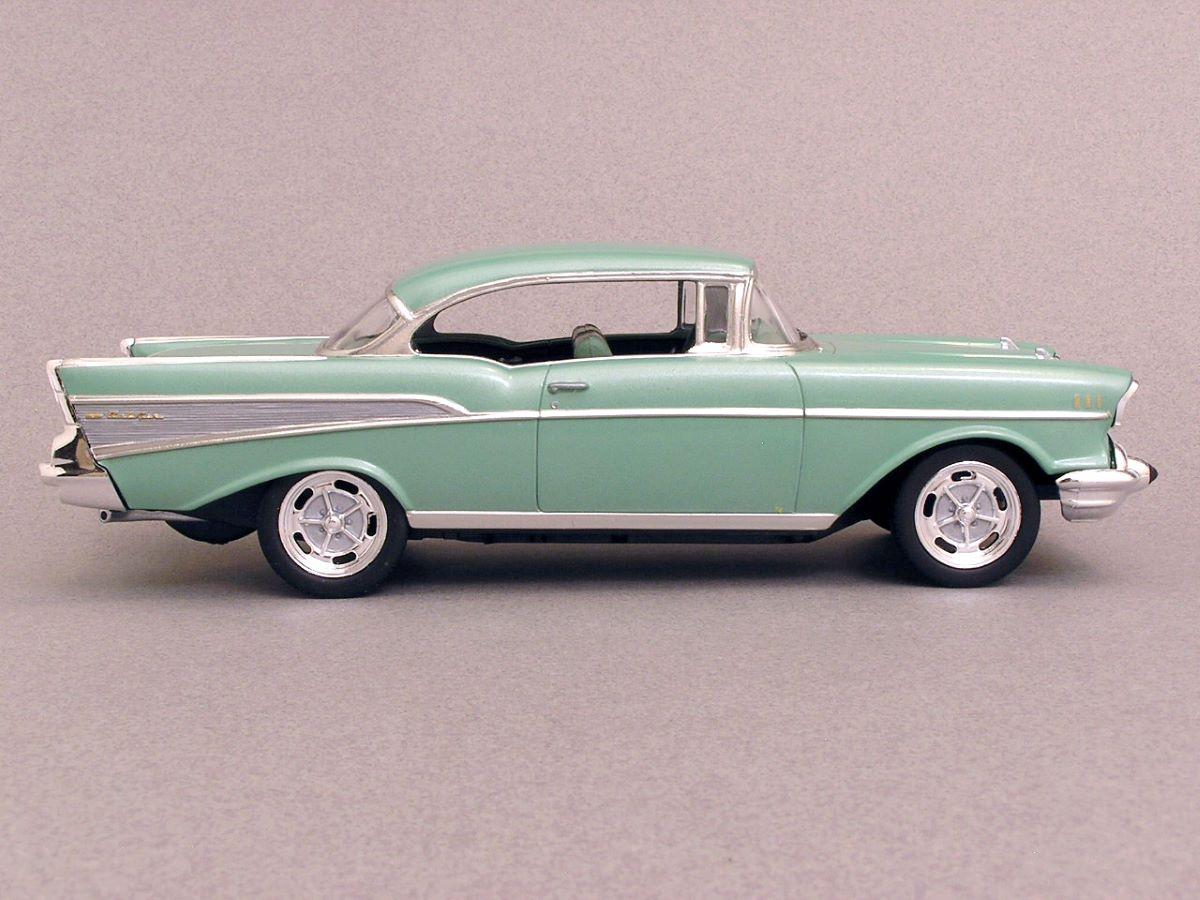
Here is my latest build - a 1957 Chevy Bel Air. This is the Revell 1/25 scale Snap-Kit. Exterior color is Tamiya TS-60 Pearl Green. Interior was done with Craft Paints (I think it was Cactus Green). I had done the Chevy scripts on the hood and trunk using the foil under paint method. Got the paint removed and the chrome exposed, and then realized that the scripts should be gold. So, the gold scripts on the hood, trunk, and rear sides were all hand painted. The Chevy logo in the front grill is from a photo that I cleaned up in Photoshop and printed on my computer. Dash gauges were also printed from photos that were cleaned up in Photoshop. Thanks for checking this out! Bart

- 16 replies
-
- 12
-

-
Cheaper alternative to Molotow chrome markers
bh1701 replied to Monty's topic in Tips, Tricks, and Tutorials
I totally agree! When I would use Testor's Silver for something, it would usually be for exterior door handles and key holes, interior trim and window handles, chrome trim around windows, and other small details. I also agree that it takes a long time to totally dry, if ever. It's just one of the tools in my arsenal and I use it where it seems appropriate. The chrome pens may end up getting used in place of Testor's silver sometimes since it seems to dry pretty well. Bart -
Cheaper alternative to Molotow chrome markers
bh1701 replied to Monty's topic in Tips, Tricks, and Tutorials
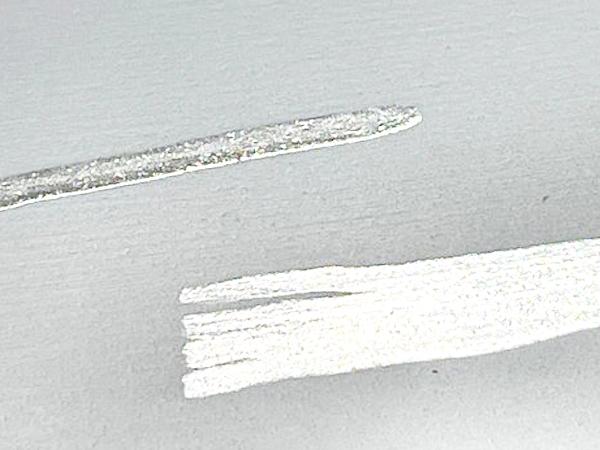
I bought some of the Zoet chrome pens that the original poster mentioned to see how they worked. Here is my unprofessional analysis (Note: I am not a scientist or an expert on this stuff!). It is VERY shiny! It does lose its shine and smudge a bit when rubbed very aggressively with your finger. Please note that you have to rub very hard and multiple times to degrade it, so it might be able to stand up to normal handling. It is a little darker than Bare Metal Foil I was surprised to see that Testor's silver and the Chrome Pen are actually very similar. Tamiya TS-13 clear did cause it to lose its shine. It also causes Testor's silver to lose its shine. Overall, I was pleased with the results, but I would definitely use it only after clear has been applied to the model. My primary uses for it will probably be to touch up chrome parts where the sprue had been attached, fill in any gaps I might have on areas that were foiled, and to apply chrome the vent windows on 50's and 60's vehicles ( i find it very difficult to foil these areas well). I am sure I will find other places to use these, too. I was surprised at how well Testor's Silver compared to it. I think I had always put Testor's silver on before the clear coats were applied which definitely dulled it down. I may now try using Testor's after the clear coats are on to see how that looks and how that holds up to handling. Thanks, Bart Here are the photos of my results. I found that it is hard to get good pictures that duplicate what you see in person and show how shiny this stuff is.
-
Great work. Looks good! Bart
-
Thanks! The display base is an item called a Wood Canvas that I picked up at Hobby Lobby for a couple of bucks. The dimensions are roughly 13" wide x 10" deep x 1/2" thick. They also have some that are about 8" x 10". A nice ready-made base with enough room under it for the battery holder. Just needed a coat of paint and it was pretty much ready. Bart
-
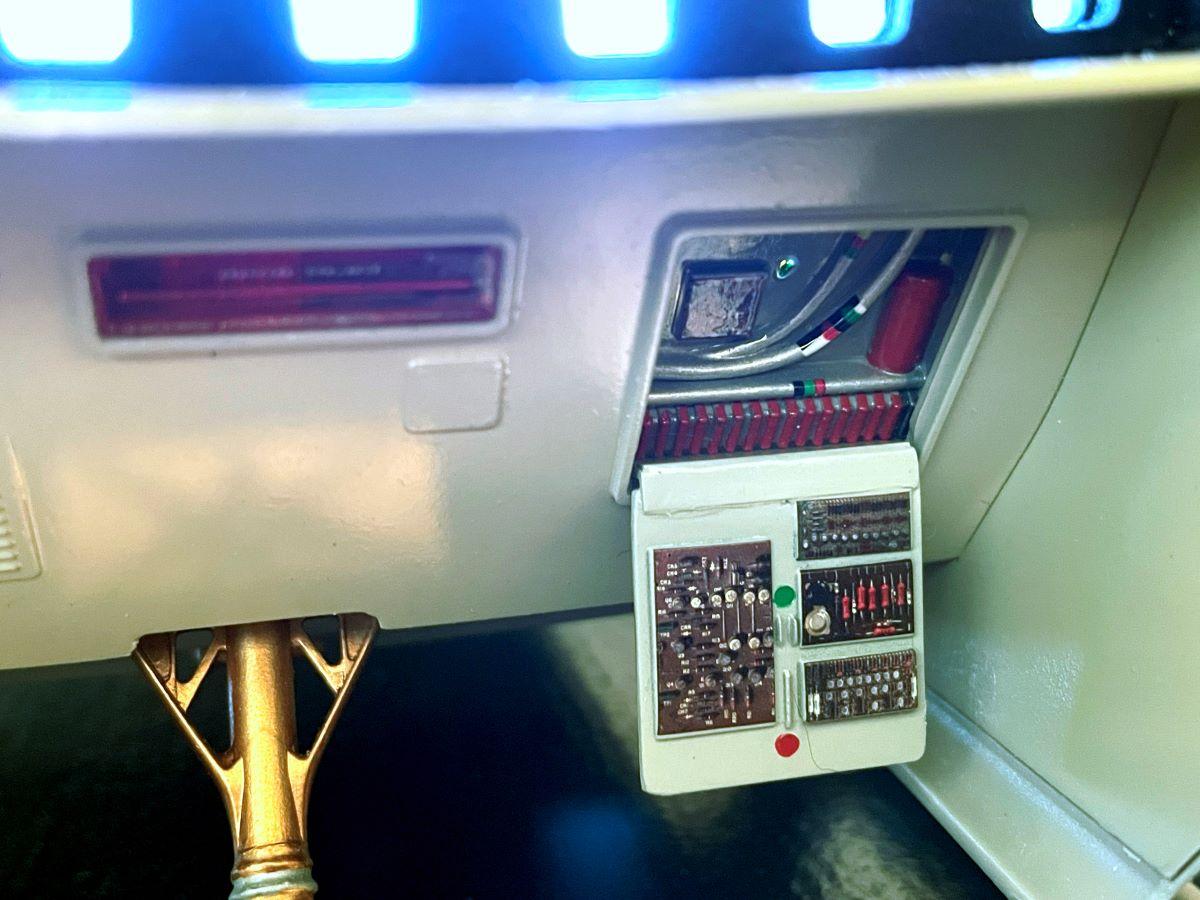
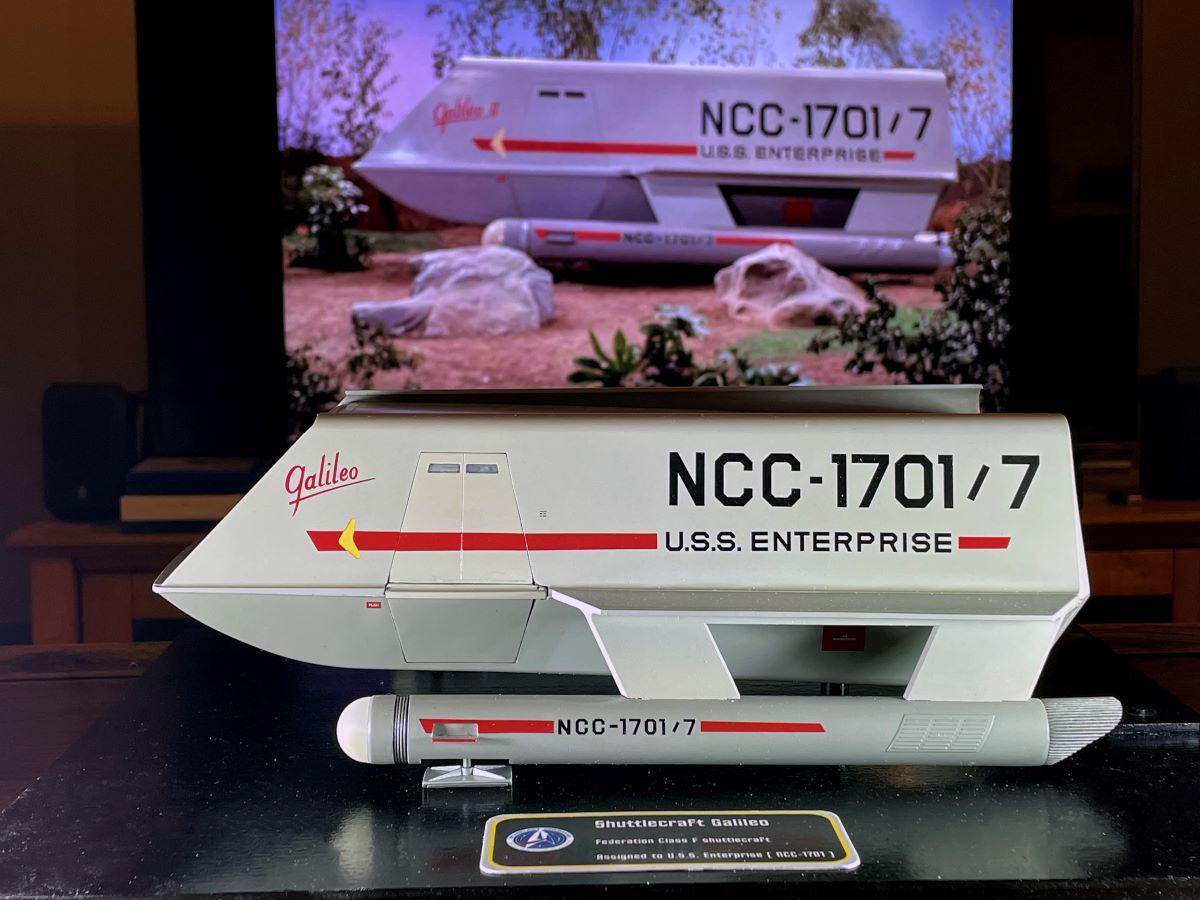
David, The kit includes the details for the opening floor panel and the opening rear access panel. The drop down panel in the rear is done with decals provided in the kit, and the inside details for that area were mostly painted. With the rear access panel, there is no hinge provided to allow you to open and close it. So, you are supposed to either glue it in place in the open or closed position. I couldn't figure out how make a hinge for it. Luckily my kit had two of these panels; one had a slight defect in it, so Polar Lights provided a replacement in the box (really appreciate their Quality Control process to catch this!). The one that is used for the closed position uses a small magnet on the back side to hold it in place on the body. Thanks, Bart
-
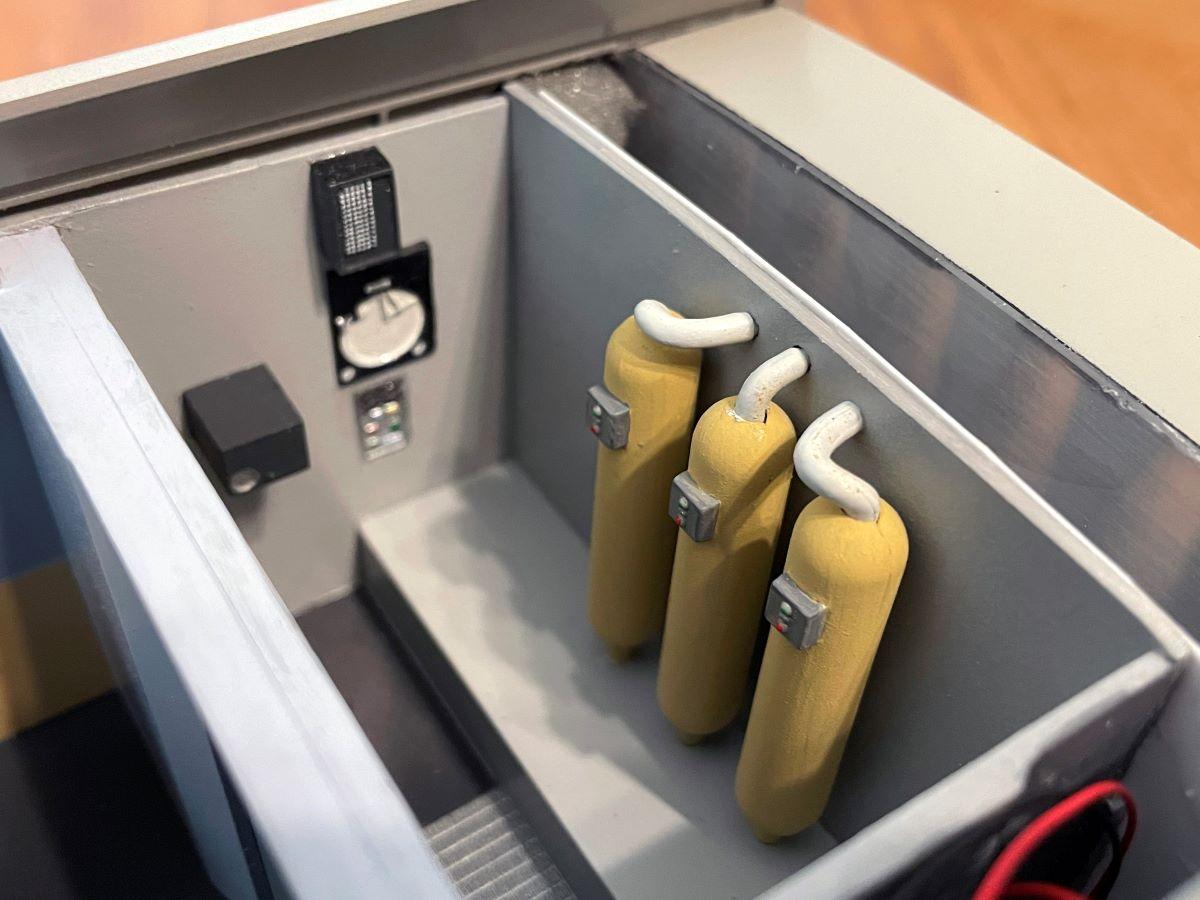
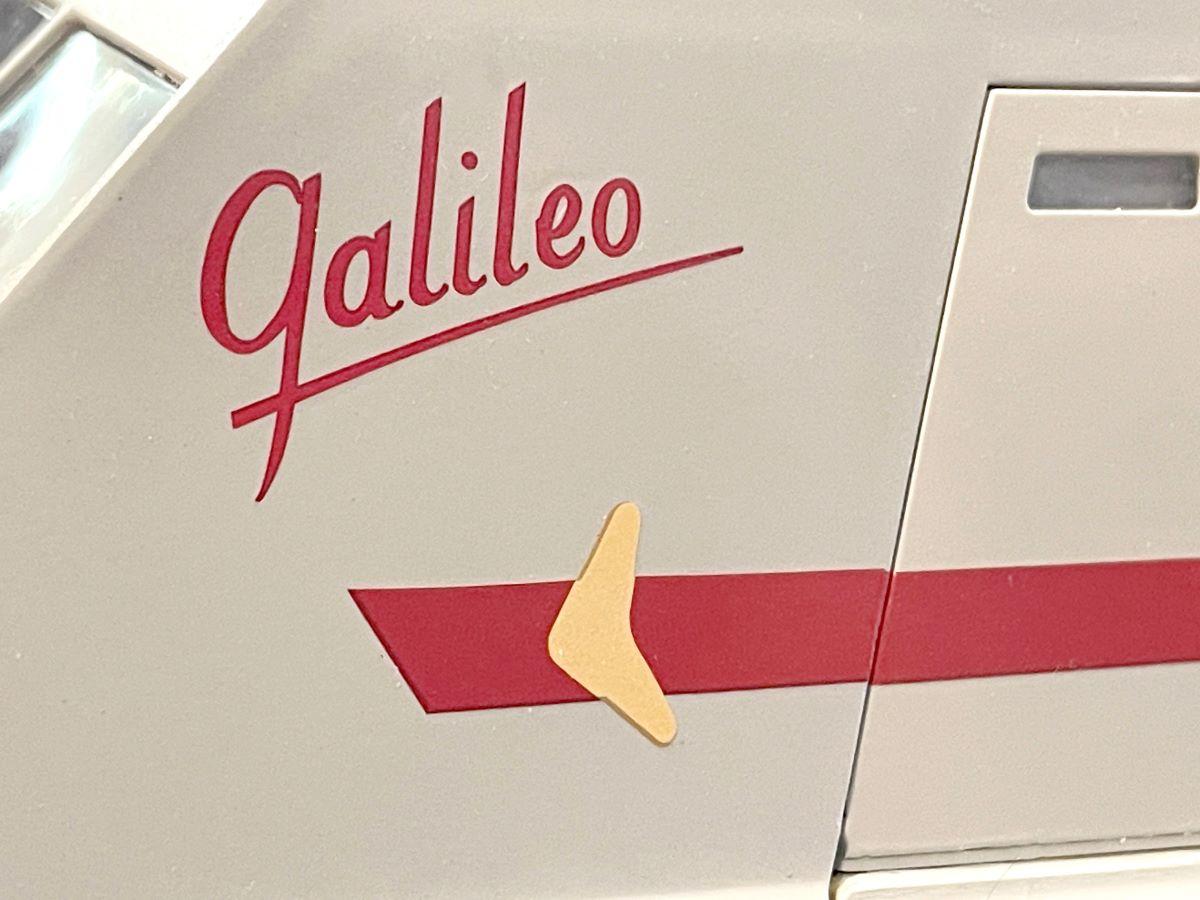
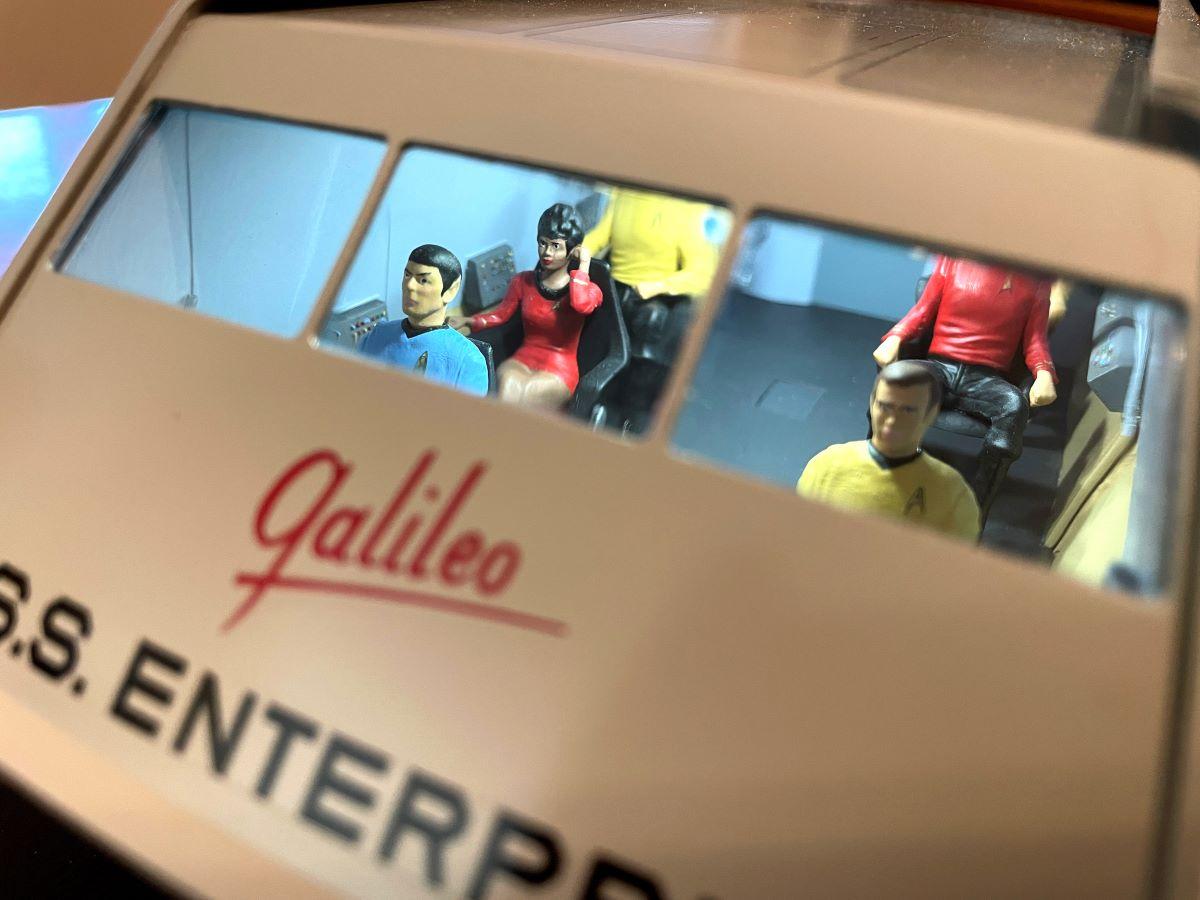
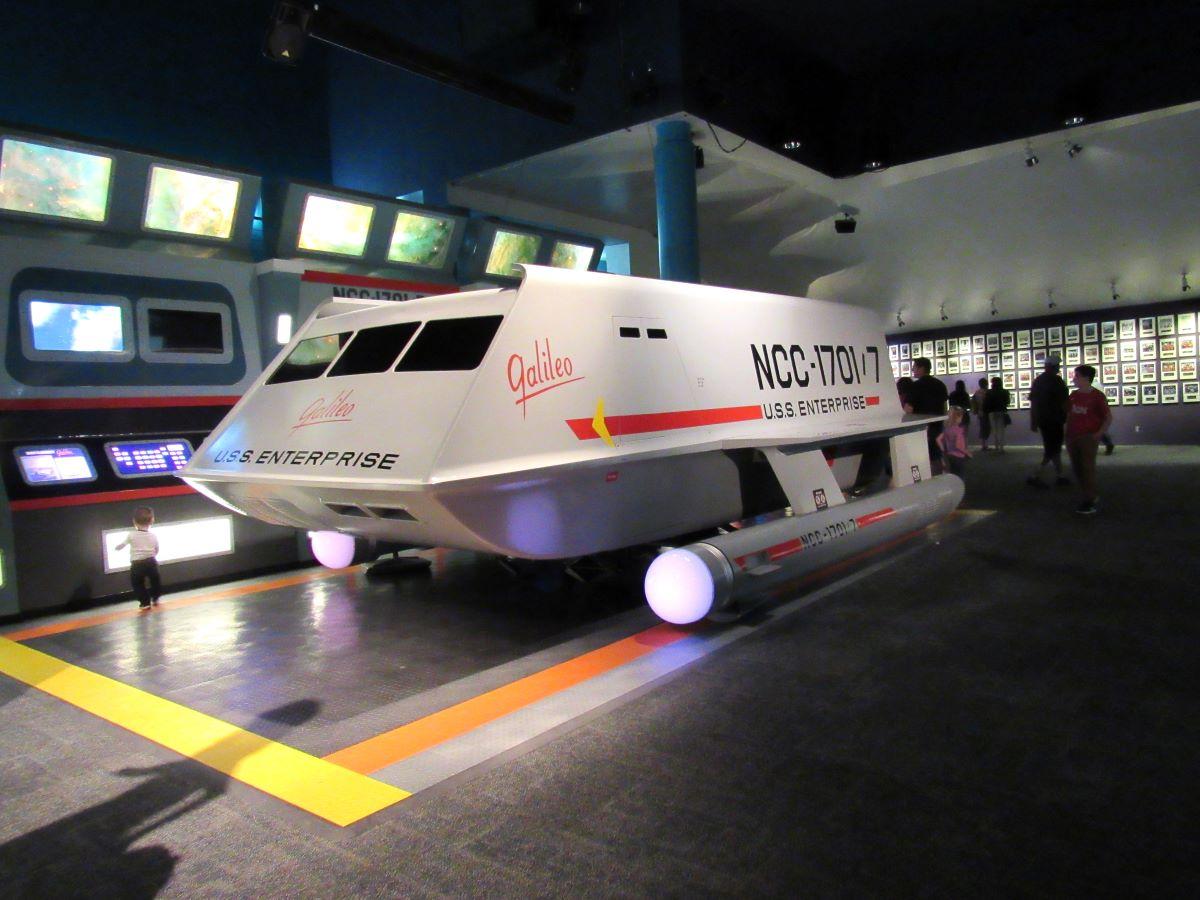
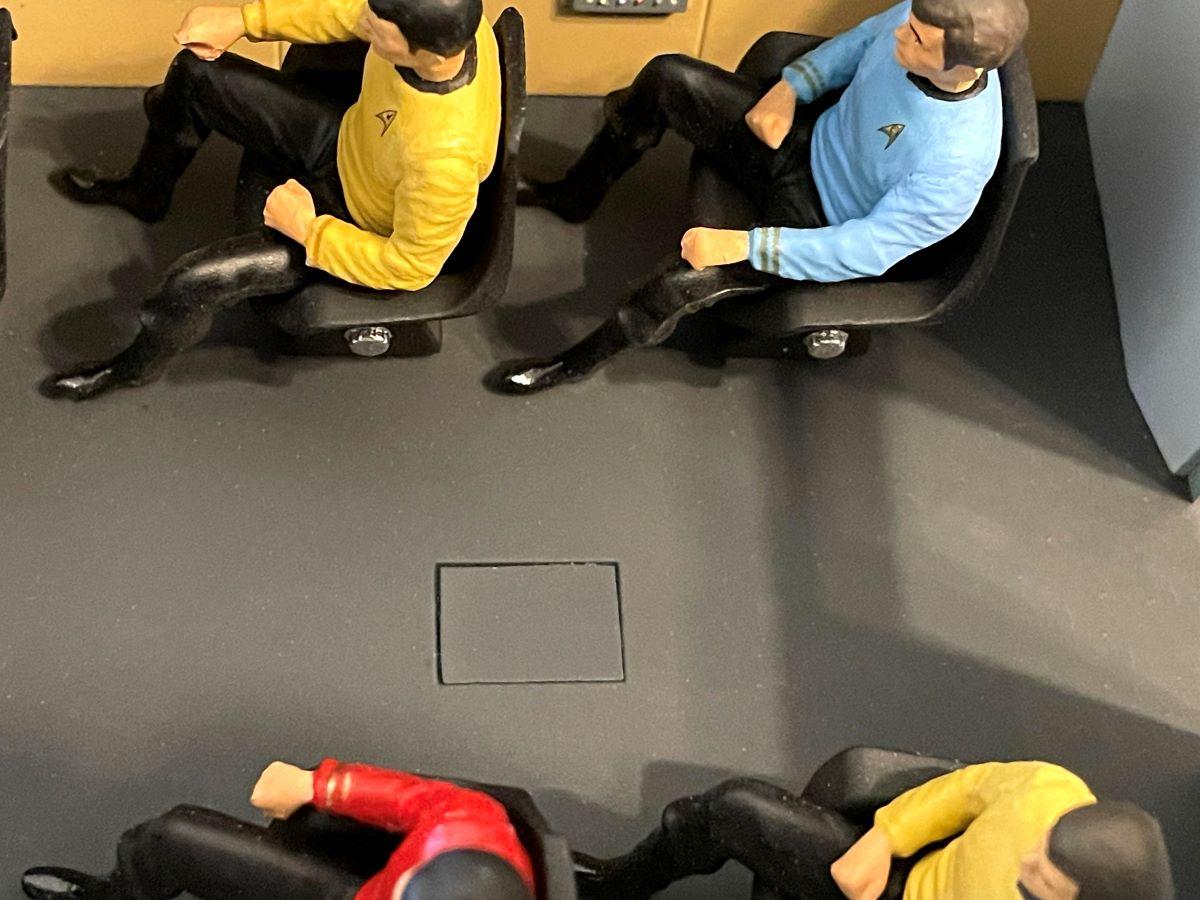
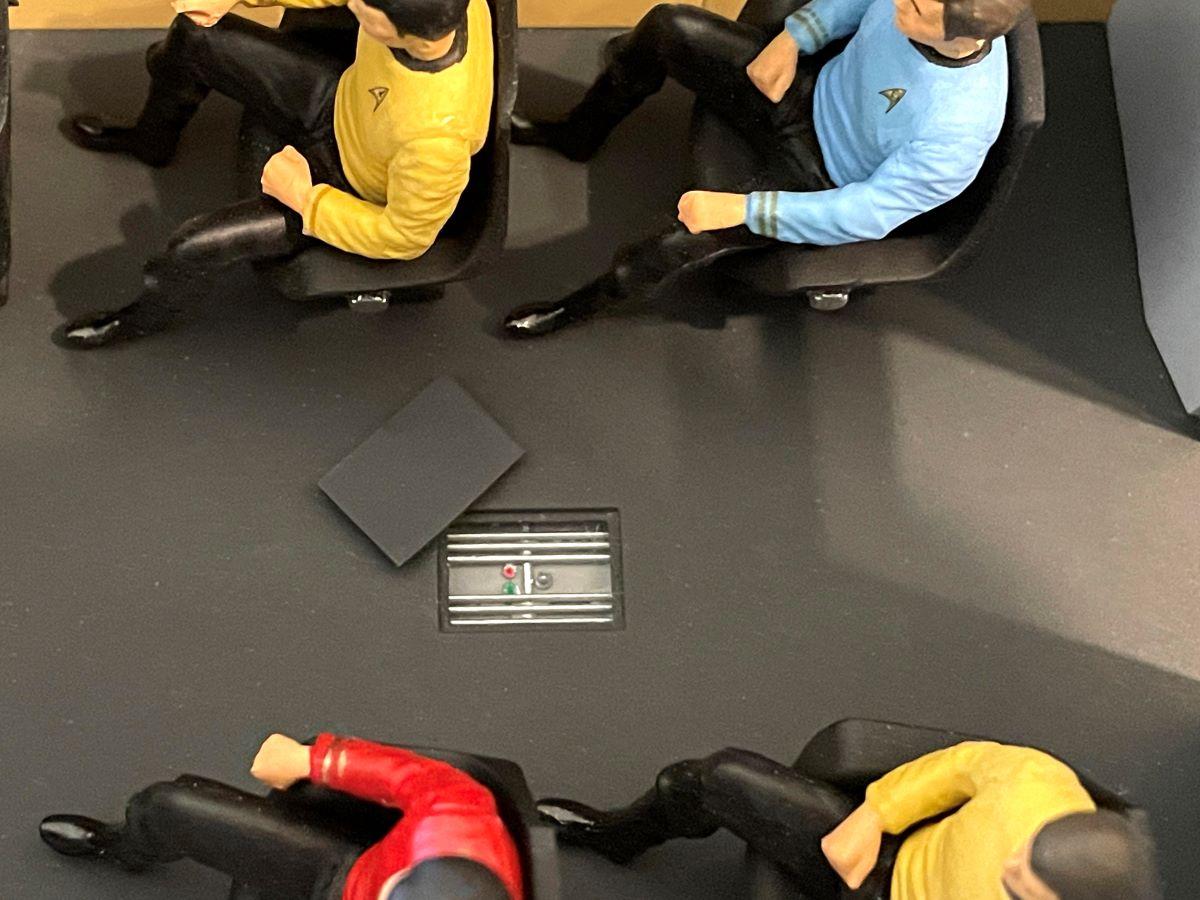
Here is my model of the Galileo shuttlecraft from Star Trek. This is the Polar Lights 1/32nd scale model. I added lighting to the interior and the propulsion units in the rear. The panel lines on the roof were masked off and painted. When finished, this is a really solid model. I did find that I needed to make a few minor modifications to get the interior shell to fit properly inside the body, and made some mods to the roof so it would slide in and out a little easier. Thanks for checking this out! Bart The restored Galileo that was used for live-action exterior shots with the actors. This is when it was on display at the Houston Space Center.
-
That is superb! Great job on this! Bart
-
How to strip Tamiya TS paint?
bh1701 replied to 10543Modeler's topic in Model Building Questions and Answers
I have never had that issue when I am using Tamiya Lacquer Thinner and paper towels or Kleenex to wipe the paint off. However, I am guessing that soaking it in the thinner might be enough to do some damage. Bart -
How to strip Tamiya TS paint?
bh1701 replied to 10543Modeler's topic in Model Building Questions and Answers
I have also used Tamiya Lacquer Thinner. I'll put some on a paper towel or Kleenex and then rub/wipe the surface with it. That first application starts to remove and soften the paint. A couple subsequent wipes will usually get it all off. If there are recessed areas, a toothbrush or a paint brush with some thinner on it will usually take care of those areas. Bart -
Looks really nice! The color looks great!
-
Looks really good - especially the opening doors!
-
Looks great! I like the photography with the mirror and the colored lights highlighting the background. Bart
-
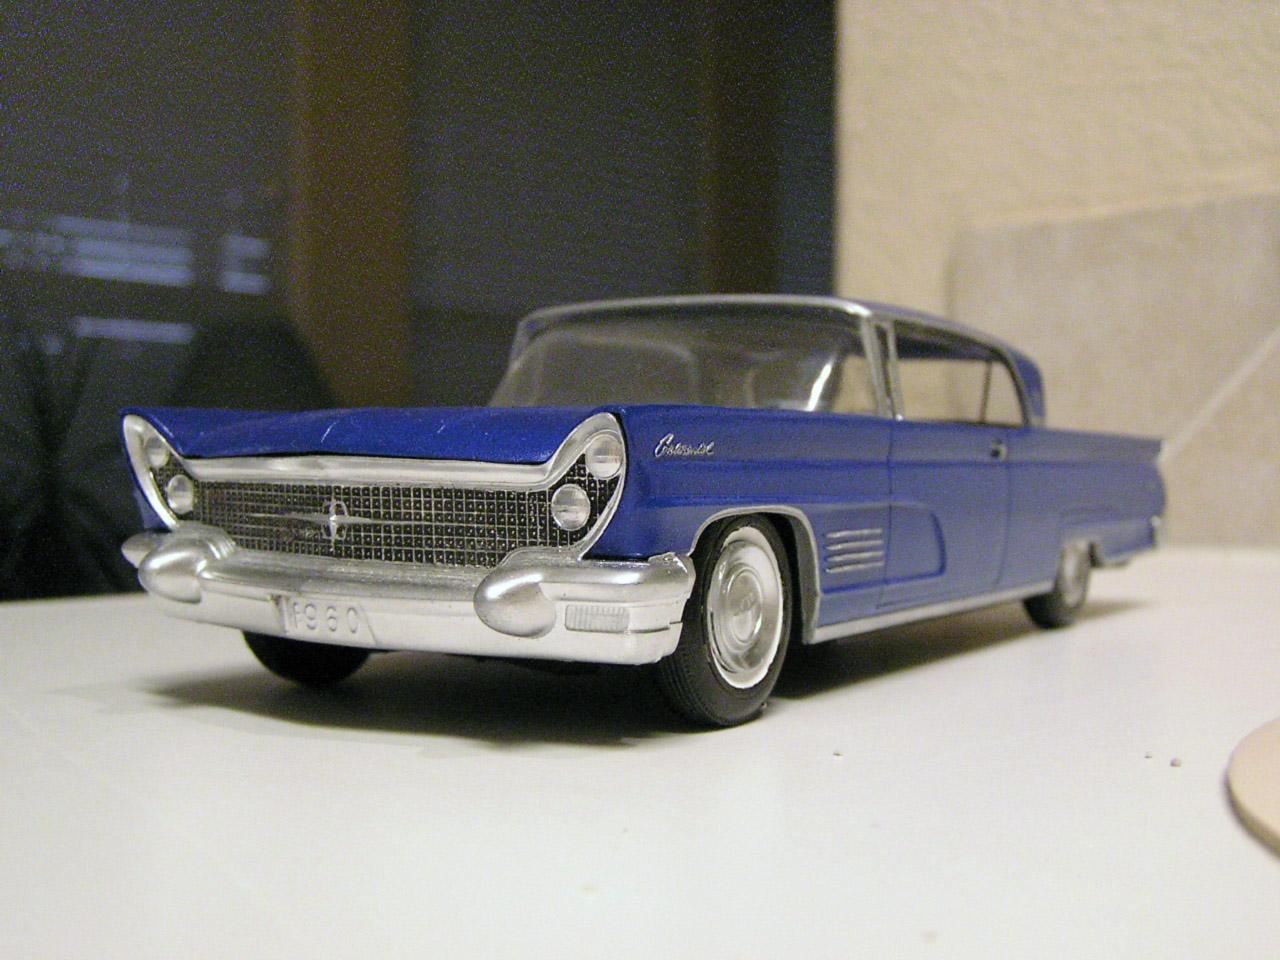
This 63 Thunderbird is probably my oldest unrestored model. Built in 1963 when I was 11 years old. Tires are long gone, but this should be an easy one to restore when I get around to it. As far as my oldest RESTORED kit, it's this 1960 Lincoln built back in 1960. About 25 years ago, this was the first model I disassembled, stripped the paint from, and rebuilt.
- 89 replies
-
- 10
-
-
The attached photos show the interior ceiling pieces for the Star Trek Galileo 7 shuttlecraft from Polar Lights. I had put the model aside for a couple of months and went to work on it last night. The ceiling pieces had been glued together a while ago, but they were now warped. I separated all of the parts and need some ideas on how to get these parts flat again, and to avoid warping issues when I put it back together. For some more background, I was also using a piece of plastic mesh that is used with needlepoint to create a grid that replicated what was in the actual filming model. I also used some thin Evergreen or Plastruct plastic strips to create a frame on the interior portion of the ceiling to support the mesh and the original clear plastic insert. I probably just used Testor's tube glue to glue it all together. I am wondering if there was some interaction between the tube glue, mesh and/or plastic strips that caused the warping. Thanks for your help! Bart