bh1701
-
Posts
389 -
Joined
-
Last visited
Content Type
Profiles
Forums
Events
Gallery
Everything posted by bh1701
-
Thanks! The details on the dash are actually pretty easy. Scroll up in the post and you'll see the printed images I purchased to use for the dash details. Bart
-
Good job with the rebuild of this kit. Always great to see an older model being saved and given a second life! Bart
-
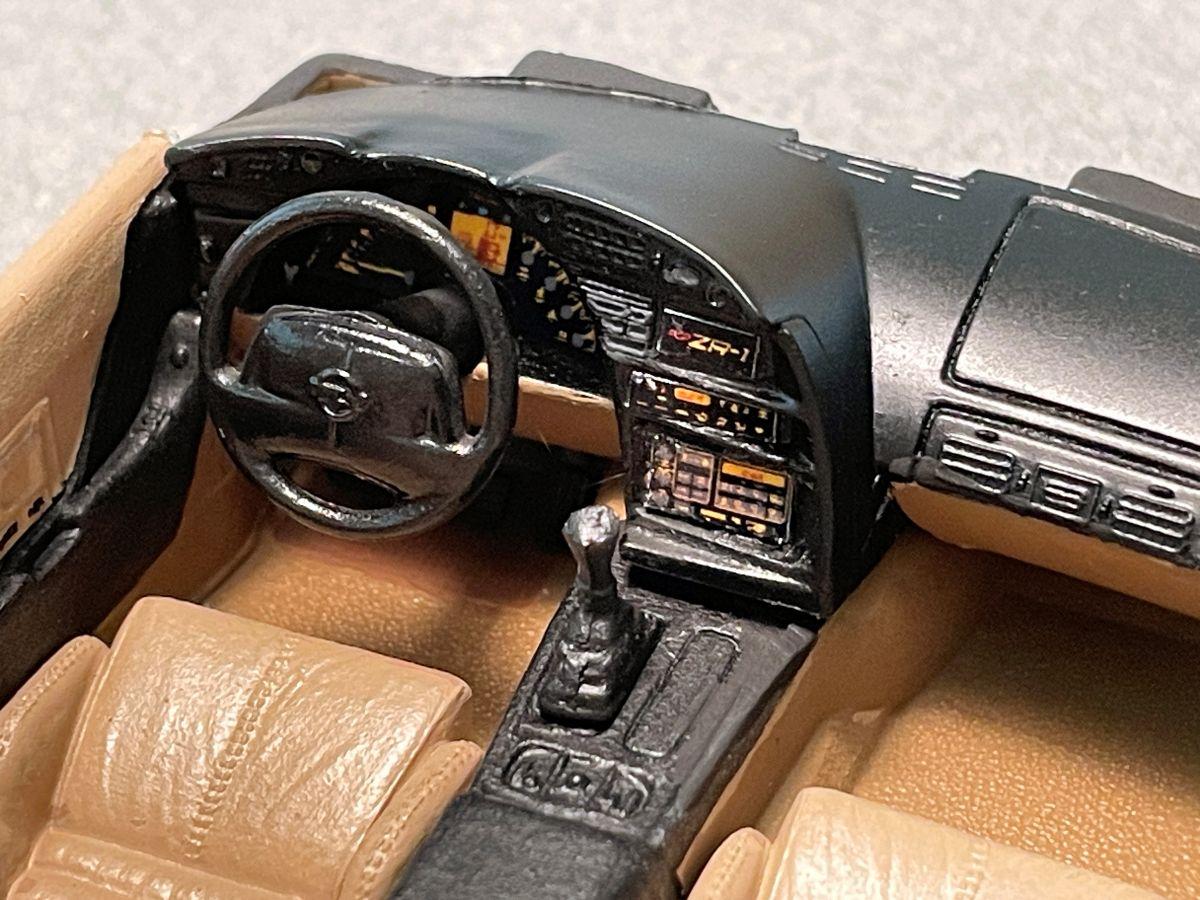
Thanks, Mike! The dash was actually pretty easy. I bought the dash gauges and displays from BestModelCarParts on eBay. Makes it real easy! For a couple of bucks, it is well worth it. He also sells gauges for quite a variety of other cars. I often check out his offerings before I try to find images and print my own. The ones I print myself are nowhere as clear as his are. Bart
-
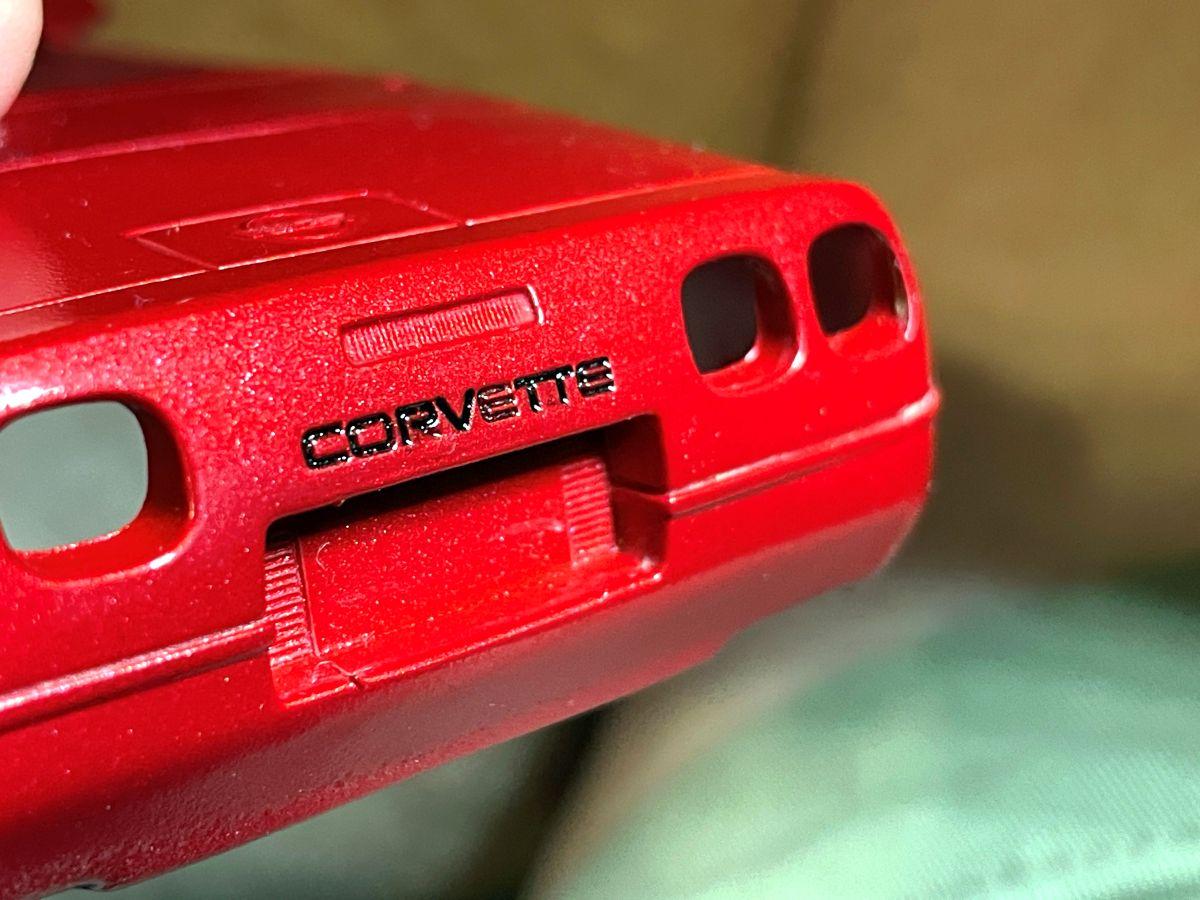
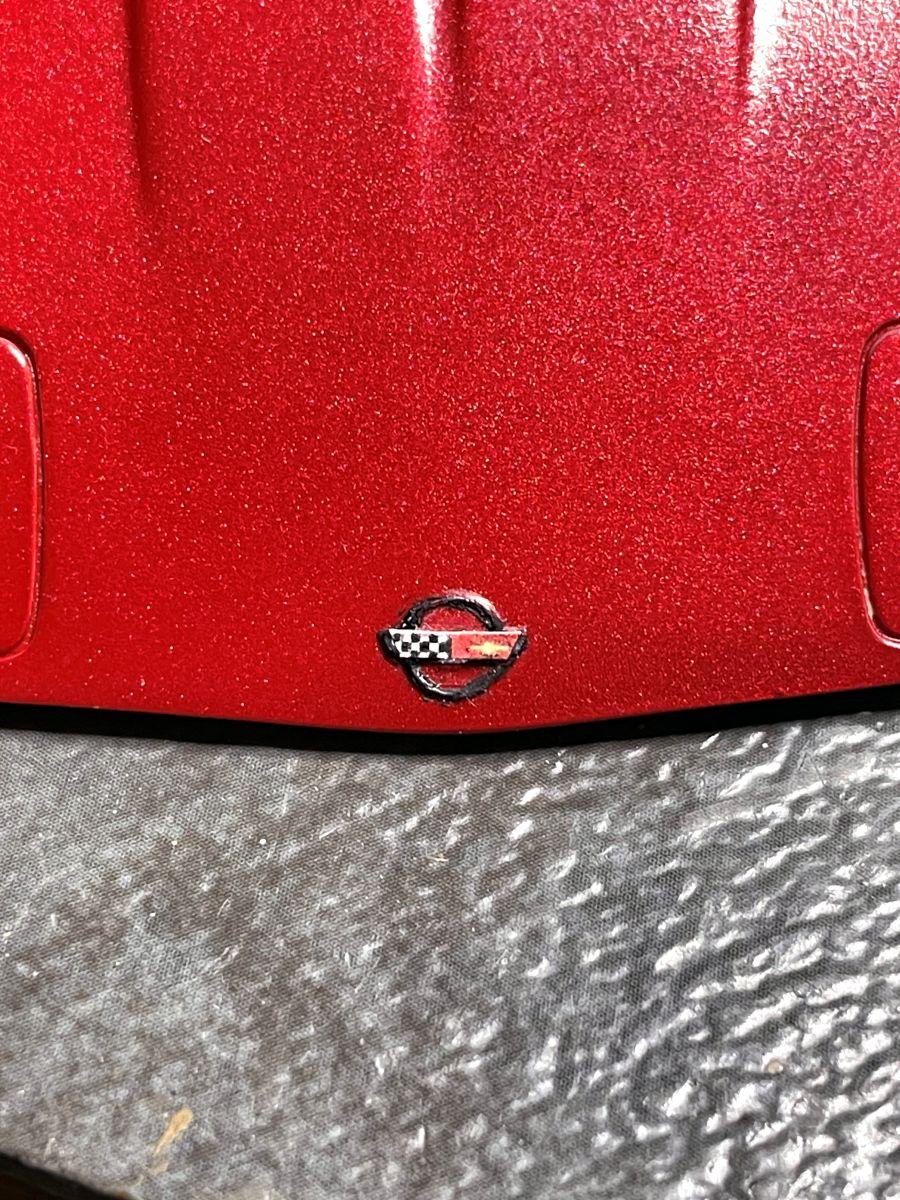
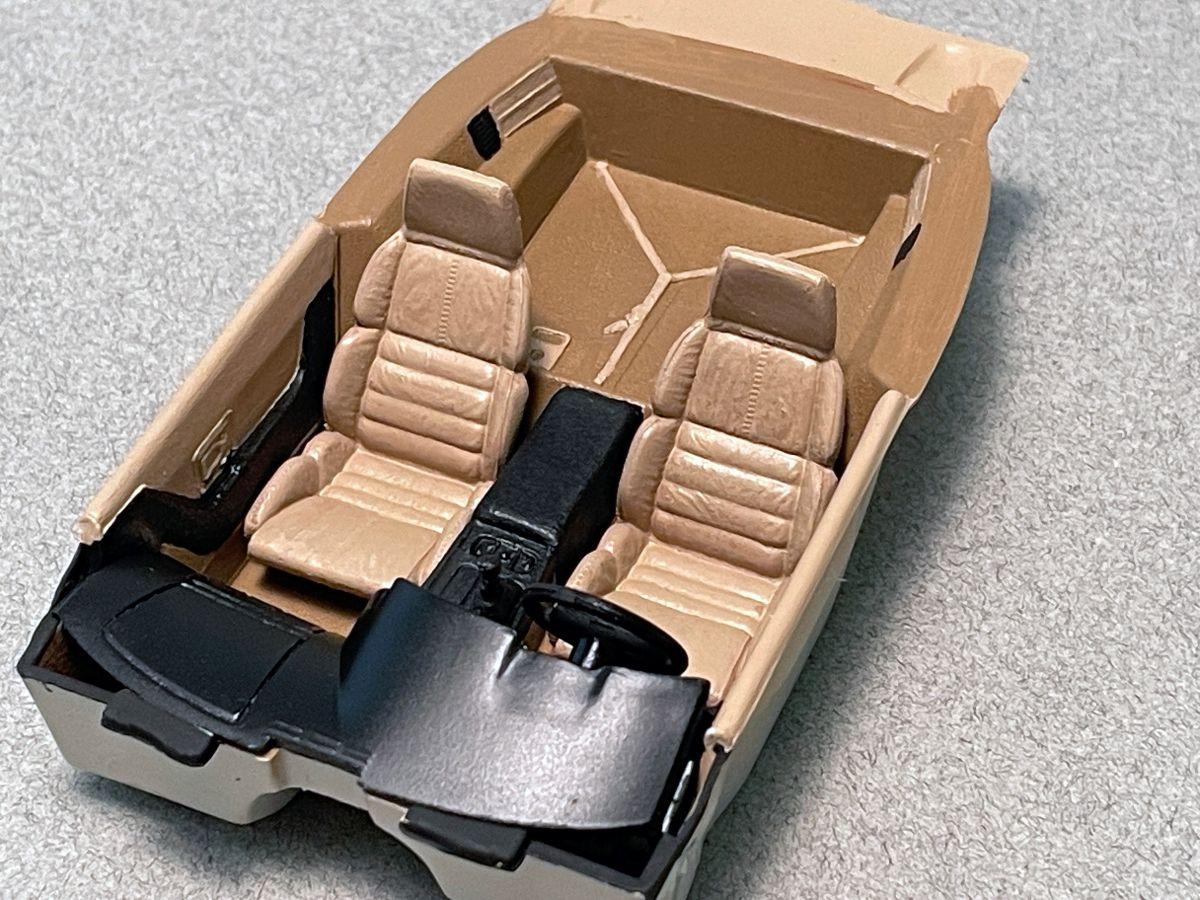
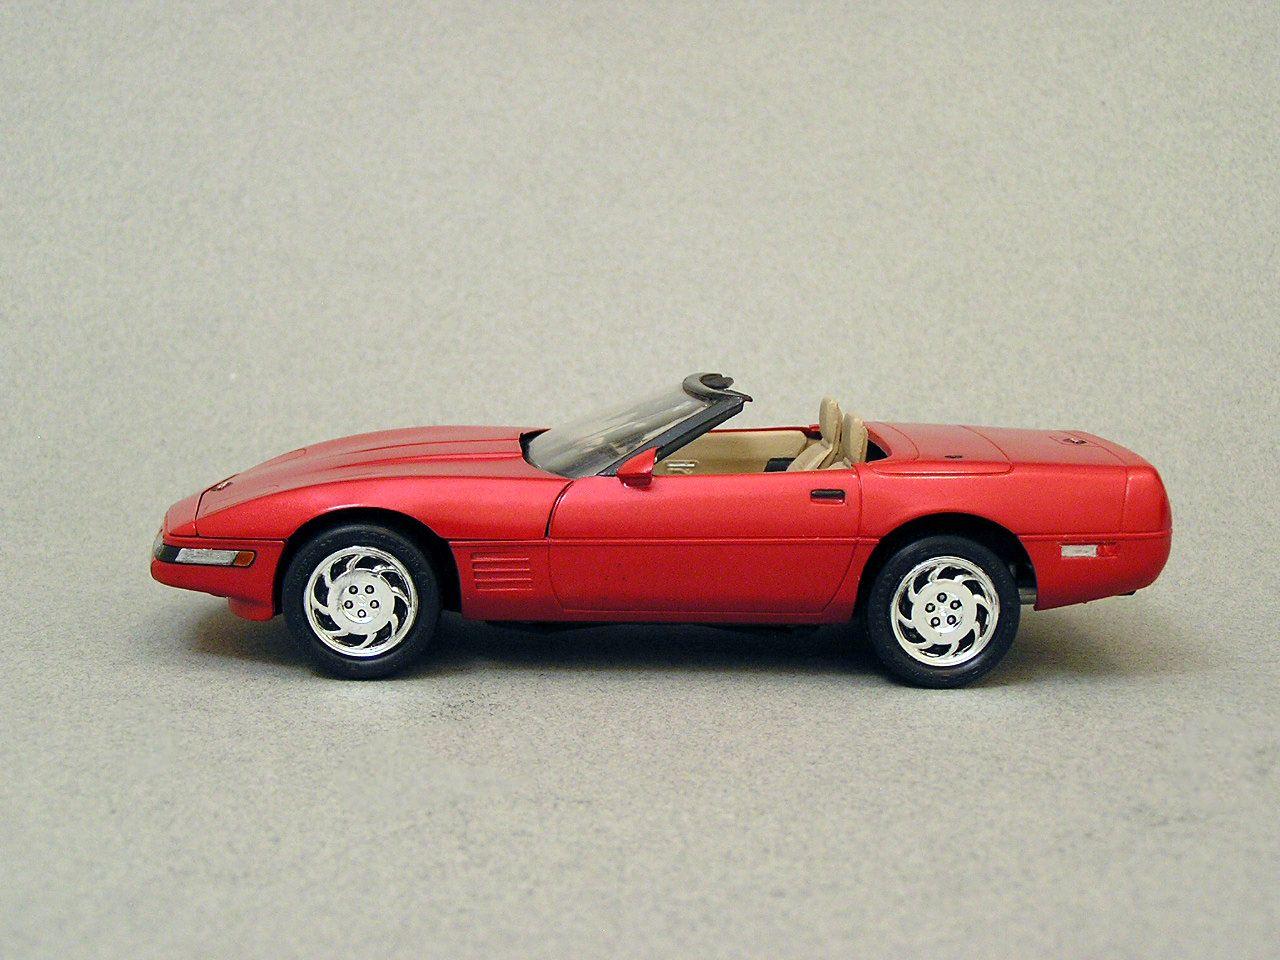
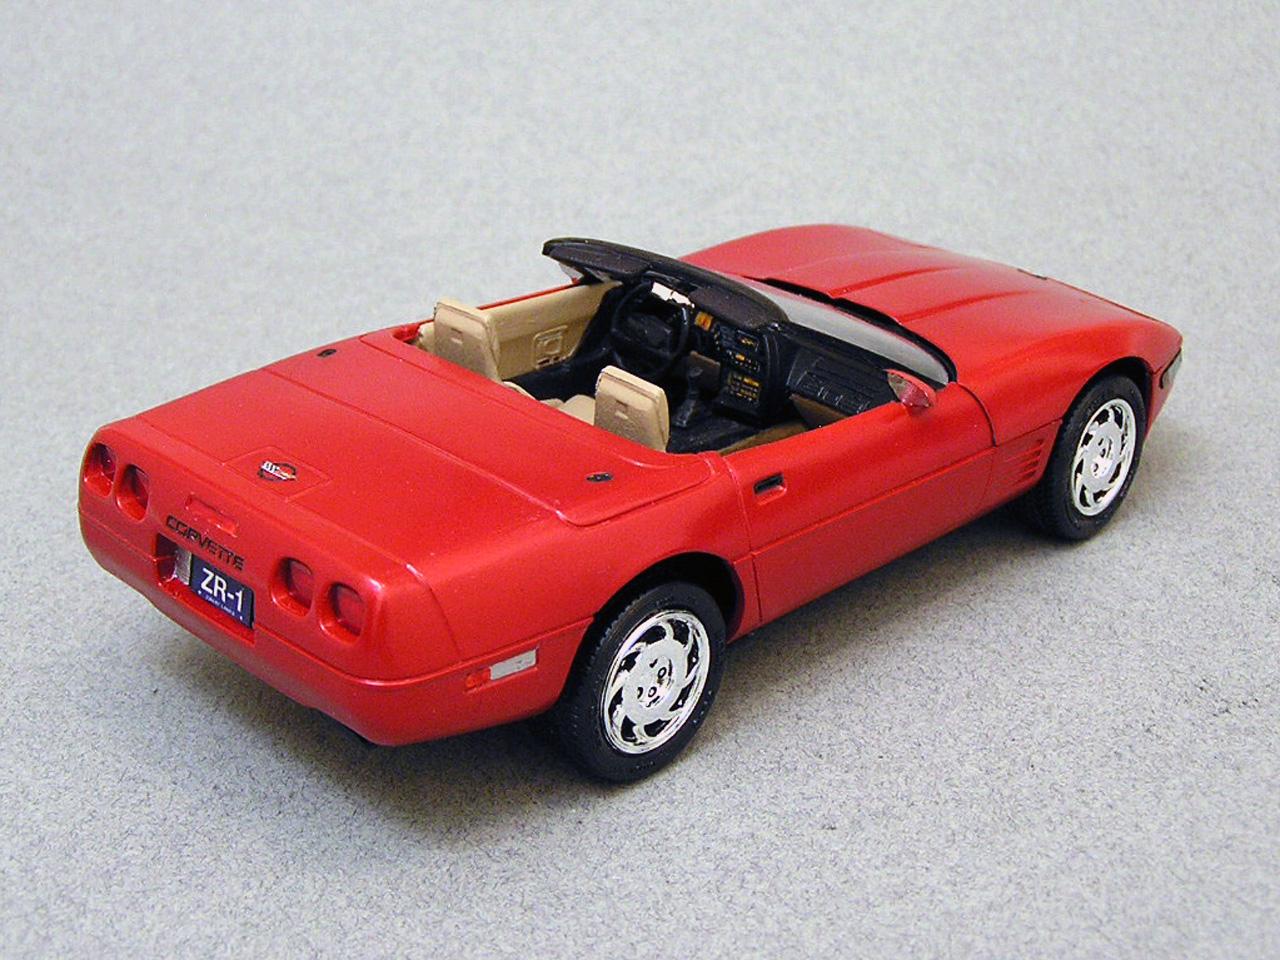
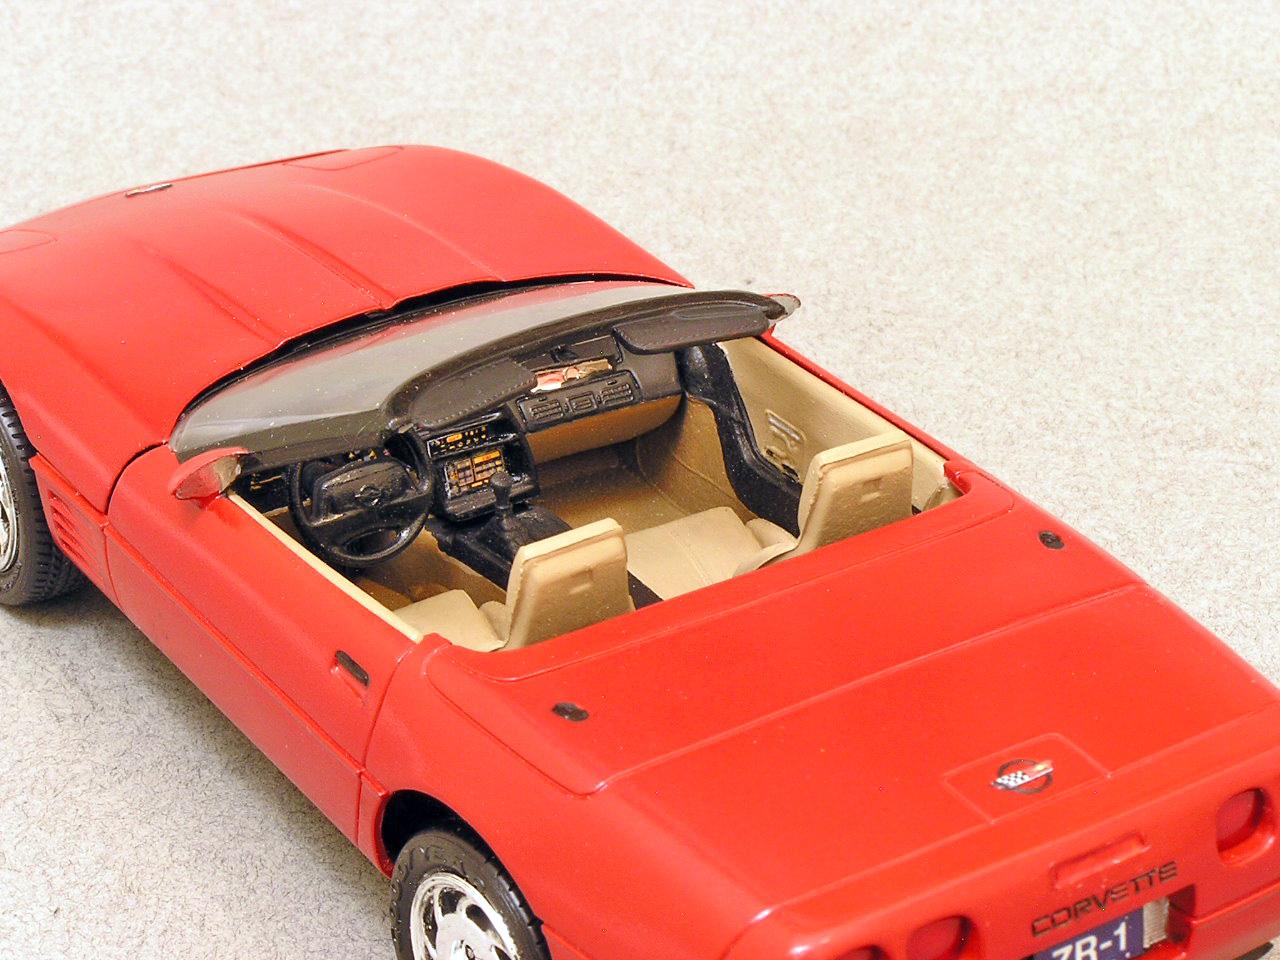
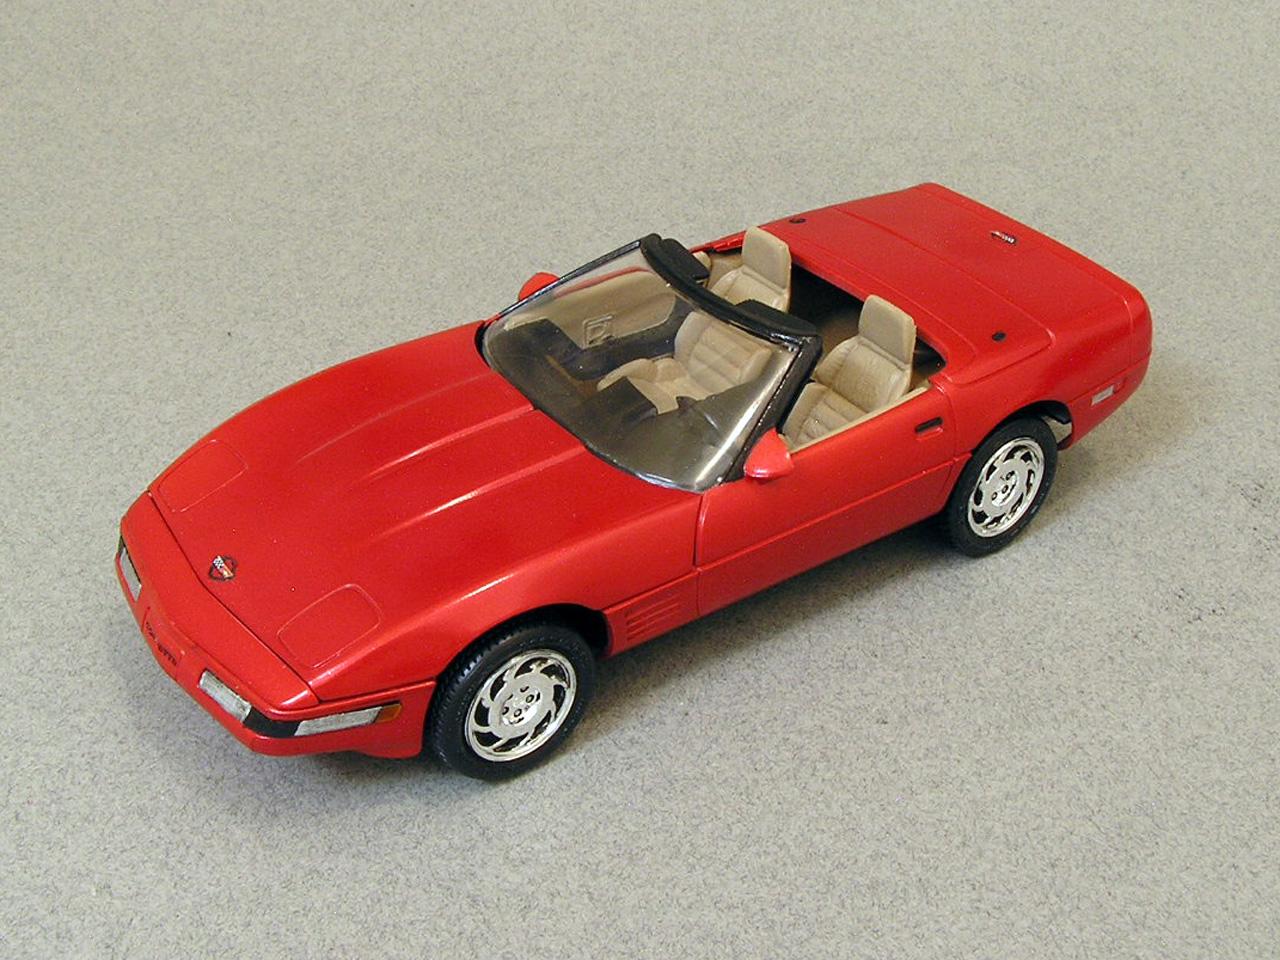
Here is my latest build - a 1994 Corvette! Exterior is Tamiya's Mica Red. Corvette logos for the hood and rear were printed from images I found and were glued on. The recessed Corvette lettering was done using Tamiya's Black Panel Line Accent Color. Dash gauges are from BestModelCarParts. This is actually a bit of a Franken-Vette. In the mid 90's, I built a model of my brother's Corvette. I had to get 3 kits in order to get the right seats, engine, and wheels for it. That meant I had enough parts left over to build 2 more models. I finally got around to putting one of these together - not sure all of the parts are necessarily from the same kit. I picked and chose what I liked best from all the parts I had! Thanks for checking this out! Bart

- 13 replies
-
- 11
-

-
Looks amazing! Very clean build and excellent detailing! Bart
-
Thanks for all of the positive comments from everyone! A lot of people have commented on the interior. I have always enjoyed doing interiors and like to add as much detail as I can. Now, if you ask me about detailing an engine compartment, that's an entirely different story. I have absolutely no idea where the different wires and hoses would come from and go to! They are built only with the parts from the kit and are pretty basic looking. So don't be looking for pictures of them!😃 Bart
-
The model is really great, but your diorama is fantastic! Have you posted information on your diorama somewhere else on the forum? Would love to see some additional shots of it. Bart
-
Jeff, Thanks, and you may be right that Ford never used this specific pattern. I used some artistic license to pick a pattern from Mr. Model's catalog that I thought would look nice. This was the look I was trying to come close to. Bart
-
It is embossing powder for the carpet. It is a "brown" I got at Hobby Lobby or Michael's. I did not paint over the embossing powder, so this is its actual color. I do usually spray some flat or semi-gloss clear over it when the glue is dry so that it holds the little embossing powder particles in place better. Bart
-
Very sharp looking model! Bart
-
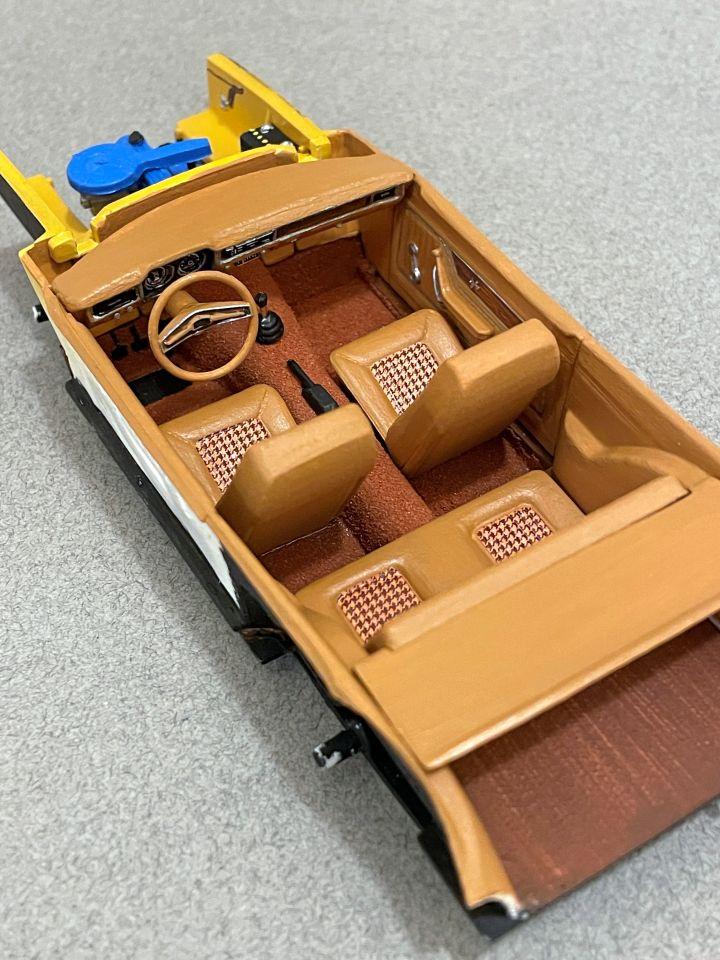
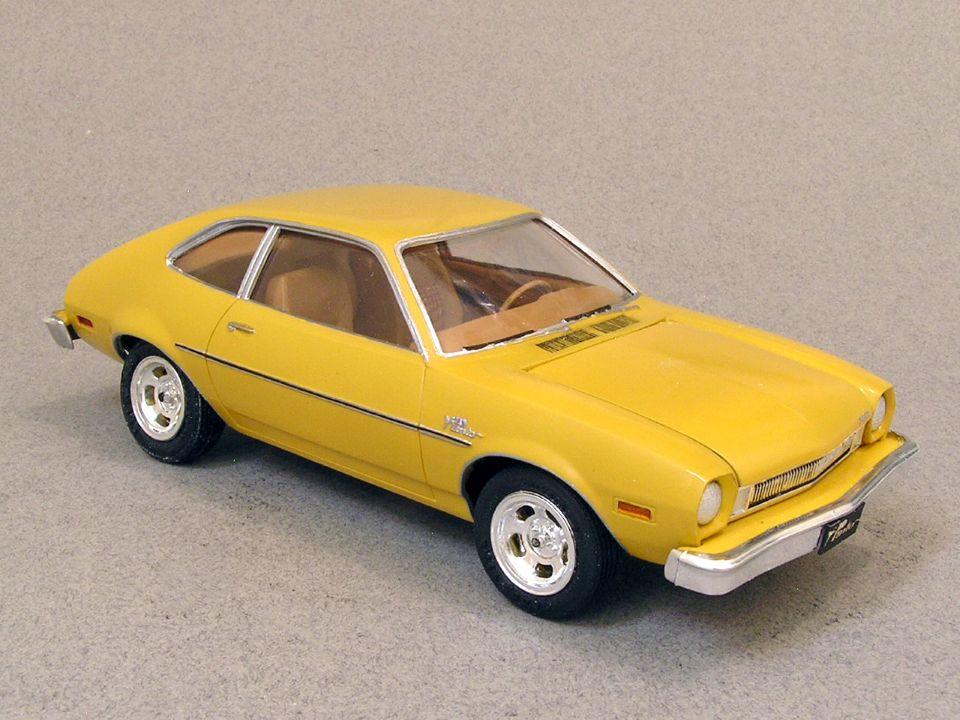
Here is my 1975 Ford Pinto. This is an MPC kit I bought on the internet. It's been quite a while since I built an MPC kit and I was surprised at how well designed it was. I especially appreciated that the side panels of the interior were separate parts rather than being molded into an interior tub. This makes painting the details on the door panels so much easier! The color is ScaleFinishes Medium Yellow Gold - which replicates a very popular Pinto color. The interior is painted with various craft paints. The houndstooth pattern on the seats are decals from Mr. Model. The gauges are from BestModelCarParts. For the side protective moldings, I painted the molding silver and then added a really thin piece of chart tape down the center. All chrome trim and the emblems/script were hand painted with acrylic metallic silver paint. Thanks for checking this out! Bart
- 21 replies
-
- 23
-
-
Very nice! Bart
-
1956 Ford Thunderboat
bh1701 replied to Alan Barton's topic in All The Rest: Motorcycles, Aviation, Military, Sci-Fi, Figures
Looks great! Very imaginative idea! Bart -
Very nice Mustang. Good work! Bart
-
AMT 1964 Chevelle Malibu SS in Turquoise Metallic.
bh1701 replied to Dragonhawk1066's topic in Model Cars
An excellent model. Great work! Bart -
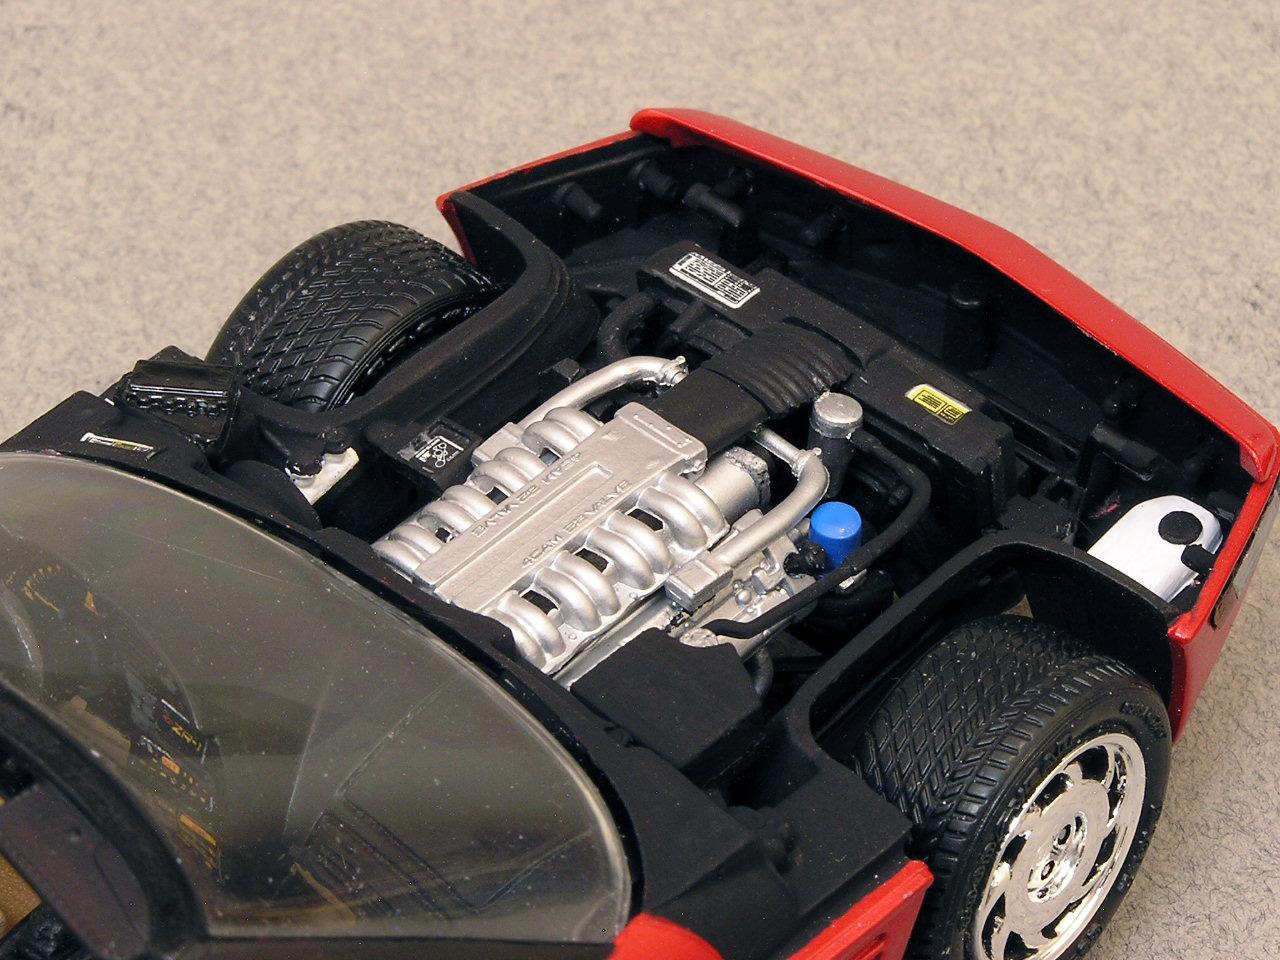
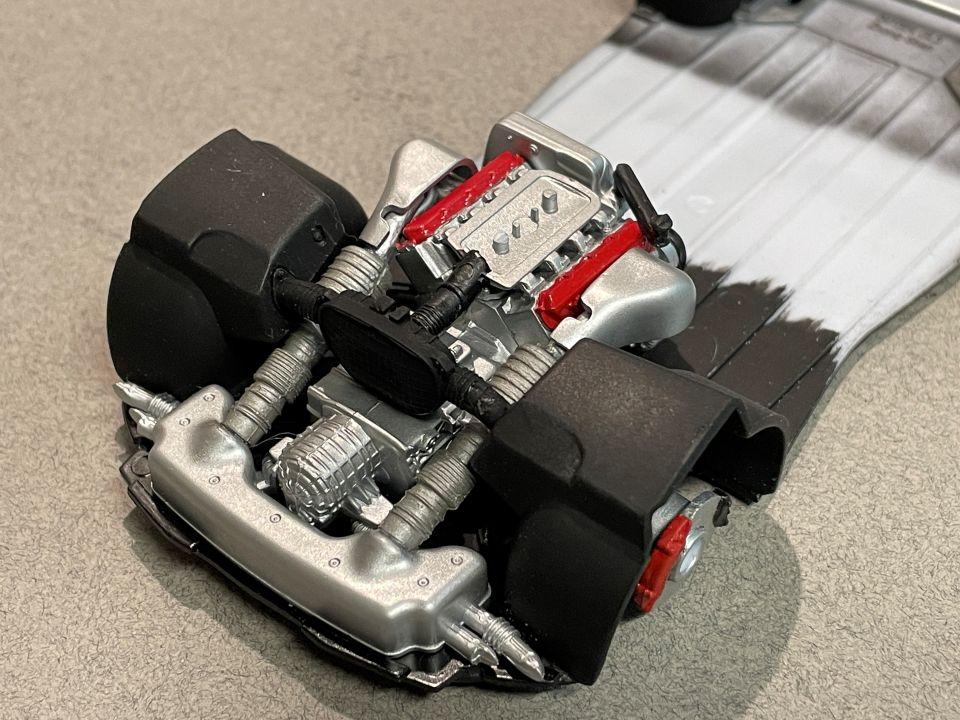
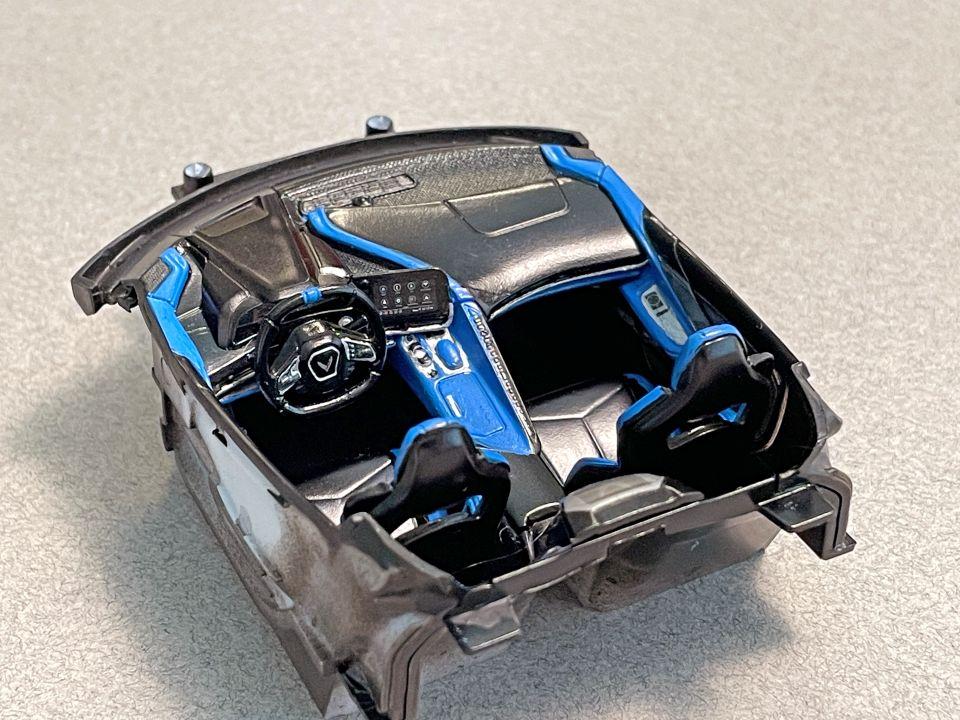
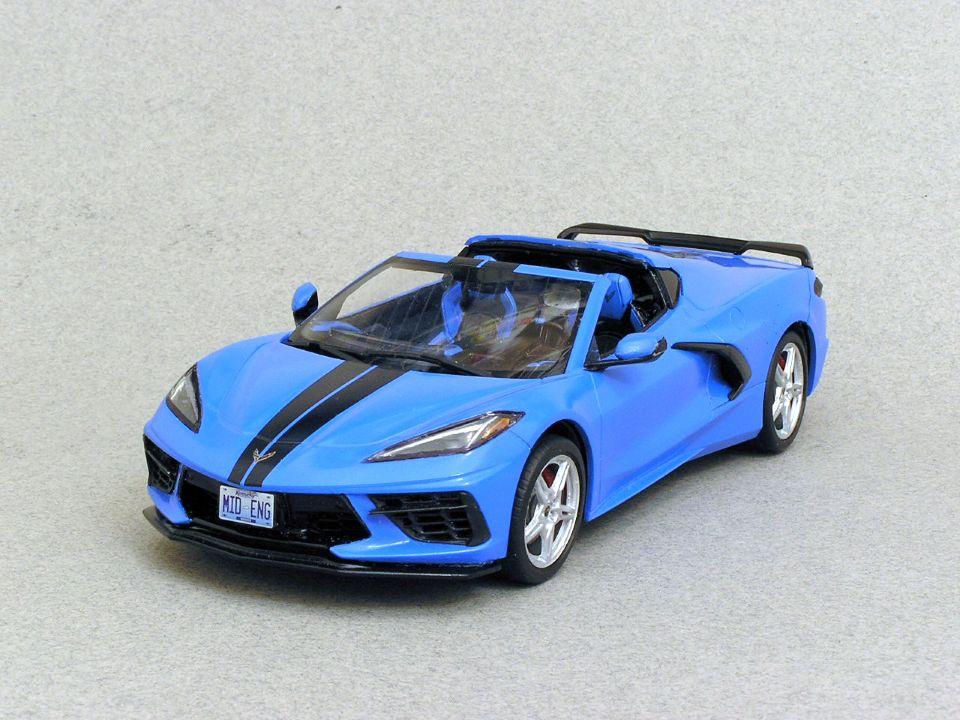
My latest completion is this 2022 Corvette Stingray. The exterior color is Rapid Blue (from Scale Finishes). It was a well engineered kit, but I did run into my share of challenges building this kit (some of these were unfortunately self inflicted!). Painting the taillights and headlights was one of those challenges. The biggest challenge was getting the front of the interior and cowl to fit snugly to the body. I followed the instructions and glued the cowl piece (where the windshield wipers are) to the dashboard. When I tried to glue the interior in, I could not get the cowl piece to fit flush with the underside of the hood. There was quite a gap visible! I made some adjustments and finally got it to fit pretty much as it should. After watching a couple of "build" videos, I learned that it was better to glue to cowl separately to the underside of the body first, and then the interior will fit perfectly when you glue it in. There is a raised line under the hood that the cowl fits up against. If you follow the instructions and glue the cowl to the dashboard, there isn't anything to indicate exactly where it fits - so you are basically making a guess on where to glue it. I obviously guessed wrong. I also glued the rear hatch into place. I had one corner that did not want to sit flush with the body. It was also going to be very hard to open the hatch since it fit very tightly into the body. You really can't see much of the engine when the hatch is open; you can see the same amount of engine through the window in the hatch. I made a few other tweaks to the kit to get parts to fit together better. I think I won most of the battles and the completed model looks very good. Bart The almost completed engine. The engine cover has not been attached yet. Tiny little decals on the brake pads!
- 11 replies
-
- 10
-
-
Thanks, Jeremy! I was looking at some of Tamiya's Yellows and the Pearl Yellow looked nice. Good to see a photo of a model in the sunshine with this color on it! With your Camaro, did you use a white primer under the yellow? Bart
-
Did some more research and found out that Accelerate Yellow and Competition Yellow are 2 different colors. Here is a shot of Corvettes in each color - the Competition Yellow is on the left, Accelerate Yellow is on the right. Bart
-
Was Accelerate Yellow a previous name for the Competition Yellow Metallic color? Here is a picture from the internet of a Corvette in Competition Yellow. Looks a lot different than my 1st photo that I pulled from the Corvette configurator on the Chevy website. The yellow is nice, but I kind of like the gold color in the first image I posted. Thanks, Bart
-
Any suggestions on duplicating (or even coming close) to the Competition Yellow shown below that is used on the new Corvettes. Scale Finishes does not have this color available. Wondering if there were any cars in the past that offered something close to this that Scale Finishes might have. I'm open to any paint manufacturer's products. Thanks, Bart
-
Bare metal foil gum residue
bh1701 replied to Racersonly's topic in Model Building Questions and Answers
If it's lacquer or acrylic paint, I use cigarette lighter fluid ( such as Ronsonol ) to remove it. I apply just a little to a Kleenex or cotton swab and rub that on the residue to remove it. Note: The lighter fluid cannot be used on enamels since that will affect the paint. Bart -
Looks really nice! Bart
-
Ford Levacar Mach 1
bh1701 replied to bh1701's topic in All The Rest: Motorcycles, Aviation, Military, Sci-Fi, Figures
Jesse, Hopefully you can find some way to restore the one you have and to fix your missing side exhaust tube (that's the official name of that item per the instruction sheet!) The 2 parts were identical. Maybe you'd be able to make a mold/casting using the one you have? I am not experienced in doing this, but I am sure there are folks who are knowledgeable about that process on the forum. I was lucky enough to find a pristine unbuilt kit at a price I was willing to pay. It wasn't cheap, but it was in the range I was willing to pay. Good luck with your LevaCar. Bart -
Revell 1971 Olds 442 W-30 done in Sienna Brown Metallic.
bh1701 replied to Dragonhawk1066's topic in Model Cars
An excellent build. Interior looks great! Bart -
You might try here - some of the brochures may show dimensions, and some owners manuals can also be found with their specifications. https://www.oldcarbrochures.com/ Bart