bh1701
-
Posts
389 -
Joined
-
Last visited
Content Type
Profiles
Forums
Events
Gallery
Everything posted by bh1701
-
Outstanding model. I especially like the interior! Bart
-
An excellent model! Bart
-
Thanks, Ken! I did the chrome detailing using two methods. The BUICK letters on the trunk were done with a Zoet chrome pen (similar to a Molotow pen). I will push the tip up and down on a piece of scrap plastic to get a small drop of the chrome paint. Then, I will use a very fine brush or a toothpick to pick up some of the chrome and will very slowly and carefully apply it to the letters. I have tried applying chrome directly from the pens and have not been successful doing it that way. I don't think that the tips on the pens provide me with enough control. The rest of the chrome (window frames, chrome strips on the sides, etc.) was done using a Metallic Silver craft paint from Hobby Lobby. I like using these paints since any mistakes you make can be cleaned up with some water. I usually mask off the areas to be painted, but once in a while some paint may seep under the tape. I would then use a toothpick dipped in water to run along the edge of the trim to remove the paint that seeped through. If you painted the car with lacquer paint, you can also use Testor's silver paint and remove any mistakes with a toothpick or small brush dipped in lighter fluid. The lighter fluid will not harm the lacquer paint. It takes a bit more work to remove the Testor's paint and it takes forever to dry (if it ever really does!). The Craft Store paints do dry and that is why I prefer them. Bart
-
Jeffrey. I am going to try the wheel backs and axles that the other person listed. If they do not work for me, I will reach out to you with the dimensions I would need. Thanks much, Bart
-
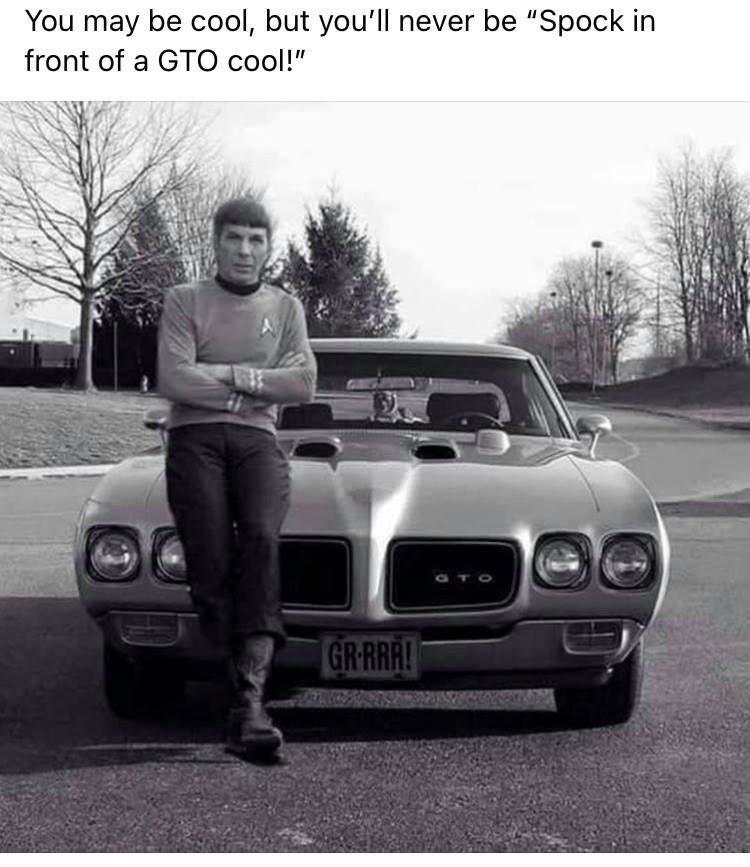
Thanks, Michelle! Live long and prosper! That may be Bill Shatner's Corvette in the background.

-
Here is my newest completion - a 1963 Buick Riviera. I bought this already built model off of the internet. I disassembled it and stripped the paint off. It was repainted with Tamiya TS-102 Cobalt Green for the exterior and DecoArt Sand Grey for the interior. Chrome trim and script were hand painted. Thanks for checking this out! Bart What it looked like when I received it Removing the paint. Looks like a good car for Cruella DeVil at this point!
- 21 replies
-
- 15
-

-

-
Thanks, John! That propellor looks absolutely amazing! Next time I have some woodgrain to do, I'll give your technique a try. The longer working time for the oil paint would be a definite advantage over acrylics. Bart
-
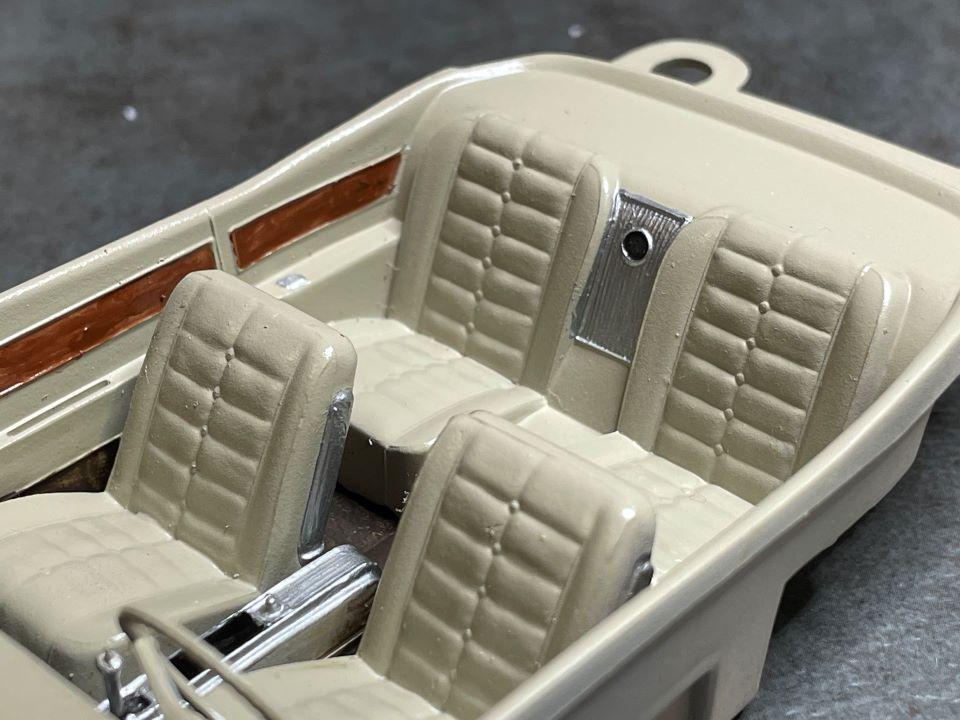
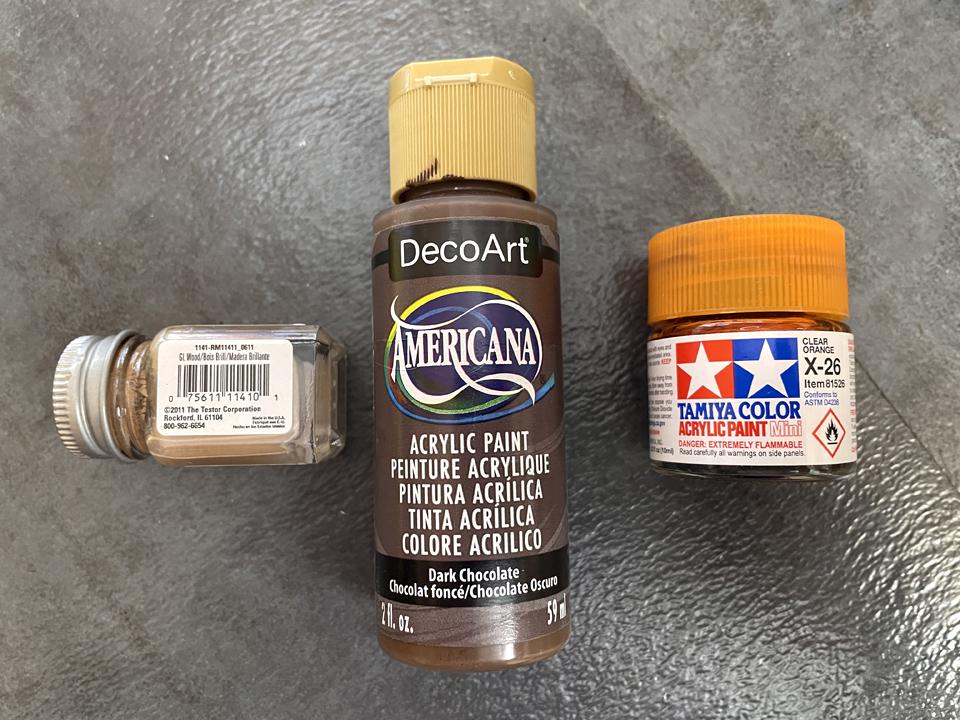
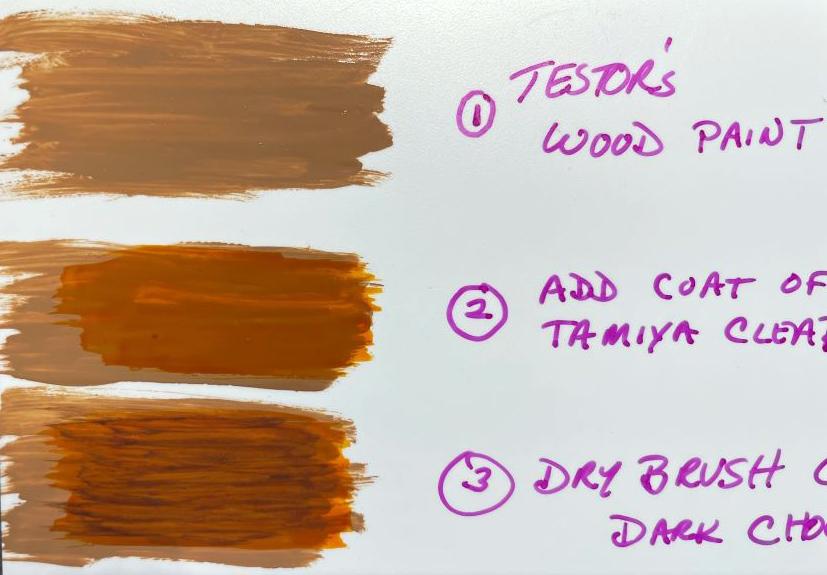
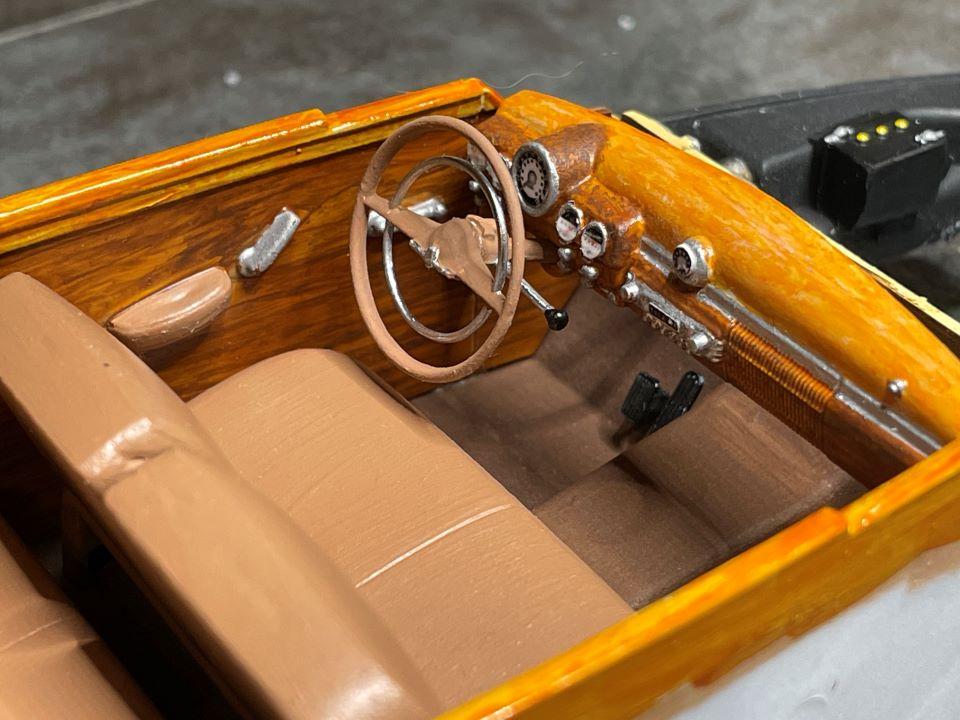
John, and others, had asked about my technique for the woodgrain on this kit. This shows the technique I used. I did LOTS of experiments on a scrap piece of plastic using many different shades of tan/beige (Craft paints, Tamiya colors, and Testors) to see what they looked like when the clear orange was applied over them. The photo below is only a small sample of the many colors I tested. My final choice for paints were Testor's Gloss Wood , Tamiya Clear Orange, and DecoArt Dark Chocolate craft paint. (NOTE: As I thought about this, I think I actually used the Flat Tan as shown in the above photo for the base color! The important thing is to experiment with lots of different base colors until you get the woodgrain color you are looking for!) I painted the exterior trim with the Gloss Wood paint and then brushed clear orange over it once it was dry. While you want to have good coverage for both paints, some visible brush strokes will enhance the woodgrain effect. Be sure to always brush in the direction you want the wood grain to go in. The outer wood trim just used the Gloss Wood and Clear Orange paints. For the interior panels, I used the Dark Chocolate to create a darker woodgrain effect. I dry brushed the Dark Brown paint using a flat, somewhat stiffer, brush. I applied the paint in this strokes using the outer edge of the brush (as opposed to the whole surface of the brush). This gave me finer lines and allowed me better control of the effect. If you really don't like how it's going, you can always remove the craft paint with a wet tissue while it is still wet so you can try again. You can also use a brush lightly moistened with water to thin down any of the Craft paint if it looks too heavy in any areas. Thanks, Bart
-
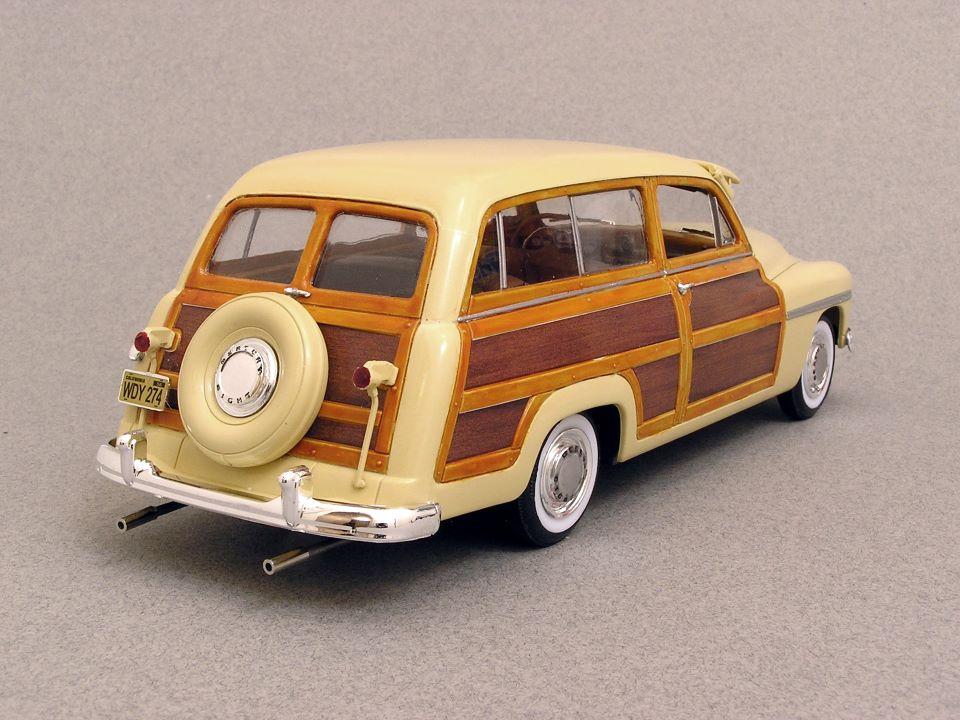
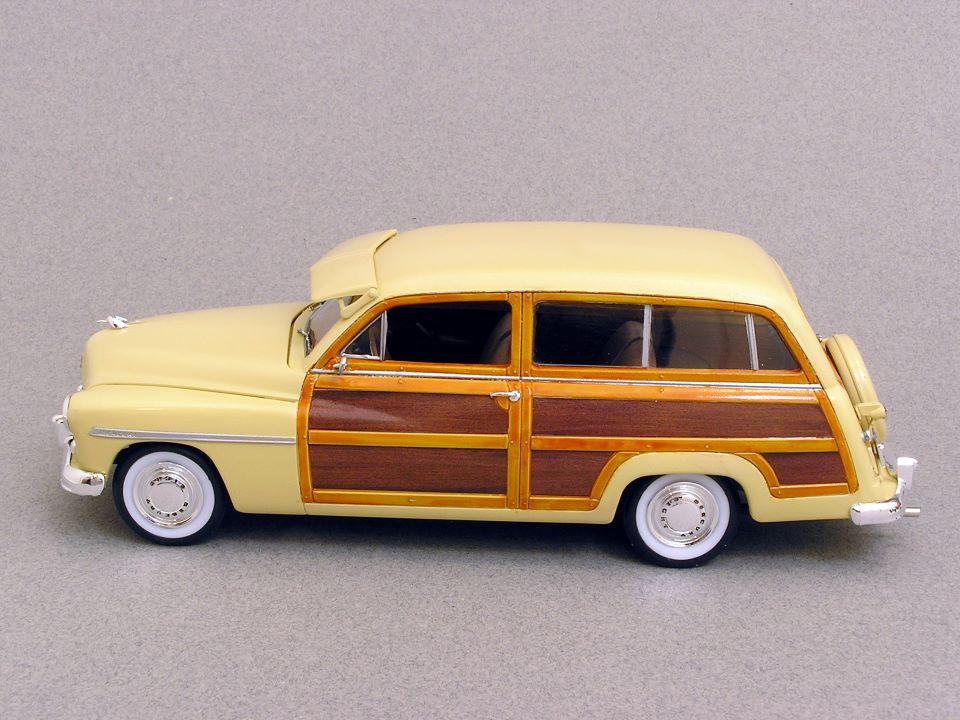
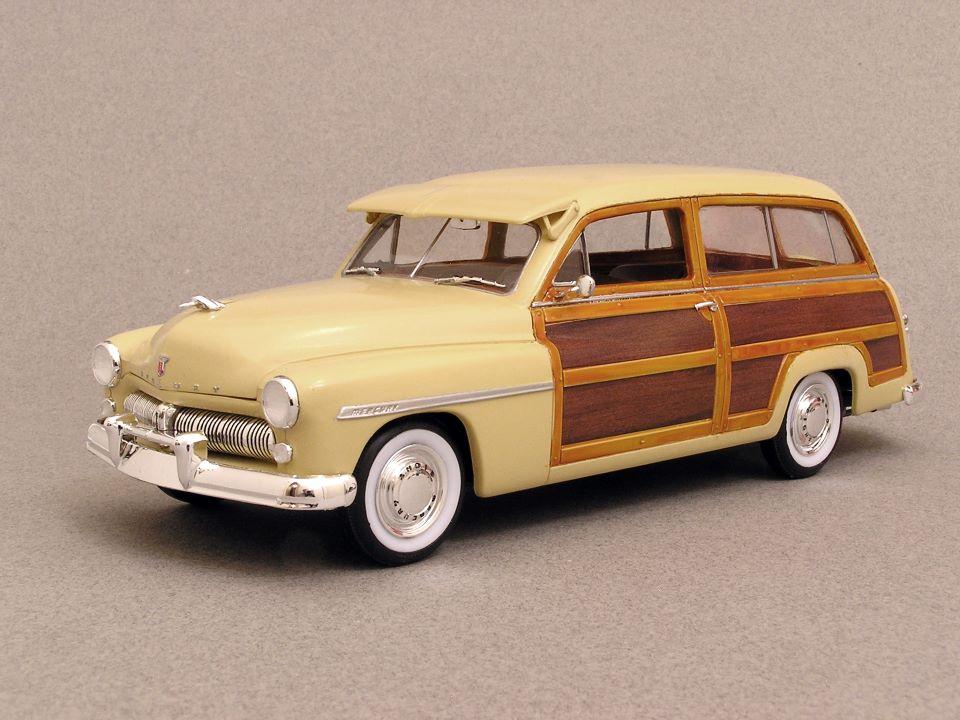
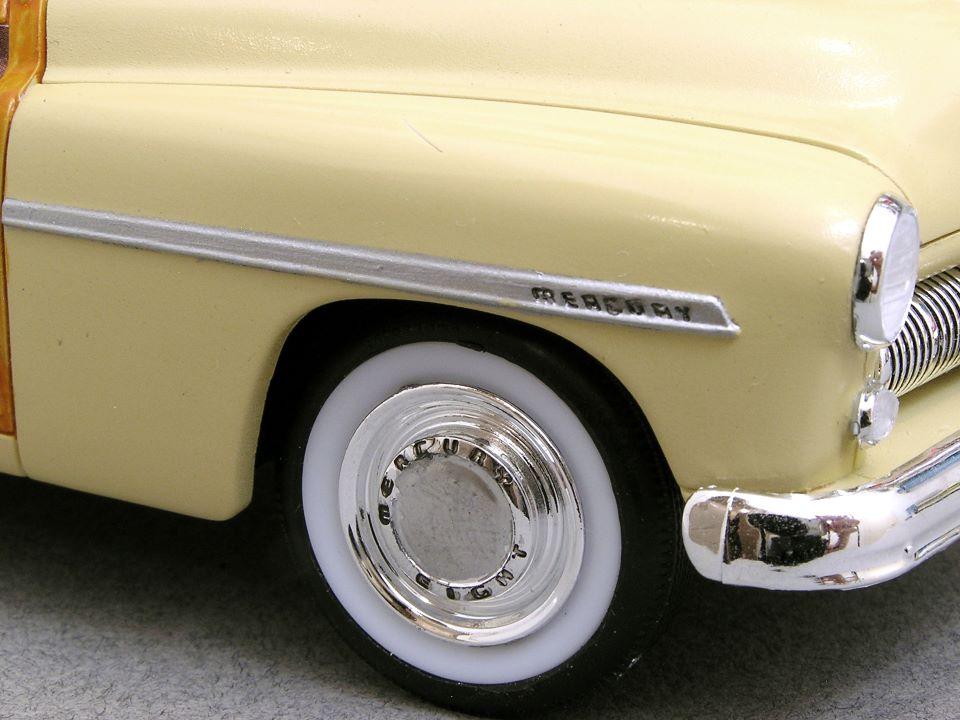
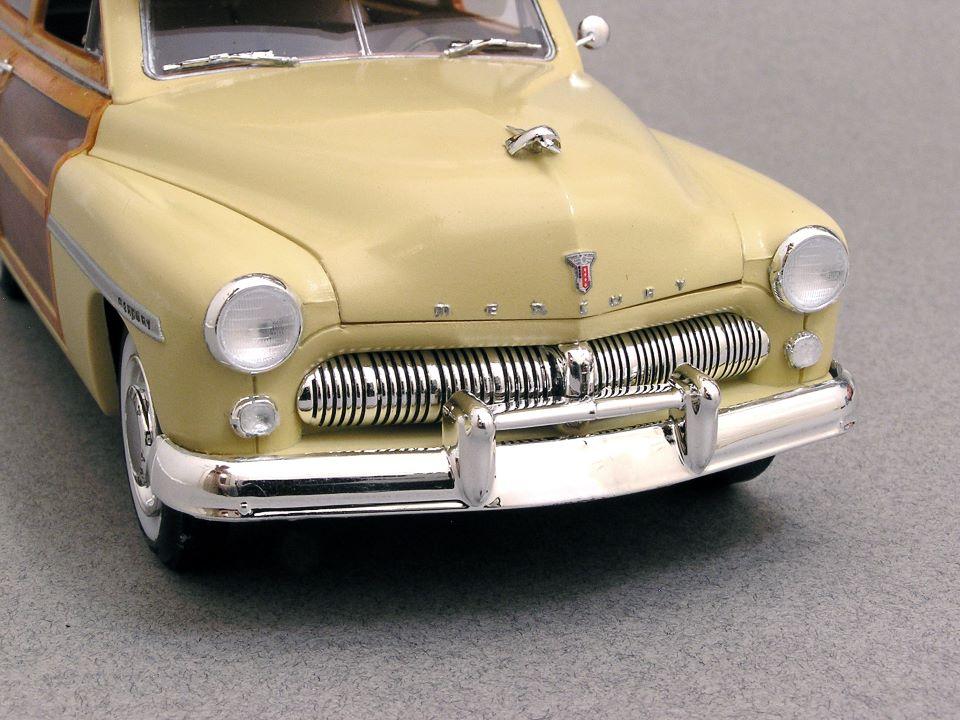
Here are some photos of my 49 Mercury Station Wagon. More information about the build can be found in my Under Glass posting. Bart
-
I got a kit from a model car show. It was already opened and I thought I had checked that all parts were in the box. I don't know how I missed this, but it was short the metal axles and the inner wheels. Would anyone have any of these? I don't think it matters too much what kit they are from, but my kit is the 1961 Ford Galaxie. If I need to, I know I could make the axles out of some metal rod, but would prefer to avoid that if possible. Thanks, Bart
-
Monogram's 1955 Lincoln Futura Concept Car: Finished
bh1701 replied to David G.'s topic in Model Cars
David, That turned out really well! I was following your WIP thread, and all of the effort you put into this kit was well worth it! Bart -
David, I would be happy to post some photos to the community thread. Do you have a link for it? Bart
-
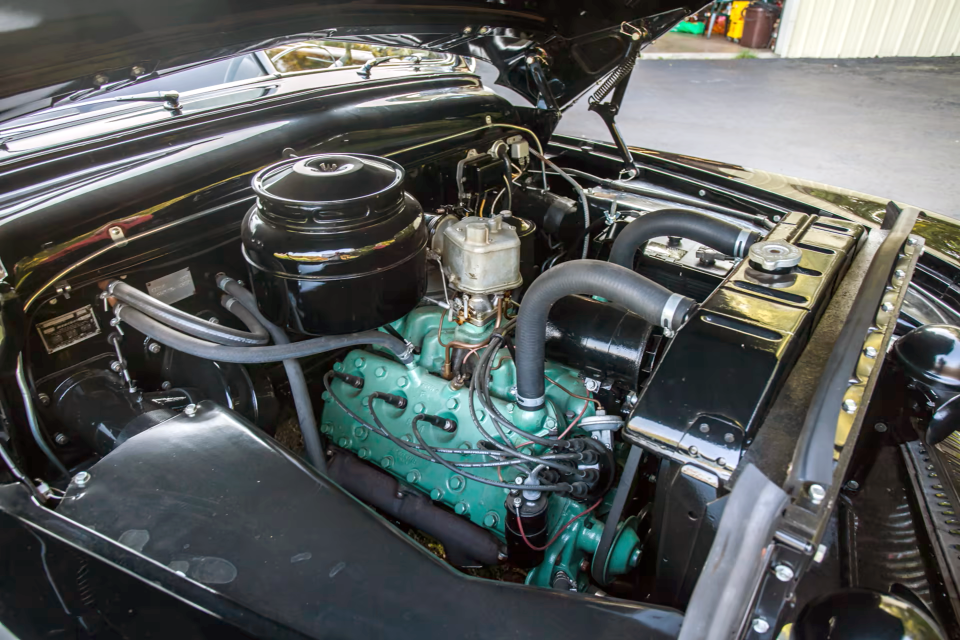
Thanks, David There is an engine in this model. I usually don't include photos of the engine, since I usually just use whatever is in the kit and do not add any wiring or hoses like some of the forums members do. But, here are some photos of it. This doesn't look like the stock 1949 engine. I think I heard that it may be a Cadillac engine. I think the kit was once done as a Surf Woody which would explain the different engine, and the Hawaii and California license plate decals that were included. Thanks, Bart
-
I bought one of these at a model show and thought I had checked to be sure that all parts were in the box. Looks like I am missing the stock rear bumper. Does anyone have one of these? Hoping maybe somebody built one of the custom versions and saved their spare parts! If nobody has one, I may be able to get one from Round2 (for a price!) if they still have parts available. Thought I'd check here first! Thanks, Bart
-
Here is my latest completion - a 1949 Mercury Wagon. This is the Revell kit. Painted with Scalefinishes Bermuda Cream paint to duplicate a color offered on the real car. Mercury script on the hood is hand painted. Various colors of Testor's and Craft Paints used for the interior. Also used Tamiya Black Panel liner to fill in the letters on the hubcaps and on the front fenders. I decided to add the black to the lettering on the front fenders after I took some of the photos - so you won't see it on all of the photos. This was a very nice kit that went together well. Several firsts for me with this kit: First time using Scalefinishes paint. Really impressed by how well it came out. This is my 3rd attempt at airbrushing. First two times were using craft paint on other models. First time trying to paint simulated woodgrain. The dashboard, interior side panels, and lighter wood trim on the exterior were the pieces done.
- 40 replies
-
- 22
-
-
Greg, Thanks for finding the Coca Cola version of the Jeep Liberty. That's the first 1/24th scale one I have seen. The price might be a little high for me. The 1/18 scale ones I have seen run from $50 to $80. Also, I need to repaint and decal whatever one I get to replicate a friend's business vehicle. I am worried that it might be hard to remove the Coca-Cola decals that are on the side rear windows. I appreciate you searching for this. I will continue to search for 1/24 scale versions since we now know that someone was making them. Maybe I will be able to find a stock version. Bart
-
Looking for a 2002-2007 Jeep Liberty - could be plastic model or diecast. Prefer plastic kit. 1/25th scale or larger? Does anyone know where I might find one. FYI: I have located a number of Matchbox 1/18 scale diecast cars on the Internet, but wondering if there is anything else out there? Thanks, Bart
-
Looks good! I can smell the onions on the sliders right now! Bart
-
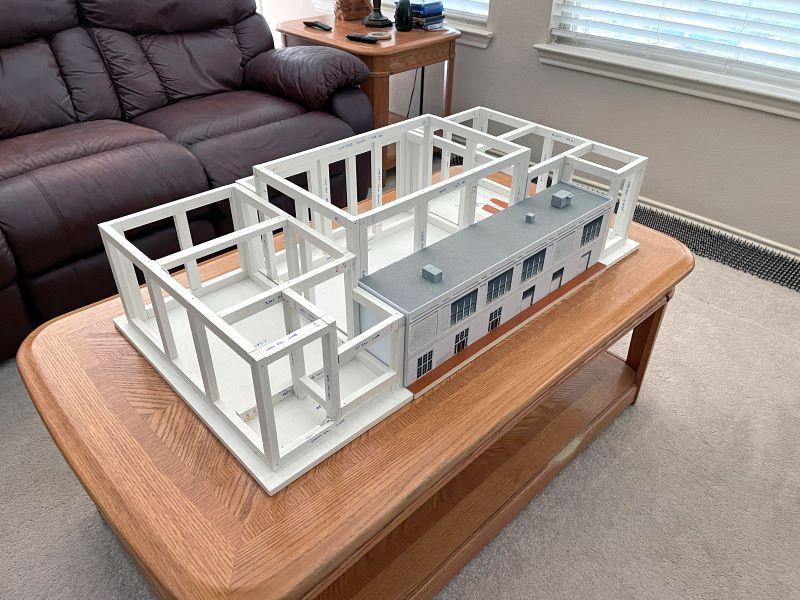
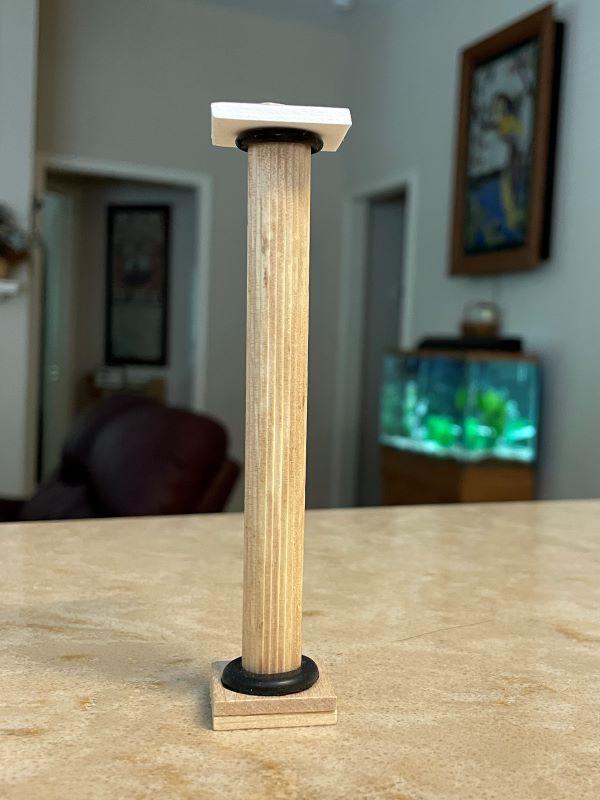
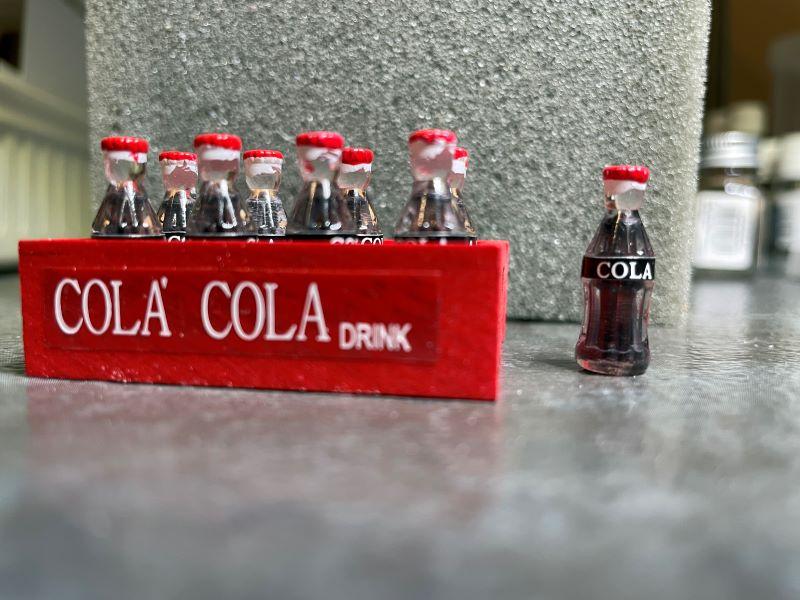
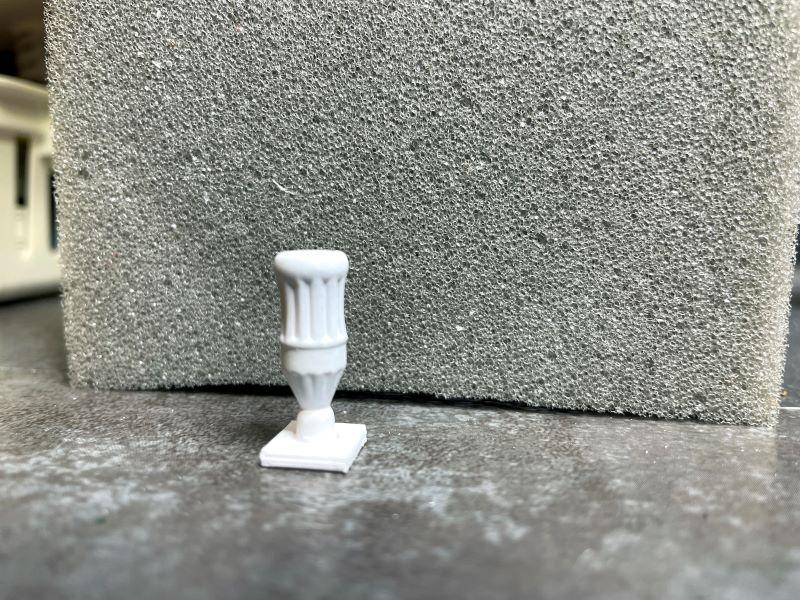
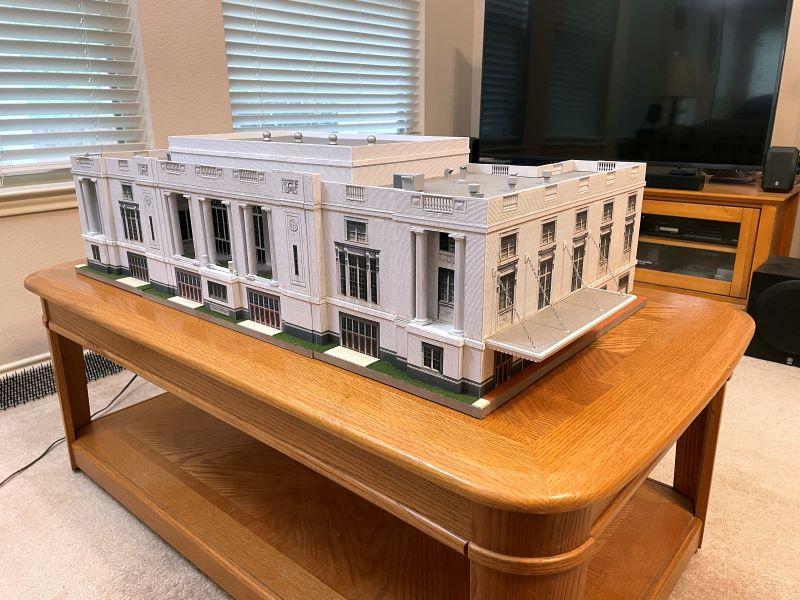
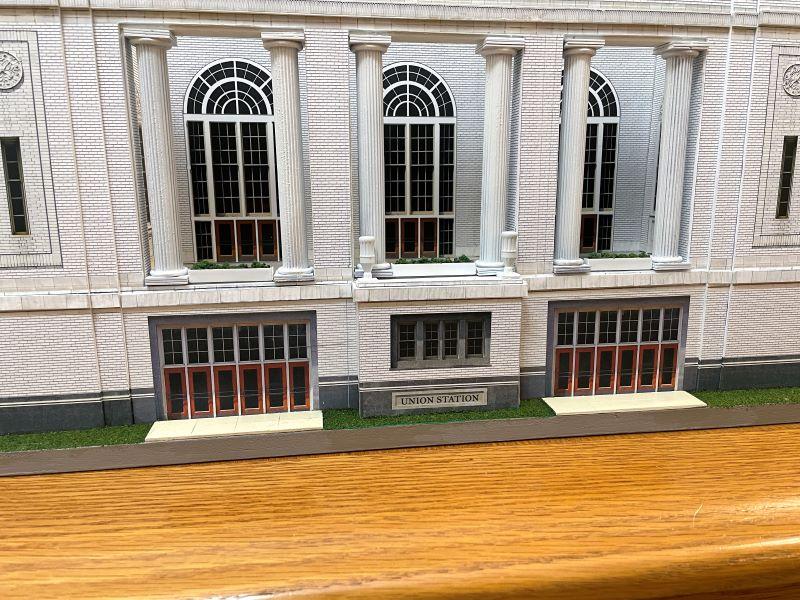
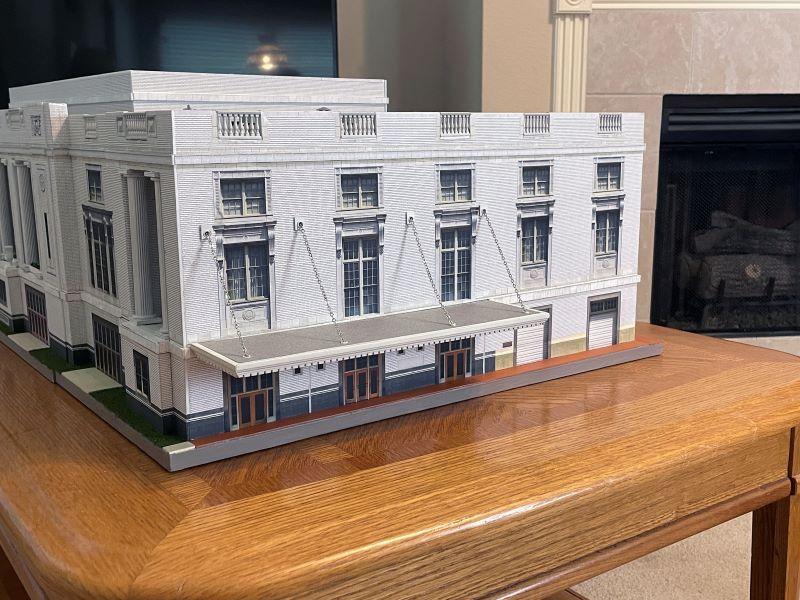
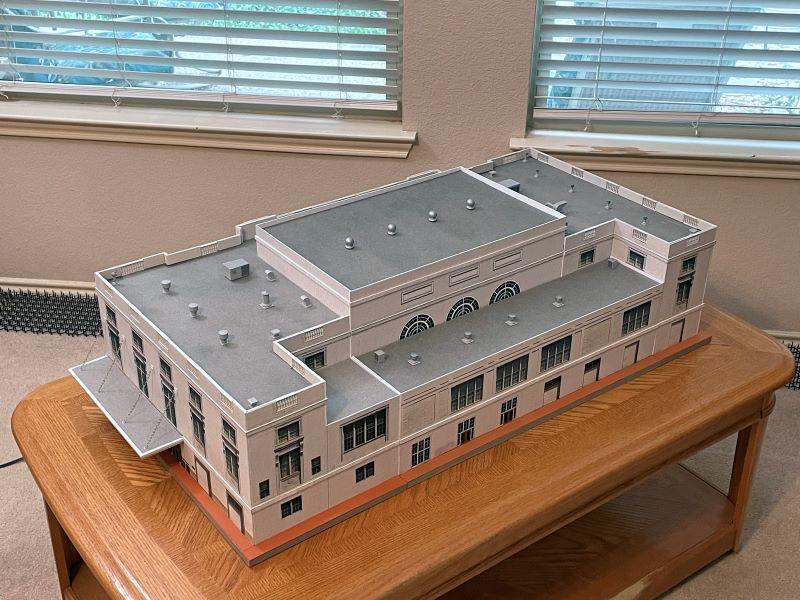
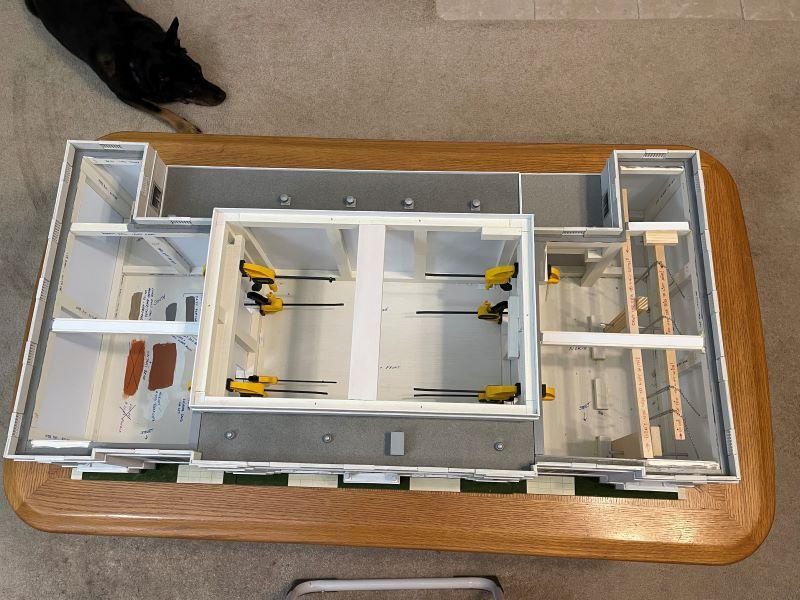
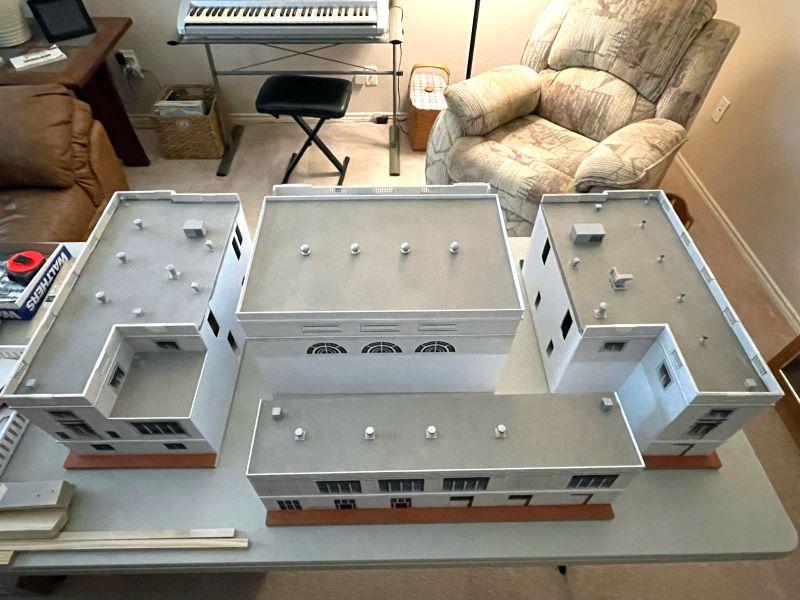
This is something quite a bit different from my usual car and science fiction models. I scratch built this HO scale model of Dallas Union Station for a friend who has a Free-Mo module that represents the station and the surrounding tracks in the 1950's. The model measures about 19" x 38". I created images of all of the exterior walls using my Photoshop skills and had them printed on heavy weight paper at my local Fed Ex Printing shop. The images were glued to 1/16" plastic sheets that were then glued to an interior wood framework that is attached to plywood bases. It's built in 4 sections for easier storage and transportation. Some of the more creative aspects of this model are the urns that are by the front balcony. These are doll house Coke bottles painted white and flipped over. The columns are 5-inch fluted wood dowels, O-Rings, and small plastic square tiles on the top and bottom. The canopy that extends out from the side of the building uses necklaces and pins from Hobby Lobby; the canopy is removeable to protect it from damage while being transported or stored. Balusters along the top edges of the walls were 3-D plastic prints. Roof material is a gray art paper from Hobby Lobby. Roof details are from a Walthers roof detail set. Thanks for checking this out! The wood framework that supports the walls. The 4 sections that make up the station. Doll house coke bottles Coke bottles painted white and flipped over to become some urns for the front of the station. Columns are made with fluted wood dowels, O-Rings, and square pieces on top and bottom. Finished columns and urns installed. Canopy with necklaces for the chains. Roofs removed to show interior and clamps that attach sections together.
-
Very clever! Great looking model! Bart
-
Stunning build!\
-
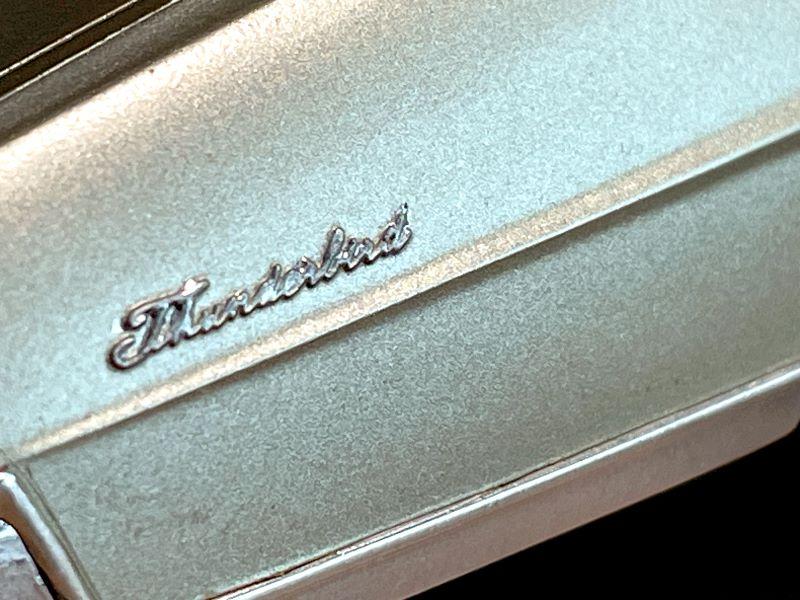
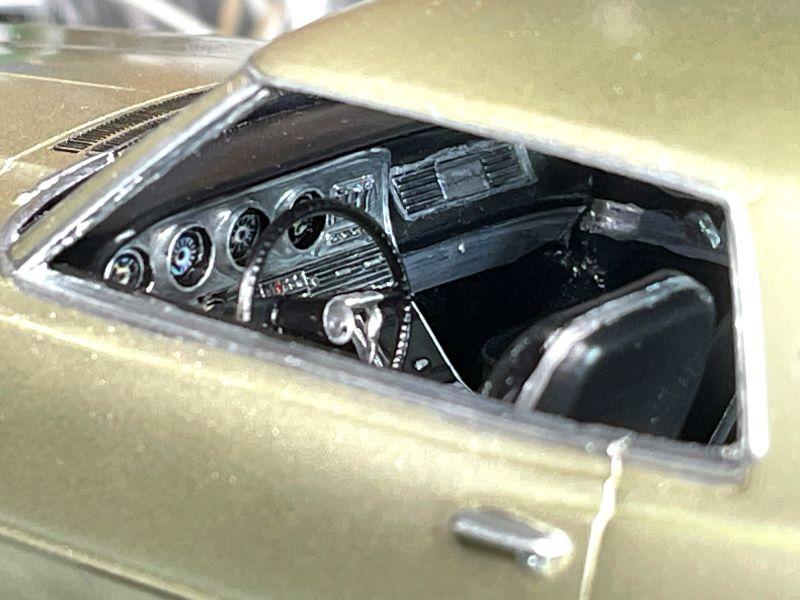
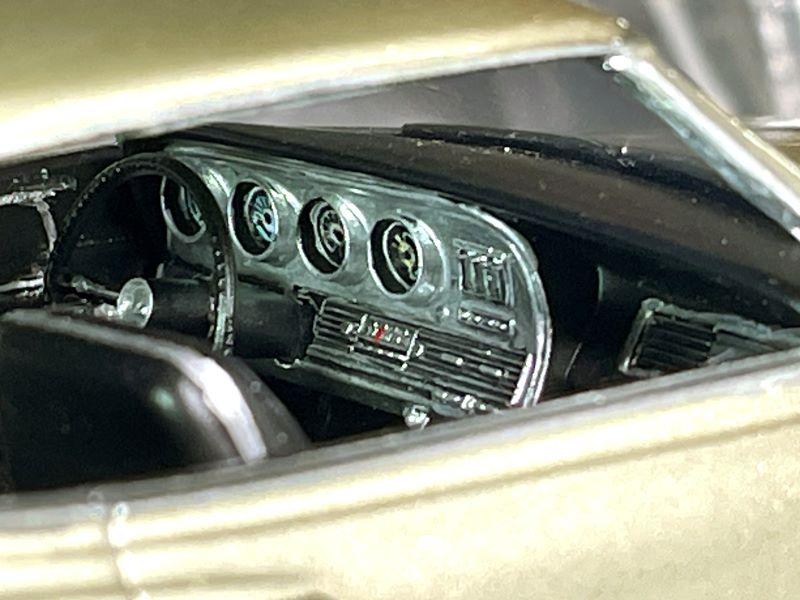
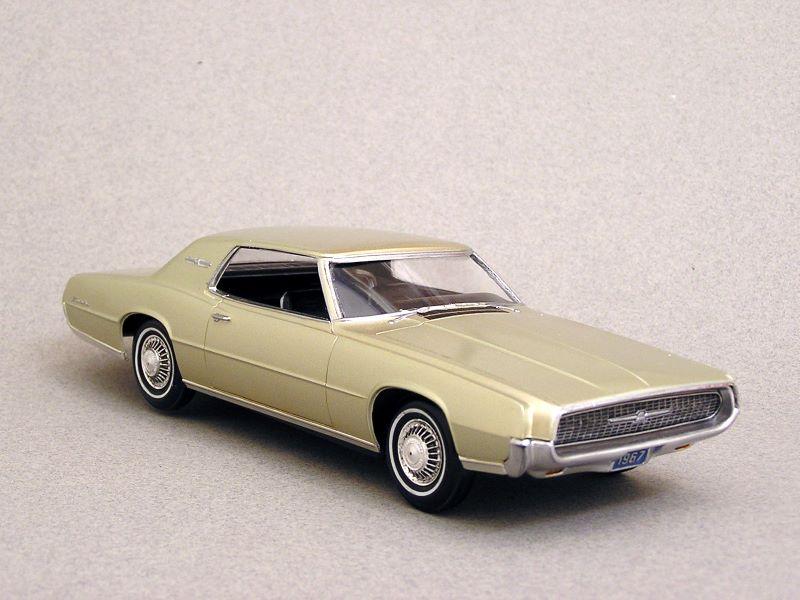
David, The Thunderbird script is just chrome paint. The black highlights you see around the letters are actual real-life shadows that my camera captured. On the dash, I did use black wash to accent the air vents, heater / AC control panel, radio and other details. When I look at my photos, the dashboard always amazes me at how well it turned out. I even surprise myself sometimes! Bart
-
Thanks everyone for the comments! Bob, I, too, was amazed at how well that script came out. ☺️ To be honest, I think it was a combination of a brush and a sharpened toothpick. Bart
-
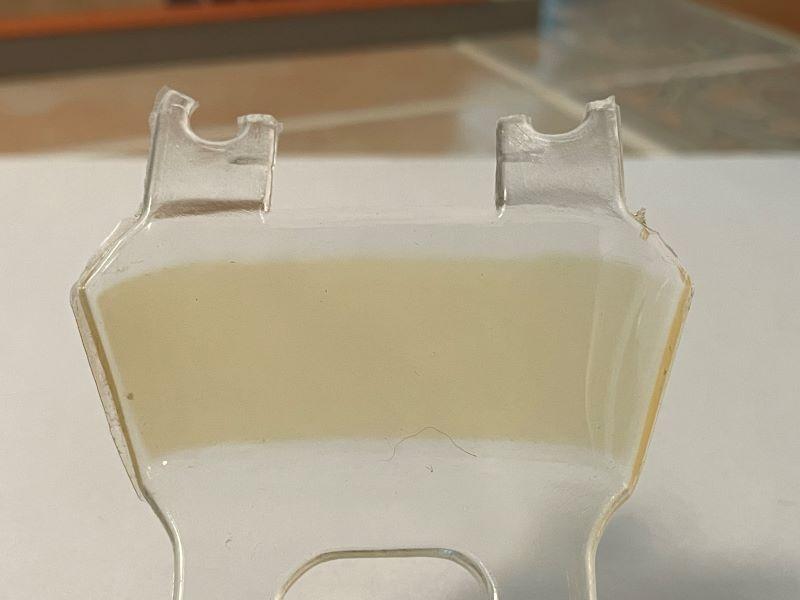
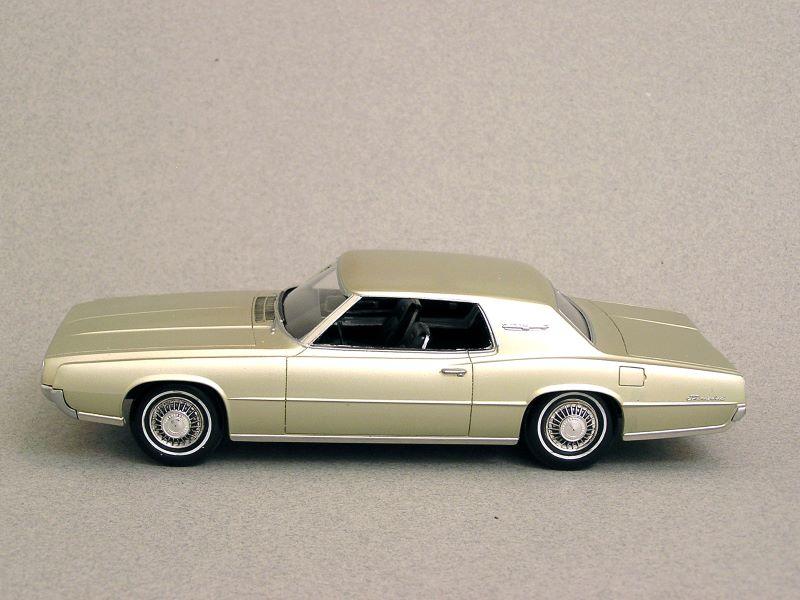
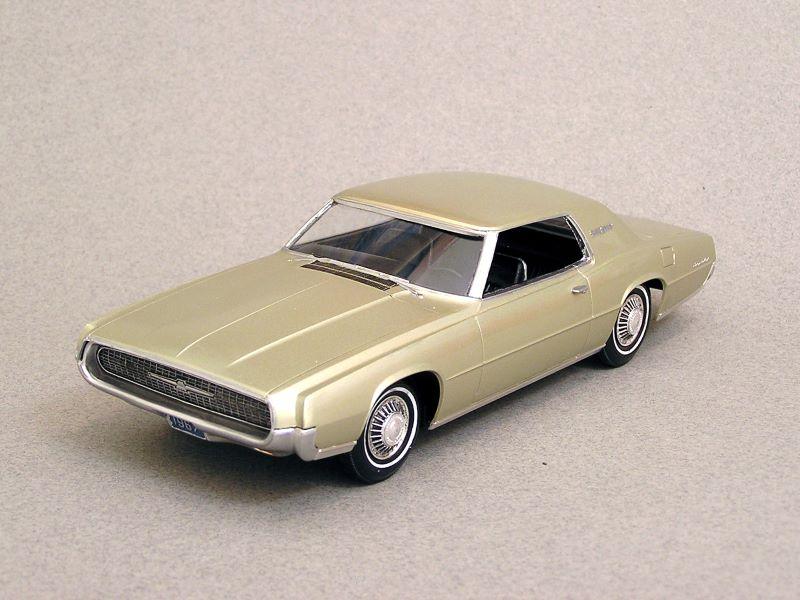
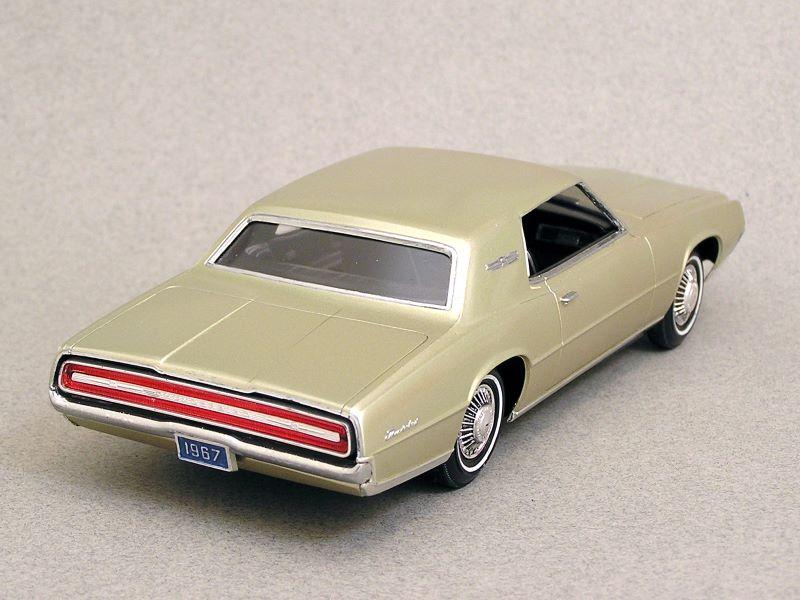
I purchased this online recently. It is an AMT promo model of the 1967 Ford Thunderbird. The model had a couple of issues with it. The front passenger window frame was missing a section, and the plastic windows had yellowed badly. I used plastic strips and putty to repair the window frame. I tried several techniques to remove the yellowing from the windows, but none of them worked. So I created new windows using clear plastic sheets. The color is Tamiya TS-75 Champagne Gold. I was trying to get a color similar to the Sauterne Gold that was offered that year. The rocker panels are done with Bare Metal foil. I hand-painted the Thunderbird script, emblems and window frames using Zoet Chrome markers. I press the tip of the marker several times on a scrap piece of plastic to get a wet blob of the chrome paint, and then apply it using a fine paint brush. It is a nice addition to my many Thunderbird models. Thanks for looking! Bart Broken window frame Yellowed glass Repairing the broken window frame
- 23 replies
-
- 12
-
-
That's absolutely amazing! Wish I had some of your skills. Adding LED lighting on my Galileo 7 shuttlecraft was pushing my skills to the limit for me! Bart