lghtngyello03
-
Posts
1,246 -
Joined
-
Last visited
Content Type
Profiles
Forums
Events
Gallery
Everything posted by lghtngyello03
-
Beautiful build!
-
Those are some sweet builds man!!
-
Thanks buddy! Hope It helps when you spray!!
-

Tamiya AMG GT3
lghtngyello03 replied to lghtngyello03's topic in Other Racing: Road Racing, Salt Flat Racers
Thanks man! This kit is amazing, just as any Tamiya kit is. If you take the time and mold in all of the vents that glue onto the body, as on the 1:1, it really makes a big difference. -
Tamiya AMG GT3
lghtngyello03 replied to lghtngyello03's topic in Other Racing: Road Racing, Salt Flat Racers
Thank you!!! Thanks a lot man! -
Thanks man! I definitely love the outcome of this build. I plan on doing another one in the future with another loud/off the wall OEM color as well. Thank you!! I hope the painting process helps some people!
-
Thank you very much!! Thanks buddy! Thanks for the kind words man!!! Thank you sir!
-
Thanks buddy!!
-
No problem at all Bob, hope it helps!
-
Thanks man! Probably one of my favorite colors of any build I have done now! Thanks Dominik
-
Looks great! You did a great job. I hated doing the BMF on my 59 convertible but it was worth it.
-
Thank you very much!
-
Thanks Roger! The photo etch is definitely a must if this kit is built. It looks waaaaay better than the factory pieces that come in the kit. The suspension work wasn't horrible, just time consuming to get the right look.
-
Thank you very much!!
-
Sure thing man! It's long, but I am going to try to be as detailed as possible and hope it helps anyone! Prep - I prep my body as normal, such as, remove all mold lines, scribe all panel lines super deep, then finish the bare plastic with a quick sanding with 2000 grit sand paper to remove any stray highs from the panel line scribing edges.Of course you always want to wash the body with a good dish soap and soft brush, to degrease it. Primer - After your prep is done on your body and it's clean, I spray the primer through my Paasche Talon with a 0.38mm needle @ 27 - 30 psi. Their primer likes to be sprayed on heavy and wet to lay down smoothly (waiting 5 minutes in between coats.) Let the primer dry on its own, no dehydrator. Then, you can sand smooth with some 2000 grit paper, and wash the body again to clean it up. If you don't sand with this primer, the color coat may not have a good surface to "bite" onto and it could possibly pull up if you plan on doing any masking before clear for other color coats. After you've sanded and cleaned the body after your primer coats, you can spray color. Color - Again, I spray the color through the same airbrush, same needle size (0.38mm,) and the same pressure settings (27-30psi) and work in light mist coats (waiting 5 minutes between coats.) You could do heavy coats right off the bat, if you are using Splash Primer and Splash Color, but I play it safe and spray mist coats until you can lay a medium-ish coat. After your color is sprayed, it can dry in the dehydrator....I've never had any bad luck with this. Remember if you sand a metallic based paint before clear, due to trash in the paint or a flaw of some sort, you have to respray with additional coats of color. If not, you will see every sanding mark you made once you apply clear, and it will have to be sanded down and resprayed in that area. Clear Coat - After any decals have been laid down on the body, or any additional colors have been sprayed, I wait a day or so to make sure the decals are dry, or the paint is gassed out before I clear. I also spray clear with the exact same airbrush needle size as everything previously sprayed (0.38mm) as well as the same pressures (27-30psi.) ----- The clear is a 3:1 mix ratio, so 3 parts Clear coat to 1 part hardener/reducer. Your first coat or two needs to be a light, or tack, coat (Waiting 5 Minutes between coats) This way you don't kill any decals, (if any were laid down prior to) or craze the color coat. This also gives your following coats something to latch onto and not run. The 3rd coat needs to be a medium-wet coat, moving slowly but a little heavier than your tack coats. (wait 5 minutes between next coat) The 4th coat needs to be your wet coat. Move a little faster than your 3rd coat with your gun, but lay down a heavier layer of clear. I have started playing with how much I thin the last coat of my clear on each job. So I'll add more reducer/hardener to my final coat. You have to be careful doing this as if it gets too thin.... it will run. This helps in the leveling of the clear as it cures, as 2k clear is a self leveling clear coat. This will take care of your "orange peel" effect and greatly reduce the amount of wet sanding and polishing that will be done in the end. After your last coat of clear is laid down and you are satisfied, you can either let air dry under a vented cover to keep dust off of it, or throw it in the dehydrator. I use the lowest setting on my dehydrator of 95 degrees and let it bake for a couple of hours until I handle it at all. Wet Sanding/Polishing - I wait 3-5 days for the clear to fully cure before any sanding is done at all. I start with 3600 grit sanding sponges, and work my way all the way to 12,000 grit. When starting a different grit, make sure to sand in the opposite direction of the previous. So if you went left to right on the previous grit, change to up and down or front to back (depending on panel.) Make sure you wash the body down and change your water out with fresh water in your bowl between grit changes. This makes sure there is no grit left behind from previous coarse grits to cause further marring. Then, once all grits are complete with sanding, I polish out with Meguiar's Scratch X and then follow with Meguiar's Ultimate Polish, using some small pads and my Dremel.
-
Thank you Bob! This is by far my favorite color out of anything I've built. It has so much pearl to it, the color changes with the slightest angle difference or light change.
-
Thank you very much! This was a build I had been wanting to do for the longest with a color other than the normal Red, Blue, or Black that everyone always builds. I'm very pleased with the results! Thank you very much!! Thank you sir! The Photo Etch set was a must, or all of the air inlets/outlets on the bumpers would look like the center grill....one solid piece of plastic with Honeycomb molded in. Definitely a must to purchase if anyone plans on building one of these. Thank you!!! Thanks man!
-
Thanks man. It definitely has an aggressive look to it.
-
Thank you very much! Not too bad for an iPhone camera huh?
-
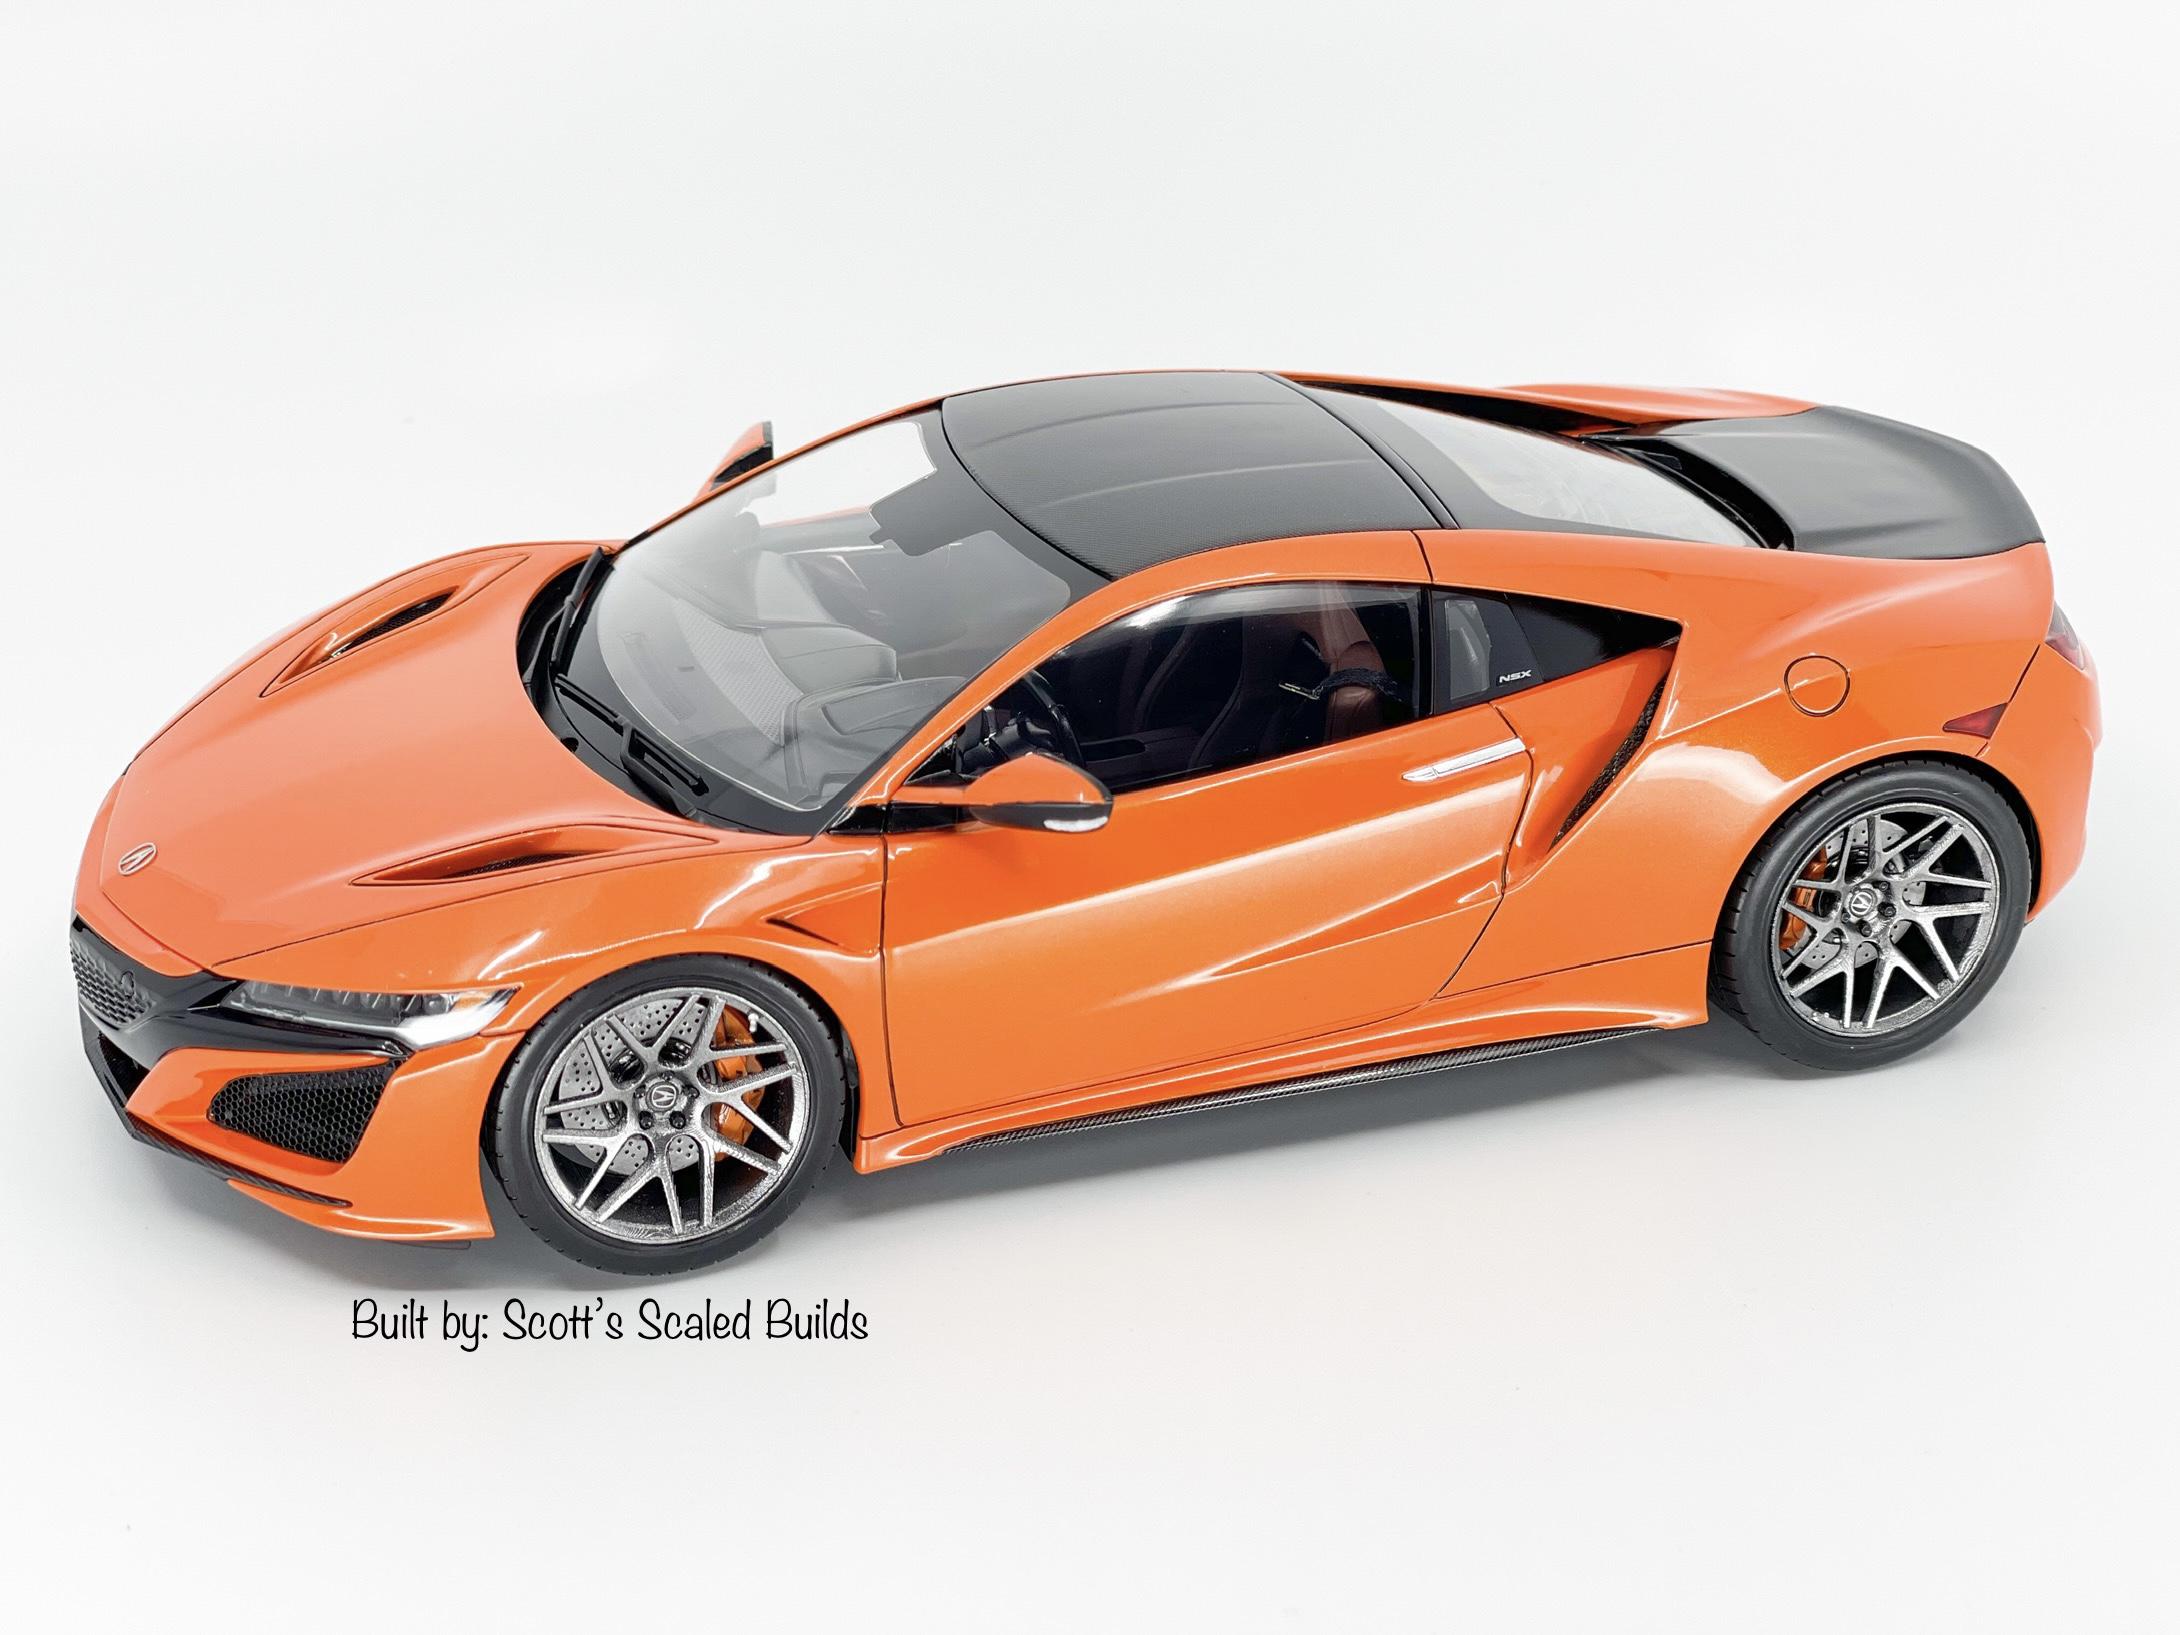
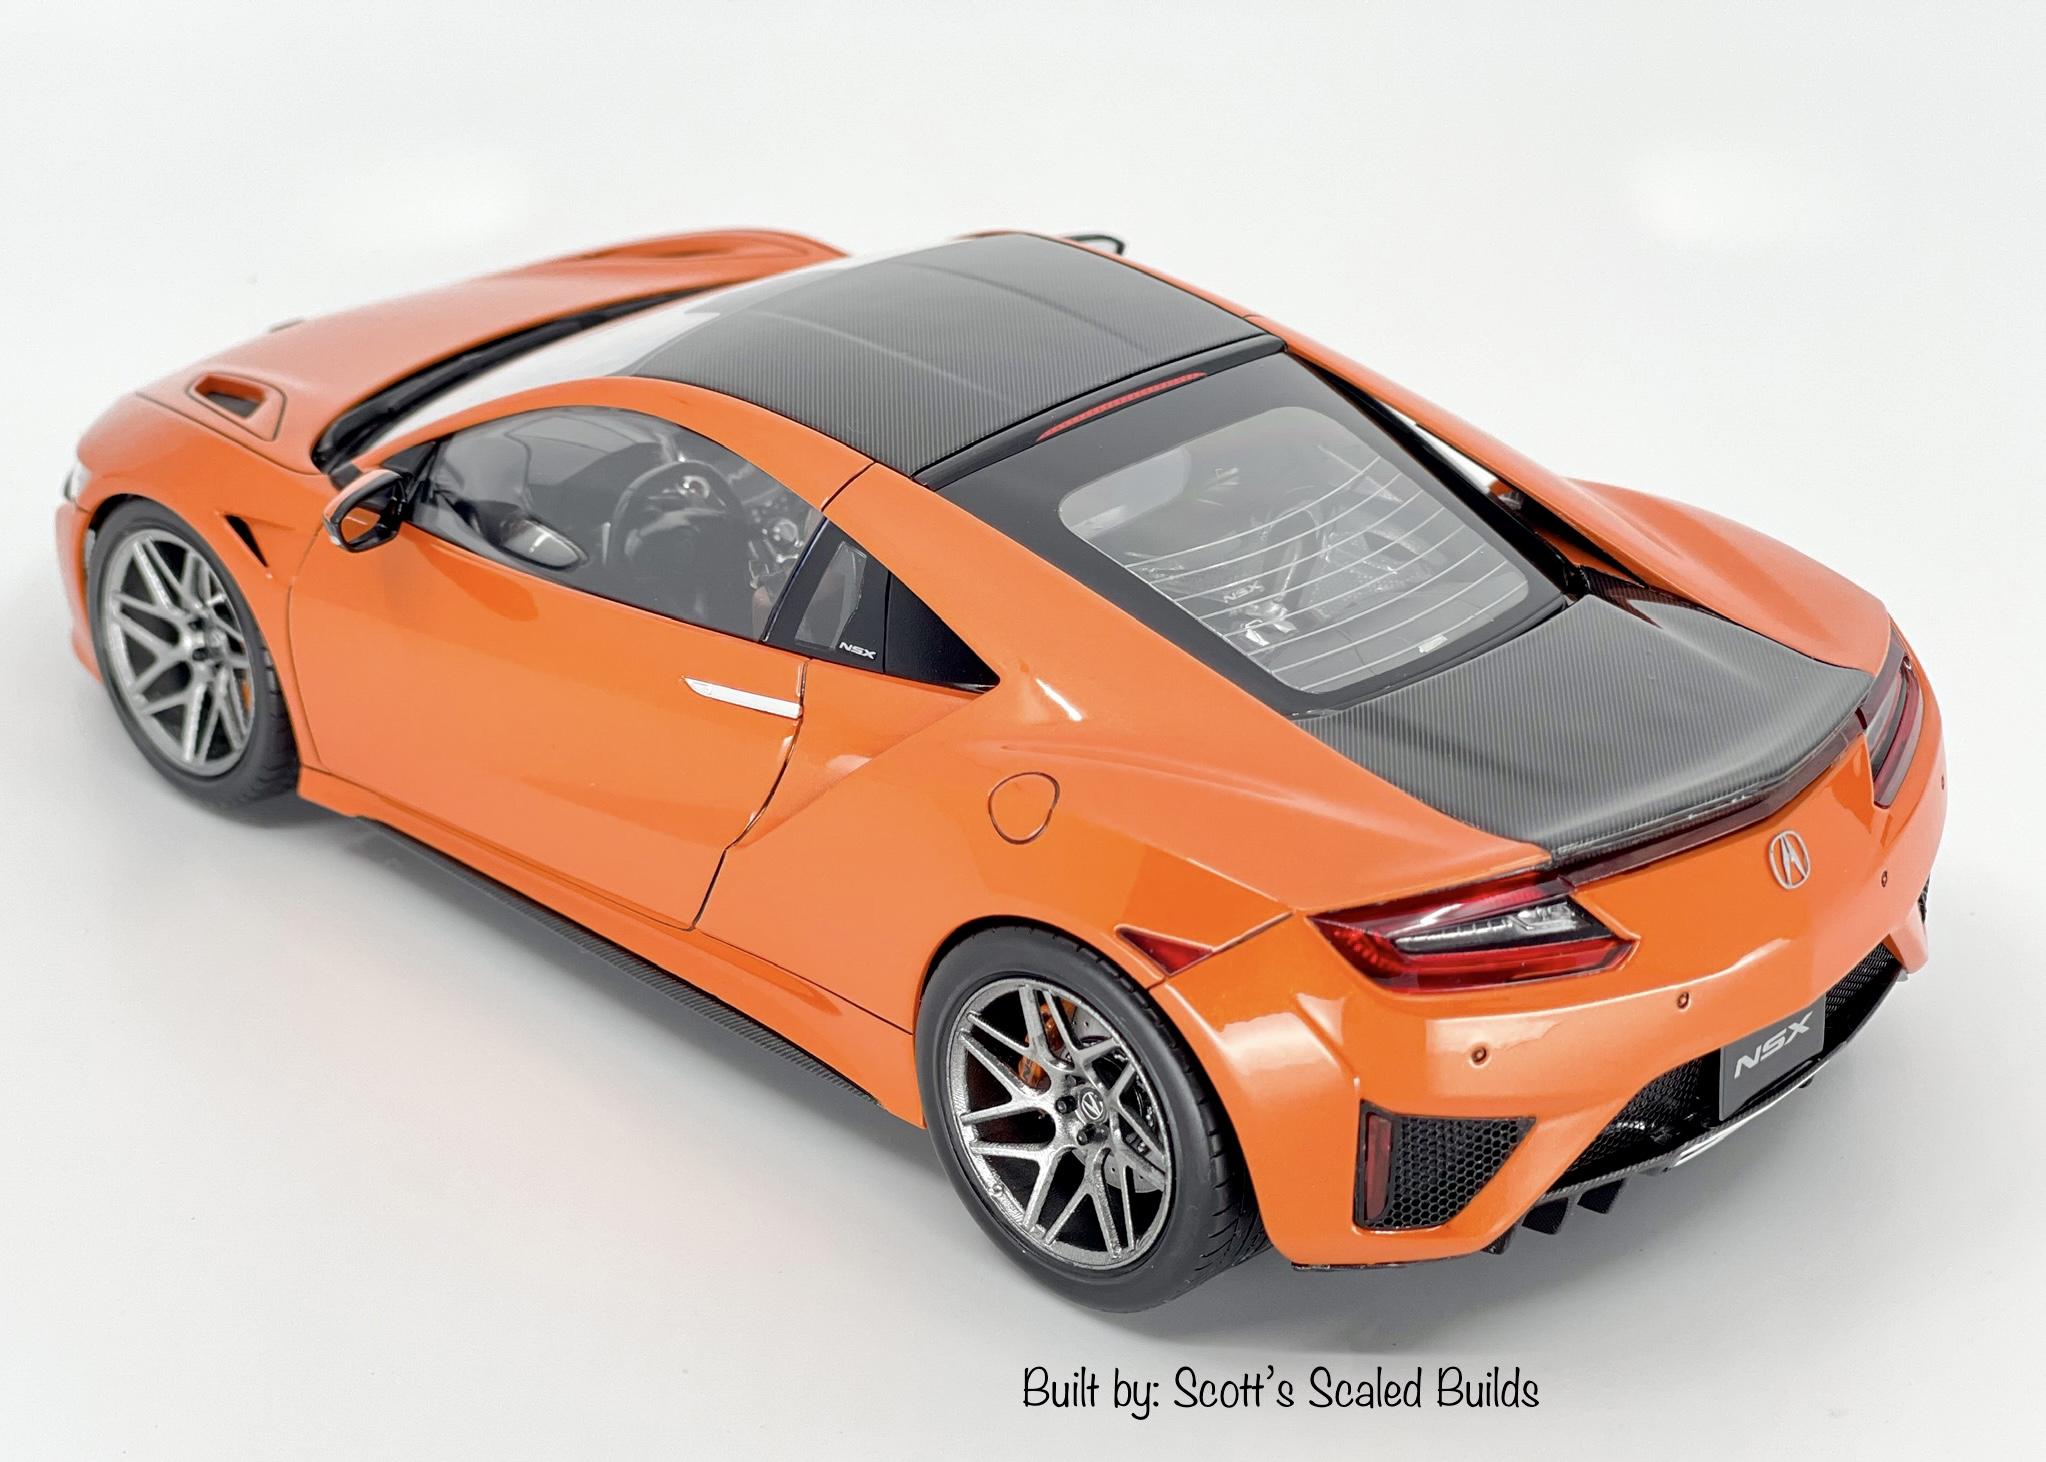
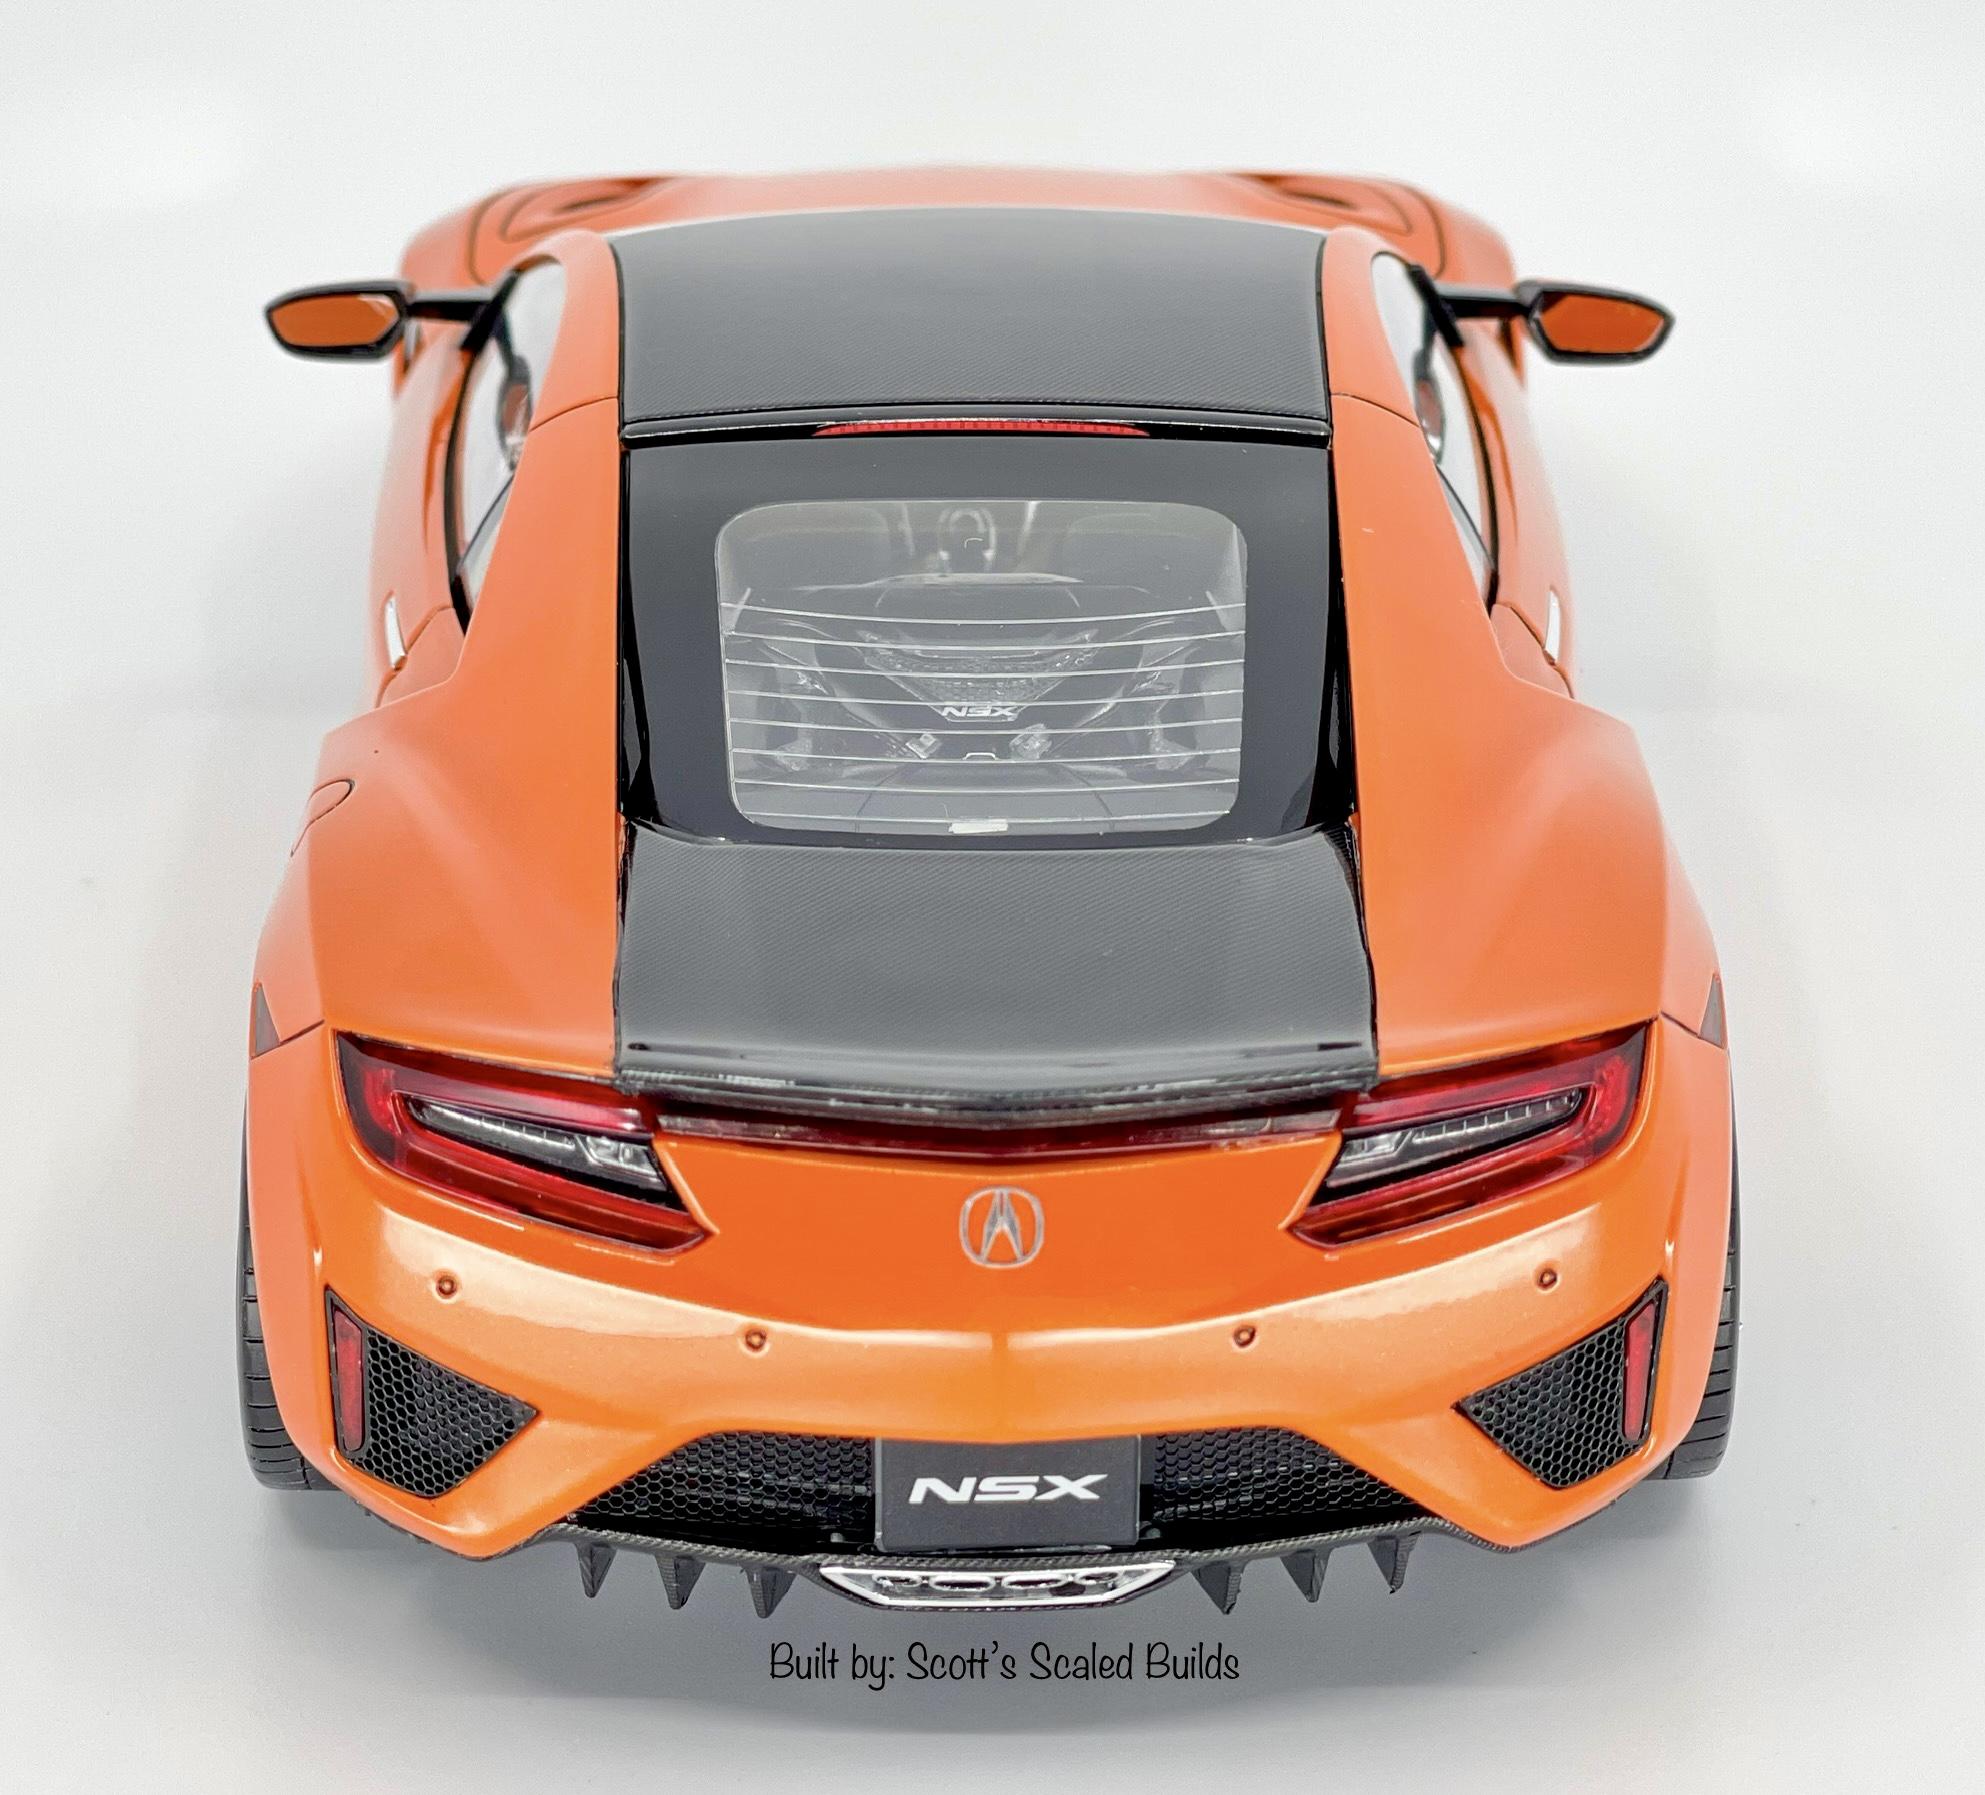
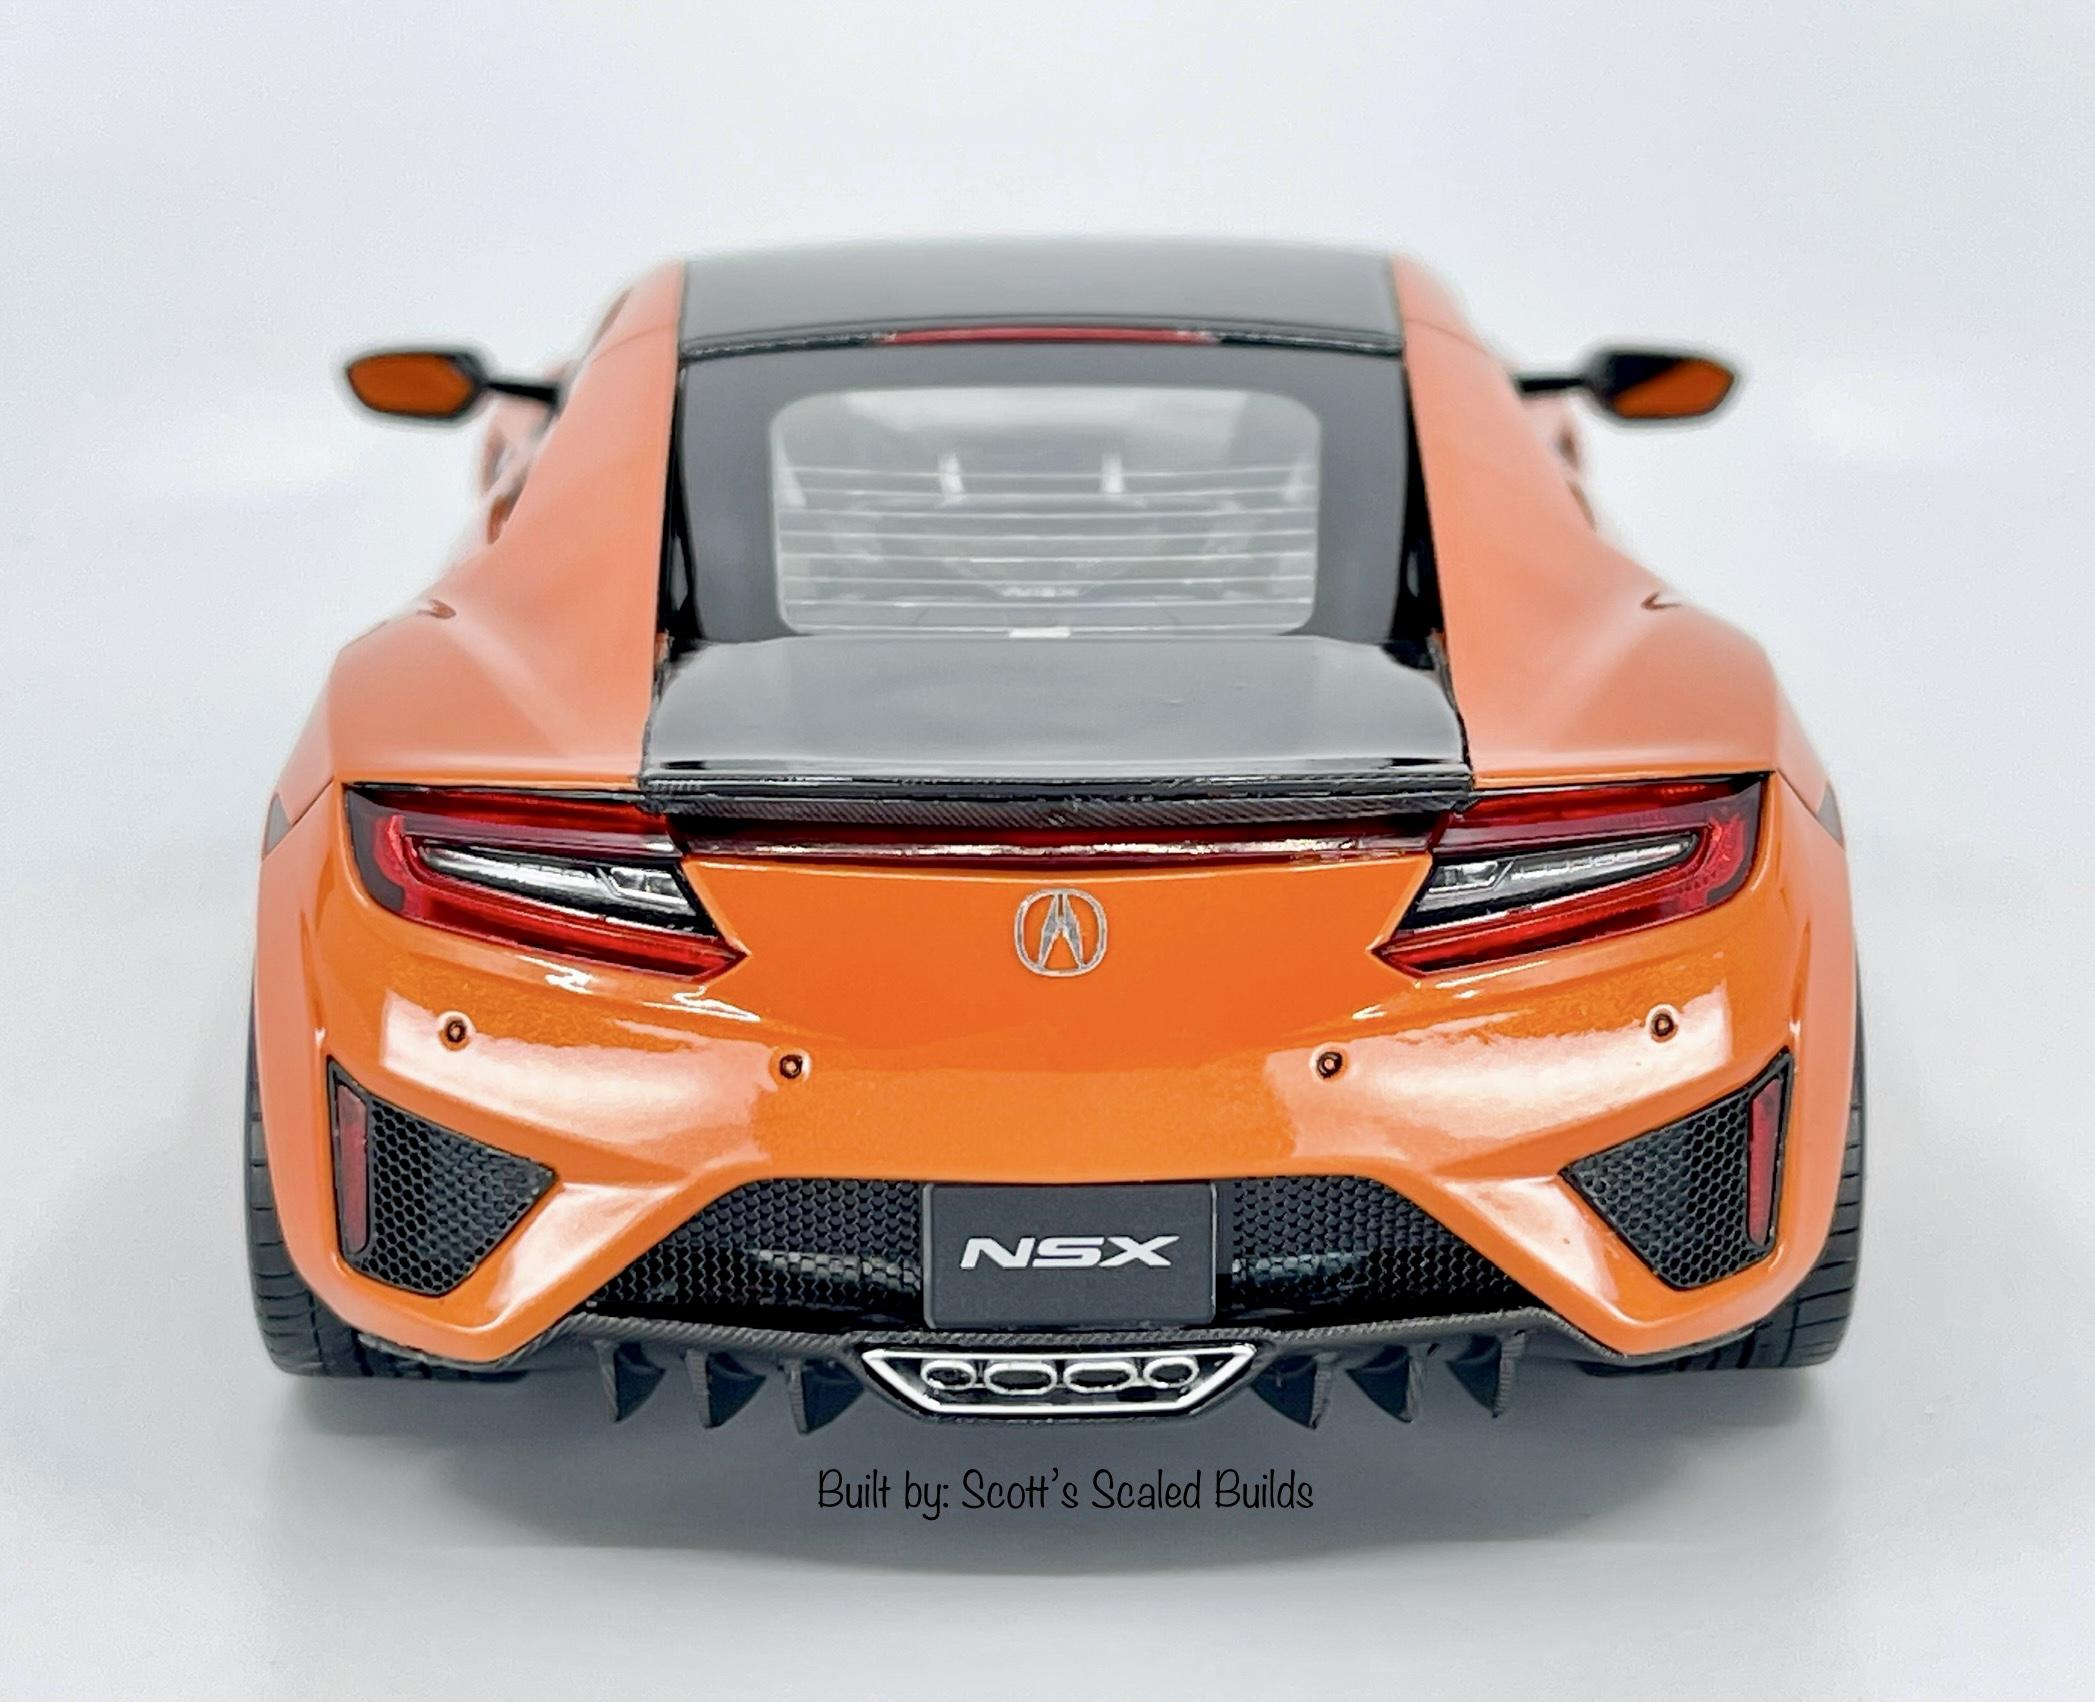
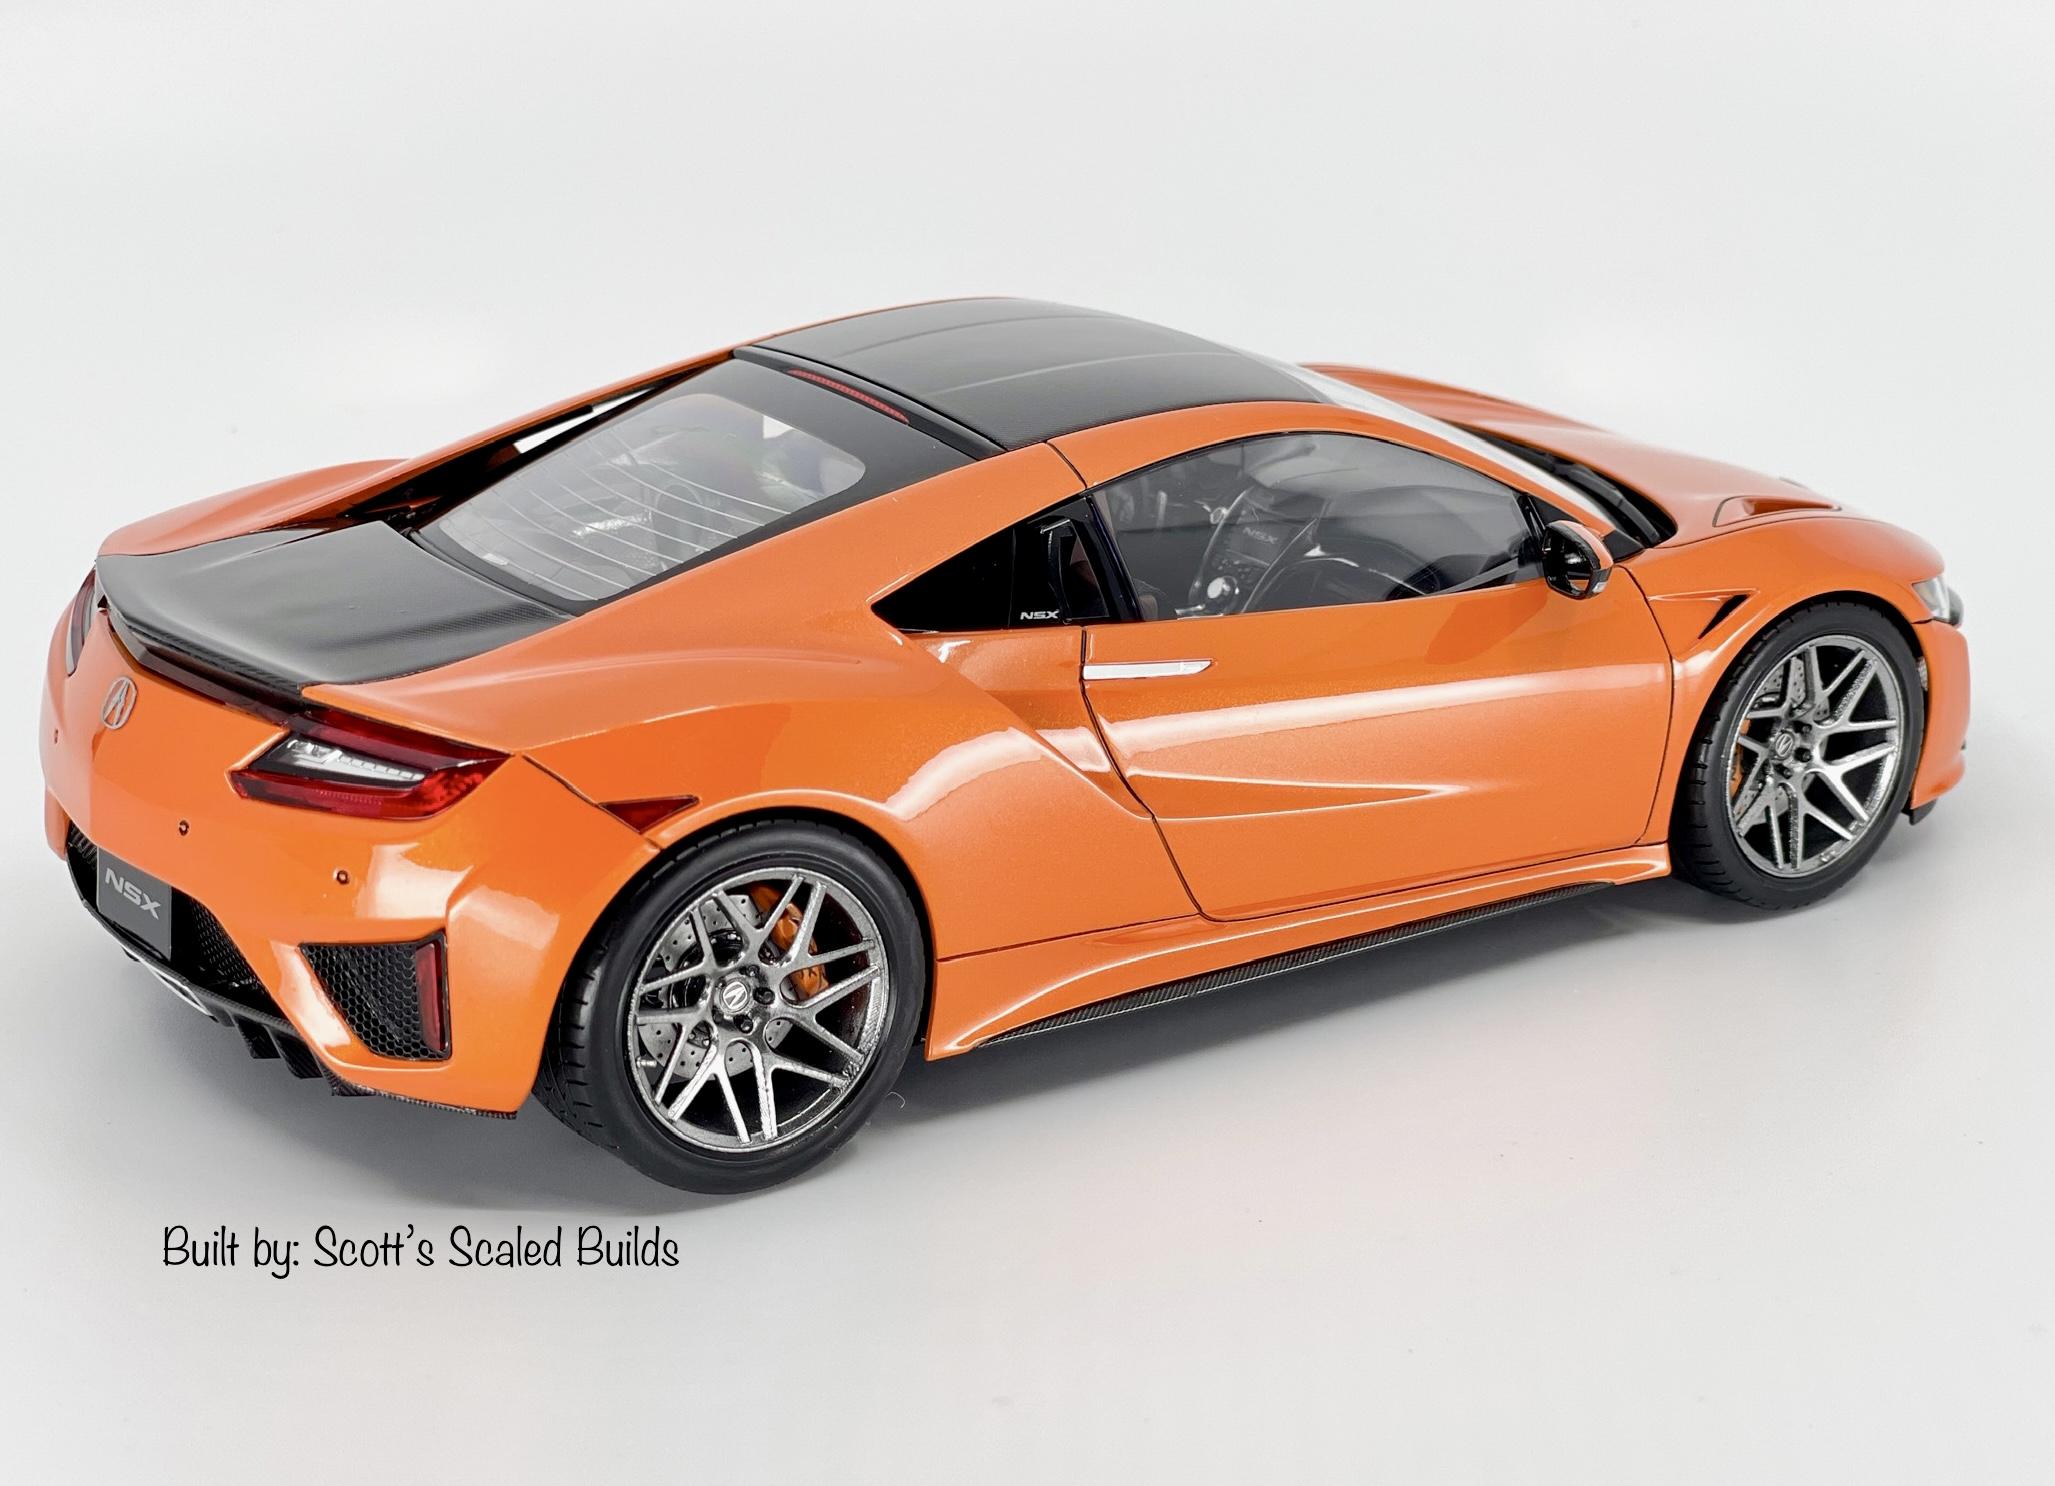
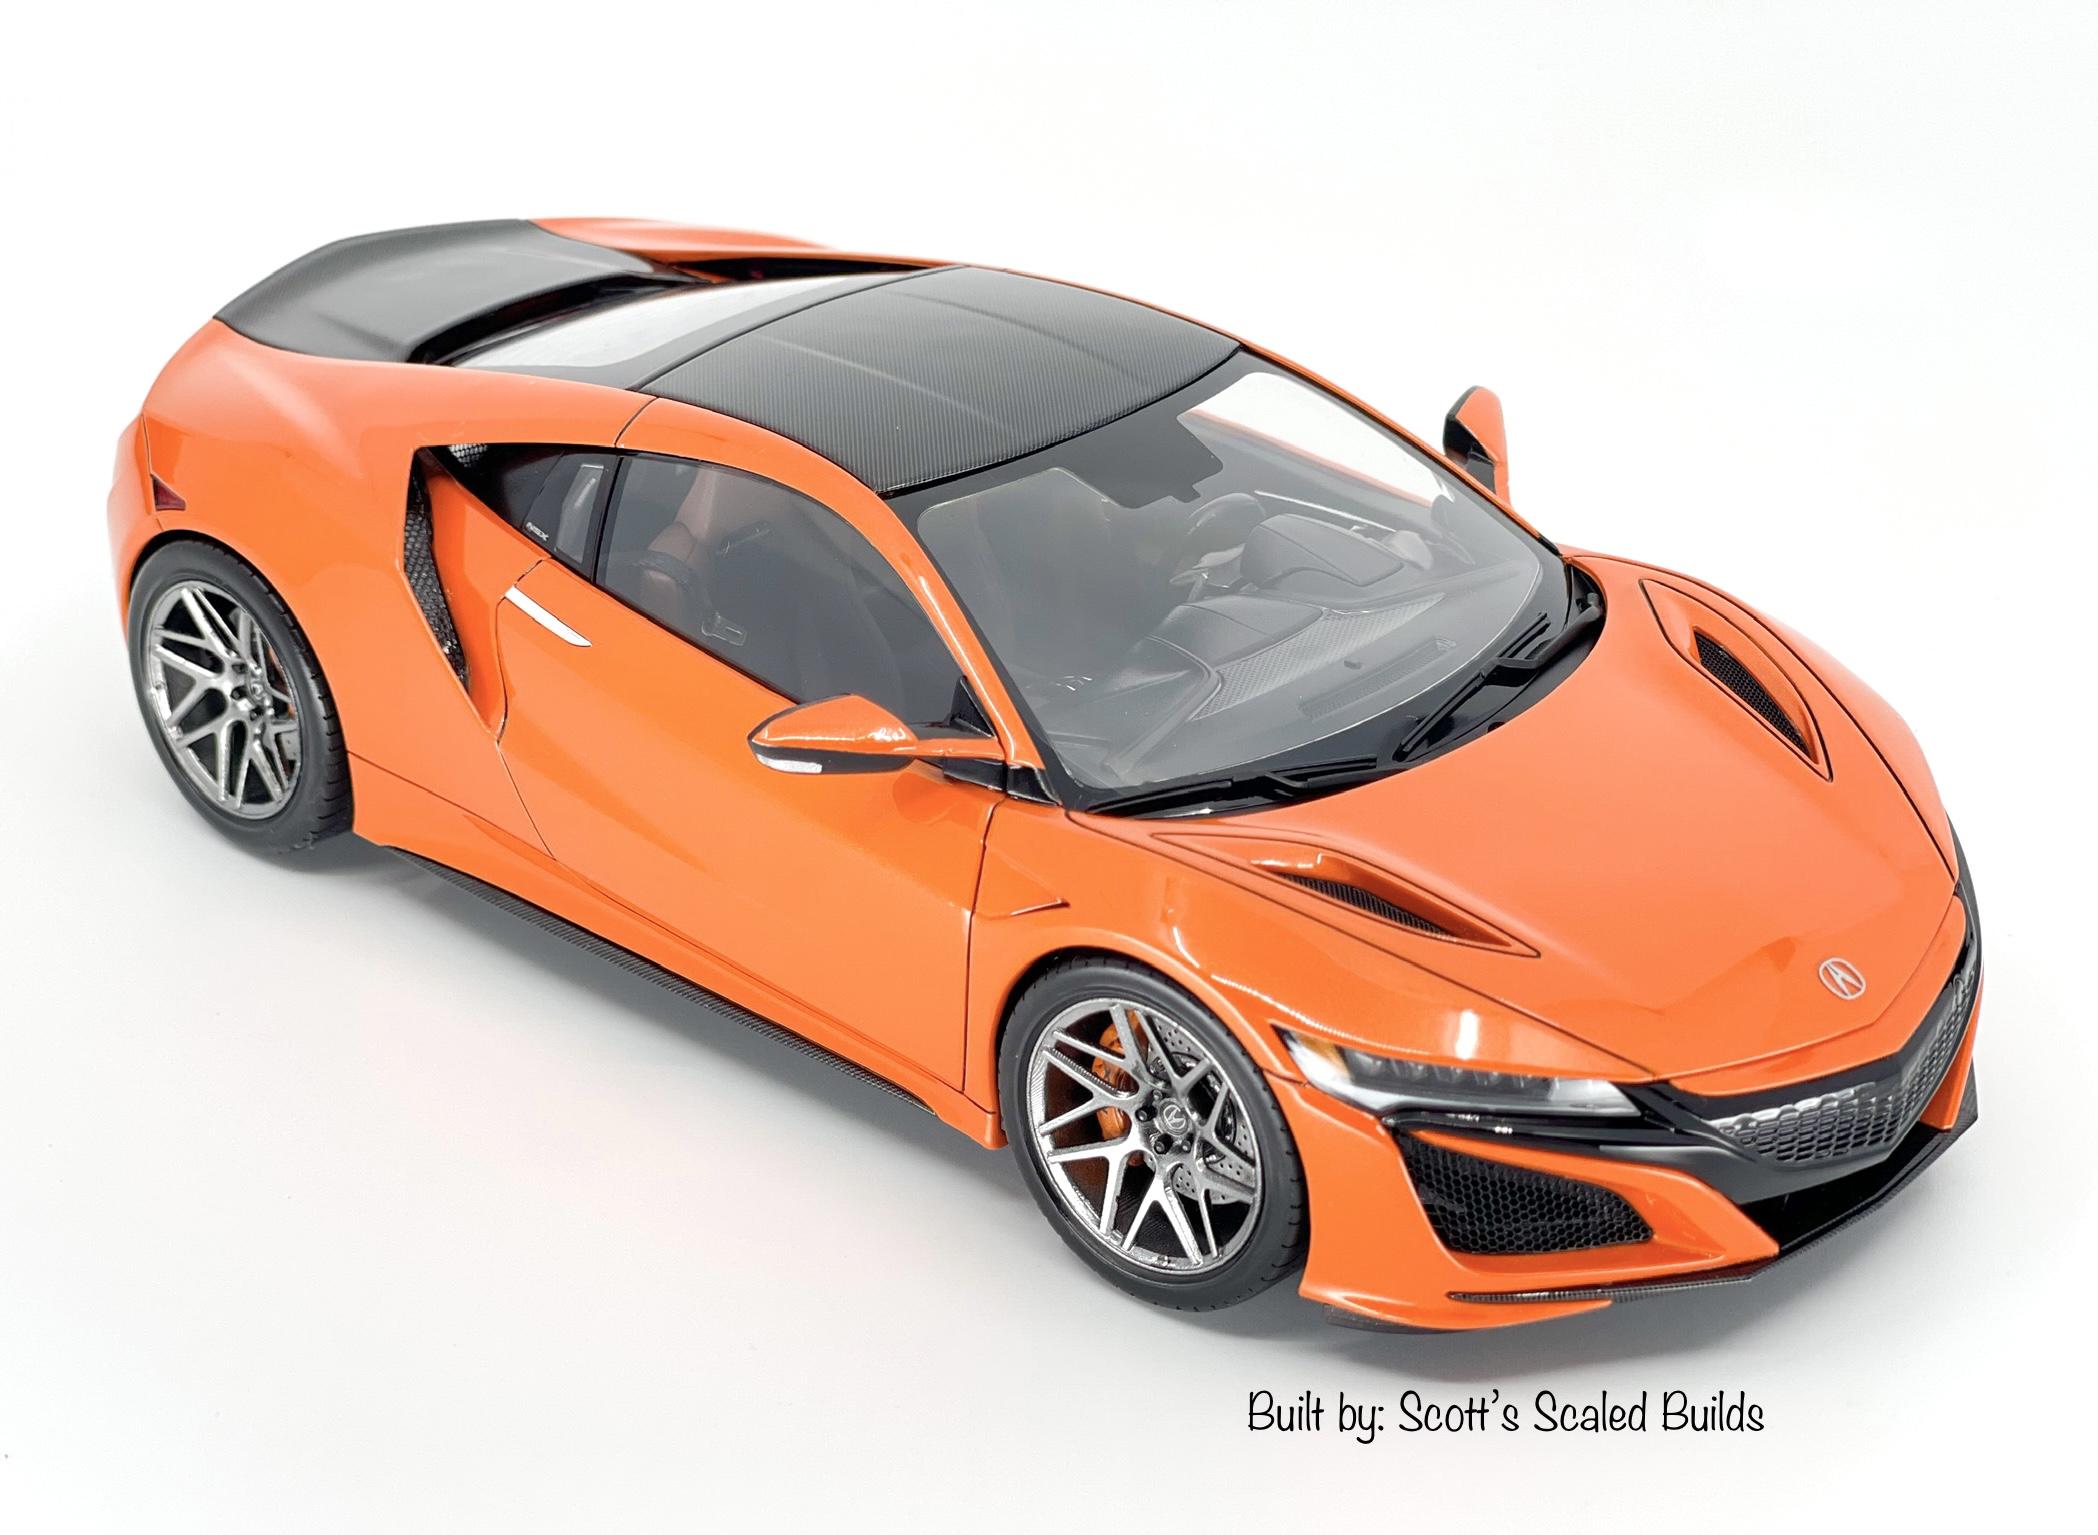
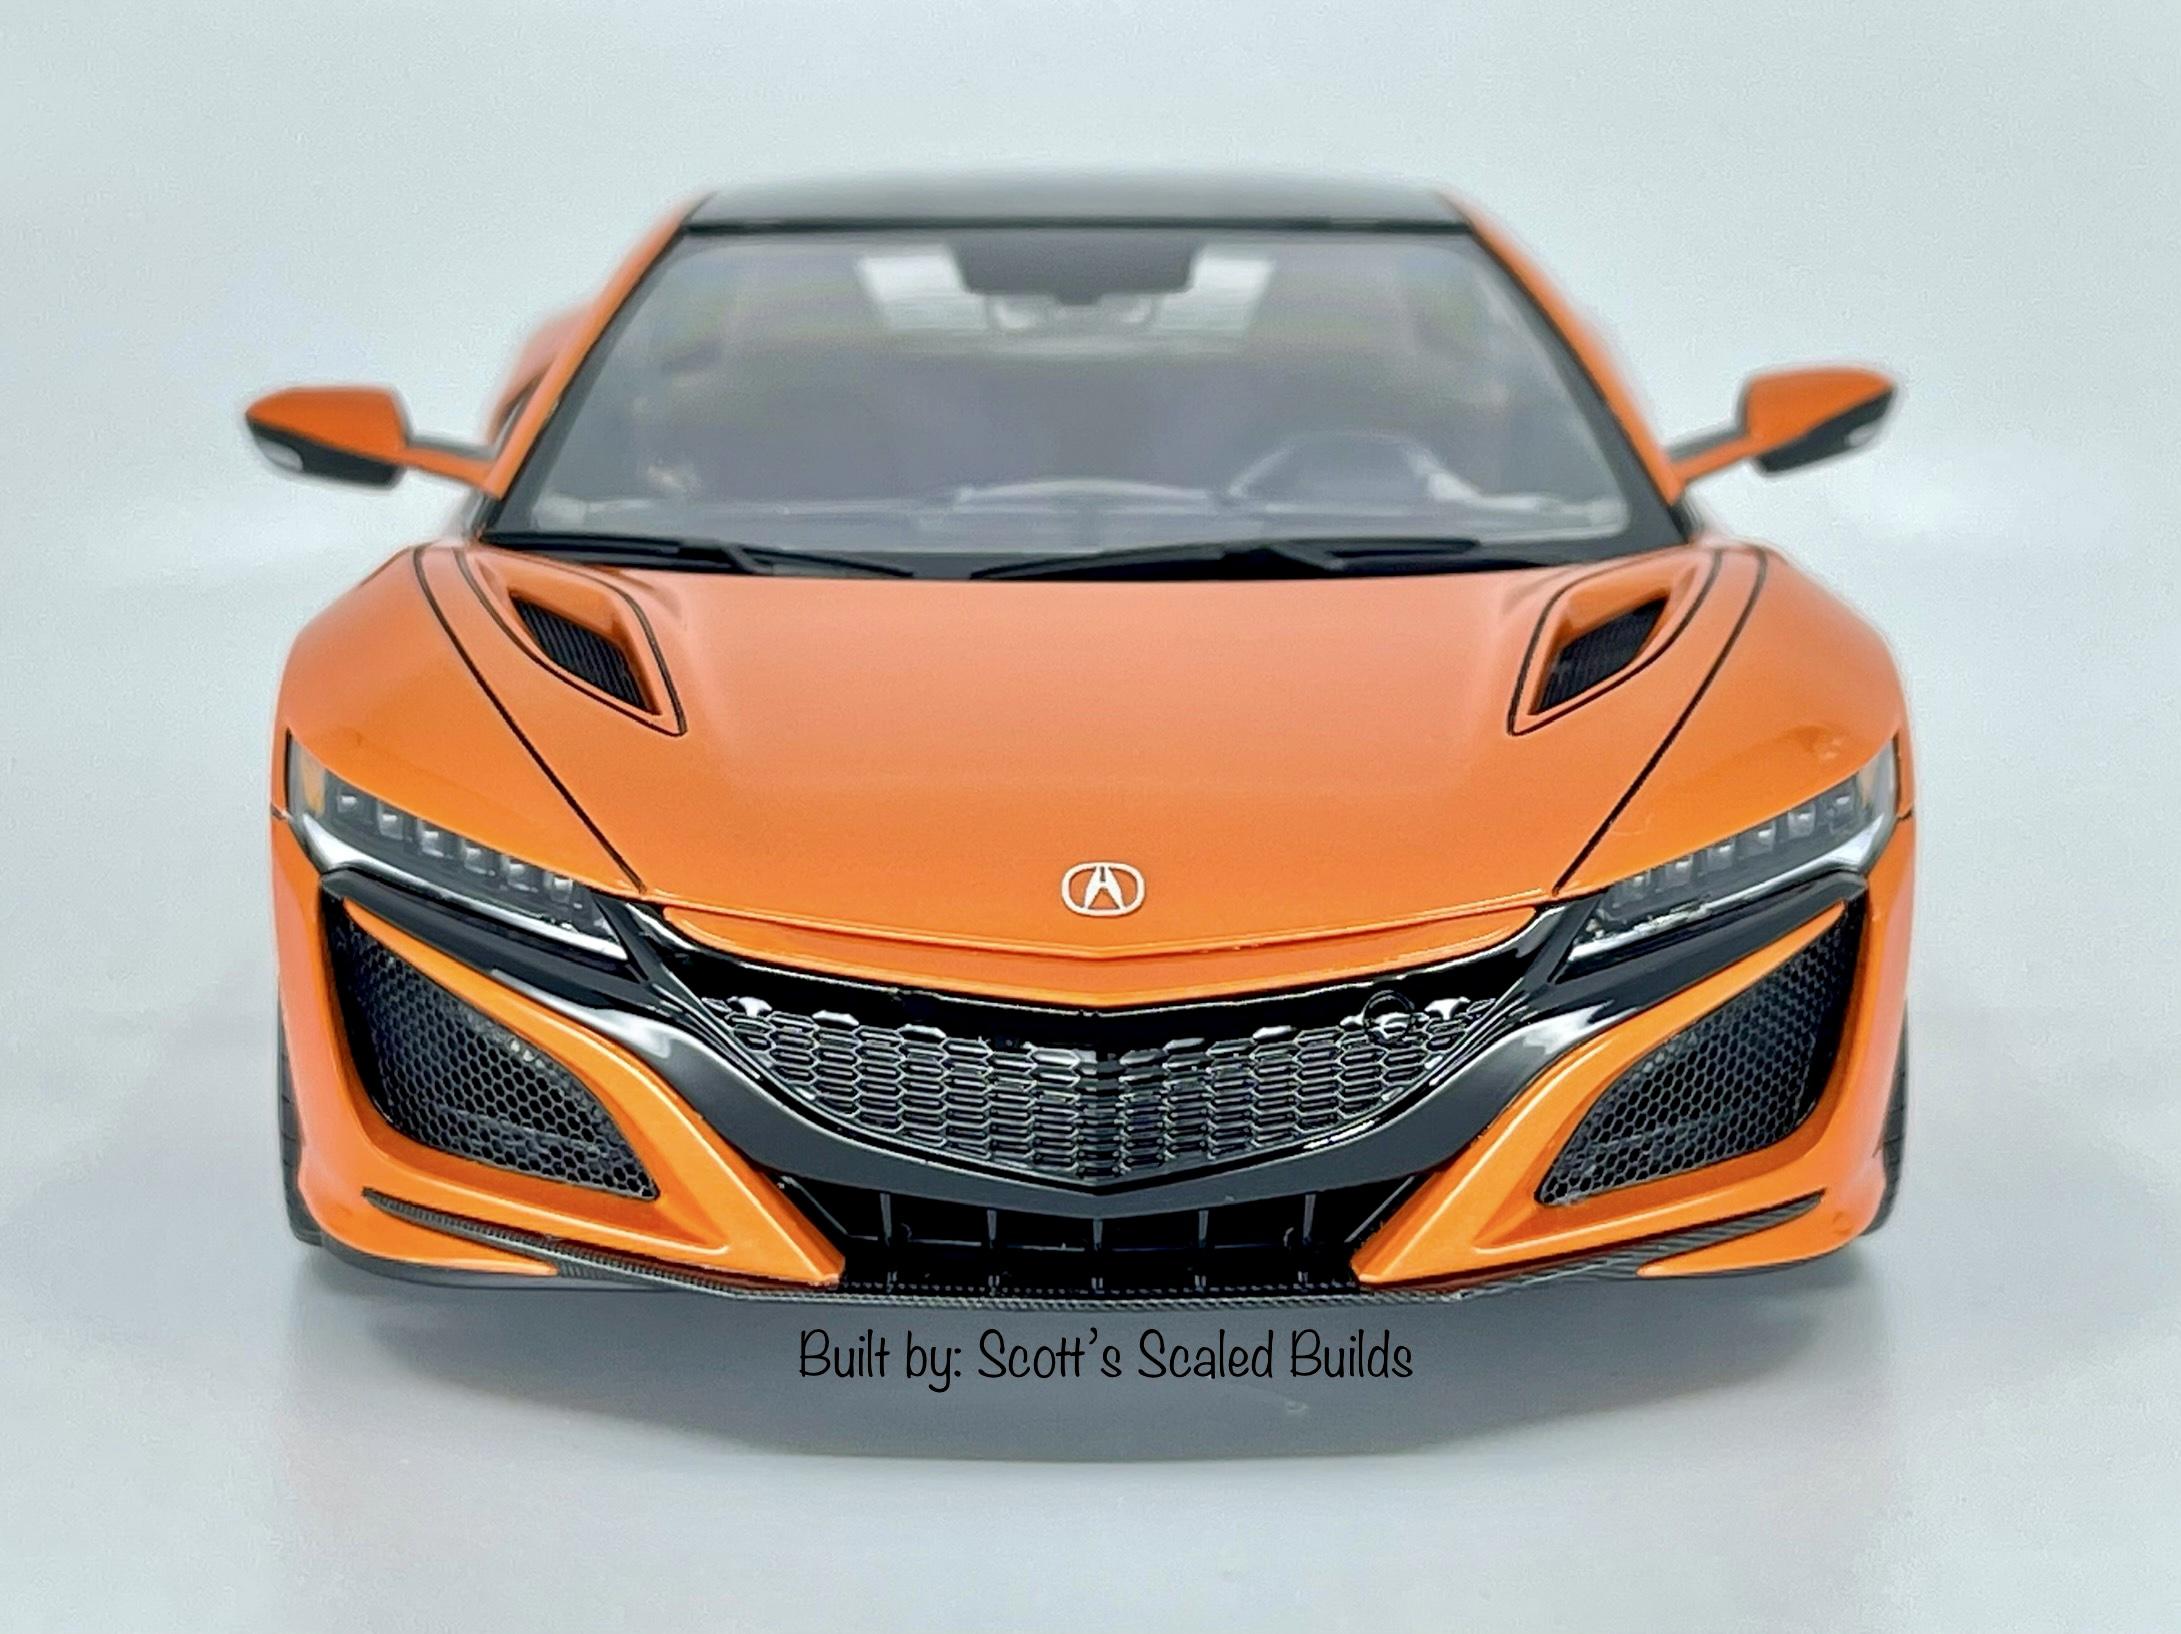
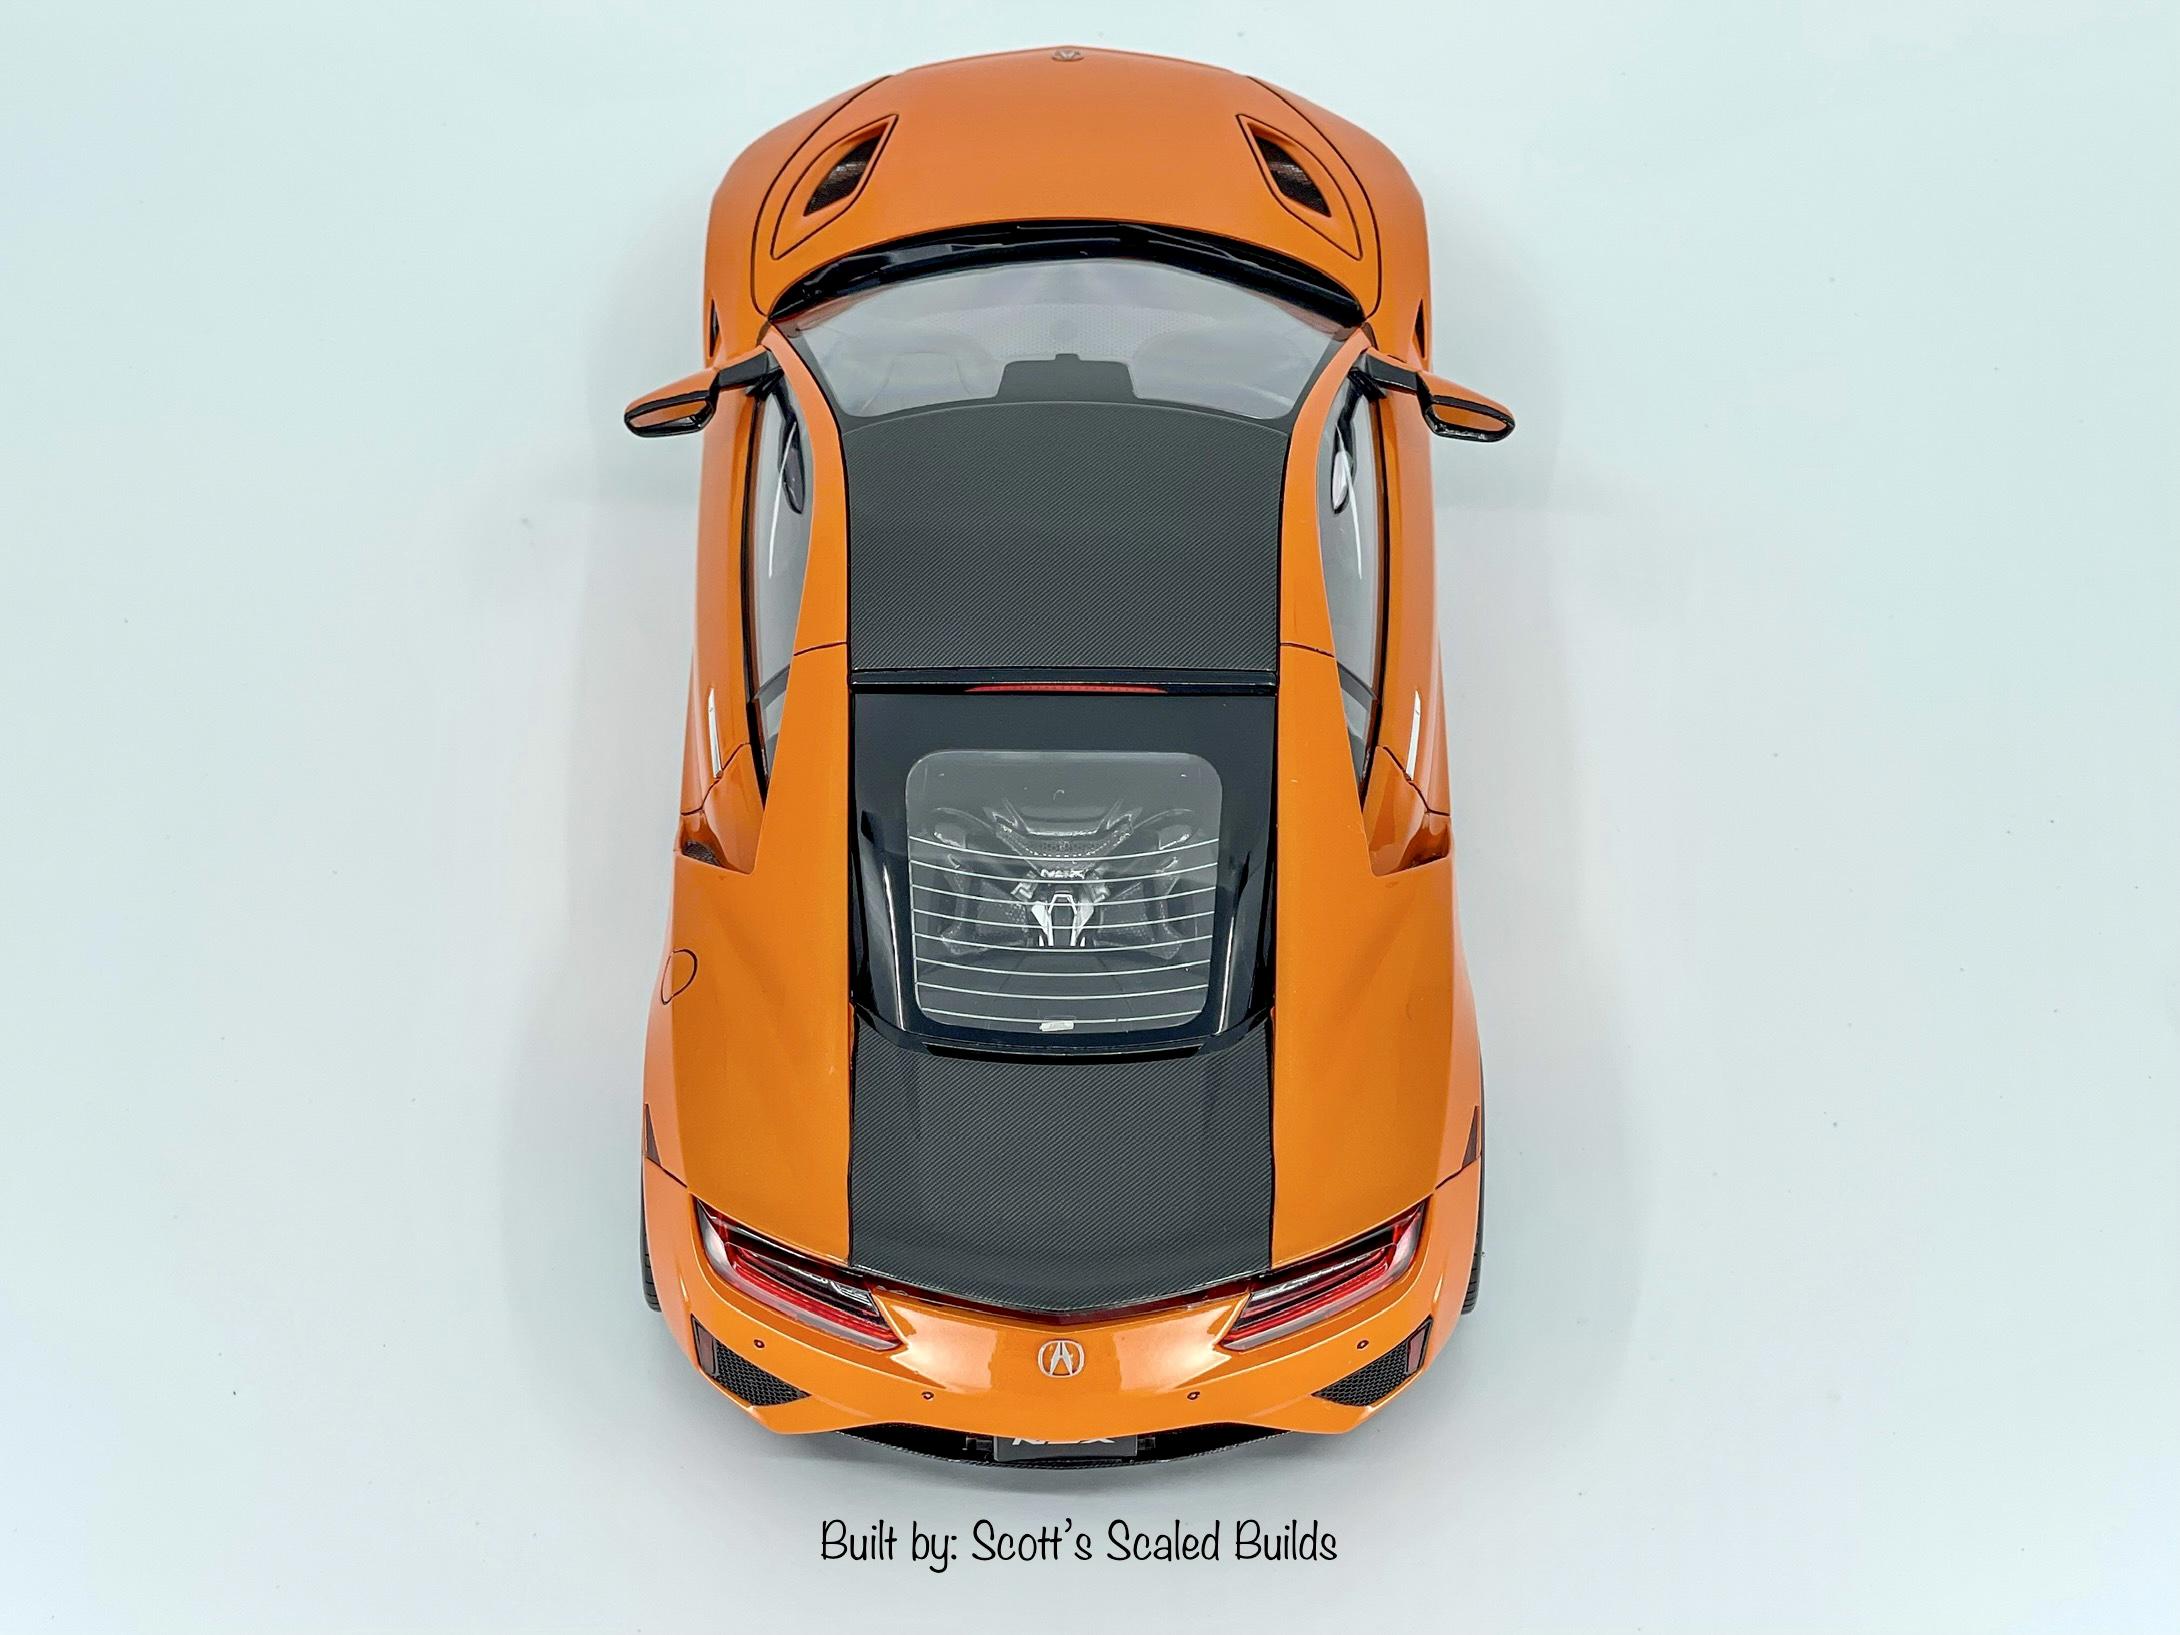
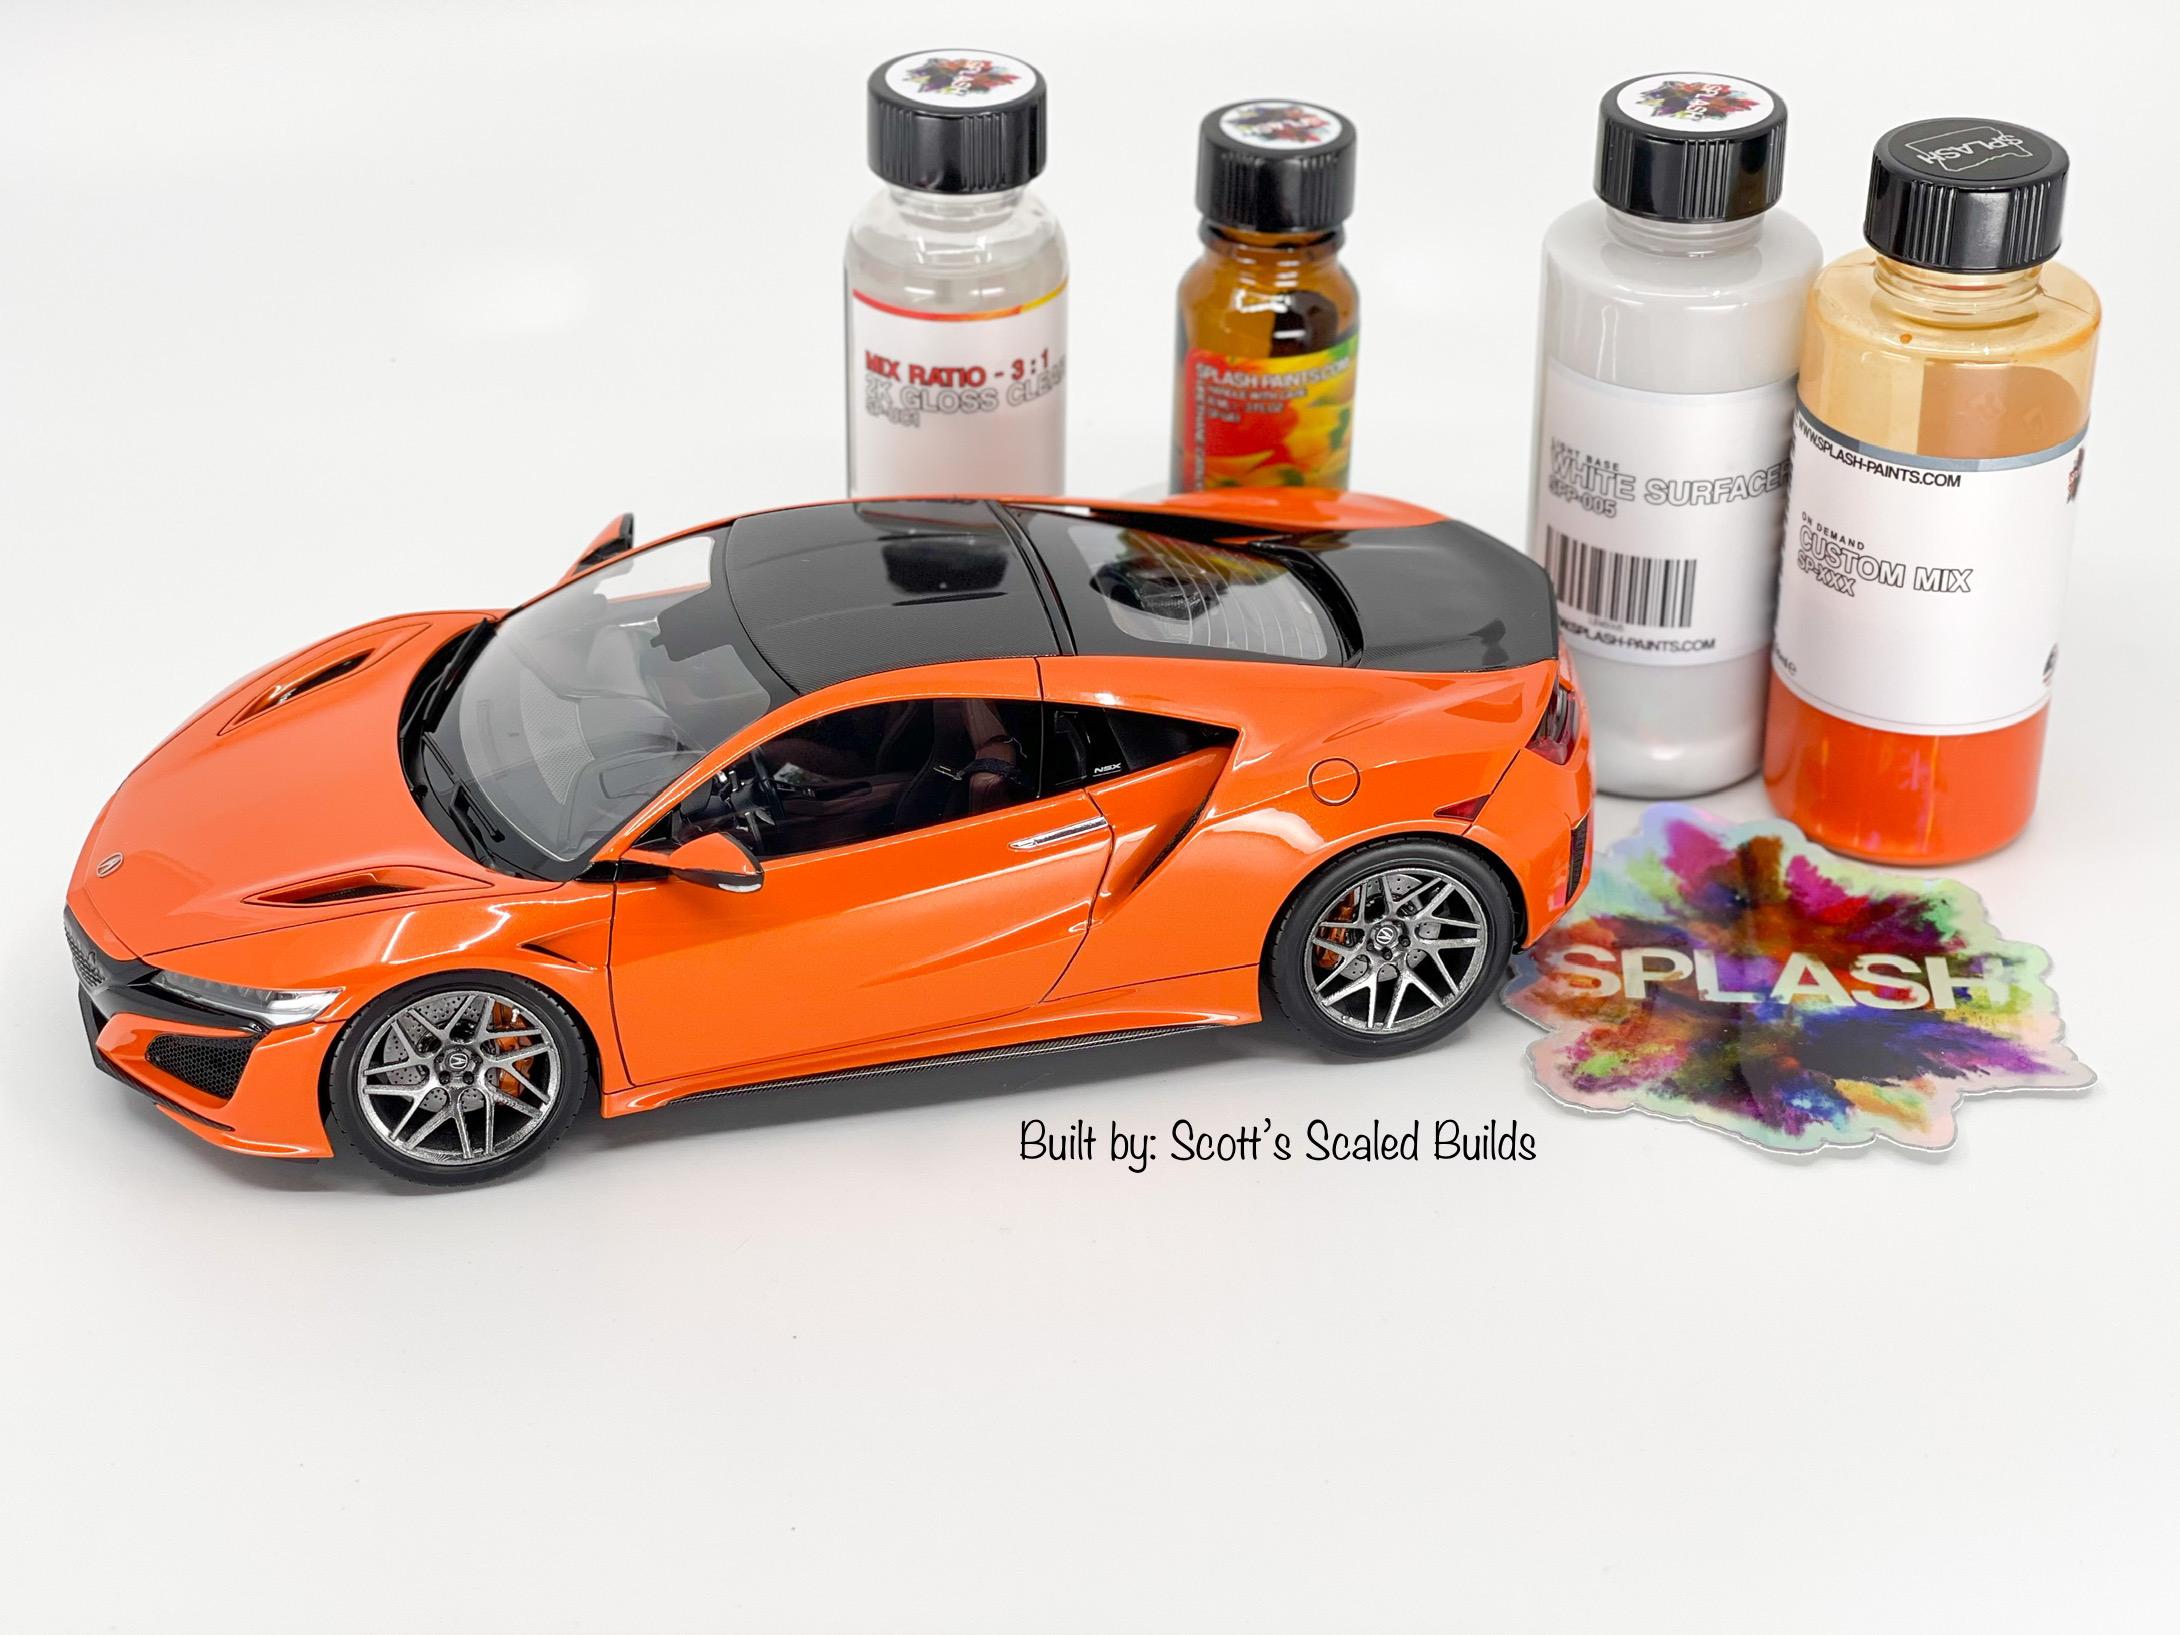
This one is posted on my Instagram but I have to share it on here. It’s finally complete! Tamiya’s NSX in OEM Thermal Orange Pearl mixed by Splash Paints. What a beautiful color when topped with their awesome 2k clear! Built pretty stock, with the exception of some heavy suspension mods to get the right stance and wheels to fit correctly, Hobby Design detail set, some interior details, and exterior carbon. The body was prepped and sprayed with Splash Paints White Surface Primer, then coated with the custom mixed Splash Paints Thermal Orange Pearl, and topped off with Splash Paints 2k clear. Scale Motorsports carbon fiber decals were used for the roof, engine cover, lower side skirts, front splitter, and rear diffuser. The Tamiya solid panels for all of the air vents/inlets were ditched and replaced with Hobby Design photo etch parts, sprayed in semi gloss black, from the detail up set. The only interior mods are added seatbelts with photo etch buckles and clips, embossing powder for the carpet, and some magazines from balazs_modelworks over on Instagram. It’s a shame you can’t really see much of the interior of this car. Wheels are Vossen VSP-315t, from DiOlex Productions, and are finished in a couple of light coats of Alclad II Chrome, for a darker chrome look. I also added RB Motion Valve Stems. Thanks to everyone who followed along and supported me during this build. Hope you guys enjoy it! Stay tuned for the next build with another wicked Splash Paints custom mixed color.

-
Tamiya AMG GT3
lghtngyello03 replied to lghtngyello03's topic in Other Racing: Road Racing, Salt Flat Racers
Ah man. It is always a good show, maybe you'll be able to make it one year, lol. Thank you very much for those compliments man! I strive hard to improve on things on each build. -
Tamiya AMG GT3
lghtngyello03 replied to lghtngyello03's topic in Other Racing: Road Racing, Salt Flat Racers
Thank you sir! -
Tamiya AMG GT3
lghtngyello03 replied to lghtngyello03's topic in Other Racing: Road Racing, Salt Flat Racers
Thank you very much, it definitely is different from the matte grey that everyone builds lol. Thank you for the kind words! Thanks man! This color sets it a part from the others for sure! Yes sir it was! Thank you very much for those kind words. Glad to see someone on the forums that was at the show! Will you be coming to the Spartanburg show this January? -
Tamiya Mustang GT4 - Red, White, & Blue - ‘Merica
lghtngyello03 replied to lghtngyello03's topic in Model Cars
Thank you very much. This kit was great to build. -
Tamiya Mustang GT4 - Red, White, & Blue - ‘Merica
lghtngyello03 replied to lghtngyello03's topic in Model Cars
Thank you!