

Jay
-
Posts
166 -
Joined
-
Last visited
Content Type
Profiles
Forums
Events
Gallery
Everything posted by Jay
-
 It looks great! The only thing I see is that you have the head light decals upside down & on the wrong sides.
 -
-
Thanks man!! The diffuser was included in the kit. It was also a complete pain in the a$$ to build...
-
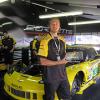
The next time you see this it should be in the completed gallery. I decided to make this the #63 car instead. I'm a big Ron Fellows fan & I like the red windshield banner. It really makes the car stand out. The body is all decaled up & needs final assembly. I'll be working on the door frames & the rear spoiler over the next few nights. The car should be completed for the NNL East in two weeks. I took some pics outside so you guys can see the color! It really pops!! Questions & comments welcome.
-
Very cool paint scheme buddy! That clear is FLAWLESS! I don't care too much for Robbie Gordon, but he does have some cool paint schemes.
-
That's a sweet piece Dave!! Thanks for the color tip.... I have this sheet & want to build this baby in the near future!
-
Just awesome Tom!!! It looks perfect! The stance, the splitter braces..... everything dude! I'll be starting mine after my vette's done. I can't wait!!
-
That is way cool dude!! Hey Jamie, I knew this car was pretty much done...Dave just wanted to drive you nuts!! Looks like it worked!
-
1995 Ward Burton Pontiac W.i.p. Pics
Jay replied to MarkJ's topic in WIP: Stock Cars (NASCAR, Super Stock, Late Model, etc.)
Mark, Great job with all the body work! It looks just like the photo! Get in primer & post some more pics.... -
I got the body, hood & doors painted & cleared today. The paint is Zero Paints Le Mans C6R yellow over a white primer base. I then topped it off with three coats of Omni 2 part urethane clear. I'll wait 24 hours to wet sand out a few pieces of trash in the paint & then it's on to decals!!
-
I've been wanting to compliment you on this car!! Glad you posted over here! Nice touch with the foam too. The car looks outstanding!! I can't wait to see it finished!
-
That's a beauty Dave!! Despite all the hassles, it came out perfect man! You guys are right too....this place is deader than Casey Atwood's career!
-
I finally have an update for you guys on this. It's been hard finding modeling time with a 5 month old! I've got most of the chassis complete. I started adding a little more detail to this one...it's too bad it will all be covered up. i added some braided line & fittings to the rear engine area. I still have one of the oil cooler hoses I have to re-attach. I added some racing electronics & an aluminum fire extinguisher to the interior. I also added some wires & connectors to the battery. I used cigarette foil for the heat shielding on the firewall. The steering column is aluminum rod with a #4 line fitting on the end. The inner net was made from masking tape & some mesh I had lying around. I added a few extra details under the hood too. I added plug wires, an aluminum overflow bottle, some CF decals & some ProTech bolt heads on the engine cover. I also used 2 part clear to give it a nice shine. Everything still needs buttoning up, but you get the general idea. Here are a couple of mock up shots. It's on to the body next!
-
That's a beauty Dave! I keep passing those kits up at my LHS because I really don't know anything about them. I may have to try one now....
-
No I didn't. Those pics were taken maybe an hour after I dull coated the tires. It took them about 24 hours to level out.
-
I decided to take the plunge on this car and I wanted to show you guys what I have so far. This is the beautiful Scale Motorsport kit done in collaboration with Revell. It comes with everything you need to build the 2006 Le Mans class winning C6R including the Revell kit, instructions, & decals. The turned aluminum parts, especially the rims, are quite impressive. I started with the rims & tires. The kit comes with new brake rotors, hub sections, & calipers. The rotors & calipers are resin & of decent quality. With a little clean up they turn out real nice. The only issue I had was drilling out the rotors on the sides where the cooling fins are. Most are filled in by resin. This only presents a problem if you are displaying the car with the wheels off. Here are the rims & tires completed...I applied a black wash to the rims to dull them down just bit. The aluminum is kind of bright. The rotors were painted a dark gunmetal color as the real car has carbon fiber rotors that do not shine! The tires were dirtied up a bit using the Tamiya weathering kit. This will not be a full raced version, but I will add some wear & tear for a little added realism. Here are some mock up pics of the body & chassis sitting on the wheels. I'm going to try & get this car as low as possible. I built the regular Revell kit box stock last year & the ride height is TERRIBLE!! Sorry about the bad pics...I'll try & snap some new ones after I repair my light box.
-
1994 Kodiak Lumina
Jay replied to jamie's topic in WIP: Stock Cars (NASCAR, Super Stock, Late Model, etc.)
Chew-Chew here comes Jamie.... Looks awesome bro. I'd like to build his 90 Daytona car. Just not sure where to find the decals...hint, hint. -
1990 Levi Garrett Lumina - Ricky Rudd
Jay replied to jamie's topic in WIP: Stock Cars (NASCAR, Super Stock, Late Model, etc.)
Very cool man! You nailed the stance! Yet another awesome "chew" car from Jamie... -
Clean up, prime, & paint the rims first. Install the rims into the tires & shoot a lacquer based clear coat(Tamiya or MM) over the entire wheel. Let that dry for a couple hours then apply the tire lettering decals. You may want to use a decal setting solution to improve adhesion. Once the decals are good & dry, take a dime & place it over the rim & shoot a lacquer dull coat over the tires. The dime keeps the dull coat off the rims. They are supposed to be glossy. Once the dull coat dries you may want to mix up a black wash or use a Tamiya weathering kit to dirty up the lettering a bit. This adds some nice realism & is really easy to do. I hope this helps...
-
2007 Budweiser Chevy
Jay replied to Jay's topic in WIP: Stock Cars (NASCAR, Super Stock, Late Model, etc.)
Thanks dude....That's a pretty sweet compliment! -
Okay, first thing with the windows....get yourself some Testors window maker glue. It comes in a little purple bottle. It dries 100% clear and will not fog up your windows. It's pretty strong too. That's all I use and I love it. Second....the tires. What I do is take the tire and flip it so the lettering is to the inside(towards the motor). Then you take a sharp xacto blade and cut the inner trim ring from the tire. This allows the rim to fit inside the tire on the opposite side. Then you can get yourself some SLIXX or Powerslide tire decals and your done. If you are going to try & paint the lettering make sure the paint you use IS NOT ENAMEL!!!!! Enamel will not dry on the rubber tires. Tamiya flat white would work or the white from the Testors Acryl line will also work.
-
I did this one a few years back & had a blast with it! I tried to capture "the look" of the raced car from the move. I mixed up some custom Hardee's orange, basically it's neon orange with a few drops of neon yellow in it, & sprayed it through my airbrush. I themn shot some Tamiya clear over it & applied the kit decals plus some contingencies from Scale Designs. Then I dirtied the S*** out of it. I used flat black, brown, & a Tamiya weathering kit & this is what I came up with.
-
1987 Ken Ragan Ford
Jay replied to Billy Kingsley's topic in WIP: Stock Cars (NASCAR, Super Stock, Late Model, etc.)
That came out real nice Billy! One of your cleanest builds yet! Did you do anything to the ride height? It looks low & mean! -
Built this one a few months ago. I moved the exhaust to the right side and lowered the stance. Paint is Tamiya bright red with 2 part automotive clear. The decals are from Powerslide with a few contingencies from the misc. pile to make it 2007.
-
Here's one of my favorite DoT builds. It's built box stock with the exception of the ride height. I used Rustoleum neon pink over a white base. I then applied 2 part automotive clear. After the clear dried I wet sanded & buffed out the clear using various sanding pads & 3M rubbing compound. The decals are by Powerslide.