

ibj40
-
Posts
352 -
Joined
-
Last visited
Content Type
Profiles
Forums
Events
Gallery
Everything posted by ibj40
-
 I remember watching SCCA races in the late 60's and early 70's. I want to recall at least seeing Fiat 850 and 124 Spiders, as well as maybe an Abarth coupe (with the open rear engine compartment?).
 -
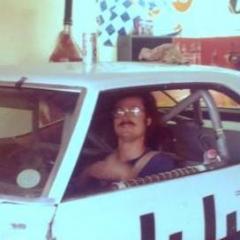
Back in the day, and if you search the Internet, it is difficult to ascertain, but actor James Brolin entered a Fiat Abarth 131 in the International Motorsports Association (IMSA) GTU series.Here is the only picture I could find, although when I saw him race, it was at the Hallett Motor Racing Circuit on July 5, 1978.This picture is from the Monterey Triple Crown Laguna Seca April 30, 1978.Knowing that James Brolin was there, but also knowing that the breadth of driving talent in both the GT and GTU series, notwithstanding Mr. Brolin's acting prowess, he was a respectable competitor.Anyway, during the race weekend, I happened to be standing on line at one of the multiple Porta-Potties in the infield (which also acted as the "garage" area for all the competitors), and who might walk up behind me but, James Brolin himself.I am sure that the expression on my face caused him to realize that I immediately recognized him, and he turned his face away.Being a racer myself, I engaged him not in his celebrity, but in how the car was performing, and what his chances were, considering the formidable field that had presented itself.He was not very encouraged at the moment, but appreciated my interest.Anyway, I acquired this model in contemplation of removing some of the rallye components, and painting it to recreate this one-off racer (Racing Sports Cars shows it only appearing at Laguna Seca and Hallett).It is a 1/18 scale Kyosho rallye Fiat Abarth 131.With the help of the late Kenny Terry, we produced a decal sheet, and with the patient assistance of my friend Brian Moore in painting and decaling, the conversion is now complete.
-
Actually, there is a way to correct it. I just haven't gotten around to doing these. It is pretty simple, you remove two screws that hold the front suspension on, add a couple of fibre washers, and done. Here's a Flickr album on it: https://flic.kr/s/aHsmi2WM4b
-
I wish all diecast manufacturers would do this, however, to date, this is the only mass-produced, affordable Customer White donor available.Here's a link to a separate Flickr album with more detailed shots: https://flic.kr/s/aHBqjzEAKEAnyway, being retired, I have way too much time on my hands, and fortunately access to resources to allow me to pursue things that creep into my imagination.I have started creating some fantasy versions of this model, primarily based on existing and historic Nascar liveries. Here's what I've done so far.First one I did was a Sta-Power Buddy Baker version. Album here: https://flic.kr/s/aHsmSuyw8FNext one I did was an Alan Kulwicki Hooters version. Album here: https://flic.kr/s/aHsmVStnkqNext, a more contemporary livery, R&L Carriers. Album here: https://flic.kr/s/aHBqjzEbp7And the most recent, a Wendell Scott Howard's Furniture version. Album here: https://flic.kr/s/aHBqjzEGUKNext one will be a Skoal version, based on the Rick Mast Thunderbird livery. Album here: https://flic.kr/s/aHBqjzF5NP This will be the last one until I can break loose with $125 plus shipping for another donor.This is based on Dan Gurney’s 1963 “Motor Trend 500” Winning 427 Ford Galaxie. Album here: https://flic.kr/s/aHBqjzGTR8
-
This is the livery that my #22 at the top is based on. No suitable period-correct donors in 1/18 scale. Thanks!
-
Wish I could find a picture of what it looked like when Scott raced it. Would make a great custom add, and I have more 1/18 scale Boss 302 donors on hand. Thanks!
-
Thought I would share some of my collection, all but one of which are custom paint/decal projects.I have previously discussed my admiration for Wendell Scott, Sr. (not sure how many of you were aware that Wendell, Jr. passed away on the 11th of this month, his funeral is today), but I also have 1/18 scale diecast models for Willy T. Ribbs.Here is my Wendell Scott memorabilia.And here are the models, all 1/18 scale diecast. Starting from the top:#22 Retro Ford Mustang - Wendell Scott shared a 1965 Mustang painted in this livery with owner Jim Sutter and co-driver Dr. Dick Thompson at the Virginia International Raceway 400 Trans-Am race on July 31, 1966.#34 Retro Chevrolet Lumina - This is the livery of the 1962 Chevrolet that Wendell Scott won his only Cup Series race in, on December 1, 1963 at Speedway Park in Jacksonville, Florida.#34 Retro Chevrolet Monte Carlo - This is the livery of the alleged Junior Johnson-prepared 1971 Chevrolet Monte Carlo, entered by Richard Howard for Scott at the 1972 World 600 at Charlotte.#34 Fantasy 1970 Boss 302 - This is just me playing around with a decal sheet and a donor white ACME Mustang.#394 1969 Dodge Charger - I have posted about this one on here before. Scott borrowed Nascar West owner and driver's Charger was his Ford was out of commission. He raced this at the 1970 Falstaff 400, held at Riverside, California on June 14, 1970.#34 1970 Fantasy Plymouth Superbird - I have posted about this one on here before as well. This is another one where I had some decals, and some donors, and thought they made a good story.#34 1969 Plymouth Roadrunner - This one, like the Wiltshire Dodge, is a true reproduction of a racer that Scott participated with. He drove this in eleven races in 1970, prepared by Jabe Thomas, entered by Don Robertson's Star City Body Shop.#34 Fantasy 1995 Dodge Craftsman Supertruck - Took some inspiration from the Bubba Wallace Camping World Series Toyota that he drove to victory with a livery commemorating Scott's induction into the Nascar Hall of Fame.#34 Retro Ford Taurus - Scott used a variety of liveries on his cars during his Nascar career. If you look my Flickr album - flic.kr/s/aHBqjzCWhm - you will see this livery on a plaque I acquired. The sponsorship is from WILA 1580, which was the Danville, Virginia AM radio station back then. After each race, Scott would appear live on the radio Monday morning to give a recap of the previous day's Cup race.#30 Retro Chevrolet Monte Carlo - Few are aware that Willy T. Ribbs ran a couple of Nascar Cup series races. This livery is from 1986, racing for DiGard in five races.#34 Retro Ford Taurus - Another one of the various liveries Scott used.#24 Lola Ford Indy Car - Willy T. Ribbs had a love/hate relationship with Indy Car racing, although he was the first Black driver to qualify for the Indy 500.More picture in my album.Hope you enjoyed this.
-
Done!Found a set of headers that seem to fit (just don't look really closely), fabricated a drive shaft, got the engine mounted in the chassis (again, don't look too close), and fabricated a upper radiator hose.And now a shot of the finished product. I'll post more in the proper forum. Finished product here:
-
Done!Took delivery of one of the ACME Dodge Ramp Trucks, in Corporate Blue. Not quite a perfect color match, but close. IMG_5290 by Jim Forte, on Flickr
-
Got one side done, so I could take a picture.Now all I have to do is match the other side to this one.
-
Still trying to figure out headers. Been going through my parts and found three of four sets, but their just sitting on the workbench for now.Thought I'd at least try to make some progress, so started on the decals.The decal sheet I'm using is one of those two layer-type, with a white set and then a color set, plus I am adding in some STP decals as if this was on early pre-Granatelli temper tantrum version.Not done yet, but thought I'd share the progress.
-
Again, lots of high detail, quality fabrication and research!
-
Thanks, that is what I thought. I did the first one, and used all of them, but really couldn't tell what the white under-decals contributed. IMG_E3856 by Jim Forte, on Flickr IMG_4151 by Jim Forte, on Flickr
-
Recently I have acquired a couple of decal sets that have a color sheet and a white sheet. It is clear that where there is only white, that is the decal to apply. But, on the white sheet, there is also a background for decals on the color sheet. My question is, do I need to apply the white decals under the color decals in order to get the proper color depth over a colored background? Thanks!
-
Thanks for your patience! Build thread here.Just in time to pair it up with one of the ACME Ramp Haulers.
-
Thanks for your patience! Finished pictures here.
-
Thanks for the picture, Mike! That is amazing and gives a little bit more credibility to my fantasy build. And that is clearly King Richard himself! Well, Happy New Year to all who are following this build.I've put the engine install on the backburner while I figure out headers.So, instead I did a hard dry fit of all the other parts and pieces of the model, in order to go ahead and apply decals soon.Added a pedal assembly that the Plymouth interior didn't have. Doors will eventually be glued closed.Still need to fabricate a fuel filler.Got the engine installed, and the carb and air cleaner in place. Still need to install the top water hose from the engine to the radiator.And the hood stays open by itself (unusual for me on one of these body/chassis swaps).Just need to figure out how to connect the engine to the exhaust dumps. Already have a driveshaft roughed together, just need to cut it to length.The package tray for the Roadrunner interior didn't extend back to the rear window of the Torino, so I placed a thin sheet of aluminum in the void.
-
Would love to see those pictures, however don't make yourself crazy trying to find them. Thanks for the compliments, feedback is really appreciated.
-
In the process of owning and (occasionally) racing four different race cars, I've taken delivery of my share of long blocks.They all, more or less, looked like this.Usually, I knew they were going to fit into the chassis, as I raced Chevy Smallblocks exclusively.Hoping for the same luck with this GMP 429 with a dry sump pan and drive from an Ertl Nascar Ford going into an Ertl Torino chassis.Happy New Year!
-
So, how did we achieve the new dry fit?By going dry sump!Prior to 1969, my exposure to Nascar racing had been through Wide World of Sports, so I knew very little other than what ABC, Jim McKay, and Chris Economaki wanted me to know.In 1969, Texas International Speedway opened with inaugural Texas 500.As president of the Texas A&M Sports Car Club at the time, I had an ongoing relationship with the track.One day I got a phone call asking if I knew of anyone who would be interested in pumping gas for Union 76 during race events. I volunteered myself, and then started looking for others to join me.My job was to pump gas and give out lubricants to the Nascar teams.The Union 76 reps (which included Bill Broderick) gave us a list of teams, showing what kind of oiling system they were using.If a team was still using wet sump, we were to give them eight quarts of oil whenever they requested it, but the newer, more advanced teams using dry sump would get an entire case.So, now equipped with the knowledge that dry sump was in existence during the era of this fantasy build, I looked around on my shelves and found an 1/18 scale Nascar chassis with a dry sump setup.So I salvaged a pan and drive system and removed the bellhousing and transmission from the GMP wet sump pan.With the dry sump pan taped in place, looks like we might have a winner! Found a dry sump tank in the spares bins, as well, so it will be mounted in the appropriate location in the interior.Got to wait on some paint to dry, then we have to take courage and SuperGlue in hand and assemble the engine.
-
This is a new dry fit.Looks pretty good.That is, if you leave this minor component off.A little more work required.
-
Good discussion on what we face when customizing 1/18 scale diecast. No offense intended to our 1/24 scale plastic kit brethren, but when your shop floor is littered with metal shards, and you realize that the part you just “modified” is both not going to work and was the only one you had, me, I just go back inside my house and grab another beer. Stay the course Mike!
-
Thanks for your support and positive comments! Trying make some progress, but seems like it is one step forward, three steps back.Got the header flanges ground down. The one on the right was the Guinea Pig, but when it is glued to the head, won't be noticeable.Dry fit from the bottom looks good.Dry fit from the top shows that a lot of work needs to be done.If you remember the engine crossmember from a few posts up, I already removed a considerable amount of plastic, including a stalk that the Ertl engine was attached to.Looks like a lot more surgery will be required to get the GMP 429 to sit flat.Was hoping not to have to remove the radiator, but that may be my only access point.
-
On Christmas Day, it is 82 degrees here. My paint booth is my front driveway, so I had to take advantage of the weather and put down a couple of coats of paint.There will be a couple of coats of clear, as well, and temps are above 70 from now until new Sunday.What do you think? Might be a little too dark, or might be the light in my shop, but this is the paint color that my research revealed, Basin Street Blue.Tried a picture with the flash on. Still might be a little dark, but I'm going to go with it.
-
Mustang racer (DONE)
ibj40 replied to landman's topic in WIP: Other Racing: Road Racing, Land Speed Racers
Actually, that is the accumulator tank for the dry sump. Oil is pumped from the engine back to this tank, and then drawn back from the bottom. That is the concept of dry sump, in that the pump is always supplied from a gravity perspective. When we were building 1:1, the tank went where you put it, the battery opposite corner.

