Anglia105E
-
Posts
3,487 -
Joined
-
Last visited
Content Type
Profiles
Forums
Events
Gallery
Everything posted by Anglia105E
-
Thanks Pat and Yordan.... that was the first thought that crossed my mind when I saw the effect on the windows, which does look like raindrops. It is probably the light catching the dust! Here are a few photos of recent work on the diorama. One shows the difference in size between the Austin 7 and the Rolls-Royce Phantom III, while another photo shows the 1:43 scale bicycle which will look quite good once it is painted and chromed. Two further photos show the coving, which has gone into place quite nicely. Only today, and after 2 years constructing these two Hooper buildings, have I realised that the coving runs along the top edge of the roof level, so there is actually a low wall above the coving! The wall will finish off the proportions of the building nicely.... can't think why I never noticed this before. David

-
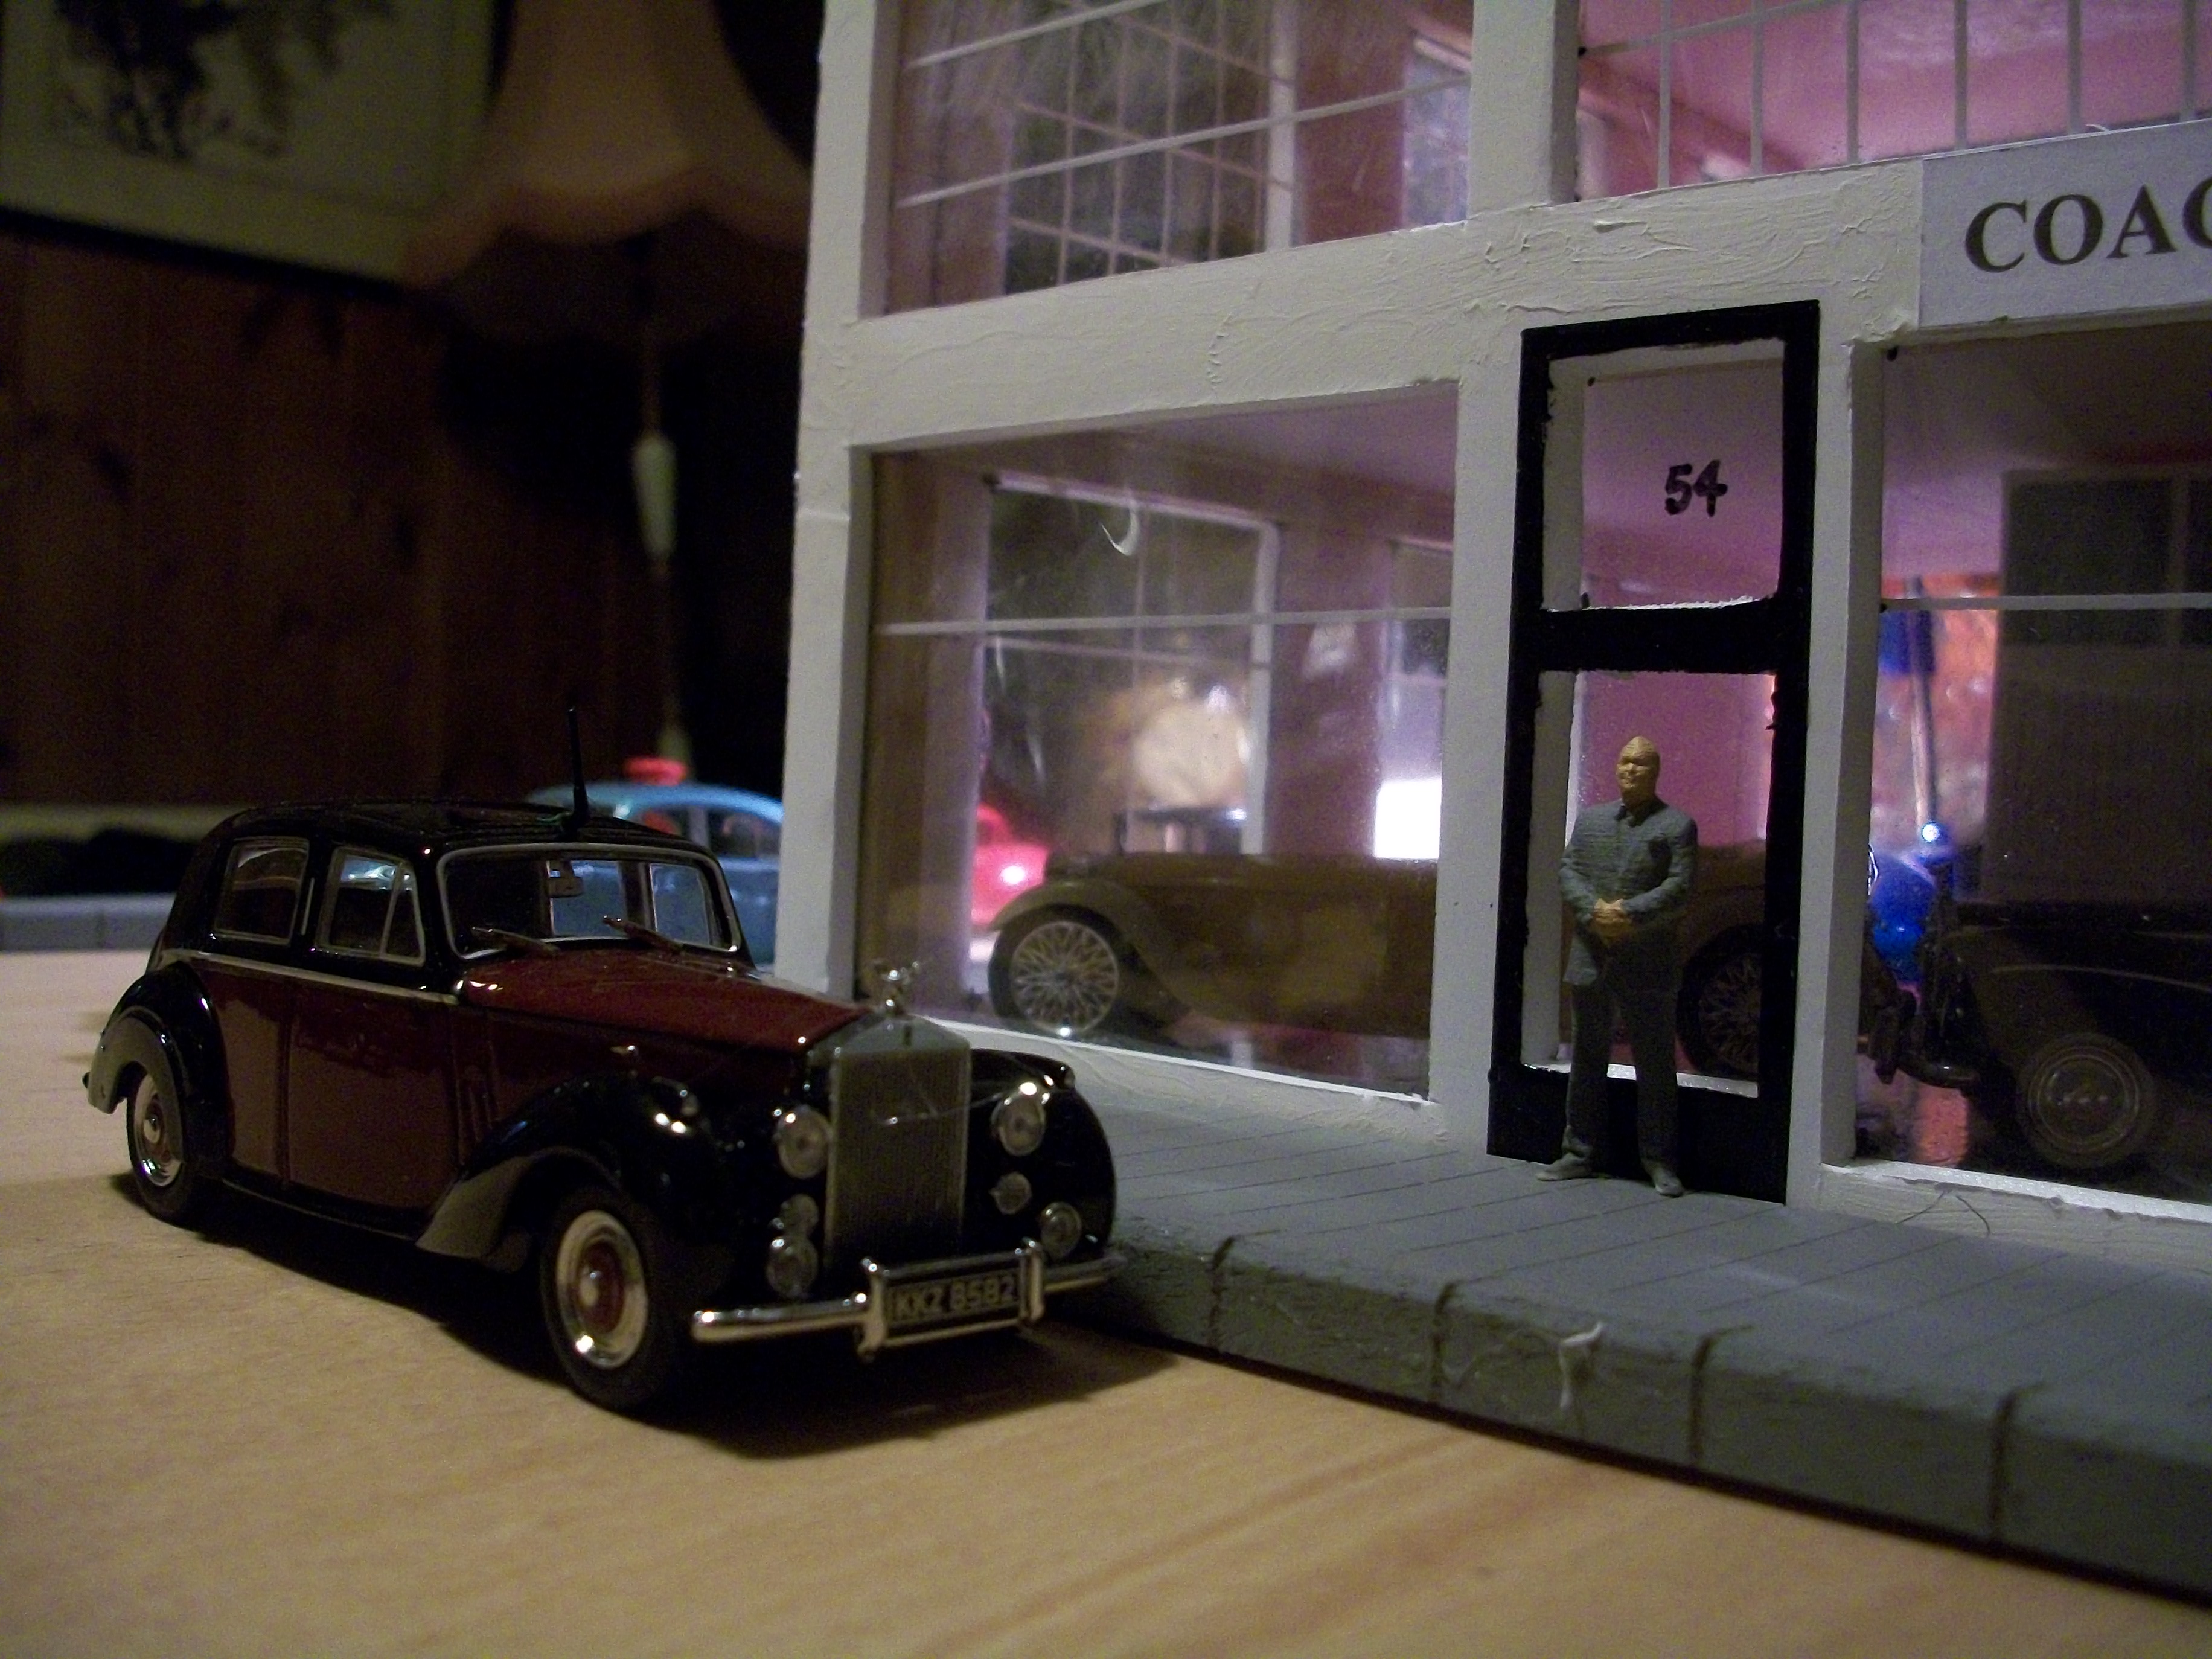
The bay window structure has all the sign writing done, the filler is sanded down and the white acrylic gesso has been applied. Nine white stripes for the zebra crossing have been marked out and painted on Bennet Street, ready to be blanked off for the laying down of asphalt. The dimensions of the two belisha beacons have been calculated and these will be scratch built shortly. The latest addition to the collection of 1:43 scale motor cars has arrived.... this 1937 Rolls-Royce Phantom III Sedanca de Ville, finished in yellow and black and produced as a model by Eaglemoss. The registration plate ( license plate ) will have to be changed, as AU1 belonged to the villain of the 1964 James Bond movie ' Goldfinger '. David
-
Gary and Pat..... thank you for the encouraging comments, which are always motivating and very welcome. As well as the ongoing work to the bay window structure, I have some O-gauge station platform lamps that will make very nice street lamps and they can be wired up with the LED lighting Gary. Also, I have some O-gauge bicycles that should paint up nicely if I can see what I am doing, not to mention a very steady hand! The sage green 1953 Ford Popular is a 1:43 scale Corgi diecast and in a couple of days a 1937 Rolls-Royce Phantom III Sedanca de Ville will be arriving. The Phantom is a yellow and black motor car as featured in the James Bond ' Goldfinger ' film ( movie ), but it could also be the the car that was featured in ' The Yellow Rolls-Royce ' movie that was filmed at the Hooper & Co showroom around the year of my scale model building. David
-
I don't think it is so much the size of the sign, Yordan..... my feeling is that the problem might be the font. Somehow I think the lettering should be a different type of font. You could try different lettering styles in Microsoft Word or similar, by inserting the same words into the same size sign? Then if you find one that works, you can burn it into the real sign with the soldering iron. David
-
The frontage of your building has a very realistic look to it now. Interesting that you have tried a vintage filter on the photo, which is a heavy sepia filter. I have tried sepia filters on some of my photos, and also I sometimes set my camera to black & white mode. The filtered photos can look really authentic for the period feel, but it's nice to be able to see the colour version also. Your diorama has some marvellous colours, which of course don't show up in the sepia version. I find that black & white photographs for my 1958 diorama, and now the 1959 diorama produce a nice effect because most of the photographs you see of the original buildings of that time would have been black & white in any case. You could experiment with a more subtle sepia filter that is not so heavy..... ? David
-
I like the frames and the panels on those upper windows. David
-
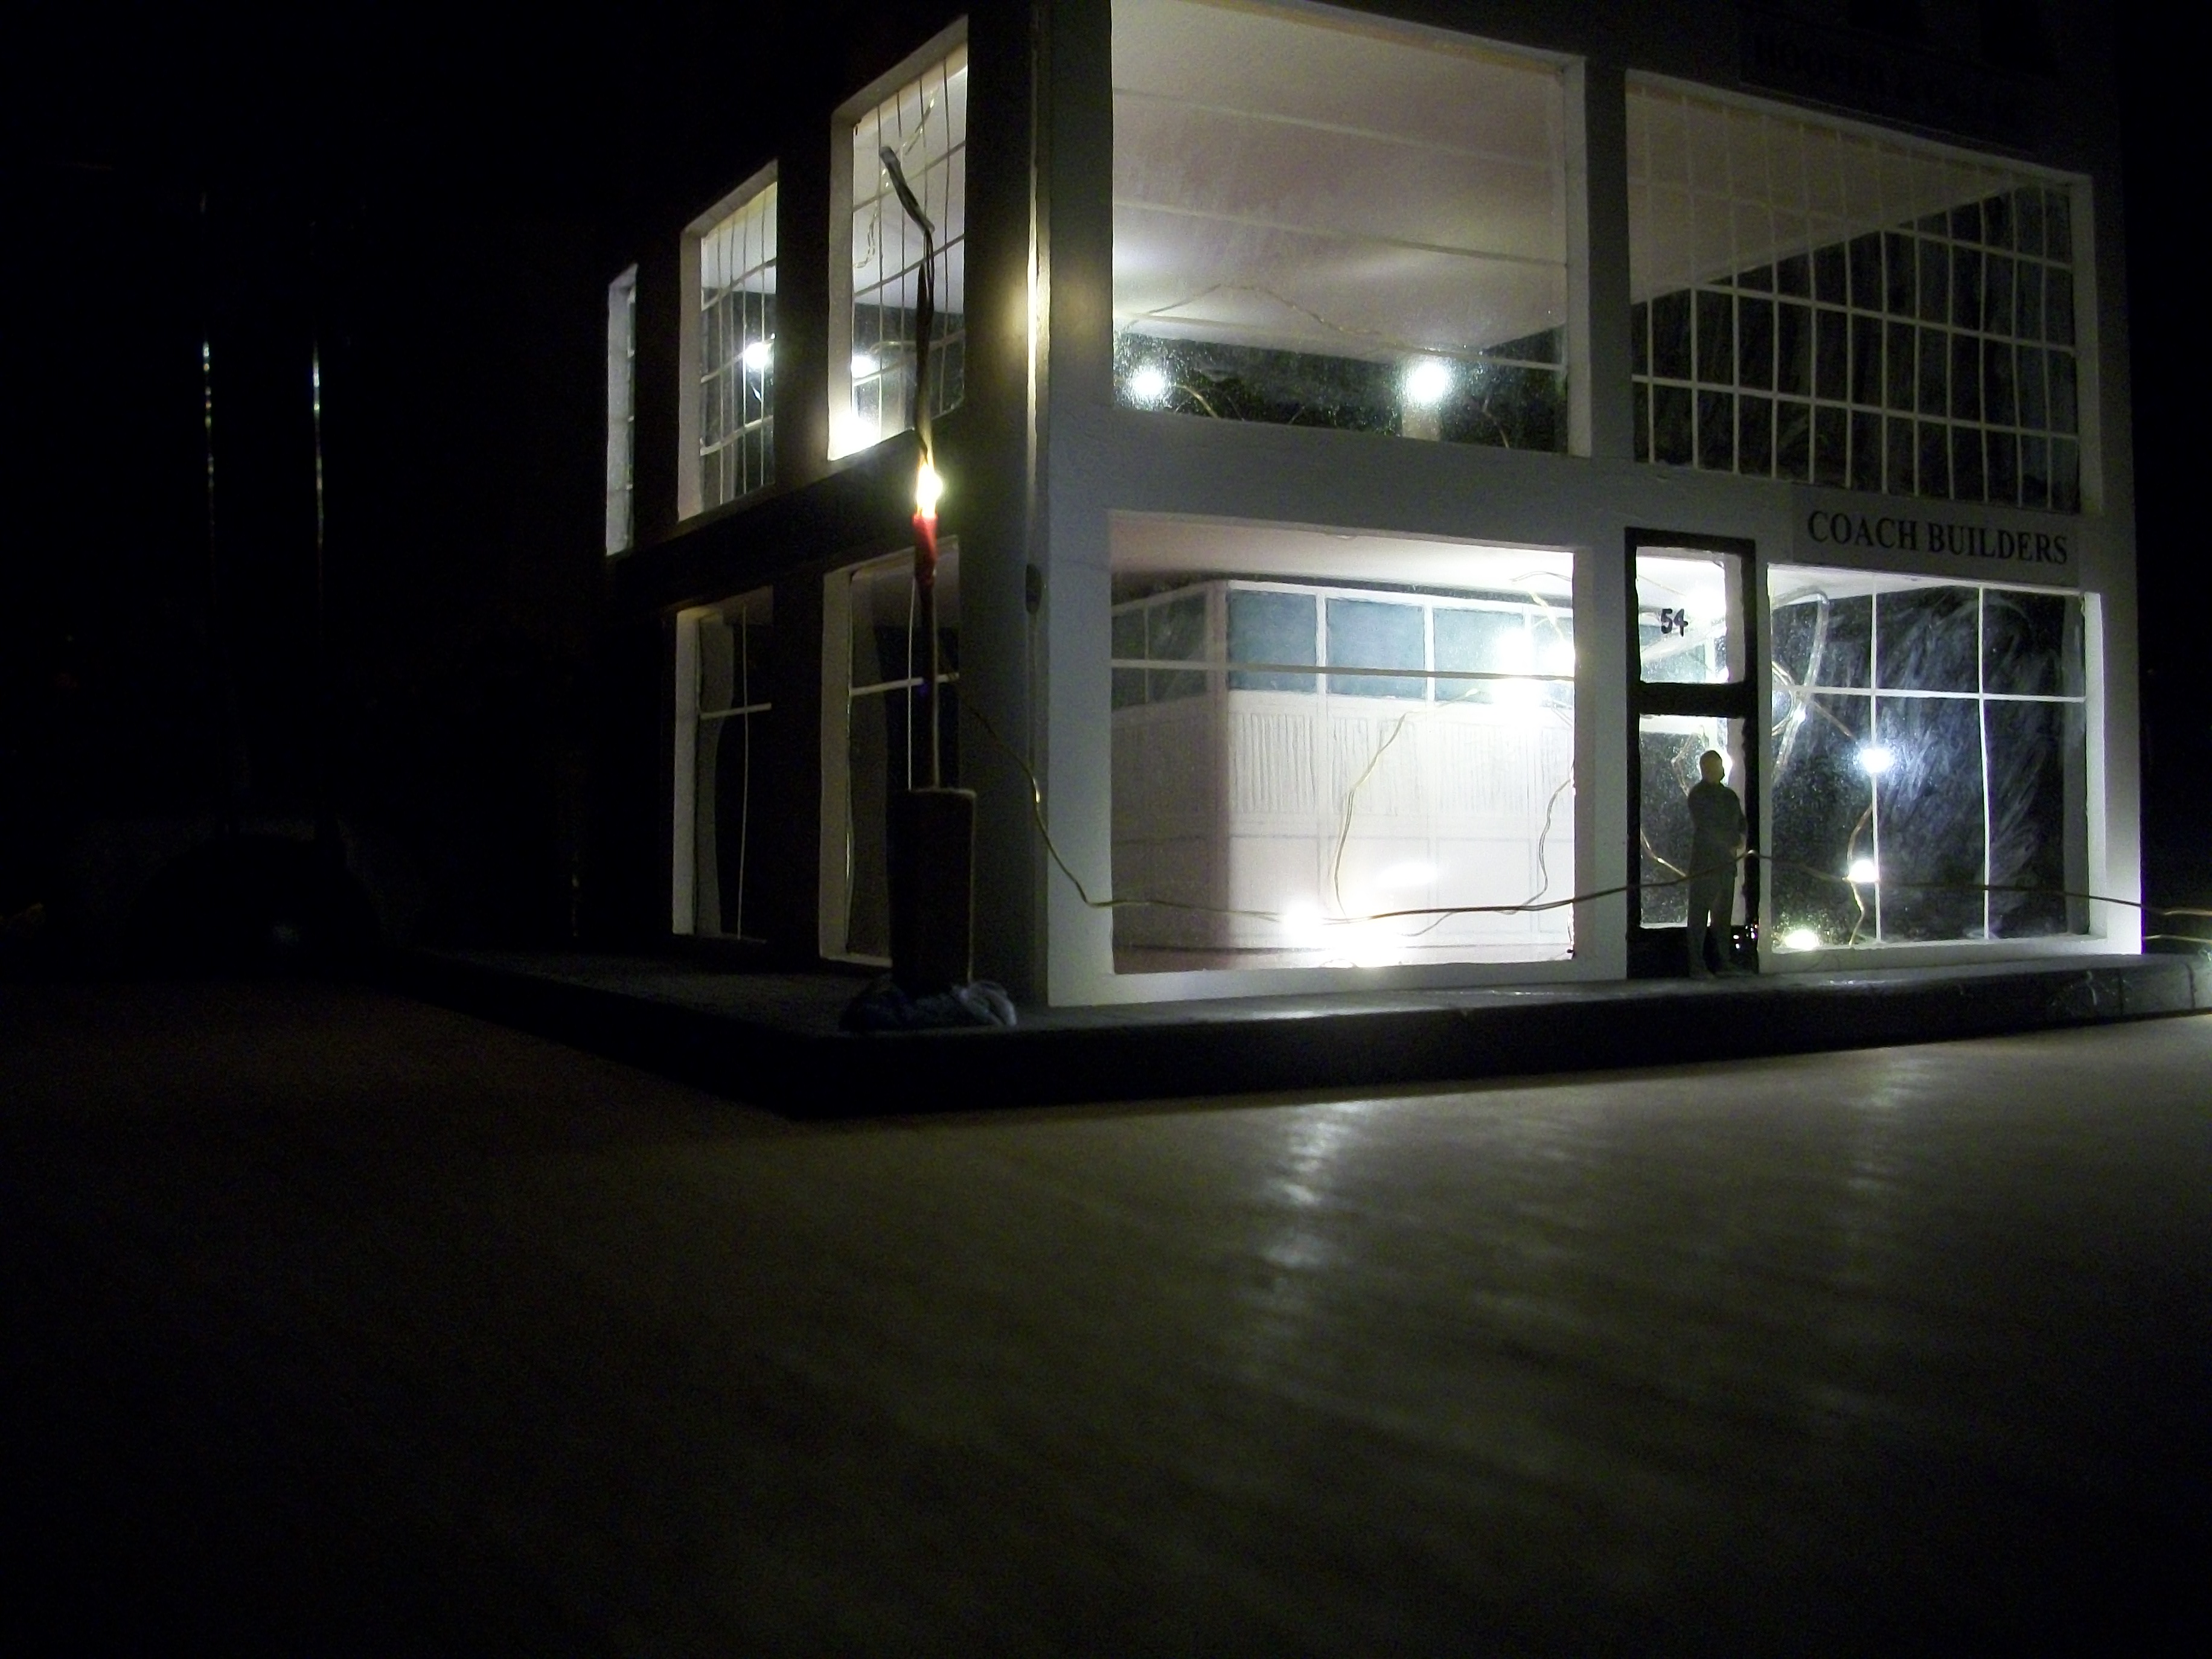
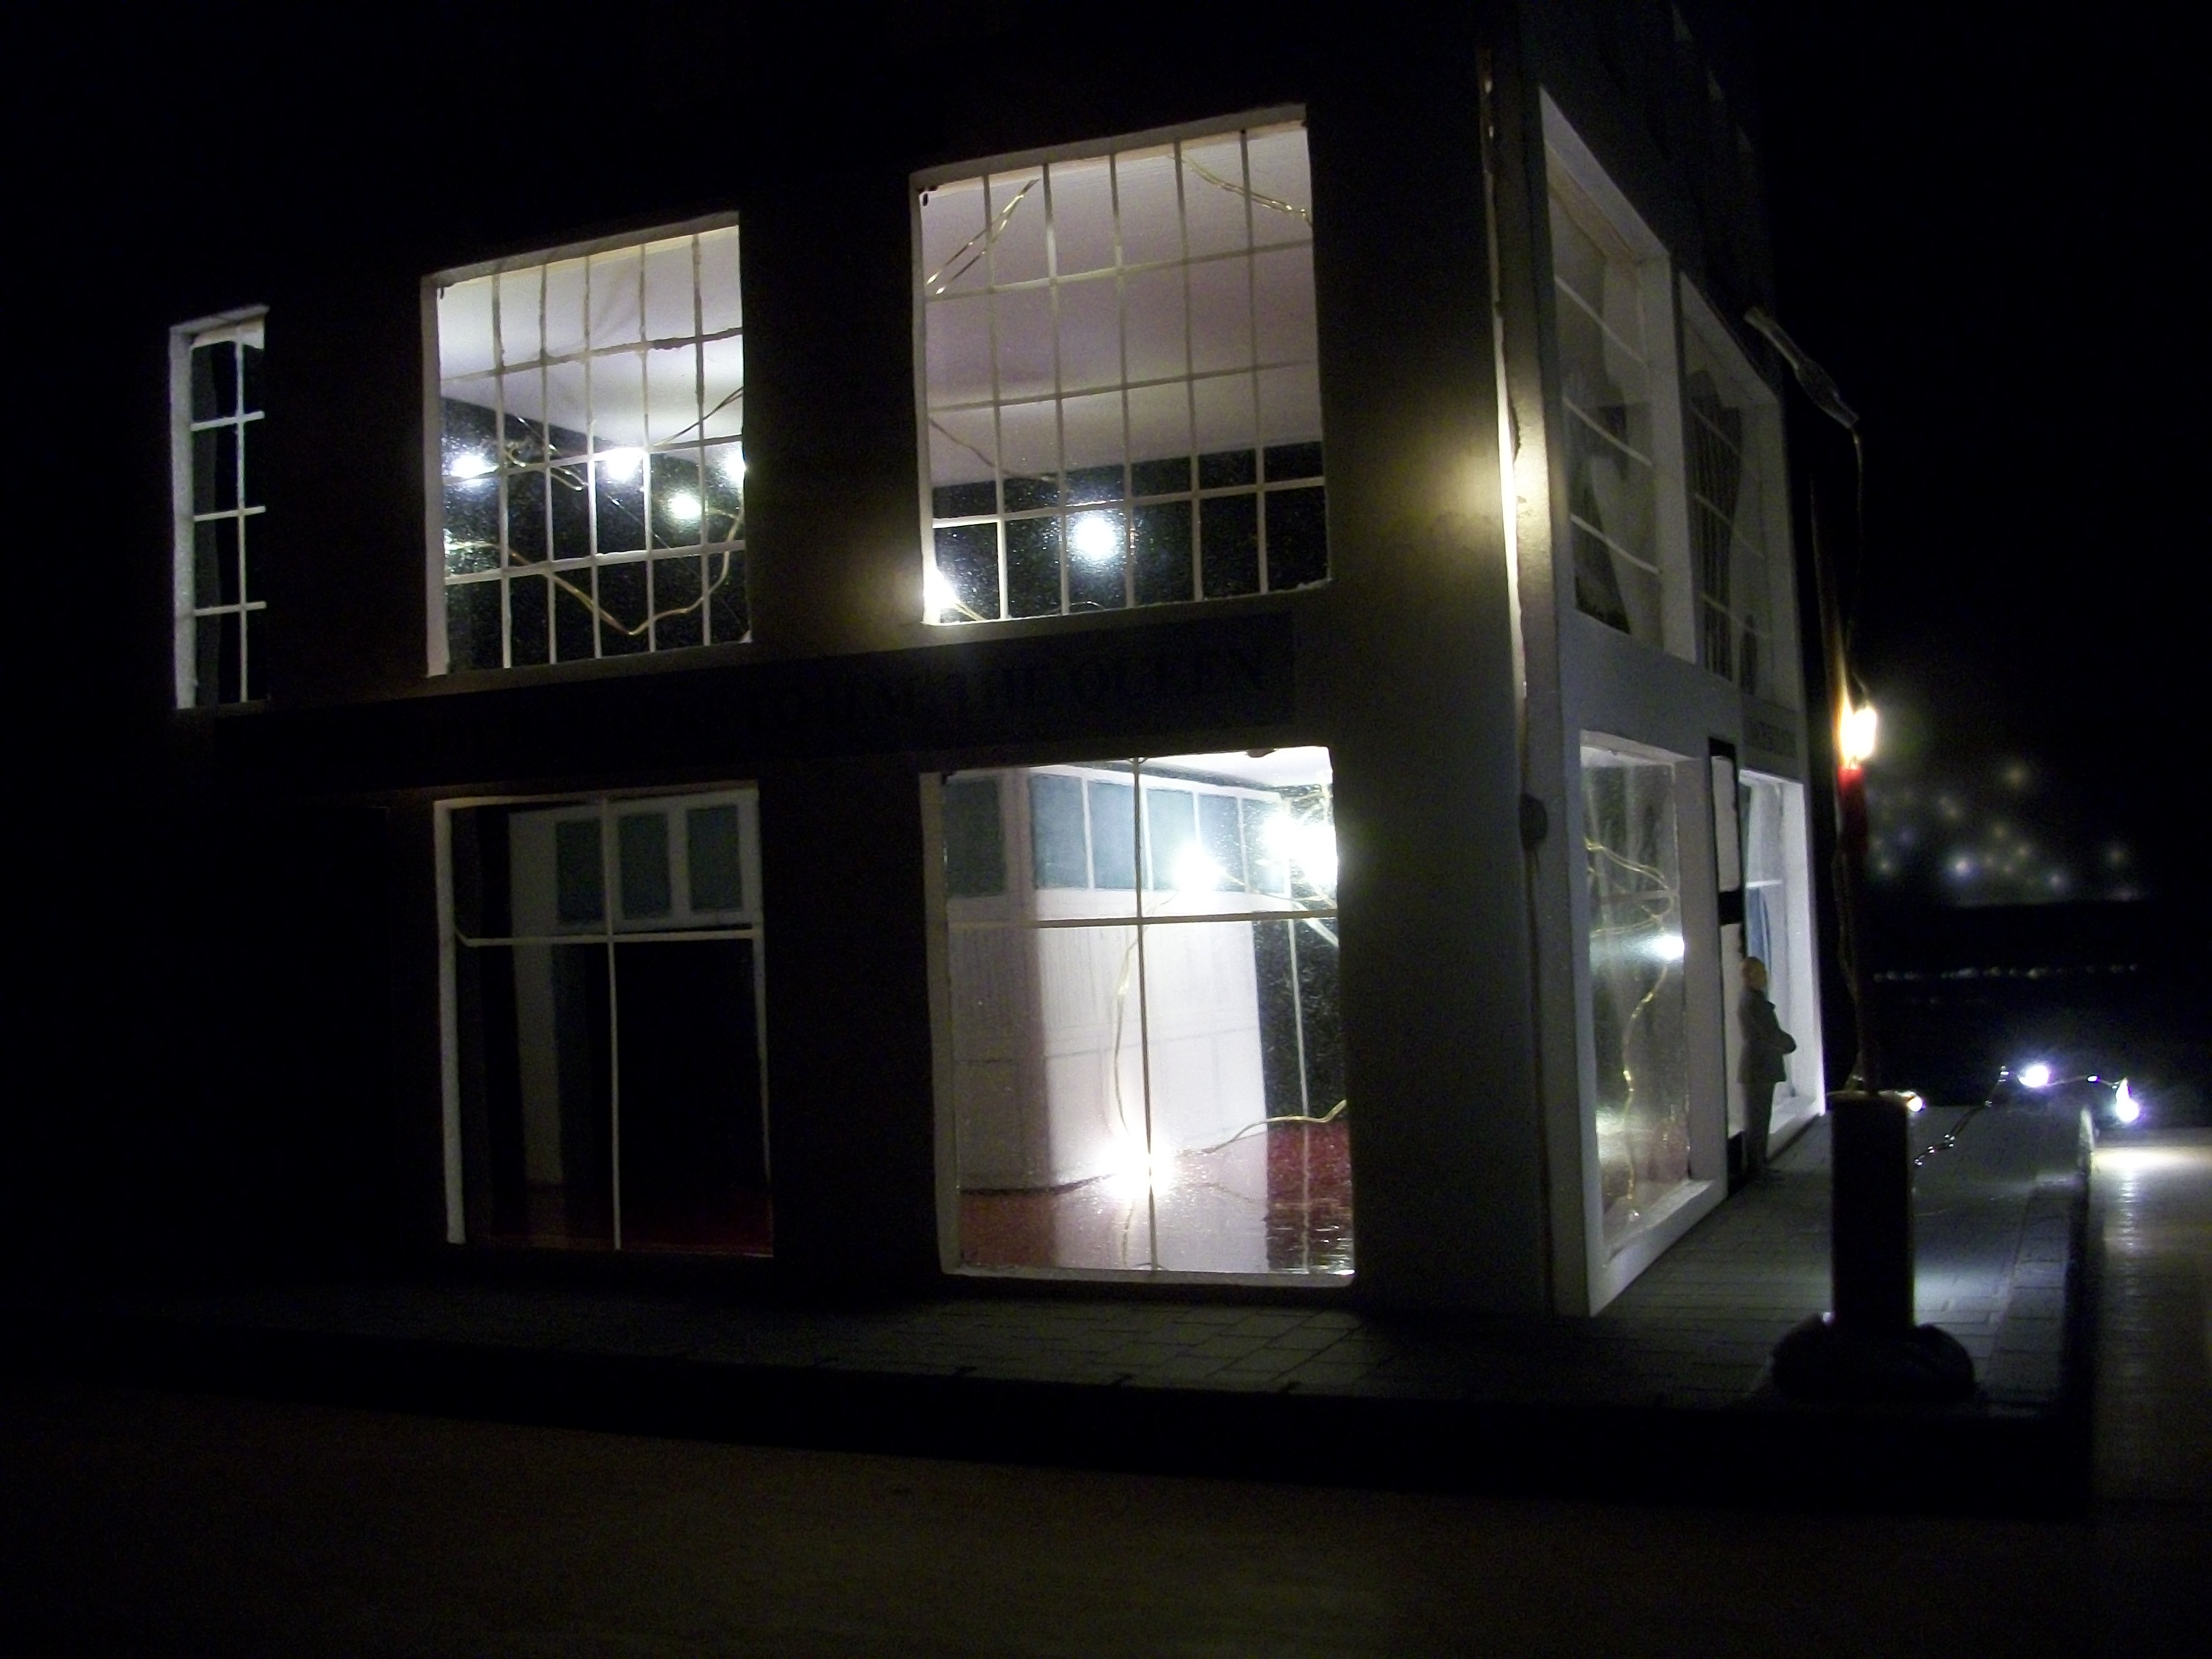
Fabricating the six window panels and fitting them into the bay window frame structure turned out to be quite difficult, as I expected it to be. Anyway, the windows are in place. The Royal crest has been added to the top of the upper bay window board and this will look better once the textured white acrylic gesso blends in around the crest and the filled joints. Some of these photos show the King George V Daimler Double-Six from inside the showrooms of the building. The figure of the man standing in front of the bay window gives some idea of the size and proportions of the structure. David
-
I was also intimidated by the airbrush at first, and I was scared to use it, but once you try it you will find it quite straightforward really. The airbrushed paint dries to a flat matt finish also. Airbrushing is an acquired skill and just needs a bit of practice to build up your confidence. You could airbrush kit parts but of course you cannot airbrush the diecast car, not without masking off everything which would be difficult. David
-
Yordan..... you were asking earlier how to make the paint finish of your diecast model vehicle flat..... I have two suggestions, one is that you could use clear matt varnish over the existing paint finish if you want to keep it the same colour, or you could use Revell Aqua Color to paint the model in any colour you like, which dries to a matt flat finish. ( I usually give the car body a coat of Yacht Varnish over the Revell Aqua Colour to produce a high gloss shine ). David
-
Yes Yordan, I noticed the title of your topic is ' Oak Barrels ' and the sign says ' Oak Barrel ' but I didn't want to criticise your spelling! That is why the wording of my comment was to use what I could see on the sign itself..... hoping you would notice the difference. David
-
The slatted roofing above the wall water fountain is a nice feature, especially the way it casts the shadows. I see the ' Oak Barrel Whiskey Club ' sign is ready to go up. David
-
Oh yes.... I am liking that door a lot, and the wall water fountain is extremely realistic. That is the sort of level I need to get to. When I look at both of my dioramas, there is very little in the way of weathering or ageing really. I tend to assemble some part of the building and paint it, but then I don't go on to add the kind of textures that you are using. This means that most of my diorama is going to look too ' new ', while I am aware that what is needed is for most of the scene to look OLD. You see, I can learn from you, and others like you. David
-
Thanks Yordan and you are already at the same level with your three dioramas..... you have clearly made some serious progress with your work so far. The sky is the limit for us! David
-
Yes Yordan, the 1:24 scale Hooper & Co (Coachbuilders) Limited 1958 diorama was exhibited for three days at an International event in England during June 2018. This was the Rolls-Royce Enthusiasts Club Annual Rally, which is held at Burghley House in Stamford and it is the biggest gathering of Rolls-Royce and Bentley motor cars from all over the world. The event attracts over 2,000 of the finest motor cars dating right back to the 1920's, and even the original Rolls-Royce Silver Ghost from 1907. My diorama was on show in the largest marquee where the The Hunt House have their headquarters, so this was a prime location for my very first exhibit. I am waiting for confirmation that my double diorama is to be booked into this year's event at the same location. My intention is to display the 1:43 scale diorama that is currently under construction directly alongside the larger 1:24 scale model, side by side. David
-
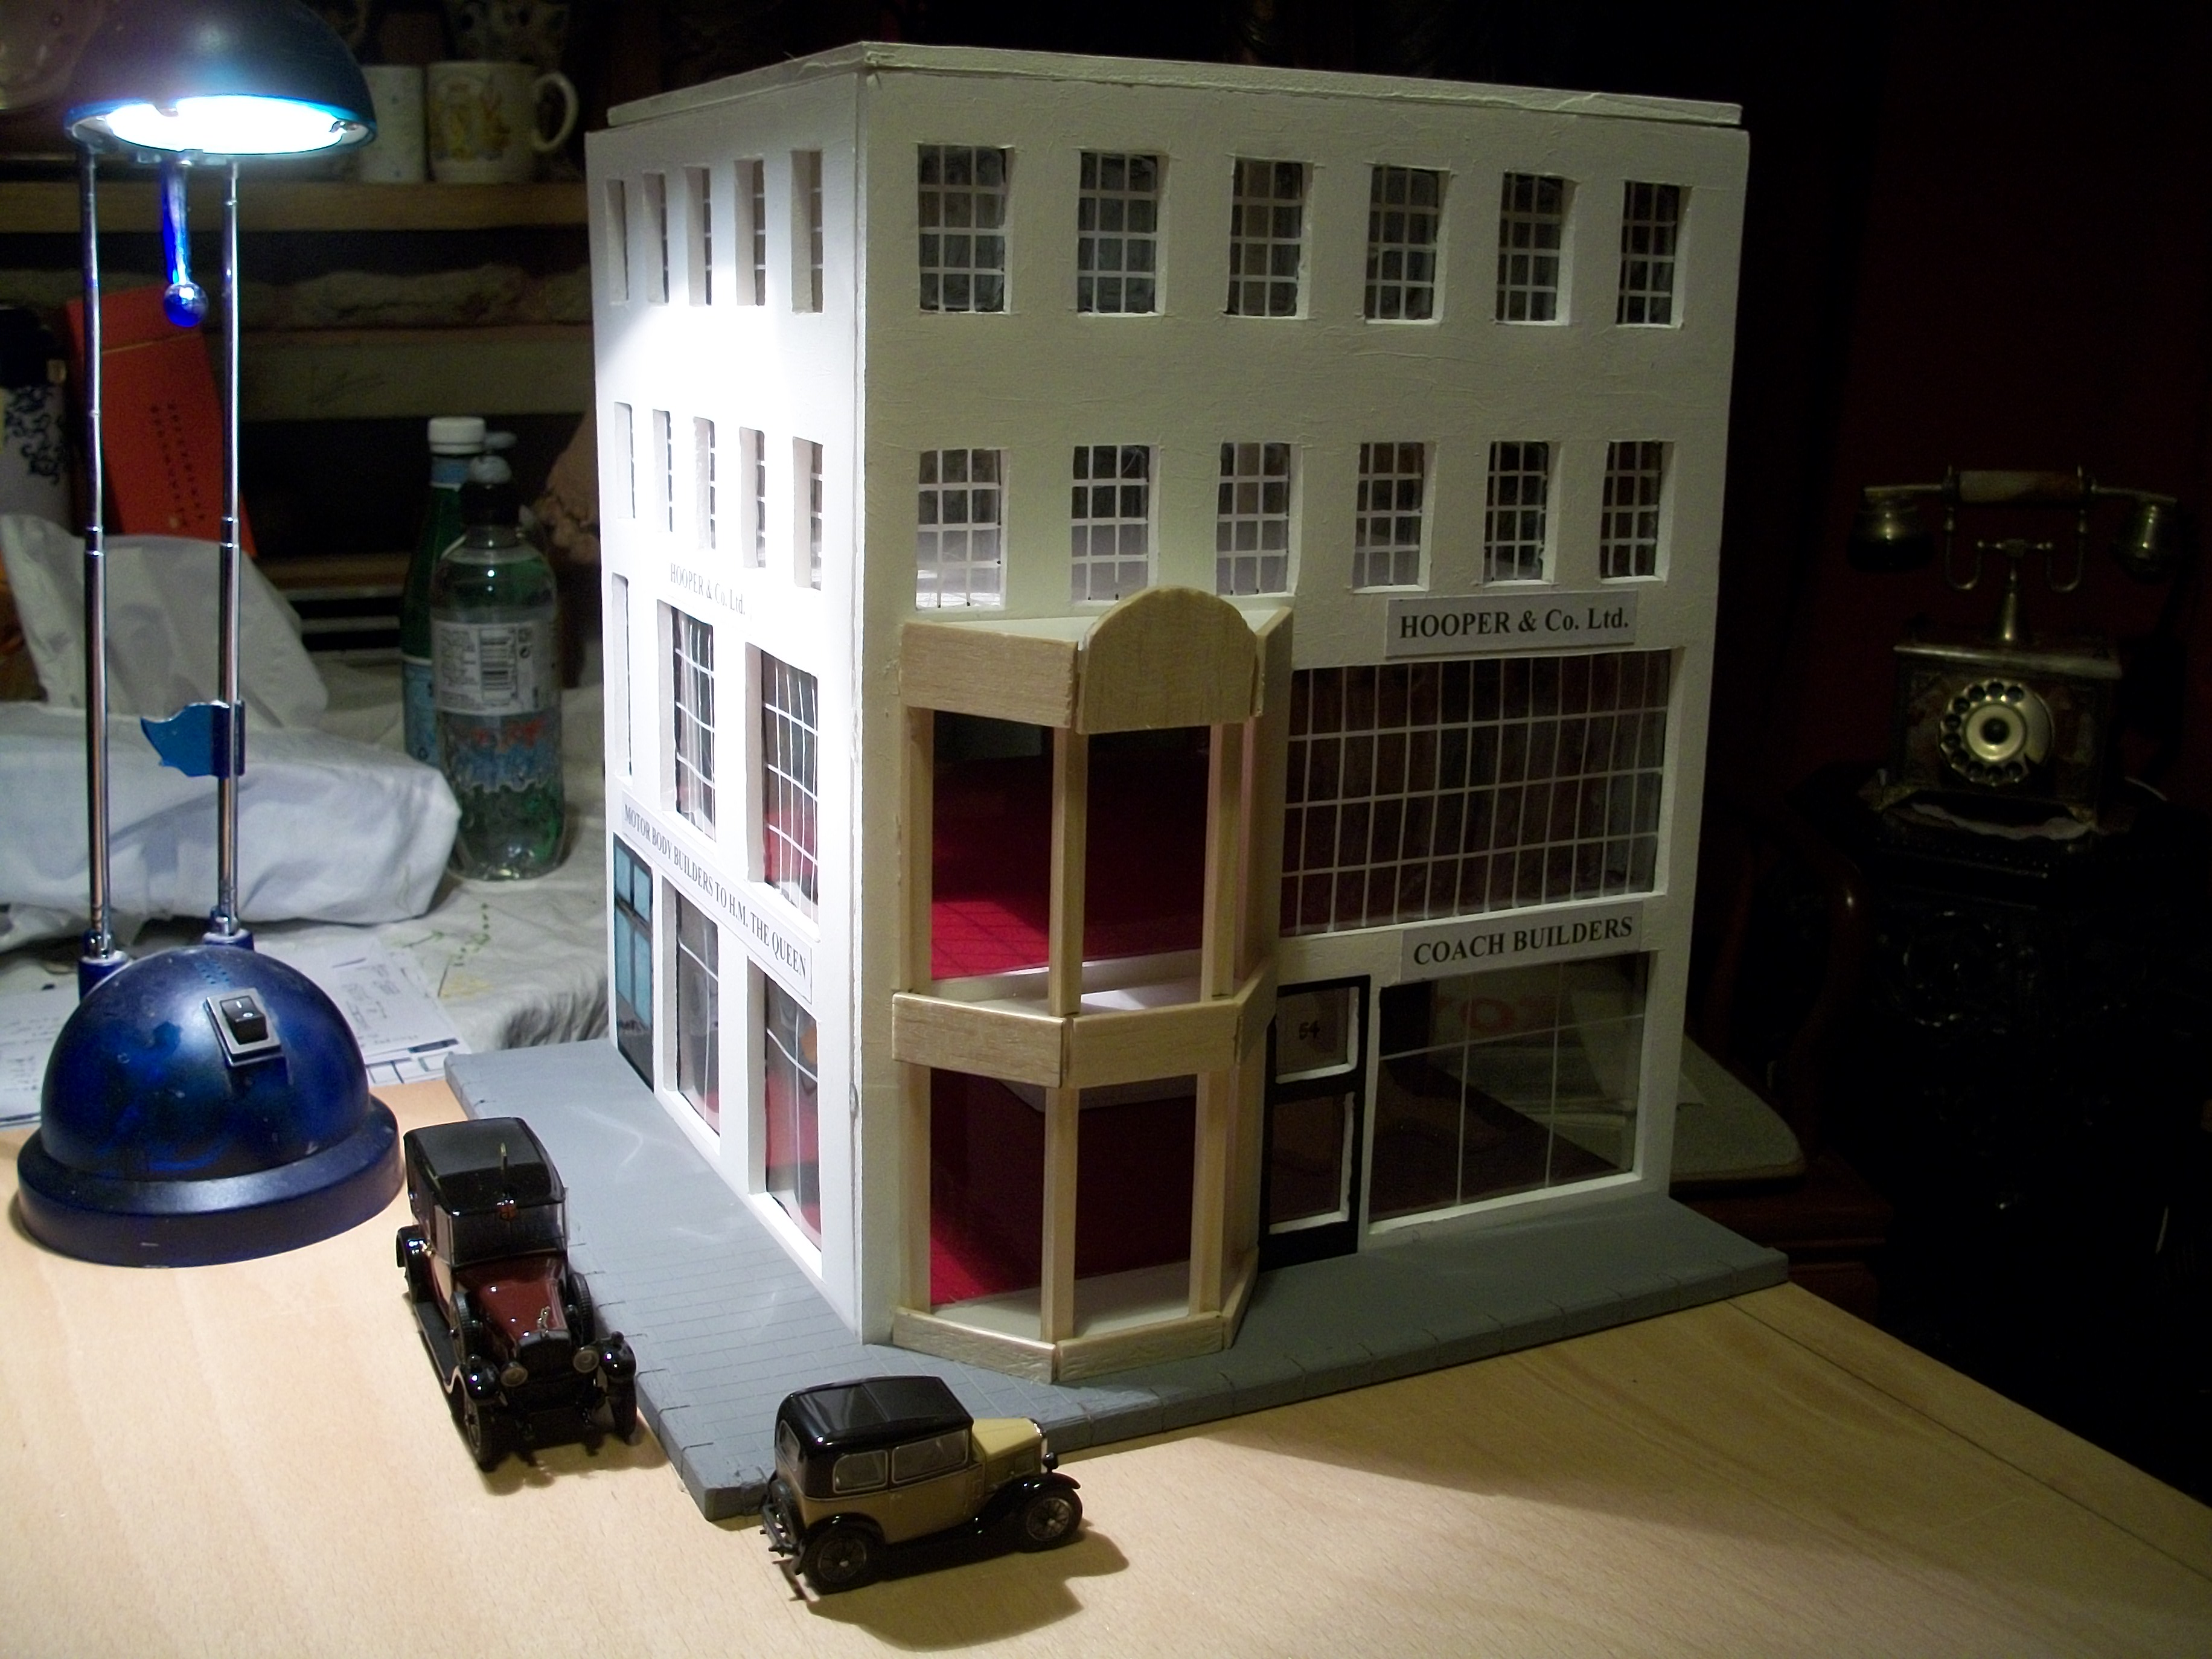
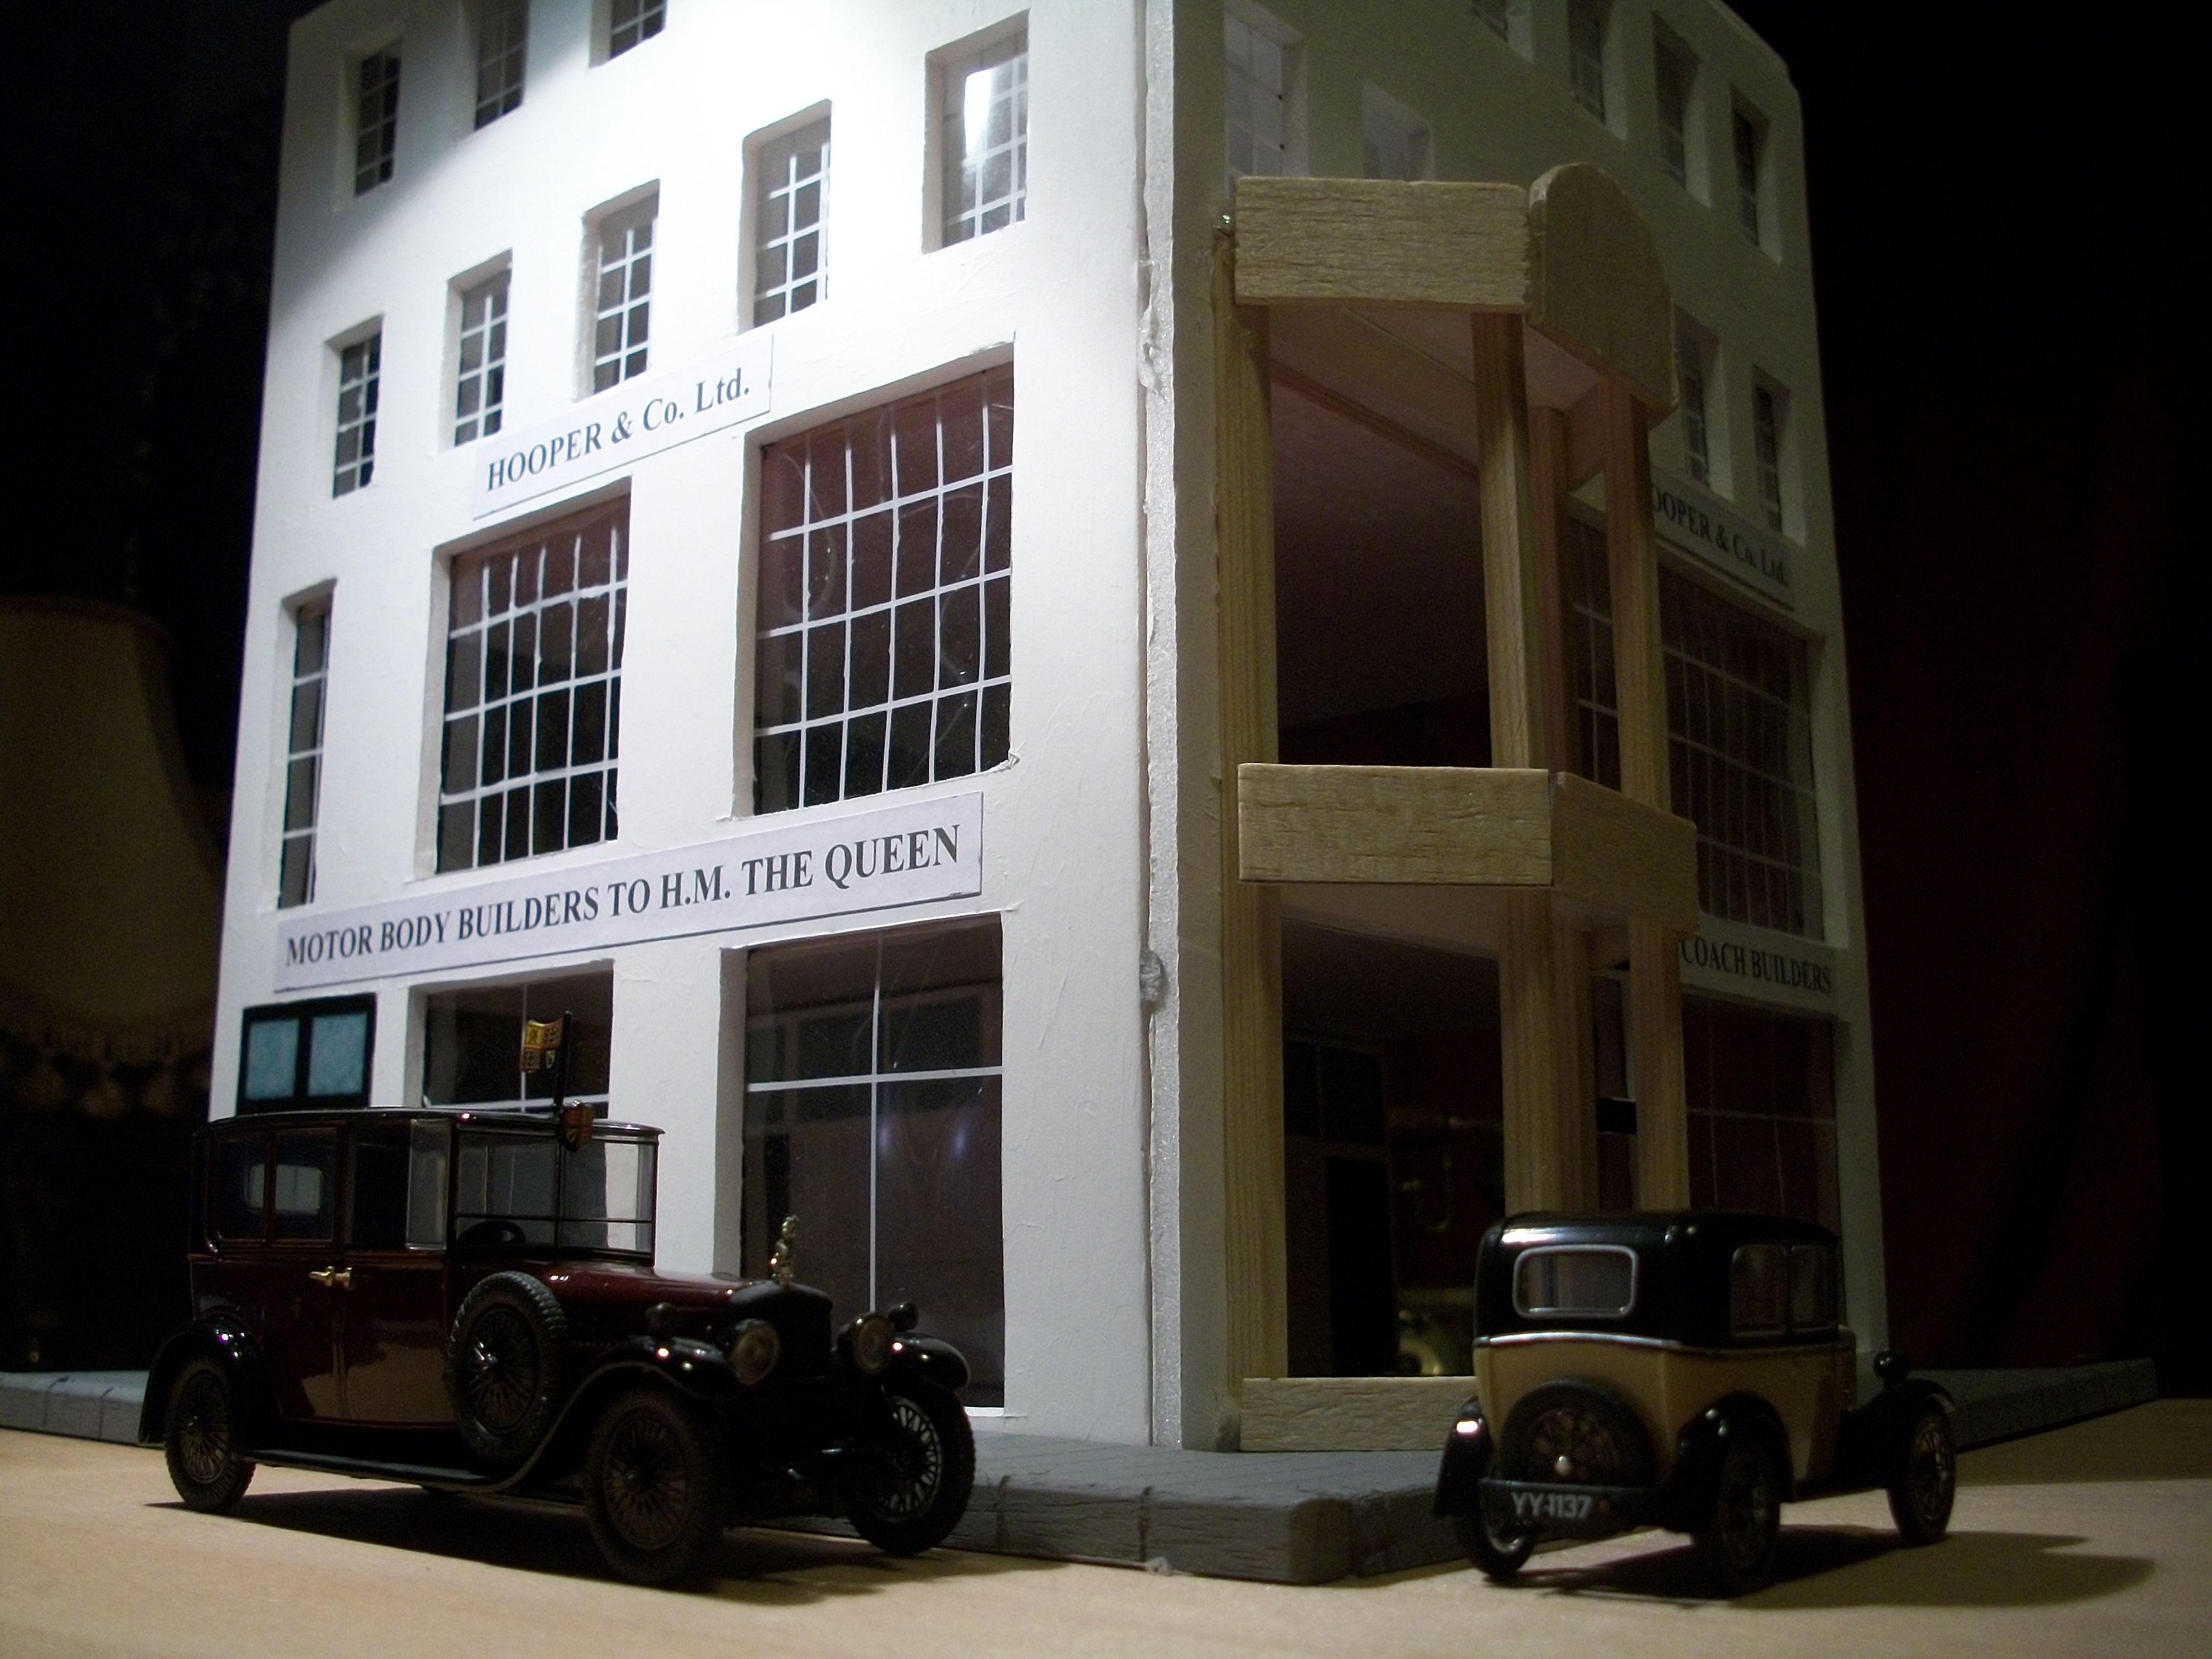
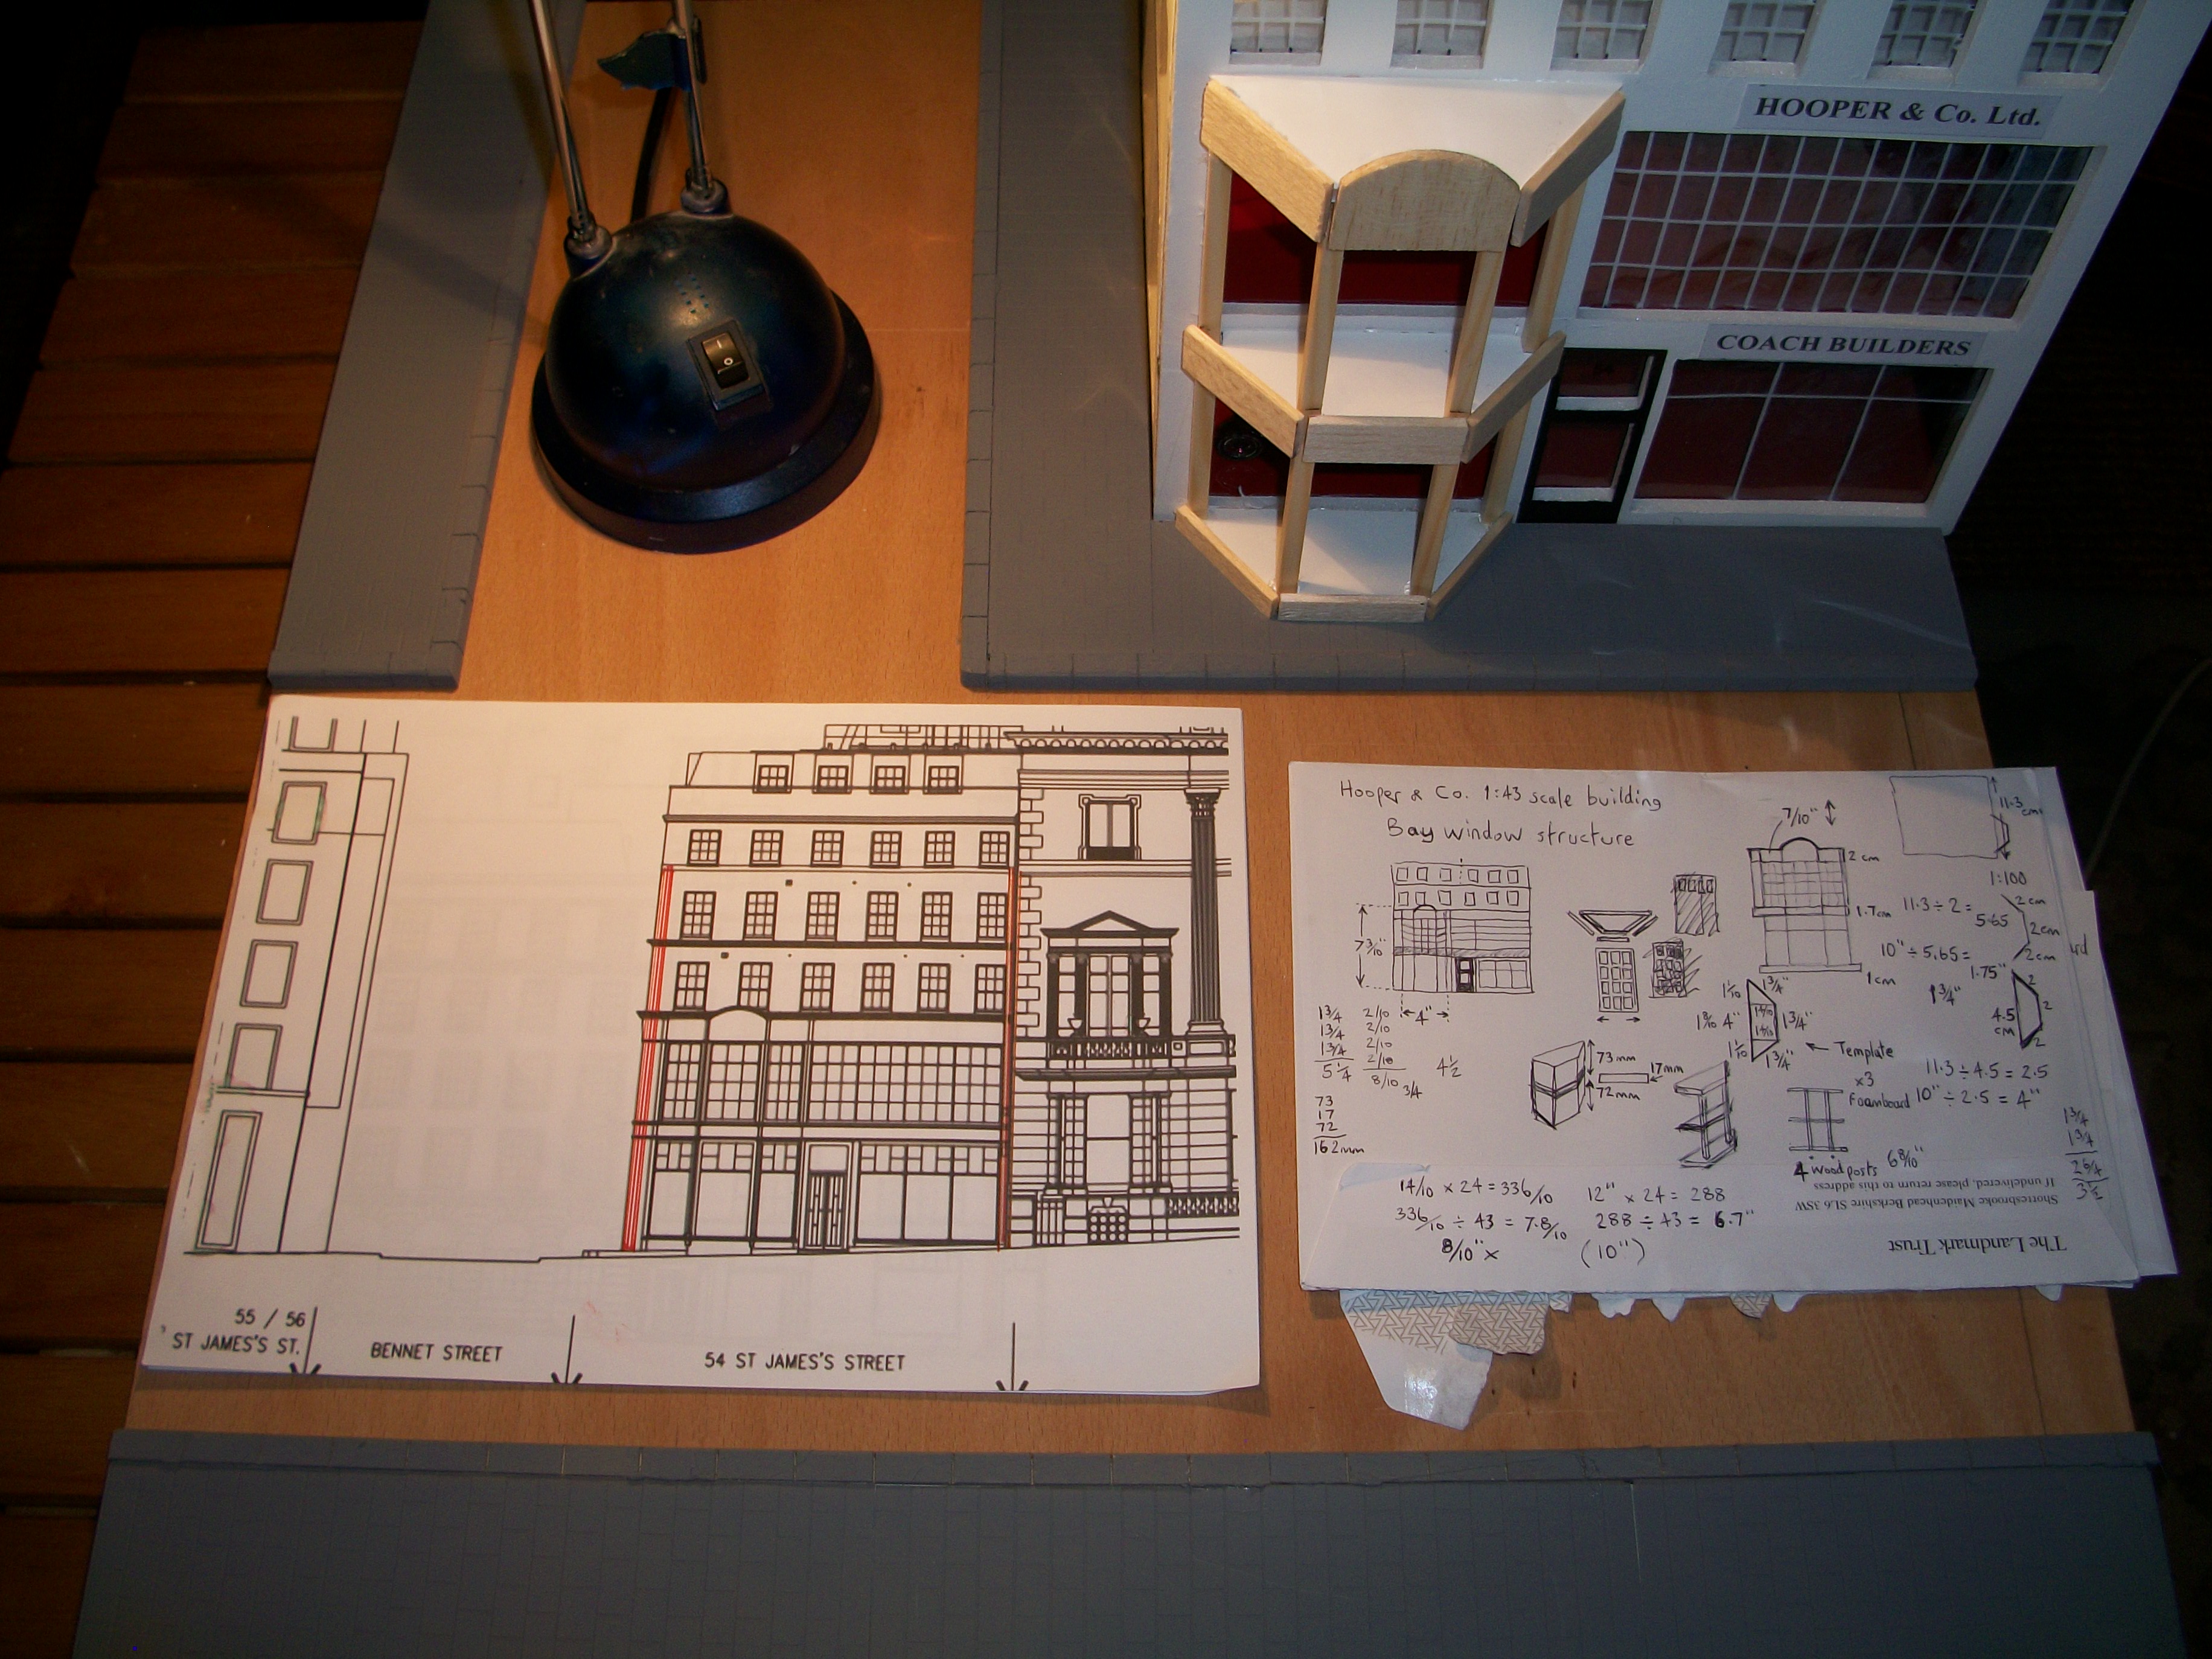
Much work has been done with the construction of the bay window structure for the 1:43 scale building, and today this was assembled at the front of the Hooper building. Foamboard has been used, also four wooden posts and balsa wood. The joints where the boards don't meet will have filler applied shortly, and then I can add sign writing, textured white gesso paint and six individual window panes. The L-shaped paving can slide under the ground floor bay window, just like the 1:24 scale building, so the whole building can be removed from the baseboard for transportation. Alongside the smallest model car, which is the 1932 Austin 7 RN Saloon, you can see the largest model car which is the 1928 Daimler Double-Six King George V Brougham. Following the arrival of some excellent warm white LED lighting, I have ordered four street lamps in 1:43 scale O-gauge, and also eight bicycles from the same model railway supplier. The roof will be hot glued to the building very shortly, and the AK Asphalt textured material will be applied to the streets, once the zebra crossing has been put in place. Thanks for looking at my work in progress, which I am enjoying immensely. David
-
Yordan..... the exposed stonework around the doors and windows is just brilliant ! - Your 5-step technique, on top of what you have already done, is something I shall make a note of for reference so thanks for that. This is diorama scale model building at it's best and I understand how enjoyable this creative work is. The end result is extremely satisfying when you get it right. David
-
You have made a really nice job of building that Camaro, Doug and I do like your choice of paint colour also. Actually, I like the Foose Cadillac Eldorado, which I don't think is available in 1:12 scale, only 1:25 scale. My builds are '50's British and European cars in 1:24 scale, but I keep looking at the American cars that I find very interesting, again the 1950's period in particular. David
-

Your favorite manufacturer of 1/24 kits
Anglia105E replied to Ahajmano's topic in General Automotive Talk (Trucks and Cars)
I would say Tamiya is best for the Jaguar MK II and Morgan 4/4 in particular; Heller are best for unusual cars that are not available from other manufacturers, such as Talbot Lago, Delahaye and Citroen; Revell I do like also for the Rolls-Royce Silver Cloud II, which was also done by Minicraft and others. The best kit I have ever made has to be the Revell London Routemaster Bus kit, which at nearly 400 parts and comes in a box that is so large it will frighten the life out of you, is incredible value even at twice the price I paid. Other builds have included Aoshima, Italeri, Monogram, Emhar and SMER....Having said all that..... my favourite kit manufacturer is hard to choose, but I must say EMHAR is by far the best, as long as you like old Bedford trucks and don't mind paying quite a high price. David -
Thanks Gary, Yordan and Pat...... those little lights are going to be an interesting feature of the 1:43 scale Hooper building Gary, and as you can see from the photos , I might be able to scratch build a street lamp and tape one of the warm white LED's to the top of the lamp post. Pat.... the Hooper & Co workshops were in Acton, which is 6 miles to the West of London city centre, and this was an area famous for industrial sites with names like Renault, Vandervell, Wilkinson Sword as well as Rolls-Royce. The building on St James's Street in London SW1 was used primarily for showrooms and offices. David
-
The front and side walls of the Hooper building are now hot glued together, and a couple of additional supporting posts have been put in place, near to the roof and also the ground floor. These photos show each floor level being assembled, along with their supporting posts at the far corner. Here are a few test shots that include a lighting experiment in the early stages and a few of the 1:43 scale diecast model cars. One of the Shapeways Printle Shop figures is standing at the main entrance door and has yet to be fully painted. Work is now in progress to prepare the bay window structure and the pavements and streets will be textured and painted quite soon. David
-
Not seen one of these Tamiya Toyota Landcruisers built and painted before..... very nicely done, Alexandr. David
-
Really nice build you have there Scott, and the driver figure adds a touch of realism that transforms the scale model immensely. I have built this Heller kit and I think it can turn out extremely well when you put the effort in. Very much a classic racing car and several other kit manufacturers have produced this kit, such as SMER, Mistercraft and various different versions of the Heller kit. I might have to consider putting a driver figure in my Talbot-Lago GP now that I have seen yours Scott. David
-
1962 Bel Air final assembly
Anglia105E replied to minkos's topic in Model Building Questions and Answers
Mark.... I can't help you directly with the AMT 1962 Chevy Bel Air build, which looks really nice from what you have achieved so far, but when I was assembling a Minicraft 1962 Rolls-Royce Silver Cloud there was a similar issue. The kit is the most basic you could ever find, and it only has 26 parts, but when it came to mating up the body and chassis it just would not sit right. Turned out to be the interior tub butting up against the side window glass, and there was no cut-out where the side windows glass needed to fit inside the dashboard. Once I cut small pieces of plastic away from the critical areas all was fine. As other members on here are saying, maybe the firewall is hitting an obstruction in your case? David -
I like the arched windows and that vehicle is going to work so well with this diorama setting. You are making good progress Yordan. David
-
Lamborghini Huracan Performante, Aoshima, 1/24
Anglia105E replied to Matt Bacon's topic in Model Cars
Nicely put together Matt, and it sounds like it wasn't an easy build. You have done a fine job on it, and the colour is far more subtle than bright orange or gold-plated! The only Aoshima model that I have built is a Mitsubishi Pajero Metaltop Wide XR-II, also in 1:24 scale, and it matches the vehicle which is my daily drive.... a Mitsubishi Pajero 2.8TD SWB MKII. David