Anglia105E
-
Posts
3,487 -
Joined
-
Last visited
Content Type
Profiles
Forums
Events
Gallery
Everything posted by Anglia105E
-
The two scratch built Belisha Beacons have been completed and are now in place on the zebra crossing. Getting on quite well with the figure painting and the next scratch built model will be the London bus stop. The next 1:43 scale model car will be arriving on Thursday, which will be the 1948 Ford V8 Pilot. I tried to post a lengthy reply to Gary and Pat the other day, but the website would not allow me to post. All I got was the '404 error - Cannot load the page ' Even a pm containing the same text repeatedly came up with the same error and would not post..... ? David

-
Getting a 3D printer has got to be one of the most exciting aspects of scale model building...... I am super envious..... David
-
Thanks Yordan...... I guessed you must be busy. Yes, movie set is an accurate description. Setting up a diorama scene for a photo shoot is exactly the same sort of procedure that a movie company crew would follow when getting ready to shoot a scene for a movie. David
-
 Cannot post at the moment..... getting ' 404 ' error, page not found David
 -
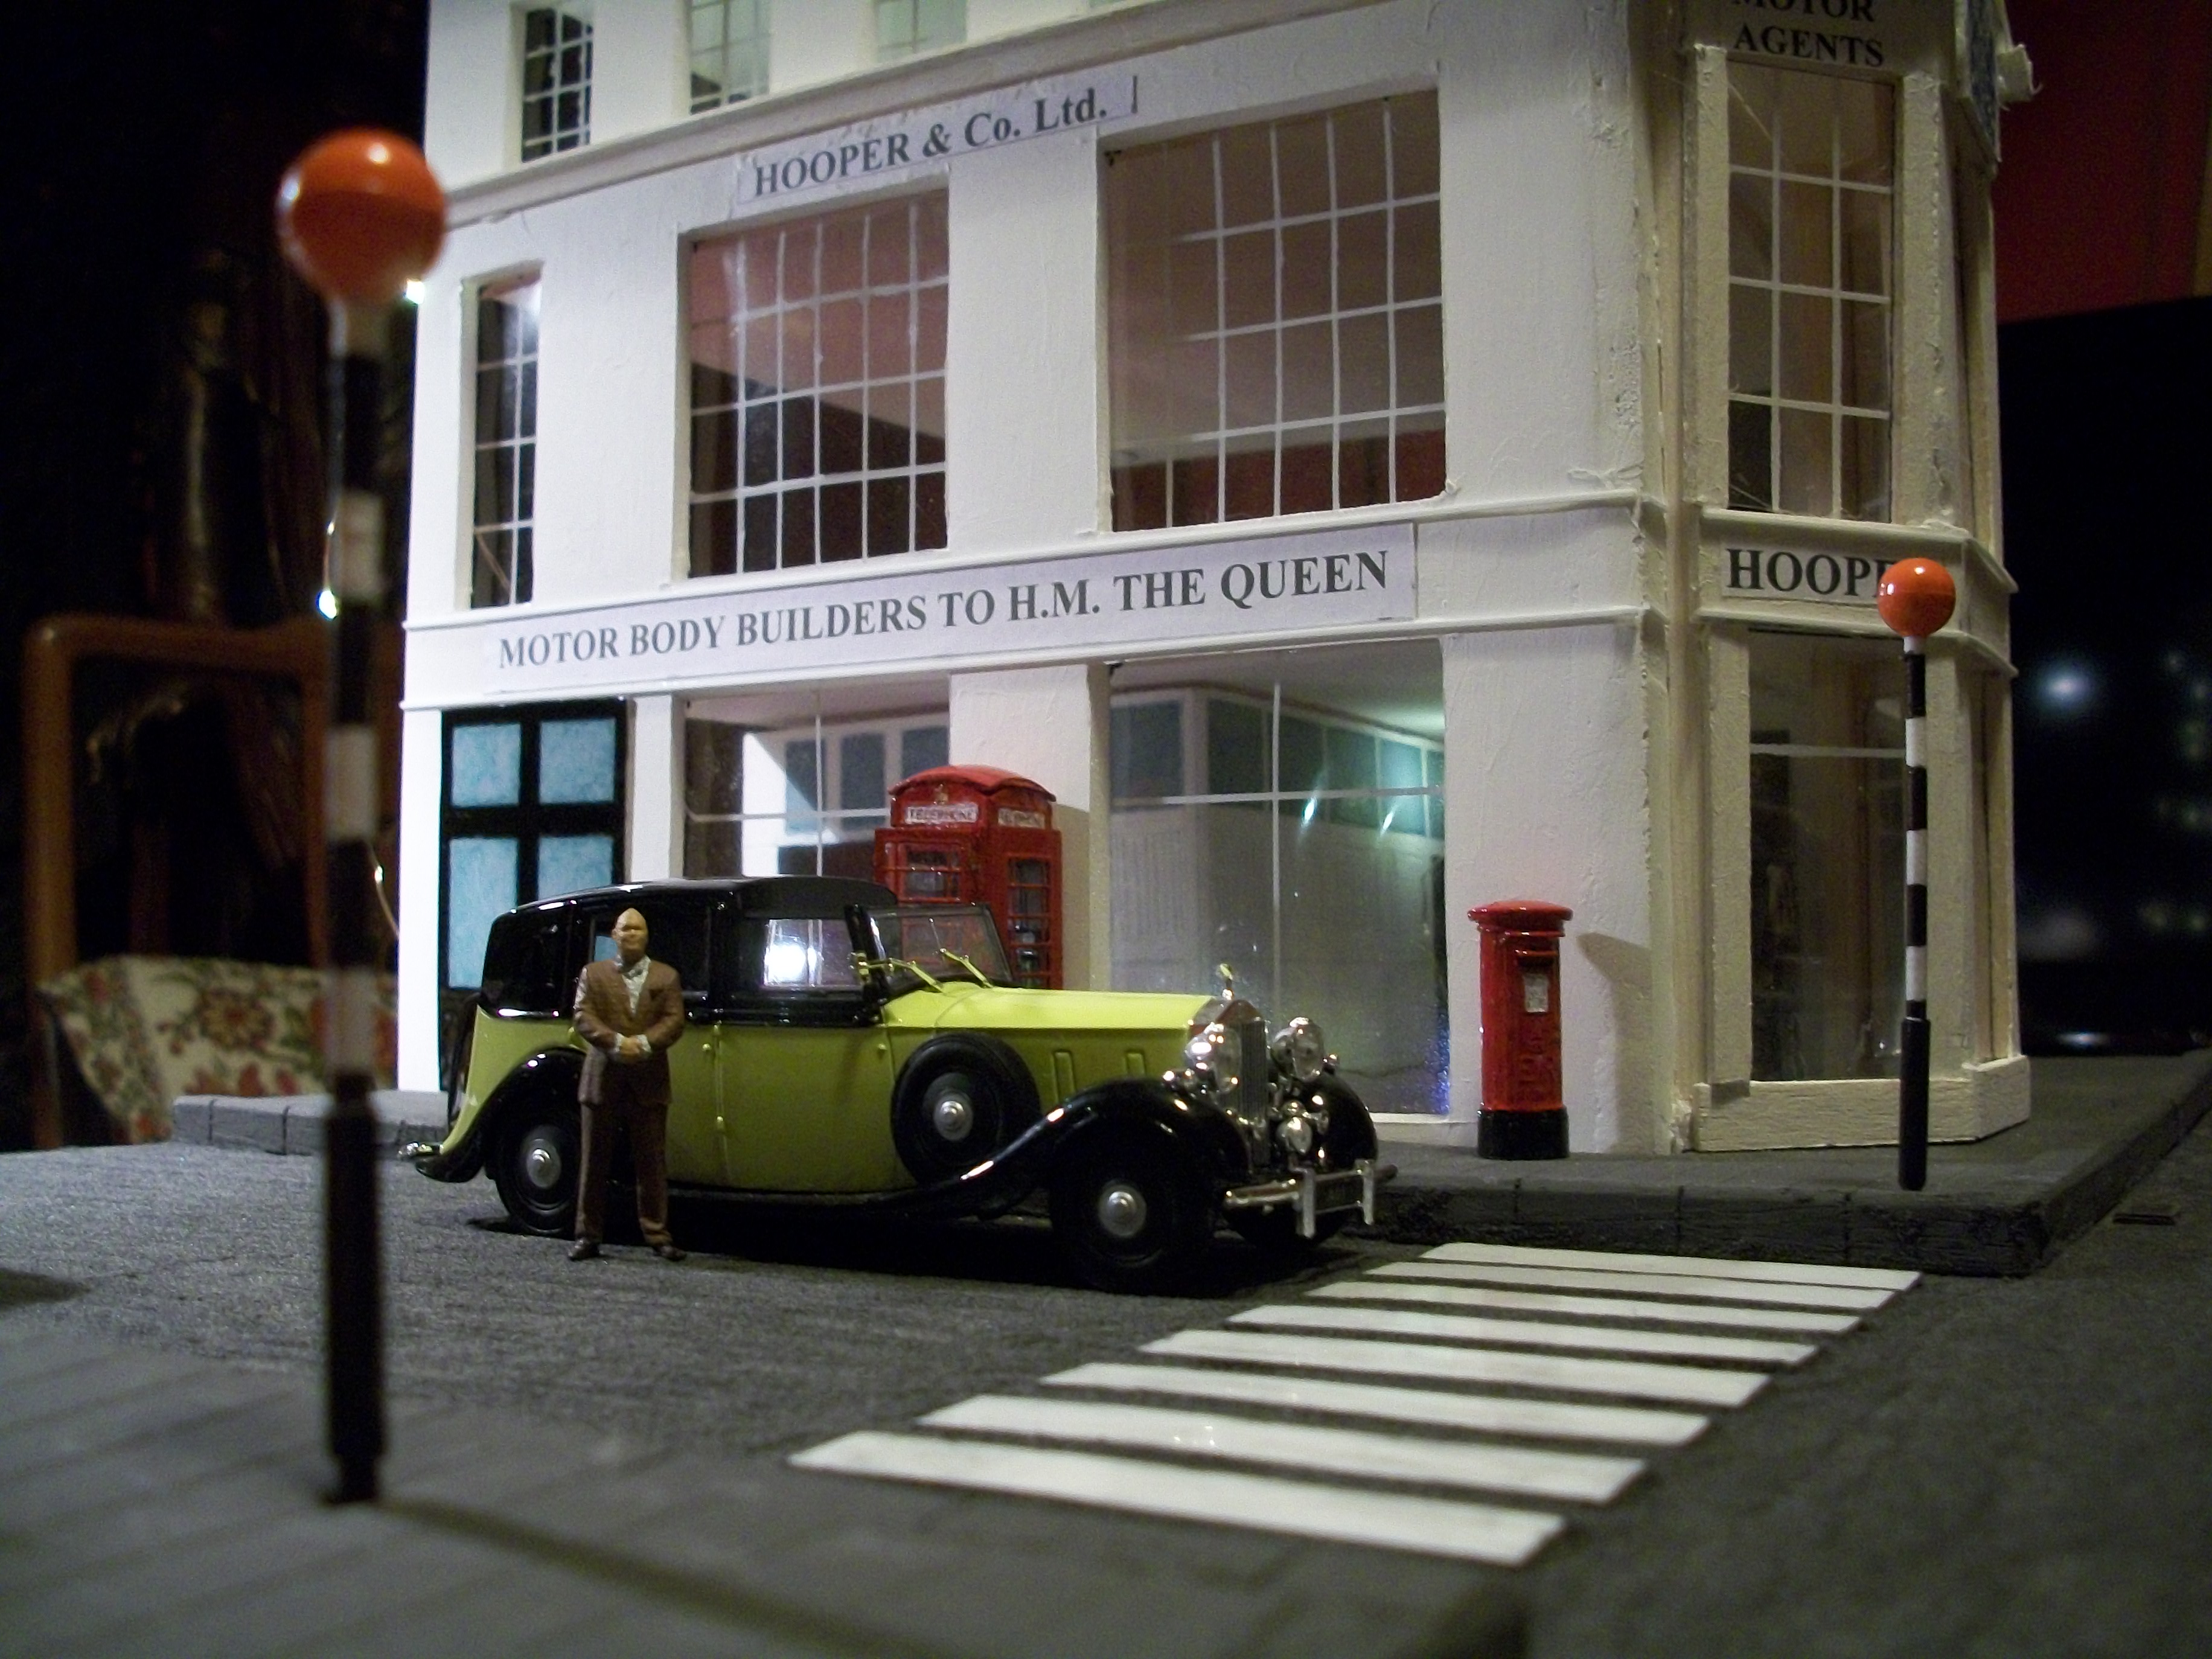
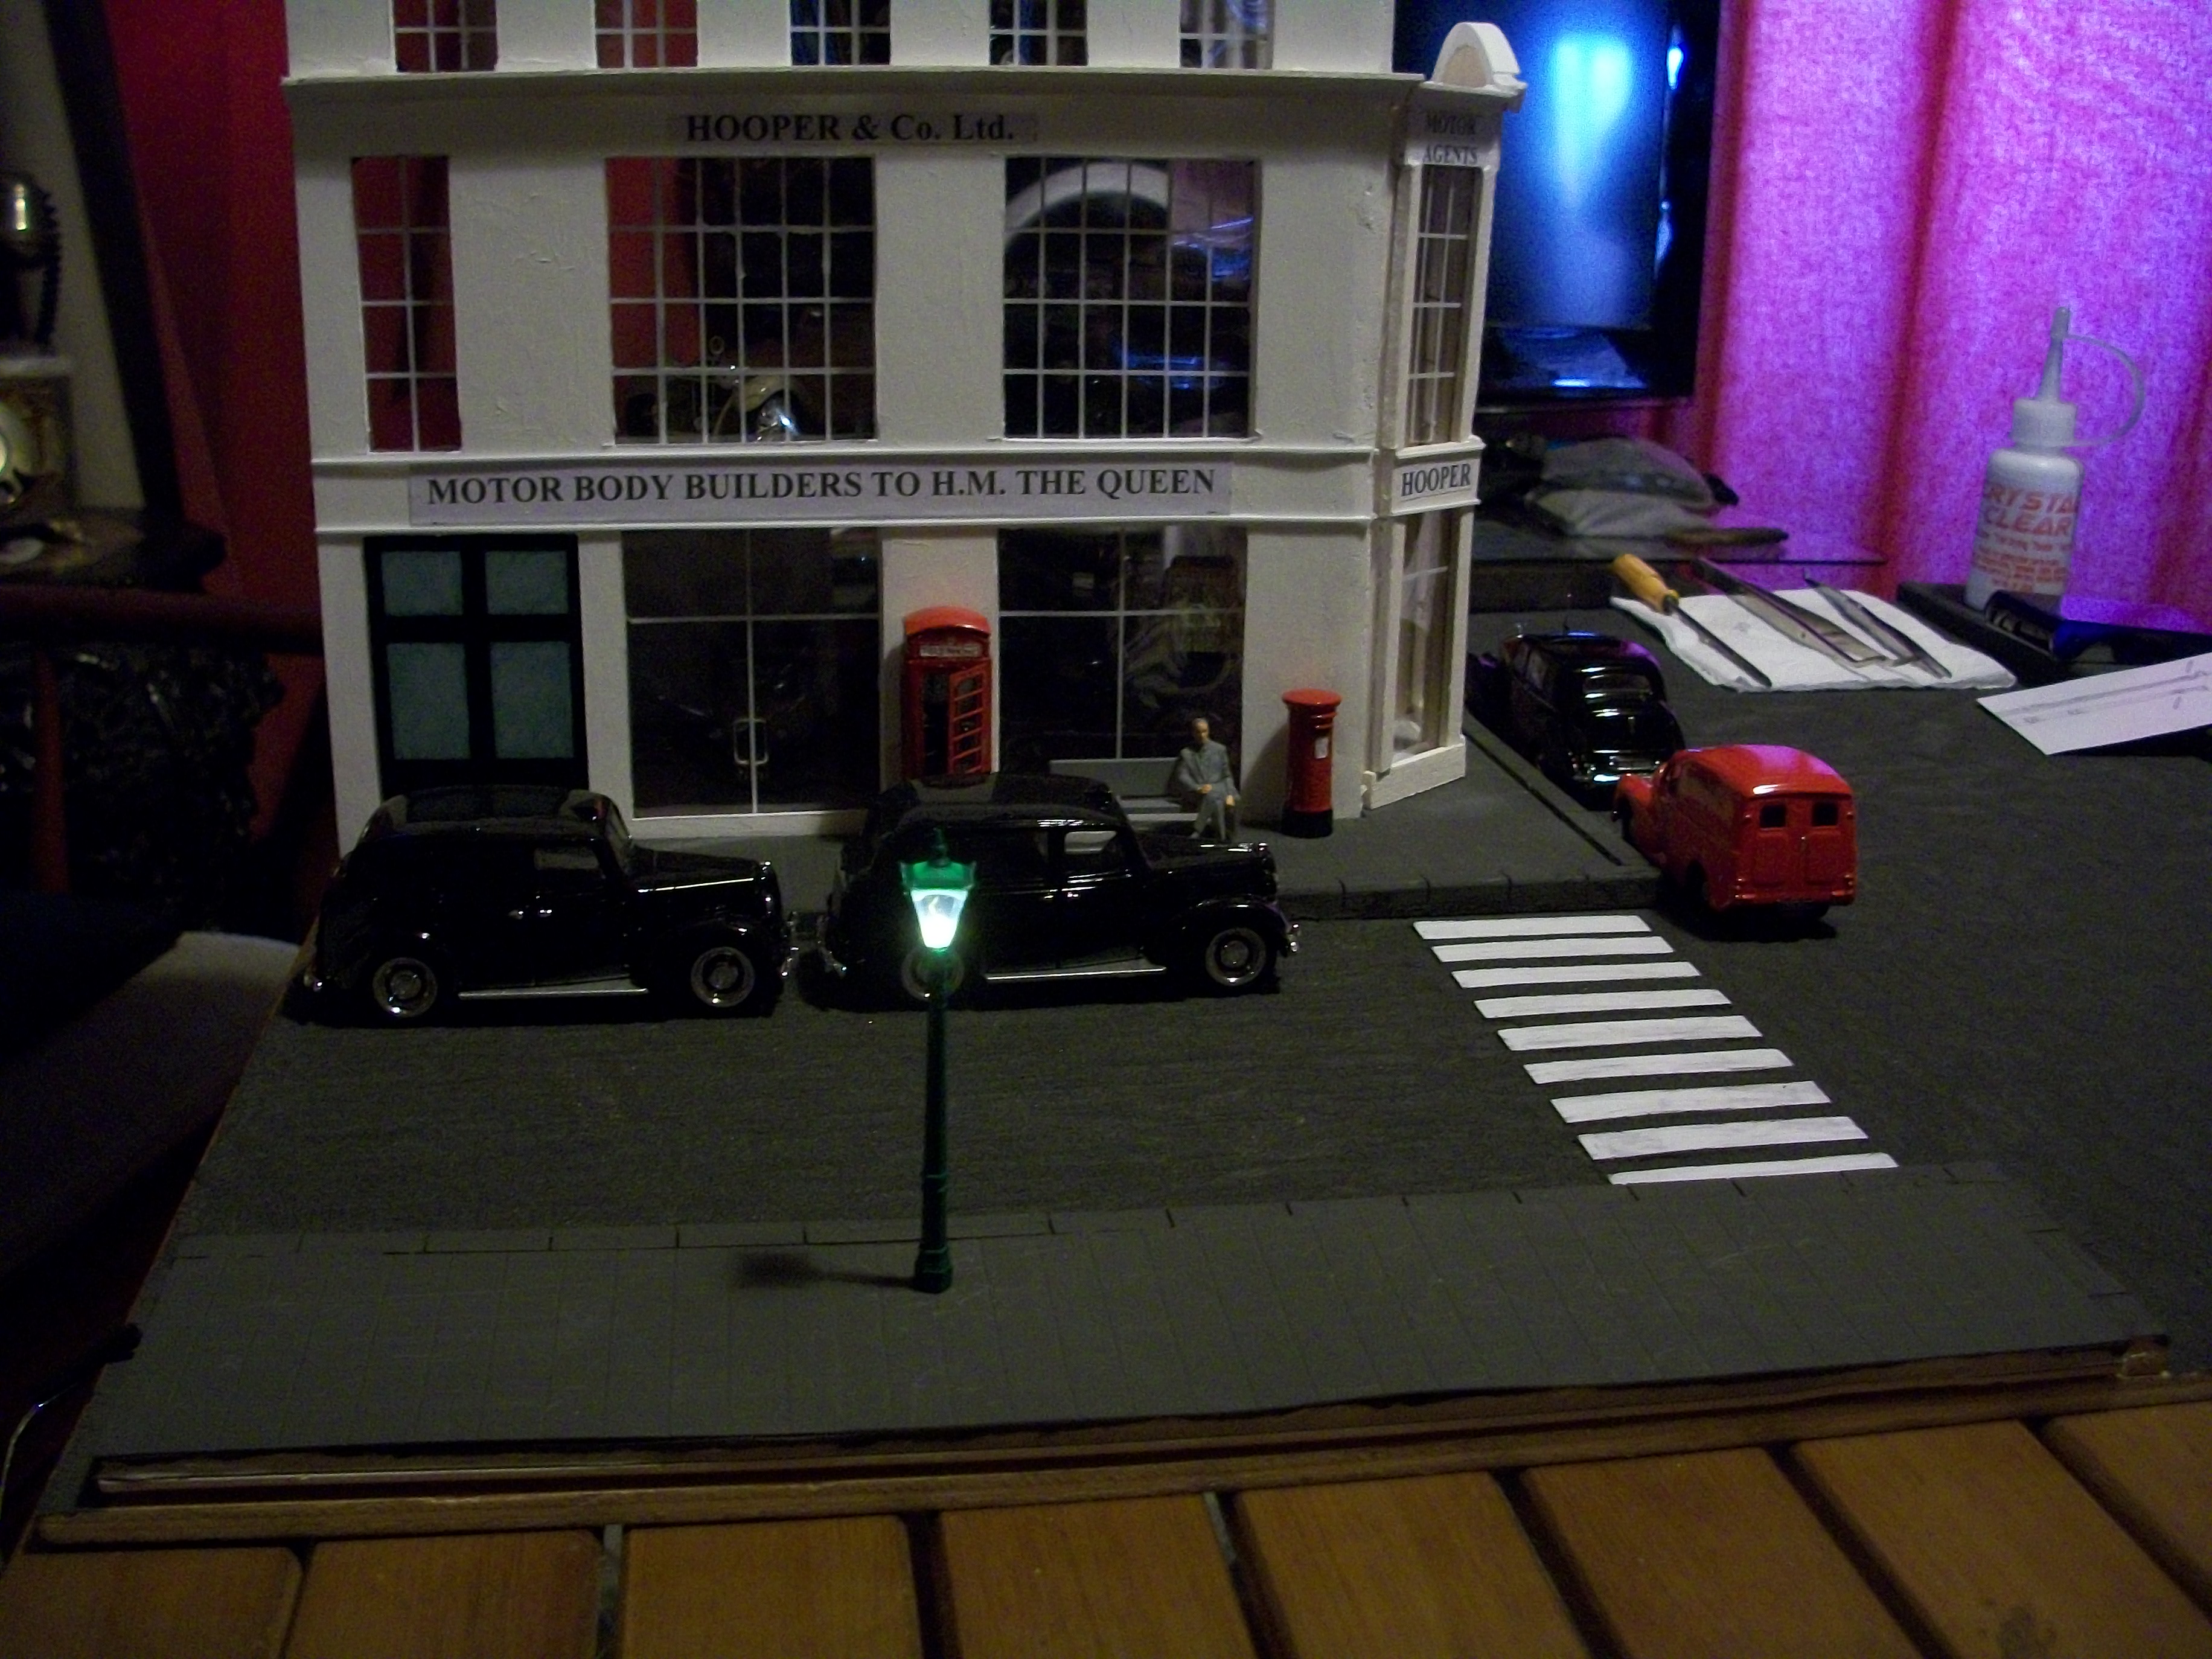
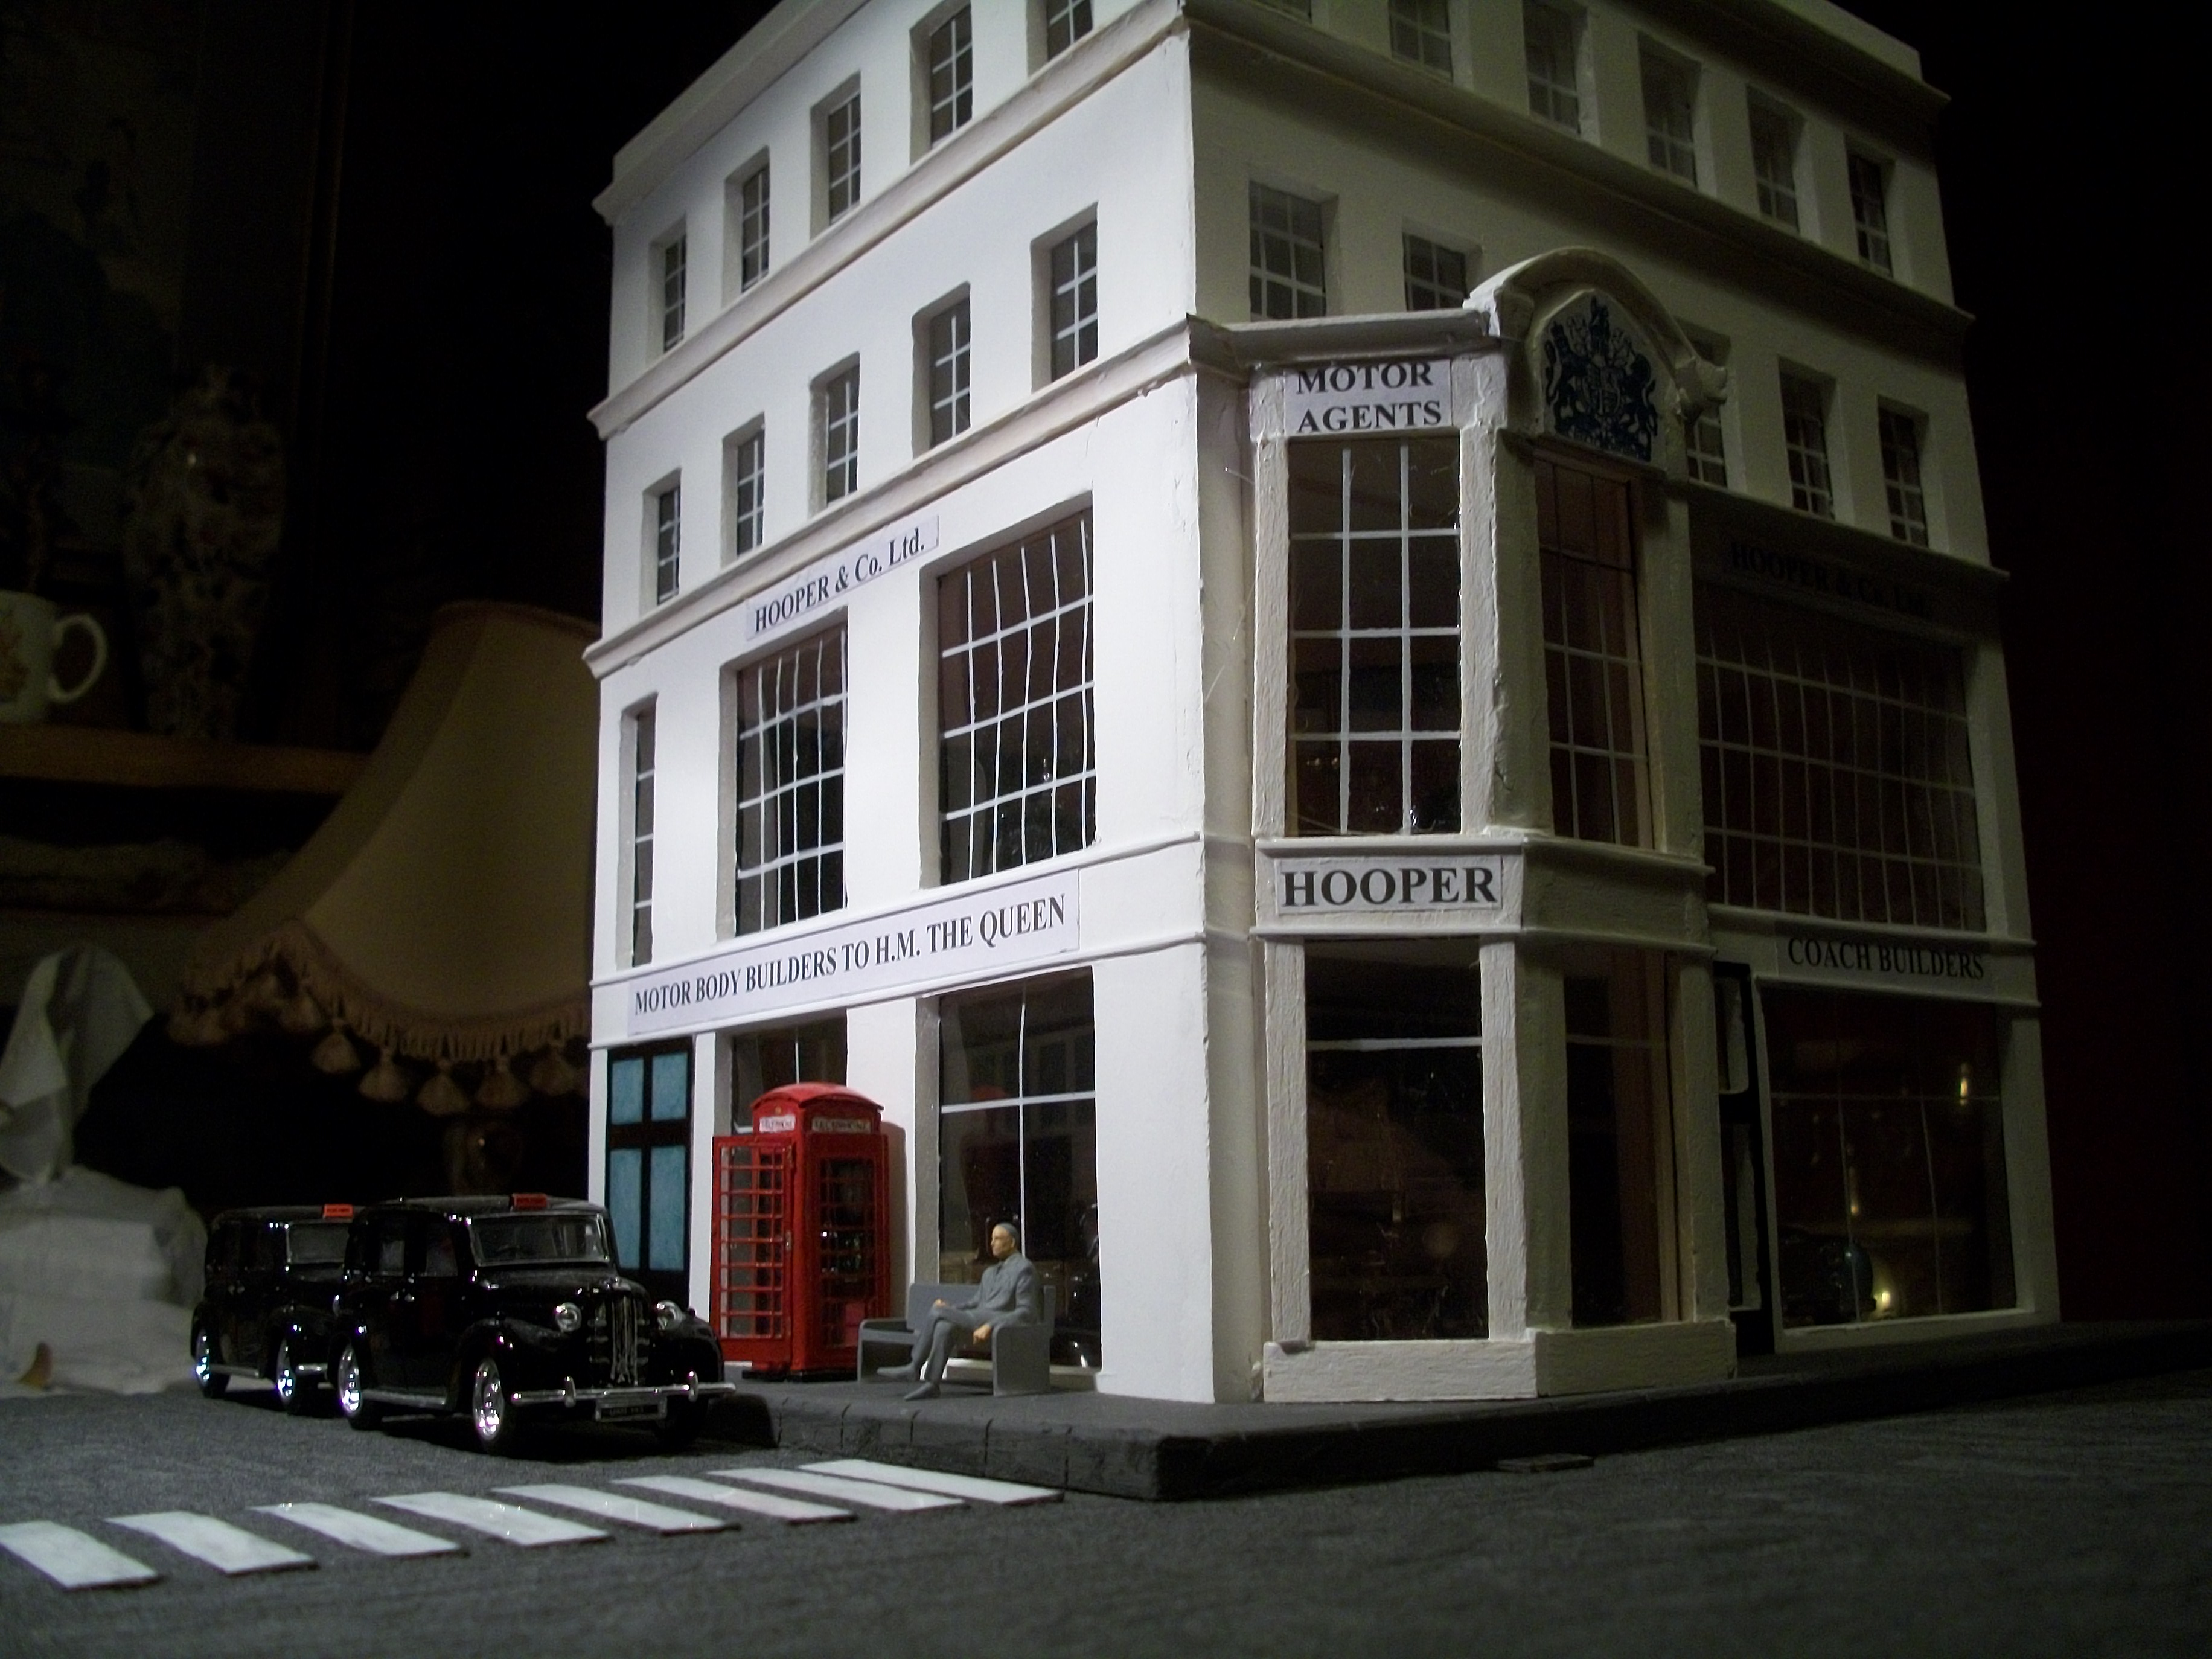
The installation of the first working street lamp is completed and the chimney stack is in place up on the roof. The two halves of the 1:43 scale lamp post were inserted tightly into a hole in the pavement, then the length of wire that has the last LED light in the chain was pushed up inside the lamp post from under the pavement and the two halves were glued together. The glazing unit was placed over the end of the wire at the top, then the four post frame was lowered over the glazing unit and the lid of the lamp was glued in place on top. The remaining wire and lights passes under the pavement and any lights that are not required have black PVC tape wrapped around them to prevent any light being emitted. . I am rather pleased with the result and I did expect this to be more difficult. All the rest of the wire and lights will run along the back edge of the diorama baseboard and into the Hooper building, where the controller box will be located inside the office. I haven't figured out yet how to wire up the second, third and fourth street lamps, because the space inside the lamp posts is not wide enough to accommodate a double thickness of wire / cable. David
-
Excellent detail in the workshop, Pat........ and there is so much to look at. Completely convincing, and all true to scale. You must be really enjoying this project! David
-
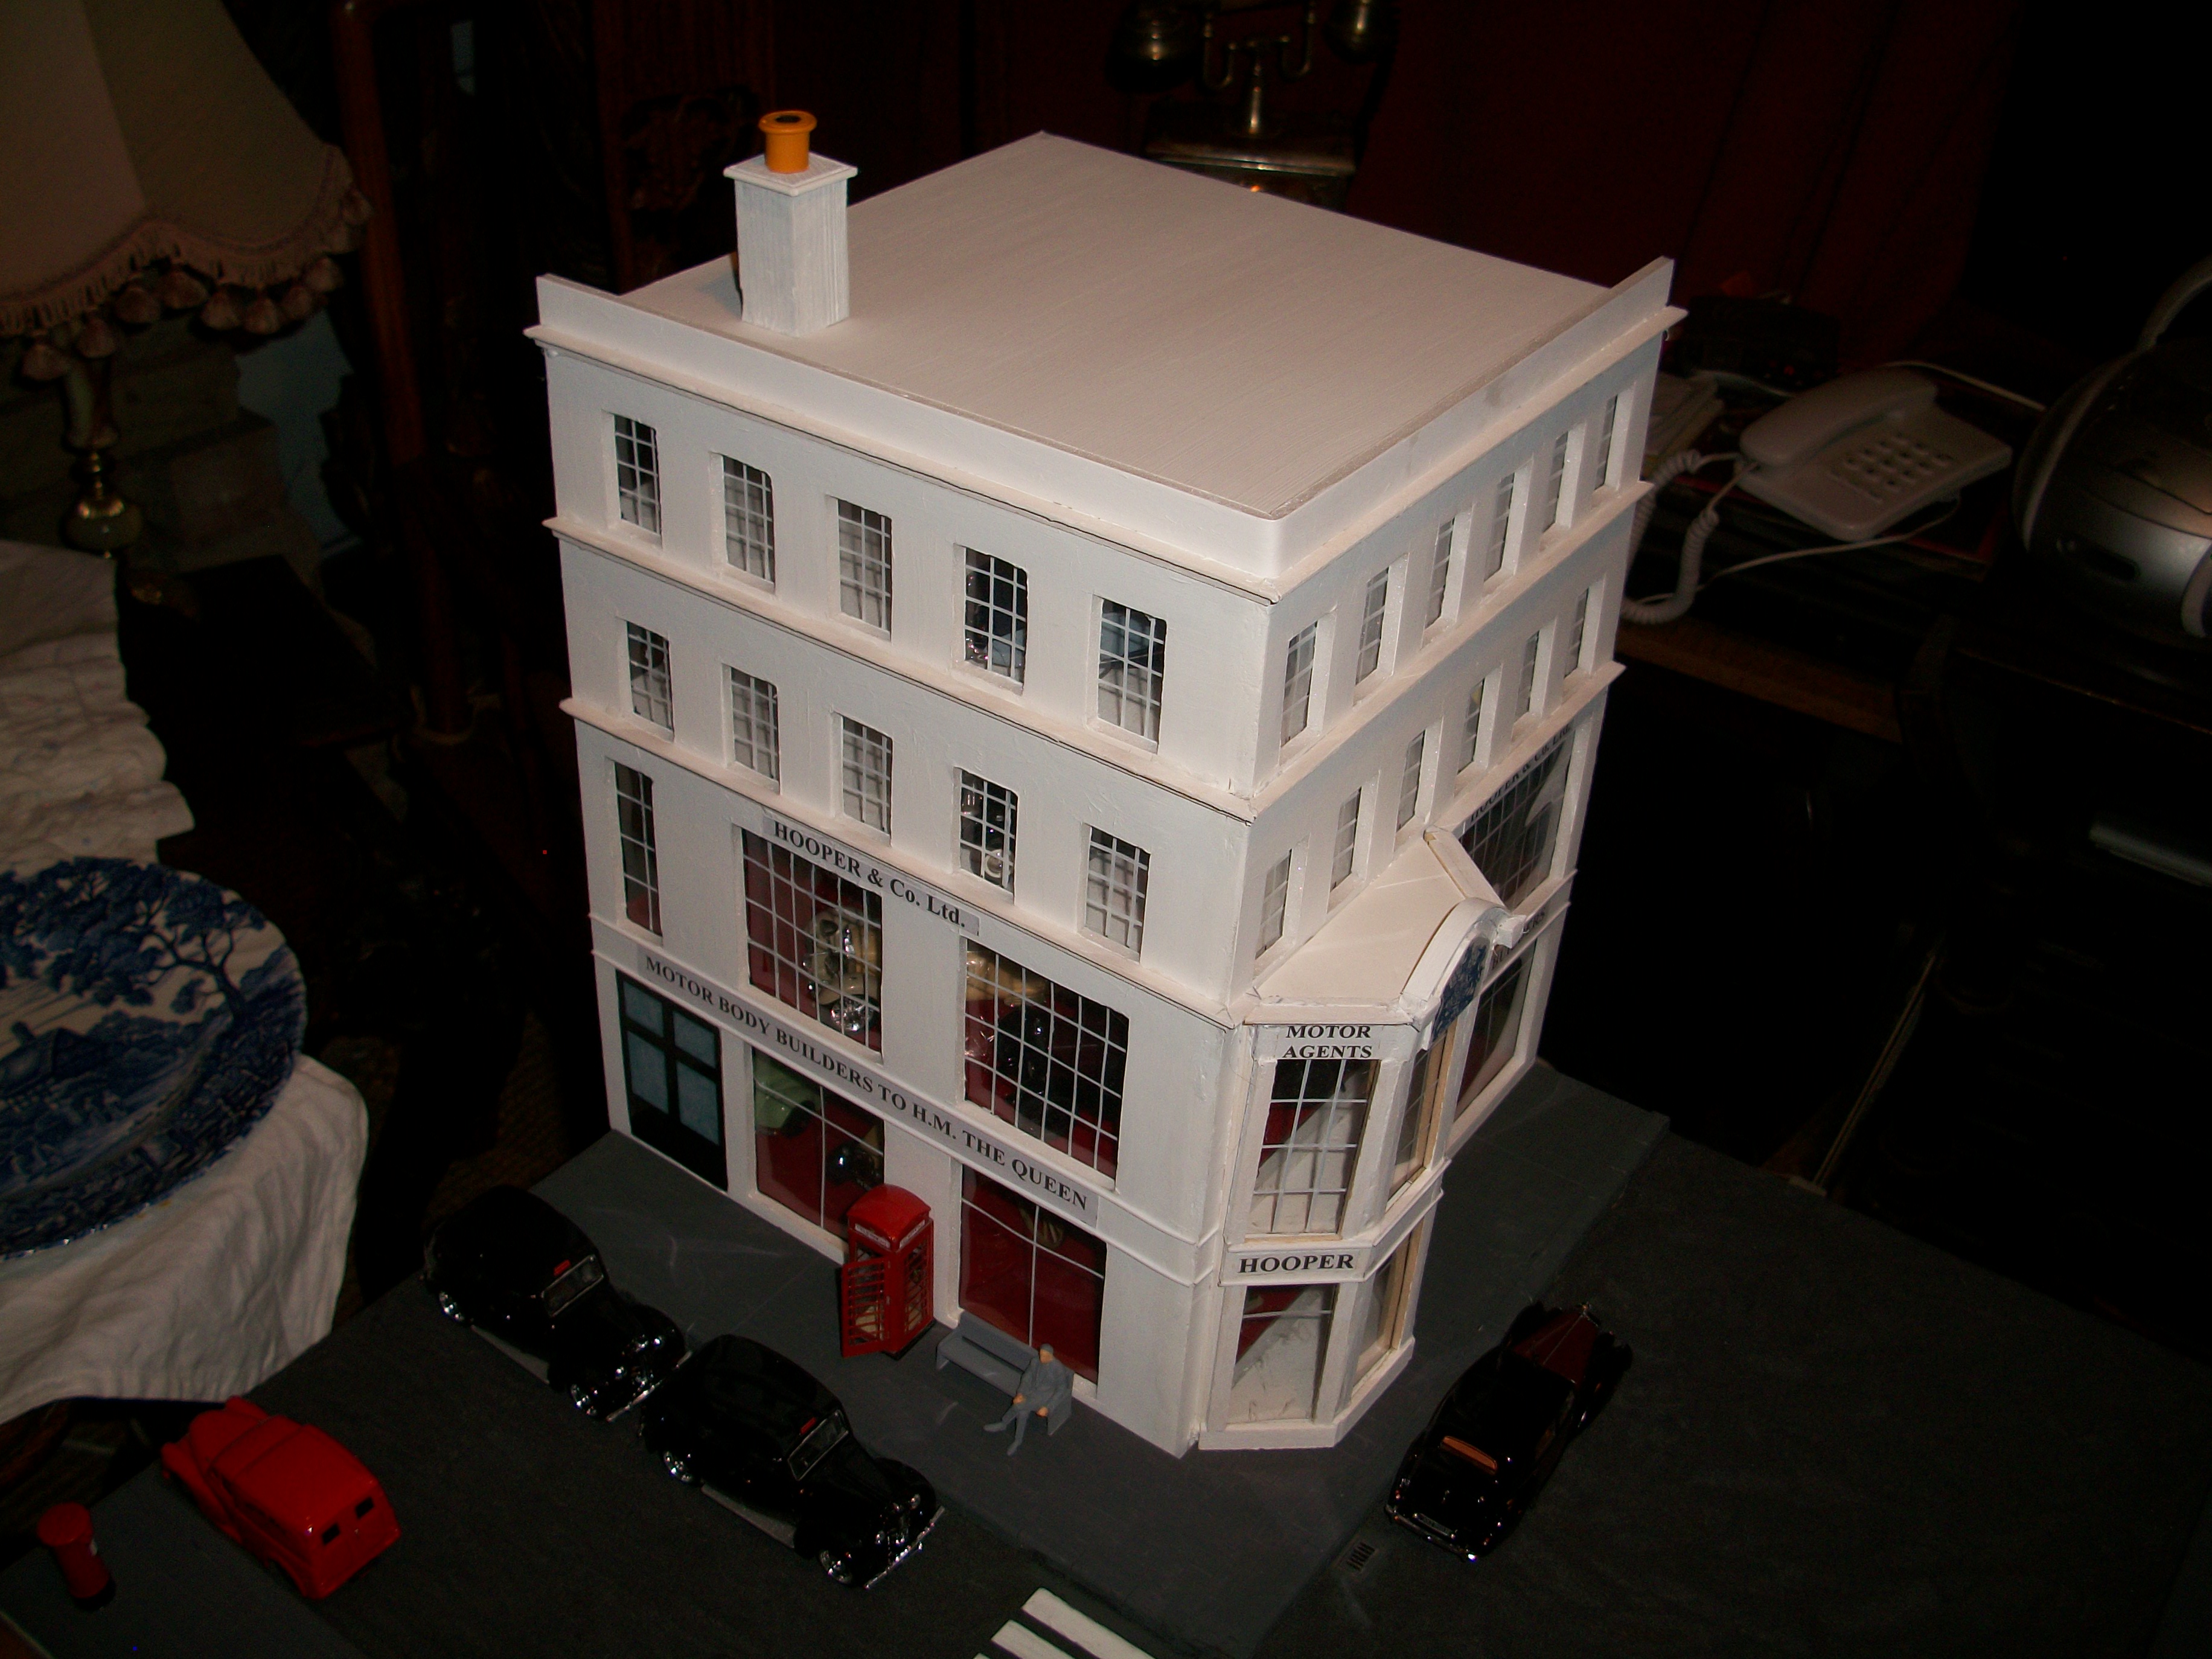
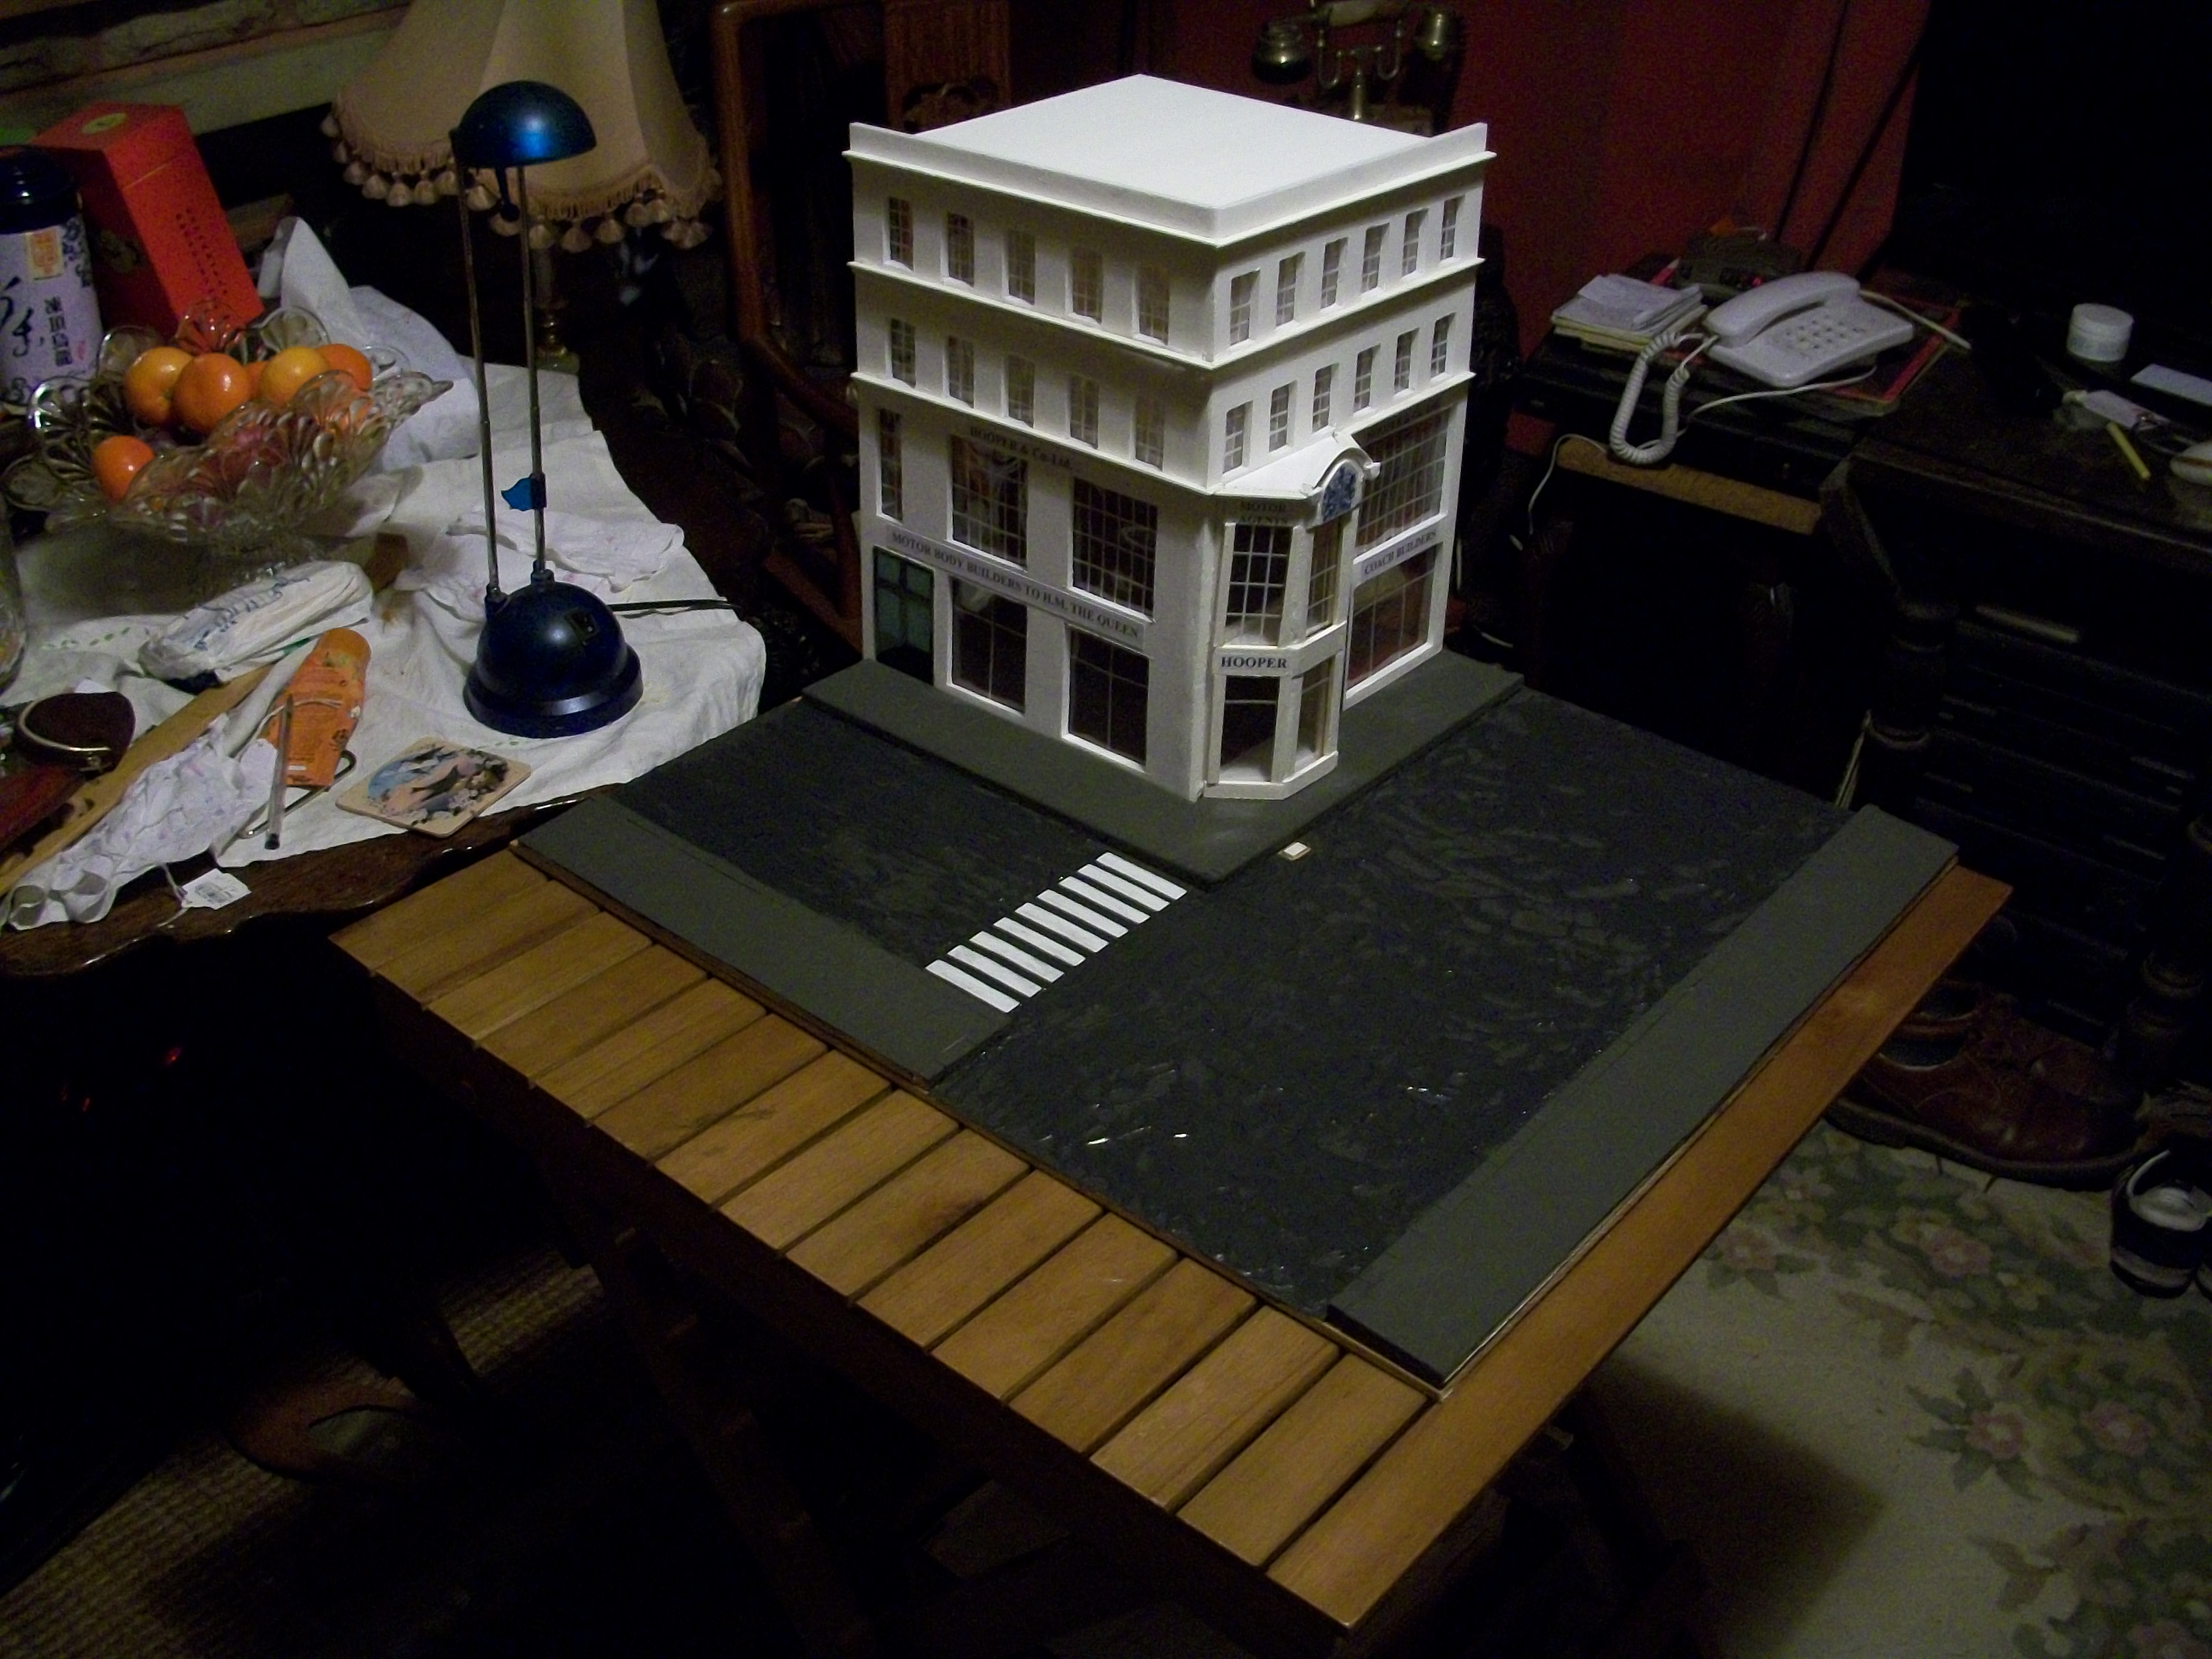
Completed the piping along the border just above the ground floor windows, which I was expecting to be difficult but did not pose any problems really. I used 1 mm square styrene rod for the piping and super glue to secure the lengths. The grate is done, using pieces of card stuck together and a black Sharpie, with grey acrylic paint applied as a wash. Simply to see how the 1:24 scale chimney stack looked on the roof of the 1:43 scale building, I placed it on the roof and realised the chimney stack actually appears to be correct to scale! Putting together a second chimney stack which will be the same size as the first one. The odd thing is, the 1:24 version does not look wrong on the larger scale building..... ? Placed two backing sheets of white foamboard behind the building to see how this diorama will look without the distraction of the room in which it is displayed. David
-
Now there's a classic engine, Pat and just when you think there is no Rolls-Royce Merlin engine..... two come along at once! David
-
Thank you Gary....... I was examining the LED lighting that you sent me, last night and I am puzzled by something. The last LED light is at a position on the wire that is five centimetres from the end of the wire. The end seems to be terminated in some way and I am not sure if I can cut off the wire after the last LED in the wire? The reason I ask is that I want the LED to be inside the glazing unit at the top of the street lamp, with the wire cable running up inside the lamp post. David
-
Thank you Pat, and it was a shame that the clay coving didn't quite work as I thought it might. The curved section was the tricky part of the structure and it is also the most important feature of the building. Thank you Yordan, and the thing with the camera angles is to place the camera almost at scale ground level, but in such a position so as not to be able to see the camera reflected in the window glass of the scale model building. Placing the camera inside the showrooms is also fun to experiment with, and this leads to my awareness of what is outside the building, and where the lighting source is positioned. When you have a photograph which shows a giant telephone outside it becomes rather like a poorly made King Kong film from the early 1930's ( limited technology at that time of course ). David
-
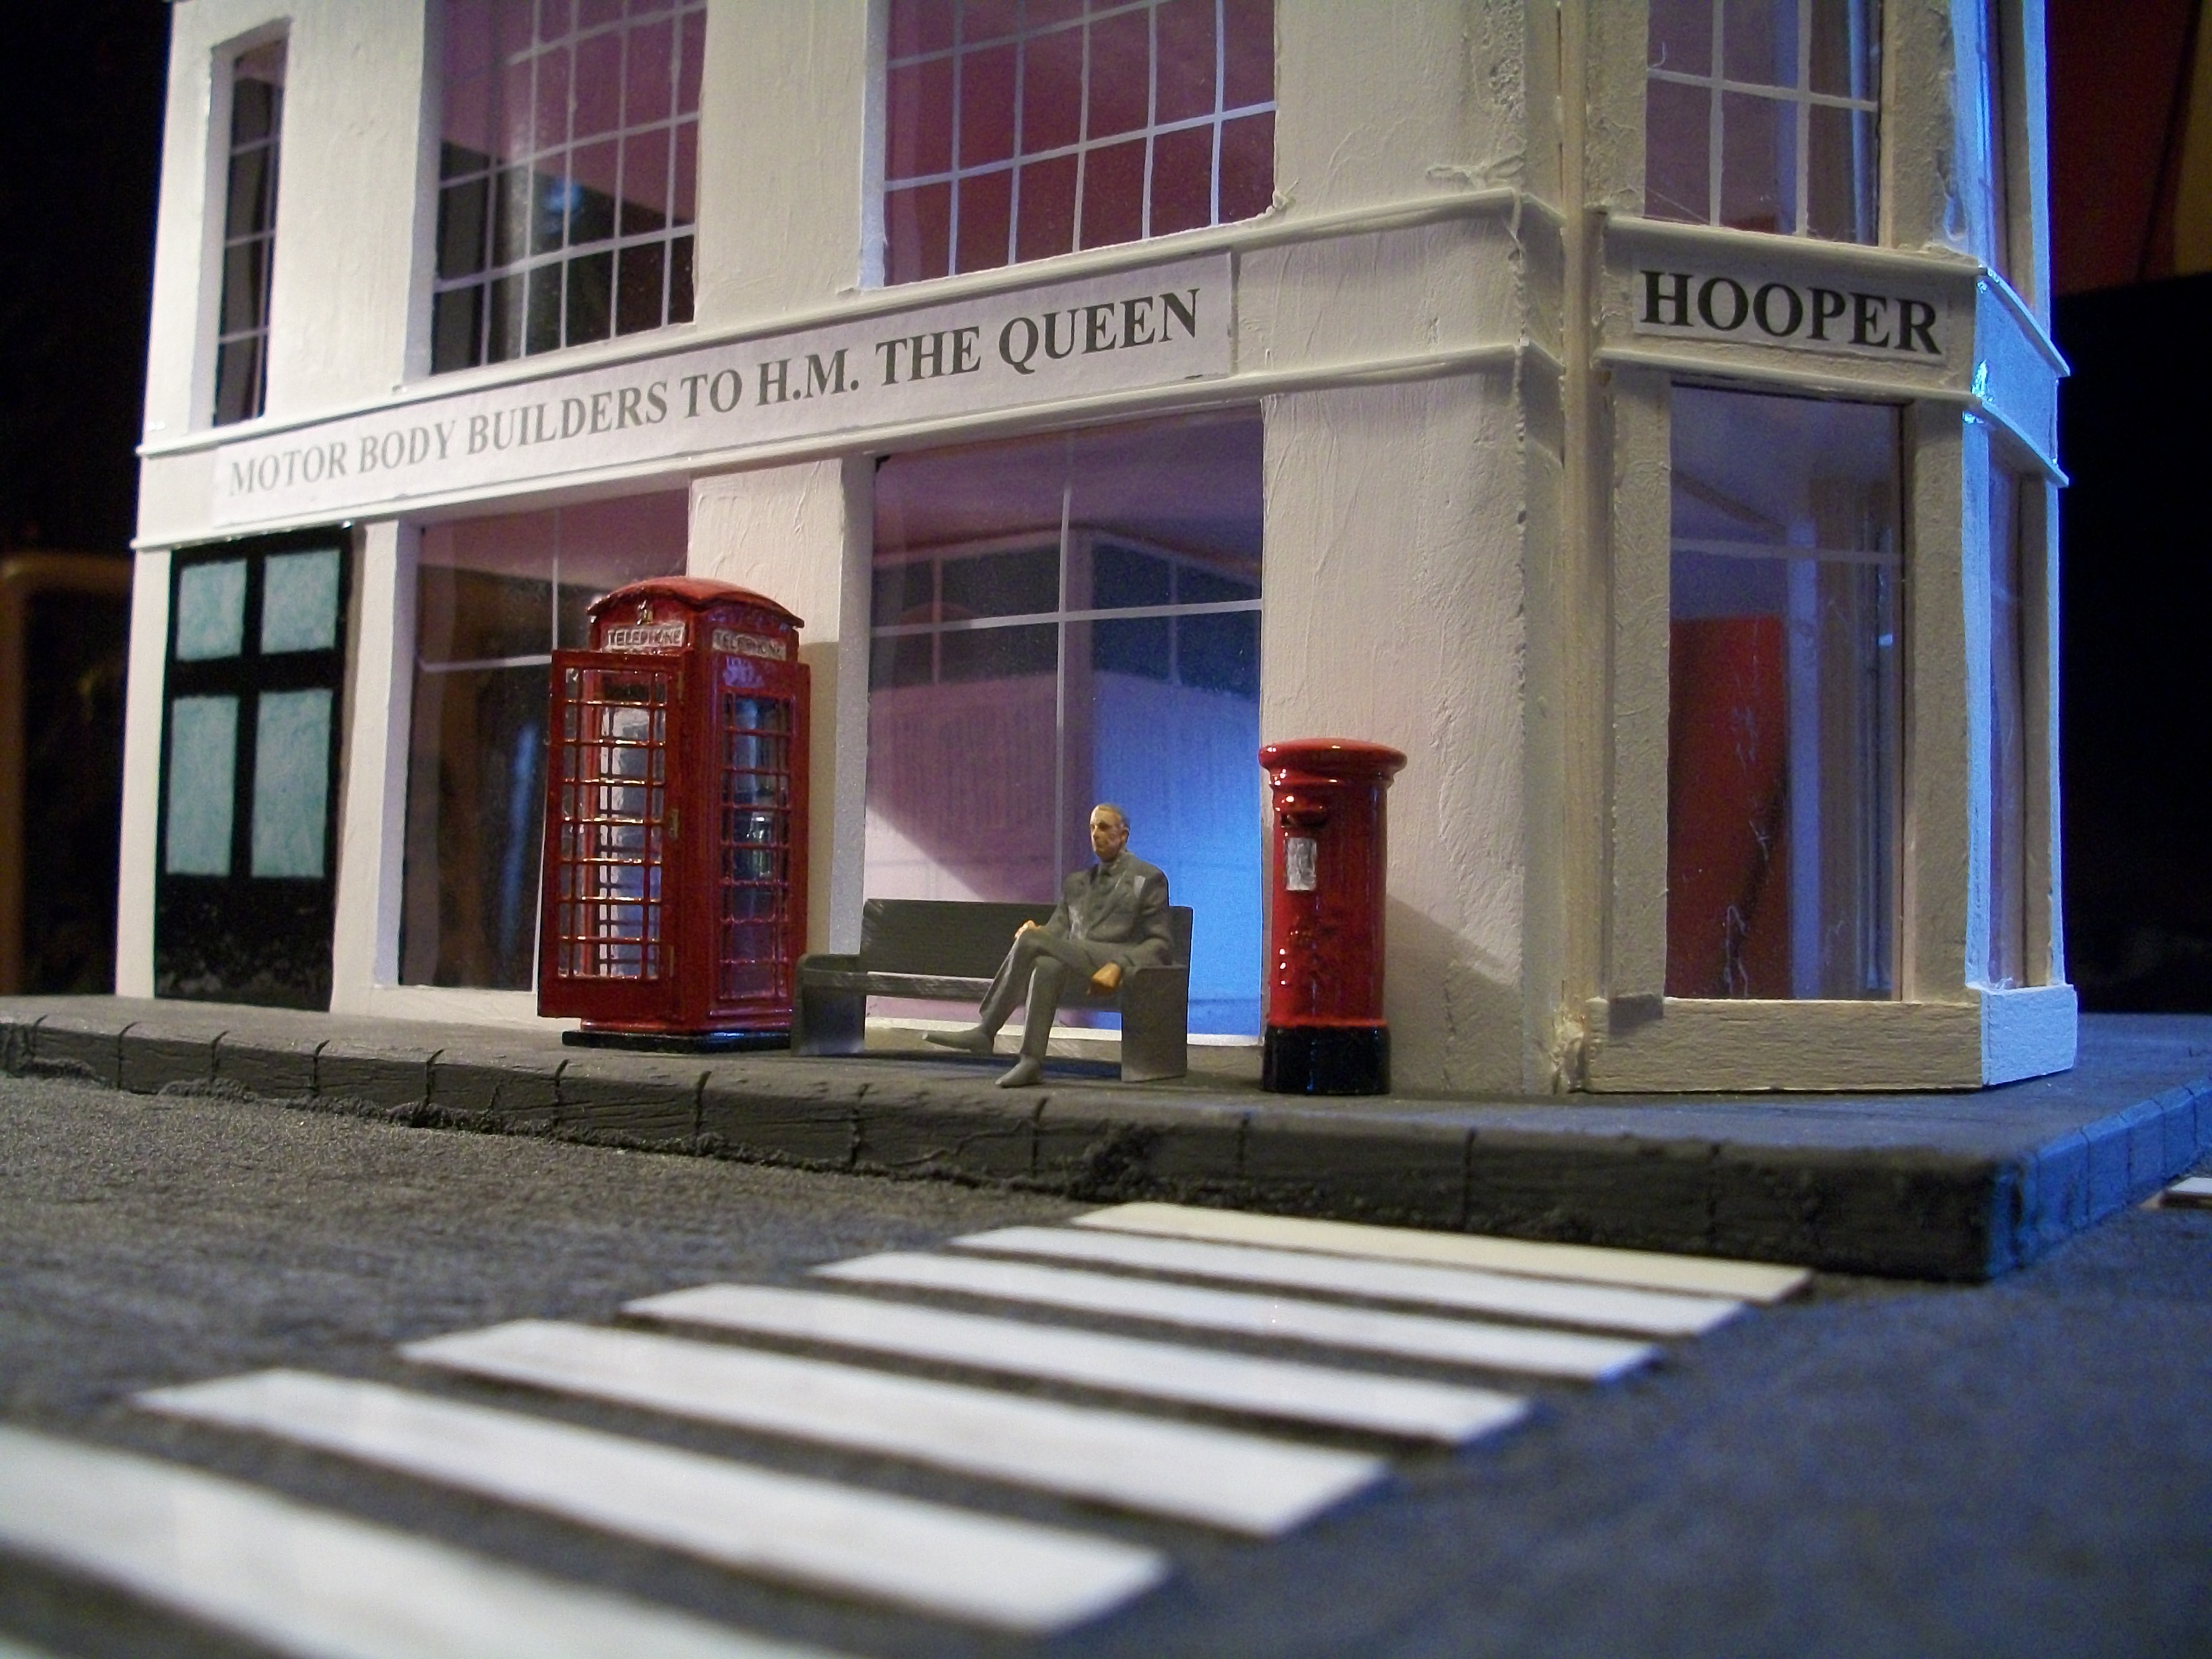
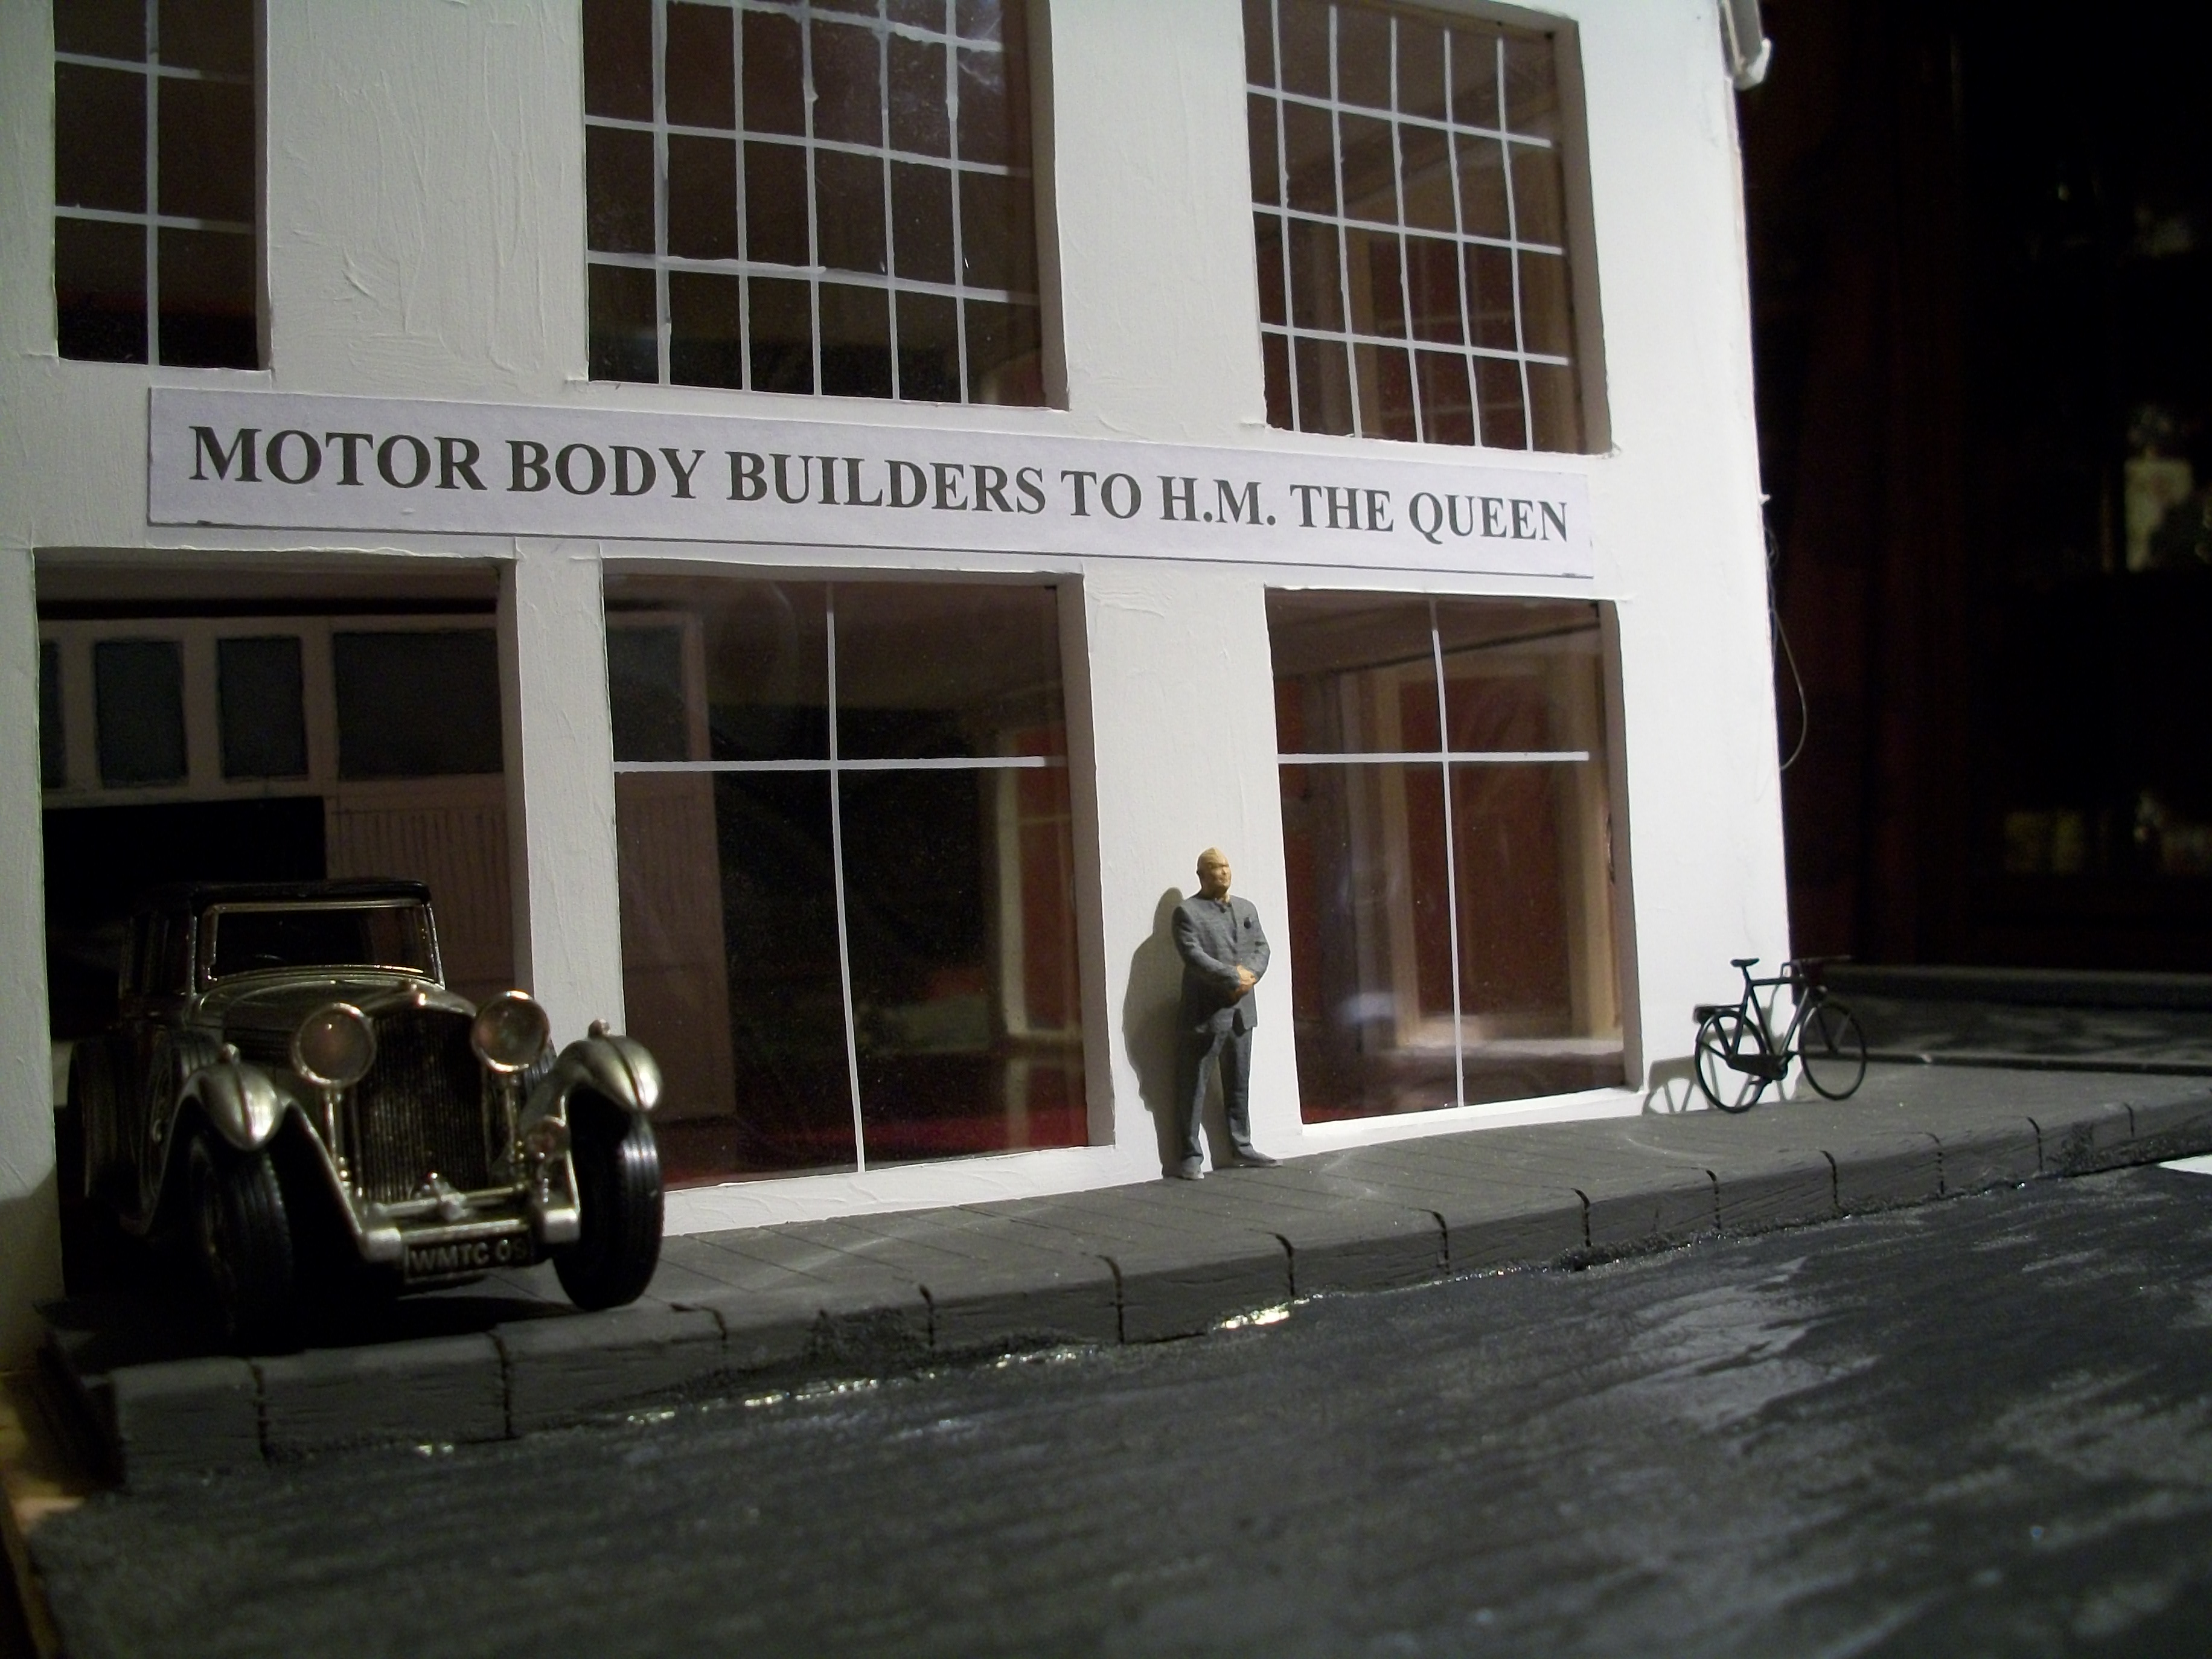
The coving for the Hooper building is now all in place and white acrylic gesso has been applied to the lengths of coving, as well as the roof top wall. The attempt to use DAS modelling clay for the curved section of the coving did not work, so I used foamboard and styrene instead. Having completed the zebra crossing, using strips of white styrene, the asphalt has been laid on Bennet Street and St James's Street, leaving a small area for the drainage grate. The asphalt will be drying overnight. Next up on the workbench are the belisha beacons for the zebra crossing, and also the first working street lamp. The three figures need detail painting and the first of eight bicycles also need painting. On top of the roof there will be a flagpole and a chimney stack, just like on the 1:24 scale version of the diorama. Along with the telephone kiosk and the post box, I shall need to scratch build a bus stop. Work is on schedule but there are still a few issues to sort out that I am not happy with. David
-
Thanks Randy.... I agree that from a photo like this you would assume the Bentley was at least 1:24 scale or larger, so it is impressive at 1:43 scale. David
-
Thanks Mark..... your clear explanation makes sense to me. Like the fire extinguisher also. David
-
Yes Gary, I too was very impressed by the amount of detail that has been packed into a small scale car like this. Even the door handles are separate parts. The road wheels do not turn, but then you wouldn't want this expensive model to roll off the table would you? Today I received the glazing units in the post, and these are the ones that were missing from the 1:43 scale station platform lamps, that I want to use with the LED lights you kindly sent me. I am hoping to run the light cable / wire through several street lamps as well as inside the Hooper building itself. David
-
Interesting to hear your comments Yordan...... piano, acoustic guitar, diorama building, Sheriff Deputy, classic vehicles..... you are indeed a dark horse, as we say! The 1:43 scale vehicles in my collection are all diecast and mostly from Oxford Diecast, although the 1930 Bentley 8 Litre is from Lansdowne Models, which are manufactured by Brooklin Models, and these are white metal. The other 1:43 vehicles are from IXO, ERTL, Whitebox, Corgi, BRUMM, Eaglemoss and Del Prado. Currently there are 15 vehicles in the collection. The 1:24 scale models that I use for the larger diorama are 50% diecast and 50% built kits, mostly from Franklin Mint, Danbury Mint, Welly, Wills Finecast, Original Classics, Revell, Tamiya, EMHAR, Minicraft, Hubley, Italeri, Monogram, Heller, Airfix and SMER. Currently there are 49 vehicles in the collection. For the figures I like Shapeways, but also ICM do some really nice figures from the Model T Ford era. Sometimes I pick up Corgi diecast figures which are very good, but rare. I hope you do eventually get to visit England and Australia..... certainly England is the centre of the World ( at least on our map anyway! ) David
-
The 1:43 scale Hooper & Co showrooms have three Rolls-Royce motor cars, also two Daimler motor cars and now the single Bentley motor car has arrived today. This is a Lansdowne Models white metal 1930 Bentley 8 Litre, which is one of only 125 made and it is very heavy, even in 1:43 scale. In fact it is heavier than the 1:24 scale MG K3 Magnette that I built. This model is of superb quality and it is highly accurate in the detail. The Bentley does photograph particularly well, and it is the star of the collection by some margin. David
-
Today I picked up this Lansdowne Models 1930 Bentley 8 Litre in 1:43 scale, which is a white metal model and Made in England. The model car is very heavy and highly accurate in the detail. It is a limited edition with only 125 models made. David
-
Maybe this is what I am missing? Stone Screens. ( sorry ) David
-
I just know this is going to be a stupid question on my part..... but Mark, why have your front wings / fenders got holes in them? Had a look through loads of photos of the 1:1 Caterham 7 Gulf cars and all of them have the smaller wings, like motorcycle mudguards. Only the Sprint version has the longer wings like your model has, and .....no holes in sight !!! ( I realise that you have built a race car, but I just don't get those holes? ) David
-
Thanks Yordan.... Progress is important at this stage. David
-
Cheers Pat, you are a gent.....
-
Thank you Pat..... the antique telephone is one of the many items that my wife picks up when she is visiting the local charity shops. She returns home with all sorts of surprises, one minute it could be an antique telephone, the next it could be a 1:18 scale Ferrari 250 TestaRossa on a mahogany wooden base, or even a Mamod steam engine ! Although my toolbox does not contain a router or a jigsaw, these are tools that I was considering investing in at some point. I am reading your explanation how to make the curved section of the coving from MDF, but somehow my brain doesn't work in such a way that I can follow your method..... could you put it into different words, or possibly a pencil sketch? Please excuse my lack of joinery skills ! David
-
There are now three levels of coving in place, with only the curved section to make. I shall have to give this curved section some serious thought, as it will not be easy to fabricate, given the ornate profile of it. All the straight pieces are of wood, but this curved piece might have to be clay or foamboard, not sure yet. The small gap that ran from the ground level at the outer corner all the way up to the roof has now been filled and sanded. The coving will be painted with white acrylic gesso, to blend in with the surrounding areas. My feeling is that this building is becoming stronger in construction, and also taking on the appearance of the real building, which is proving to be quite rewarding at this stage of the project. Hope you like it, and thanks for looking! David
-
I like the splash shield on your flywheel grinder, Pat and the thickness of the aluminium can metal is true to scale. David
-
Brilliant sign Yordan..... the Avery sheets look really useful and it is a coincidence that you should be using an aluminium drinks can for the material. During this past week I was doing exactly the same thing to make a burner tray for a Mamod steam engine. Your ' No Trespassing ' sign is very convincing and I would never have thought this was the first one that you produced. The flattened and sanded aluminium sheet could be used for all sorts of scratch building, because we tend to think of styrene, balsa, foam board and card as the obvious materials to use for our hobby. David